Are you ready to make a splash with your style at the beach this summer? Wondering what simple summer toe nails for beach fun you can indulge in? Whether you’re lounging by the ocean or attending a sunset beach party, the right toe nail design can add a spark of creativity and elegance to your look. Let’s dive into some vibrant, trendy toe nail designs that are perfect for any beach getaway!
Hot Pink Sparkle
There’s nothing like a bold splash of hot pink to make a statement during the summer. These nails are a dazzling example of how a simple color can be transformed with the right touch of glitter. This design uses a vibrant pink polish as the base, enhanced with a sprinkle of silver glitter on the big toe for a festive, eye-catching look. The consistency of the color and the high-quality gloss finish make these nails an ideal choice for both day and night beach festivities.

Materials List
- Base Polish: Essie Nail Polish in ‘Bachelorette Bash’
- Glitter Polish: Sally Hansen Xtreme Wear in ‘Silver Spark’
- Top Coat: Seche Vite Dry Fast Top Coat
- Recommendations: Use a dense glitter polish for the big toe to ensure a uniform sparkle effect, and don’t skimp on the top coat to maintain durability in the sandy beach environment.
DIY Instructions
- Apply a base coat to protect your nails and prevent staining.
- Paint two coats of Essie ‘Bachelorette Bash’ on each toe, allowing them to dry between coats.
- Apply Sally Hansen ‘Silver Spark’ to the big toenail, focusing on the tip and gradually fading toward the base.
- Seal with a layer of Seche Vite top coat for a glossy finish and added longevity.
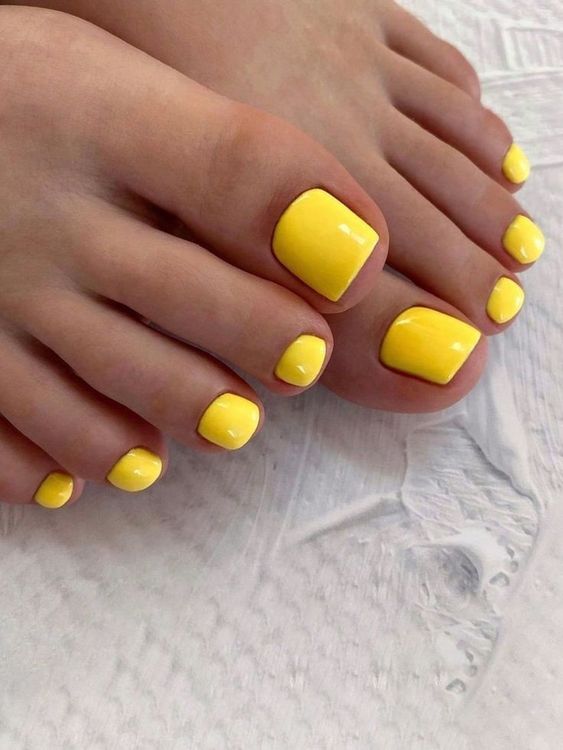
Sunshine Yellow
This sunny yellow polish embodies the joyful spirit of summer. The uniform application and matte finish offer a contemporary twist to a classic beach color. These toe nails are not only eye-catching but also versatile, complementing a wide range of skin tones and summer footwear.
Materials List
- Base Polish: OPI ‘Exotic Birds Do Not Tweet’
- Matte Top Coat: OPI Matte Top Coat
- Recommendations: Opt for a matte finish to contrast the typical glossy beach looks, adding an understated chic to your toes.
DIY Instructions
- Start with a clean, dry pedicure.
- Apply a base coat to each toenail.
- Paint two to three layers of OPI ‘Exotic Birds Do Not Tweet’, allowing for complete drying between coats.
- Finish with the OPI Matte Top Coat for a smooth, matte appearance.
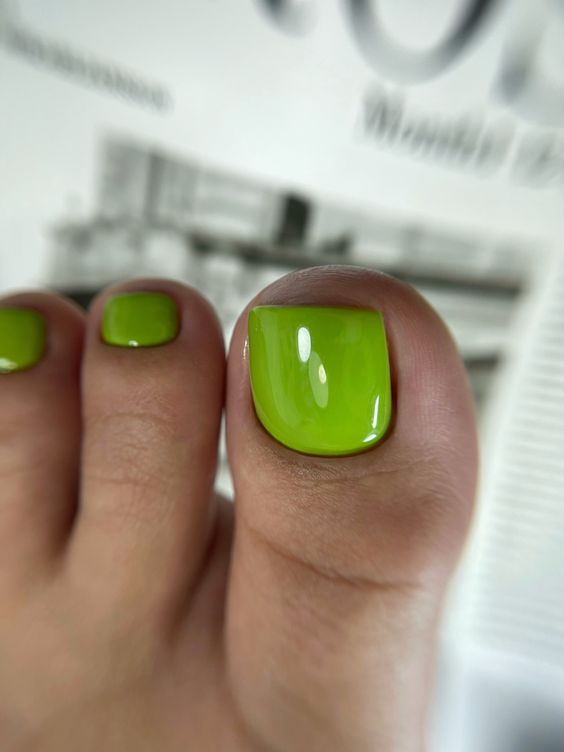
Neon Green
These neon green toes are perfect for those who love to stand out. The brightness of the green is reminiscent of tropical foliage, making it a superb choice for beach outings and summer parties. The glossy finish enhances the vibrancy of the color, making it a real showstopper.
Materials List
- Base Polish: China Glaze in ‘I’m With the Lifeguard’
- Top Coat: Sally Hansen Insta-Dri Top Coat
- Recommendations: This shade is best complemented by a high-gloss top coat to emphasize the neon effect.
DIY Instructions
- Ensure nails are clean and trim before starting.
- Apply a clear base coat.
- Apply two coats of China Glaze ‘I’m With the Lifeguard’.
- Seal with Sally Hansen Insta-Dri Top Coat for a lasting finish.
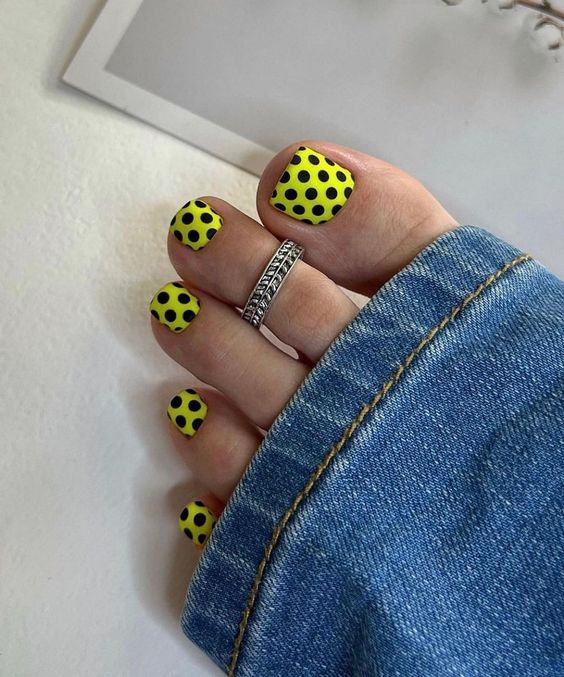
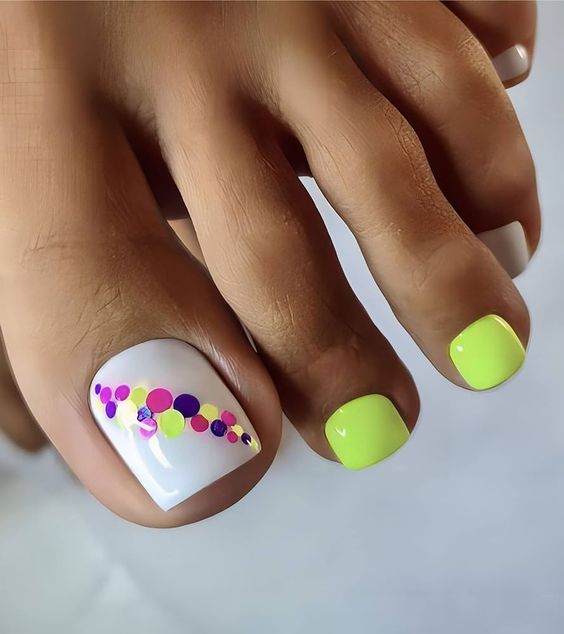
Funky Polka Dots
This image showcases an adventurous mix of neon yellow with black polka dots, a playful design that screams summer fun. The contrast between the bright yellow and the bold black dots creates an eye-catching pattern, perfect for those who like to experiment with their beach look.
Materials List
- Base Polish: OPI ‘Need Sunglasses?’
- Dotting Tool: Dotting pen or a bobby pin
- Black Polish: Essie ‘Licorice’
- Top Coat: CND Vinylux Long Wear Top Coat
- Recommendations: Use a dotting tool for more precise dots, ensuring each dot is evenly spaced.
DIY Instructions
- Paint your nails with two coats of OPI ‘Need Sunglasses?’, letting them dry thoroughly.
- Dip the dotting tool in Essie ‘Licorice’ and gently dot onto each toe nail.
- Once the design is dry, apply a top coat for durability and shine.
Chic Leopard Print
The toes in this image are adorned with a chic leopard print pattern, set against a background of glossy red and pink. This nail design is perfect for those looking to combine classic style with a touch of wild flair. The leopard spots, detailed in black and gold on the accent nail, provide a luxurious contrast against the vivid red, making this design a striking choice for any beachside occasion.

Materials List
- Base Polish Red: OPI ‘Big Apple Red’
- Base Polish Pink: Essie ‘Mod Square’
- Detailing Polish Black: Sally Hansen ‘Black Out’
- Gold Glitter Polish: OPI ‘Goldeneye’
- Top Coat: Seche Vite Dry Fast Top Coat
- Recommendations: For precision in detailing the leopard spots, use a fine-tip nail art brush. Layering the gold glitter polish over a dot of black helps achieve a three-dimensional look for the leopard spots.
DIY Instructions
- Apply a base coat to protect your nails and ensure a smooth polish application.
- Paint the big toe with two coats of Essie ‘Mod Square’ and the remaining toes with OPI ‘Big Apple Red’, allowing them to dry fully.
- On the big toe, use Sally Hansen ‘Black Out’ to paint small irregular shapes for the leopard spots.
- Add a touch of OPI ‘Goldeneye’ inside the black spots to enhance the leopard pattern.
- Finish with a layer of Seche Vite top coat for a glossy, durable finish.
Subtle Pink Crackle
The delicate crackle effect on these toenails offers a unique and subtle texture that catches the eye without overpowering. Set against a soft pink background, the crackled design is reminiscent of fine porcelain, making it a sophisticated choice for beach goers who prefer a touch of artistic flair on their toes. This design pairs well with both casual beach wear and more dressed-up summer outfits, providing versatility.

Materials List
- Base Polish: Essie ‘Ballet Slippers’
- Crackle Polish: China Glaze Crackle Glaze in ‘Cracked Medallion’
- Top Coat: Seche Vite Dry Fast Top Coat
- Recommendations: Apply the crackle polish thinly to achieve a more refined crackle effect and ensure the undercolor shows through elegantly.
DIY Instructions
- Apply a base coat to protect the nail.
- Paint two coats of Essie ‘Ballet Slippers’, allowing sufficient drying time.
- Apply a thin layer of China Glaze Crackle Glaze in ‘Cracked Medallion’ over the dried base coat.
- Once the crackle effect has fully developed, seal with Seche Vite top coat for a glossy finish and to preserve the design.
Vibrant Magenta
The bold magenta toes seen radiate confidence and fun, perfect for a summer day out or a beach party. The high-gloss finish and deep saturation of the color make these nails stand out, offering a pop of vibrant color that complements the lively beach atmosphere.

Materials List
- Base Polish: OPI ‘Kiss Me I’m Brazilian’
- Top Coat: Sally Hansen Insta-Dri Top Coat
- Recommendations: For those with a vibrant personality, this polish color will surely match your summer vibe. Ensure to apply a protective top coat to maintain the color’s brightness against the beach elements.
DIY Instructions
- Start with a clean and prepped toenail.
- Apply a base coat for a smooth polish application.
- Paint two coats of OPI ‘Kiss Me I’m Brazilian’ for full opacity.
- Finish with Sally Hansen Insta-Dri Top Coat for a durable, glossy look.
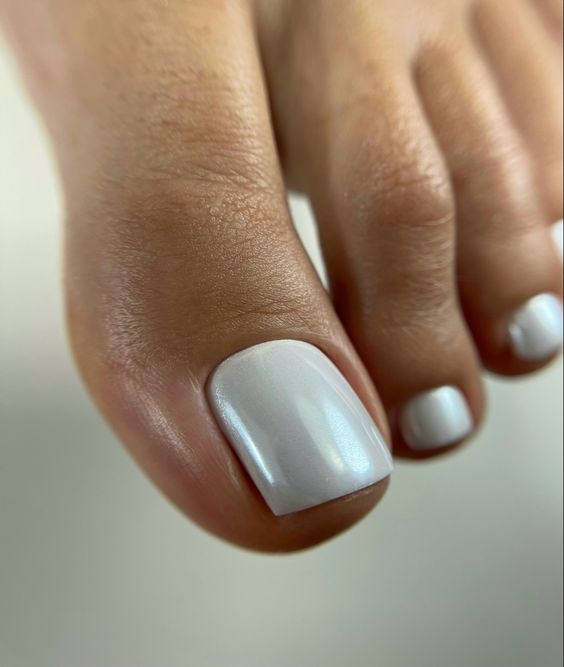
Elegant White Sheen
Flawless white nail polish with a subtle shimmer is a classic choice that speaks of elegance and simplicity. The slight shimmer shimmers beautifully in the light, making these nails a sophisticated choice for any summer occasion, especially when paired with a light colored summer dress.
Materials List
- Base Polish: Essie ‘Blanc’
- Shimmer Top Coat: INM Out The Door Top Coat in ‘Northern Lights’
- Top Coat: Seche Vite Dry Fast Top Coat
- Recommendations: The shimmer top coat adds a special touch to the classic white, perfect for enhancing the toes without overt decoration.
DIY Instructions
- Ensure toenails are clean and shaped.
- Apply a base coat to prevent staining.
- Paint two coats of Essie ‘Blanc’ for a solid white color.
- Apply one coat of INM ‘Northern Lights’ for a subtle shimmer effect.
- Seal with Seche Vite top coat for a smooth and durable finish.
Creative Black and White
The design of this sock features a creative play of black and white patterns with hints of minimalism. The inclusion of geometric shapes and contrasting colors makes this model spectacular, suitable for those who like a little twist to their style. This design is particularly eye-catching and can be a conversation piece at any summer party.

Materials List
- Base Polish: Essie ‘Licorice’
- White Polish: OPI ‘Alpine Snow’
- Top Coat: CND Vinylux Long Wear Top Coat
- Recommendations: Precision is key in achieving clean lines and shapes. Use a fine brush for the details and a steady hand.
DIY Instructions
- Paint the base of the toenails with two coats of Essie ‘Licorice’.
- Using a fine brush, design patterns with OPI ‘Alpine Snow’ on the dried black base.
- Apply CND Vinylux Top Coat for a long-lasting finish and a protective shine.
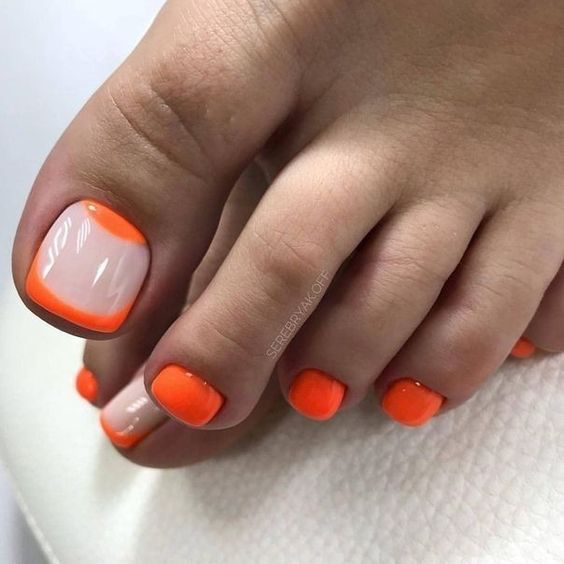
Fresh Tangerine
The vibrant tangerine polish is a celebration of summer’s playful and energetic spirit. The glossy finish enhances the bright, eye-catching color, making it perfect for sunny beach days and tropical vacations. This color works well with both casual and formal summer wear, adding a fresh pop to any look.
Materials List
- Base Polish: Sally Hansen ‘Sun Kissed’
- Top Coat: OPI Top Coat
- Recommendations: The bright hue of ‘Sun Kissed’ is ideal for those looking to add a lively burst of color to their summer wardrobe. Ensure the application is even to avoid streaks.
DIY Instructions
- Begin with a base coat to protect your natural nails.
- Apply two coats of Sally Hansen ‘Sun Kissed’, allowing each coat to dry thoroughly.
- Finish with a coat of OPI Top Coat to enhance the color’s vibrancy and ensure longevity throughout your beach outings.
Starry Night Blues
The toenails depicted in this design feature a captivating blue hue that’s reminiscent of a clear summer night sky, complete with a sprinkle of glitter that mimics the stars. This whimsical and enchanting design is ideal for evening beach gatherings or a romantic walk along the shore.
Materials List
- Base Polish: Essie ‘Butler Please’
- Glitter Polish: OPI ‘Starry-Eyed for Dear Daniel’
- Top Coat: Seche Vite Dry Fast Top Coat
- Recommendations: For an even more stellar effect, apply the glitter polish primarily towards the tips and less so towards the base of the nail.
DIY Instructions
- Start with a base coat to protect your nails.
- Apply two coats of Essie ‘Butler Please’, allowing adequate drying time between coats.
- Lightly dab OPI ‘Starry-Eyed for Dear Daniel’ at the tips of your toenails, fading it out as you move toward the cuticle.
- Seal with Seche Vite top coat for a durable, glossy finish that enhances the depth of the blue.
Soft Pink Simplicity
The soft pink toenails provide a classic and clean look, perfect for those who prefer subtle elegance. The high gloss finish adds a luxurious touch to this simple design, making it versatile enough to pair with any summer outfit, be it casual or dressy.

Materials List
- Base Polish: OPI ‘Mod About You’
- Top Coat: Sally Hansen Insta-Dri Top Coat
- Recommendations: This shade is particularly flattering on lighter skin tones and works well for a polished, understated beach look.
DIY Instructions
- Apply a base coat to clean, dry nails to ensure a smooth application.
- Paint two coats of OPI ‘Mod About You’ on each toenail, waiting for the first coat to dry before applying the second.
- Finish with Sally Hansen Insta-Dri Top Coat for a quick-drying, high-gloss finish.
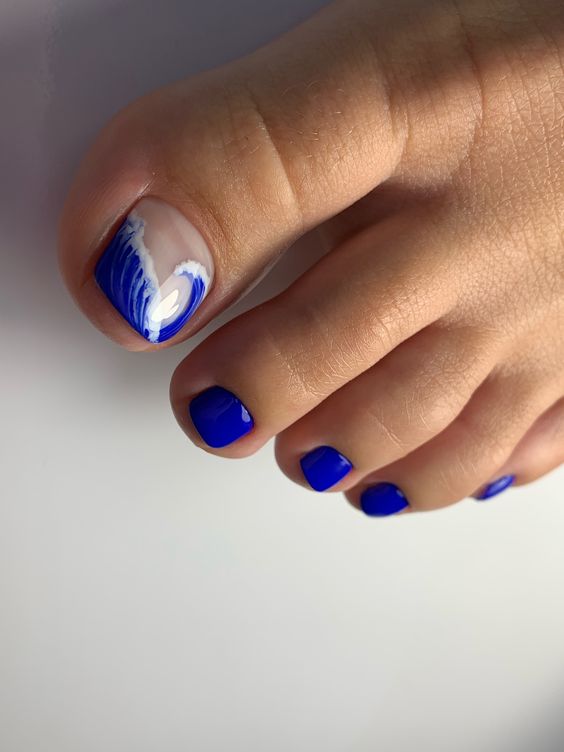
Ocean Wave Accent
Showcases an innovative blue wave pattern over a white base, evoking the dynamic movement of ocean waves. This artistic and creative design is perfect for those looking to make a statement at beach parties or seaside events.
Materials List
- Base Polish White: Essie ‘Blanc’
- Blue Polish for Waves: China Glaze ‘I Sea the Point’
- Detailing Tool: Thin nail art brush
- Top Coat: CND Vinylux Long Wear Top Coat
- Recommendations: Practice the wave patterns on paper before applying to nails to ensure smooth, flowing lines.
DIY Instructions
- Paint a base layer of Essie ‘Blanc’ and let it dry completely.
- Using a thin nail art brush and China Glaze ‘I Sea the Point’, paint undulating wave patterns starting from one side of the nail and sweeping to the other.
- Apply a layer of CND Vinylux Top Coat for a durable finish that will maintain the design’s integrity during beach activities.
Playful Cherry Accents
The playful cherry design is a delightful hint of vintage style, perfect for adding a touch of whimsy to your summer look. The rich red cherries on a clean white background create a striking contrast, perfect for those who love retro charm in their beachwear.

Materials List
- Base Polish White: OPI ‘Alpine Snow’
- Red Polish for Cherries: Essie ‘Russian Roulette’
- Green Polish for Stems: OPI ‘Green-wich Village’
- Detailing Tool: Dotting tool or a fine brush
- Top Coat: Seche Vite Dry Fast Top Coat
- Recommendations: Use a dotting tool to create perfectly round cherries and a fine brush for precise stem details.
DIY Instructions
- Apply two coats of OPI ‘Alpine Snow’ as the base.
- Use Essie ‘Russian Roulette’ to dot cherries onto the nail. Allow to dry.
- Draw stems with OPI ‘Green-wich Village’ using a fine brush.
- Finish with a layer of Seche Vite top coat to protect and enhance the design.
Elegant Zebra Stripes
Features an elegant mix of zebra stripes that intertwine black and white with sparkling silver lines. This bold and dynamic pattern is suited for those who wish to stand out with an exotic and stylish toe nail design at the beach.

Materials List
- Base Polish Pink: Essie ‘Fiji’
- Black Polish for Stripes: Sally Hansen ‘Black Out’
- Silver Glitter Stripe: OPI ‘Silver on Ice’
- Top Coat: CND Vinylux Long Wear Top Coat
- Recommendations: Apply the stripes with a steady hand, and consider using striping tape for sharper lines.
DIY Instructions
- Apply Essie ‘Fiji’ as the base color on each toenail.
- Once dry, use Sally Hansen ‘Black Out’ to paint zebra stripes, adding OPI ‘Silver on Ice’ for a touch of glamour.
- Seal the design with CND Vinylux Top Coat to ensure it withstands the sandy beaches and salty water.
Vivid Rainbow Swirls
The sock features a stunning swirl of rainbow colors, creating a bright and joyful expression perfect for summer festivities. This design captures the essence of fun and freedom, perfect for those who love to add a splash of color to their beach look.

Materials List
- Base Polish: OPI ‘Alpine Snow’
- Rainbow Polishes: A range of OPI colors including ‘Big Apple Red’, ‘Need Sunglasses?’, ‘That’s Hula-rious!’, and ‘No Room for the Blues’
- Top Coat: Seche Vite Dry Fast Top Coat
- Recommendations: Use a fine detail brush to blend the colors smoothly on the nail for a seamless transition between hues.
DIY Instructions
- Apply a base coat to protect the nail.
- Paint the entire nail with OPI ‘Alpine Snow’ as a base color to make the colors pop.
- While the base is still tacky, apply small dots of each rainbow polish.
- Using a fine detail brush, gently drag through the colors to create a swirling pattern.
- Seal with Seche Vite top coat for a glossy finish that enhances the vibrancy of the colors.
Striped Spectrum
Presents a playful and meticulously crafted design of horizontal stripes featuring the full spectrum of the rainbow. This pattern is not only eye-catching but also symbolizes diversity and joy, making it a perfect choice for vibrant beach outings and pride celebrations.

Materials List
- Base Polish: Essie ‘Blanc’
- Striping Polishes: Various colors from Sally Hansen and Essie
- Striping Tape
- Top Coat: OPI Top Coat
- Recommendations: Use striping tape to achieve precise and clean lines for the stripes. Ensure each stripe is fully dry before applying the next color to avoid smudging.
DIY Instructions
- Apply a base coat to all nails.
- Paint a white base with Essie ‘Blanc’.
- Once dry, place striping tape in even intervals across each nail.
- Apply different colors between the tapes, then carefully remove the tape while the polish is still slightly wet.
- Apply a top coat to seal and smooth out the design.
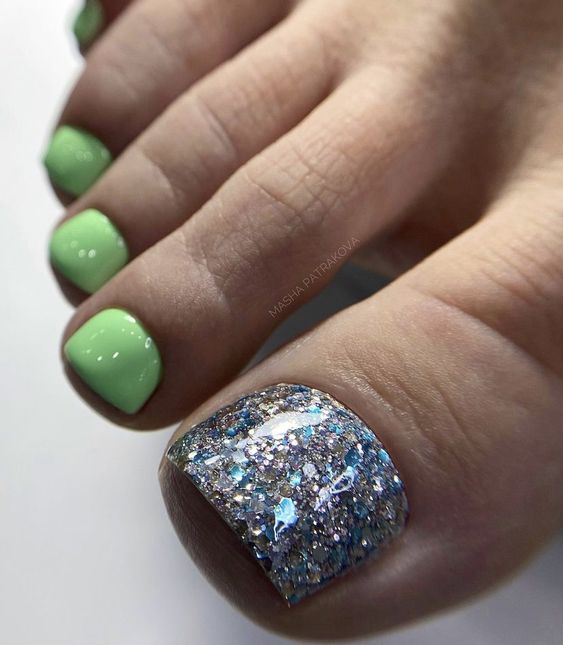
Green Glitter Accent
The design features a fresh light green polish on all nails except the thumb, which dazzles with a dense layer of silver and blue glitter. This accent manicure gives your nails a luxurious and festive look, making it a great choice for holiday celebrations or an evening out during a summer vacation.
Materials List
- Base Polish Green: Essie ‘Mint Candy Apple’
- Glitter Polish: OPI ‘Last Friday Night’
- Top Coat: Sally Hansen Insta-Dri Top Coat
- Recommendations: For the glitter accent, apply multiple layers to achieve a full, opaque effect.
DIY Instructions
- Paint all toes except the big toe with two coats of Essie ‘Mint Candy Apple’.
- For the big toe, apply a base coat and then two to three layers of OPI ‘Last Friday Night’ for a full glitter effect.
- Finish with Sally Hansen Insta-Dri Top Coat for a quick-drying and lasting shine.
Neon Dots on White
Features a minimalist design with a white base and scattered neon dots in a variety of sizes. This look combines simplicity with a touch of whimsy, perfect for those who prefer a subtle yet playful nail design for their beach adventures.
Materials List
- Base Polish White: OPI ‘Alpine Snow’
- Dotting Polishes: Neon colors from China Glaze
- Dotting Tool
- Top Coat: CND Vinylux Long Wear Top Coat
- Recommendations: Use a dotting tool for more precise dot placement and vary the sizes for a more dynamic look.
DIY Instructions
- Apply a base coat and two coats of OPI ‘Alpine Snow’.
- Using a dotting tool, apply various neon colored dots across the nail.
- Finish with CND Vinylux Top Coat to protect the design and add a professional gloss.
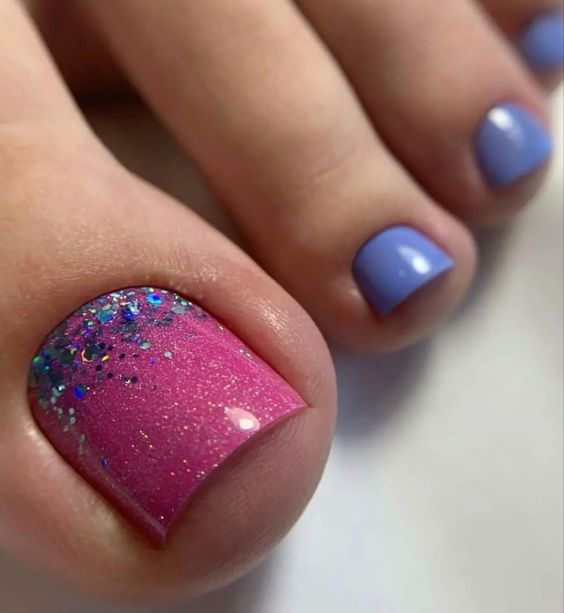
Pink and Purple Glitter Fade
The toes are adorned with a beautiful gradient from pink to purple, with a glitter overlay on top that shimmers beautifully in the sun. This romantic and feminine design is perfect for those who love a little glamor in their beach attire.
Materials List
- Base Polish Pink: Essie ‘Mod Square’
- Purple Polish: OPI ‘Do You Have this Color in Stock-holm?’
- Glitter Top Coat: Essie ‘Set in Stones’
- Top Coat: Seche Vite Dry Fast Top Coat
- Recommendations: Blend the base colors while they are still wet to achieve a smooth gradient effect.
DIY Instructions
- Apply a base coat to protect the nail.
- Start with Essie ‘Mod Square’ at the base of the nail and blend into OPI ‘Do You Have this Color in Stock-holm?’ toward the tip.
- While the gradient is still tacky, apply Essie ‘Set in Stones’ for a glittery finish.
- Seal with Seche Vite top coat for durability and extra shine.
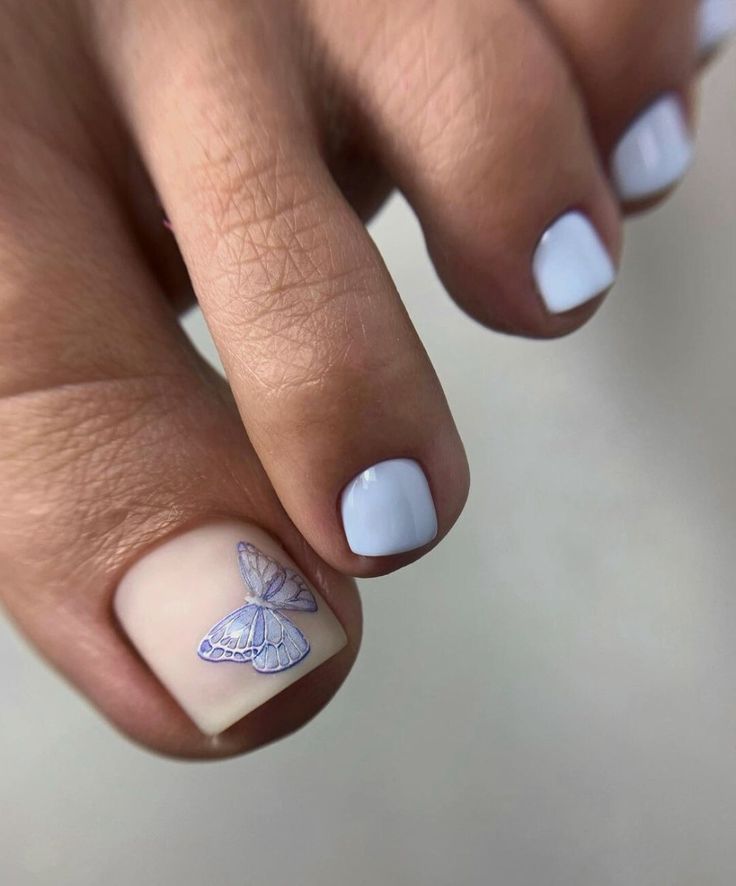
Delicate Butterfly Art
The subtle elegance of the butterfly design is perfect for those who appreciate intricate, nature-inspired art. On a matte background, the detailed lavender butterfly adds a whimsical and graceful touch, perfect for serene summer days or a gentle stroll in the garden.
Materials List
- Base Polish: OPI ‘Alpine Snow’ (matte finish)
- Butterfly Design Polish: Lavender acrylic paint
- Detailing Tool: Fine brush
- Top Coat: Matte top coat for a soft finish
- Recommendations: Use a steady hand for the butterfly details, or consider using a stencil for more uniformity.
DIY Instructions
- Apply a base coat to protect your nails.
- Paint two coats of OPI ‘Alpine Snow’, and let it dry completely.
- Using a fine brush and lavender acrylic paint, carefully draw the butterfly on the accent nail.
- Finish with a matte top coat to enhance the art and maintain the design.
Classic Red Elegance
Features a timeless glossy red that exudes confidence and style. Perfect for any occasion, from casual beach days to more formal summer events, this vibrant red is a true statement of classic beauty and sophistication.

Materials List
- Base Polish: Essie ‘Really Red’
- Top Coat: Seche Vite Dry Fast Top Coat
- Recommendations: Two coats will ensure a rich, even color and long-lasting wear.
DIY Instructions
- Start with a clean, shaped toenail.
- Apply a base coat to protect the nail from staining.
- Paint two coats of Essie ‘Really Red’ for full coverage.
- Seal with Seche Vite top coat for a glossy, durable finish.
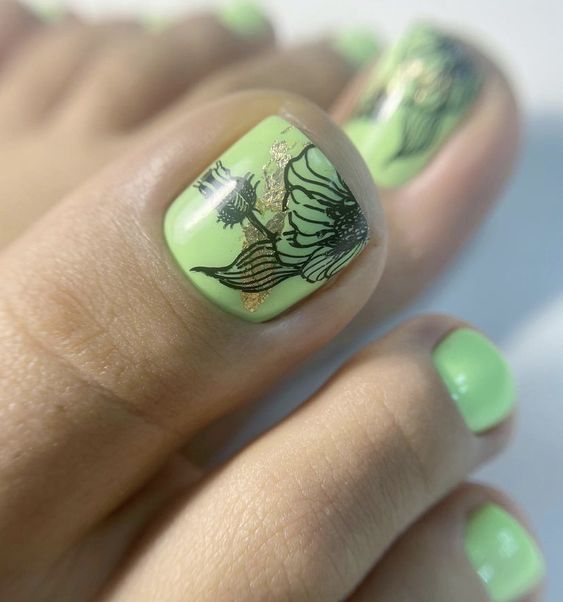
Green Floral Fantasy
Nail art combines a fresh green base with gold and black floral accents, creating a gorgeous and colorful look. This design is perfect for those who love detailed, artistic expressions on their fingers, adding a unique touch to their summer closet.
Materials List
- Base Polish Green: China Glaze ‘Lime After Lime’
- Gold and Black Detail Polish: Acrylic paints
- Detailing Tool: Thin brush
- Top Coat: High gloss top coat to enhance the details
- Recommendations: Apply the details using a thin brush for precision and layer the colors to give depth to the floral design.
DIY Instructions
- Paint your toenails with two coats of China Glaze ‘Lime After Lime’.
- Once dry, use a thin brush to add floral designs with gold and black acrylic paint.
- Allow each color to dry before adding the next to prevent smudging.
- Apply a high gloss top coat to seal in the design and add a vibrant shine.
Daisy Delight
Shows a playful and charming design with bright yellow daisies on a clean white base. This design is delightful for sunny days and pairs beautifully with light summer fabrics and colors, perfect for picnics or weekend getaways.

Materials List
- Base Polish White: OPI ‘Alpine Snow’
- Yellow and White Polish for Daisies: OPI ‘I Just Can’t Cope-acabana’ and ‘Alpine Snow’
- Top Coat: Seche Vite Dry Fast Top Coat
- Recommendations: Use a dotting tool for the daisy centers to keep them uniform and neat.
DIY Instructions
- Apply a base coat to protect the nails.
- Paint two coats of OPI ‘Alpine Snow’ as the background.
- Use OPI ‘I Just Can’t Cope-acabana’ to create the daisy petals, and add small white dots in the center of each daisy.
- Finish with Seche Vite top coat for a lasting glossy finish.
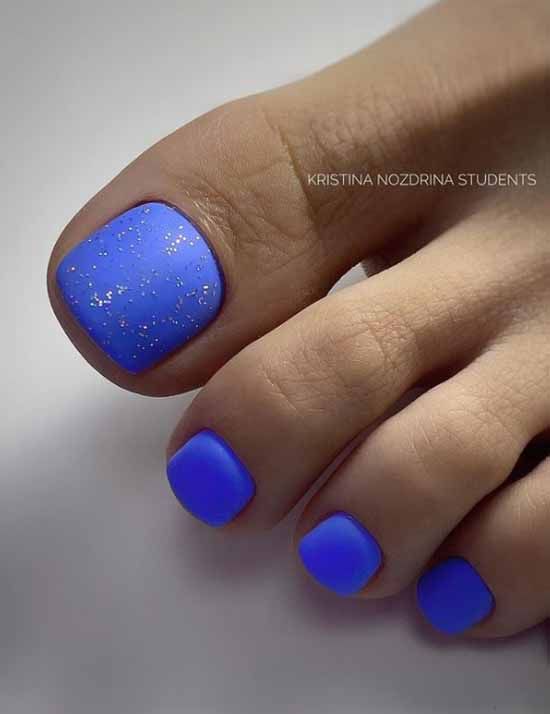
Blue Glitter Night
The deep blue color combined with silver glitter gives the impression of a starry night sky. This spectacular and eye-catching design is ideal for evening events or nighttime strolls during vacations.

Materials List
- Base Polish Blue: Essie ‘Aruba Blue’
- Glitter Polish: Sally Hansen ‘Diamond Strength’
- Top Coat: OPI Top Coat for a shimmering finish
- Recommendations: Layer the glitter polish to achieve a dense, star-like effect.
DIY Instructions
- Paint two coats of Essie ‘Aruba Blue’ for a deep blue base.
- Apply Sally Hansen ‘Diamond Strength’ over the blue, concentrating more glitter towards the tip for a gradient effect.
- Seal the design with OPI Top Coat to ensure durability and enhance the sparkle.
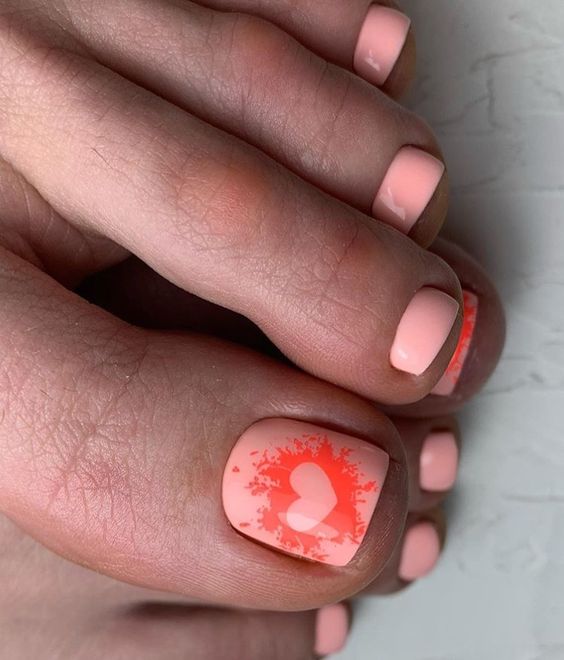
Romantic Coral Hearts
The nail design features a charming and delicate coral base with a bright heart accent in a brighter coral shade. This playful yet elegant look is perfect for a romantic date on the beach or a leisurely stroll on a summer evening.
Materials List
- Base Polish: Essie ‘Peach Side Babe’
- Accent Polish for Heart: Essie ‘Tart Deco’
- Stencil or Freehand Tool: Heart-shaped stencil or a fine brush for freehand
- Top Coat: Seche Vite Dry Fast Top Coat
- Recommendations: For a precise heart shape, a stencil is recommended, but a steady hand with a fine brush can also achieve beautiful results.
DIY Instructions
- Apply a base coat to protect the nails.
- Paint two coats of Essie ‘Peach Side Babe’ on all toes.
- For the accent toe, once the base is dry, place the heart stencil centrally or use a fine brush to paint the heart shape with ‘Tart Deco’.
- Remove the stencil carefully if used, and let the design dry.
- Finish with Seche Vite top coat for a lasting glossy finish and to enhance the color depth.
Save Pin