As the leaves begin to turn and the air gets a little crisper, it’s time to swap out those summer brights for something a bit cozier. Fall sweater nails are the perfect way to embrace the season, offering a unique blend of warmth, texture, and color that perfectly complements the cooler months. But what makes these designs so special, and how can you achieve them at home? Let’s dive into the fall sweater nail trends for 2024 that you won’t want to miss!
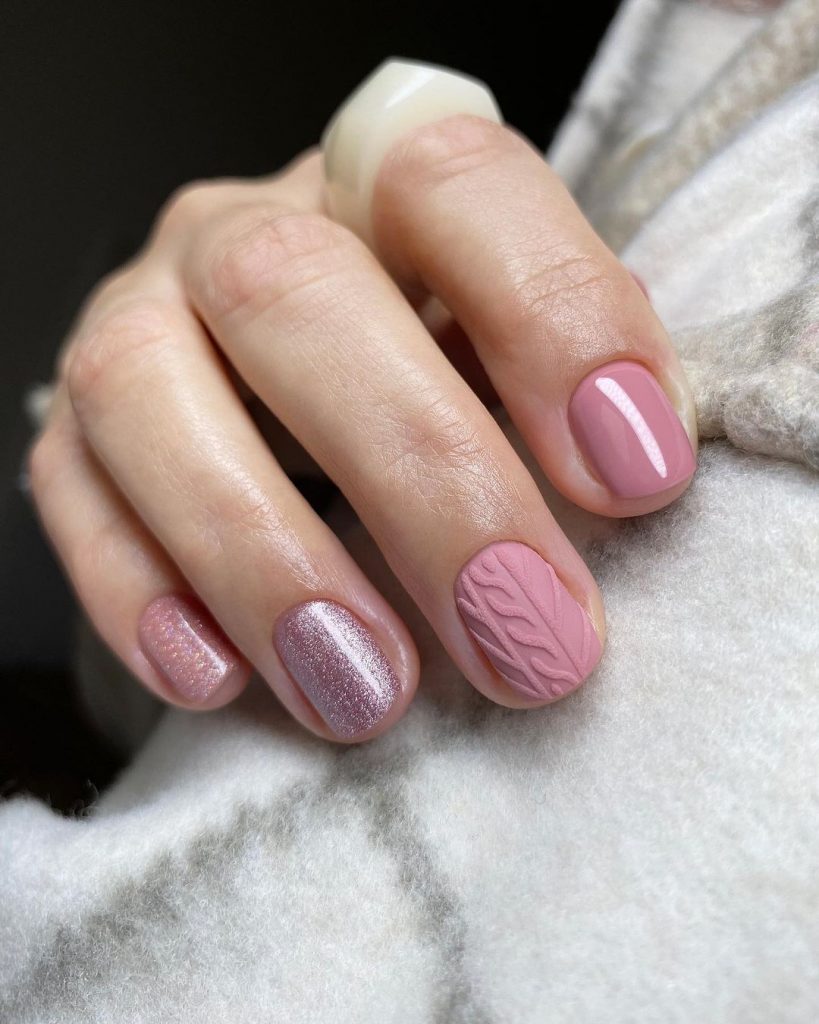
Soft Pink Texture with Subtle Sparkle
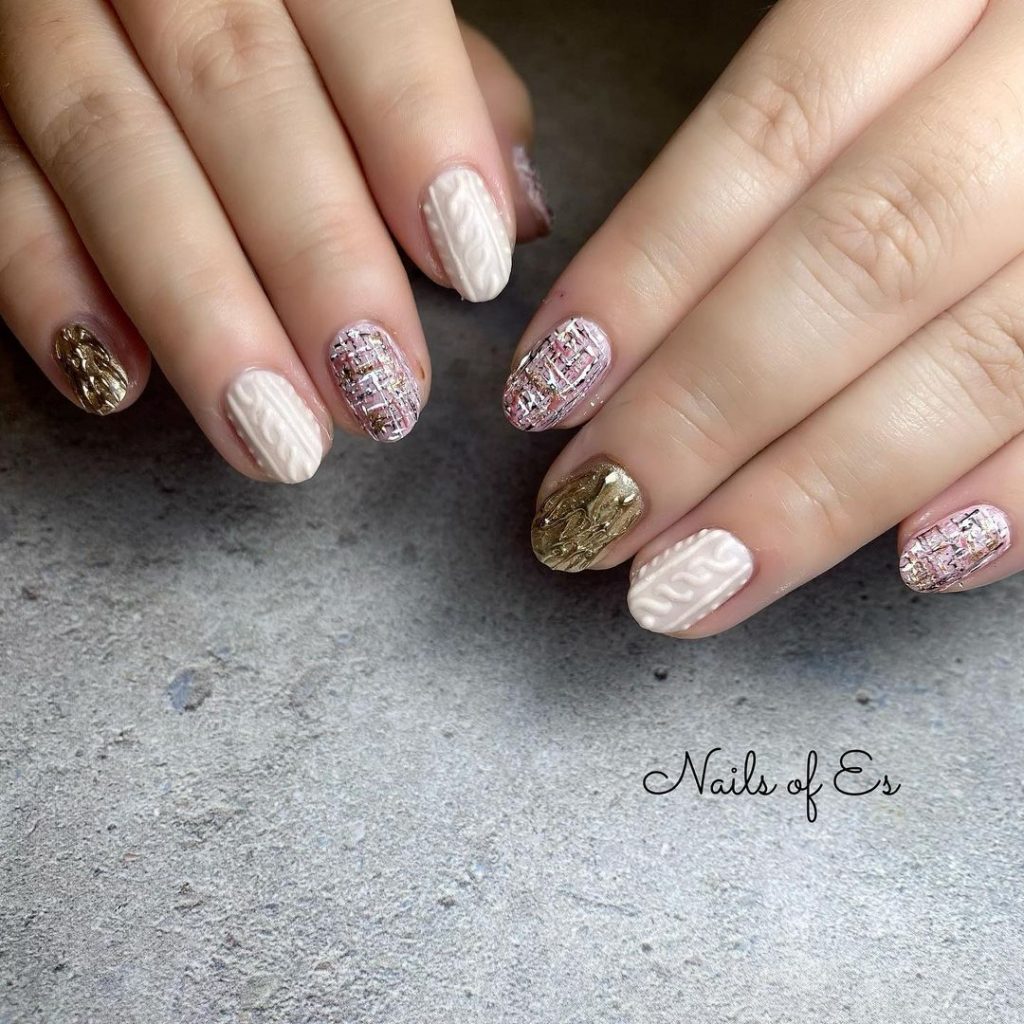
This nail design features a soft pink palette with a mix of textures that gives off a cozy, yet chic vibe—perfect for a fall day spent sipping hot cocoa. The use of a matte finish on some nails paired with a delicate cable knit pattern adds depth and interest, while the accent nail with subtle glitter brings just the right amount of sparkle to keep things interesting. The combination of these elements creates a fall sweater nails 2024 look that’s both sophisticated and cute.
Consumables:
- Matte Pink Polish: Consider brands like Essie in “Matter of Fiction” for a soft, blush pink.
- Glitter Polish: Try Zoya’s “Aphrodite” for a fine, shimmering finish.
- Cable Knit Stencil: Available on Amazon or from nail art stores like Born Pretty.
- Matte Top Coat: Essie’s “Matte About You” is a reliable choice.
- Detailing Brush: A fine-tip brush is essential for adding those intricate cable knit details.
DIY Instructions:
- Prep and Paint: Start by prepping your nails with a base coat. Apply two coats of the matte pink polish to each nail, allowing ample drying time between layers.
- Cable Knit Design: Using the stencil or freehand with a detailing brush, carefully apply the cable knit design on two accent nails. Ensure the lines are clean and even.
- Add the Sparkle: On one nail, apply a layer of the glitter polish. Let it dry completely before applying a matte top coat to seal the look.
- Final Touches: Apply a matte top coat to all nails to achieve that cozy, sweater-like finish.
Bold Lavender Stilettos
This nail design is all about making a statement with a bold, lavender hue that’s both chic and unexpected for fall. The long stiletto shape adds drama, while the cable knit pattern gives the nails a cozy, sweater-inspired texture. The soft lavender color contrasts beautifully with the intricate pattern, making these nails a standout for any fall occasion. The matte finish enhances the overall aesthetic, giving these nails a sophisticated and modern look that’s perfect for those who love to stay on trend.
Consumables:
- Lavender Polish: OPI’s “Do You Lilac It?” offers a vibrant lavender shade.
- Matte Top Coat: Consider using Sally Hansen’s “Big Matte Top Coat” for a smooth, matte finish.
- Cable Knit Stencil: A precision stencil or freehand tool is necessary to create the texture.
- Stiletto Nail Tips: Available from brands like Kiss for those looking to extend their nail length.
DIY Instructions:
- Apply the Base: Start with a base coat to protect your natural nails. Apply two coats of the lavender polish, allowing each layer to dry completely.
- Create the Texture: Use the cable knit stencil to carefully add the design to your nails. If you’re skilled with a detailing brush, you can freehand the pattern as well.
- Finish with Matte: Once the design is in place, seal your work with a matte top coat to give the nails that soft, sweater-like finish.
- Shape and Refine: If using tips, shape your nails into sharp stilettos before applying the polish. Refine the edges as needed after application.
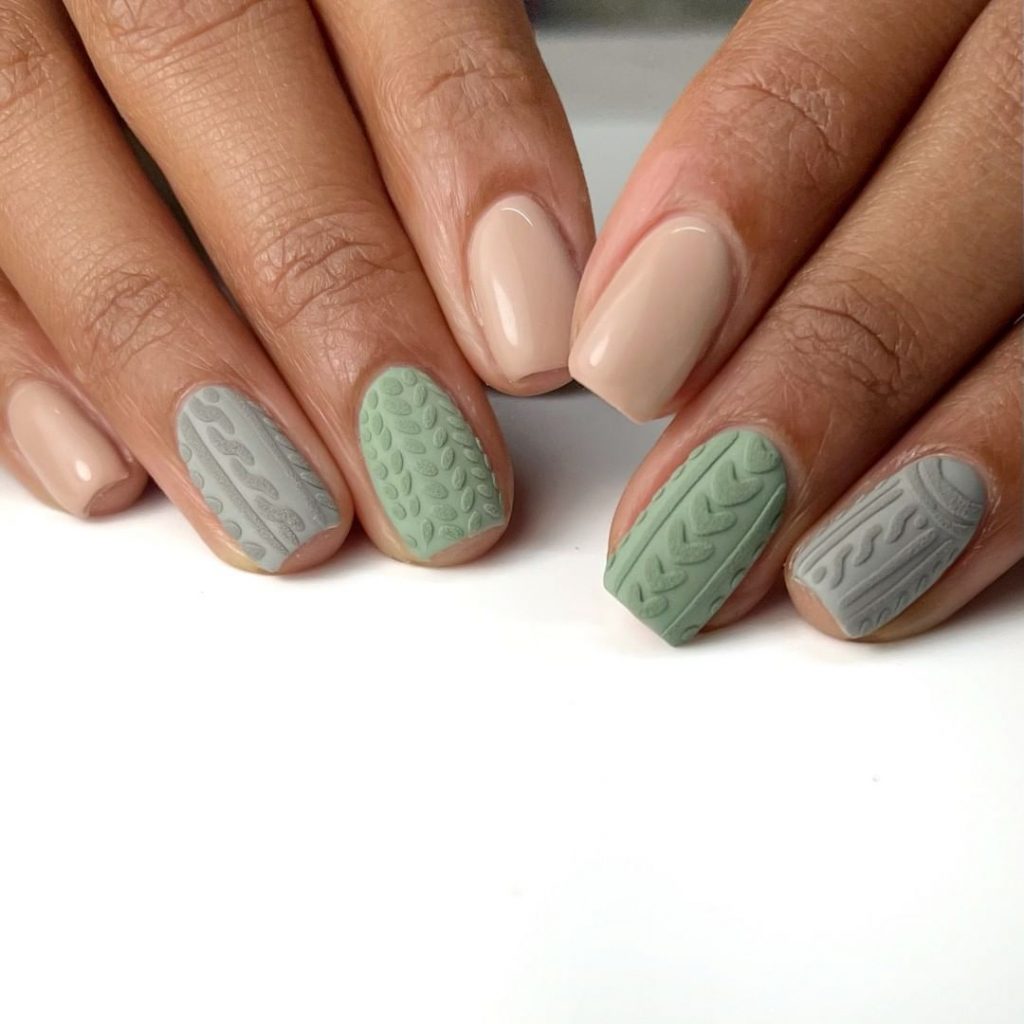
Earthy Neutrals with Subtle Green Accents
This design embraces the earthy tones of fall with a combination of soft greys and muted greens. The shorter, rounded shape of these nails makes them practical and easy to maintain, while the mix of textures adds visual interest. The green accents bring a subtle pop of color that feels grounded and natural, perfectly embodying the essence of fall. These nails are ideal for those who love a minimalist yet stylish look that can transition from day to night effortlessly.
Consumables:
- Grey Polish: Try CND Vinylux in “Mystic Slate” for a smooth, neutral grey.
- Muted Green Polish: Essie’s “Sage You Love Me” offers the perfect subtle green.
- Cable Knit Design Tool: Use a stencil or brush to create the knit pattern.
- Top Coat: A regular top coat can be used to seal the design without altering the texture.
DIY Instructions:
- Base and Color Application: After prepping your nails, apply the grey polish on some nails and the green on others. Allow each coat to dry thoroughly.
- Add the Knit Texture: On the green nails, use the cable knit stencil or brush to add the textured design. Make sure to work slowly for clean lines.
- Seal and Protect: Finish with a top coat to protect the design and add a slight sheen, keeping the look polished but understated.
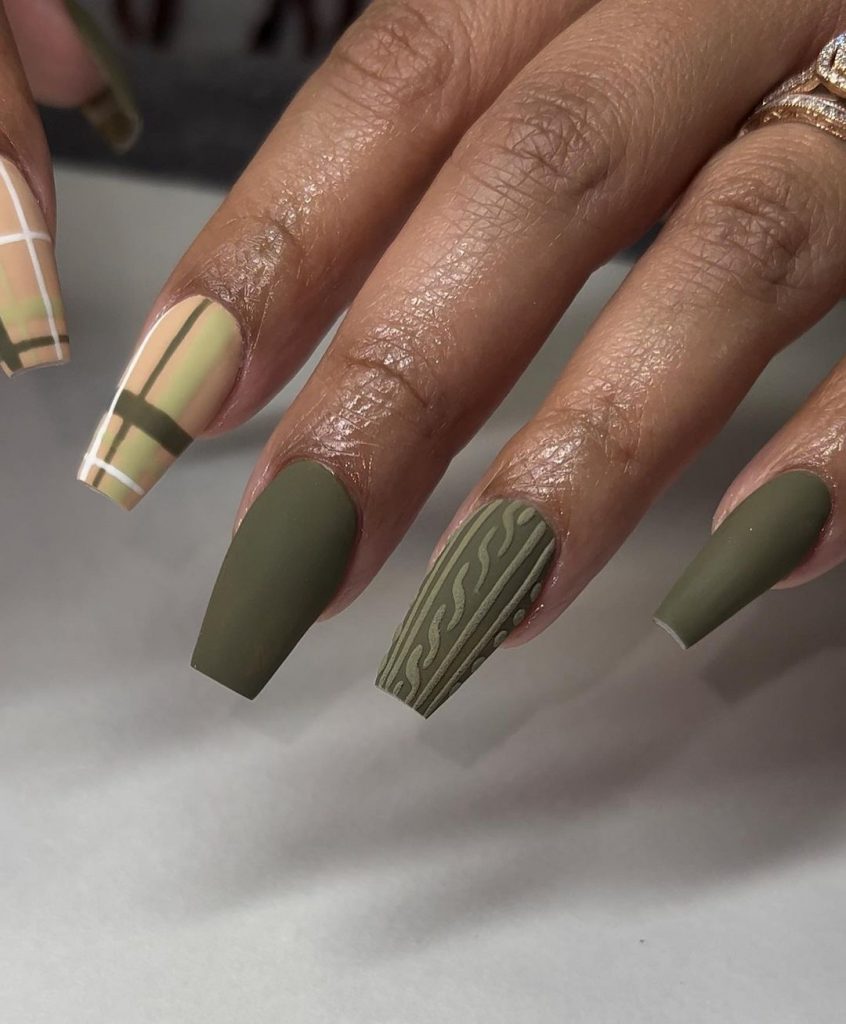
Olive Green Elegance
Embrace the autumn season with these elegant olive green nails that are both sophisticated and stylish. The mix of matte olive green and plaid patterns adds a unique twist, making this manicure perfect for the fashion-forward individual. The subtle cable knit texture on one nail ties the whole look together, creating a balanced yet eye-catching design. These nails are versatile enough for both casual outings and more formal events, making them a must-try for fall.
Consumables:
- Olive Green Polish: Zoya’s “Charlie” offers a rich, earthy green.
- Matte Top Coat: Apply Essie’s “Matte About You” to achieve that smooth, matte finish.
- Plaid Nail Art Stickers: Available from various nail art suppliers.
- Detailing Brush: Essential for creating the cable knit texture and plaid lines.
DIY Instructions:
- Start with the Base: Apply the olive green polish to all nails, ensuring even coverage. Let it dry completely.
- Add Plaid and Knit: Use the plaid stickers on some nails, and carefully add the cable knit design on one or two nails using the detailing brush.
- Finish with Matte: Seal the design with a matte top coat, making sure the finish is even and smooth across all nails.
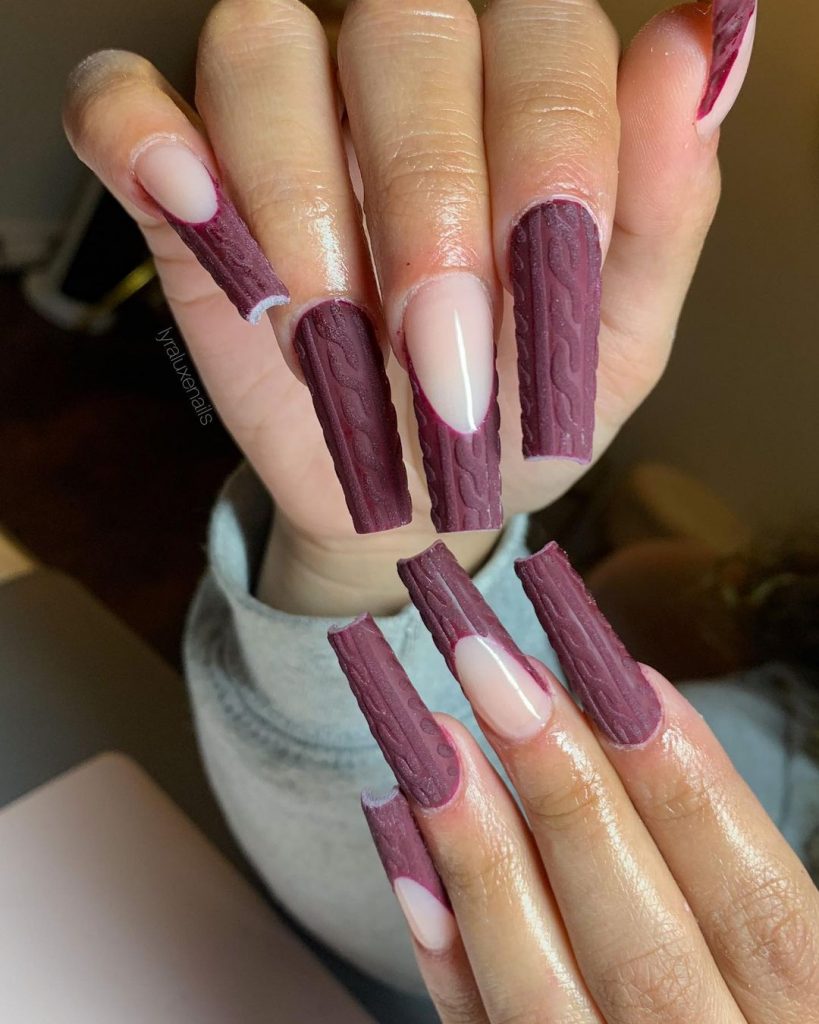
Burgundy and Nude Contrast
This manicure is a stunning combination of deep burgundy and soft nude tones, perfect for those who want a bold yet refined look. The burgundy nails feature a rich, matte finish with a cozy cable knit texture, while the nude nails keep the design grounded and wearable. The contrast between the dark, moody burgundy and the neutral nude creates a sophisticated look that’s perfect for the fall season. This design is versatile, making it suitable for both day-to-day wear and special occasions.
Consumables:
- Burgundy Polish: Essie’s “Bordeaux” offers a rich, wine-like shade.
- Nude Polish: OPI’s “Samoan Sand” provides a perfect neutral base.
- Cable Knit Stencil or Brush: Use for the textured design on the burgundy nails.
- Matte Top Coat: Ensure the matte finish with Zoya’s “Velvet Matte Top Coat.”
DIY Instructions:
- Base and Color: Apply the nude polish on some nails and the burgundy on others, making sure to apply two coats for full coverage.
- Add Texture: On the burgundy nails, use a stencil or detailing brush to create the cable knit design. Allow the design to dry thoroughly.
- Finish with Matte: Apply the matte top coat to all nails to enhance the sophisticated look and ensure longevity.
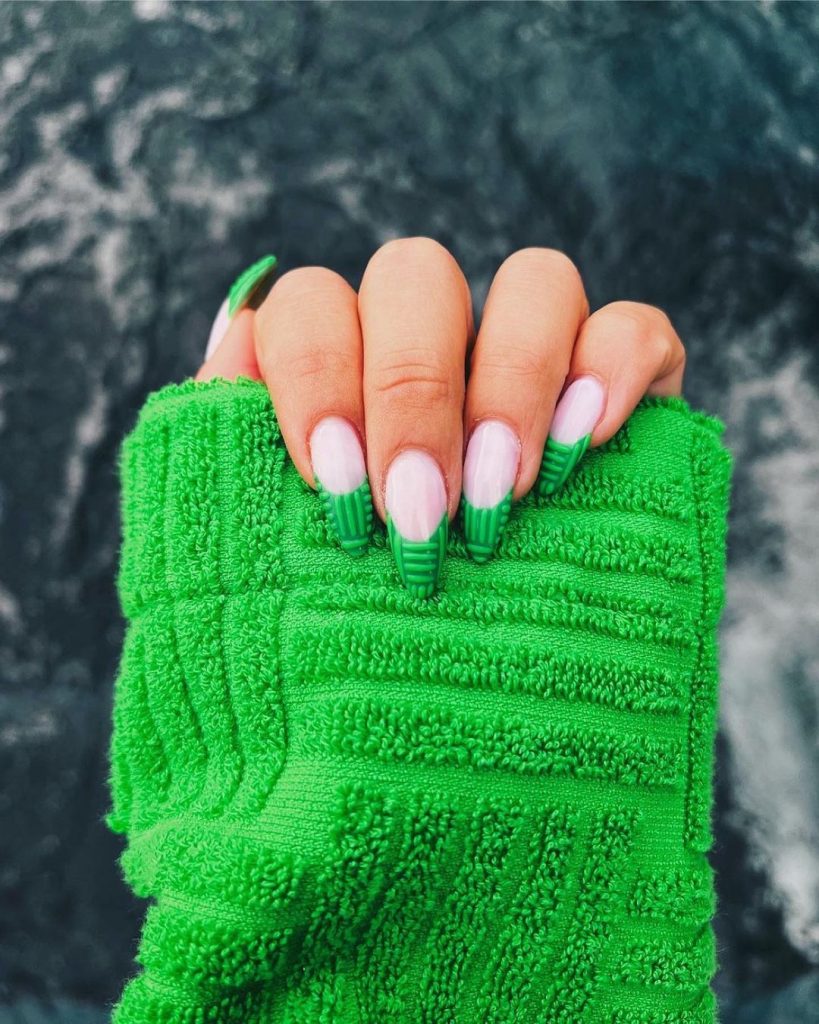
Vibrant Green Cable Knit French Tips
This nail design is a playful twist on the classic French manicure, featuring a vibrant green cable knit pattern that perfectly complements the cozy vibes of fall. The green tips are bold and eye-catching, contrasting beautifully with the soft, nude base. This look is ideal for those who want to bring a pop of color to their fall manicure while still keeping it chic and sophisticated.
Consumables:
- Nude Base Polish: Essie’s “Ballet Slippers” for a soft, elegant base.
- Green Polish: OPI’s “I’m So Swamped” offers a vibrant green perfect for this look.
- Cable Knit Stencil: Essential for creating the textured pattern on the tips.
- Top Coat: Use a high-shine top coat like Seche Vite for a glossy finish.
DIY Instructions:
- Apply the Base: Start with two coats of the nude polish on all nails, allowing them to dry completely.
- Create the French Tips: Use the cable knit stencil to carefully apply the green polish to the tips of your nails, ensuring the design is even and precise.
- Seal with Top Coat: Finish with a high-shine top coat to protect the design and give your nails a polished, professional look.
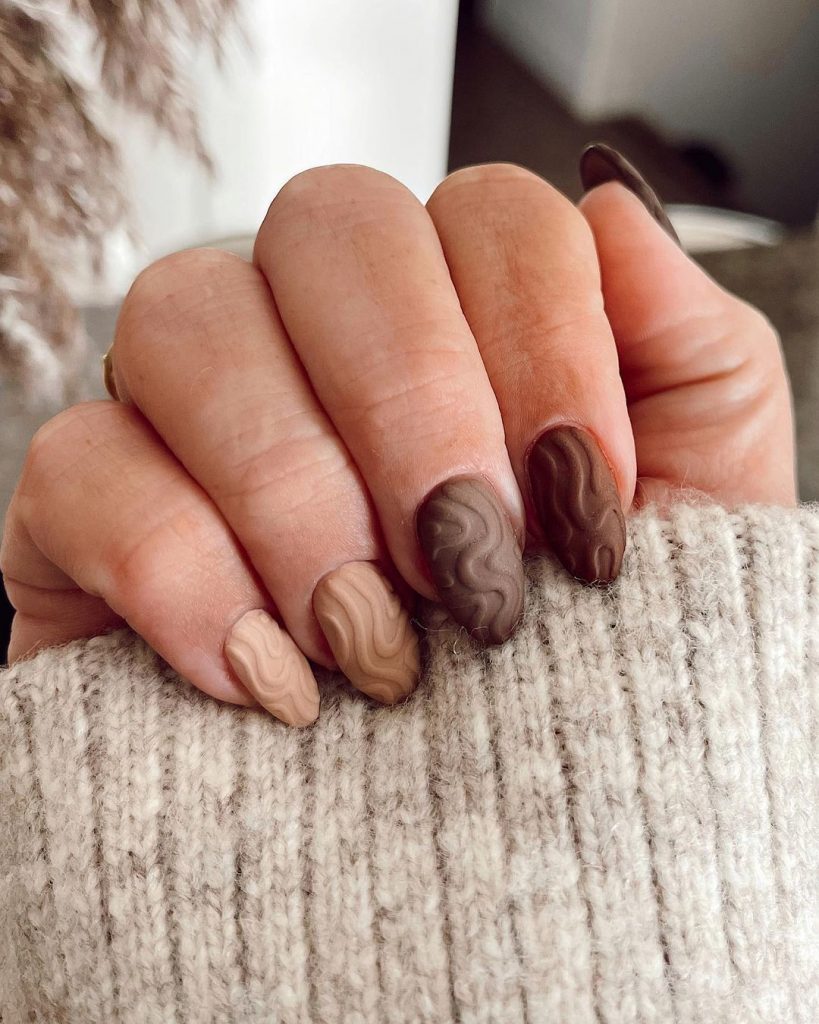
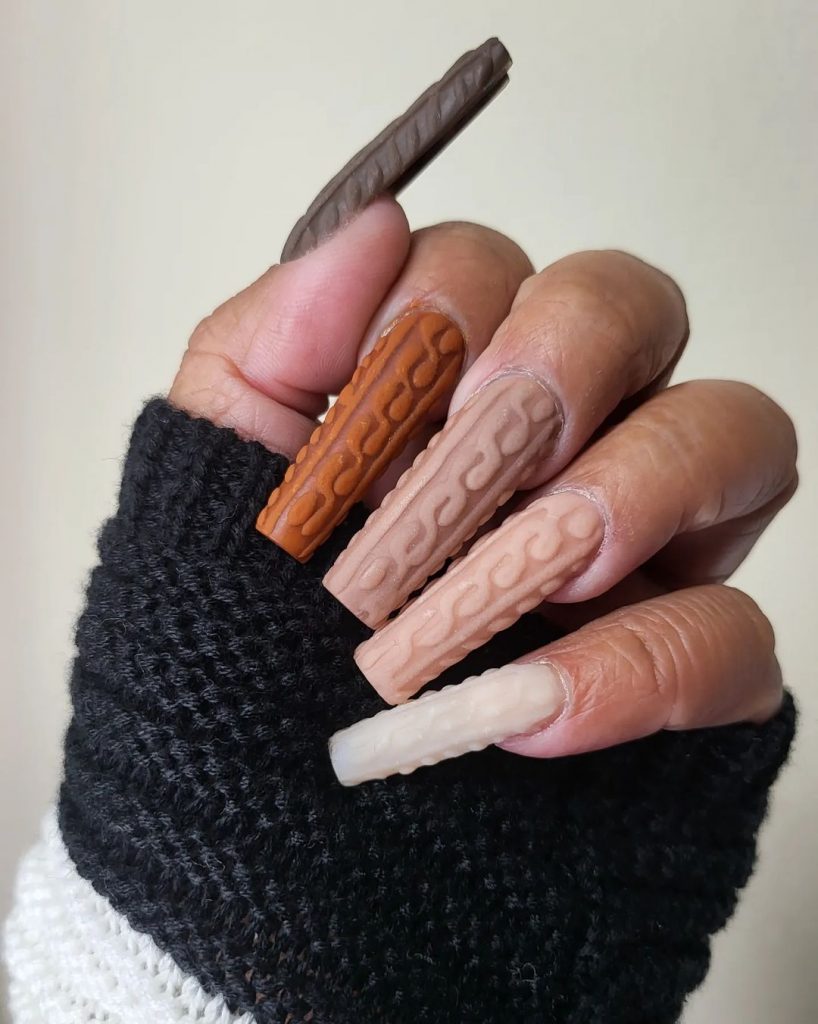
Earthy Brown Tones with Textured Accents
This design embraces the warm, earthy tones of fall with a gradient of brown shades that bring to mind cozy sweaters and hot chocolate. The textured, matte finish on some nails adds depth and interest, while the overall simplicity of the design makes it versatile and wearable. The mix of light and dark brown tones creates a sophisticated, autumnal look that’s perfect for any occasion.
Consumables:
- Light Brown Polish: Zoya’s “Louise” offers a rich, warm brown shade.
- Dark Brown Polish: Try OPI’s “Espresso Your Inner Self” for a deeper hue.
- Matte Top Coat: Essie’s “Matte About You” to achieve that soft, matte finish.
- Cable Knit Stencil: To add the cozy, textured design to your nails.
DIY Instructions:
- Base Color Application: Apply the light brown polish to half of your nails and the dark brown to the other half, ensuring even coverage.
- Add Texture: Use the cable knit stencil on selected nails to create the textured effect, applying a matte top coat over these for a soft, muted finish.
- Final Touches: Apply the matte top coat to the remaining nails to tie the look together, ensuring all nails have a uniform matte finish.
Bright Orange with Gold Accents
This design is perfect for those who love bold, vibrant colors. The bright orange base is lively and cheerful, while the gold and white accents add a touch of glamour. The mix of cable knit texture and abstract patterns on these long nails makes for a striking design that’s sure to turn heads. This manicure is ideal for fall parties or any event where you want to make a statement.

Consumables:
- Bright Orange Polish: Essie’s “Tangerine Tease” for a vibrant, energetic color.
- Gold Glitter Polish: Zoya’s “Solange” for a touch of sparkle.
- White Nail Art Pen: For creating precise, abstract lines.
- Cable Knit Stencil: To add the textured design to select nails.
DIY Instructions:
- Apply the Orange Base: Start with two coats of the bright orange polish on all nails, ensuring even coverage.
- Add the Gold and White Accents: Use a white nail art pen to draw abstract lines on some nails. Apply the gold glitter polish to select areas for a touch of sparkle.
- Textured Design: Use the cable knit stencil on one or two nails to create the textured effect, finishing with a matte top coat to seal the look.
Abstract Earth Tones with Bold Patterns
This design is a work of art, featuring a mix of abstract patterns in earthy tones. The combination of muted greens, yellows, and browns creates a unique, autumnal palette that’s both stylish and unexpected. The use of different textures and patterns on each nail makes this design stand out, making it perfect for those who love to experiment with their manicure.

Consumables:
- Muted Green Polish: Essie’s “Sew Psyched” for a soft, earthy green.
- Yellow Polish: OPI’s “Sun, Sea, and Sand in My Pants” for a warm, sunny yellow.
- Brown Polish: Zoya’s “Foster” for a rich, autumnal brown.
- Detailing Brush: Essential for creating the intricate patterns.
DIY Instructions:
- Base Color Application: Apply the different base colors to each nail, creating a mix of green, yellow, and brown nails.
- Add the Abstract Patterns: Use a detailing brush to create abstract patterns on each nail, playing with the different colors to create a cohesive yet varied design.
- Seal with Top Coat: Finish with a matte top coat to give the nails a soft, velvety finish that enhances the earthy tones.
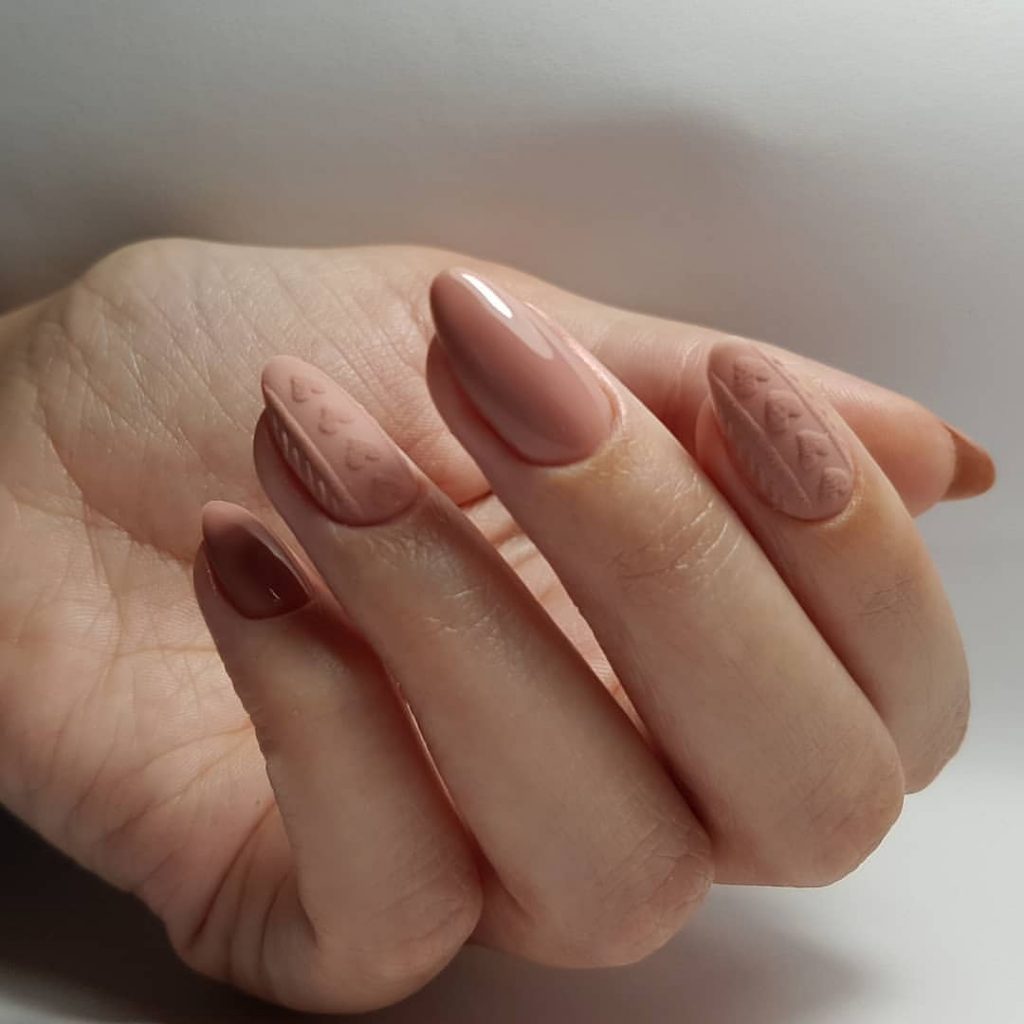
Nude Elegance with Subtle Texture
This design is all about subtle elegance, featuring soft nude tones with delicate textured accents. The almond shape of the nails adds a touch of sophistication, while the matte finish keeps the look modern and understated. The subtle cable knit texture on one or two nails adds just enough interest without overpowering the simplicity of the design. This manicure is perfect for those who prefer a more minimalist approach to their nail art.
Consumables:
- Nude Polish: Essie’s “Topless & Barefoot” for a soft, elegant nude.
- Matte Top Coat: OPI’s “Matte Top Coat” to achieve a smooth, matte finish.
- Cable Knit Stencil: To add the delicate textured design to select nails.
- Almond Nail Tips: Available from brands like Kiss for achieving the perfect nail shape.
DIY Instructions:
- Base Color Application: Apply two coats of the nude polish to all nails, ensuring a smooth, even finish.
- Add the Texture: Use the cable knit stencil on one or two nails to create the textured effect, applying the matte top coat over these nails to seal the design.
- Shape and Finish: If using tips, shape your nails into a soft almond shape before applying the polish. Finish with a matte top coat to enhance the minimalist look.
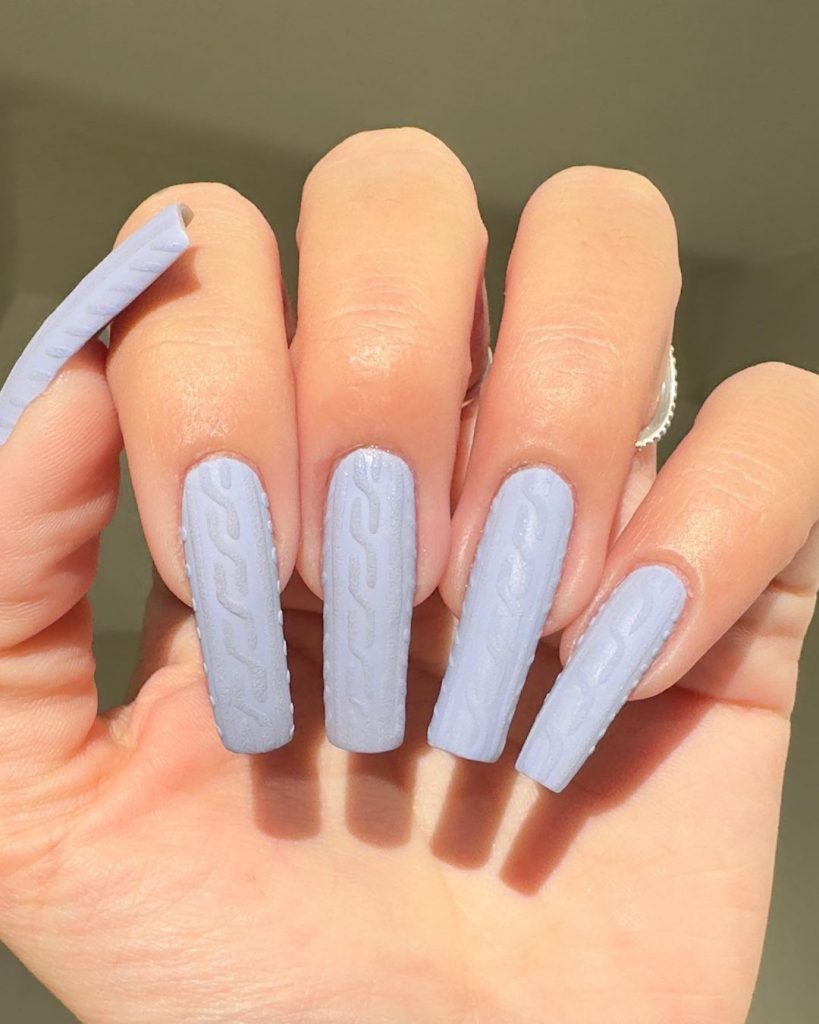
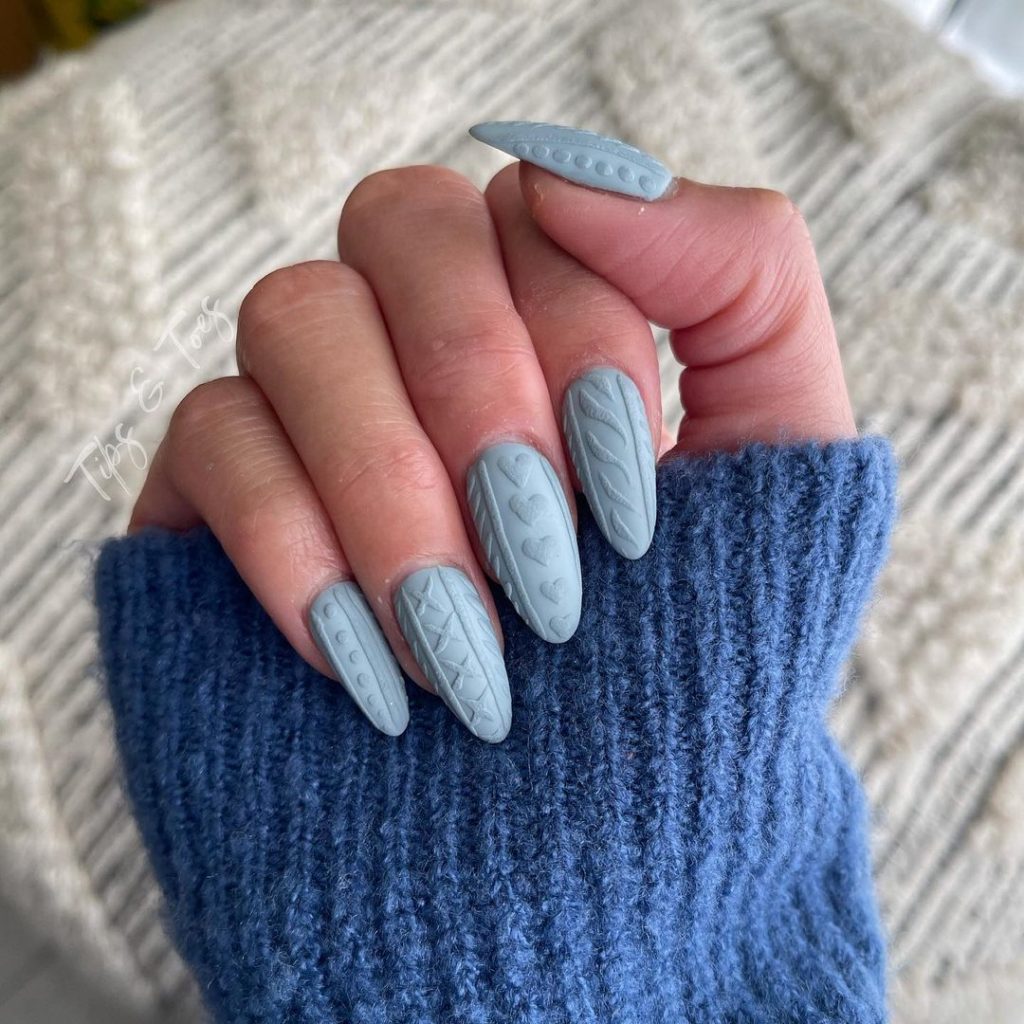
Serene Light Blue with Cozy Texture
This design features a soothing light blue shade that brings a calm and cozy feel to your nails, perfect for the fall season. The matte finish paired with a variety of textured cable knit patterns on each nail adds depth and interest, making this manicure both simple and stylish. The stiletto shape enhances the overall elegance, giving the nails a refined and polished look.
Consumables:
- Light Blue Polish: Essie’s “Bikini So Teeny” for a soft, calming blue.
- Matte Top Coat: OPI’s “Matte Top Coat” to achieve a smooth, matte finish.
- Cable Knit Stencil: Essential for creating the different textured designs on each nail.
- Stiletto Nail Tips: Available from brands like Kiss for achieving the sharp stiletto shape.
DIY Instructions:
- Apply the Base: Start with two coats of the light blue polish on all nails, ensuring a smooth, even finish.
- Create the Texture: Use the cable knit stencil on each nail to create a variety of textured designs, adding interest and depth to the manicure.
- Finish with Matte: Apply a matte top coat to seal the design and enhance the soft, cozy feel of the nails.
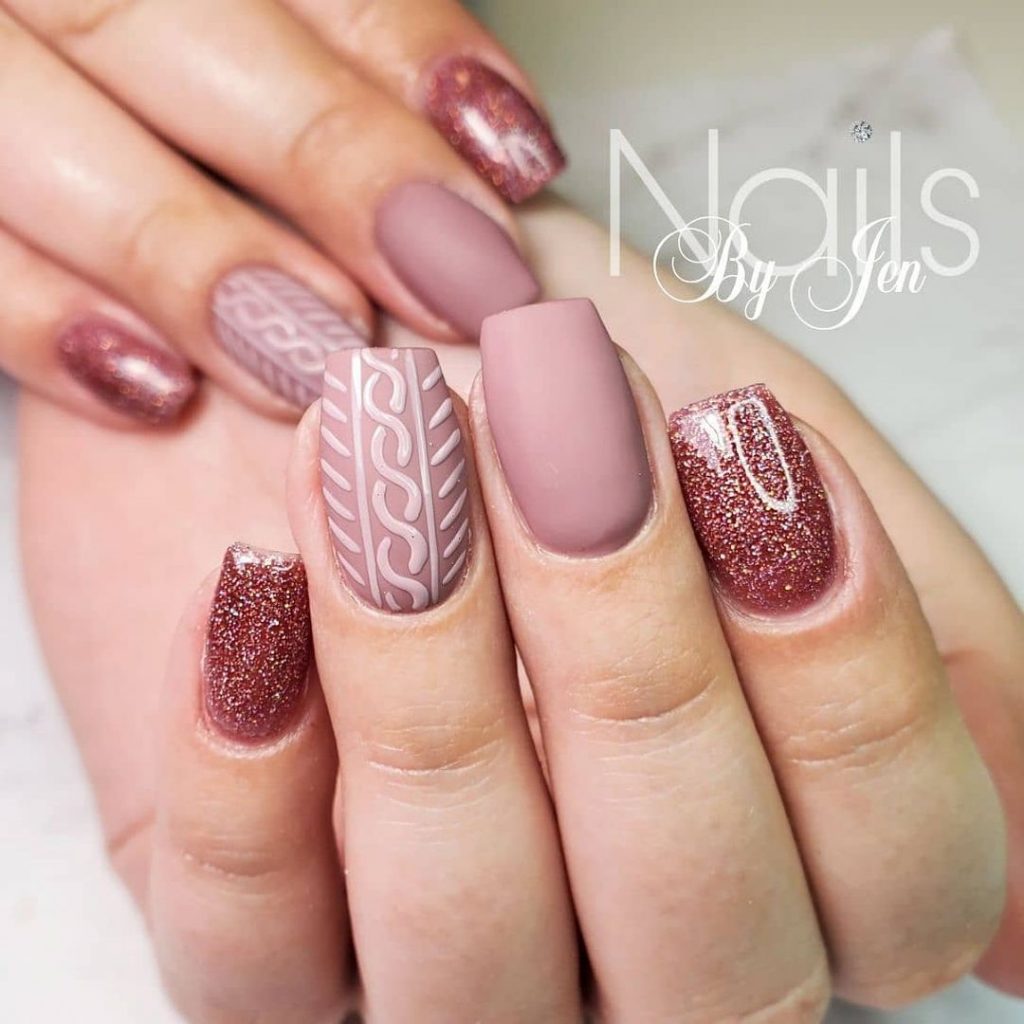
Rose Gold Glam with Subtle Knits
This manicure combines the elegance of rose gold glitter with the subtle sophistication of matte mauve and cable knit designs. The mix of textures—glitter, matte, and knit—creates a luxurious look that’s perfect for special occasions or simply adding a touch of glam to your everyday style. The square shape adds a modern touch, making these nails a chic choice for fall.
Consumables:
- Mauve Polish: OPI’s “Tiramisu for Two” offers a rich, creamy mauve shade.
- Rose Gold Glitter Polish: Try Zoya’s “Aster” for a sparkling rose gold finish.
- Cable Knit Stencil: For adding the delicate knit design on select nails.
- Matte Top Coat: Essie’s “Matte About You” to give the nails a soft, matte finish.
DIY Instructions:
- Base and Color: Apply the mauve polish to some nails and the rose gold glitter to others, ensuring even coverage and a smooth finish.
- Add the Knit Texture: Use the cable knit stencil on the mauve nails to create a subtle, textured design. Let the design dry thoroughly.
- Seal with Matte: Apply a matte top coat to the mauve nails, leaving the glitter nails glossy for a beautiful contrast.
Neutral Tones with a Touch of Glam
This design features a combination of neutral tones with a mix of cable knit textures and glossy finishes. The long square shape adds drama, while the subtle use of gold accents brings a touch of glamour to the otherwise understated design. The blend of beige, brown, and white tones creates a harmonious palette that’s both versatile and elegant.
Consumables:
- Beige Polish: Essie’s “Urban Jungle” for a soft, neutral base.
- Brown Polish: Zoya’s “Louise” for a rich, warm brown.
- White Polish: OPI’s “Alpine Snow” for crisp, clean accents.
- Gold Nail Art Decorations: Small gold studs or foil for adding a touch of sparkle.
- Cable Knit Stencil: To create the textured designs on select nails.
DIY Instructions:
- Base and Color: Apply the beige, brown, and white polishes to different nails, ensuring a smooth, even finish.
- Create the Texture: Use the cable knit stencil on some nails to add the cozy, sweater-like texture. Apply the gold accents to selected nails for a touch of glamour.
- Finish with Top Coat: Apply a glossy top coat to seal the design and give the nails a high-shine finish.
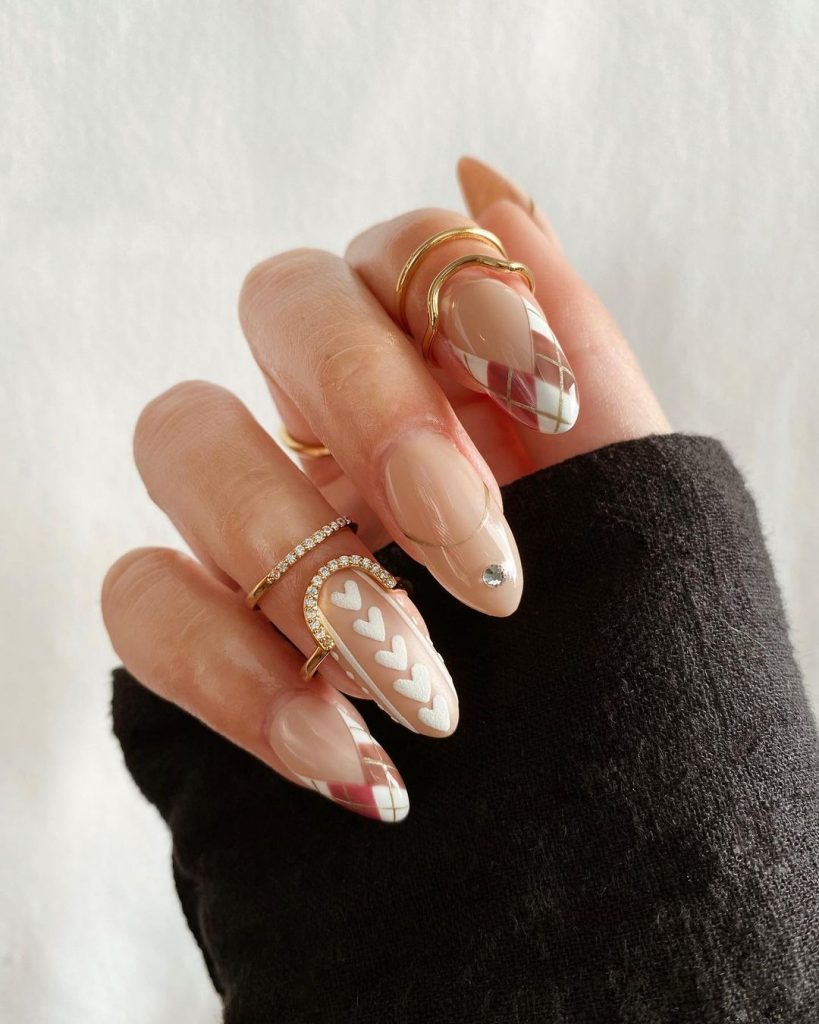
Plaid Perfection with Heart Accents
This design is a charming mix of plaid patterns and heart accents, perfect for a cozy fall look. The combination of nude and burgundy tones gives the nails a warm, inviting feel, while the plaid pattern adds a classic, timeless touch. The almond shape enhances the feminine appeal of this manicure, making it a great choice for both casual and formal occasions.
Consumables:
- Nude Polish: Essie’s “Topless & Barefoot” for a soft, elegant nude base.
- Burgundy Polish: OPI’s “Malaga Wine” for a deep, rich burgundy.
- White Nail Art Pen: For creating the plaid pattern and heart accents.
- Plaid Nail Art Decals: Available for those who prefer a quicker application.
- Top Coat: Use a glossy top coat like Seche Vite for a high-shine finish.
DIY Instructions:
- Apply the Base: Start with two coats of the nude polish on all nails, allowing them to dry completely.
- Create the Plaid and Heart Patterns: Use the white nail art pen to carefully draw the plaid pattern on selected nails and the heart accents on others. Apply burgundy polish to the tips for a French manicure effect.
- Seal with Top Coat: Apply a glossy top coat to all nails to protect the design and give the nails a polished, professional finish.
Textured Neutrals with Gold Leaf Accents
This manicure is a blend of soft neutrals and eye-catching gold leaf accents, perfect for those who love a bit of luxury in their nail designs. The mix of cable knit textures with gold leaf detailing creates a sophisticated and unique look that’s sure to impress. The short, rounded shape keeps the design wearable and practical, making it a great choice for everyday wear.
Consumables:
- Beige Polish: OPI’s “Samoan Sand” for a neutral, versatile base.
- Gold Leaf Flakes: Available from most nail art suppliers for adding a touch of luxury.
- Cable Knit Stencil: To create the cozy, textured design on select nails.
- Top Coat: Use a high-shine top coat to seal the design and add a glossy finish.
DIY Instructions:
- Base and Color: Apply the beige polish to all nails, ensuring an even, smooth finish.
- Add the Texture and Gold Accents: Use the cable knit stencil on some nails to create the textured design. Apply the gold leaf flakes to selected nails for a luxurious touch.
- Finish with Top Coat: Seal the entire design with a high-shine top coat to protect the nails and keep them looking fresh.
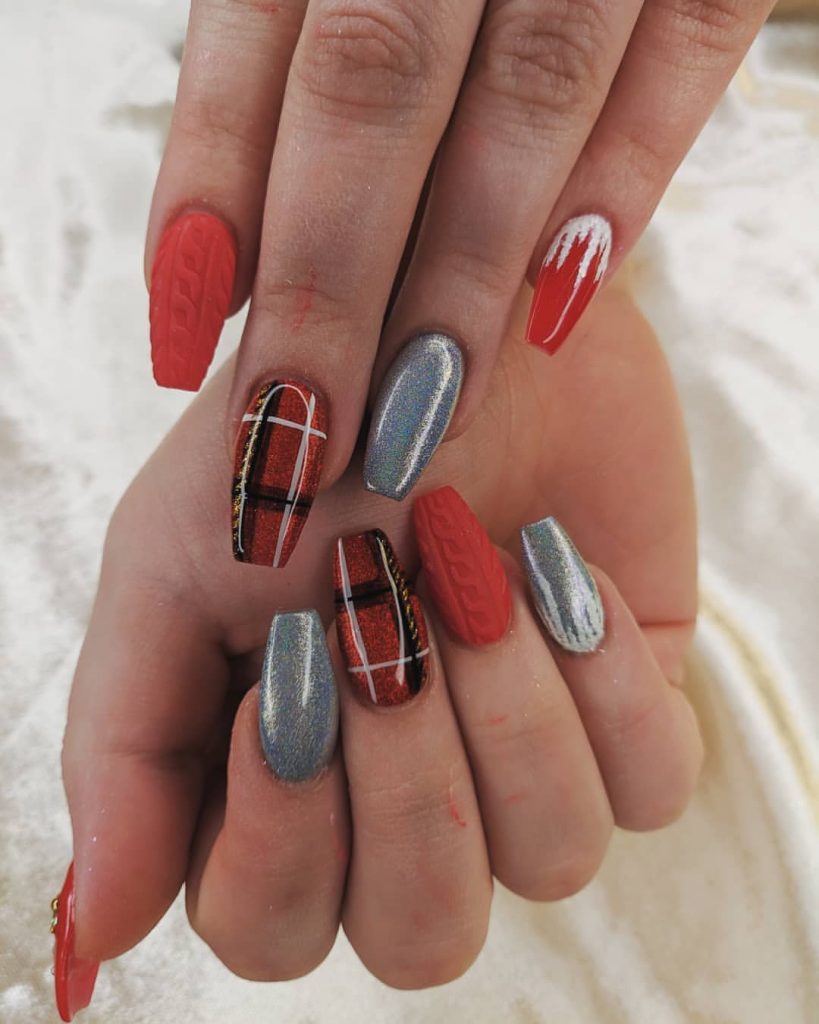
Festive Red with Plaid and Chrome Accents
This nail design embraces the festive spirit with a vibrant red base, complemented by plaid patterns, chrome accents, and a cozy cable knit texture. The combination of these elements creates a bold and eye-catching manicure, perfect for the holiday season or any special fall event. The mix of glossy and matte finishes adds depth and interest, making this design a true standout.
Consumables:
- Red Polish: Essie’s “A-List” for a classic, vibrant red.
- Plaid Nail Art Stickers: Available from nail art suppliers for a quick and easy application.
- Chrome Powder: For adding a metallic sheen to select nails.
- Cable Knit Stencil: To create the cozy texture on the red nails.
- Top Coat: Use a glossy top coat like Seche Vite to seal the design.
DIY Instructions:
- Base and Color: Apply the red polish to most of your nails, leaving one or two for the chrome finish. Use the plaid stickers on selected nails for a festive touch.
- Create the Texture: Use the cable knit stencil on the red nails to add a textured, sweater-like finish.
- Apply Chrome Accents: Use chrome powder on one or two nails for a metallic look, and seal the entire design with a top coat.
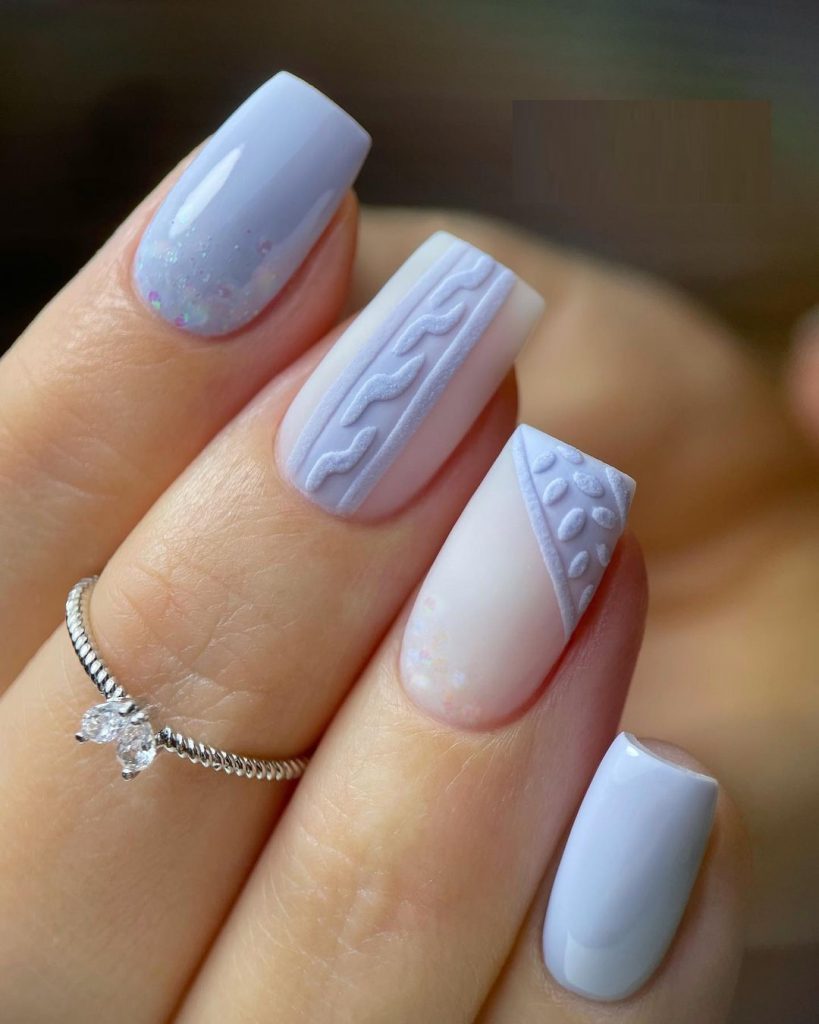
Soft Lilac with Subtle Texture
This manicure is a perfect blend of soft lilac tones and delicate textures, creating a calm and elegant look that’s ideal for the fall season. The mix of matte and glossy finishes, along with subtle cable knit patterns, gives the nails a sophisticated and modern feel. This design is great for those who prefer a minimalist approach with a touch of creativity.
Consumables:
- Lilac Polish: OPI’s “Do You Lilac It?” for a soft, pastel shade.
- Matte Top Coat: Essie’s “Matte About You” for a smooth, matte finish.
- Cable Knit Stencil: For adding the delicate textured design on selected nails.
- Glossy Top Coat: Use a high-shine top coat for the glossy nails.
DIY Instructions:
- Apply the Base: Start with two coats of the lilac polish on all nails, allowing them to dry completely.
- Create the Texture: Use the cable knit stencil on some nails to add a subtle, textured design. Apply a matte top coat over these nails.
- Seal with Gloss: Finish the other nails with a glossy top coat to create a beautiful contrast between the matte and shiny finishes.
Neutral Tones with Rich Texture
This design features a range of warm, neutral tones with a rich cable knit texture that adds depth and interest. The long, coffin shape of the nails gives them a dramatic look, while the matte finish enhances the cozy, autumnal feel of the design. The mix of beige, brown, and cream tones creates a harmonious and sophisticated palette that’s perfect for fall.
Consumables:
- Beige Polish: Essie’s “Urban Jungle” for a soft, neutral base.
- Brown Polish: Zoya’s “Louise” for a warm, rich brown.
- Cream Polish: OPI’s “Be There in a Prosecco” for a light, creamy tone.
- Cable Knit Stencil: To create the textured design on each nail.
- Matte Top Coat: OPI’s “Matte Top Coat” to give the nails a smooth, matte finish.
DIY Instructions:
- Base and Color: Apply the beige, brown, and cream polishes to different nails, ensuring a smooth, even finish.
- Create the Texture: Use the cable knit stencil on all nails to add the cozy, sweater-like texture. Let the design dry thoroughly.
- Finish with Matte: Apply a matte top coat to all nails to seal the design and enhance the rich, textured look.
Pink Glitter with Cozy Textures
This manicure combines the playful charm of pink glitter with the cozy feel of cable knit textures. The vibrant pink base is lively and cheerful, while the mix of glitter and matte finishes adds depth and interest. The coffin shape enhances the overall drama of the design, making these nails perfect for those who love to make a statement.

Consumables:
- Pink Polish: OPI’s “Pink Flamenco” for a bold, vibrant pink.
- Pink Glitter Polish: Essie’s “A Cut Above” for a sparkling finish.
- Cable Knit Stencil: For adding the textured design on selected nails.
- Matte Top Coat: Essie’s “Matte About You” for a smooth, matte finish.
DIY Instructions:
- Apply the Base: Start with two coats of the pink polish on all nails, allowing them to dry completely.
- Add Glitter and Texture: Apply the pink glitter polish to some nails for a sparkling effect. Use the cable knit stencil on other nails to create the textured design, applying a matte top coat over these nails.
- Finish with Matte: Seal the textured nails with a matte top coat to enhance the cozy feel of the design.
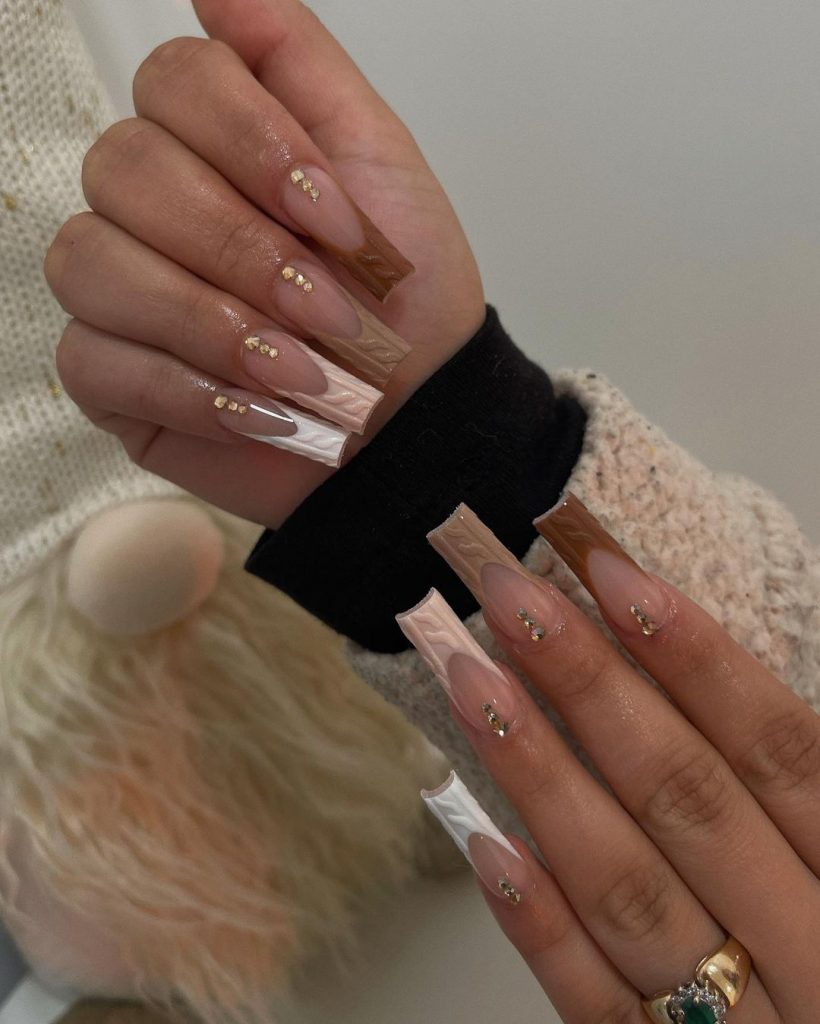
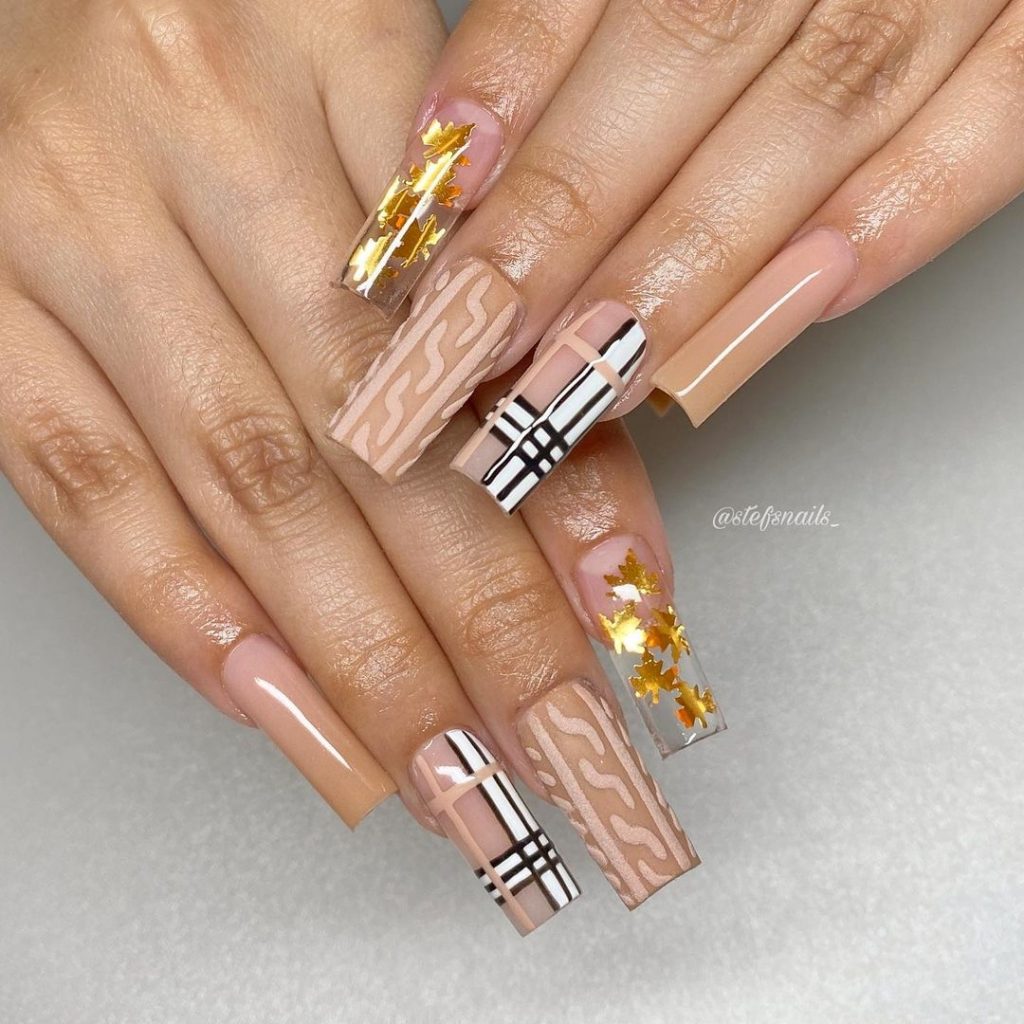
Plaid and Leaves with Nude Elegance
This nail design is a blend of classic plaid patterns and delicate leaf accents, creating a perfect fall manicure. The nude base provides a soft, elegant backdrop for the detailed designs, while the mix of matte and glossy finishes adds depth and interest. The long square shape of the nails gives them a modern edge, making this design both chic and timeless.
Consumables:
- Nude Polish: OPI’s “Samoan Sand” for a neutral, versatile base.
- Plaid Nail Art Stickers: Available from nail art suppliers for a quick and easy application.
- Gold Leaf Flakes: For adding a touch of luxury and sparkle.
- Cable Knit Stencil: To create the textured design on selected nails.
- Glossy Top Coat: Use a high-shine top coat to seal the design.
DIY Instructions:
- Apply the Base: Start with two coats of the nude polish on all nails, ensuring an even, smooth finish.
- Add Plaid and Leaves: Use the plaid stickers and gold leaf flakes to create the detailed designs on selected nails. Apply the cable knit stencil on other nails for a cozy texture.
- Seal with Gloss: Finish with a glossy top coat to protect the design and add a polished, professional finish.
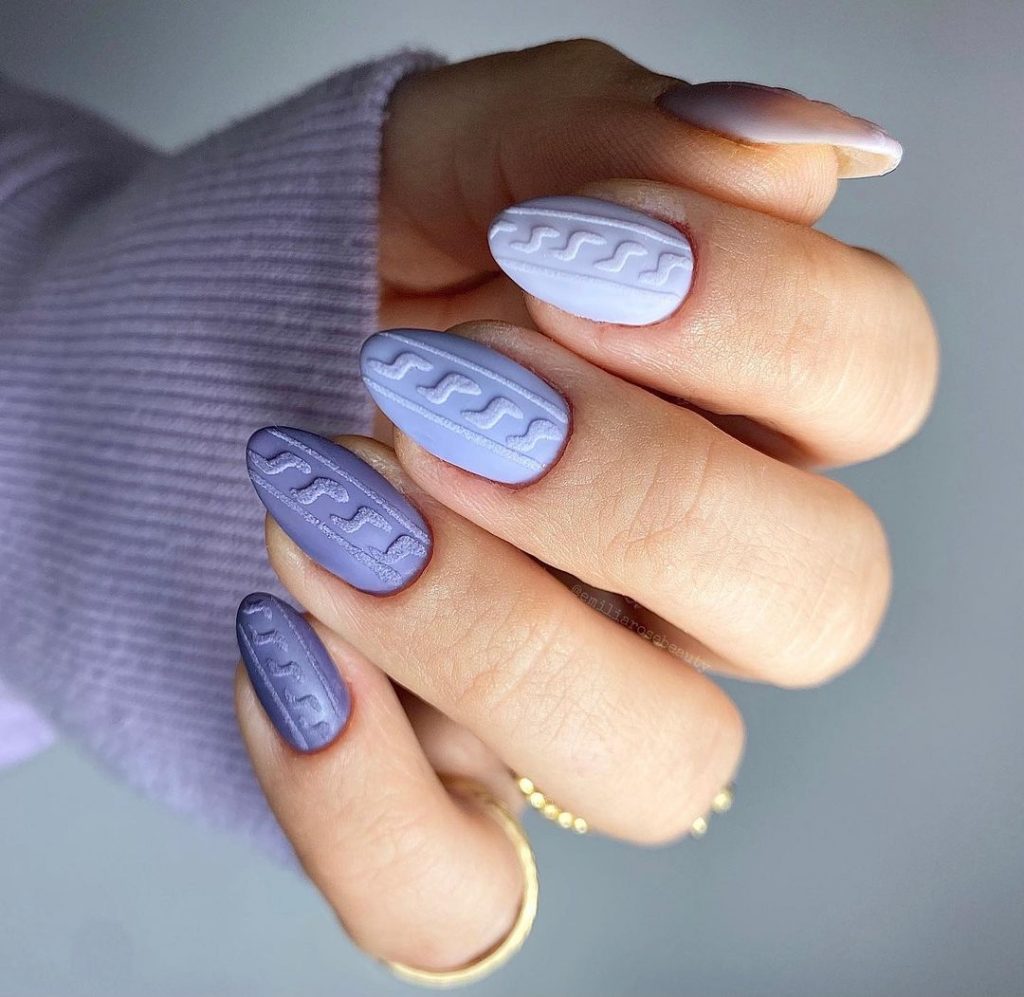
Lavender with Cozy Knits
This design features a soothing lavender base with cozy cable knit textures, creating a calm and inviting look that’s perfect for fall. The matte finish enhances the soft, cozy feel of the design, while the almond shape adds a touch of elegance. This manicure is ideal for those who prefer a subtle yet stylish look that’s easy to wear.
Consumables:
- Lavender Polish: Essie’s “Lilacism” for a soft, pastel lavender.
- Matte Top Coat: OPI’s “Matte Top Coat” for a smooth, matte finish.
- Cable Knit Stencil: For adding the textured design on selected nails.
- Almond Nail Tips: Available from brands like Kiss for achieving the almond shape.
DIY Instructions:
- Apply the Base: Start with two coats of the lavender polish on all nails, allowing them to dry completely.
- Create the Texture: Use the cable knit stencil on some nails to add the cozy, sweater-like texture. Apply a matte top coat over these nails.
- Finish with Matte: Seal the entire design with a matte top coat to enhance the soft, cozy feel of the nails.
Earthy Greens with Glitter and Texture
This manicure is a blend of earthy green tones with a mix of glitter and cable knit textures, creating a unique and stylish look for fall. The combination of matte and glossy finishes adds depth and interest, while the mix of colors creates a harmonious and natural palette. The almond shape gives the nails a soft, elegant look, making this design perfect for both casual and formal occasions.

Consumables:
- Green Polish: OPI’s “Suzi – The First Lady of Nails” for a rich, earthy green.
- Glitter Polish: Essie’s “Summit of Style” for a touch of sparkle.
- Cable Knit Stencil: For adding the textured design on selected nails.
- Matte Top Coat: Essie’s “Matte About You” for a smooth, matte finish.
DIY Instructions:
- Apply the Base: Start with two coats of the green polish on all nails, ensuring an even, smooth finish.
- Add Glitter and Texture: Apply the glitter polish to some nails for a sparkling effect. Use the cable knit stencil on other nails to create the textured design, applying a matte top coat over these nails.
- Finish with Matte: Seal the entire design with a matte top coat to enhance the earthy, cozy feel of the nails.
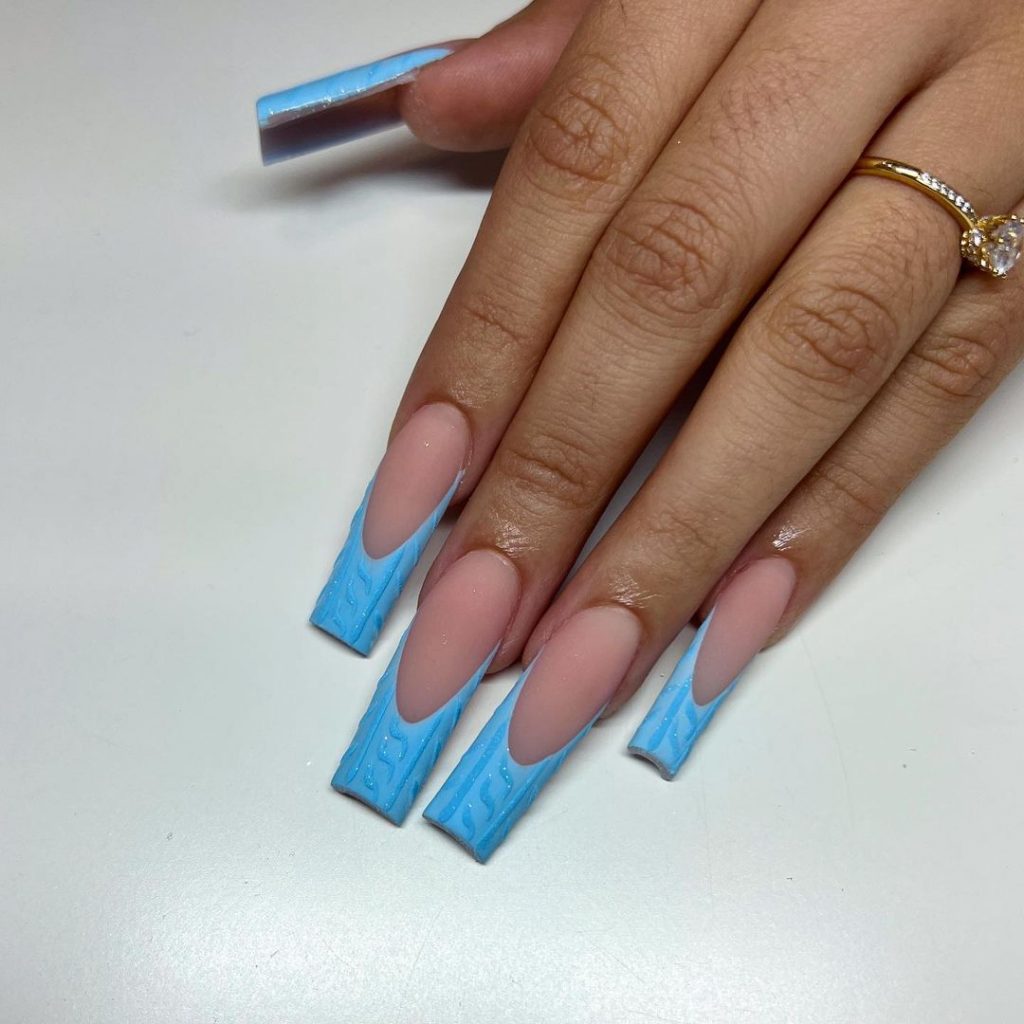
Pastel Blue with French Tips
This design is a fresh take on the classic French manicure, featuring a pastel blue cable knit texture on the tips against a nude base. The combination of the soft blue and nude tones creates a serene and elegant look that’s perfect for fall. The long, coffin shape adds drama and sophistication, making this manicure a chic choice for any occasion.
Consumables:
- Nude Polish: Essie’s “Topless & Barefoot” for a soft, neutral base.
- Pastel Blue Polish: OPI’s “It’s a Boy!” for a light, baby blue color.
- Cable Knit Stencil: For creating the textured design on the French tips.
- Glossy Top Coat: Use a high-shine top coat to seal the design.
DIY Instructions:
- Apply the Base: Start with two coats of the nude polish on all nails, ensuring an even, smooth finish.
- Create the French Tips: Use the cable knit stencil to apply the pastel blue polish to the tips of your nails, creating the textured design.
- Seal with Gloss: Finish with a glossy top coat to protect the design and add a polished, professional finish.
Save Pin