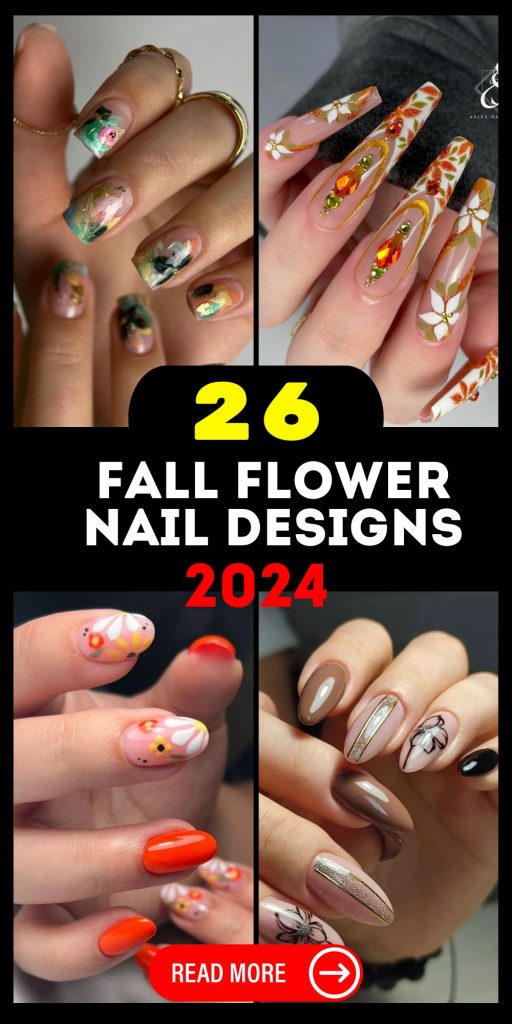
As the leaves turn and the air becomes crisp, our nails deserve a seasonal makeover that reflects the beauty of autumn. Fall flower nail designs 2024 are more than just a trend—they’re a way to carry a piece of nature with you, even as the world outside gets ready for winter. But what are the designs making waves this season? How can you recreate these intricate floral patterns at home? And which nail type and nail shape work best for each design? Let’s dive into the blooming world of fall floral nails, exploring the most trendy and cute styles that will keep your nails looking fresh and vibrant all season long.
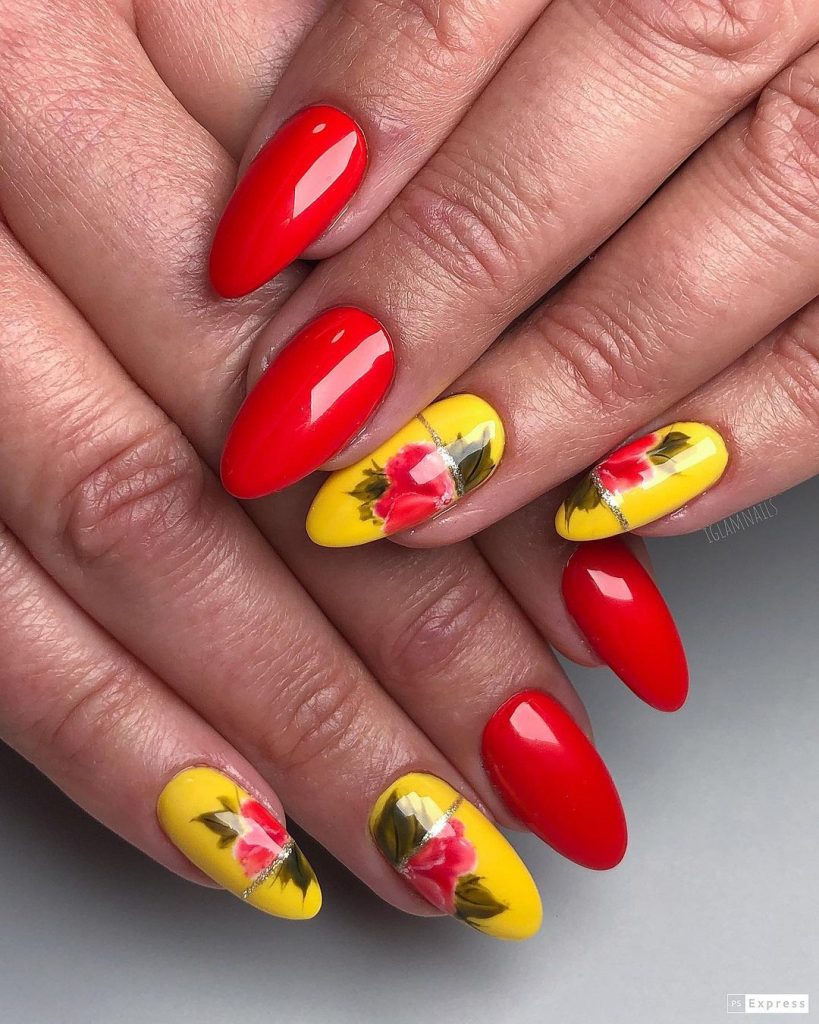
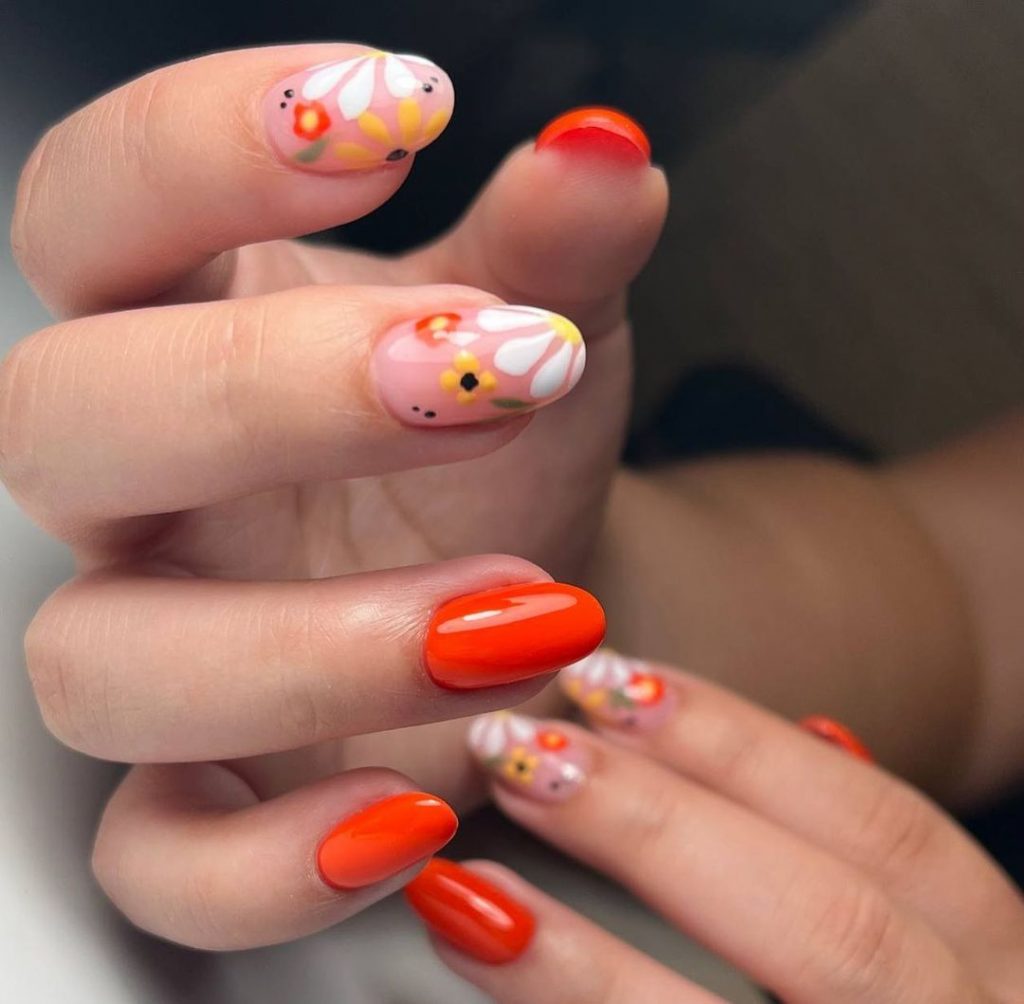
Fall Floral Fiesta with Bold Red and Yellow
The bold contrast of red and yellow in this fall flower nail design is striking. The nail shape is an elegant almond, which elongates the fingers, adding sophistication to the boldness of the colors. Each nail is a mini canvas featuring a vibrant hibiscus flower, reminiscent of a tropical Hawaii sunset. The red base on some nails exudes a warm, fiery energy, while the yellow accent nails, adorned with detailed floral art, bring in the fresh, sunny vibes of early autumn. The design’s 3D effect is subtle but adds just enough dimension to make the flowers pop without overwhelming the look.
Consumables:
-
- Red and Yellow Gel Polishes: OPI GelColor in Big Apple Red and Sun, Sea, and Sand in My Pants.
- Hibiscus Flower Decals: CND Nail Art Decals in Tropical.
- 3D Gel: Born Pretty 3D Nail Gel for added dimension.
- Top Coat: Essie Gel Couture Top Coat for a glossy finish.
DIY Tips:
Creating this simple gel design at home is surprisingly easy. Start by applying a base coat, followed by two layers of red and yellow gel polish on alternating nails. Cure under a UV lamp. Then, carefully place the hibiscus decals on the yellow nails. For added texture, use a 3D gel to outline the flowers. Seal the design with a top coat, and you’re ready to flaunt your floral fall nails!
Playful Pastel Florals on Clear Canvas
This design is all about simplicity and subtle elegance. A clear base allows the delicate floral accents to take center stage, with small white flowers sprinkled across the nails, each surrounded by a faint shimmer of gold. The nails are long and square, giving plenty of room to showcase the intricate details without cluttering the overall look. The pastel tones make this design perfect for anyone looking to keep their nails soft and cute for the fall season while still embracing the floral trend.
Consumables:
-
- Clear Gel Base: OPI GelColor in Bubble Bath.
- Pastel Flower Decals: Moyou London Flower Power Decals in Pastel.
- Gold Glitter Gel: Gelish Gold Glitter for subtle accents.
- Top Coat: Seche Vite Fast Dry Top Coat for a long-lasting finish.
DIY Tips:
To achieve this simple white and pastel floral look at home, start with a clear gel base after prepping your nails. Once cured, carefully apply the small white and pastel flower decals to each nail, ensuring they are evenly spaced for a balanced look. Add a touch of gold glitter gel around the flowers to enhance the design. Finish with a glossy top coat to seal in your design and add extra shine.
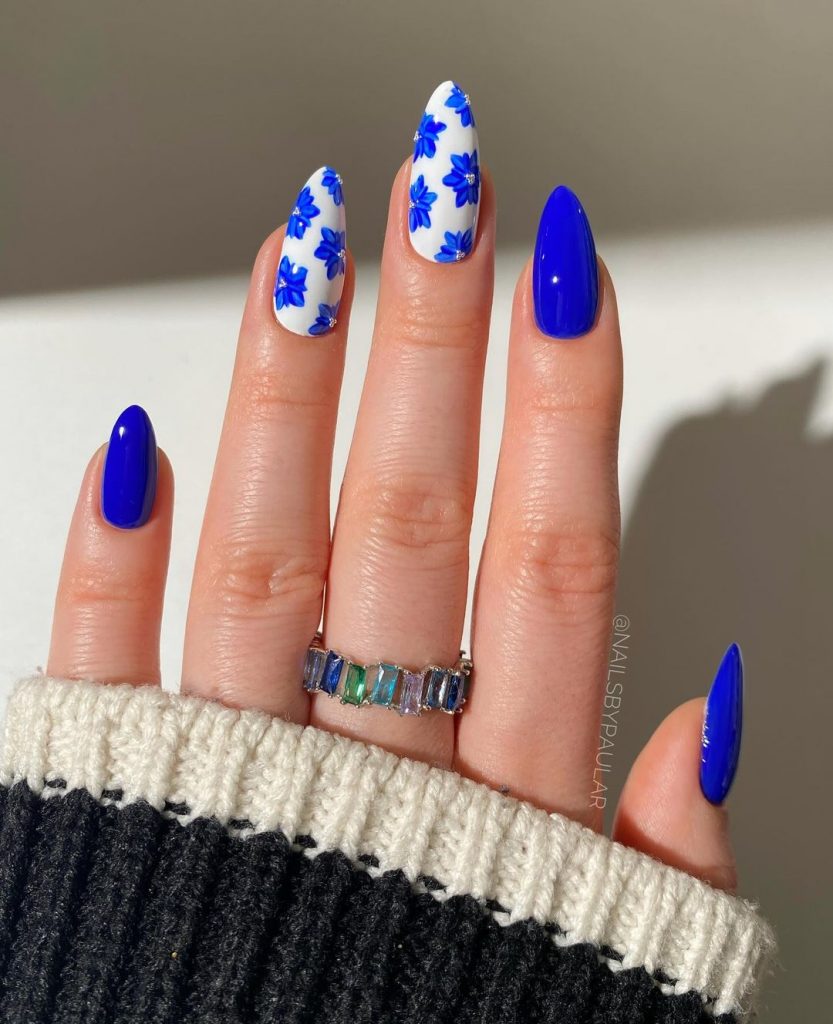
Bold Blue and White Floral Fusion
The striking combination of blue and white in this design is both refreshing and trendy for fall. The almond-shaped nails are painted with a rich, dark blue on some nails, while others are adorned with a simple white base topped with intricate blue floral patterns. This contrast creates a chic yet playful vibe, perfect for making a bold statement this season. The design feels balanced and sophisticated, making it suitable for both everyday wear and special occasions.
Consumables:
-
- Dark Blue Gel Polish: Essie Gel Couture in Bubbles Only.
- White Gel Polish: OPI GelColor in Alpine Snow.
- Blue Floral Stamps: Bundle Monster Floral Nail Stamps in Blue.
- Top Coat: CND Vinylux Weekly Top Coat for lasting durability.
DIY Tips:
To recreate this blue and white floral fusion at home, start with a base coat, then apply dark blue polish to half of your nails and white to the others. After curing, use blue floral stamps on the white nails to add intricate details. Ensure each nail is fully dry before applying a top coat to lock in the design and provide a glossy finish.
Sunny Yellow Florals with a Minimalist Touch
This design is a bright, cheerful take on fall florals, featuring a simple yellow base adorned with large, dried floral accents in a contrasting black outline. The almond shape adds a touch of elegance to this otherwise playful design. The large floral pattern stands out beautifully against the soft yellow, making it perfect for those who love a trendy yet easy design. The use of negative space in this design keeps it looking modern and fresh.
Consumables:
-
- Yellow Gel Polish: Sally Hansen Miracle Gel in Mellow Yellow.
- Black Floral Stickers: Born Pretty Floral Stickers in Black.
- Top Coat: Gelish Top It Off for a smooth finish.
DIY Tips:
To achieve this easy floral design at home, start with a yellow base coat. After curing, carefully place the black floral stickers on each nail, pressing firmly to ensure they adhere well. Finish with a top coat to protect the design and add shine.
Pastel Perfection with Lavender Blooms
Soft and feminine, this design features a delicate mix of purple and pink shades, creating a dreamy, romantic vibe. The almond-shaped nails are painted in a gradient of lavender tones, with small white floral accents scattered across the nails. This design is perfect for those who love a subtle yet beautiful look for fall, blending trendy colors with classic floral elements. The purple base is soothing, while the floral details add just the right amount of charm to make this design stand out.
Consumables:
-
- Lavender Gel Polish: OPI GelColor in Do You Lilac It?
- Pink Gel Polish: Essie Gel Couture in Fairy Tailor.
- White Floral Decals: MoYou London Nail Decals in White.
- Top Coat: Zoya Armor Top Coat for extra protection.
DIY Tips:
Start by applying a lavender gel polish on each nail, followed by a pink polish to create a gradient effect. Once cured, carefully place the small white floral decals on each nail, ensuring they are evenly distributed. Finish with a top coat to seal the design and add a glossy finish that will make the colors pop.
Vibrant Fall Blooms with a Clear Base
This nail design features a colorful array of flowers on a clear base, creating a vibrant and playful look perfect for fall. The nail shape is a soft almond, which complements the lively floral patterns while maintaining a touch of elegance. The mix of bright blue, orange, and red flowers against the transparent background gives the nails a light and airy feel, making them ideal for anyone who loves a trendy and cute nail design that still feels fresh and modern for the season.

Consumables:
-
- Clear Gel Base: OPI GelColor in Clear as Day.
- Flower Decals: Whats Up Nails Tropical Flower Nail Decals.
- Blue, Orange, and Red Gel Polishes: Essie Gel Couture in Bubbles Only (Blue), Tangerine Tease (Orange), and Rock the Runway (Red).
- Top Coat: Seche Vite Fast Dry Top Coat for a high-gloss finish.
DIY Tips:
Start with a clear gel base to give your nails a fresh and clean foundation. After curing, carefully apply the flower decals on each nail, arranging them to create a balanced yet dynamic floral pattern. Add a touch of blue, orange, and red gel polish to enhance the flowers, then finish with a top coat to seal in the design and add shine.
Rich Autumn Tones with Daisies and Glitter
This design is a stunning combination of rich, autumnal colors like deep brown and mustard yellow, accented with a touch of glitter and 3D daisy details. The nail type is long and square, perfect for showcasing the intricate design elements. The neutral beige base contrasts beautifully with the bold brown and glitter accents, while the dried daisy adds a touch of whimsy and elegance. This look is perfect for those who want to embrace the warmth of fall in a trendy and eye-catching way.
Consumables:
-
- Beige, Brown, and Mustard Gel Polishes: CND Shellac in Field Fox (Beige), Fedora (Brown), and Bicycle Yellow (Mustard).
- Glitter Gel Polish: Gelish Glitter in Golden Ticket.
- 3D Daisy Stickers: Born Pretty 3D Daisy Nail Stickers.
- Top Coat: Essie Gel Couture Top Coat for long-lasting shine.
DIY Tips:
Begin by applying the beige base coat to all nails. Once cured, add the brown and mustard gel polish to alternating nails. Use a glitter gel polish on one accent nail for added sparkle. Apply the 3D daisy stickers on the mustard nail, then finish with a top coat to protect the design and ensure a glossy finish.
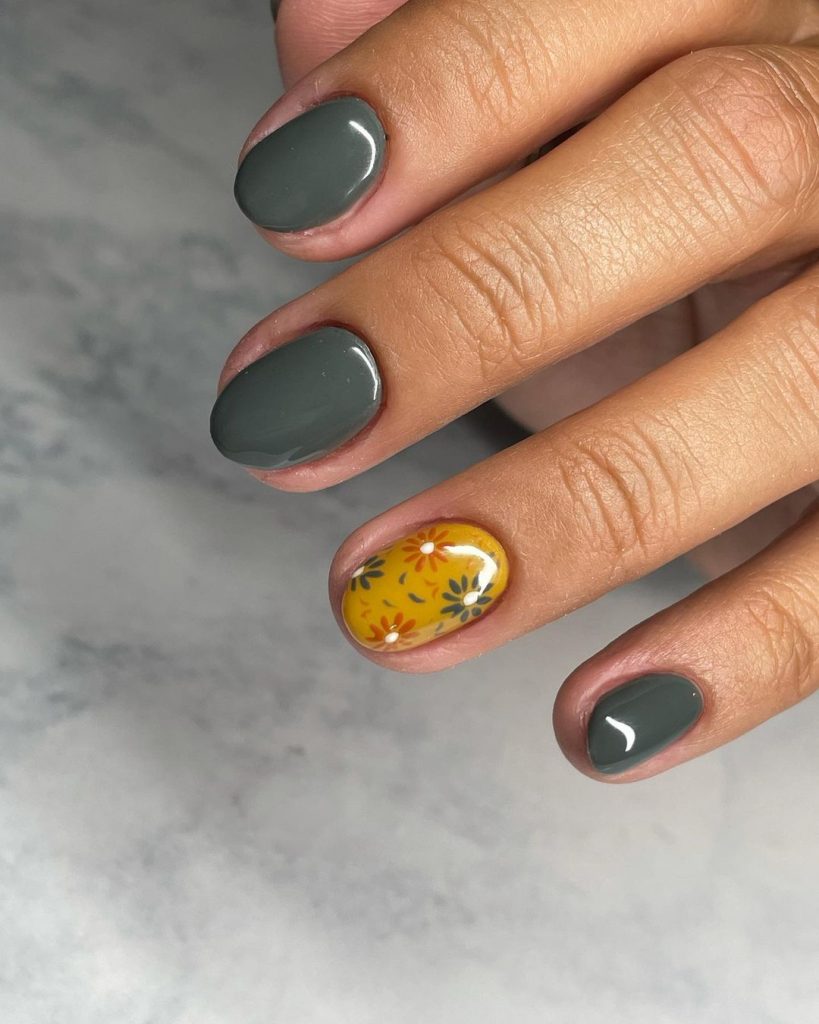
Earthy Tones with Subtle Florals
This design embraces the natural hues of fall with a palette of green, orange, and mustard yellow. The nail shape is short and rounded, making it a practical yet stylish choice for everyday wear. The subtle floral accents on the ring finger add a touch of femininity to this otherwise earthy and grounded design. It’s a great option for those who prefer simple yet sophisticated nail art that captures the essence of autumn.

Consumables:
-
- Green, Orange, and Mustard Gel Polishes: OPI GelColor in Olive for Green, Cajun Shrimp for Orange, and Never a Dulles Moment for Mustard.
- Floral Nail Stickers: MoYou London Flower Power Nail Stickers.
- Top Coat: Zoya Armor Top Coat for extra durability.
DIY Tips:
Apply the green, orange, and mustard gel polishes to your nails, alternating colors for a harmonious blend. Once cured, add the floral stickers to the ring finger for a subtle accent. Finish with a top coat to ensure your design lasts and shines throughout the fall season.
Playful Pastels with Geometric Accents
This design combines playful pastel shades with geometric patterns and floral details, creating a fun and lively look perfect for the fall season. The nails are short and square, which complements the bold color blocks and grid patterns. The mix of blue and yellow with pops of pink and purple makes this design a vibrant choice for those who want to keep their nails looking fresh and stylish. The floral accents add a whimsical touch, tying the whole look together.
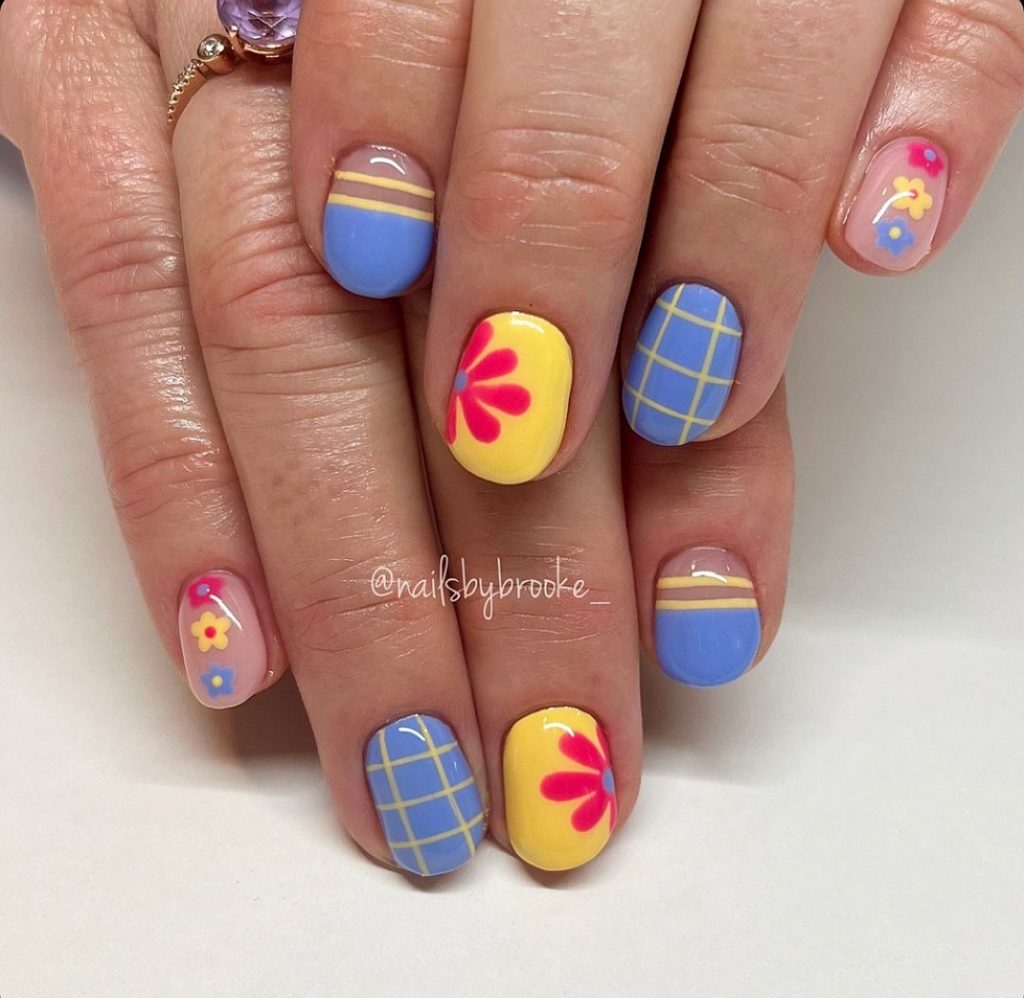
Consumables:
-
- Blue, Yellow, Pink, and Purple Gel Polishes: Essie Gel Couture in Bubbles Only (Blue), Mellow Yellow, Gelato on My Mind (Pink), and Play Date (Purple).
- Geometric Nail Stickers: Whats Up Nails Geometric Nail Art Stickers.
- Floral Decals: CND Floral Decals in Pastel.
- Top Coat: Seche Vite Fast Dry Top Coat for a long-lasting finish.
DIY Tips:
Apply the blue, yellow, pink, and purple gel polishes in blocks on your nails, creating a fun and playful pattern. Use geometric nail stickers to add grid lines or shapes to the design. Finish with a top coat to seal in the design and add a glossy finish that makes the colors pop.
Bold Orange and Floral Combo
This design is a bold and vibrant mix of orange and floral elements, perfect for making a statement this fall. The nail shape is almond, which adds a touch of elegance to the otherwise lively design. The orange base is bright and eye-catching, while the floral accents add a delicate contrast, making the overall look both trendy and playful. The mix of 3D flowers and bold colors is perfect for those who want to stand out this season.
Consumables:
-
- Orange Gel Polish: OPI GelColor in A Good Man-darin is Hard to Find.
- Floral Stickers: Whats Up Nails Floral Nail Stickers.
- 3D Gel: Born Pretty 3D Nail Gel for added dimension.
- Top Coat: CND Vinylux Weekly Top Coat for lasting durability.
DIY Tips:
Start with an orange base coat, applying two layers for full coverage. Once cured, add the floral stickers to accent nails, and use 3D gel to give the flowers dimension. Seal the design with a top coat for a glossy, long-lasting finish.
Soft Orchid Elegance
This delicate nail design embodies a soft and feminine aesthetic, perfect for those who appreciate subtle elegance. The nail shape is a refined almond, which enhances the graceful flow of the design. The base is a sheer, blush pink that allows the intricate white orchid flowers to stand out beautifully. Each orchid is meticulously crafted with fine brush strokes, adding a touch of nature-inspired artistry to the nails. The leaves, painted in gentle pastel greens, complement the flowers, creating a balanced and harmonious look. This design is ideal for anyone seeking a sophisticated and understated fall flower nail design that pairs seamlessly with any outfit.
Consumables:
-
- Sheer Blush Pink Gel Polish: OPI GelColor in Put it in Neutral.
- White Orchid Flower Decals: Whats Up Nails Orchid Nail Art Decals.
- Pastel Green Detailing Gel: Essie Gel Couture in Sage You Love Me.
- Top Coat: Seche Vite Dry Fast Top Coat for a smooth, glossy finish.
DIY Tips:
Start with a sheer blush pink gel polish to create a soft, neutral base. Once cured, apply the orchid flower decals delicately, ensuring they are centered on each nail for balance. Use a detailing brush to add pastel green leaves around the flowers for a more natural look. Finish with a top coat to protect the design and give it a polished, long-lasting shine.
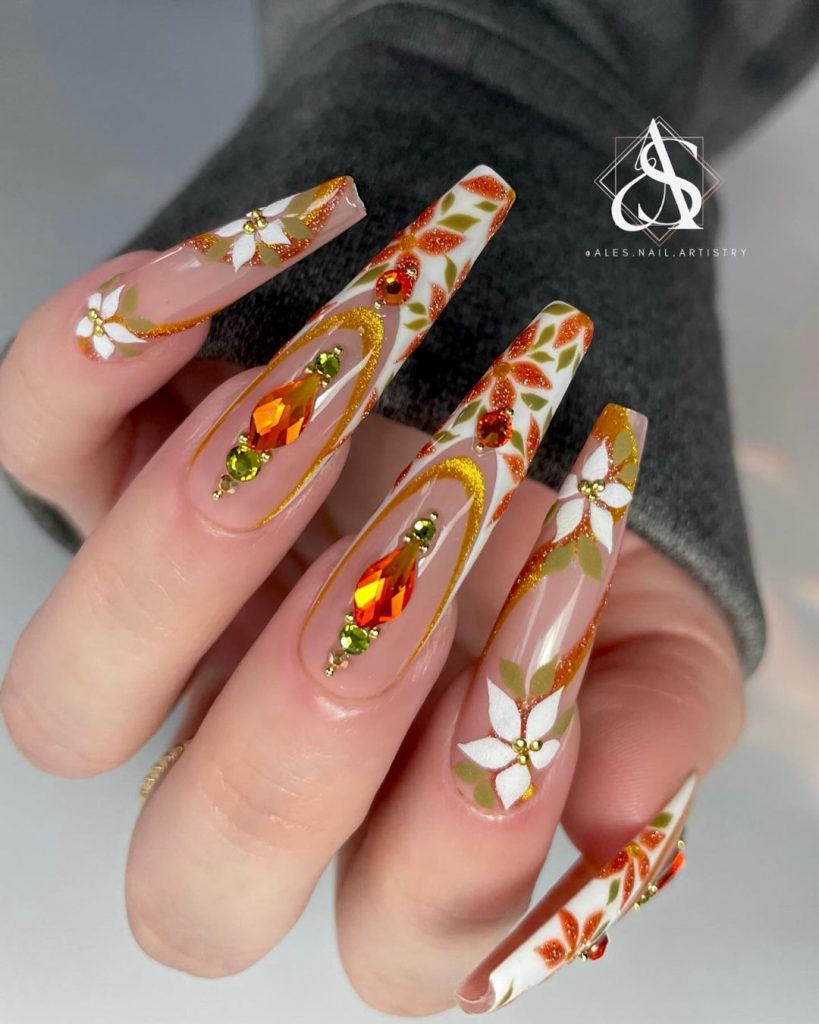
Autumnal Glam with 3D Accents
This bold and intricate design captures the rich and warm tones of autumn, making it a standout choice for the season. The nail type is long and acrylic, offering a perfect canvas to showcase the elaborate details. The base is a soft, transparent nude, allowing the vivid orange, green, and gold tones to take center stage. The nails feature detailed autumn leaves and flowers, painted in vibrant hues that mimic the colors of falling leaves. The addition of 3D elements, including sparkling rhinestones and raised floral accents, adds a touch of luxury and drama, making this design perfect for those who want to make a statement with their nails.
Consumables:
-
- Transparent Nude Gel Polish: OPI GelColor in Bubble Bath.
- Orange, Green, and Gold Gel Polishes: CND Shellac in Marigold, Field Fox, and Locket Love.
- 3D Rhinestones: Swarovski Crystals in Emerald and Topaz.
- Top Coat: Gelish Top It Off for a glossy, durable finish.
DIY Tips:
Begin with a transparent nude base to allow the vibrant fall colors to stand out. Once cured, use fine brushes to paint the autumn leaves and flowers in orange, green, and gold. Add 3D rhinestones to accentuate the design, placing them strategically to highlight the floral elements. Seal the look with a top coat to ensure a glossy, long-lasting finish that will keep your nails looking stunning all season.
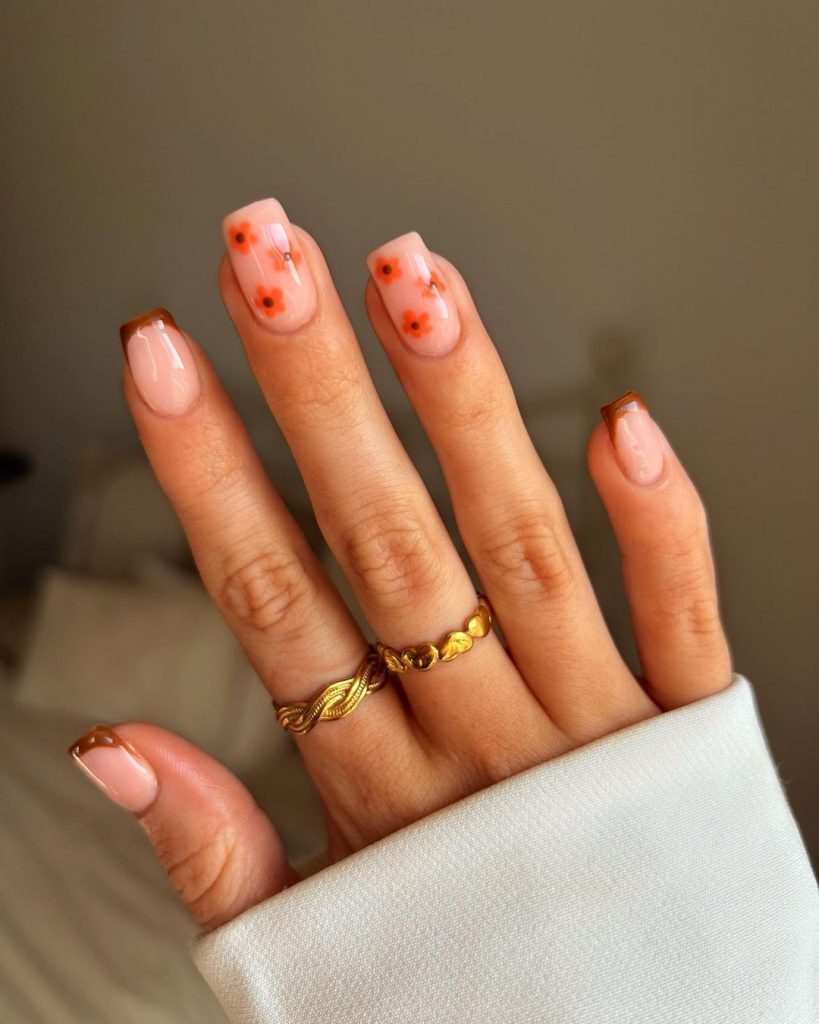
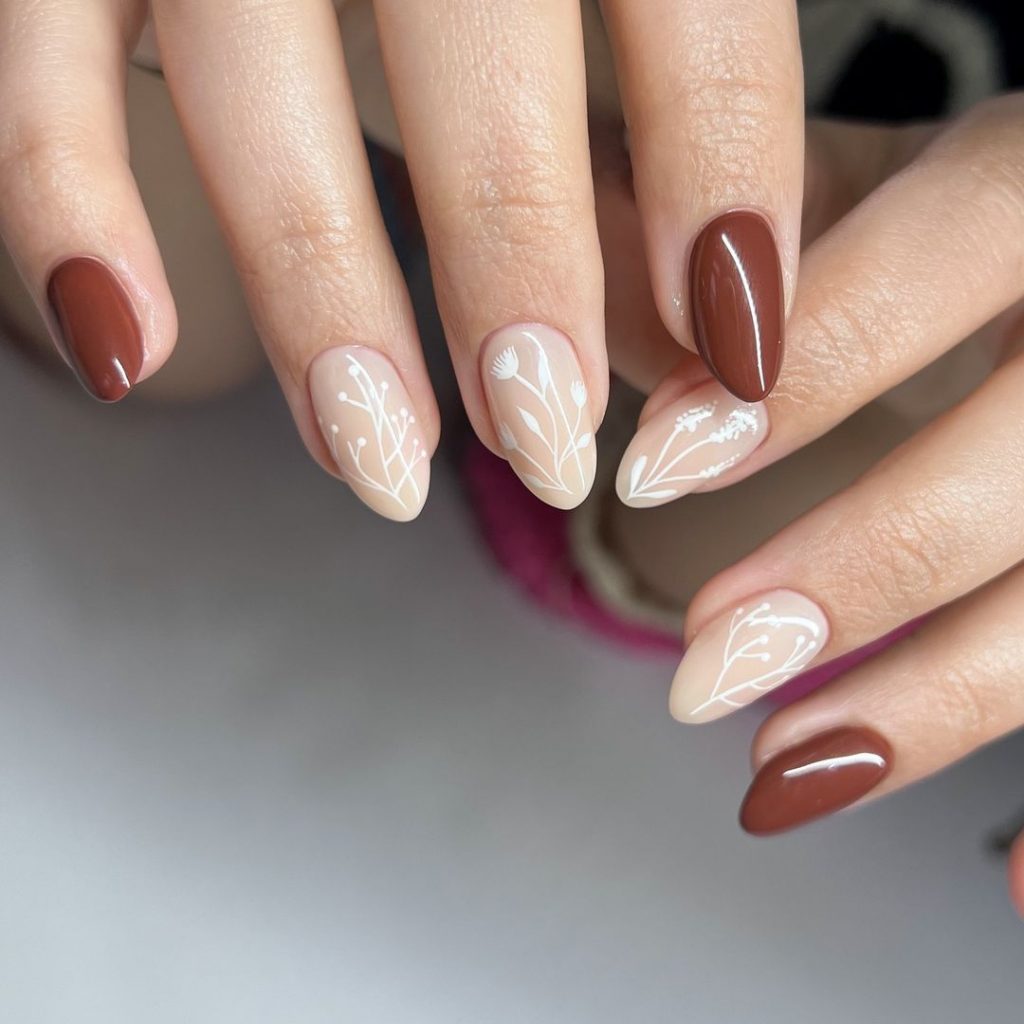
Minimalist Floral with a Twist
This design combines minimalist elegance with a playful touch, making it a versatile option for any fall occasion. The nail shape is short and square, which adds a modern edge to the classic floral theme. The base is a soft nude, providing a clean backdrop for the simple, yet striking, brown French tips and tiny orange flowers. The flowers are small and dainty, adding just the right amount of detail without overwhelming the design. This look is perfect for those who prefer a simple and understated manicure with a touch of autumn flair.
Consumables:
-
- Nude Gel Polish: Essie Gel Couture in Fairy Tailor.
- Brown Gel Polish: OPI GelColor in Espresso Your Inner Self.
- Orange Nail Art Pen: Sally Hansen I Heart Nail Art Pen in Orange.
- Top Coat: Seche Vite Dry Fast Top Coat for a smooth, glossy finish.
DIY Tips:
Start by applying the nude gel polish as a base. Once cured, create the brown French tips using a fine brush or tape for precision. Use an orange nail art pen to add small flowers on the middle and ring fingers. Keep the flowers minimal to maintain the design’s clean and simple aesthetic. Finish with a top coat to protect the design and give it a polished, long-lasting shine.
Earthy Florals with a Pop of Color
This nail design brings together the earthy tones of fall with a vibrant pop of color, creating a harmonious and eye-catching look. The nail shape is short and rounded, making it practical and easy to wear daily. The nails are painted in a rich green with one accent nail featuring a mustard yellow base adorned with tiny dried flowers in orange, white, and dark green. The combination of earthy and bright tones makes this design perfect for those who want to embrace the natural beauty of fall while adding a playful twist.
Consumables:
-
- Green and Mustard Gel Polishes: OPI GelColor in Olive for Green and Never a Dulles Moment for Mustard.
- Dried Flower Stickers: Whats Up Nails Dried Flower Nail Art Stickers.
- Top Coat: CND Vinylux Weekly Top Coat for a durable finish.
DIY Tips:
Apply the green gel polish to most of your nails, leaving one as an accent. Paint the accent nail with the mustard gel polish and cure. Once dry, carefully place the dried flower stickers on the mustard nail, arranging them to create a balanced design. Seal the look with a top coat to protect the flowers and give the nails a glossy finish that will last.
Chic Florals with Neutral Tones
This design is the epitome of chic, combining neutral tones with delicate white floral accents for a sophisticated fall look. The nail shape is almond, which adds an elegant touch to the overall design. The nails are painted in a mix of rich brown and soft beige, with white floral patterns drawn on the beige nails. The simplicity of the colors and the intricacy of the floral designs create a balanced and refined look, perfect for those who prefer a more understated manicure that still makes an impact.
Consumables:
-
- Brown and Beige Gel Polishes: Essie Gel Couture in Spiked with Style and Fairy Tailor.
- White Nail Art Pen: Sally Hansen I Heart Nail Art Pen in White.
- Top Coat: Zoya Armor Top Coat for extra protection.
DIY Tips:
Apply the brown and beige gel polishes to your nails, alternating between the two colors. Once cured, use a white nail art pen to draw delicate floral patterns on the beige nails. The key is to keep the floral designs minimal and elegant. Finish with a top coat to seal the design and give your nails a polished, long-lasting finish that will keep them looking chic throughout the season.
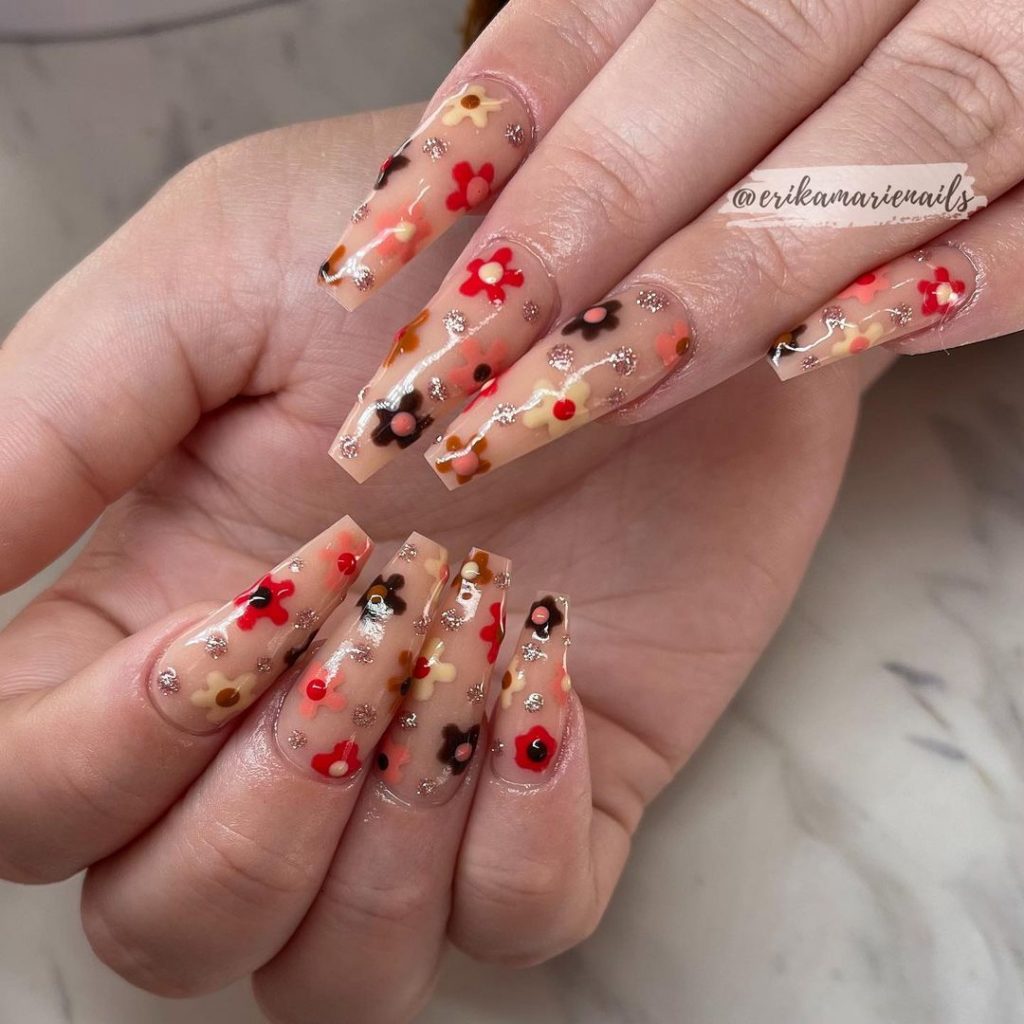
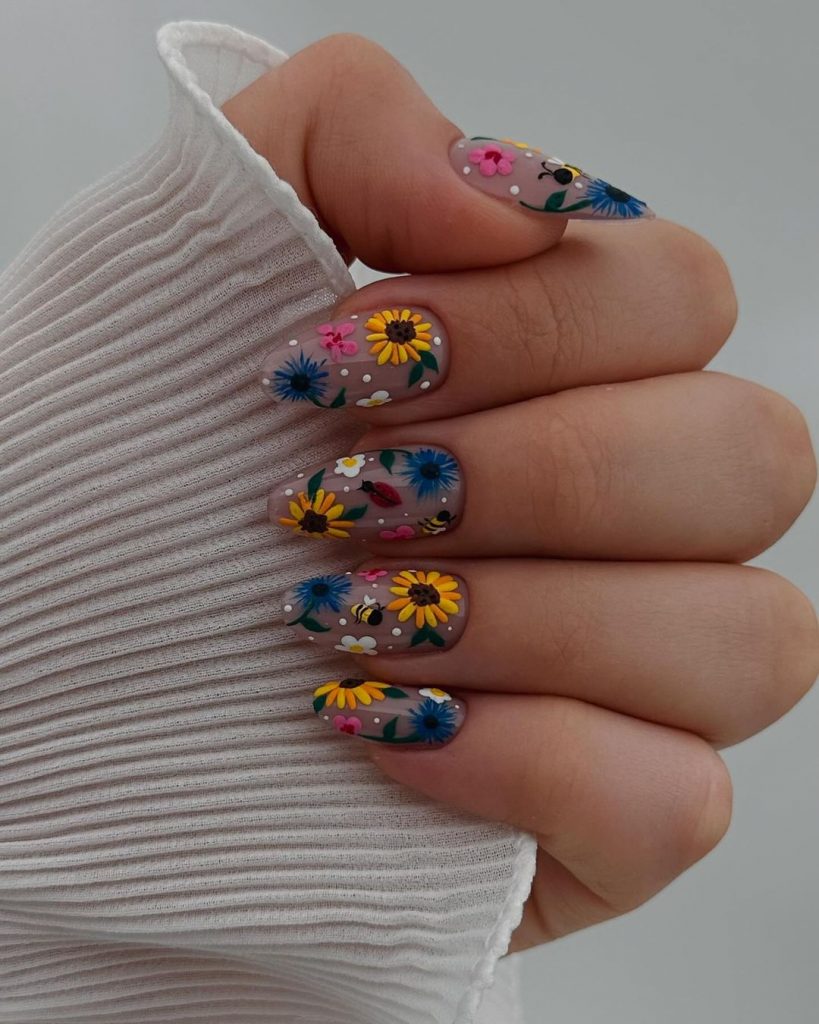
Vibrant Meadow Florals
This vibrant nail design brings a colorful meadow to your fingertips, combining a variety of bright flowers on a neutral base. The nail shape is a short almond, which balances the busy design with a soft, feminine touch. The flowers are painted in vivid yellow, blue, pink, and green hues, each detailed with tiny dots and leaves to create a lively, intricate pattern. This design is perfect for those who love to express their personality through bold, nature-inspired nail art, making it a standout choice for the fall flower nail designs 2024 trend.
Consumables:
-
- Neutral Gel Polish: Essie Gel Couture in Ballet Slippers.
- Yellow, Blue, Pink, and Green Nail Art Pens: Sally Hansen I Heart Nail Art Pens in corresponding colors.
- Top Coat: OPI GelColor Top Coat for added shine and durability.
DIY Tips:
Start with a neutral gel polish as the base to allow the colorful flowers to stand out. Use nail art pens to draw the flowers in various yellow, blue, pink, and green shades, adding small details like dots and leaves for a more intricate design. Finish with a top coat to protect your artwork and give it a glossy finish.
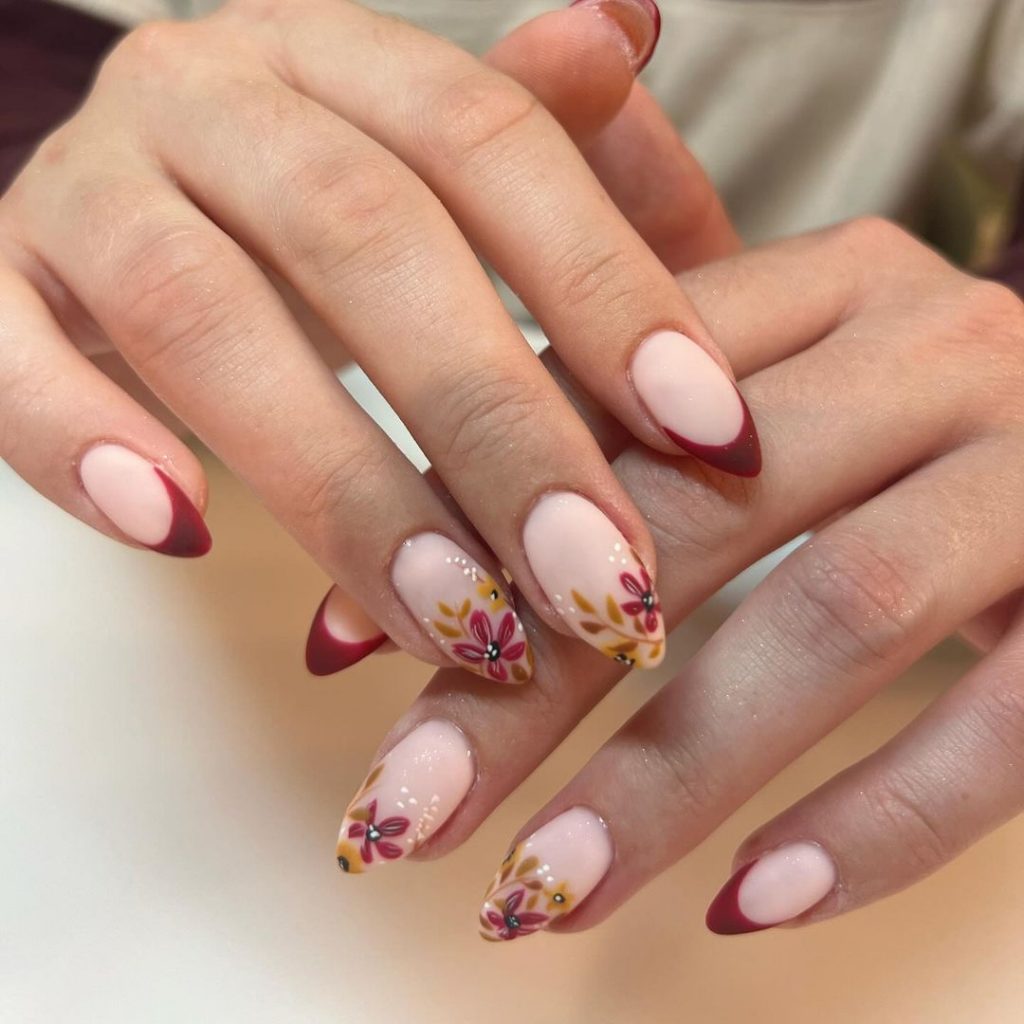
Burgundy Elegance with Floral Accents
This elegant design combines the richness of burgundy with delicate floral accents, making it perfect for the fall season. The nail shape is almond, which adds sophistication to the overall look. The nails feature deep burgundy French tips, complemented by yellow and pink flowers on a nude base. The floral accents are detailed and strategically placed to enhance the elegance of the design without overpowering the nails. This look is ideal for those seeking a refined, trendy manicure with a touch of natural beauty.
Consumables:
-
- Nude Gel Polish: OPI GelColor in Samoan Sand.
- Burgundy Gel Polish: Essie Gel Couture in Bordeaux.
- Yellow and Pink Nail Art Pens: Sally Hansen I Heart Nail Art Pens in corresponding colors.
- Top Coat: Seche Vite Dry Fast Top Coat for a smooth, glossy finish.
DIY Tips:
Begin by applying a nude gel polish to your nails, then create burgundy French tips using a fine brush or French tip stickers. Once cured, add the yellow and pink floral accents with nail art pens, focusing on the lower half of the nails to create a balanced, elegant design. Finish with a top coat to seal in the design and add shine.
Matte Florals with Bold Contrasts
This design is a modern take on fall florals, featuring a matte finish with bold black and orange accents. The nail shape is short and square, making it a practical yet stylish choice. The nails are painted in a matte, muted brown, while the accent nails feature black leaves and orange flowers on a white base. The contrast between the matte and glossy finishes, as well as the bold colors, creates a striking and contemporary look that’s perfect for those who want to make a statement this fall.
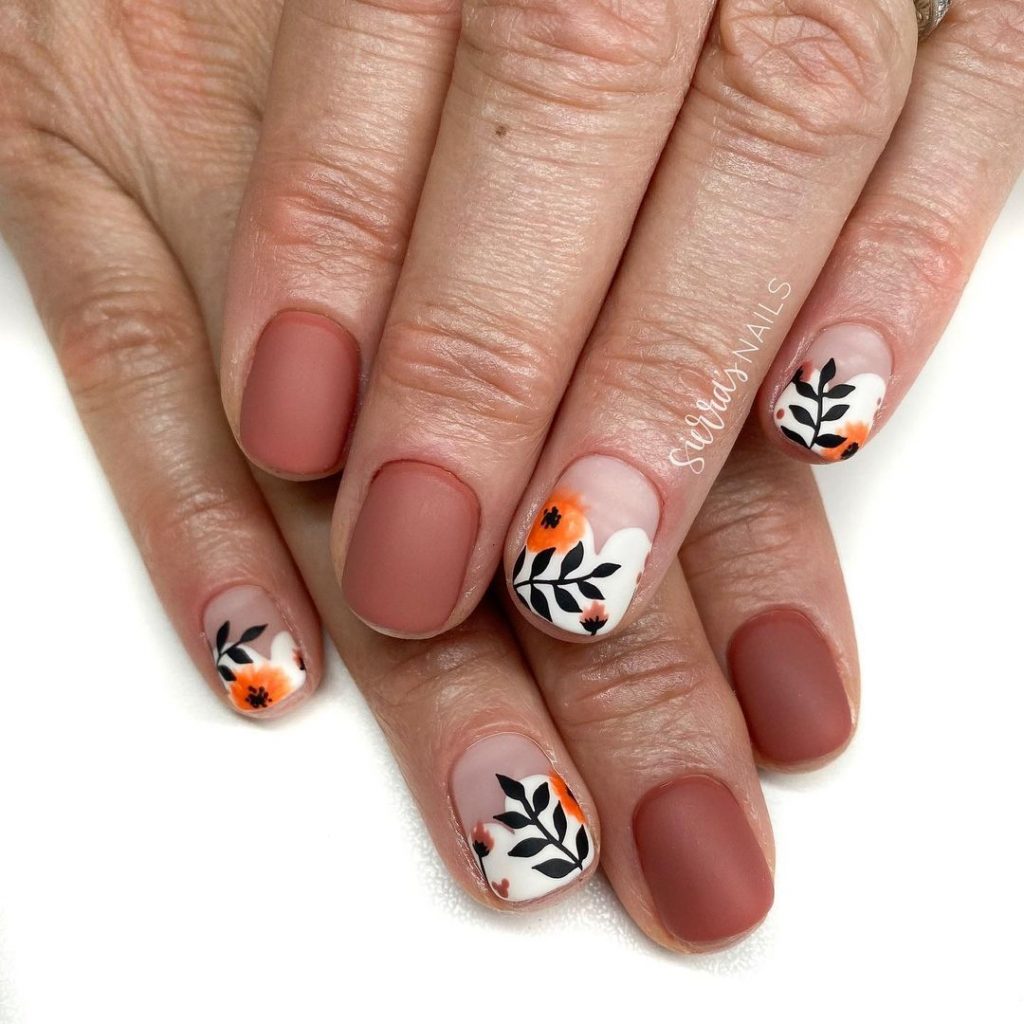
Consumables:
-
- Matte Brown Gel Polish: OPI GelColor in Squeaker of the House.
- White Gel Polish: Essie Gel Couture in Blanc.
- Black and Orange Nail Art Pens: Sally Hansen I Heart Nail Art Pens in corresponding colors.
- Matte Top Coat: Essie Matte About You Top Coat for a matte finish.
DIY Tips:
Start by applying the matte brown gel polish to most of your nails, leaving a few as accent nails. Paint the accent nails with a white gel polish and cure. Use black and orange nail art pens to create the floral patterns, ensuring a balanced yet bold design. Finish with a matte top coat to complete the look.
Soft Lilac Florals with Glitter Accents
This delicate design combines soft lilac shades with floral accents and a touch of glitter, creating a dreamy, romantic look. The nail shape is almond, which enhances the feminine and elegant feel of the design. The nails are painted in a soft lilac with some accent nails featuring white and purple flowers, highlighted with subtle glitter accents. This design is perfect for those who want a gentle, cute manicure that still catches the eye.
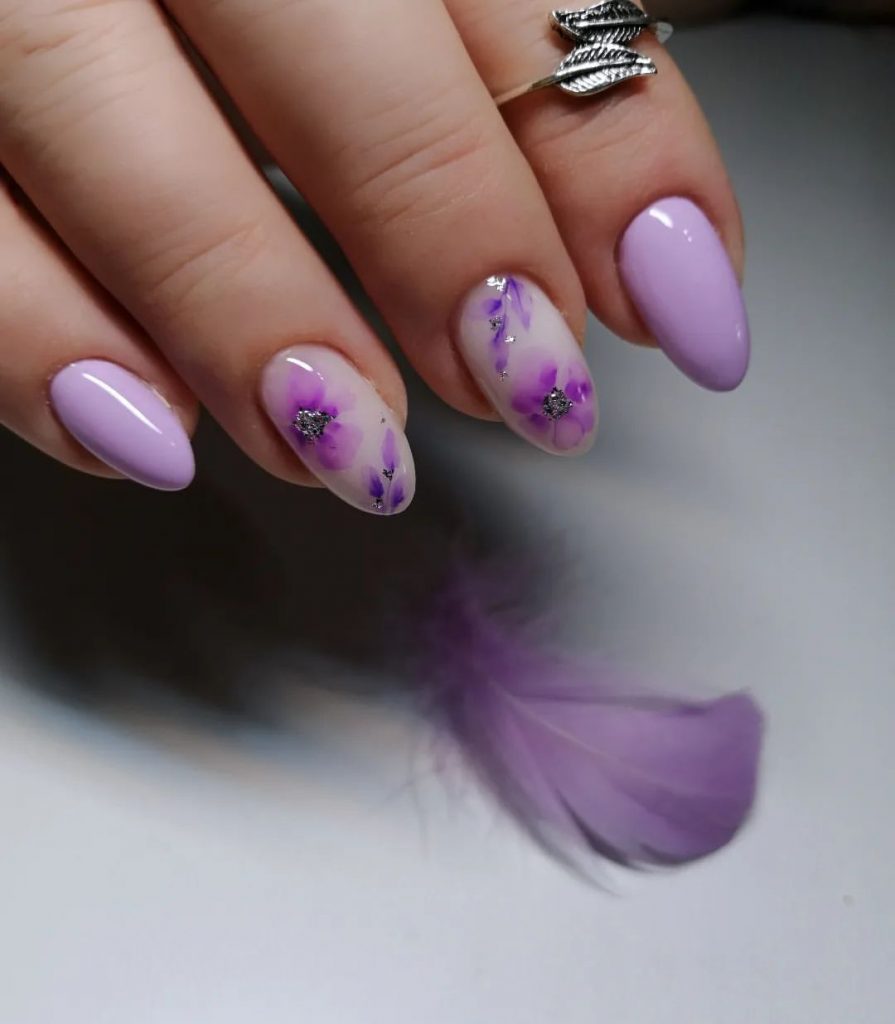
Consumables:
-
- Lilac Gel Polish: Essie Gel Couture in Go Ginza.
- White and Purple Nail Art Pens: Sally Hansen I Heart Nail Art Pens in corresponding colors.
- Glitter Gel: CND Additive in Sparkling Shimmer.
- Top Coat: CND Vinylux Weekly Top Coat for lasting durability.
DIY Tips:
Apply the lilac gel polish as the base and cure. Use the nail art pens to draw delicate white and purple flowers on the accent nails. Add a touch of glitter to the flowers for a bit of sparkle, and finish with a top coat to protect the design and ensure it lasts.
Dried Flower Elegance
This unique design incorporates real dried flowers into the nails, creating a look that is both natural and artistic. The nail shape is short and rounded, which keeps the design grounded and wearable. The nails feature a clear base with dried flowers in various colors, including purple, yellow, and green, arranged artfully to create a cohesive and organic look. This design is perfect for those who appreciate the beauty of nature and want to carry a piece of it with them.
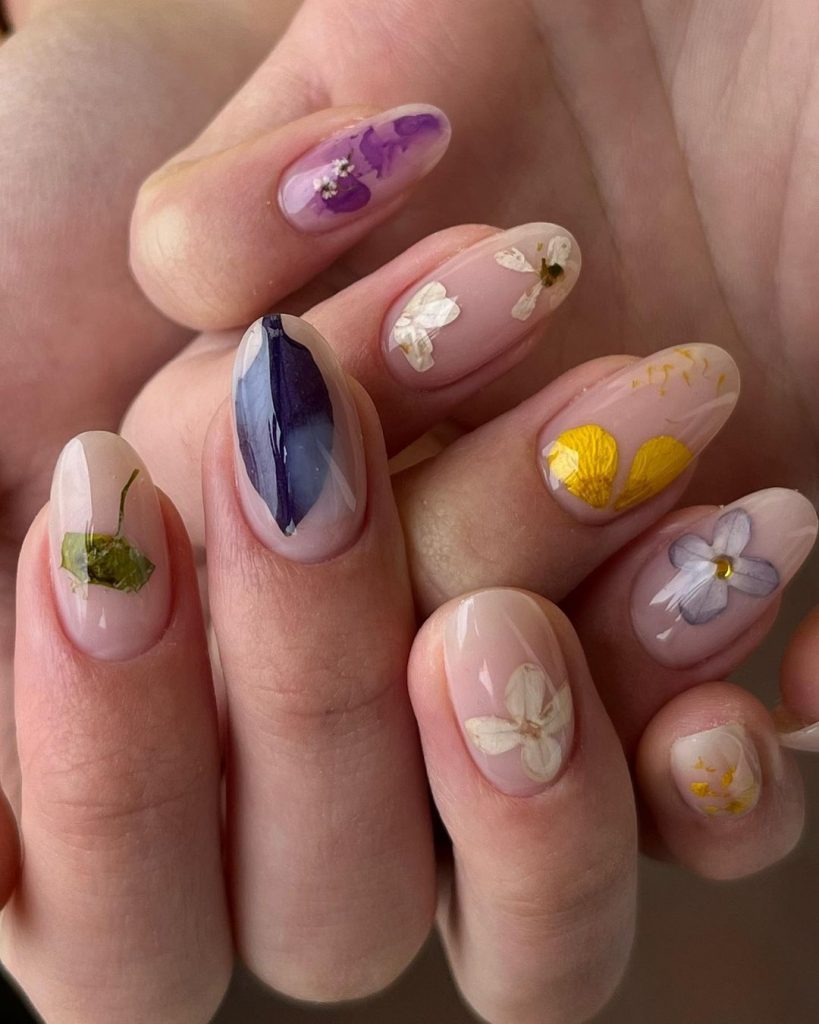
Consumables:
-
- Clear Gel Polish: OPI GelColor in Clear as Day.
- Dried Flower Stickers: Whats Up Nails Dried Flower Nail Art Stickers.
- Top Coat: Seche Vite Dry Fast Top Coat for a smooth, glossy finish.
DIY Tips:
Start with a clear gel polish to create a transparent base. Carefully place the dried flower stickers on each nail, arranging them to create a balanced and natural look. Finish with a top coat to protect the delicate flowers and add a glossy finish.
Fall Floral and Glitter Fusion
This stunning nail design is a perfect blend of fall-inspired florals and dazzling glitter, making it ideal for those who love a bit of sparkle. The nail shape is long and square, providing ample space to showcase the intricate details. The design features deep brown hues, paired with rich florals in warm tones, and accent nails covered in chunky glitter with a mix of gold and burgundy. This combination creates a luxurious and festive look, perfect for the autumn season.

Consumables:
-
- Brown Gel Polish: OPI GelColor in Espresso Your Inner Self.
- Floral Nail Decals: Whats Up Nails Autumn Floral Nail Stickers.
- Chunky Glitter Gel: CND Additive in Gold and Burgundy Sparkle.
- Top Coat: Gelish Top It Off for a glossy, durable finish.
DIY Tips:
Start by applying the deep brown gel polish to most of your nails. Use the floral decals to create a detailed and artistic accent nail. For the glitter nails, apply a clear gel polish and sprinkle on the chunky glitter, ensuring even coverage. Seal the entire look with a top coat to add shine and protect your design.
Neutral Elegance with Floral Detail
This elegant nail design features neutral tones with a touch of floral detail, perfect for those who prefer a sophisticated and understated look. The nail shape is almond, which adds a graceful touch to the overall design. The nails are painted in a mix of nude, brown, and black, with one accent nail showcasing a delicate floral design in black and silver. The addition of a thin glitter stripe on another nail adds just the right amount of sparkle to elevate the design.
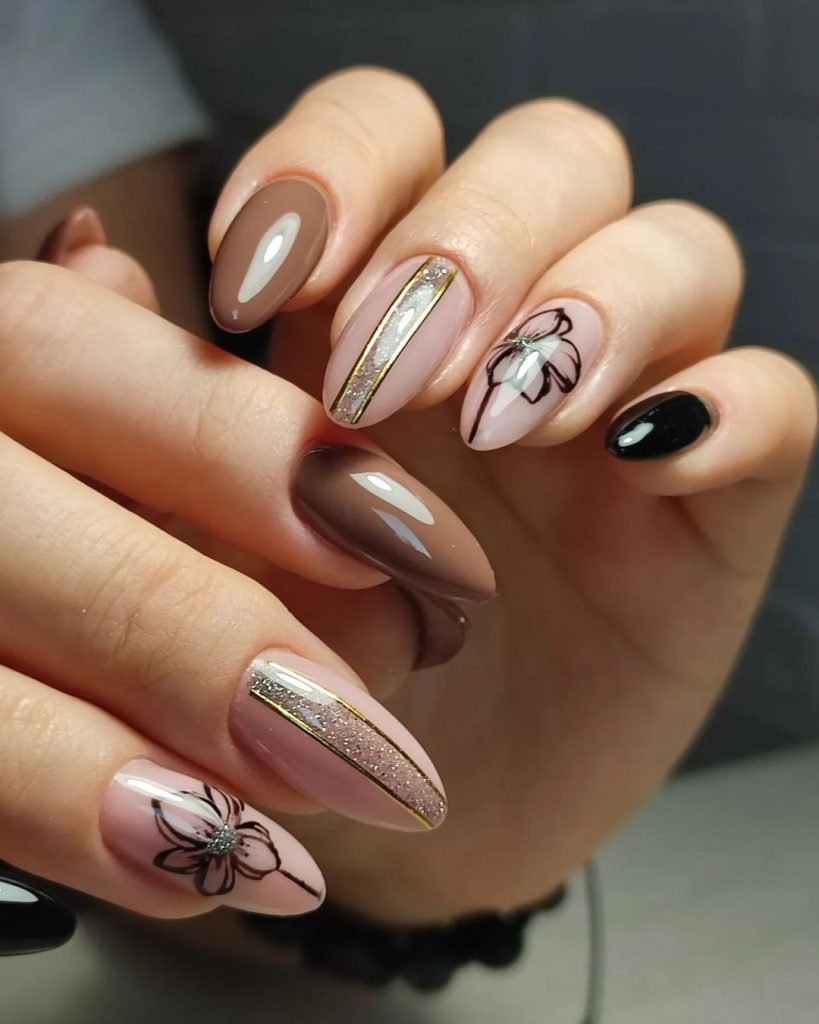
Consumables:
-
- Nude and Brown Gel Polishes: Essie Gel Couture in Fairy Tailor and Spiked with Style.
- Black Gel Polish: OPI GelColor in Black Onyx.
- Silver Glitter Gel: CND Additive in Silver Sparkle.
- Top Coat: Essie Gel Couture Top Coat for a lasting finish.
DIY Tips:
Apply the nude, brown, and black gel polishes to your nails, alternating colors for a balanced look. Use a thin brush to create a floral design on one nail with the black polish, adding silver glitter accents for a subtle shine. Finish with a top coat to protect your design and ensure a long-lasting manicure.
Artistic Floral French Tips
This nail design is a creative twist on the classic French manicure, incorporating colorful floral elements. The nail shape is short and square, making it practical and versatile. The design features nude nails with French tips that blend vibrant greens, blues, and pinks, creating a watercolor effect. Each nail is adorned with delicate floral patterns, adding an artistic touch that is perfect for those who love unique and eye-catching nail art.
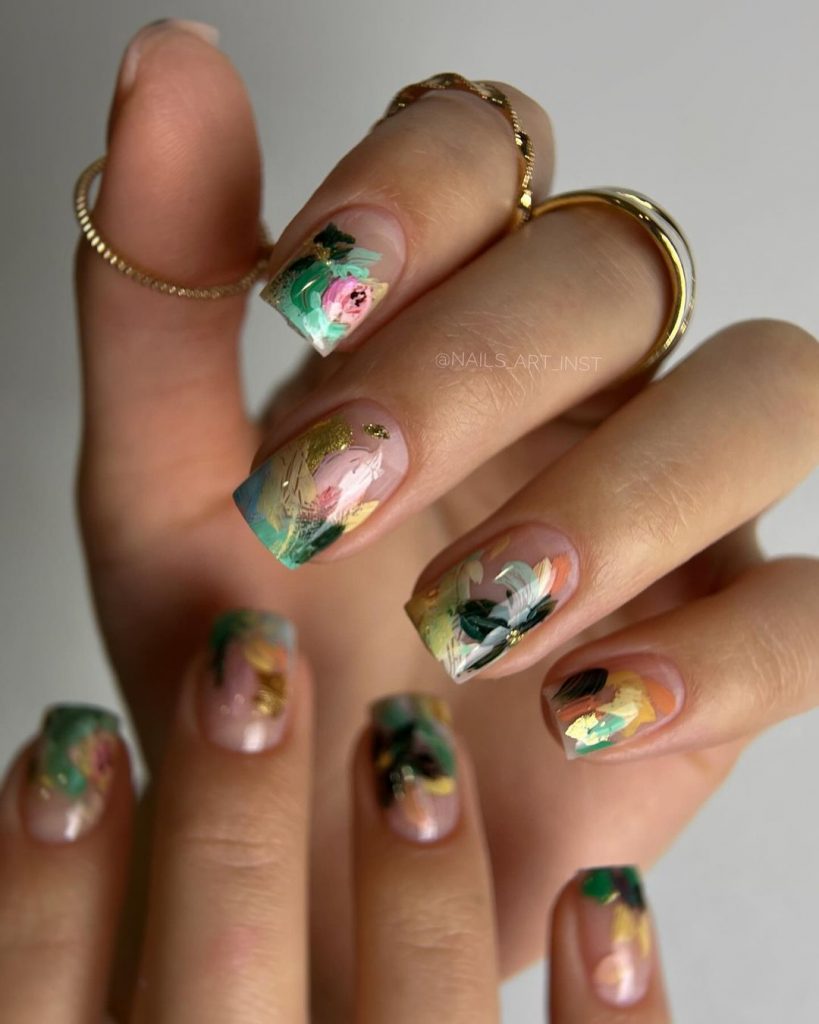
Consumables:
-
- Nude Gel Polish: OPI GelColor in Bubble Bath.
- Green, Blue, and Pink Gel Polishes: CND Shellac in Mint Convertible, Creekside, and Hot Pop Pink.
- Floral Nail Decals: Whats Up Nails Watercolor Flower Nail Stickers.
- Top Coat: Seche Vite Dry Fast Top Coat for a glossy finish.
DIY Tips:
Start with a nude gel polish base, then use a sponge to apply the green, blue, and pink polishes to the tips, creating a soft, blended effect. Apply the floral decals over the tips, ensuring they blend seamlessly with the colors. Finish with a top coat to seal the design and add shine.
Dark Florals with a Modern Edge
This nail design combines dark, moody colors with delicate florals, making it perfect for the fall season. The nail shape is almond, adding a sleek and modern edge to the design. The nails are painted in a deep gray, almost black, with intricate purple flowers that add a pop of color. The design is both elegant and contemporary, ideal for those who want to embrace the dark, mysterious vibes of autumn while still maintaining a touch of femininity.
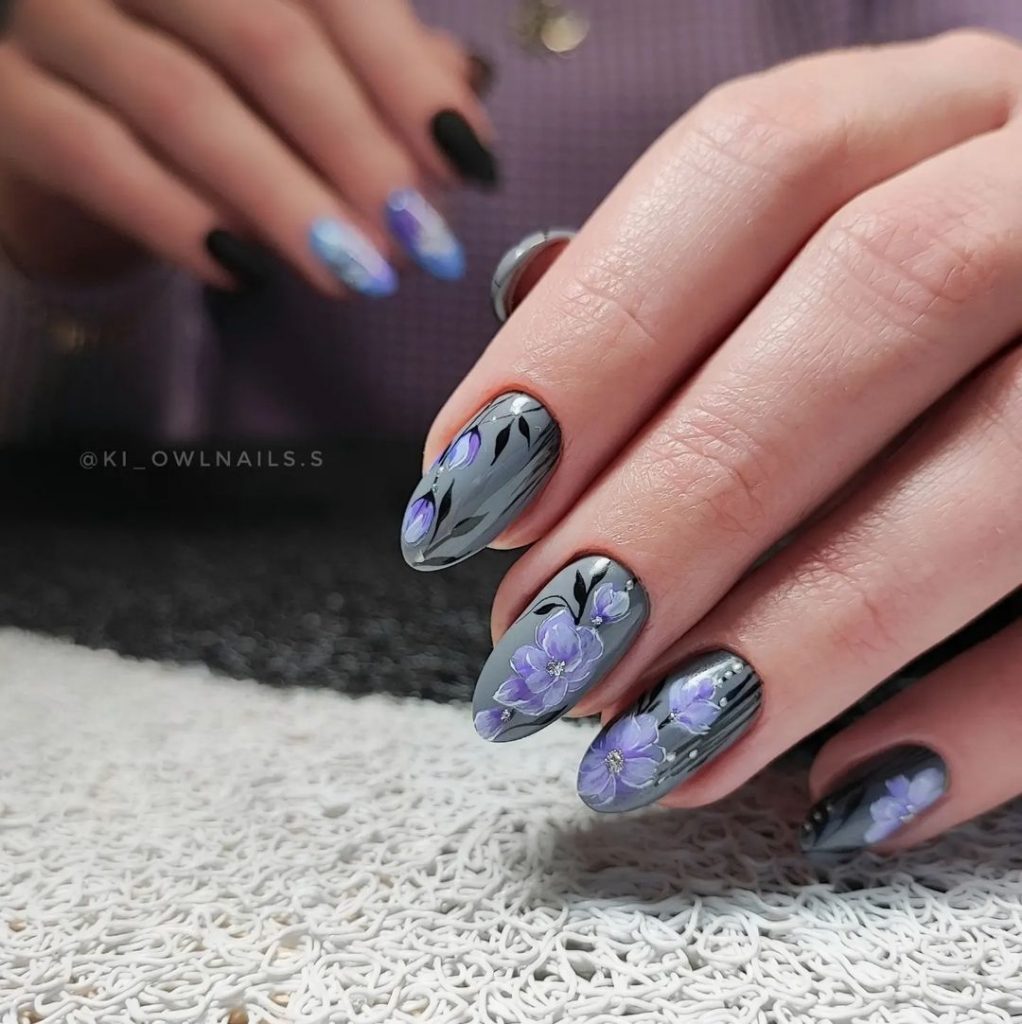
Consumables:
-
- Gray Gel Polish: Essie Gel Couture in Twill Seeker.
- Purple and Black Nail Art Pens: Sally Hansen I Heart Nail Art Pens in corresponding colors.
- Top Coat: Zoya Armor Top Coat for extra protection.
DIY Tips:
Apply the deep gray gel polish as a base and cure. Use nail art pens to draw delicate purple flowers on each nail, adding black leaves and details to complete the look. Finish with a top coat to seal the design and give it a polished, long-lasting finish.
Sunny Florals with a Pop of Yellow
This cheerful nail design is all about bright, sunny vibes, featuring bold yellow nails with floral accents. The nail shape is short and square, making it a practical yet stylish choice. Most nails are painted in a vibrant yellow, while the accent nails feature a beige base with black and yellow floral patterns. This design is perfect for those who want to add a bit of sunshine to their fall look while keeping it cute and playful.
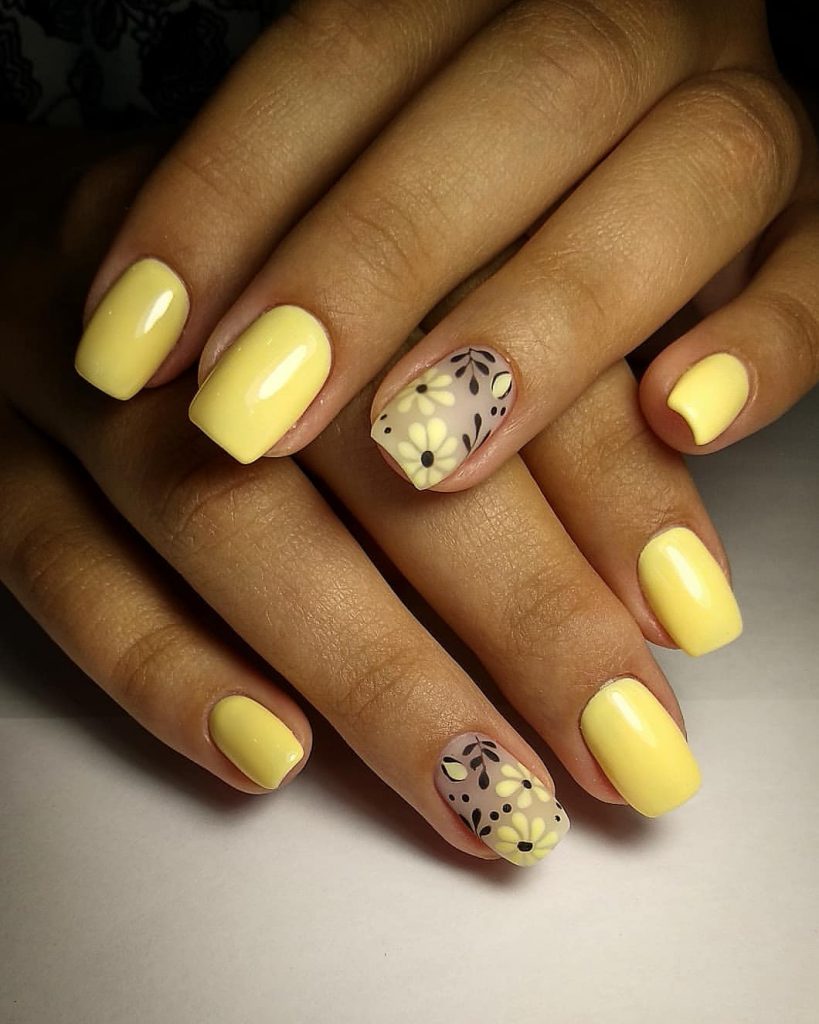
Consumables:
-
- Yellow Gel Polish: OPI GelColor in Sun, Sea, and Sand in My Pants.
- Beige Gel Polish: Essie Gel Couture in Fairy Tailor.
- Black and Yellow Nail Art Pens: Sally Hansen I Heart Nail Art Pens in corresponding colors.
- Top Coat: Essie Gel Couture Top Coat for a lasting finish.
DIY Tips:
Apply the yellow gel polish to most of your nails, leaving one or two as accent nails. Paint the accent nails with the beige polish and cure. Use black and yellow nail art pens to draw floral patterns on the accent nails, adding a touch of contrast and detail. Finish with a top coat to protect your design and ensure it stays vibrant.
Bold Red with Floral Accent
This striking nail design features bold red nails with a single floral accent, making it perfect for those who love a classic yet eye-catching look. The nail shape is short and square, which keeps the design sleek and modern. Most nails are painted in a rich red, while the accent nail features a delicate pink flower with green leaves on a clear base. This design is ideal for anyone looking to make a statement with their nails while still keeping it simple and elegant.
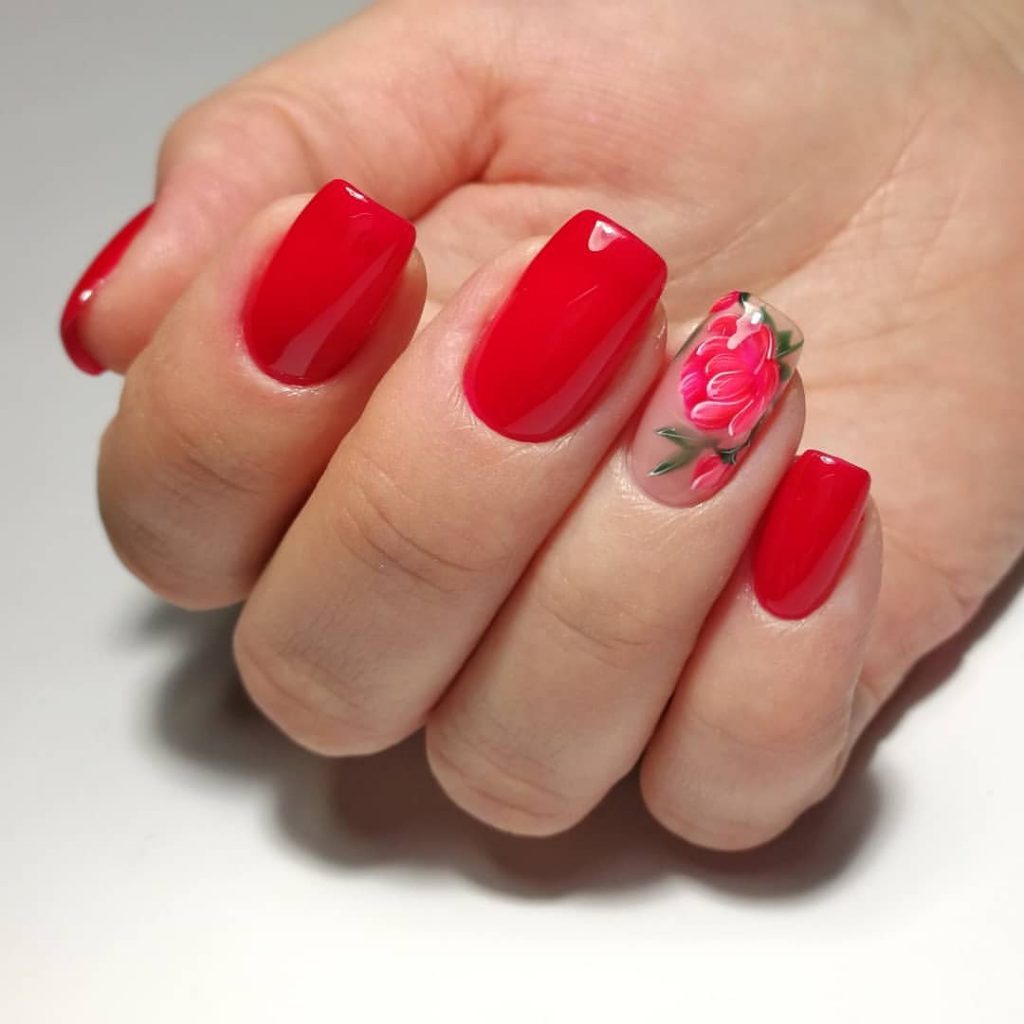
Consumables:
-
- Red Gel Polish: OPI GelColor in Big Apple Red.
- Green and Pink Nail Art Pens: Sally Hansen I Heart Nail Art Pens in corresponding colors.
- Top Coat: Seche Vite Dry Fast Top Coat for a glossy finish.
DIY Tips:
Start by applying the red gel polish to most of your nails. For the accent nail, use a clear base and draw a delicate pink flower with green leaves using nail art pens. Finish with a top coat to protect the design and add a beautiful, long-lasting shine.
Save Pin