When it comes to preparing for your wedding day, every detail matters, and your nails are no exception. Whether you’re the bride, bridesmaid, or a guest, your manicure can make a statement and complement your overall look. Fall 2024 brings an array of stunning nail designs that are perfect for the season, with rich hues, elegant art, and sophisticated finishes. So, what are the must-have nail styles for your fall wedding? Let’s dive into the top trends and ideas that will leave your nails looking flawless.
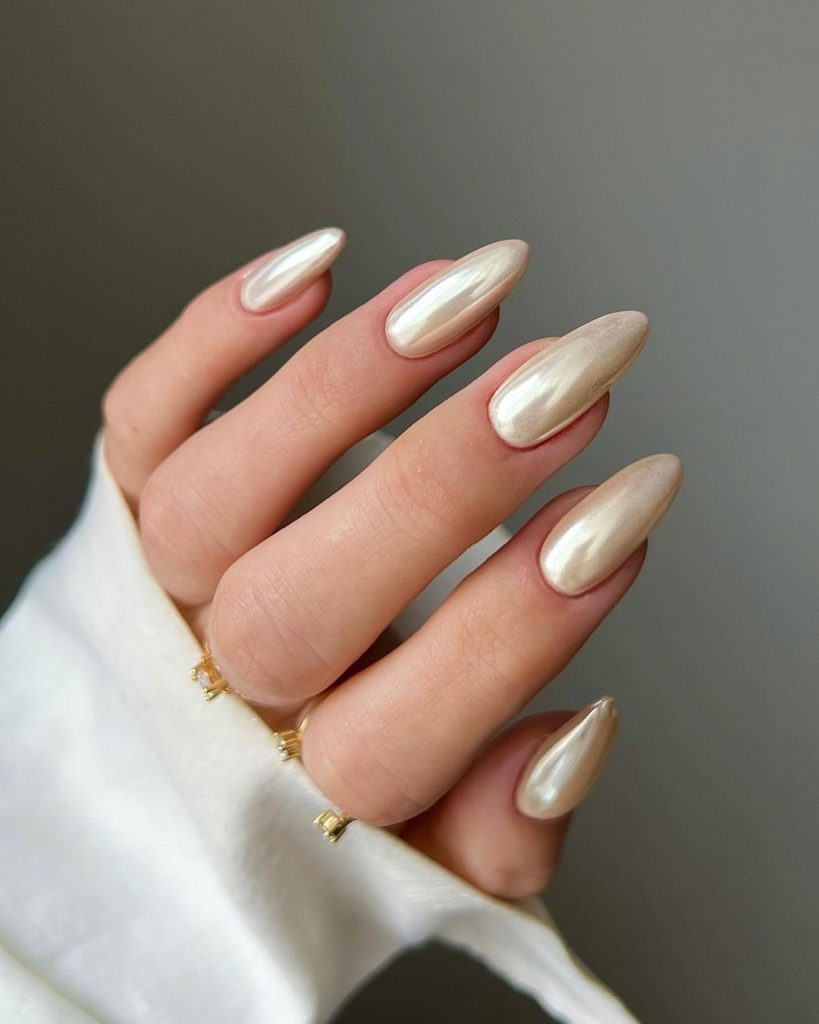
Elegant Pearl Shine: The Ultimate Bride’s Choice
For the bride who wants to radiate elegance on her special day, a pearl-shine manicure is an exquisite choice. This design is all about sophistication, with a soft, glossy finish that catches the light beautifully. The almond shape adds a timeless feel, while the delicate application of pearls or subtle sparkles enhances the overall bridal look. It’s perfect for a bride who appreciates a classy, understated style.

Consumables for Elegant Pearl Shine:
- Base Coat: OPI Nail Envy Strengthener.
- Nail Polish: Essie Gel Couture in “Sheer Fantasy.”
- Pearls: Daily Charme Micro Pearls.
- Top Coat: Seche Vite Dry Fast Top Coat.
DIY Steps for Elegant Pearl Shine:
- Prep the Nails: Start by applying the OPI Nail Envy Strengthener as a base coat to protect your nails.
- Apply the Color: Apply two thin coats of Essie Gel Couture in “Sheer Fantasy” for that perfect pearly shade.
- Add Pearls: Using a fine brush, apply a tiny amount of clear polish where you want to place the pearls, and then gently press the pearls onto the wet polish.
- Seal the Look: Finish with Seche Vite Dry Fast Top Coat to lock in the pearls and give your nails a lasting shine.
Whimsical Garden: A Dreamy Bridesmaid Look
For bridesmaids who want to embrace the fall season while adding a touch of whimsy, this nail design is a dream come true. The soft greens and neutral tones evoke the earthy feel of autumn, while the delicate floral art adds a fresh and feminine touch. The almond shape is flattering and elongates the fingers, making it a versatile option for bridesmaids of all styles.
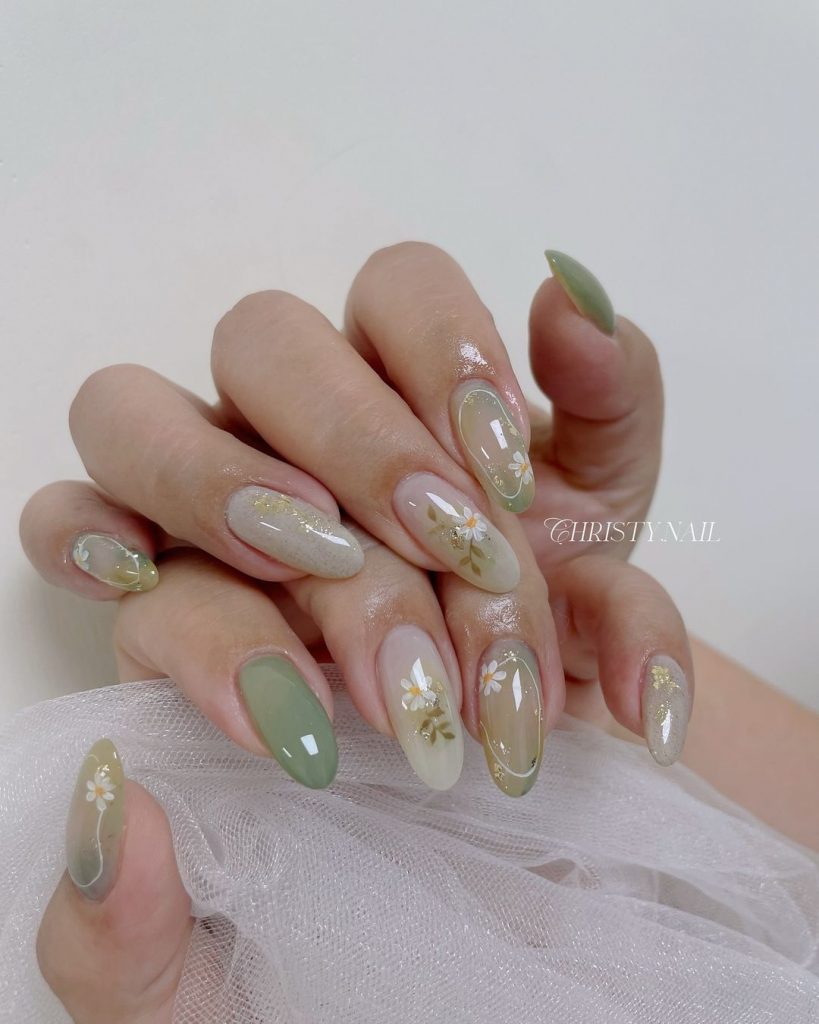
Consumables for Whimsical Garden:
- Base Coat: Orly Bonder Rubberized Basecoat.
- Nail Polish: Sally Hansen Miracle Gel in “Leaf Me Be” and “Bare Dare.”
- Floral Stickers: Dashing Diva Flower Power Stickers.
- Top Coat: CND Vinylux Weekly Top Coat.
DIY Steps for Whimsical Garden:
- Base Coat Application: Begin with Orly Bonder Rubberized Basecoat to ensure the polish adheres well and lasts.
- Polish Application: Apply “Leaf Me Be” to alternate nails and “Bare Dare” to the others, using two coats for full opacity.
- Apply Stickers: Once the polish is dry, carefully place the Dashing Diva Flower Power Stickers on the desired nails.
- Seal the Design: Finish with CND Vinylux Weekly Top Coat to protect the design and give it a beautiful shine.
Soft Pink Marble: A Timeless Guest Manicure
Guests at a fall wedding can never go wrong with a soft pink marble design. This nail art combines subtlety with sophistication, making it ideal for a formal event. The marbling effect, with hints of gold leaf, adds a luxurious feel without overpowering the rest of your outfit. The shorter length keeps it chic and practical, perfect for a guest who wants to look put-together without stealing the spotlight.
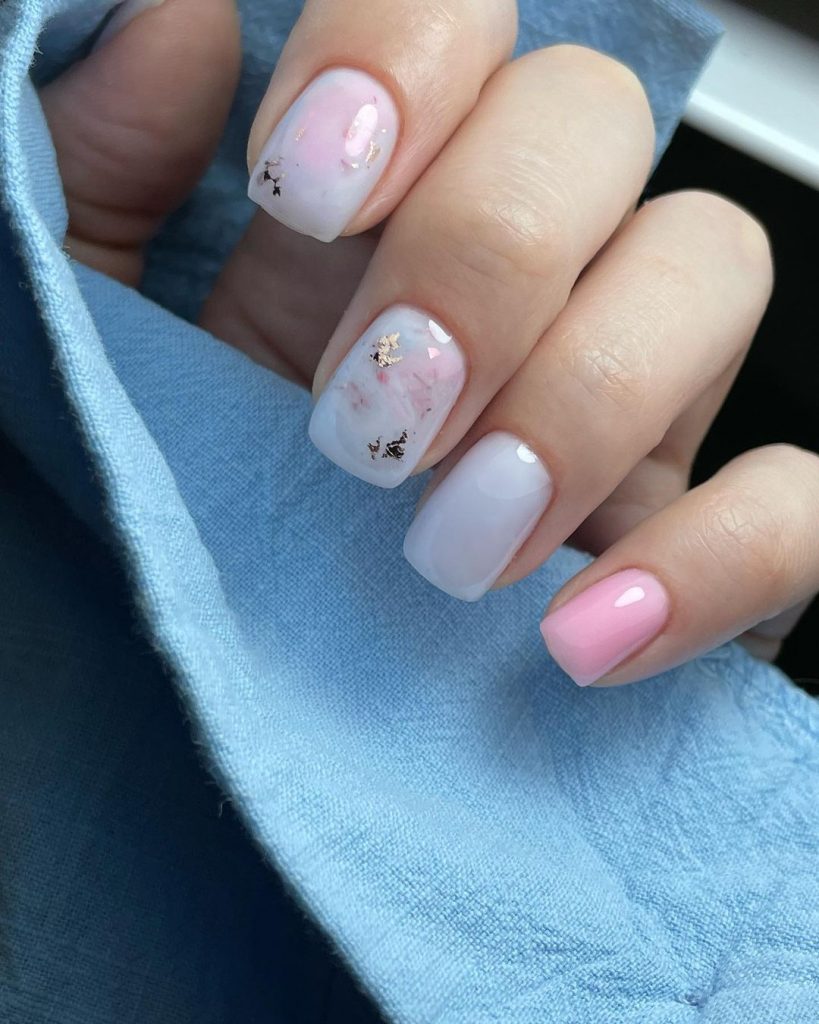
Consumables for Soft Pink Marble:
- Base Coat: Butter London Horse Power Nail Rescue Basecoat.
- Nail Polish: Zoya in “Rue” and “Madeline.”
- Gold Leaf: Gold Foil Flakes by Gold Leaf Company.
- Top Coat: Essie Good To Go Top Coat.
DIY Steps for Soft Pink Marble:
- Prepare the Nails: Apply Butter London Horse Power Nail Rescue Basecoat to strengthen your nails.
- Create the Marble Effect: Apply a base coat of Zoya “Rue.” Using a small brush, apply “Madeline” in a swirling motion to create the marble effect. Add tiny pieces of gold foil flakes while the polish is still tacky.
- Finish the Look: Apply Essie Good To Go Top Coat to smooth out the surface and add shine.
Delicate Lace: Perfect for the Bride
Delicate lace-inspired nail art is the epitome of bridal elegance. The intricate white patterns on a nude or blush base create a look that is both soft and striking. This design works especially well for brides looking to incorporate lace details from their wedding dress into their manicure. The stiletto shape adds a modern twist to the classic lace design.
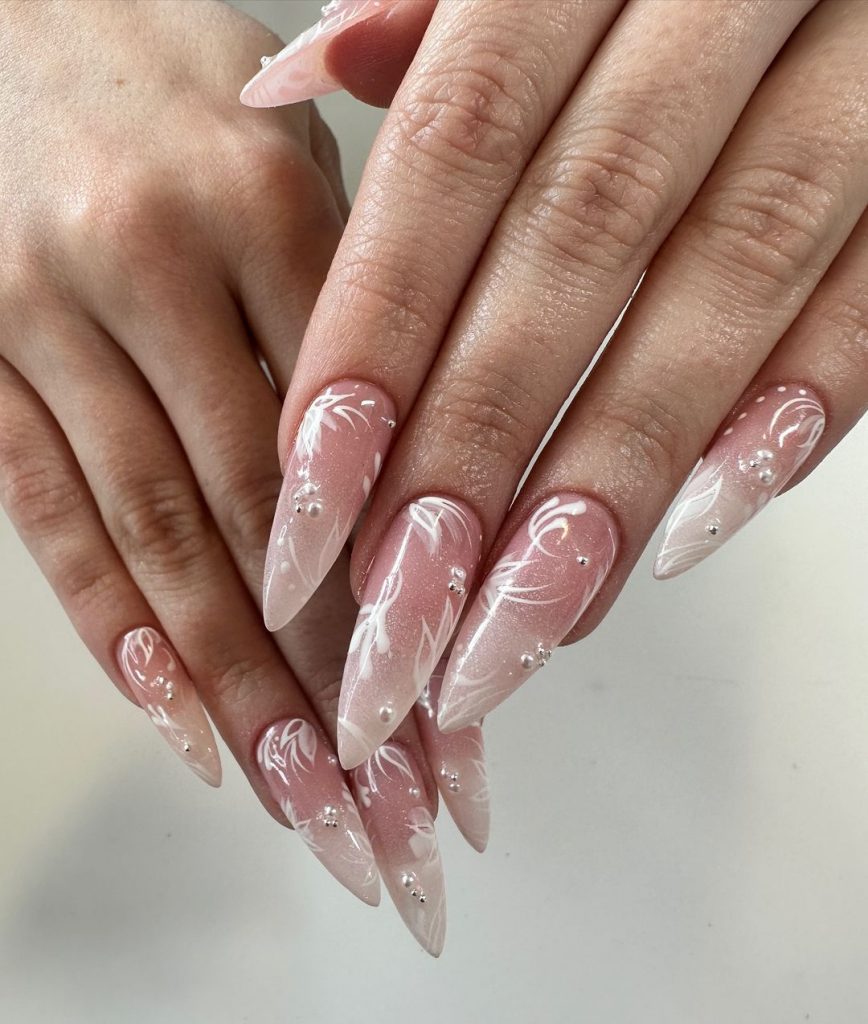
Consumables for Delicate Lace:
- Base Coat: Deborah Lippmann Gel Lab Pro Base Coat.
- Nail Polish: OPI in “Put it in Neutral.”
- White Nail Art Pen: Sally Hansen I Heart Nail Art Pen in White.
- Top Coat: OPI Plumping Top Coat.
DIY Steps for Delicate Lace:
- Prep and Polish: Start with Deborah Lippmann Gel Lab Pro Base Coat and apply two coats of OPI in “Put it in Neutral.”
- Draw the Lace: Using the Sally Hansen I Heart Nail Art Pen in White, carefully draw delicate lace patterns on each nail.
- Seal and Shine: Finish with OPI Plumping Top Coat to give the nails a glossy, plumped-up look.
Golden Flecks: A Classy Mother of the Bride Look
For the mother of the bride, a manicure with golden flecks over a neutral base is both classy and sophisticated. This design is understated yet luxurious, perfect for a mature look that exudes elegance. The shorter length ensures it’s practical for all-day wear, while the golden accents catch the light beautifully, adding a touch of glam without being too flashy.
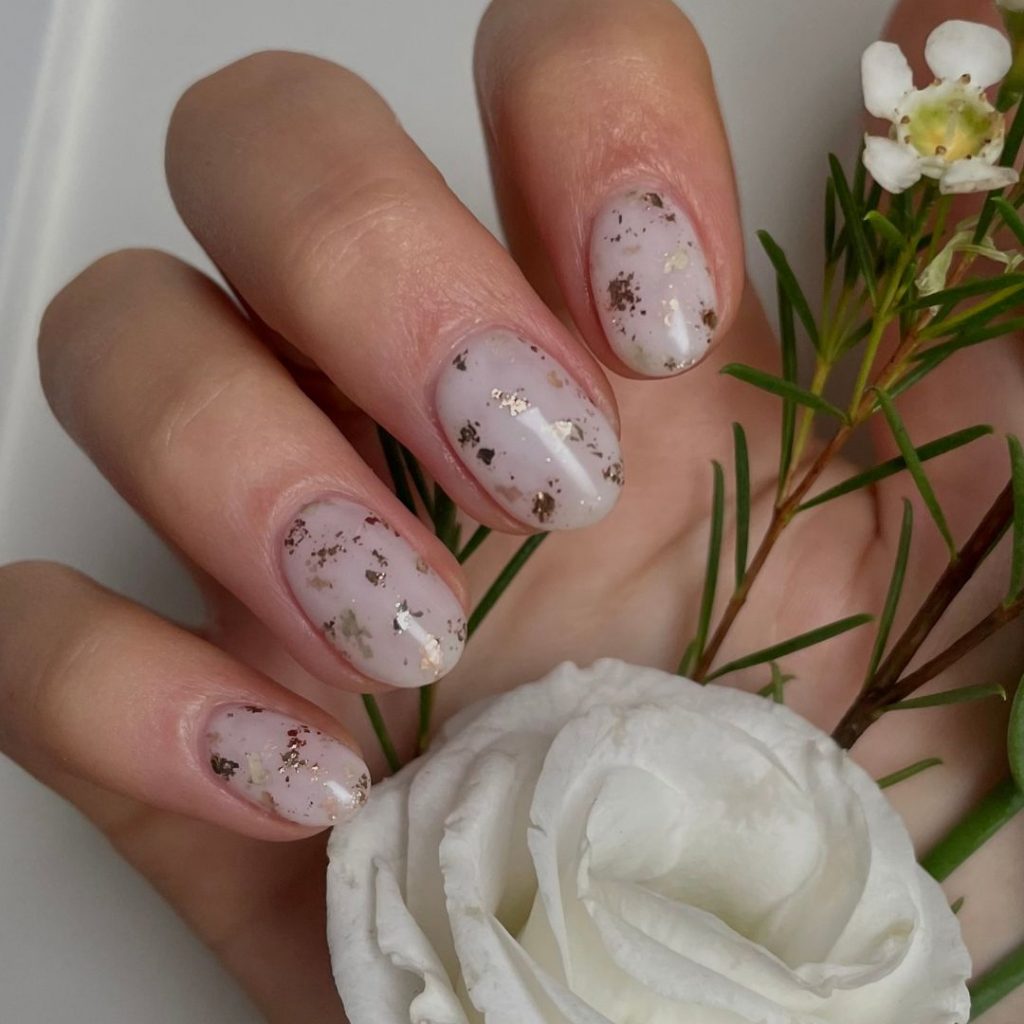
Consumables for Golden Flecks:
- Base Coat: Zoya Anchor Basecoat.
- Nail Polish: Chanel Le Vernis in “Beige Beige.”
- Gold Flakes: OPI Gold Flake Top Coat.
- Top Coat: Dior Gel Top Coat.
DIY Steps for Golden Flecks:
- Start with a Base: Apply Zoya Anchor Basecoat to prep the nails.
- Apply the Color: Use Chanel Le Vernis in “Beige Beige” for a sophisticated base color.
- Add the Gold: Apply OPI Gold Flake Top Coat to create the luxurious flecks.
- Seal it In: Finish with Dior Gel Top Coat to lock in the design and add extra shine.
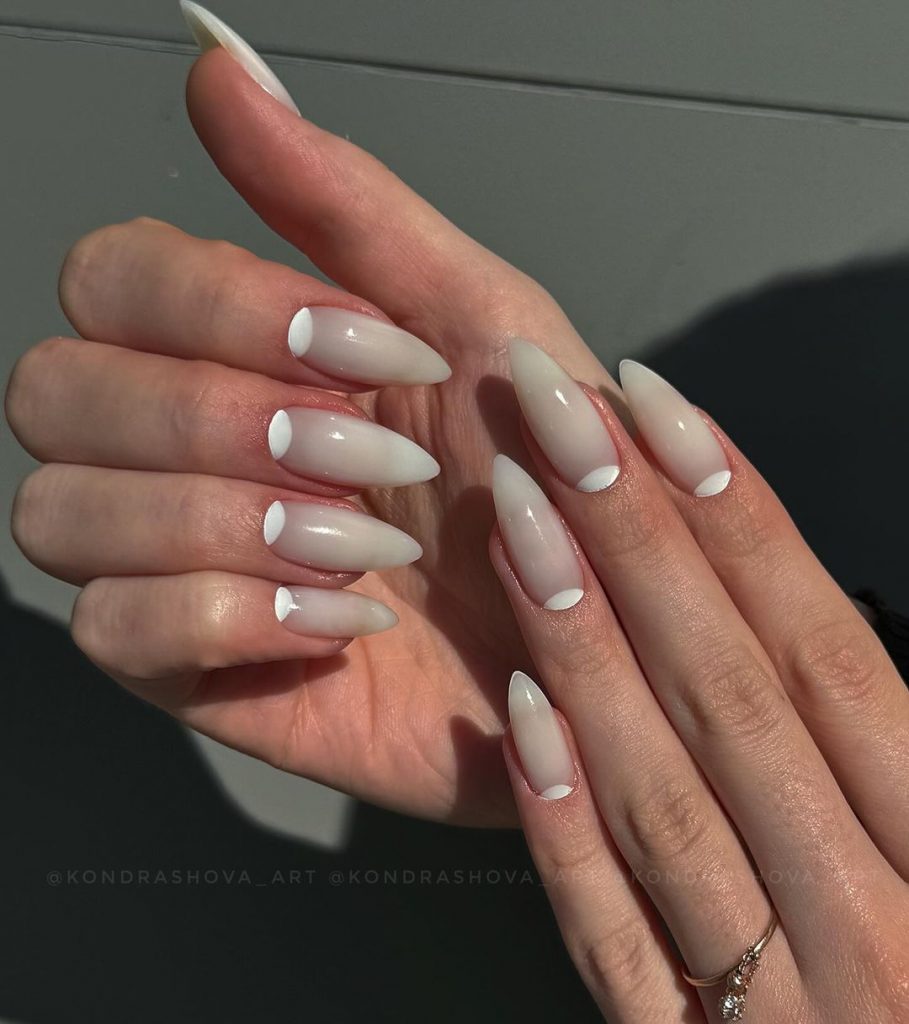
Classic Pearl Elegance: A Timeless Choice for Brides
This manicure embodies the essence of timeless elegance with its stunning pearl-like finish. The soft, reflective sheen of these almond-shaped nails gives off a sophisticated and luxurious vibe, perfect for any bride who desires a classic yet modern look. The smooth, even application of the polish enhances the natural beauty of the nails, making them a perfect match for a sleek wedding gown or an intricate lace dress.
Consumables for Classic Pearl Elegance:
- Base Coat: Essie Smooth-e Base Coat.
- Nail Polish: OPI Nail Lacquer in “Kyoto Pearl.”
- Top Coat: Sally Hansen Miracle Gel Top Coat.
DIY Steps for Classic Pearl Elegance:
- Prepare the Base: Start by applying the Essie Smooth-e Base Coat to create a smooth surface for the polish.
- Apply the Color: Use two coats of OPI Nail Lacquer in “Kyoto Pearl” to achieve that elegant, pearlescent finish.
- Seal and Shine: Finish with Sally Hansen Miracle Gel Top Coat to ensure long-lasting shine and durability.
Silver Marble Masterpiece: A Stunning Statement for Bridesmaids
This silver marble design is a bold and glamorous choice for bridesmaids who want to make a statement. The combination of silver foil accents and marble effects creates a modern, artistic look that is both edgy and elegant. The long, square shape of the nails further enhances the dramatic effect, making these nails a showstopper at any wedding.

Consumables for Silver Marble Masterpiece:
- Base Coat: Orly Bonder Rubberized Basecoat.
- Nail Polish: Zoya Nail Polish in “Purity” and “Trixie.”
- Silver Foil: Gold & Silver Leaf Sheets by Beetles.
- Top Coat: Seche Vite Dry Fast Top Coat.
DIY Steps for Silver Marble Masterpiece:
- Base Preparation: Begin with Orly Bonder Rubberized Basecoat for a strong foundation.
- Create the Marble Effect: Apply Zoya Nail Polish in “Purity” as a base, then use “Trixie” and a fine brush to create the marble effect. Apply silver foil accents for added drama.
- Finish with Top Coat: Seal the design with Seche Vite Dry Fast Top Coat to protect the foil and ensure a glossy finish.
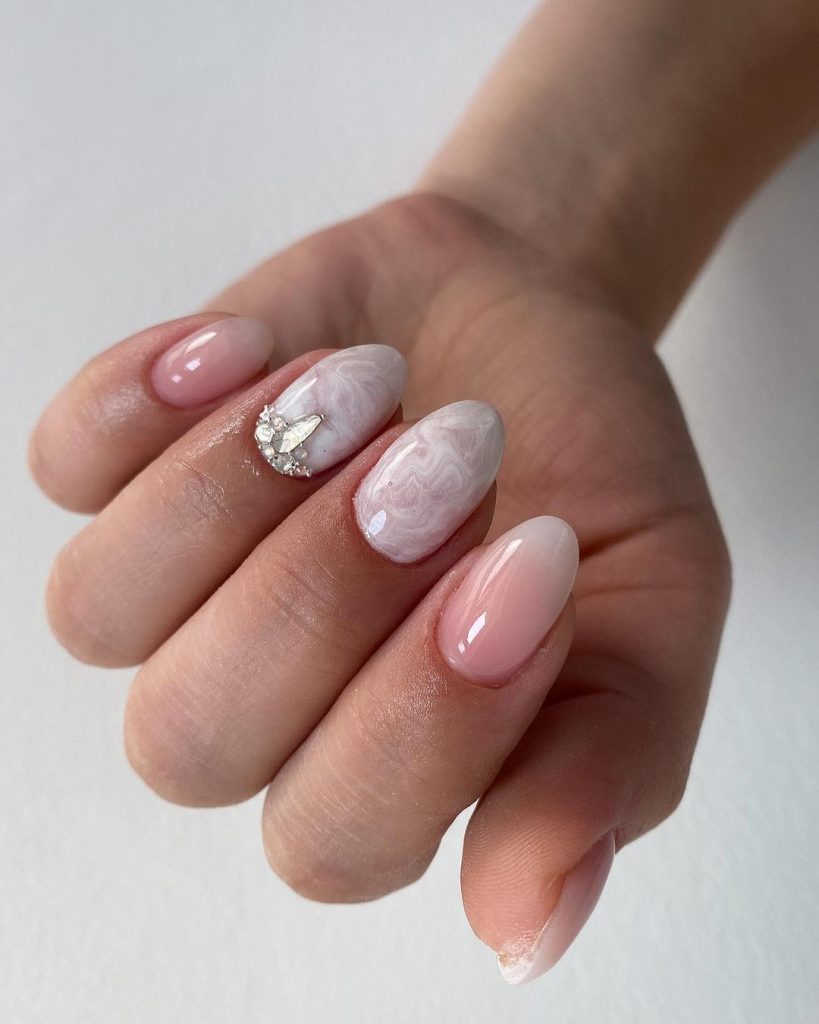
Soft Pink and Marble: Perfect for the Bride or Mother of the Bride
This soft pink and marble design is the epitome of subtle elegance, making it ideal for either the bride or the mother of the bride. The delicate pink shade is complemented by the intricate marble design on an accent nail, finished with a touch of sparkle from small rhinestones. This manicure is understated yet luxurious, perfect for those who prefer a refined look.
Consumables for Soft Pink and Marble:
- Base Coat: Butter London Nail Foundation Priming Basecoat.
- Nail Polish: Essie Gel Couture in “Fairy Tailor.”
- Marble Effect: Water Marble Nail Art Tool Kit.
- Rhinestones: Swarovski Crystal Pixie Petite.
- Top Coat: Dior Top Coat Abricot.
DIY Steps for Soft Pink and Marble:
- Apply the Base: Start with Butter London Nail Foundation Priming Basecoat.
- Color and Marble: Apply two coats of Essie Gel Couture in “Fairy Tailor.” Use the Water Marble Nail Art Tool Kit to create the marble effect on the accent nail, then place the Swarovski crystals for a touch of sparkle.
- Seal the Look: Finish with Dior Top Coat Abricot for a high-shine, protective finish.
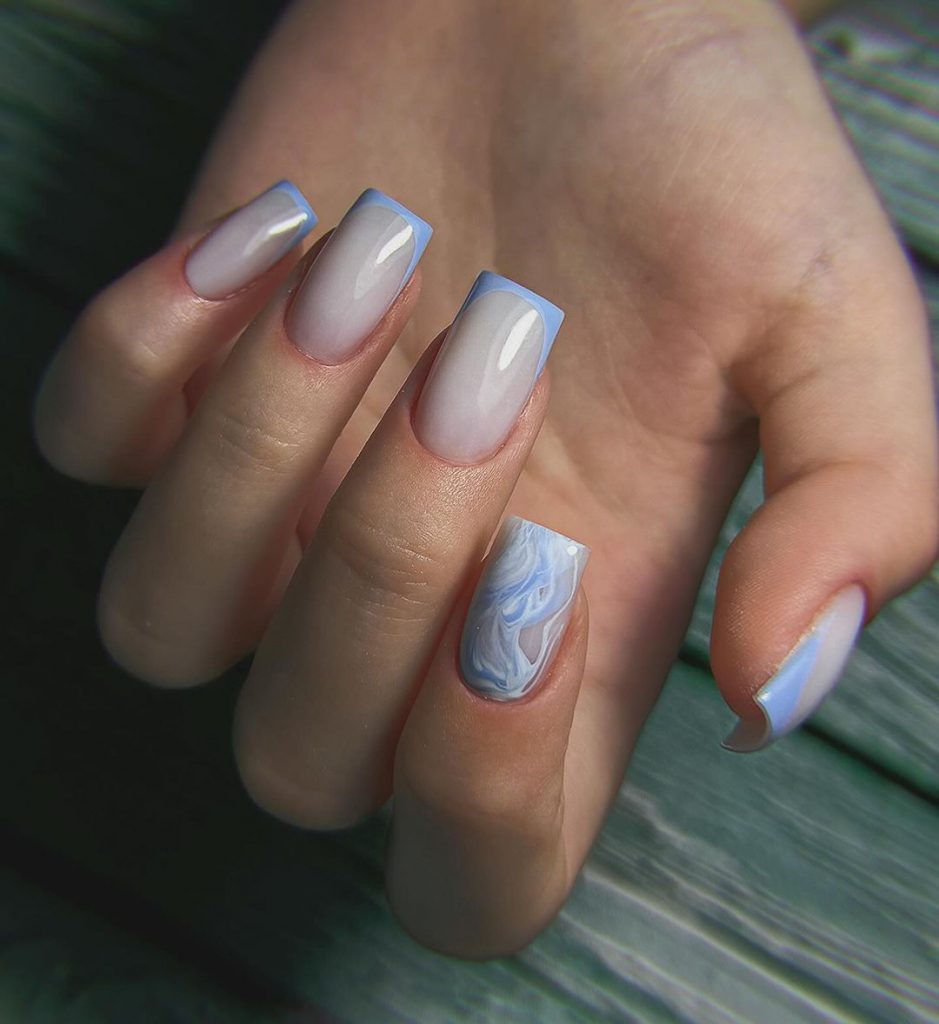
Blue French Twist: A Trendy Option for the Bridesmaid or Guest
This design brings a fresh twist to the classic French manicure by incorporating a soft blue tip and marble accent nail. The cool tones of this manicure are perfect for a fall wedding, adding a touch of modernity to a traditional style. The square shape and minimalistic design make this look versatile for both bridesmaids and guests.
Consumables for Blue French Twist:
- Base Coat: Deborah Lippmann Hard Rock Nail Strengthener.
- Nail Polish: Chanel Le Vernis in “Ballerina” and “Bleu Pastel.”
- Marble Effect: China Glaze Nail Polish in “Sea Spray.”
- Top Coat: OPI Infinite Shine Gloss.
DIY Steps for Blue French Twist:
- Strengthen the Nails: Start with Deborah Lippmann Hard Rock Nail Strengthener to prep your nails.
- Create the French Tip: Apply Chanel Le Vernis in “Ballerina” as a base, then use “Bleu Pastel” for the French tips. Add the marble effect using China Glaze “Sea Spray” on the accent nail.
- Top It Off: Finish with OPI Infinite Shine Gloss for a long-lasting, high-gloss finish.
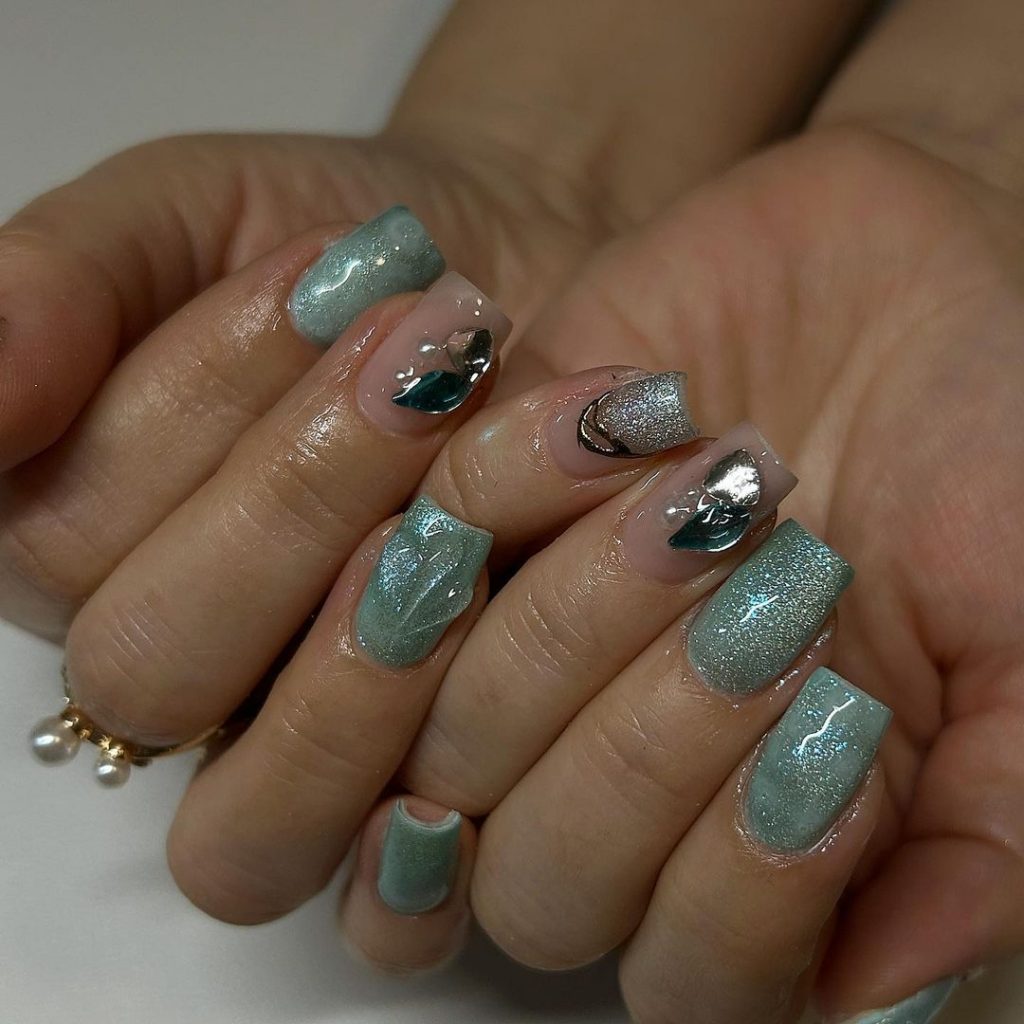
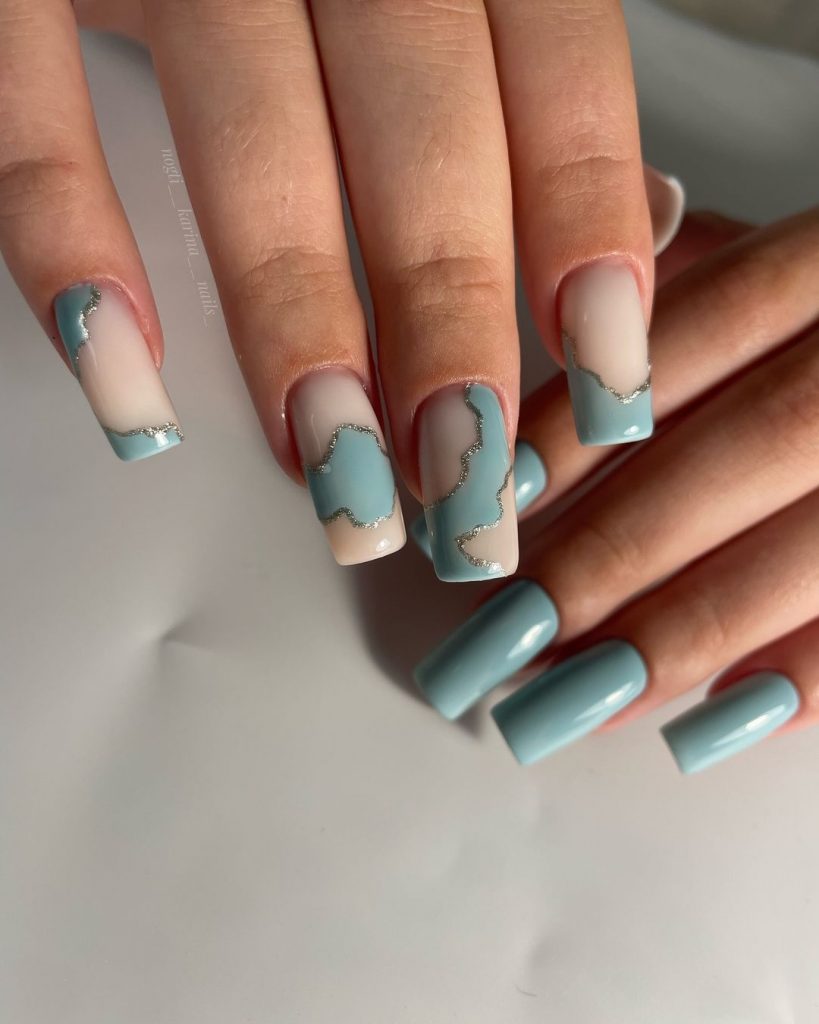
Teal Glamour: A Bold and Beautiful Option for the Bridesmaid
This teal and silver design is for the bold bridesmaid who isn’t afraid to shine. The rich teal color is complemented by shimmering silver accents and glitter, creating a look that is both glamorous and trendy. The intricate design, combined with the bold color choice, makes this manicure perfect for a fall wedding where you want to stand out.
Consumables for Teal Glamour:
- Base Coat: CND Stickey Anchoring Base Coat.
- Nail Polish: Essie Nail Polish in “Trophy Wife.”
- Silver Accents: KISS Salon Secrets Nail Art Kit.
- Top Coat: Sally Hansen Big Shiny Top Coat.
DIY Steps for Teal Glamour:
- Anchor the Color: Start with CND Stickey Anchoring Base Coat for better adhesion.
- Apply the Teal: Use Essie Nail Polish in “Trophy Wife” for a bold, teal finish.
- Add the Silver: Use the KISS Salon Secrets Nail Art Kit to add silver accents and glitter for a touch of glamour.
- Seal the Deal: Finish with Sally Hansen Big Shiny Top Coat to keep your manicure looking fresh and shiny.
Earthy Tones with Delicate Leaf Art: A Fall Favorite for the Bride
This manicure blends earthy nude tones with delicate black leaf accents, creating a perfect balance of simplicity and elegance. The almond shape complements the subtle color palette, making it an ideal choice for brides who appreciate natural beauty with a touch of artistry. The black leaf designs add a hint of contrast, making the nails stand out without overpowering the overall look.
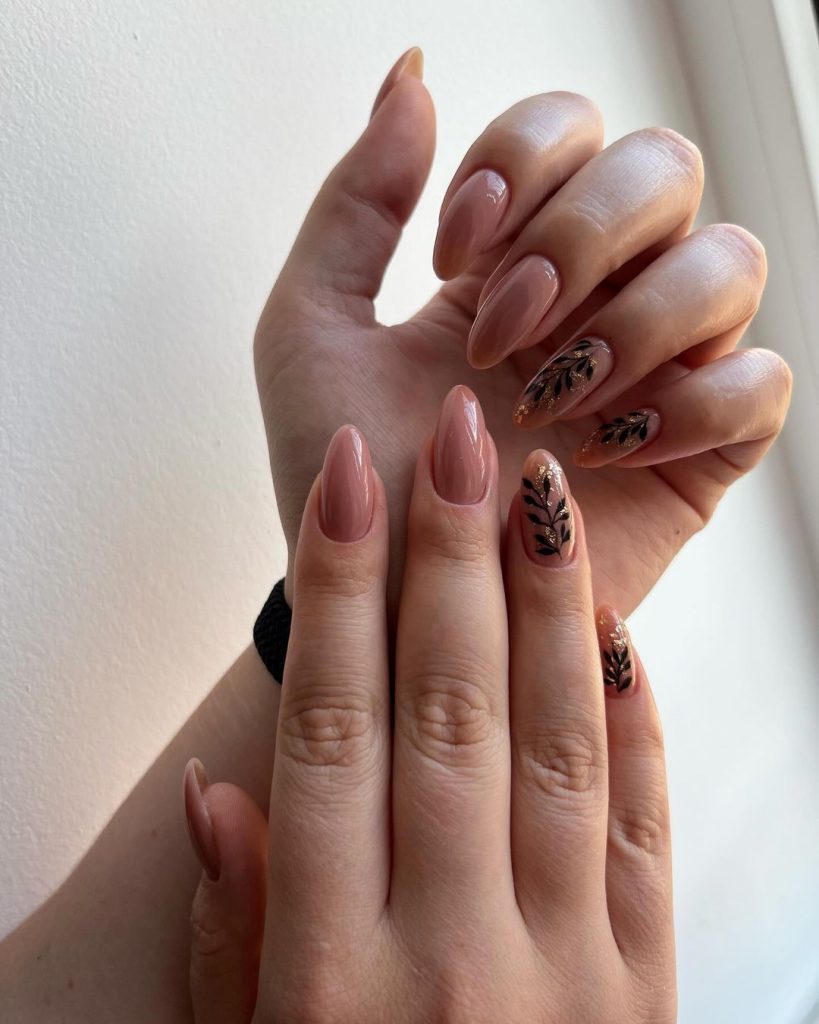
Consumables for Earthy Tones with Delicate Leaf Art:
- Base Coat: Zoya Naked Manicure Base.
- Nail Polish: Essie Gel Couture in “Pinned Up.”
- Leaf Stickers: Whats Up Nails Leaf Pattern Nail Stencils.
- Top Coat: OPI Top Coat.
DIY Steps for Earthy Tones with Delicate Leaf Art:
- Prepare the Nails: Start with Zoya Naked Manicure Base to ensure a smooth application.
- Apply the Base Color: Use two coats of Essie Gel Couture in “Pinned Up” for a soft nude finish.
- Add the Leaf Art: Once dry, apply the leaf stencils and use a fine brush to fill in with black polish. Carefully remove the stencils to reveal the delicate leaf design.
- Seal the Look: Finish with OPI Top Coat to protect the design and add shine.
Rose Marble and Gold Flakes: A Luxurious Choice for Bridesmaids
This stunning rose marble design, accented with gold flakes, exudes luxury and sophistication, making it a perfect option for bridesmaids. The combination of soft pink and white marbling, along with the rich gold accents, creates a manicure that is both eye-catching and elegant. The long, coffin shape adds to the drama, ensuring that these nails will be a conversation starter.
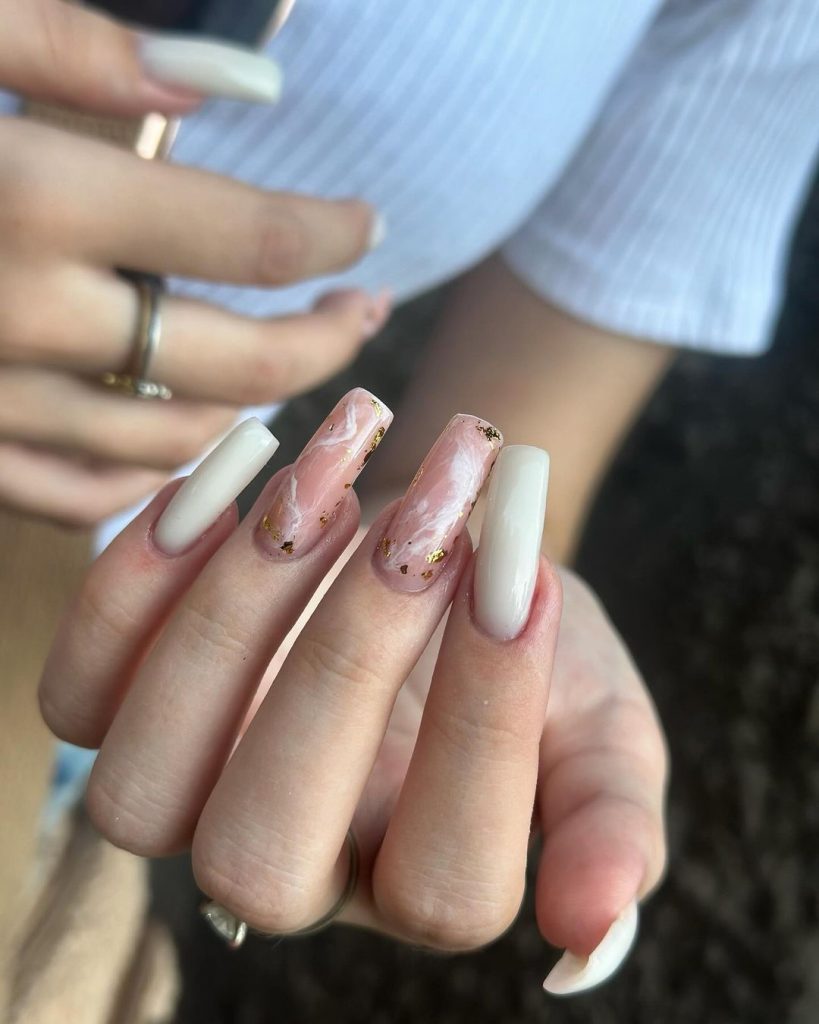
Consumables for Rose Marble and Gold Flakes:
- Base Coat: Orly Bonder Basecoat.
- Nail Polish: China Glaze Nail Lacquer in “Innocence.”
- Marble Effect: Born Pretty Marble Ink Set.
- Gold Flakes: Mia Secret Gold Leaf Flakes.
- Top Coat: Seche Vite Dry Fast Top Coat.
DIY Steps for Rose Marble and Gold Flakes:
- Prep the Nails: Apply Orly Bonder Basecoat to help the polish adhere better.
- Create the Marble Base: Apply a base of China Glaze “Innocence.” Use the Born Pretty Marble Ink Set to create a marbled effect on selected nails.
- Add Gold Accents: While the marble design is still tacky, carefully place Mia Secret Gold Leaf Flakes for that luxurious touch.
- Seal the Design: Finish with Seche Vite Dry Fast Top Coat to lock in the design and add shine.
Pastel Perfection: A Cute and Simple Design for the Bride or Guest
This manicure is all about soft pastels and a touch of playful charm. The combination of a gentle lavender shade with a creamy accent nail, adorned with tiny pastel dots, creates a look that is both cute and elegant. This design is perfect for a bride looking for something understated yet chic, or for a guest who wants to add a subtle pop of color.
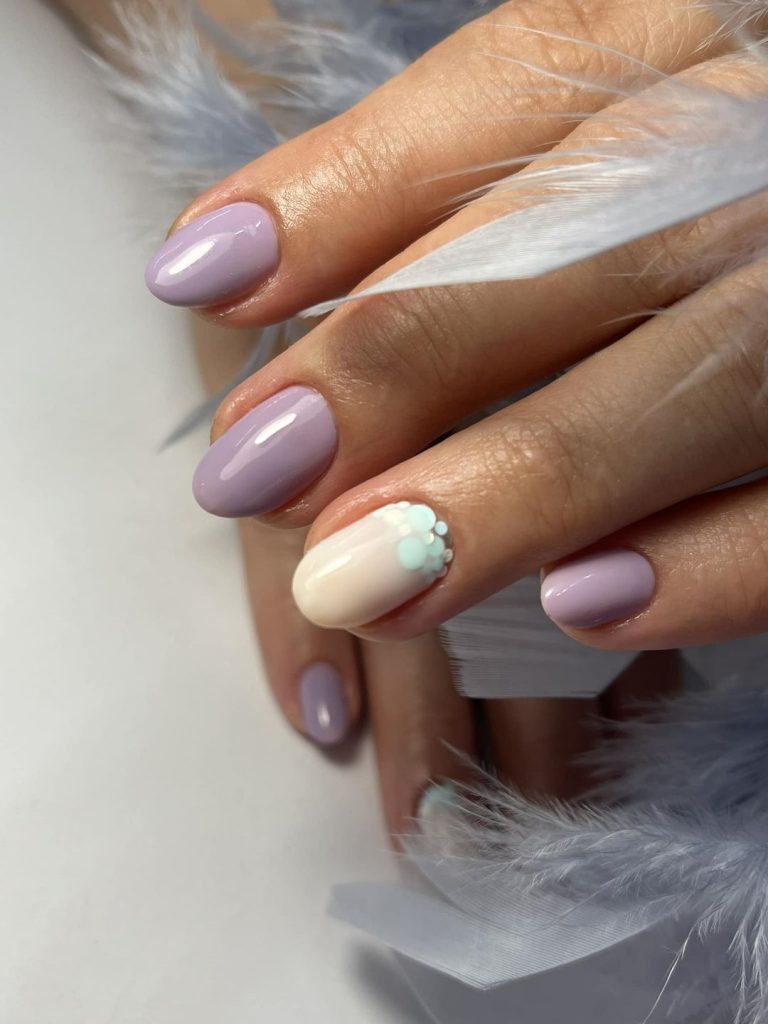
Consumables for Pastel Perfection:
- Base Coat: Essie All-in-One Base.
- Nail Polish: OPI Nail Lacquer in “Do You Lilac It?” and “Funny Bunny.”
- Dotting Tool: Winstonia Nail Art Dotting Tools.
- Top Coat: Revlon Extra Life No Chip Top Coat.
DIY Steps for Pastel Perfection:
- Base Application: Start with Essie All-in-One Base to protect your nails.
- Apply the Colors: Use OPI “Do You Lilac It?” on most nails and “Funny Bunny” on the accent nail.
- Add the Dots: Use the dotting tool to apply tiny pastel dots on the accent nail for a playful effect.
- Top It Off: Seal with Revlon Extra Life No Chip Top Coat for durability and shine.
Subtle Silver French: A Classy and Timeless Option for the Bride
This subtle silver French manicure is the epitome of understated elegance. The soft gradient effect, transitioning from a pale pink base to a delicate silver tip, adds a modern twist to the classic French manicure. This design is ideal for brides who want a refined and timeless look that pairs well with any wedding dress.
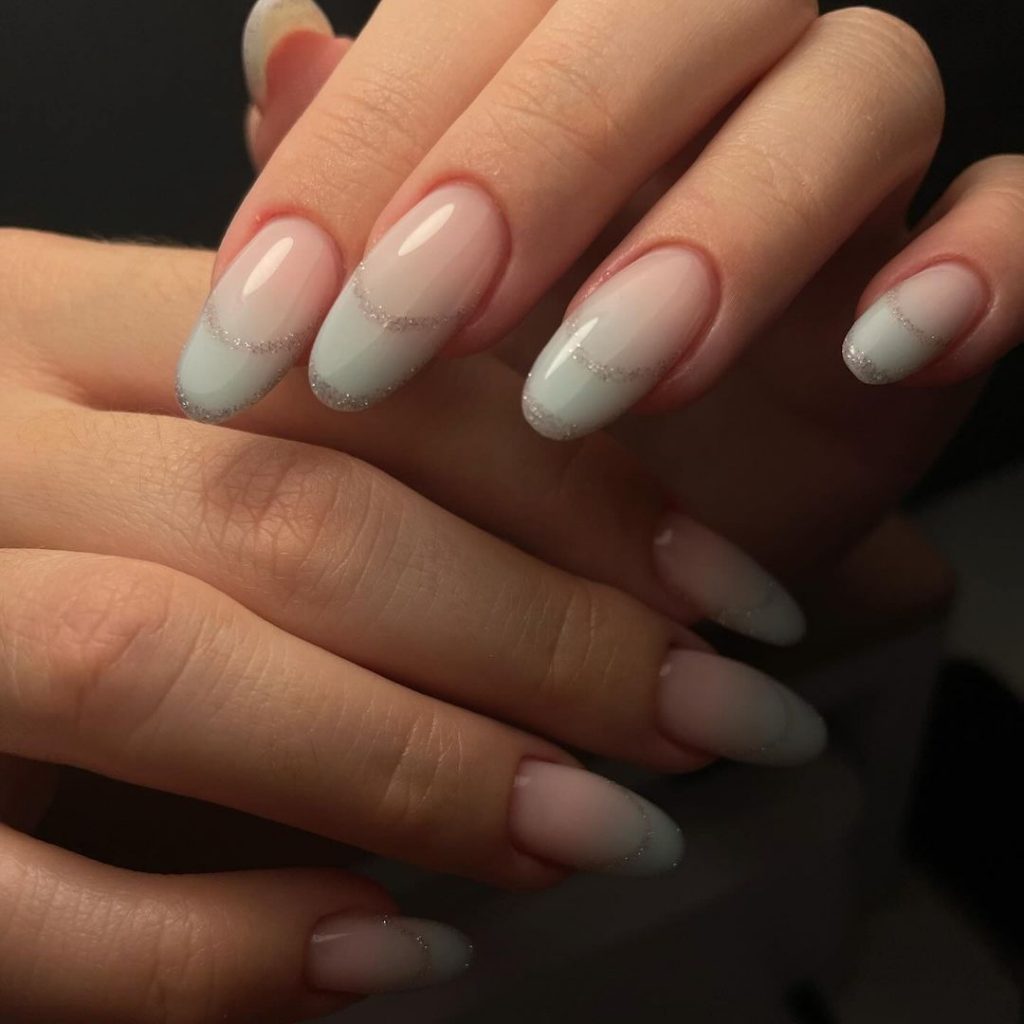
Consumables for Subtle Silver French:
- Base Coat: Butter London Horse Power Nail Rescue Basecoat.
- Nail Polish: Dior Vernis in “Muguet” and “Silver Pearl.”
- French Tip Guides: Orly Half Moon Guides.
- Top Coat: Chanel Le Gel Coat.
DIY Steps for Subtle Silver French:
- Apply the Base: Start with Butter London Horse Power Nail Rescue Basecoat for a strong foundation.
- Create the Gradient: Apply Dior Vernis in “Muguet” as the base color. Use the Orly Half Moon Guides to create the silver tips with “Silver Pearl.”
- Seal with Shine: Finish with Chanel Le Gel Coat for a glossy, long-lasting finish.
Pink Marbled Perfection: A Trendy Option for Bridesmaids
This pink marbled design with delicate gold veining is a trendy and feminine choice for bridesmaids. The soft pink base is complemented by subtle marbling and fine gold accents, creating a look that is both modern and romantic. The stiletto shape adds an extra touch of drama, making these nails perfect for a stylish bridal party.
Consumables for Pink Marbled Perfection:
- Base Coat: OPI Nail Envy Original.
- Nail Polish: Essie Nail Polish in “Ballet Slippers.”
- Marble Effect: Sally Hansen Color Therapy in “Well, Well, Well.”
- Gold Veining: LA Colors Art Deco Nail Art Striper in Gold.
- Top Coat: Essie Gel Setter Top Coat.
DIY Steps for Pink Marbled Perfection:
- Strengthen the Nails: Begin with OPI Nail Envy Original as your base.
- Apply the Base Color: Use Essie “Ballet Slippers” as the main color. Create the marbled effect with Sally Hansen “Well, Well, Well” using a fine brush.
- Add Gold Veining: Use the LA Colors Art Deco Nail Art Striper in Gold to add delicate gold veining for a touch of luxury.
- Finish with Top Coat: Seal the look with Essie Gel Setter Top Coat for a glossy, durable finish.
Intricate Lace and Rhinestones: A Luxe Choice for the Bride
This manicure takes bridal nails to a whole new level with its intricate lace detailing and rhinestone embellishments. The soft matte grey base provides a chic backdrop for the raised lace-like design, which is accented with subtle purple leaves and sparkling rhinestones. This look is perfect for a bride who wants to incorporate luxury and texture into her wedding day manicure, making a statement while still maintaining elegance.
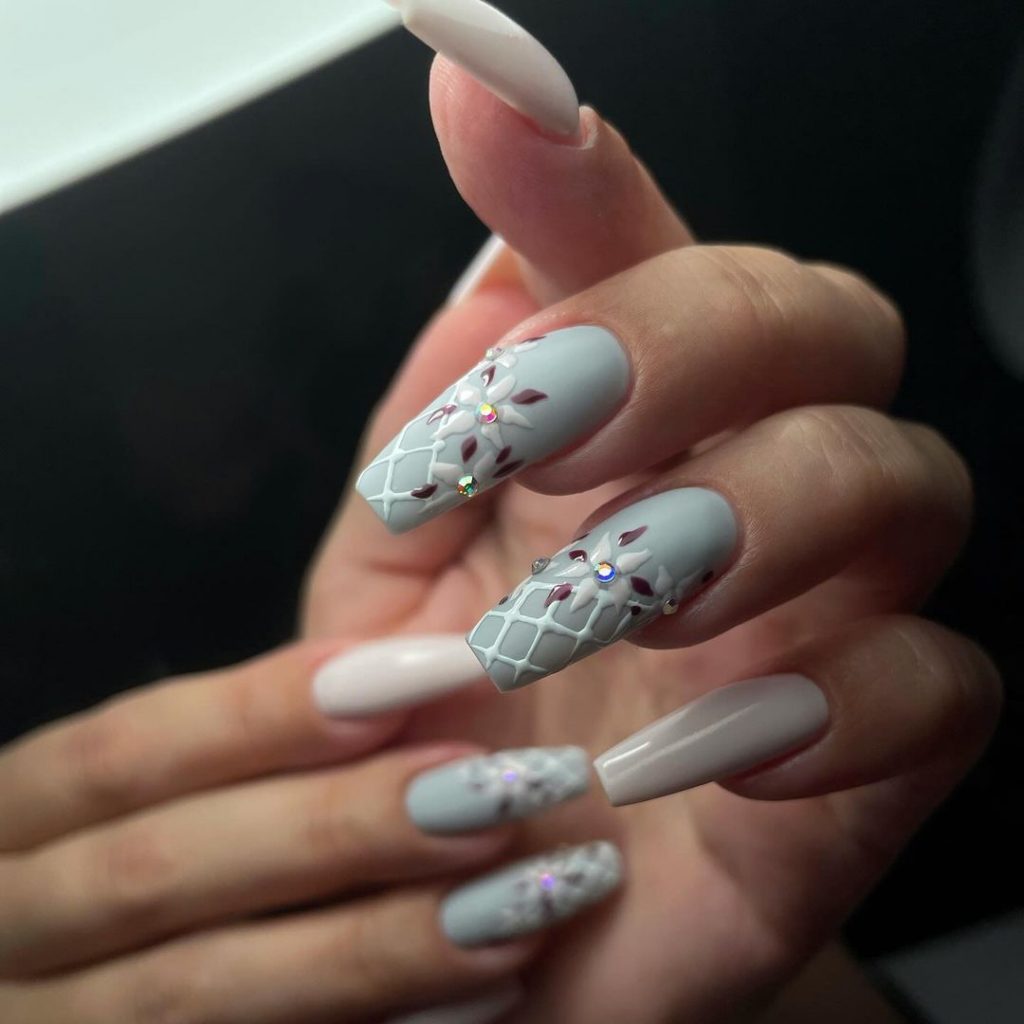
Consumables for Intricate Lace and Rhinestones:
- Base Coat: CND Stickey Anchoring Base Coat.
- Nail Polish: OPI Nail Lacquer in “Suzi Takes the Wheel.”
- 3D Gel for Lace: Moyra 3D Sculpting Gel.
- Rhinestones: Swarovski Crystal Flatback Rhinestones.
- Top Coat: Essie Matte About You Top Coat.
DIY Steps for Intricate Lace and Rhinestones:
- Apply the Base: Start with CND Stickey Anchoring Base Coat for a long-lasting finish.
- Base Color Application: Use two coats of OPI “Suzi Takes the Wheel” for the perfect matte grey base.
- Create the Lace: Sculpt the lace pattern using Moyra 3D Sculpting Gel, and add purple accents with fine brush details.
- Add Rhinestones: Apply Swarovski Crystal Flatback Rhinestones at the center of the lace design for a touch of sparkle.
- Seal with a Matte Finish: Use Essie Matte About You Top Coat to complete the look.
Delicate Floral Accents: A Cute and Simple Option for Bridesmaids
This manicure is a beautiful blend of simplicity and charm, featuring delicate floral accents on a soft, milky base. The short, square shape keeps the look practical yet stylish, perfect for bridesmaids who want a manicure that complements their dress without drawing too much attention. The tiny flowers in pink and blue add a playful and feminine touch, making this design a sweet choice for a fall wedding.
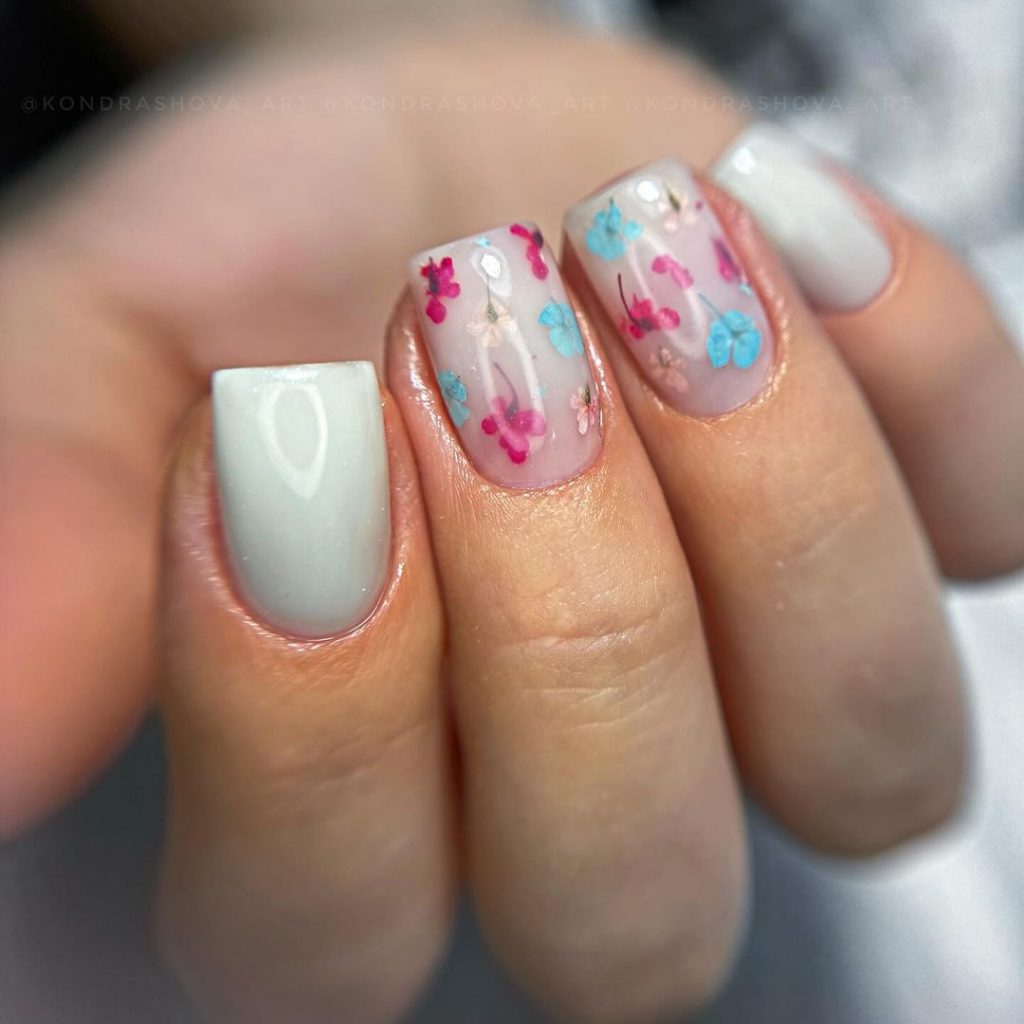
Consumables for Delicate Floral Accents:
- Base Coat: OPI Natural Nail Base Coat.
- Nail Polish: Essie Nail Polish in “Marshmallow.”
- Flower Stickers: Dashing Diva Flower Child Nail Art Stickers.
- Top Coat: Sally Hansen Miracle Gel Top Coat.
DIY Steps for Delicate Floral Accents:
- Prep the Nails: Apply OPI Natural Nail Base Coat to ensure smooth adhesion.
- Apply the Base Color: Use two coats of Essie “Marshmallow” for a soft, milky base.
- Add Floral Accents: Carefully place Dashing Diva Flower Child Nail Art Stickers on the accent nails.
- Seal and Protect: Finish with Sally Hansen Miracle Gel Top Coat for a long-lasting shine.
Nude Sophistication: A Timeless and Classy Option for the Bride or Guest
This manicure is all about understated elegance, with a perfect nude shade that exudes sophistication. The almond shape elongates the fingers, making it an ideal choice for both brides and guests who prefer a minimalistic yet polished look. The simplicity of this design allows the natural beauty of the nails to shine, making it a versatile option for any wedding style.
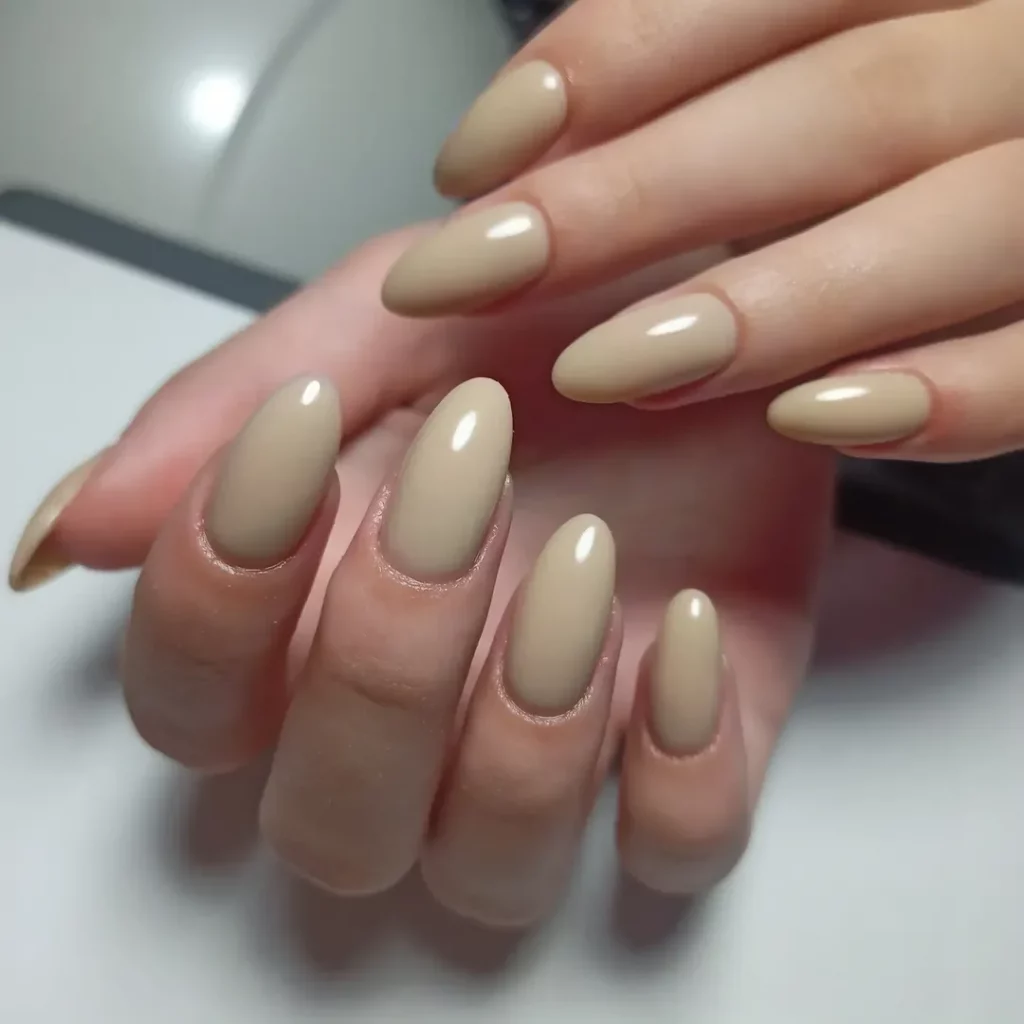
Consumables for Nude Sophistication:
- Base Coat: Essie Ridge Filling Base Coat.
- Nail Polish: Chanel Le Vernis in “Organdi.”
- Top Coat: Dior Top Coat Abricot.
DIY Steps for Nude Sophistication:
- Smooth the Surface: Start with Essie Ridge Filling Base Coat to create an even nail surface.
- Apply the Nude Shade: Use two coats of Chanel “Organdi” for a flawless nude finish.
- Finish with a Glossy Top Coat: Apply Dior Top Coat Abricot for a high-shine, protective layer.
Modern French with a Twist: A Chic Look for the Bridesmaid
This modern take on the classic French manicure features a subtle ombré effect with a half-moon twist at the base. The soft, gradient transition from nude to white adds a fresh and contemporary feel to the traditional French tip, making it perfect for a chic bridesmaid look. The almond shape adds elegance, making this design both trendy and timeless.
Consumables for Modern French with a Twist:
- Base Coat: Orly Bonder Basecoat.
- Nail Polish: Essie Nail Polish in “Ballet Slippers” and “Blanc.”
- French Tip Guides: Kiss Precision Tip Guides.
- Top Coat: Seche Vite Dry Fast Top Coat.
DIY Steps for Modern French with a Twist:
- Prepare the Nails: Apply Orly Bonder Basecoat to anchor the polish.
- Create the Ombré Base: Apply Essie “Ballet Slippers” as the base color. Use a makeup sponge to gently blend “Blanc” from the tip downwards for an ombré effect.
- Add the Half-Moon Detail: Use Kiss Precision Tip Guides to create the half-moon detail at the base.
- Seal the Look: Finish with Seche Vite Dry Fast Top Coat for a glossy finish.
Gold-Tipped Glamour: A Bold and Elegant Choice for the Bride
This manicure combines the glamour of gold with the sleekness of grey, creating a bold yet sophisticated look. The square shape adds structure to the design, while the glittery gold tips offer a luxurious touch, perfect for a bride who wants to add a bit of sparkle to her wedding day look. This design is a stunning choice for those who appreciate both modern and classic elements in their manicure.
Consumables for Gold-Tipped Glamour:
- Base Coat: Zoya Anchor Base Coat.
- Nail Polish: OPI Nail Lacquer in “I Can Never Hut Up.”
- Gold Glitter: Ciaté London Mini Paint Pot in “Gold Digga.”
- Top Coat: Butter London Hardwear Shine UV Top Coat.
DIY Steps for Gold-Tipped Glamour:
- Start with a Base: Apply Zoya Anchor Base Coat to protect the nails.
- Apply the Base Color: Use two coats of OPI “I Can Never Hut Up” for a sophisticated grey base.
- Add Gold Tips: Carefully paint the tips with Ciaté London “Gold Digga” for a glittery gold finish.
- Seal and Shine: Finish with Butter London Hardwear Shine UV Top Coat to lock in the glitter and add a glossy finish.
Red Waves and Gold Glamour: A Bold Statement for the Bride
This manicure features bold red waves complemented by a glittery gold accent, making it a stunning choice for brides looking to make a statement. The combination of nude and red tones with the sparkling gold detail offers a modern and luxurious twist to the classic wedding manicure. The sharp, clean lines of the wave design add a touch of sophistication, making this a perfect choice for those who want their nails to be a standout feature on their big day.
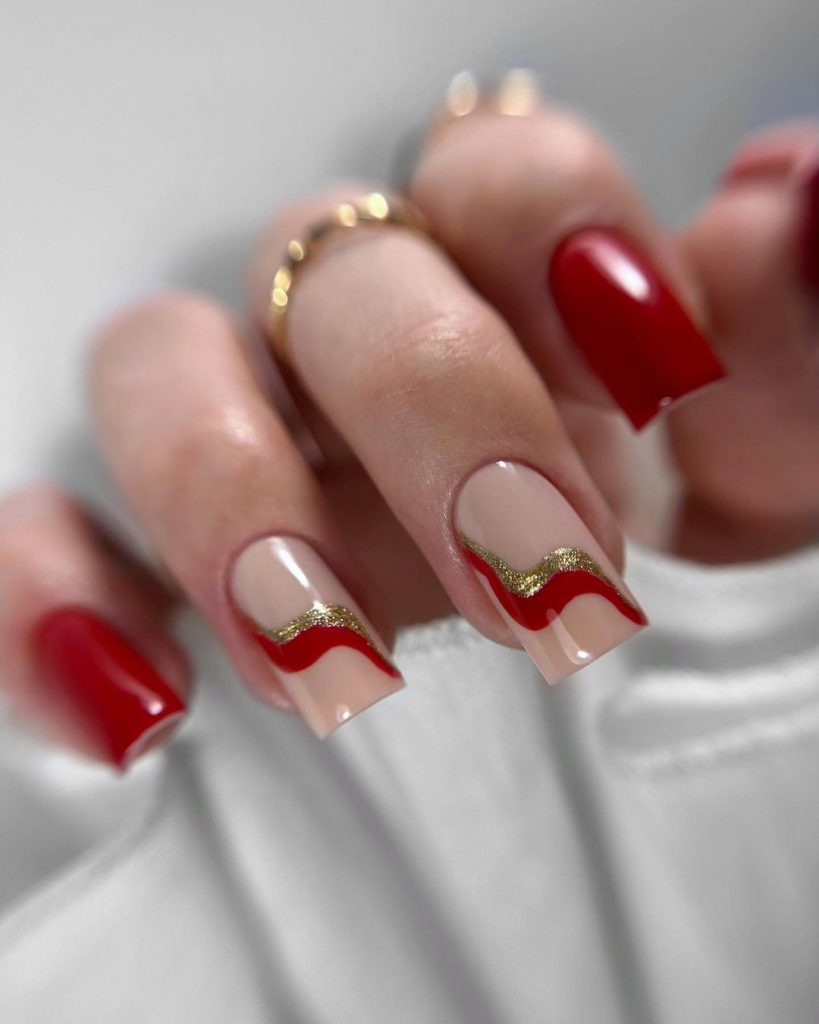
Consumables for Red Waves and Gold Glamour:
- Base Coat: Deborah Lippmann Gel Lab Pro Base Coat.
- Nail Polish: Essie Nail Polish in “Lacquered Up” and “Mademoiselle.”
- Gold Glitter: Orly Instant Artist Gold Glitter.
- Top Coat: Dior Gel Coat.
DIY Steps for Red Waves and Gold Glamour:
- Prep the Nails: Apply the Deborah Lippmann Gel Lab Pro Base Coat to ensure the polish adheres well.
- Create the Base: Apply “Mademoiselle” for a neutral nude base on all nails.
- Add the Red Waves: Using a fine brush, paint the red waves with Essie “Lacquered Up,” ensuring a smooth, clean line.
- Apply the Gold Accent: Use Orly Instant Artist Gold Glitter to outline the red waves, adding a touch of sparkle.
- Finish with Top Coat: Seal the design with Dior Gel Coat for a high-shine, long-lasting finish.
Classic French Elegance: Timeless and Sophisticated for the Bride
This classic French manicure is the epitome of timeless elegance. With a soft pink base and crisp white tips, this design is ideal for brides who prefer a simple yet sophisticated look. The short, square shape adds to the manicure’s classic appeal, making it a versatile option that pairs well with any wedding style.

Consumables for Classic French Elegance:
- Base Coat: Orly Bonder Rubberized Basecoat.
- Nail Polish: OPI Nail Lacquer in “Bubble Bath” and “Alpine Snow.”
- French Tip Guides: Kiss French Manicure Tip Guides.
- Top Coat: Sally Hansen Diamond Flash Top Coat.
DIY Steps for Classic French Elegance:
- Apply the Base: Start with Orly Bonder Rubberized Basecoat to ensure a long-lasting manicure.
- Create the Base Color: Apply OPI “Bubble Bath” as the soft pink base.
- Add the French Tips: Use Kiss French Manicure Tip Guides to achieve perfectly crisp white tips with OPI “Alpine Snow.”
- Seal and Shine: Finish with Sally Hansen Diamond Flash Top Coat for a brilliant shine and chip-resistant finish.
Iridescent Dream: A Magical Touch for the Bridesmaid
This iridescent manicure brings a touch of magic to the nails with its ethereal, shimmering finish. The pearlescent base is accented with subtle flecks of iridescent foil, making it a perfect choice for bridesmaids who want to add a bit of sparkle to their look without overpowering the overall style. The stiletto shape enhances the elegance, creating a stunning, otherworldly effect.
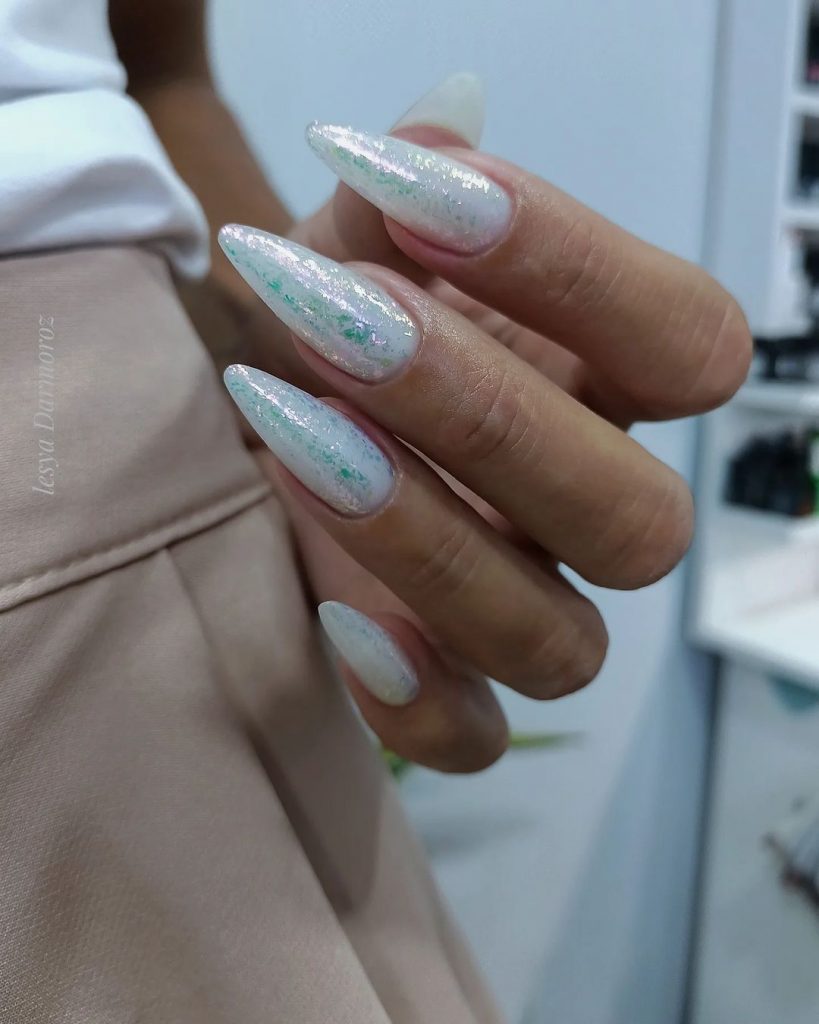
Consumables for Iridescent Dream:
- Base Coat: Zoya Naked Manicure Base.
- Nail Polish: ILNP “The Harpist” Holographic Nail Polish.
- Iridescent Foil: Born Pretty Iridescent Nail Foil.
- Top Coat: Seche Vite Dry Fast Top Coat.
DIY Steps for Iridescent Dream:
- Prepare the Nails: Start with Zoya Naked Manicure Base to create a smooth canvas.
- Apply the Iridescent Base: Use two coats of ILNP “The Harpist” for a shimmery, pearlescent finish.
- Add the Iridescent Foil: Apply small pieces of Born Pretty Iridescent Nail Foil for an extra touch of sparkle.
- Finish with Top Coat: Seal the look with Seche Vite Dry Fast Top Coat for added shine and durability.
Soft Pink and Leaf Art: A Delicate Option for the Bride
This soft pink manicure with delicate leaf art is the perfect blend of simplicity and elegance. The soft, feminine shade is beautifully complemented by the subtle leaf designs, making it an ideal choice for brides who want a natural yet refined look. The almond shape adds to the overall sophistication, ensuring that the manicure is both timeless and trendy.
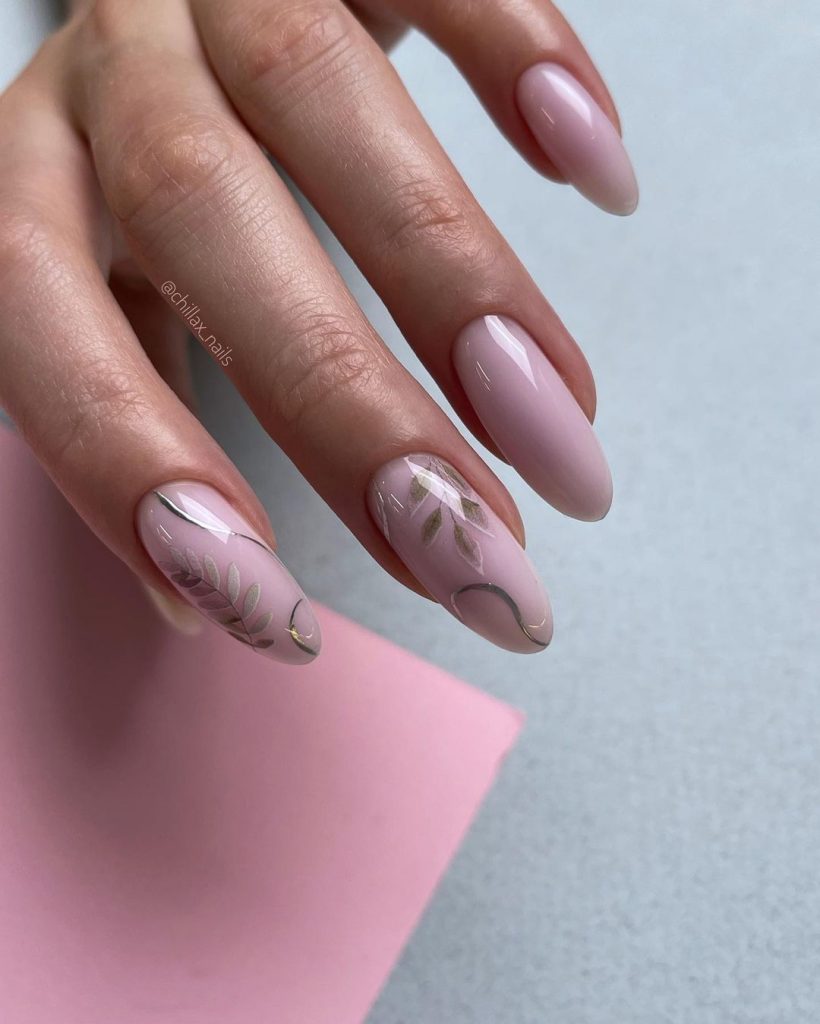
Consumables for Soft Pink and Leaf Art:
- Base Coat: OPI Nail Envy Original.
- Nail Polish: Essie Nail Polish in “Romper Room.”
- Leaf Stickers: Whats Up Nails Leaf Pattern Nail Stencils.
- Top Coat: Chanel Le Gel Coat.
DIY Steps for Soft Pink and Leaf Art:
- Strengthen the Nails: Apply OPI Nail Envy Original as a base coat.
- Create the Base Color: Use Essie “Romper Room” for a soft pink base.
- Add the Leaf Art: Apply Whats Up Nails Leaf Pattern Nail Stencils and fill in the design with a metallic polish.
- Seal the Look: Finish with Chanel Le Gel Coat for a glossy, long-lasting finish.
Aqua Abstract: A Trendy Choice for the Bridesmaid
This aqua abstract design is a trendy and modern option, perfect for bridesmaids who want to make a stylish statement. The combination of soft nude and bold aqua shades, outlined with delicate silver details, creates a chic and artistic look. The square shape adds structure to the design, making it a fashionable choice for a contemporary wedding.
Consumables for Aqua Abstract:
- Base Coat: Deborah Lippmann Hard Rock Base and Top Coat.
- Nail Polish: Essie Nail Polish in “Blanc” and “Turquoise & Caicos.”
- Silver Nail Art Pen: Sally Hansen I Heart Nail Art Pen in Silver.
- Top Coat: Essie Good to Go Top Coat.
DIY Steps for Aqua Abstract:
- Start with the Base: Apply Deborah Lippmann Hard Rock Base and Top Coat to strengthen the nails.
- Create the Abstract Design: Use Essie “Blanc” as the base color. Apply “Turquoise & Caicos” in abstract shapes, leaving some areas of the nude base visible.
- Outline with Silver: Use the Sally Hansen I Heart Nail Art Pen in Silver to outline the aqua shapes.
- Finish with Top Coat: Seal the design with Essie Good to Go Top Coat for a glossy, quick-dry finish.
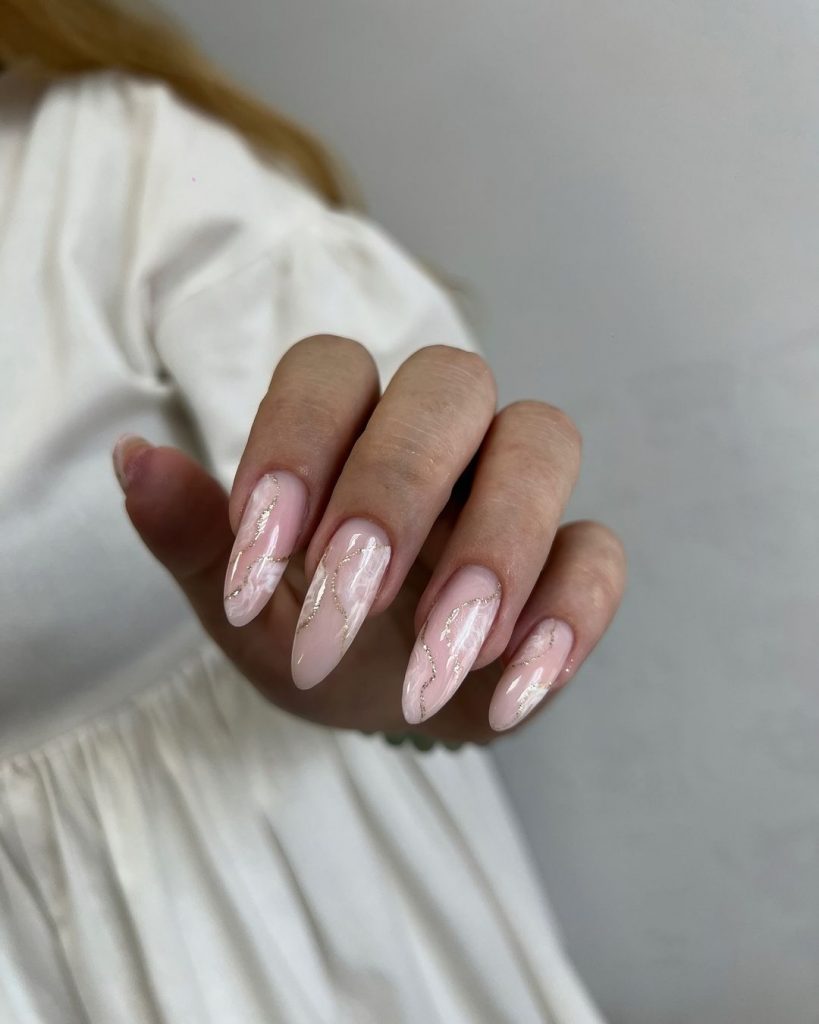
Marble and Gold Veins: A Luxurious Choice for the Bride
This marble and gold veins design is the epitome of luxury, perfect for a bride who wants to incorporate opulence into her wedding day look. The soft marble effect, combined with delicate gold veins, creates a sophisticated and high-end appearance. The long, coffin shape adds drama, making this manicure a true statement piece.
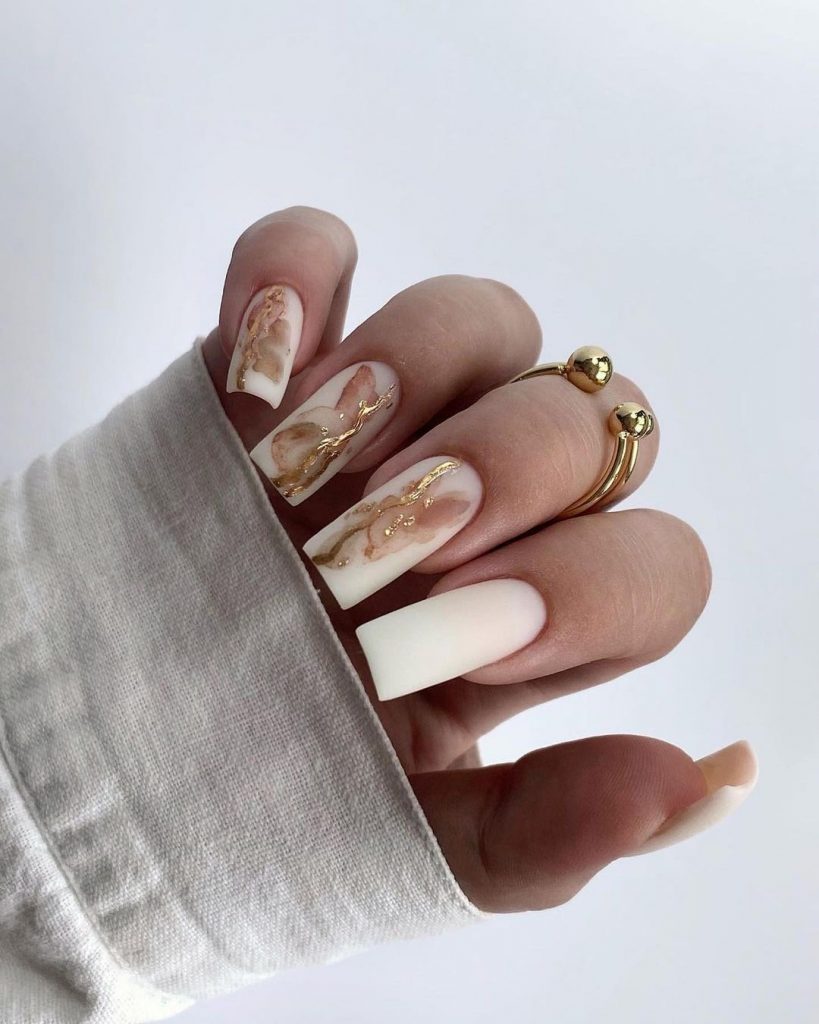
Consumables for Marble and Gold Veins:
- Base Coat: Essie All-In-One Base Coat.
- Nail Polish: OPI Nail Lacquer in “Funny Bunny.”
- Marble Effect: Sally Hansen Color Therapy in “Well, Well, Well.”
- Gold Veining: LA Colors Art Deco Nail Art Striper in Gold.
- Top Coat: Dior Top Coat Abricot.
DIY Steps for Marble and Gold Veins:
- Prep the Nails: Begin with Essie All-In-One Base Coat to protect and strengthen the nails.
- Apply the Marble Base: Use OPI “Funny Bunny” as the base color. Create the marble effect using Sally Hansen “Well, Well, Well” and a fine brush.
- Add the Gold Veins: Use the LA Colors Art Deco Nail Art Striper in Gold to add delicate gold veins throughout the marble design.
- Seal and Shine: Finish with Dior Top Coat Abricot for a high-shine, protective finish.
Save Pin