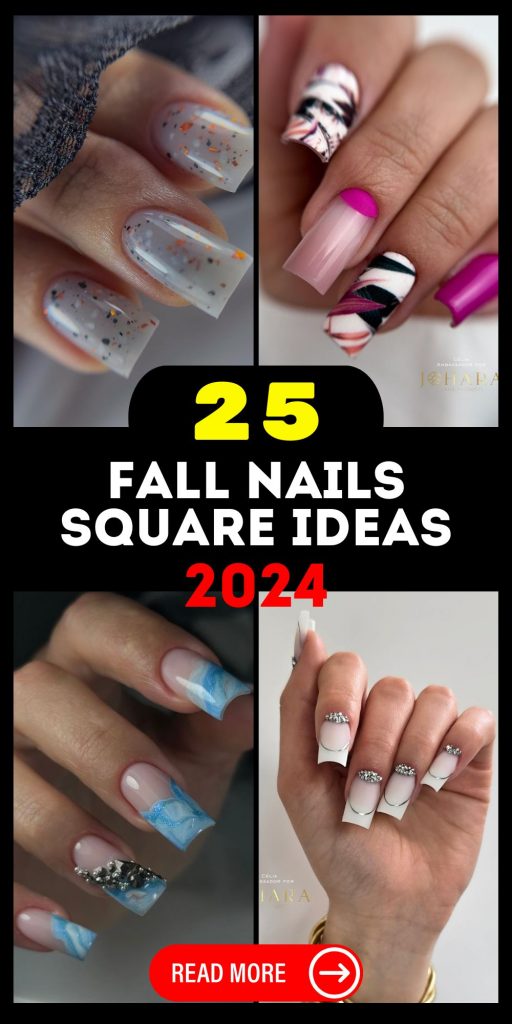
When it comes to embracing the trends of fall 2024, nail designs are stepping into the spotlight in the most stylish ways possible. From subtle elegance to bold statements, fall nails square 2024 is all about balancing classic shapes with contemporary design. Whether you’re opting for short and sweet or going all out with long and dramatic, there’s a square nail look for everyone this season. But how do you choose the right design? And how can you achieve salon-quality nails at home? Let’s dive into some must-see nail designs that will have you fall-ready in no time.
Elegant Matte Neutrals with a Touch of Glam
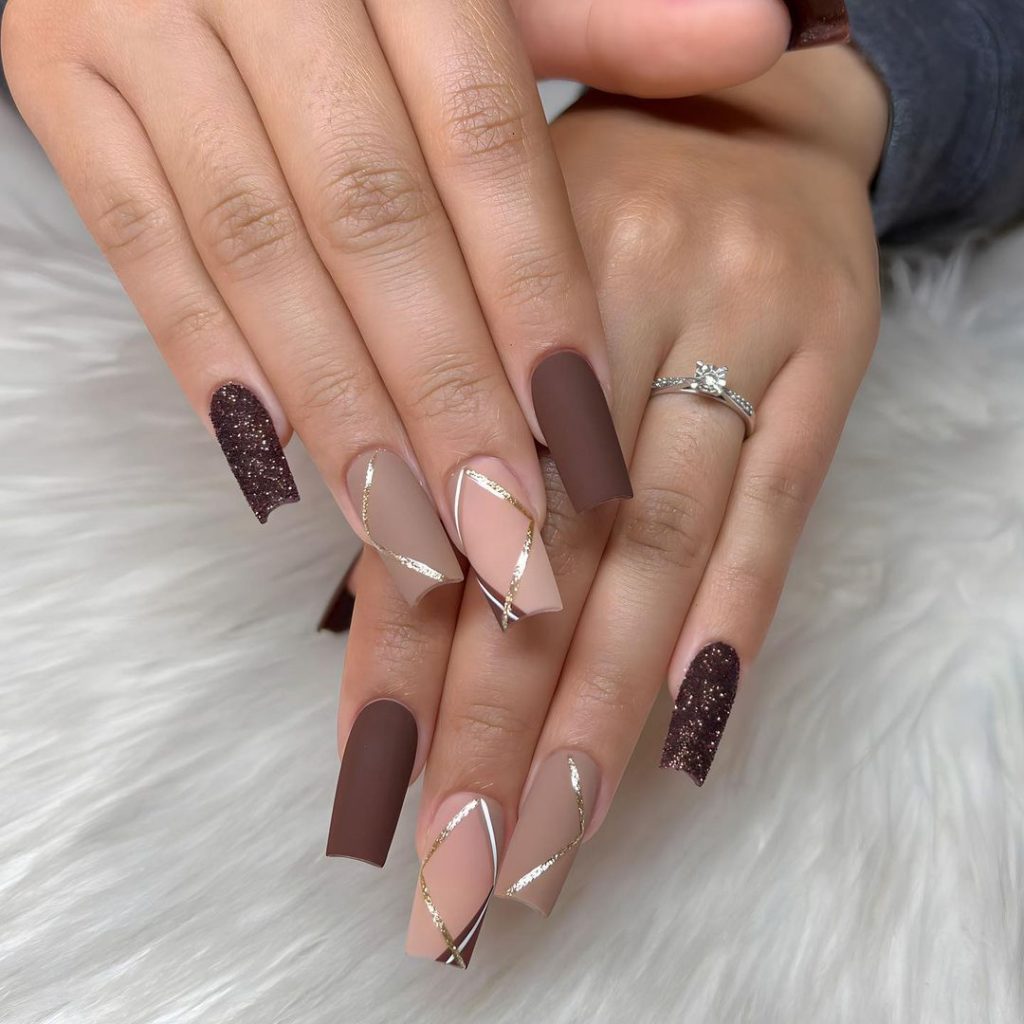
This design is the epitome of understated elegance. The use of matte finishes in neutral tones, accented by shimmering lines of gold and glitter, creates a look that is both pretty and minimal yet undeniably chic. The square shape enhances the sophistication of the design, making it perfect for both everyday wear and special occasions. The subtle contrast between the short brown matte nails and the glittery accents adds just the right amount of glam without overpowering the overall look.
Consumables:
- Matte nail polish in brown and neutral shades (e.g., OPI Matte Top Coat, Essie “Bare With Me”)
- Gold nail striping tape
- Brown glitter nail polish (e.g., China Glaze “Glitter Matters”)
- Nail art brush for precise application
DIY Instructions:
- Start by applying a base coat to protect your nails.
- Apply two coats of the neutral matte polish on three nails and brown matte polish on two nails, allowing each layer to dry completely.
- Use the nail art brush to apply the gold striping tape in diagonal patterns on the neutral nails, creating an elegant crisscross effect.
- Finish by applying the brown glitter polish on the accent nails, making sure the glitter is evenly distributed.
- Seal the design with a matte top coat for a cohesive look.
Black and Silver French Tip with a Twist
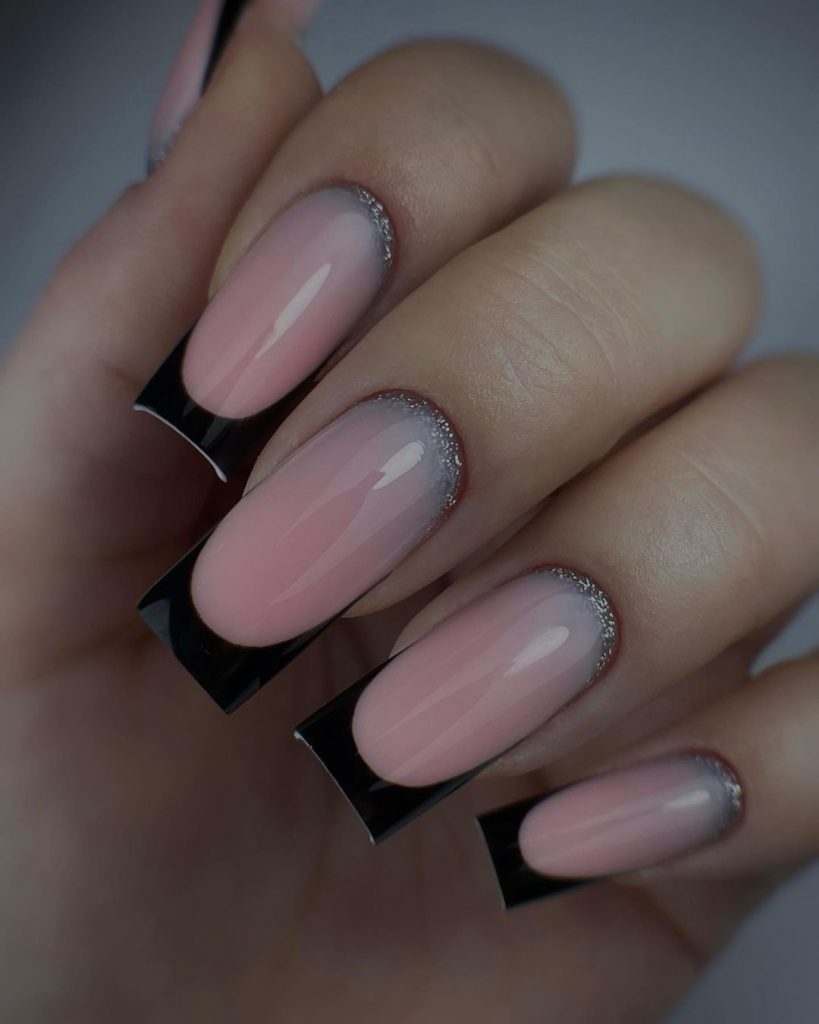
This French tip design takes the classic look and adds a modern, edgy twist. The black tips are paired with a subtle gradient of silver near the cuticle, creating a minimalist yet eye-catching design. The square shape is perfect for this look, as it gives a bold, defined edge that contrasts beautifully with the delicate gradient. This dark and elegant design is ideal for those who want something trendy yet timeless.
Consumables:
- Black nail polish (e.g., Essie “Licorice”)
- Silver glitter nail polish (e.g., Sally Hansen “Strobe Light”)
- Sponge for gradient effect
- French tip guides for precise application
DIY Instructions:
- Begin by applying a base coat to protect your nails.
- Use the French tip guides to create clean, even black tips on each nail.
- Using a small sponge, dab the silver glitter polish near the cuticle, blending upwards towards the black tip for a gradient effect.
- Remove the guides and allow the polish to dry completely.
- Finish with a clear top coat to enhance the shine and durability of the design.
Bold Red for a Statement Look
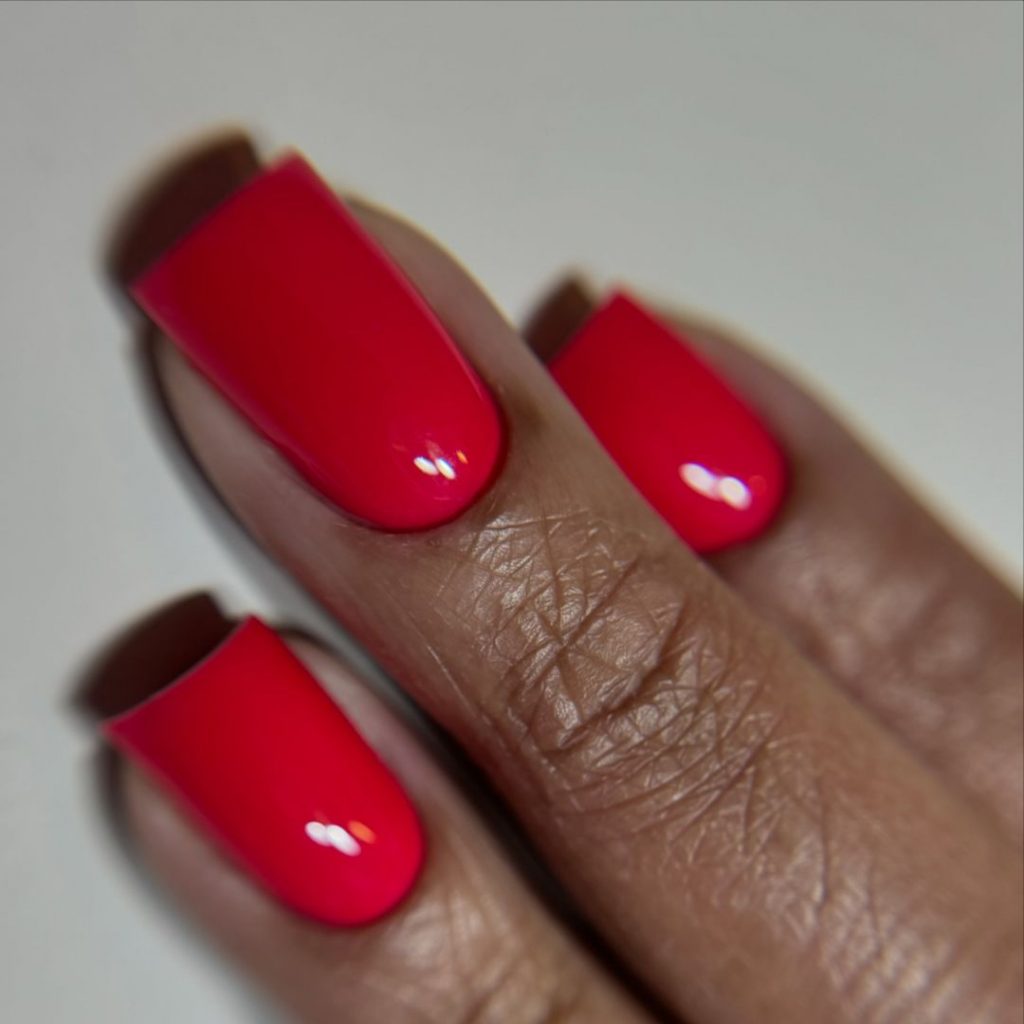
Bold, bright, and unapologetically red—this design is perfect for making a statement. The simplicity of the red polish paired with the square nail shape gives a powerful, confident look that is both trendy and timeless. This design is versatile, working equally well for a birthday celebration, a vacation, or any occasion where you want to stand out.
Consumables:
- Bright red nail polish (e.g., Chanel “Pirate”)
- Glossy top coat (e.g., Seche Vite Dry Fast Top Coat)
DIY Instructions:
- Start by applying a base coat to prevent staining and to help the polish adhere better.
- Apply two even coats of red polish, making sure each coat dries fully before applying the next.
- Finish with a glossy top coat to enhance the vibrancy and longevity of the polish.
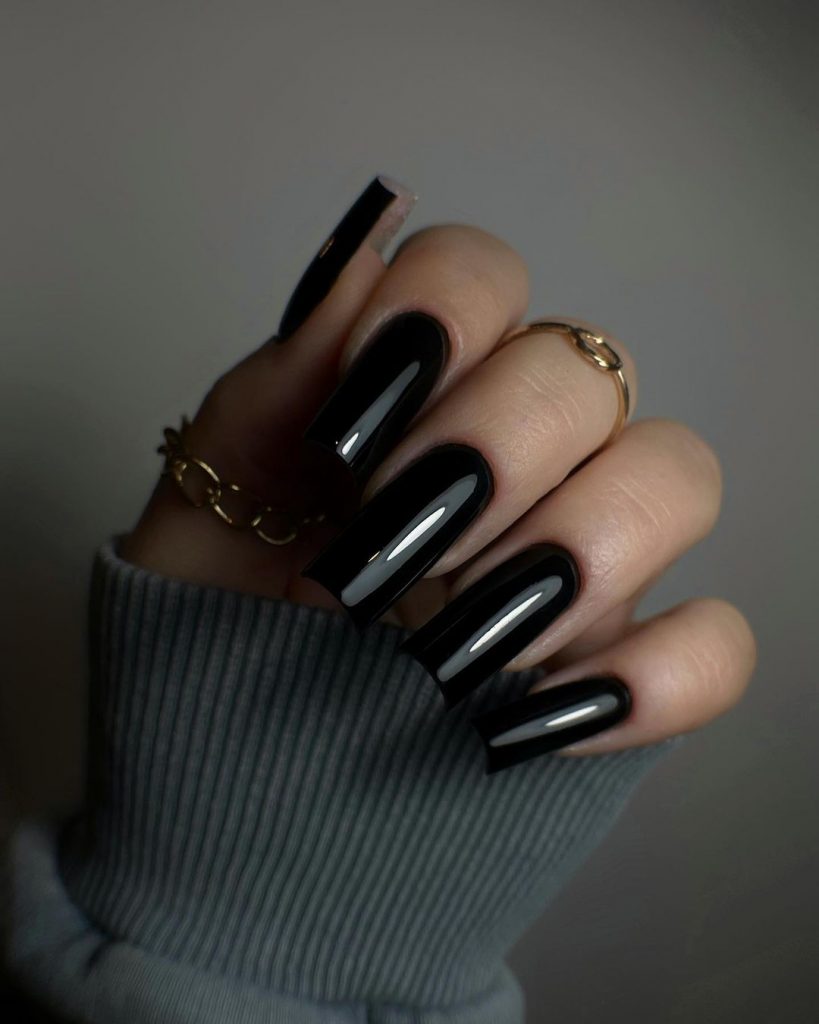
Sleek and Shiny Black for a Classic Look
This black nail design is the epitome of classic elegance. The long square nails provide a sleek canvas for the high-shine black polish, creating a look that is both sophisticated and versatile. Whether you’re dressing up for a night out or simply want to add a bit of edge to your everyday style, this design is a go-to for any season.
Consumables:
- High-shine black nail polish (e.g., Dior “Black Out”)
- Clear top coat for added shine (e.g., Essie “Gel Setter”)
DIY Instructions:
- Apply a base coat to protect your nails.
- Carefully apply two coats of black polish, allowing each coat to dry thoroughly.
- Finish with a clear top coat to achieve a sleek, shiny finish that lasts.
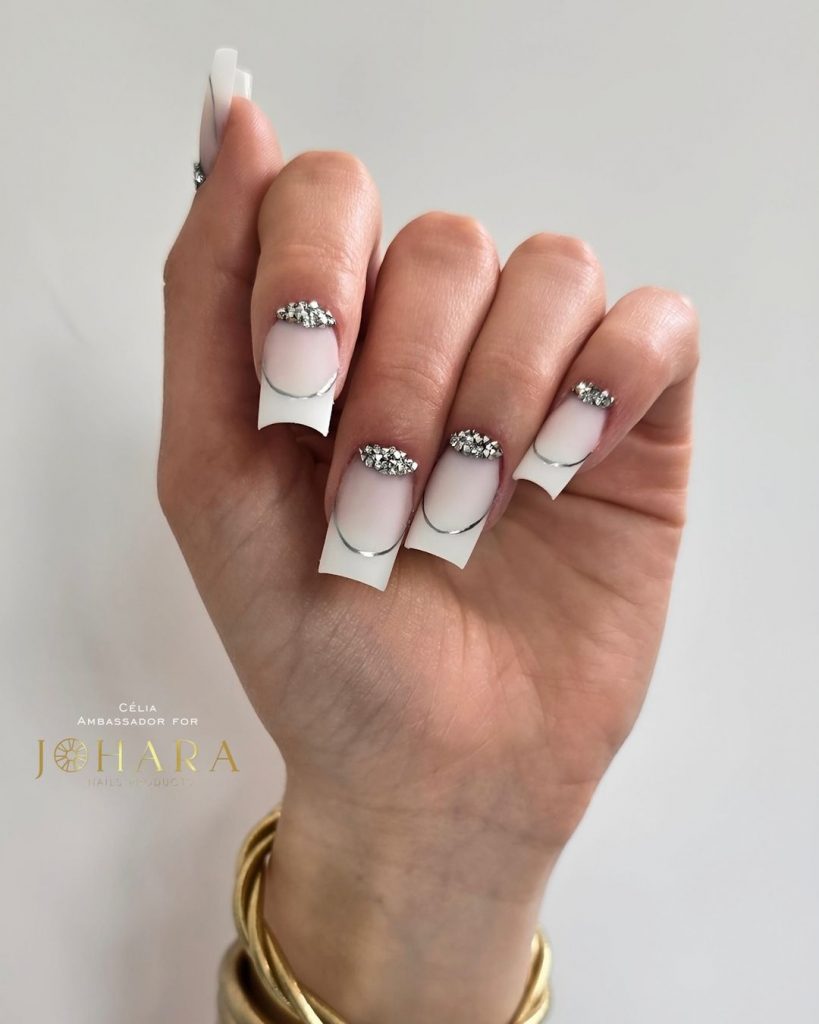
French Tip with Rhinestones for a Touch of Glamour
A French tip manicure gets a glamorous upgrade with the addition of rhinestones along the cuticle. The white tips are contrasted beautifully by the sparkle of the rhinestones, making this design perfect for special occasions. The square shape adds a modern twist to this classic look, while the rhinestones add just the right amount of bling.
Consumables:
- White nail polish for the tips (e.g., OPI “Alpine Snow”)
- Clear rhinestones for nail art
- Nail glue for securing rhinestones
- French tip guides for precise application
DIY Instructions:
- Start with a base coat to protect your nails.
- Apply the white polish to the tips using French tip guides for a clean, even line.
- Use nail glue to carefully apply rhinestones along the cuticle line, pressing gently to ensure they adhere properly.
- Finish with a clear top coat to secure the rhinestones and add a glossy finish.
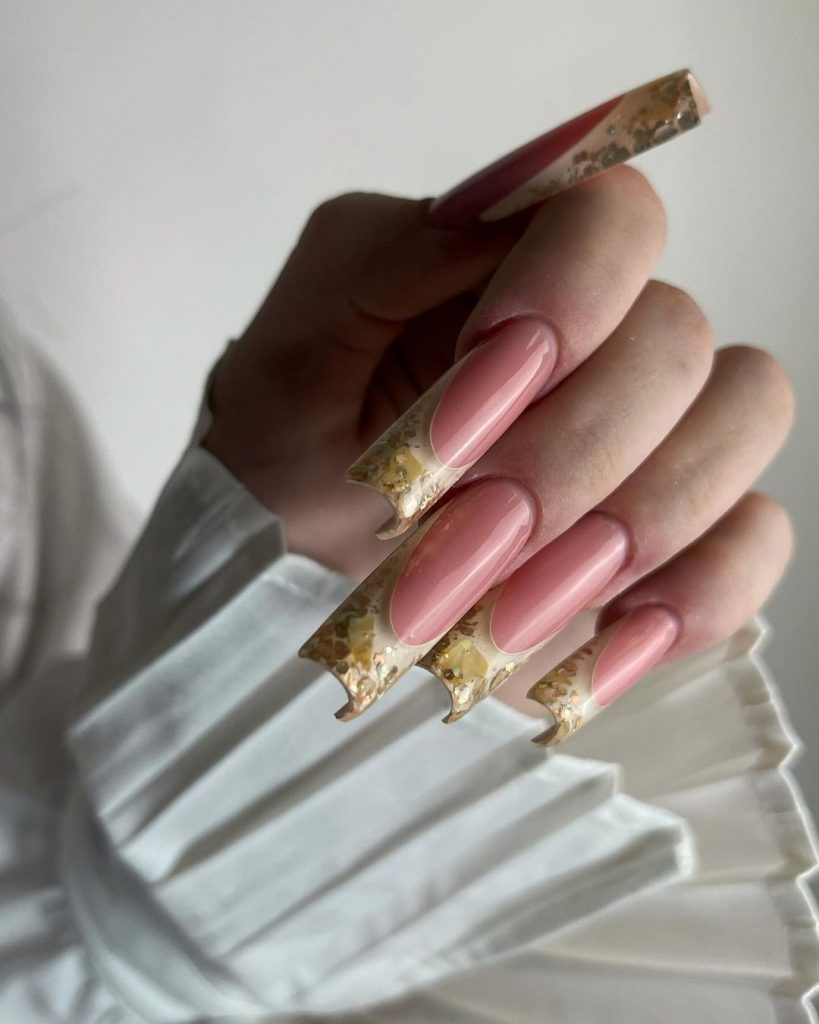
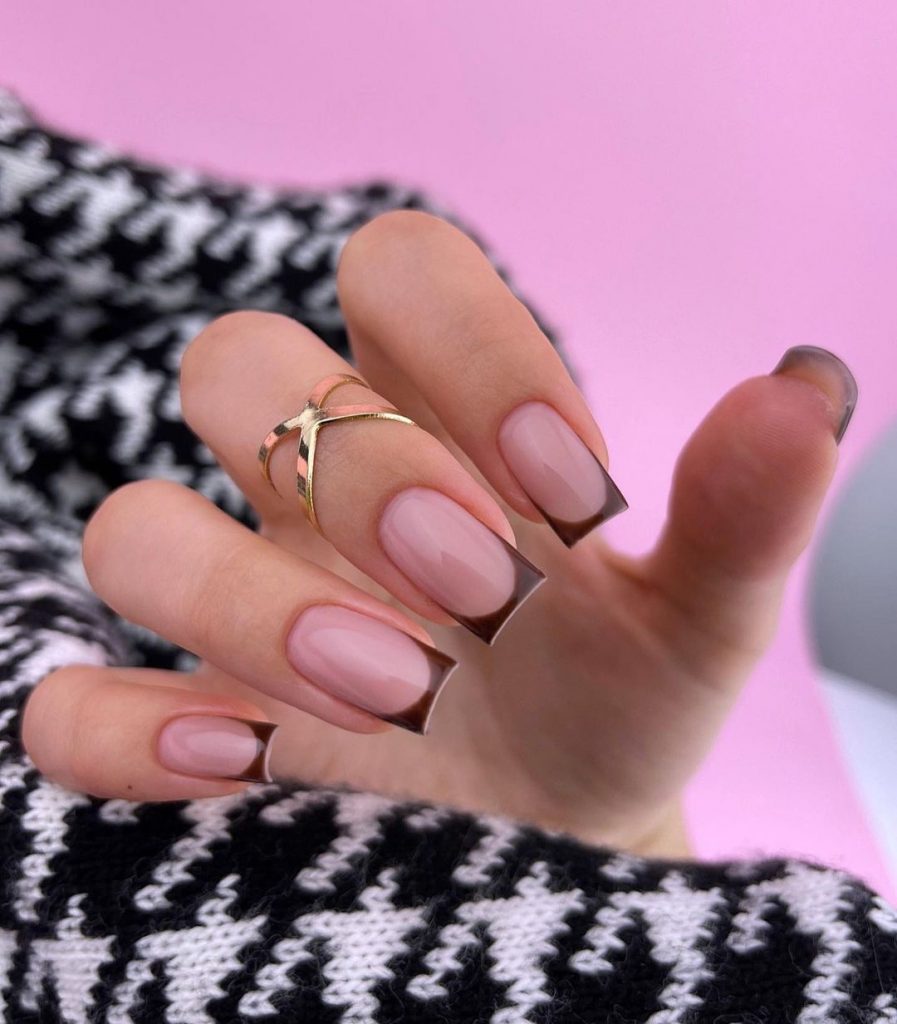
Golden Glam with a Retro Twist
This nail design merges a modern aesthetic with retro-inspired elements, offering a fresh take on French tips with a golden twist. The long square shape provides an ideal canvas for the intricate golden flake detailing that hugs the edges of the tips, creating a unique and elegant look. The soft pink base adds a subtle touch of femininity, making this design perfect for those looking to make a statement without going overboard. The curve of the golden tips enhances the shape of the nails, giving them a sophisticated and luxurious feel.
Consumables:
- Soft pink nail polish (e.g., Essie “Ballet Slippers”)
- Gold foil flakes (e.g., Misa Nail Art Foil)
- Clear gel polish for sealing (e.g., Gelish Top It Off)
- French tip guides for precision
DIY Instructions:
- Start by applying a base coat to your nails.
- Apply two coats of soft pink polish, allowing each layer to dry completely.
- Use French tip guides to apply the gold foil flakes to the tips of the nails, pressing them gently into place.
- Seal the design with a clear gel polish and cure under a UV lamp for long-lasting wear.
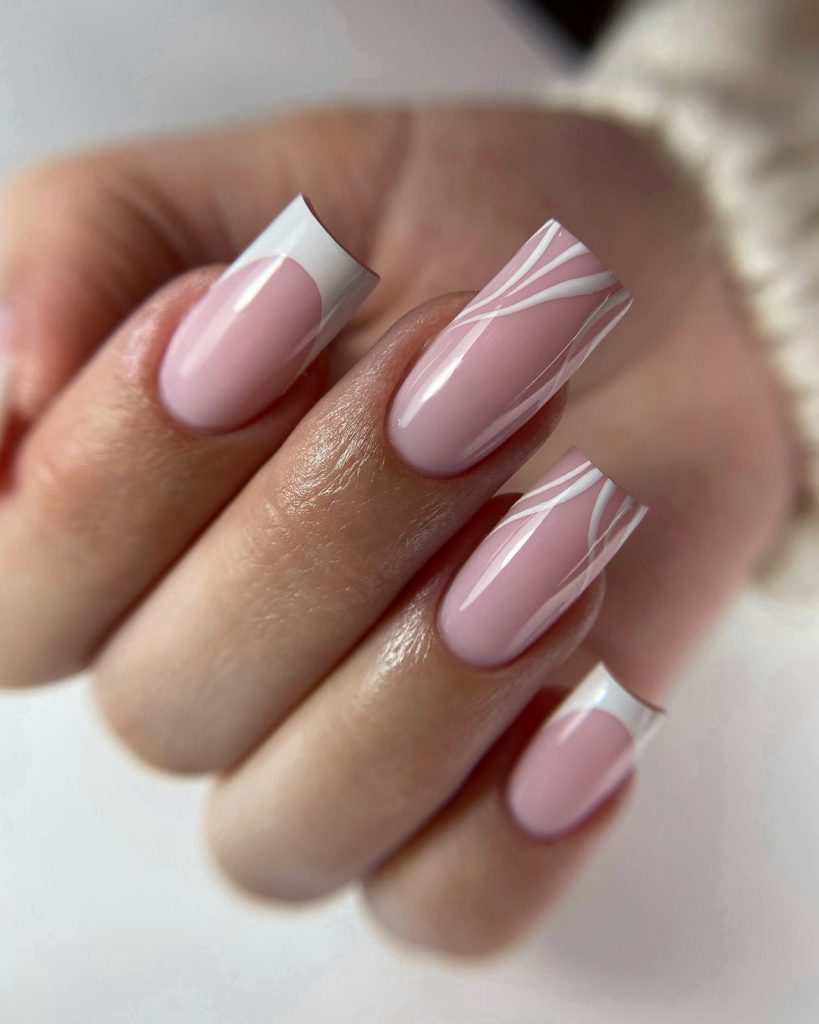
Modern French Tips with a Minimalist Edge
This design brings a minimalist yet pretty twist to the classic French tip manicure. The medium length nails are adorned with sleek white tips, while the accent nail features delicate white lines that add a modern flair. The square shape of the nails enhances the clean lines and gives a refined, aesthetic look that is perfect for those who love a simple yet chic design. The use of negative space adds a touch of sophistication, making this look both trendy and timeless.
Consumables:
- Soft pink nail polish (e.g., OPI “Bubble Bath”)
- White nail polish for tips (e.g., Essie “Blanc”)
- Nail striping tape or a fine nail art brush for line work
- Clear top coat for shine and protection
DIY Instructions:
- Begin with a base coat to protect your nails.
- Apply two coats of soft pink polish and allow it to dry.
- Use French tip guides to create clean, crisp white tips on each nail.
- For the accent nail, use striping tape or a fine brush to create delicate white lines over the pink base.
- Seal the design with a clear top coat for added shine and durability.
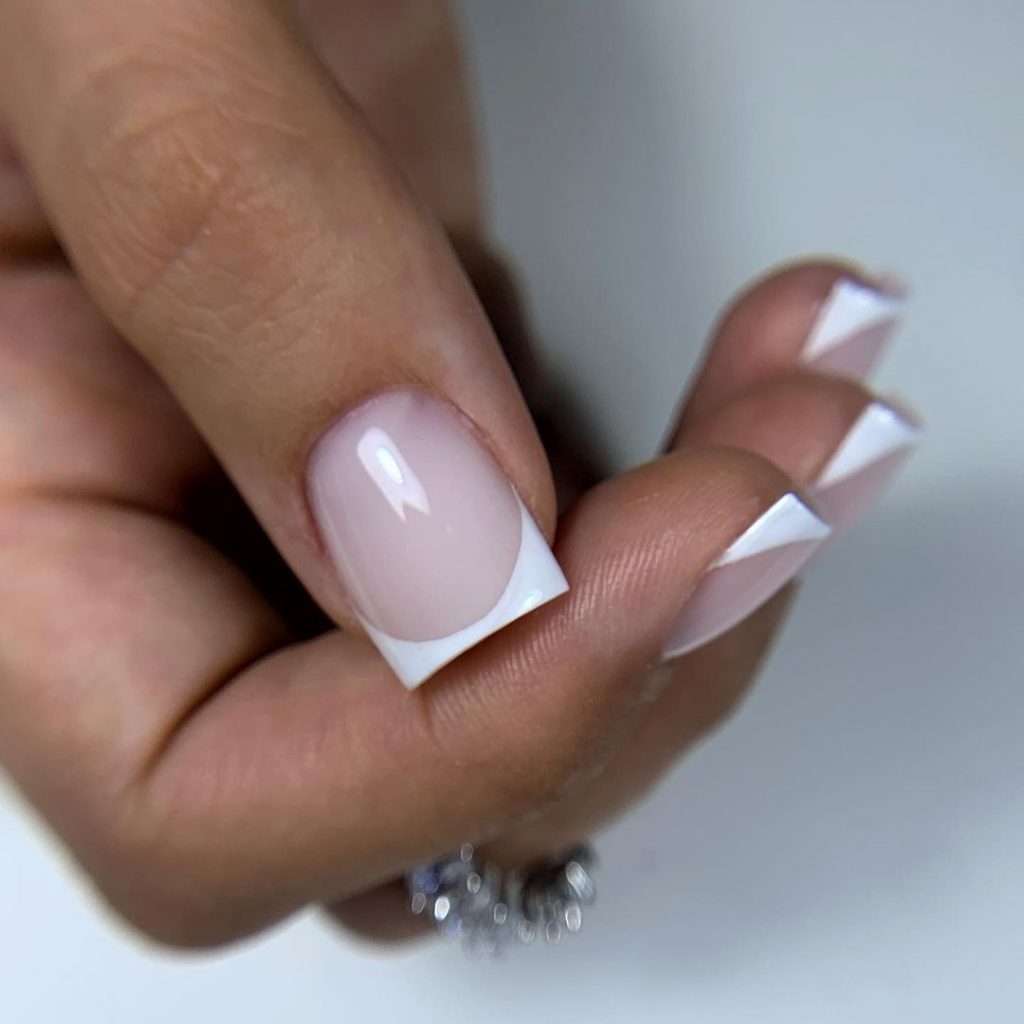
Short and Chic White French Tips
This short square nail design is a minimalist’s dream come true. The clean white French tips contrast beautifully with the natural pink base, creating a look that is both elegant and subtle. The short length makes it practical for everyday wear, while the crisp white tips add a touch of sophistication. This design is perfect for those who prefer a basic, no-fuss manicure that still makes a polished statement.
Consumables:
- Clear or pale pink base coat (e.g., OPI “Bubble Bath”)
- White nail polish for the tips (e.g., Sally Hansen “White On”)
- French tip guides for a clean application
- Top coat for shine and longevity
DIY Instructions:
- Start by applying a base coat to your nails.
- Apply one or two coats of a clear or pale pink polish, allowing it to dry between coats.
- Use French tip guides to apply the white polish to the tips of the nails, ensuring a crisp, clean line.
- Finish with a top coat to seal in the design and add shine.
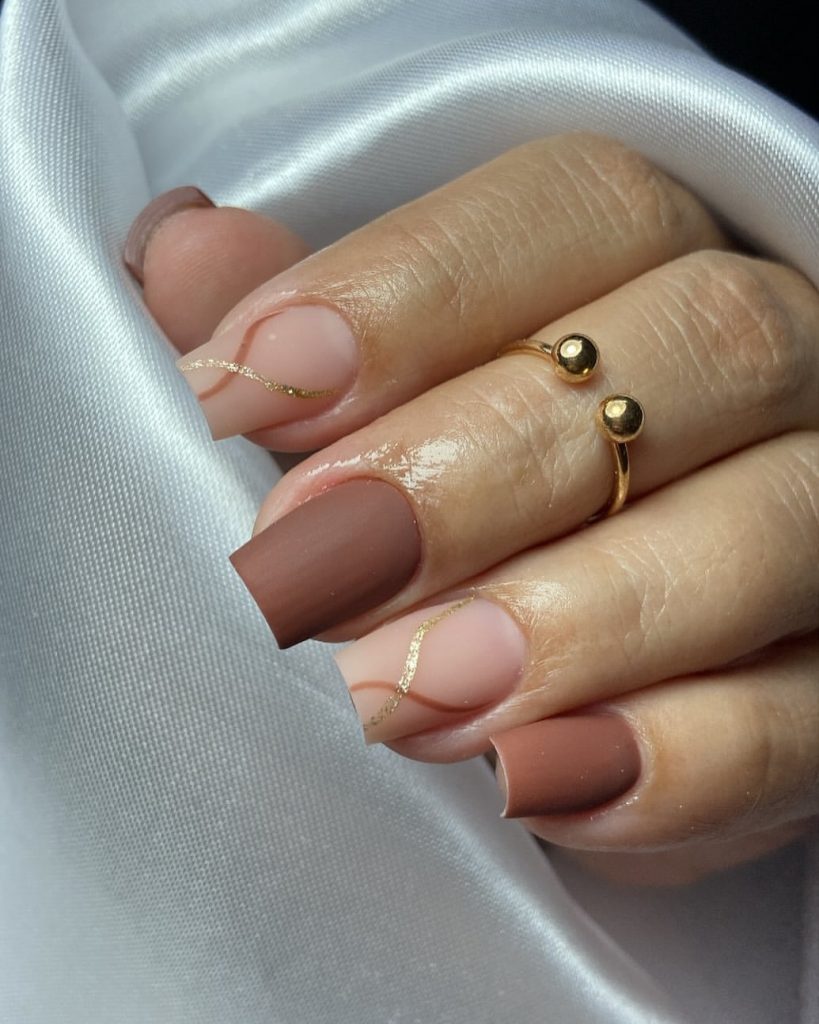
Elegant Matte Brown with Gold Accents
This design is a perfect example of how fall nails square 2024 can embrace warm, earthy tones while still maintaining an air of sophistication. The short brown matte nails are accented with delicate gold lines, creating a look that is both elegant and understated. The square shape adds a modern twist, while the matte finish keeps the design subtle yet trendy. This is an ideal choice for those looking for a simple autumn manicure that exudes class and style.
Consumables:
- Matte brown nail polish (e.g., Zoya “Lou”)
- Gold nail striping tape or a fine nail art brush with gold polish
- Matte top coat for a velvety finish (e.g., Essie Matte About You)
DIY Instructions:
- Begin by applying a base coat to protect your nails.
- Apply two coats of matte brown polish, allowing each coat to dry completely.
- Use striping tape or a fine brush to apply thin gold lines across the nails for a touch of elegance.
- Finish with a matte top coat to ensure the design stays chic and sophisticated.
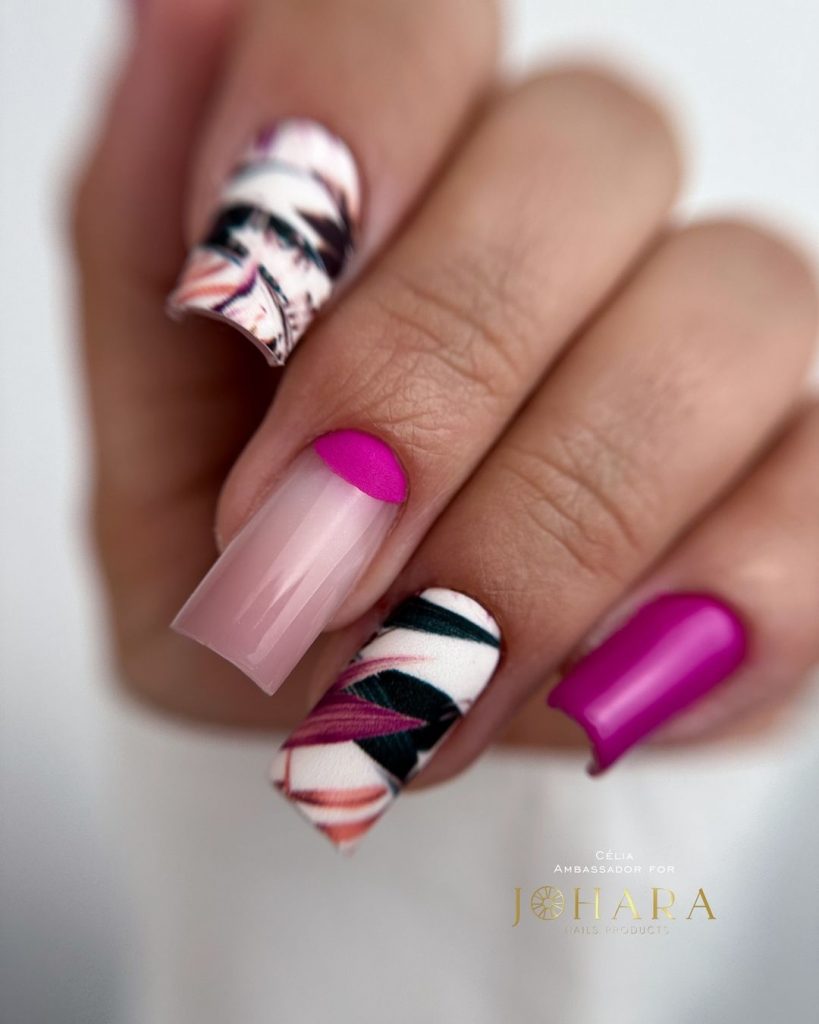
Bold and Colorful Floral Design
This vibrant nail design is a celebration of color and creativity. The long square nails feature a mix of bold patterns and colors, with a standout floral accent that is sure to turn heads. The combination of a matte pink half-moon design with colorful floral patterns gives the nails a playful, cute, and trendy vibe. This design is perfect for those who love to experiment with color and aren’t afraid to make a bold statement with their nails.
Consumables:
- Matte pink nail polish (e.g., OPI “Mod About You”)
- Floral nail decals or nail wraps (e.g., Sally Hansen Nail Art Stickers)
- Clear top coat to seal the design (e.g., Seche Vite)
DIY Instructions:
- Apply a base coat to your nails to start.
- Paint the nails with a matte pink polish, allowing each coat to dry thoroughly.
- Apply the floral nail decals to one or two accent nails, smoothing out any bubbles.
- Seal the design with a clear top coat to ensure long-lasting wear.
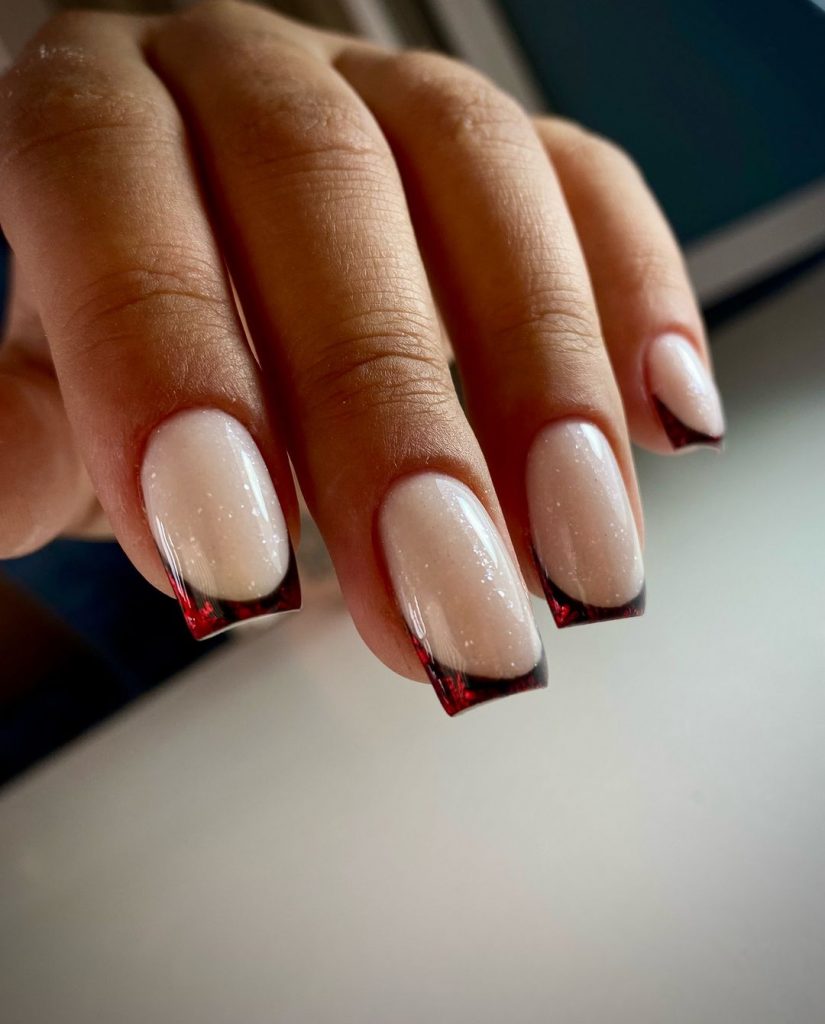
Chic Red-Tipped French with a Modern Twist
This design takes the classic French tip manicure and gives it a modern, edgy twist with a deep red accent. The square shape of the nails is enhanced by the sharp contrast between the white base and the dark red tips, creating a look that is both elegant and bold. The gradient effect on the red tips adds a subtle touch of sophistication, making this design perfect for those who want a refined yet trendy manicure.
Consumables:
- White base polish with a hint of sparkle (e.g., Essie “Pearl Perfection”)
- Deep red nail polish for tips (e.g., OPI “We the Female”)
- French tip guides for precise application
- Top coat to seal the design and add shine
DIY Instructions:
- Start with a base coat to protect your nails.
- Apply two coats of the white polish, allowing it to dry completely.
- Use French tip guides to apply the deep red polish to the tips, creating a gradient effect if desired.
- Finish with a top coat to enhance the shine and durability of your manicure.
Nude Perfection for a Timeless Look
This medium length square nail design is the epitome of timeless elegance. The nude color is both subtle and versatile, making it a go-to for any occasion. The glossy finish gives the nails a polished look, while the square shape adds a modern edge. This design is perfect for those who prefer a simple yet sophisticated manicure that complements any outfit.
Consumables:
- Nude nail polish (e.g., Zoya “Taylor”)
- Glossy top coat for shine (e.g., Seche Vite)
DIY Instructions:
- Begin with a base coat to protect your nails.
- Apply two coats of nude polish, allowing each layer to dry thoroughly.
- Finish with a glossy top coat to give the nails a sleek, polished finish.
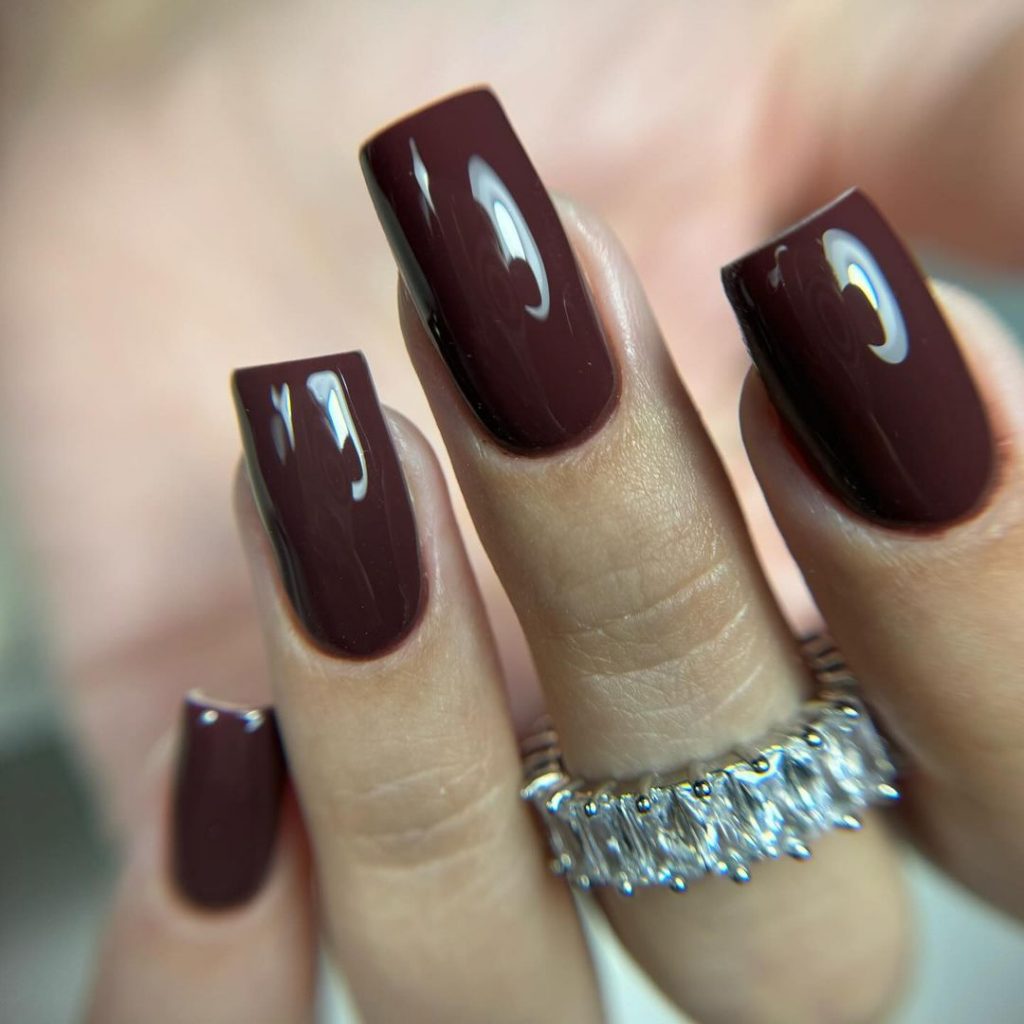
Deep Maroon for a Bold Statement
This maroon nail design is perfect for making a bold, confident statement. The deep, rich color is ideal for fall and pairs beautifully with the square shape, giving the nails a sophisticated yet edgy look. The glossy finish enhances the depth of the color, making this design perfect for those who want to embrace the darker tones of the season.
Consumables:
- Maroon nail polish (e.g., Essie “Angora Cardi”)
- Top coat for added shine and protection (e.g., Sally Hansen “Miracle Gel”)
DIY Instructions:
- Start with a base coat to protect your nails from staining.
- Apply two coats of maroon polish, ensuring even coverage.
- Finish with a top coat to seal in the color and add a glossy finish.
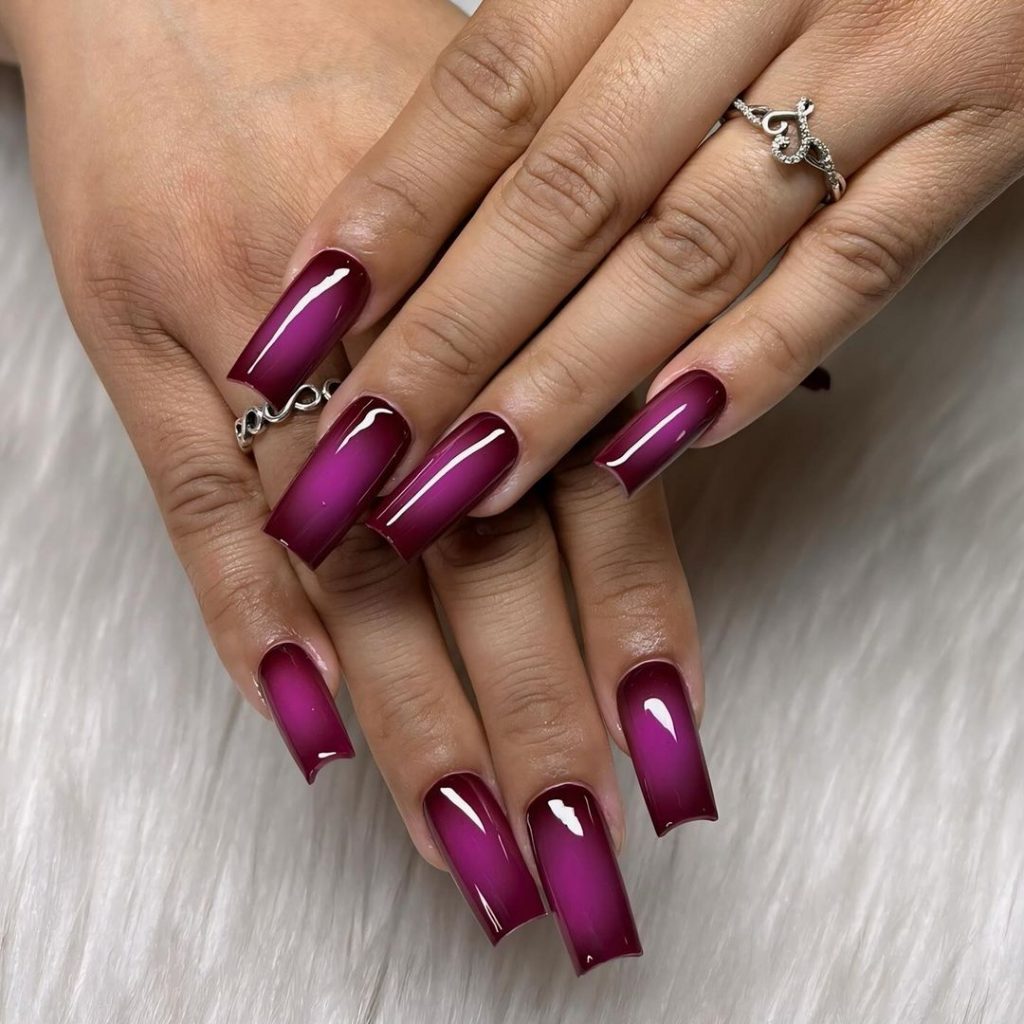
Gradient Maroon for an Ombre Effect
This long square nail design features a beautiful gradient maroon ombre, creating a look that is both trendy and elegant. The smooth transition from a lighter to a deeper shade of maroon gives the nails depth and dimension, making them perfect for those who love a bit of drama in their manicure. The glossy finish enhances the overall effect, making this a stunning choice for fall.
Consumables:
- Two shades of maroon nail polish, one lighter and one darker (e.g., OPI “Malaga Wine” and “Black Cherry Chutney”)
- Sponge for creating the ombre effect
- Top coat for shine (e.g., Essie Gel Couture Top Coat)
DIY Instructions:
- Apply a base coat to protect your nails.
- Paint a light layer of the lighter maroon shade on the entire nail.
- Use a sponge to dab the darker maroon shade onto the tips, blending it upwards to create a gradient effect.
- Finish with a top coat to smooth the ombre and add a glossy finish.
Bold Blue for a Pop of Color
This blue nail design is a bold and trendy choice for those looking to make a statement. The vibrant blue color is eye-catching and pairs perfectly with the square nail shape, adding a modern and playful touch to your manicure. The accent nail with a touch of glitter adds an extra dimension, making this design perfect for a birthday or any special occasion where you want your nails to stand out.

Consumables:
- Vibrant blue nail polish (e.g., Essie “Butler Please”)
- Silver glitter polish for the accent nail (e.g., Zoya “Trixie”)
- Top coat to seal and add shine (e.g., Seche Vite)
DIY Instructions:
- Apply a base coat to start.
- Apply two coats of vibrant blue polish, allowing each coat to dry fully.
- For the accent nail, apply a coat of silver glitter polish.
- Finish with a top coat to seal in the color and add a glossy finish.
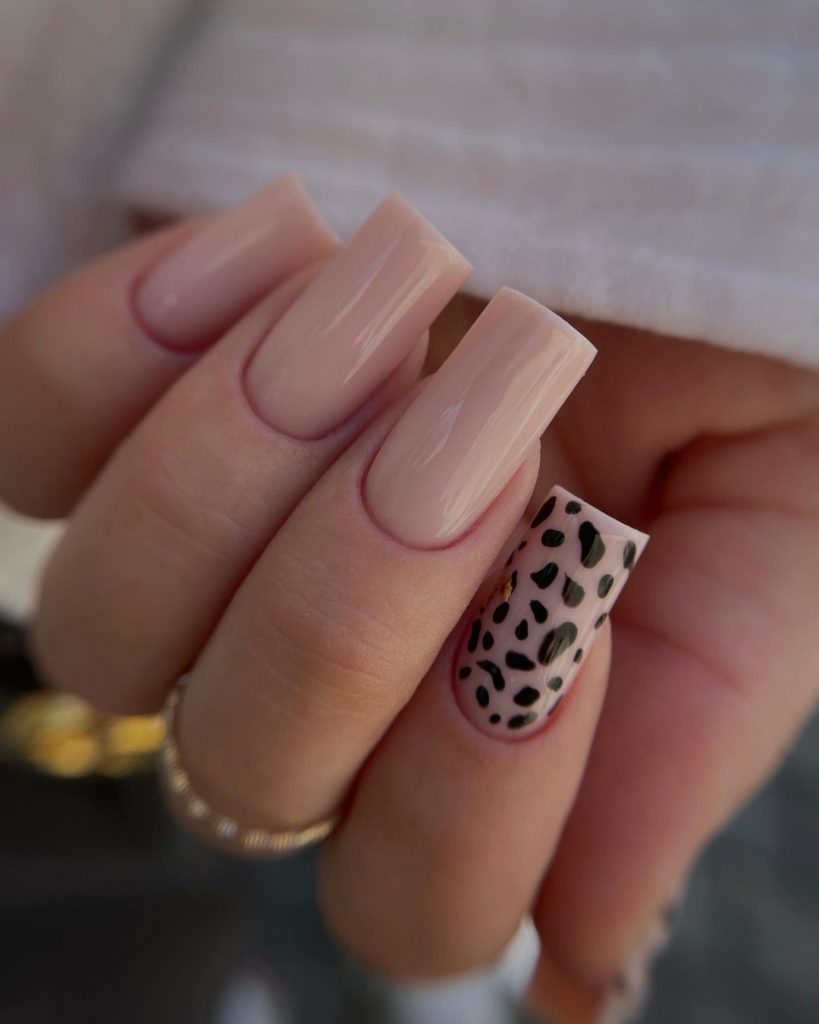
Nude Elegance with a Leopard Accent
This long square nail design combines classic nude with a playful twist by adding a leopard print accent nail. The nude polish creates a clean and elegant base that is both versatile and sophisticated, perfect for any occasion. The accent nail, featuring a minimalist leopard print, adds just the right amount of edge to this otherwise subtle and pretty design. This is an excellent choice for those who want a chic yet trendy look that stands out in a minimalist way.
Consumables:
- Nude nail polish (e.g., Essie “Topless & Barefoot”)
- Black and brown nail polish for the leopard print (e.g., OPI “Black Onyx” and “Chocolate Moose”)
- Thin nail art brush for detailing
- Clear top coat to seal the design
DIY Instructions:
- Apply a base coat to start.
- Paint all nails with two coats of nude polish, allowing each layer to dry completely.
- On the accent nail, use a thin nail art brush to create irregular black and brown spots to mimic a leopard print.
- Finish with a clear top coat to ensure the design stays intact and glossy.
Bold Black with Gold Leaf Accents
This black square nail design is a bold statement of elegance and sophistication. The deep black polish paired with gold leaf accents on a single nail creates a striking contrast that exudes luxury. The square shape enhances the drama of the dark polish, making this design perfect for those who love a classic look with a twist. The gold leaf detail adds a touch of opulence, making it ideal for a special event or a glamorous night out.

Consumables:
- High-gloss black nail polish (e.g., Essie “Licorice”)
- Gold leaf foil for accents
- Clear gel polish for sealing and curing (e.g., Gelish Top It Off)
- UV lamp for curing
DIY Instructions:
- Apply a base coat to your nails.
- Paint all nails with two coats of black polish, letting each coat dry thoroughly.
- On the accent nail, gently apply gold leaf foil using a small brush or tweezers, pressing it into the tacky surface.
- Finish with a clear gel polish and cure under a UV lamp for long-lasting shine and durability.
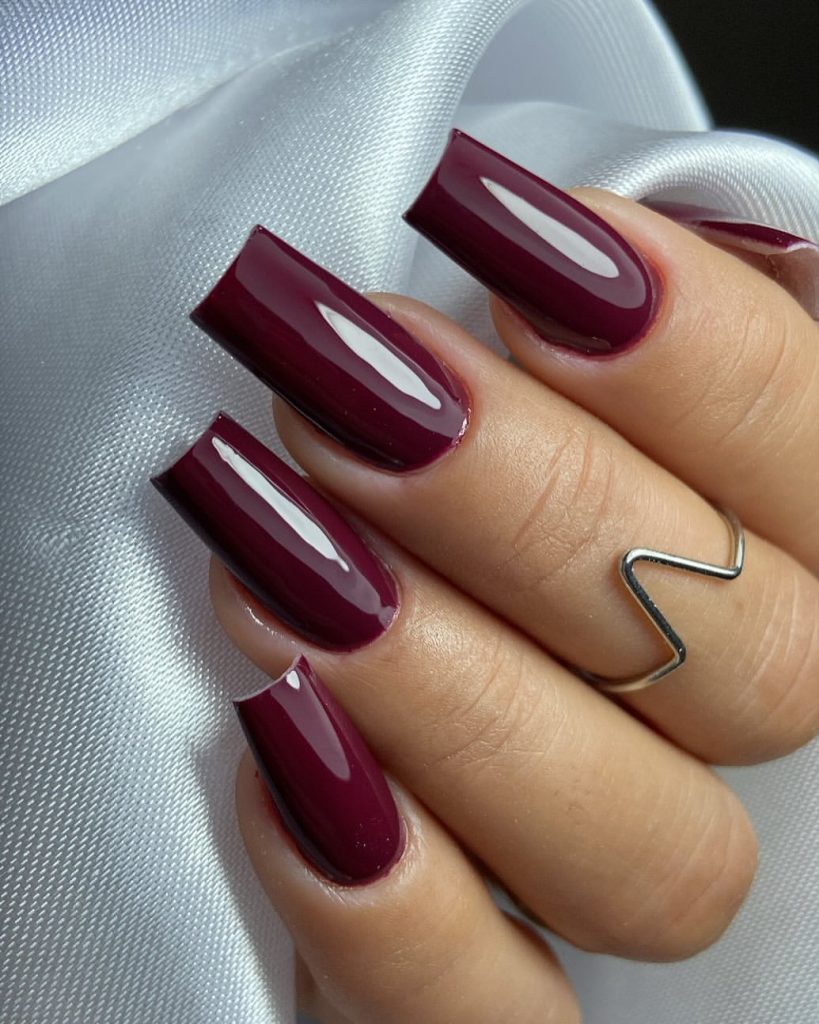
Glossy Maroon for a Rich Fall Look
This maroon square nail design is rich and luxurious, perfect for the fall season. The deep maroon color is both warm and inviting, making it a top choice for those who want to embrace the autumn palette. The glossy finish adds depth and shine, enhancing the beauty of the color and giving your nails a polished, high-end look. This design is both elegant and trendy, ideal for anyone who loves a classic fall manicure with a modern twist.
Consumables:
- Deep maroon nail polish (e.g., OPI “Malaga Wine”)
- Glossy top coat for added shine (e.g., Seche Vite)
DIY Instructions:
- Start with a base coat to protect your nails.
- Apply two coats of maroon polish, ensuring each coat is fully dry before proceeding.
- Finish with a glossy top coat to enhance the color and longevity of the manicure.
Cool Blue Marble with Crystal Accents
This design is a fresh and modern take on French tip nails, with cool blue marble patterns and crystal accents. The square shape provides a perfect canvas for the intricate marble design, which adds depth and texture to the nails. The crystal embellishments on one nail elevate the look, making it perfect for a birthday celebration or any special occasion where you want your nails to shine. This design is both trendy and elegant, offering a unique twist on classic styles.
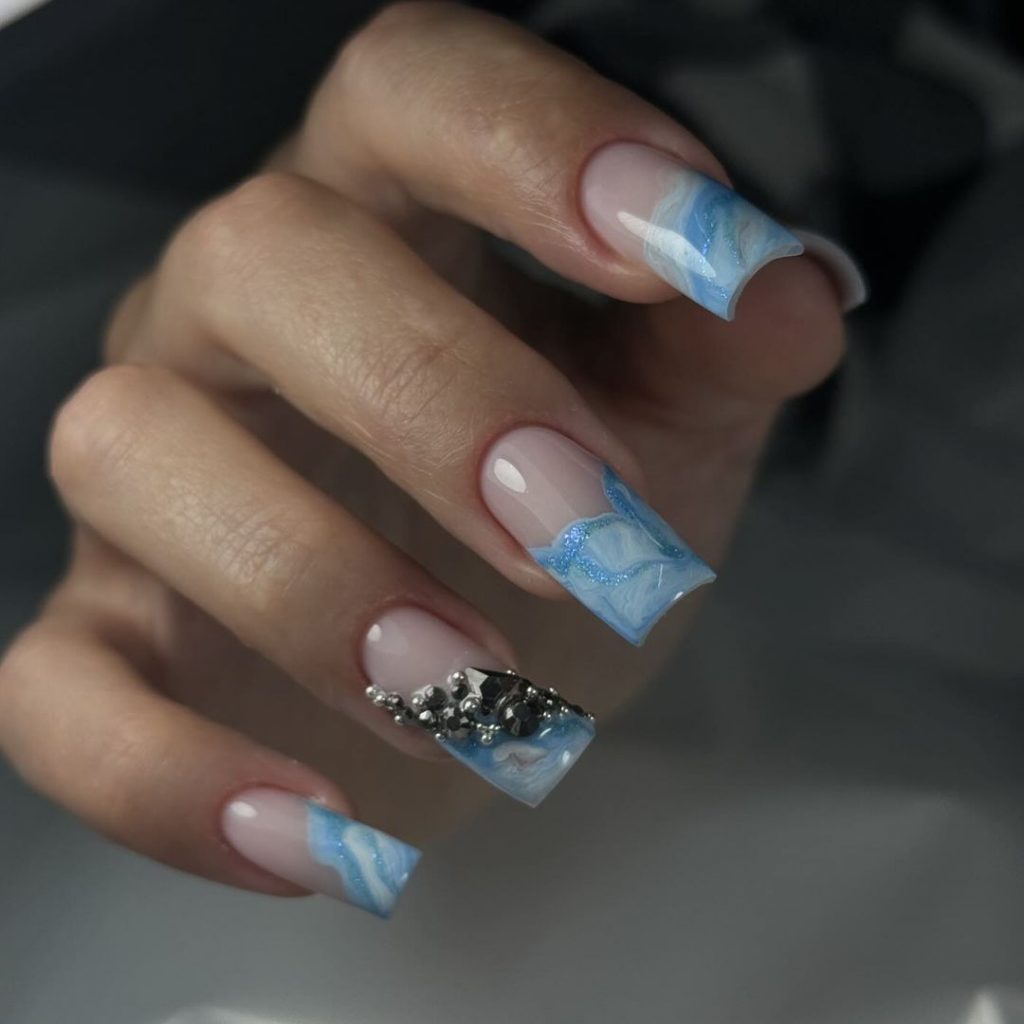
Consumables:
- Soft blue and white nail polishes for marbling (e.g., China Glaze “Sea Spray” and “White on White”)
- Clear crystals for nail art
- Nail art brush for creating the marble effect
- Clear top coat for shine and protection
DIY Instructions:
- Begin by applying a base coat.
- Use a nail art brush to swirl the blue and white polishes together, creating a marble effect on the tips of the nails.
- Carefully place the crystals onto the accent nail while the polish is still tacky, pressing them gently to adhere.
- Seal the design with a clear top coat to ensure everything stays in place.
Vibrant Jewel-Toned Extravaganza
This nail design is a true showstopper, featuring vibrant jewel tones and intricate embellishments. The long square nails are adorned with a rich mix of colors, glitter, and jewels, making them perfect for those who love to make a bold statement. The combination of purple hues and multi-faceted jewels creates a dazzling, almost regal look that is both trendy and extravagant. This design is ideal for special occasions where you want to showcase your personality through your nails.
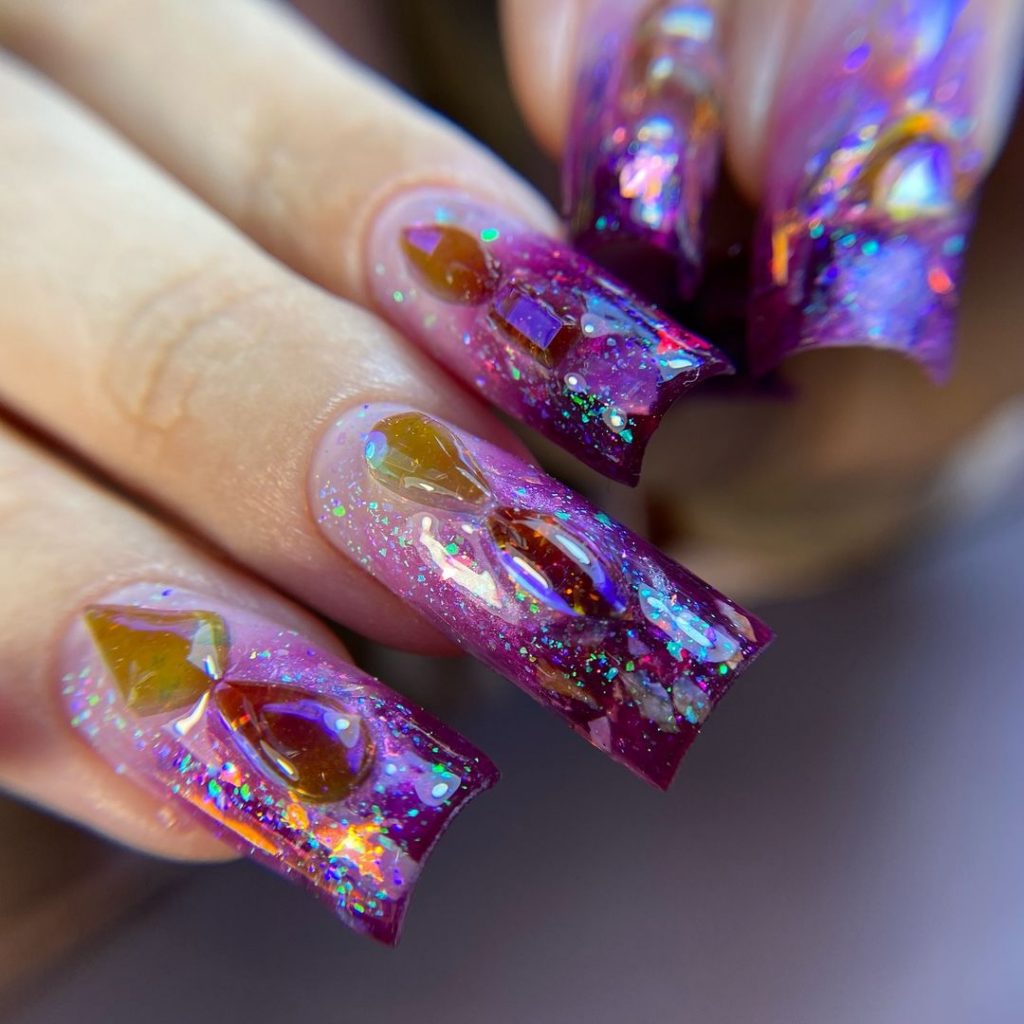
Consumables:
- Deep purple nail polish with glitter (e.g., Zoya “Thea”)
- Multi-colored jewel embellishments for nail art
- Clear gel polish for securing the jewels (e.g., Gelish Top It Off)
- UV lamp for curing
DIY Instructions:
- Start with a base coat to protect your nails.
- Apply two coats of deep purple polish, allowing each to dry completely.
- Use a clear gel polish to place and secure the jewel embellishments on the nails.
- Cure the design under a UV lamp to ensure it lasts, and finish with a clear top coat for added shine and durability.
Bright Red with a Chic Cow Print Accent
This bold and vibrant nail design combines a bright red with a chic cow print accent, making it a standout choice for those who love to experiment with color and pattern. The square shape adds structure to the playful design, while the cow print adds a fun, unexpected twist. This design is perfect for those who want to make a statement with their manicure while keeping it trendy and cute.
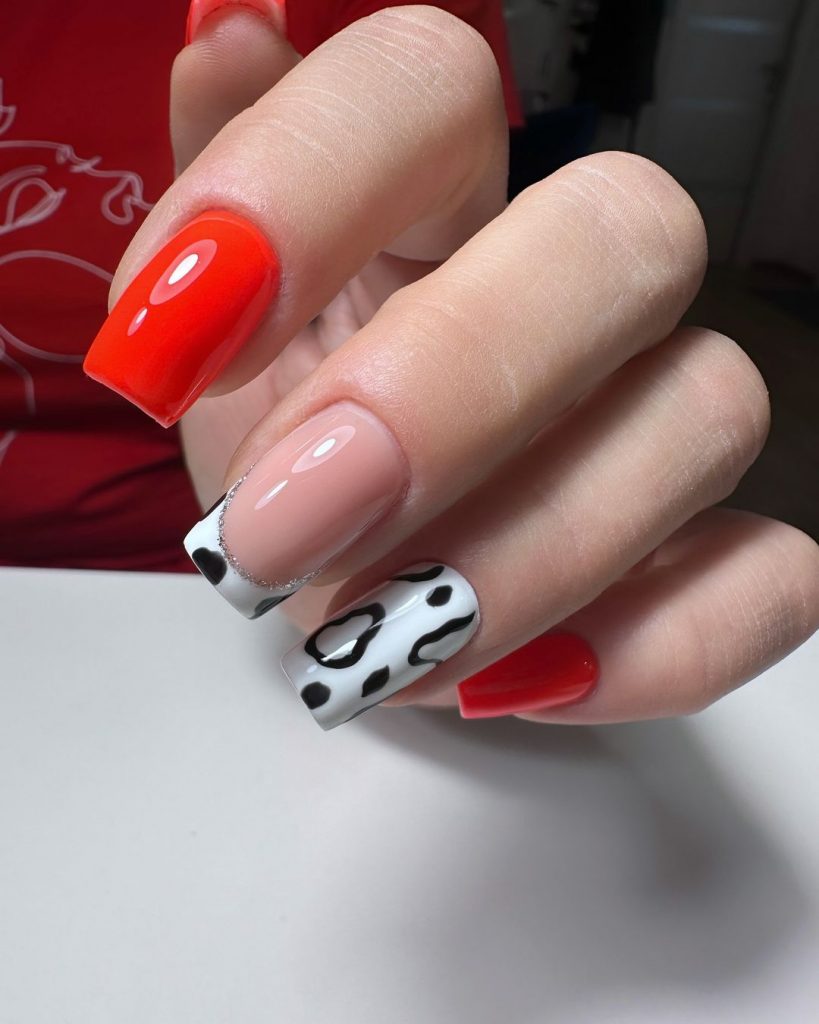
Consumables:
- Bright red nail polish (e.g., Essie “Forever Yummy”)
- White and black nail polish for the cow print (e.g., Sally Hansen “White On” and OPI “Black Onyx”)
- Fine nail art brush for the cow print
- Top coat for sealing and shine (e.g., Seche Vite)
DIY Instructions:
- Apply a base coat to protect your nails.
- Paint all nails with the bright red polish except for the accent nail.
- For the accent nail, paint it white and use a fine brush to create irregular black spots for the cow print.
- Seal with a top coat to ensure the design stays vibrant and glossy.
Soft Gray with Multicolor Flecks
This simple autumn design features a soft gray base with multicolor flecks, offering a delicate and understated look perfect for the season. The square shape enhances the clean lines of the design, while the subtle glitter adds a touch of sparkle without overwhelming the overall minimalist aesthetic. This design is ideal for those who prefer a subtle, elegant look that still has a bit of fun.
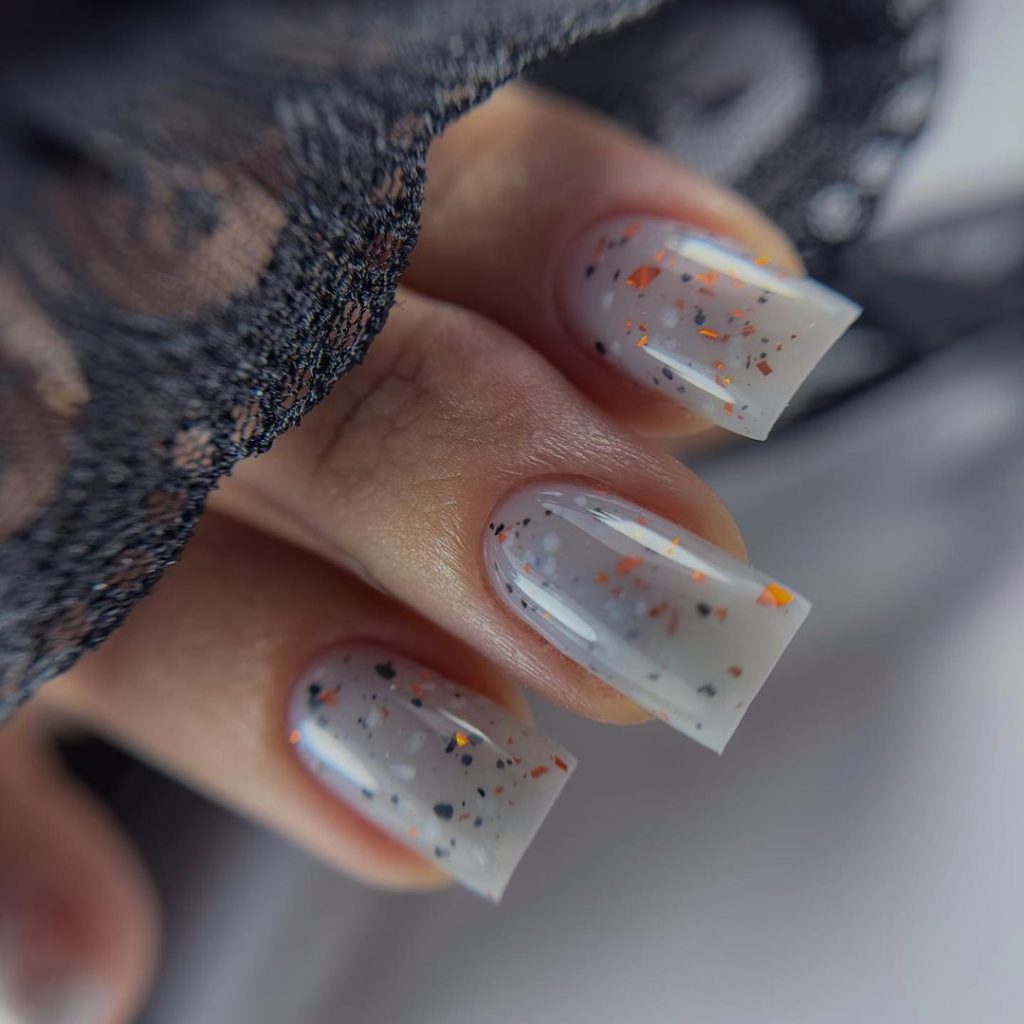
Consumables:
- Soft gray nail polish (e.g., OPI “I Can Never Hut Up”)
- Multicolor glitter polish (e.g., China Glaze “Fairy Dust”)
- Top coat for added shine (e.g., Essie Gel Couture Top Coat)
DIY Instructions:
- Begin with a base coat.
- Apply two coats of soft gray polish, allowing each coat to dry thoroughly.
- Apply one or two coats of the multicolor glitter polish for a scattered effect.
- Finish with a top coat to seal the design and add extra shine.
Classic Brown-Tipped French for Fall
This design offers a sophisticated twist on the classic French tip by using a warm brown instead of the traditional white. The result is a manicure that feels both fresh and timeless, perfect for embracing the fall season. The square shape of the nails complements the clean lines of the French tips, making this a simple yet elegant choice for those who prefer a subtle but polished look.
Consumables:
- Pale pink or nude base polish (e.g., Essie “Ballet Slippers”)
- Warm brown polish for tips (e.g., Zoya “Louise”)
- French tip guides for precision
- Top coat for shine and longevity (e.g., Seche Vite)
DIY Instructions:
- Start with a base coat to protect your nails.
- Apply two coats of the pale pink or nude base polish, letting it dry completely.
- Use French tip guides to create crisp brown tips on each nail.
- Seal the look with a top coat to enhance the shine and protect the design.
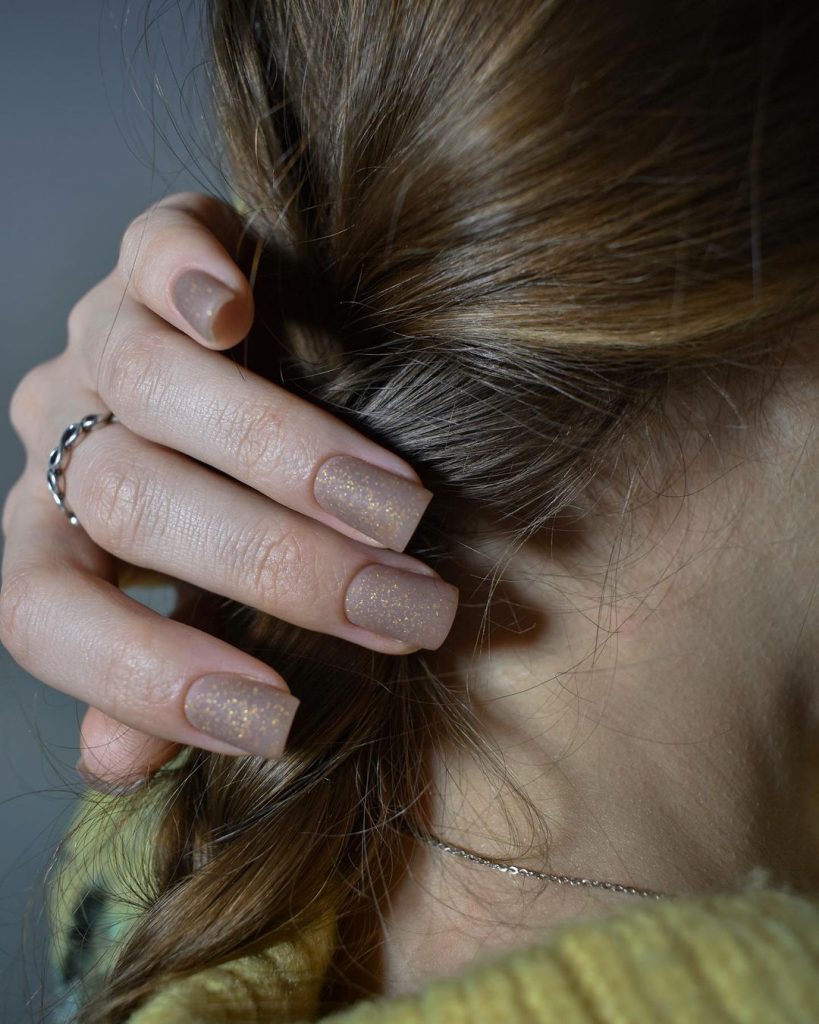
Nude with Gold Flecks for a Subtle Glow
This design is all about subtle elegance, featuring a nude base with delicate gold flecks that catch the light. The short square shape makes this manicure practical for everyday wear, while the gold accents add just the right amount of sparkle. This minimalist design is perfect for those who want a polished, subtle look that still feels special.
Consumables:
- Nude nail polish (e.g., OPI “Dulce de Leche”)
- Gold flecked polish for accents (e.g., Essie “Summit of Style”)
- Top coat for a smooth finish (e.g., Sally Hansen “Insta-Dri”)
DIY Instructions:
- Begin by applying a base coat.
- Apply two coats of nude polish, allowing each coat to dry fully.
- Lightly apply the gold fleck polish for a scattered effect, focusing on the tips or entire nail as desired.
- Finish with a top coat to smooth out the surface and add shine.
Lavender Swirls for a Playful Look
This trendy nail design features a playful combination of lavender and white swirls, creating a dynamic and eye-catching look. The swirls add movement and fun to the square-shaped nails, making this design perfect for someone who loves to experiment with patterns and colors. The mix of matte and glossy finishes adds depth and dimension, ensuring that your nails are both stylish and unique.

Consumables:
- Lavender and white nail polishes (e.g., OPI “Do You Lilac It?” and Essie “Blanc”)
- Nail art brush for creating swirls
- Matte and glossy top coats for different finishes
DIY Instructions:
- Apply a base coat to protect your nails.
- Paint a lavender base coat on all nails and let it dry completely.
- Use a nail art brush to create white swirls on each nail, adding as many or as few as desired.
- Seal the design with a top coat—use a matte finish on some nails for contrast, and a glossy finish on others.
Save Pin