When it comes to nail art, fall is the perfect season to experiment with rich, earthy tones and nature-inspired designs. Fall leaf nail designs are trending in 2024, offering a stunning way to embrace the beauty of autumn right at your fingertips. Whether you’re into simple, elegant styles or love bold, intricate details, there’s a fall leaf design to suit every taste. From short, almond-shaped nails to longer, stiletto and coffin shapes, these designs are versatile enough for any nail length. Ready to find your next manicure inspiration? Let’s dive into the top 27 fall leaf nail designs that will have you feeling the autumn vibes all season long!
Fall Leaf Nail Design – Elegant Simplicity
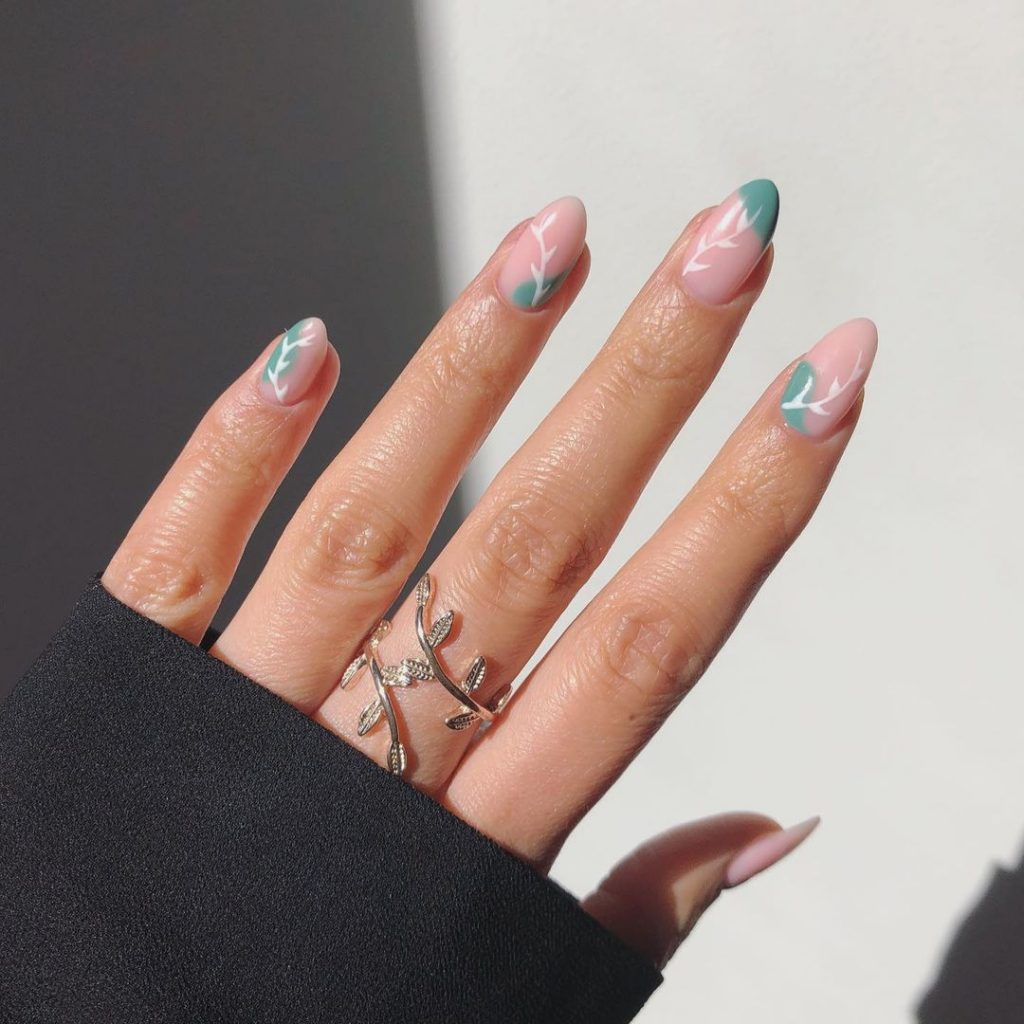
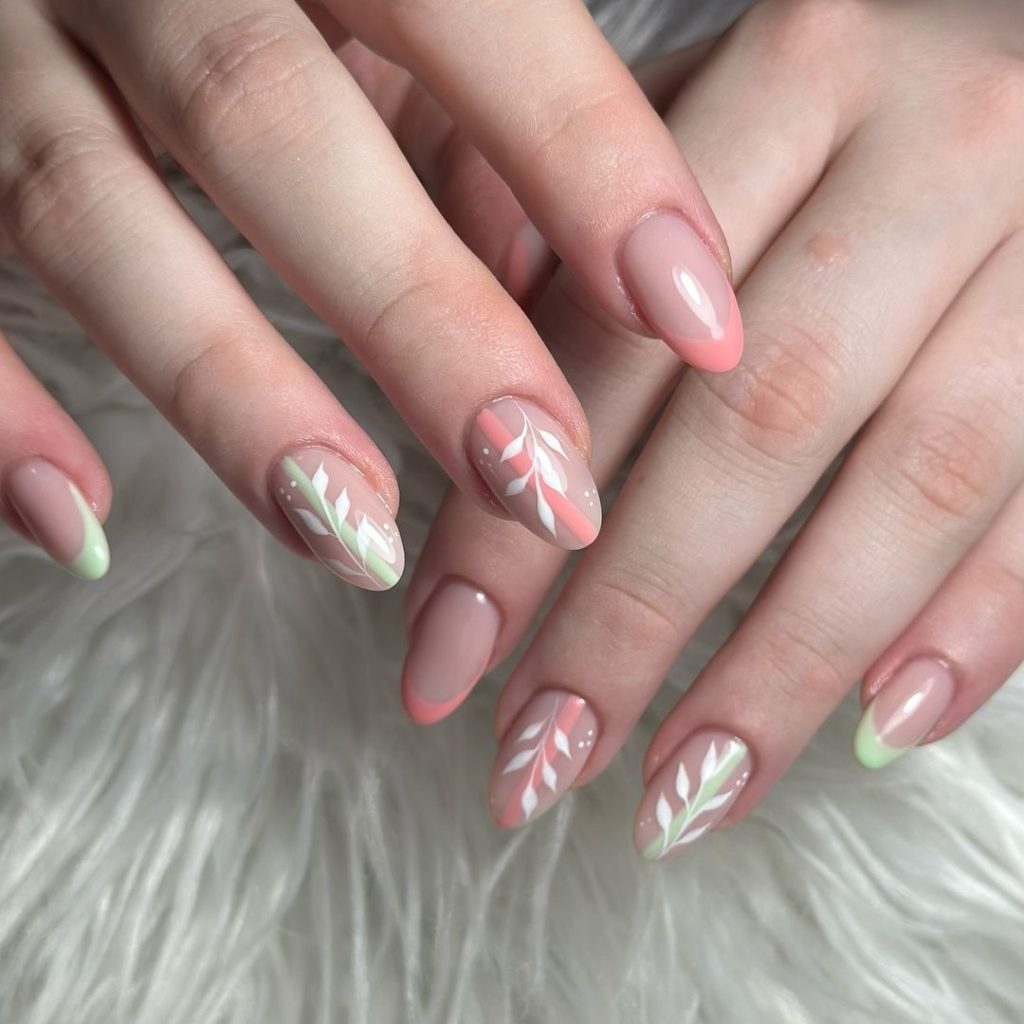
This nail design perfectly captures the early autumn vibe. The almond shape adds a touch of elegance, while the minimalist leaf pattern in white brings a sense of sophistication. The soft pink base pairs beautifully with the delicate green French tips, creating a fresh and light effect. This manicure is ideal for those who appreciate understated simplicity and style in one package.
Consumables
- Base coat: Essie’s “All in One”
- Soft pink nail polish: OPI “Bubble Bath”
- Green polish for French tips: Essie “Mint Candy Apple”
- White nail art pen for leaves: Sally Hansen Nail Art Pen in White
- Top coat: Seche Vite Fast Dry Top Coat
DIY Tutorial
- Start by applying a base coat to protect your natural nails.
- Once the base coat is dry, apply two coats of the soft pink polish.
- Use the green polish to create delicate French tips on each nail.
- With the white nail art pen, draw small, simple leaf patterns on the tips.
- Finish with a top coat to seal the design and add shine.
Bold and Striking Autumn Nails
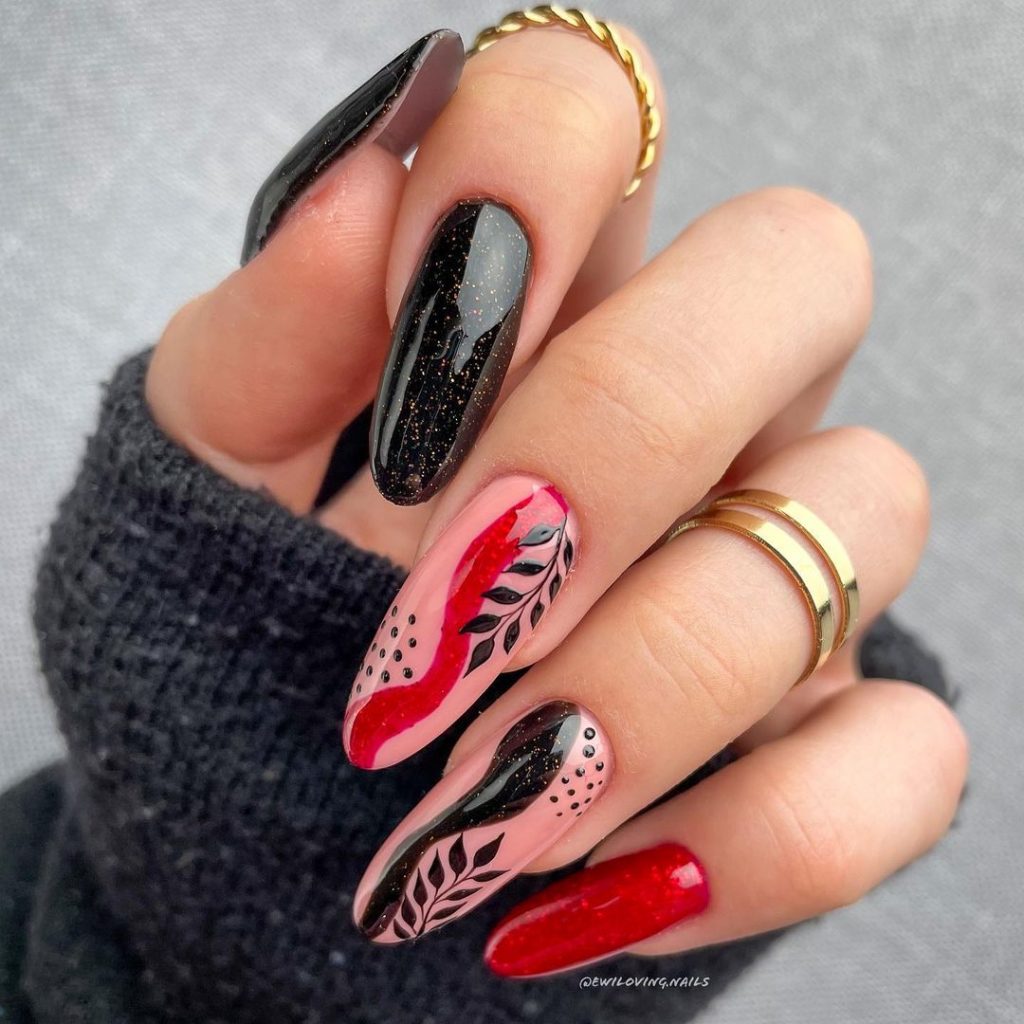
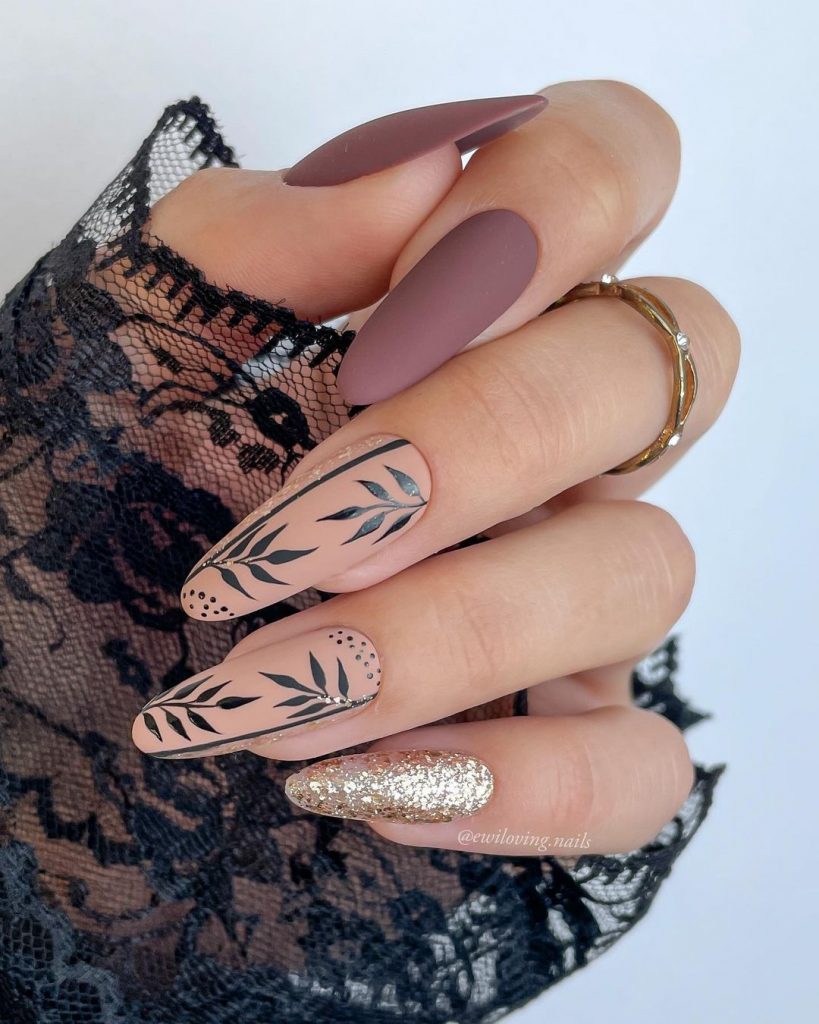
This bold design takes the traditional fall palette to new heights. The combination of black and red with intricate leaf details makes a powerful statement. The stiletto shape of the nails enhances the dramatic effect, making it perfect for those who love to stand out. The glossy finish adds depth and sophistication, making it an ideal choice for both casual and formal occasions.
Consumables
- Base coat: Orly Bonder Basecoat
- Black nail polish: Sally Hansen “Black Out”
- Red nail polish: OPI “Big Apple Red”
- Detail brush for leaf patterns: Beetles Nail Art Brush Set
- Top coat: Essie Gel Couture Top Coat
DIY Tutorial
- Apply a base coat to prep your nails.
- Paint alternating nails with black and red polish, applying two coats for full opacity.
- Use a detail brush and black polish to draw intricate leaf patterns on the red nails.
- Seal the design with a top coat for a high-gloss finish.
Warm Toned Matte Leaf Nails
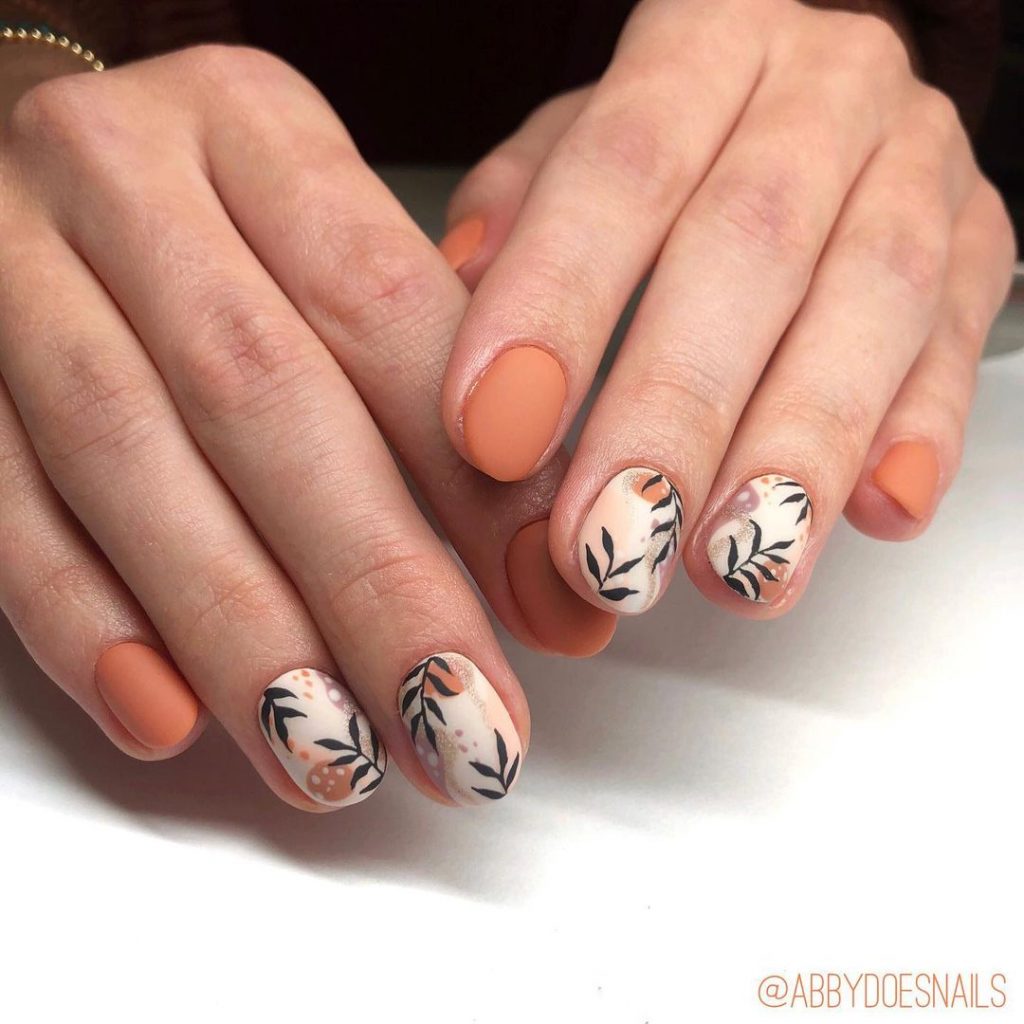
This design embraces the warm tones of autumn with a matte finish. The short square shape makes it versatile for everyday wear. The orange matte base is complemented by delicate black leaf patterns, adding a touch of nature-inspired elegance. The design’s simplicity combined with the warm tones makes it perfect for the cozy fall season.
Consumables
- Base coat: Zoya Anchor Base Coat
- Orange matte nail polish: Butter London “Marmalade Skies”
- Black nail art pen for leaves: Barry M Nail Art Pen in Black
- Matte top coat: OPI Matte Top Coat
DIY Tutorial
- Apply a base coat to protect your nails.
- Paint all your nails with the orange matte polish, allowing each coat to dry before applying the next.
- Use the black nail art pen to draw delicate leaf patterns on select nails.
- Finish with a matte top coat to seal and complete the look.
Neutral Toned Fall Leaves
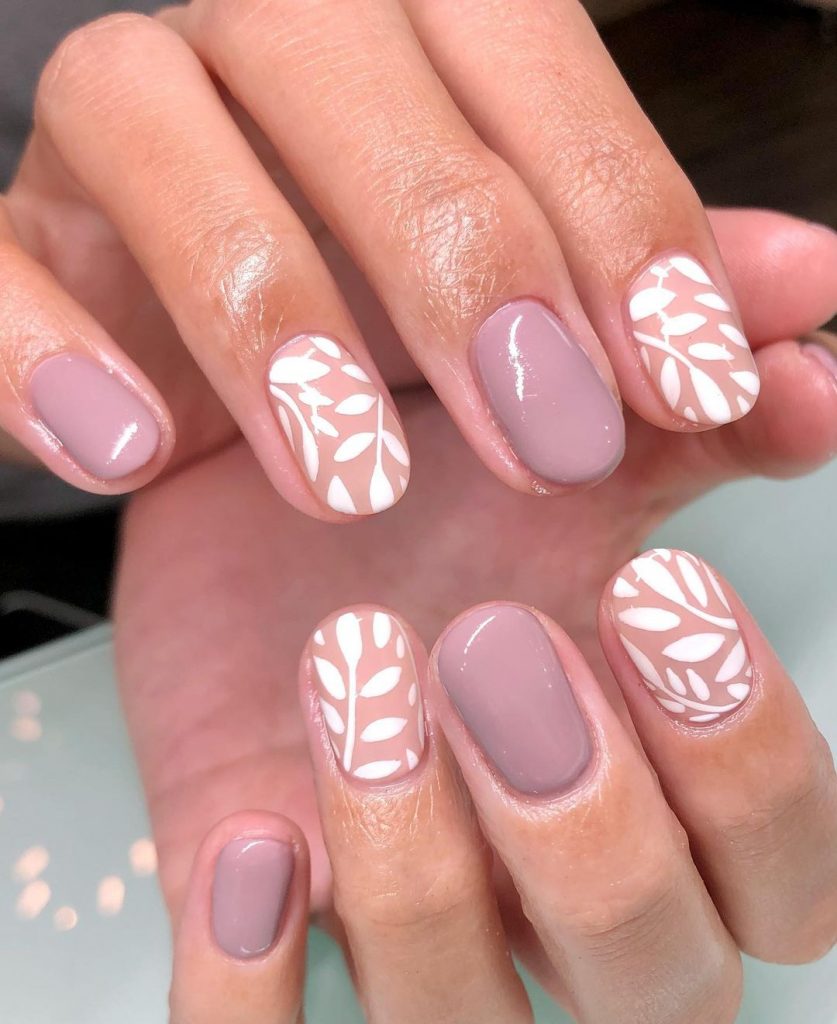
This manicure combines neutral tones with white leaf accents for a chic autumn look. The rounded nails are perfect for those who prefer a softer shape. The taupe and beige shades offer a sophisticated backdrop for the white leaf designs, making this manicure subtle yet stylish.
Consumables
- Base coat: Deborah Lippmann Hard Rock Base Coat
- Taupe nail polish: Essie “Chinchilly”
- Beige nail polish: OPI “Samoan Sand”
- White nail art pen for leaves: Winstonia Fine Nail Art Pen
- Top coat: Sally Hansen Miracle Gel Top Coat
DIY Tutorial
- Begin with a protective base coat.
- Apply taupe polish to half of your nails and beige polish to the other half, ensuring an even coat.
- Use the white nail art pen to draw small leaf patterns on the nails.
- Seal your design with a top coat for a long-lasting finish.
Pastel French Leaf Design
This design mixes pastel tones with a modern take on the classic French manicure. The almond shape provides a graceful silhouette, while the pastel green and pink tips are accented by white leaf patterns. It’s a refreshing and subtle way to wear fall-inspired nails, perfect for those who love a softer color palette.
Consumables
- Base coat: Essie “First Base”
- Nude base polish: Zoya “Taylor”
- Pastel green polish: Essie “Mint Candy Apple”
- Pastel pink polish: OPI “Mod About You”
- White nail art pen for leaves: Sally Hansen Nail Art Pen in White
- Top coat: CND Vinylux Weekly Top Coat
DIY Tutorial
- Start with a base coat to prep your nails.
- Apply the nude base polish for an even, smooth finish.
- Use pastel green and pink polishes to create French tips, alternating between colors on each nail.
- Draw delicate white leaf patterns over the tips using the nail art pen.
- Finish with a top coat for shine and durability.
Golden Leaf Accents
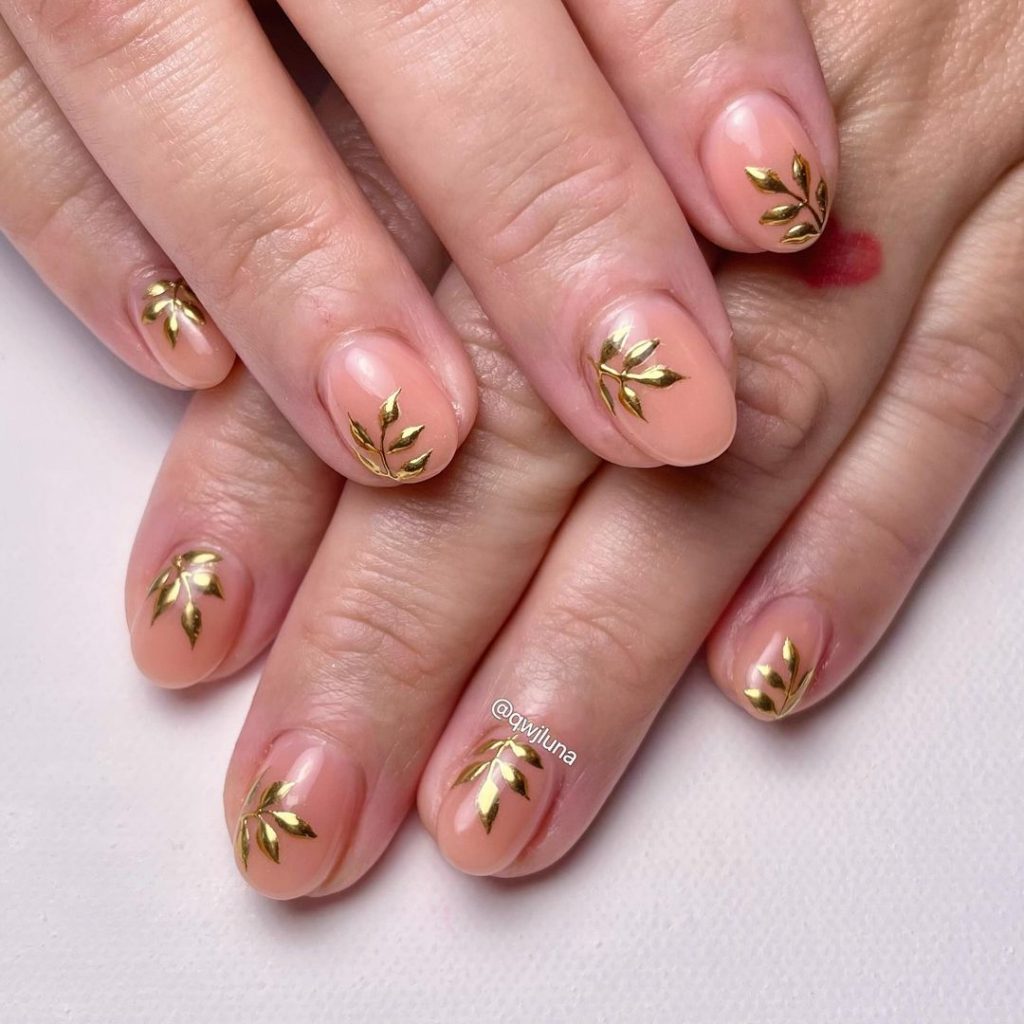
This design exudes luxury with its golden leaf accents on a nude base. The short, rounded nails keep the look elegant and refined. The gold foil leaves are strategically placed near the cuticles, adding a touch of opulence without overwhelming the overall minimalist style. This manicure is perfect for those who want a subtle yet luxurious look for the fall season.
Consumables
- Base coat: OPI Nail Envy
- Nude nail polish: Essie “Ballet Slippers”
- Gold leaf foil: Daily Charme Gold Leaf Flakes
- Nail glue: Makartt Nail Foil Glue
- Top coat: Zoya Armor Top Coat
DIY Tutorial
- Start with a base coat to strengthen your nails.
- Apply two coats of nude polish, letting each layer dry thoroughly.
- Use nail glue to carefully place the gold leaf flakes near the cuticles on each nail.
- Seal the design with a top coat to ensure the foil stays in place and adds a glossy finish.
Sage Green Leafy Elegance
This manicure embraces the calming tones of sage green with a matte finish, accented by delicate white leaf patterns. The almond-shaped nails add an element of sophistication, making this design both serene and stylish. It’s an excellent choice for those looking to incorporate nature-inspired tones into their fall nail look.

Consumables
- Base coat: Deborah Lippmann Hard Rock Base Coat
- Sage green nail polish: Zoya “Becca”
- White nail art pen: Sally Hansen Nail Art Pen in White
- Matte top coat: Butter London Matte Finish Shine Free Topcoat
DIY Tutorial
- Apply a base coat to prep your nails.
- Paint all nails with two coats of sage green polish for an even, matte base.
- Use a white nail art pen to draw delicate leaf patterns on each nail, focusing on the center.
- Finish with a matte top coat to maintain the subtle, natural look.
Deep Blue Autumn Vibes
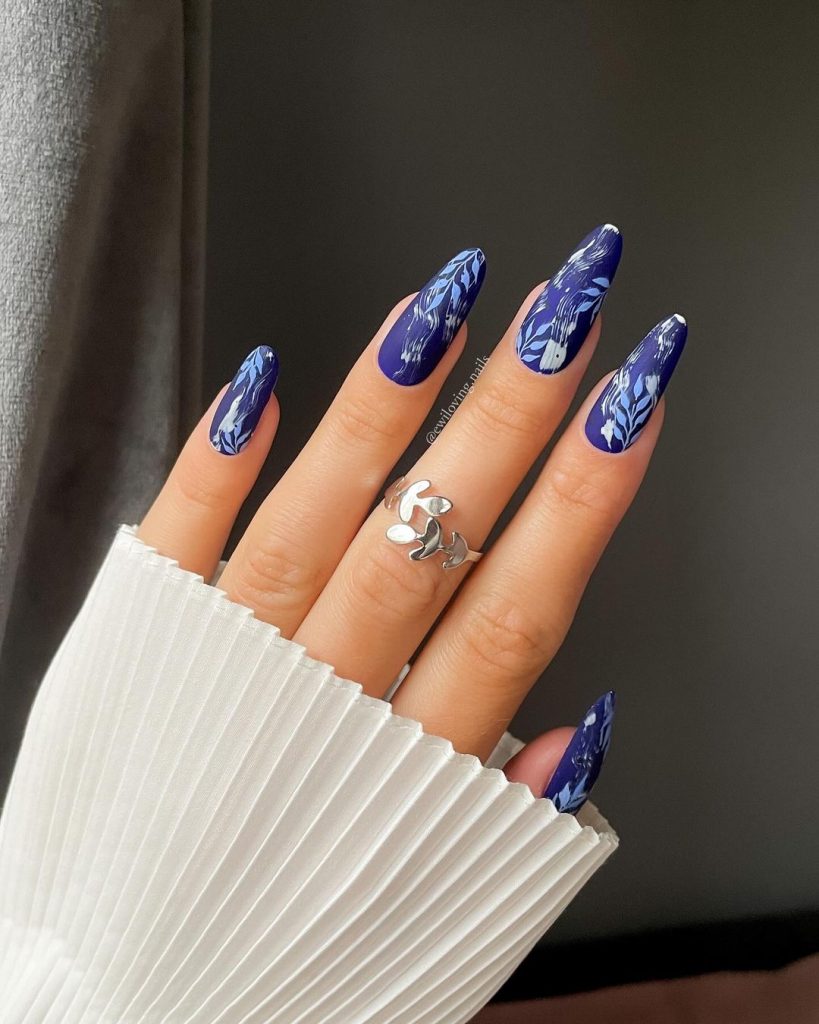
This striking manicure combines deep blue with intricate leaf designs, creating a bold autumn look. The long, almond-shaped nails give this design a dramatic flair, while the white and light blue leaves add a beautiful contrast. This design is perfect for making a statement during the fall season, blending elegance with a touch of whimsy.
Consumables
- Base coat: CND Stickey Base Coat
- Deep blue nail polish: OPI “Russian Navy”
- White and light blue nail art pen: Winstonia Fine Nail Art Pens in White and Light Blue
- Top coat: Essie Gel Couture Top Coat
DIY Tutorial
- Begin with a protective base coat.
- Apply two coats of deep blue polish, allowing each layer to dry completely.
- Use white and light blue nail art pens to create the intricate leaf designs, focusing on the tips and middle of the nails.
- Seal with a top coat to add shine and protect the artwork.
Neutral Glam with Glitter
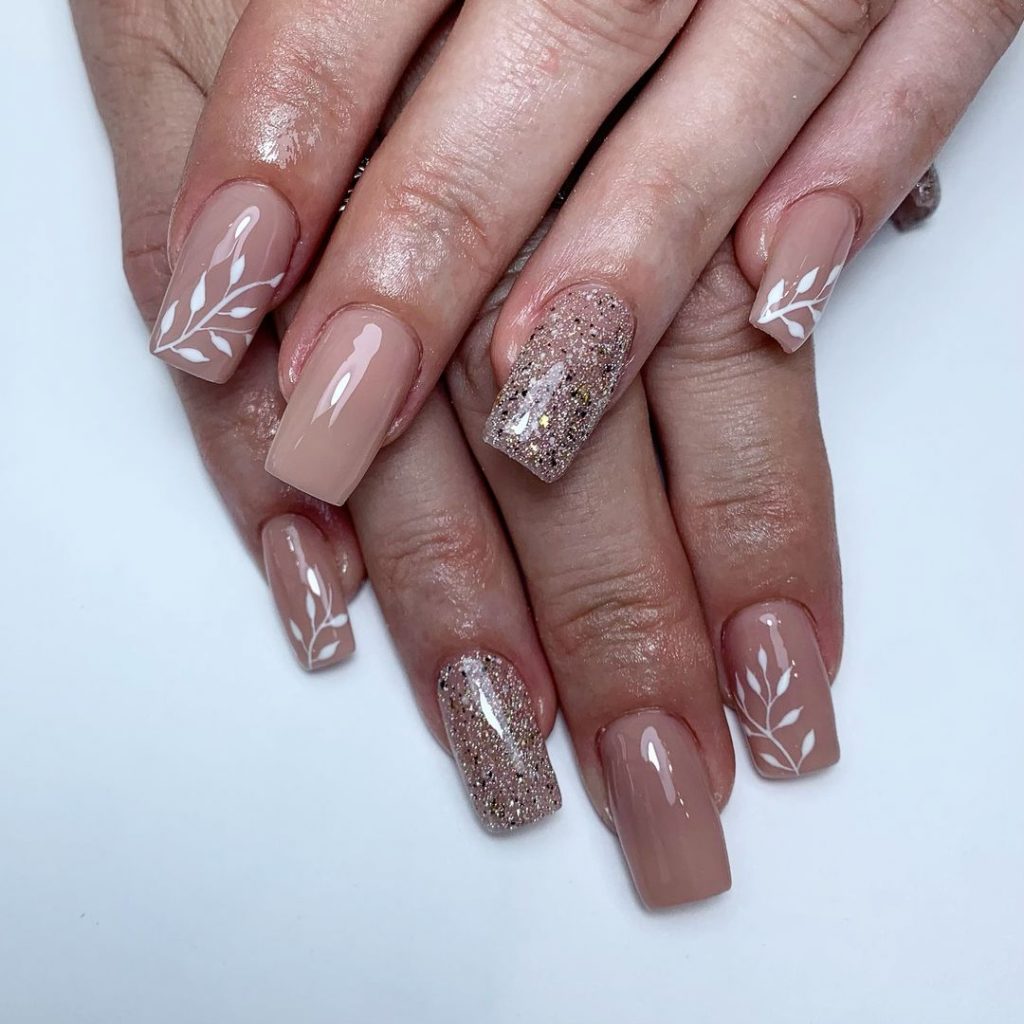
This neutral-toned manicure combines the simplicity of beige with the glamour of glitter. The square-shaped nails are adorned with delicate white leaf patterns, while the glitter accent nail adds a touch of sparkle. This design is a beautiful blend of subtlety and elegance, making it versatile for both casual and formal fall events.
Consumables
- Base coat: OPI Natural Nail Base Coat
- Beige nail polish: Essie “Sand Tropez”
- White nail art pen: Barry M Nail Art Pen in White
- Glitter polish: China Glaze “Fairy Dust”
- Top coat: Seche Vite Dry Fast Top Coat
DIY Tutorial
- Start with a base coat to protect your nails.
- Apply beige polish to most of your nails, leaving one or two nails for the glitter polish.
- Use the white nail art pen to draw leaf patterns on the beige nails.
- Apply glitter polish to the accent nail, allowing it to dry before sealing the entire manicure with a top coat.
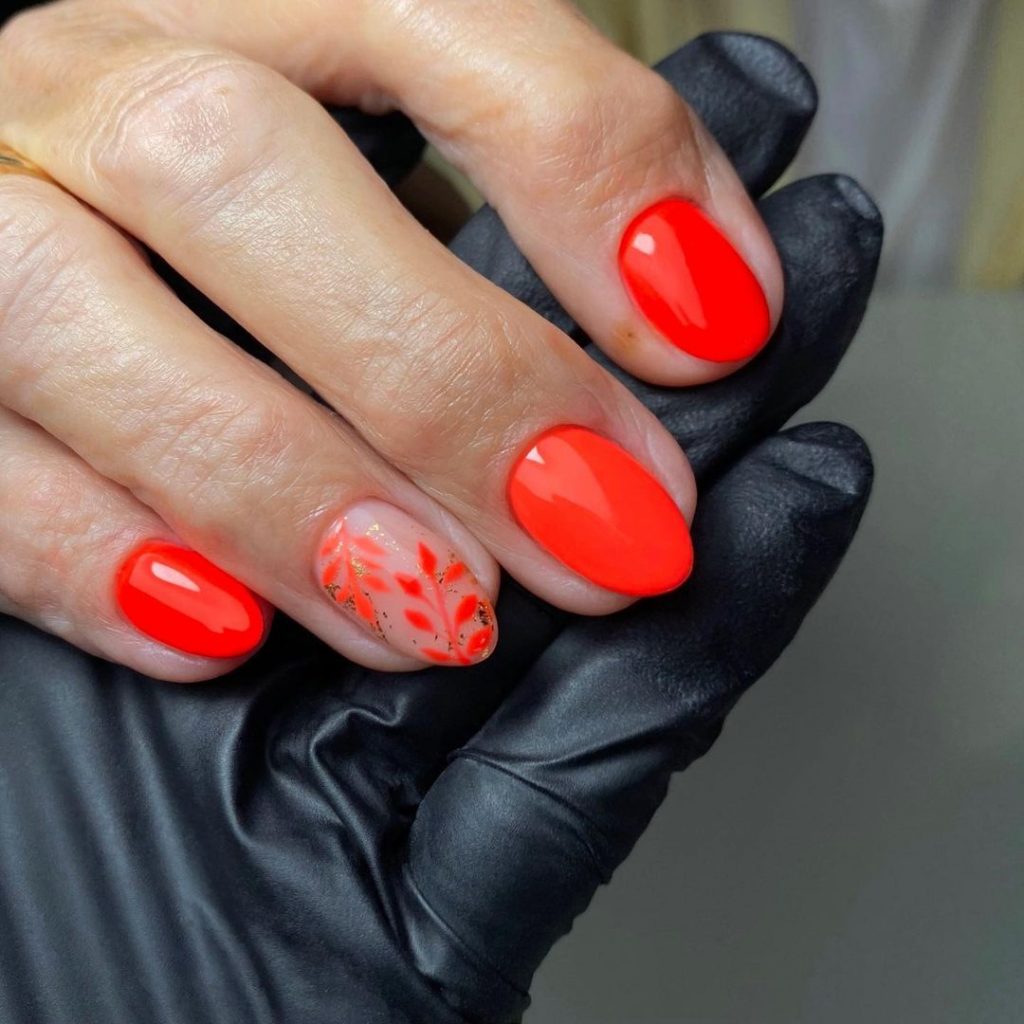
Vibrant Orange Autumn Leaves
This vibrant design captures the essence of autumn with bold orange polish and a delicate leaf accent. The short, rounded nails keep the look playful and easy to wear. The orange shade is eye-catching and perfect for the fall season, while the single leaf accent adds a subtle nod to nature.
Consumables
- Base coat: Sally Hansen Double Duty Base & Top Coat
- Orange nail polish: Essie “Tangerine Tease”
- Leaf nail decal: Dashing Diva Gel Strips in Autumn Leaves
- Top coat: Revlon ColorStay Gel Envy Diamond Top Coat
DIY Tutorial
- Start by applying a base coat to protect your nails.
- Apply two coats of the vibrant orange polish, letting each coat dry fully.
- Place the leaf decal on an accent nail, smoothing out any bubbles.
- Finish with a top coat to protect the design and give it a glossy finish.
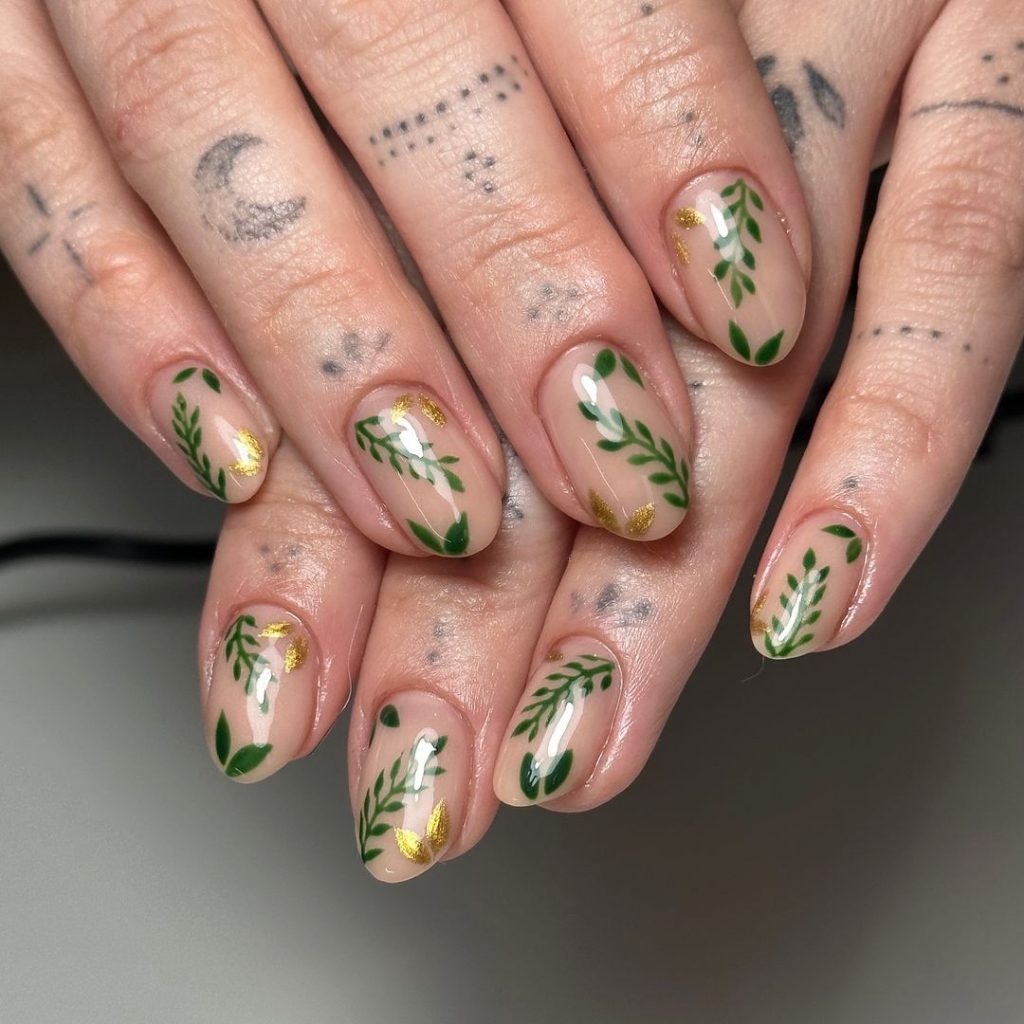
Botanical Greenery with Gold Accents
This nail design features lush green leaf patterns against a nude base, with a touch of gold foil for added elegance. The oval shape gives the nails a natural look, while the intricate green leaves create a beautiful contrast. The addition of gold accents enhances the overall design, making it perfect for a sophisticated yet earthy fall look.
Consumables
- Base coat: OPI Natural Nail Base Coat
- Nude nail polish: Essie “Mademoiselle”
- Green nail art pen: Maniology Dual-Ended Nail Art Pen in Green
- Gold leaf foil: Born Pretty Gold Nail Foil
- Top coat: INM Out the Door Top Coat
DIY Tutorial
- Begin with a base coat to protect your nails.
- Apply two coats of the nude polish for a smooth base.
- Use the green nail art pen to draw detailed leaf patterns on each nail.
- Carefully place gold foil accents using a fine brush and nail glue.
- Finish with a top coat to secure the design and add shine.
Colorful Autumn Foliage
This vibrant design combines the rich colors of autumn with playful leaf patterns. The almond-shaped nails are painted in shades of mint green, deep red, and muted mustard, each with its own unique leaf or floral design. This look is perfect for those who love to mix and match colors while embracing the beauty of fall.

Consumables
- Base coat: Zoya Anchor Base Coat
- Mint green polish: China Glaze “For Audrey”
- Deep red polish: OPI “Malaga Wine”
- Mustard polish: Essie “Hay There”
- Black nail art pen: Winstonia Fine Nail Art Pen in Black
- Top coat: Sally Hansen Miracle Gel Top Coat
DIY Tutorial
- Start with a base coat to prep your nails.
- Paint each nail a different color, alternating between mint green, deep red, and mustard.
- Use the black nail art pen to create detailed leaf patterns on the mint and red nails.
- Add small floral accents to the mustard nail for extra detail.
- Seal with a top coat to protect your design and ensure a long-lasting finish.
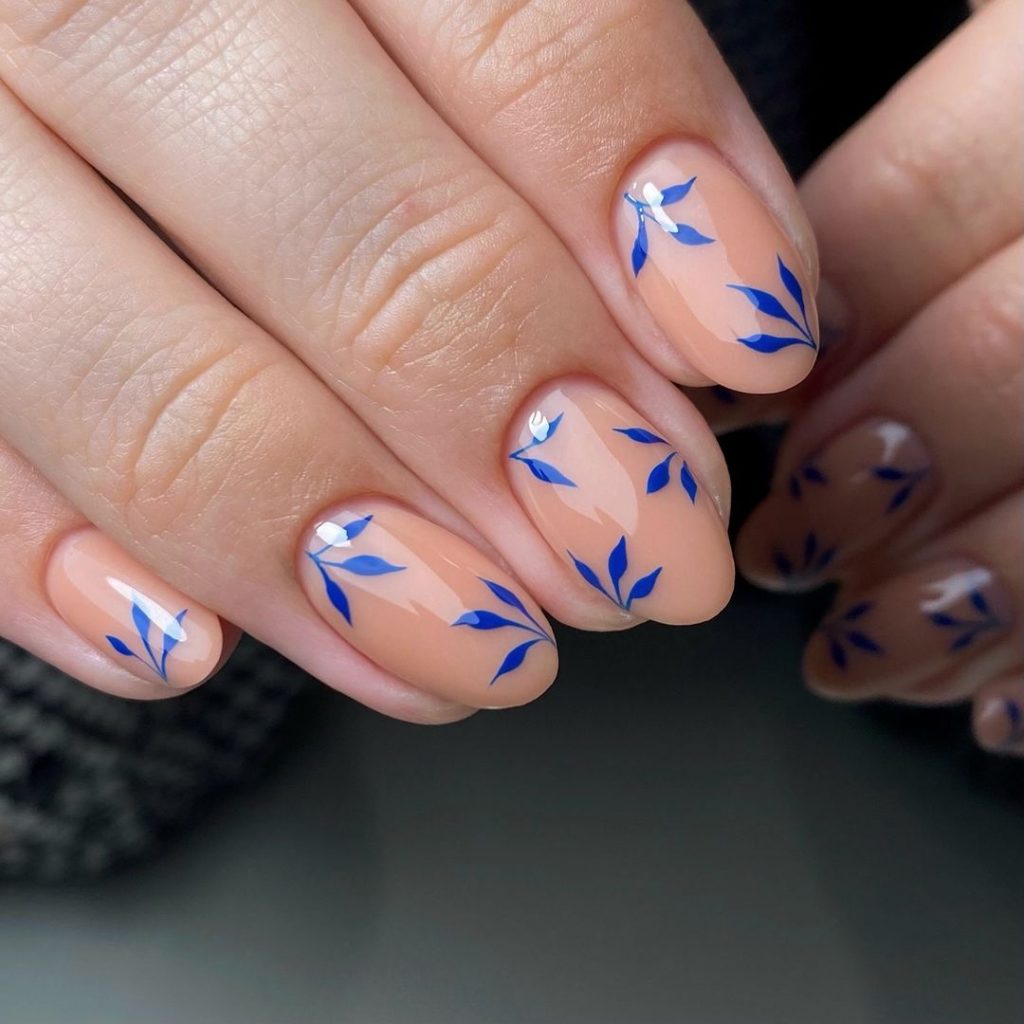
Blue Leafy Minimalism
This minimalist design features delicate blue leaf patterns on a soft nude base. The short, rounded nails keep the look clean and understated, making it ideal for those who prefer a subtle yet stylish manicure. The contrast between the nude and blue adds just the right amount of interest while keeping the overall look elegant.
Consumables
- Base coat: Essie “First Base”
- Nude nail polish: Zoya “Taylor”
- Blue nail art pen: Maniology Dual-Ended Nail Art Pen in Blue
- Top coat: CND Vinylux Weekly Top Coat
DIY Tutorial
- Apply a base coat to start.
- Paint your nails with two coats of nude polish, allowing each to dry completely.
- Use the blue nail art pen to draw simple leaf patterns on each nail, focusing on the edges.
- Finish with a top coat to add a glossy finish and protect the design.
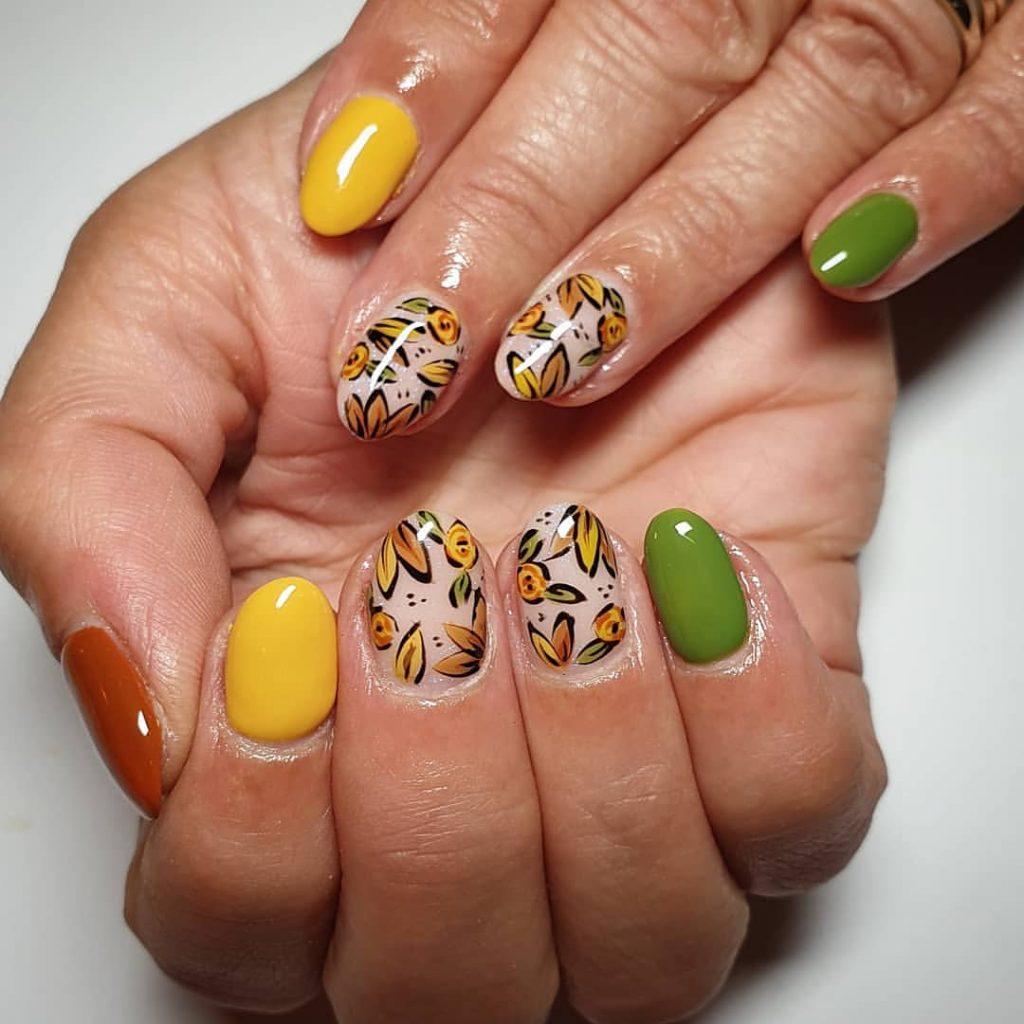
Vibrant Autumn Floral Mix
This design is a celebration of fall colors with a mix of green, yellow, and orange. The oval-shaped nails feature detailed floral and leaf patterns, creating a vibrant and joyful autumn look. The mix of colors and patterns makes this design stand out, perfect for those who love to embrace the full spectrum of fall.
Consumables
- Base coat: OPI Nail Envy
- Green polish: Zoya “Tilda”
- Yellow polish: China Glaze “Happy Go Lucky”
- Orange polish: OPI “A Good Man-darin is Hard to Find”
- Black nail art pen: Winstonia Fine Nail Art Pen in Black
- Top coat: Essie Gel Couture Top Coat
DIY Tutorial
- Begin with a protective base coat.
- Paint each nail in a different shade—green, yellow, and orange.
- Use the black nail art pen to draw detailed floral and leaf patterns on the nails.
- Apply a top coat to seal the design and add a glossy finish.
Sophisticated Matte Neutrals with Glitter
This elegant design combines matte neutral tones with a touch of glitter for a sophisticated autumn look. The almond-shaped nails feature a matte taupe color, complemented by black leaf patterns and a glitter accent nail. This design is perfect for those who want a chic, understated manicure with a bit of sparkle.
Consumables
- Base coat: Deborah Lippmann Hard Rock Base Coat
- Taupe matte polish: OPI “Taupe-less Beach”
- Black nail art pen: Sally Hansen Nail Art Pen in Black
- Gold glitter polish: China Glaze “Golden Enchantment”
- Matte top coat: Essie Matte About You
DIY Tutorial
- Start with a base coat to protect your nails.
- Apply two coats of taupe polish to all nails except one, which will be your glitter accent nail.
- Use the black nail art pen to draw leaf patterns on the taupe nails.
- Paint the accent nail with gold glitter polish for a touch of sparkle.
- Finish with a matte top coat to seal the design and give it a sophisticated finish.
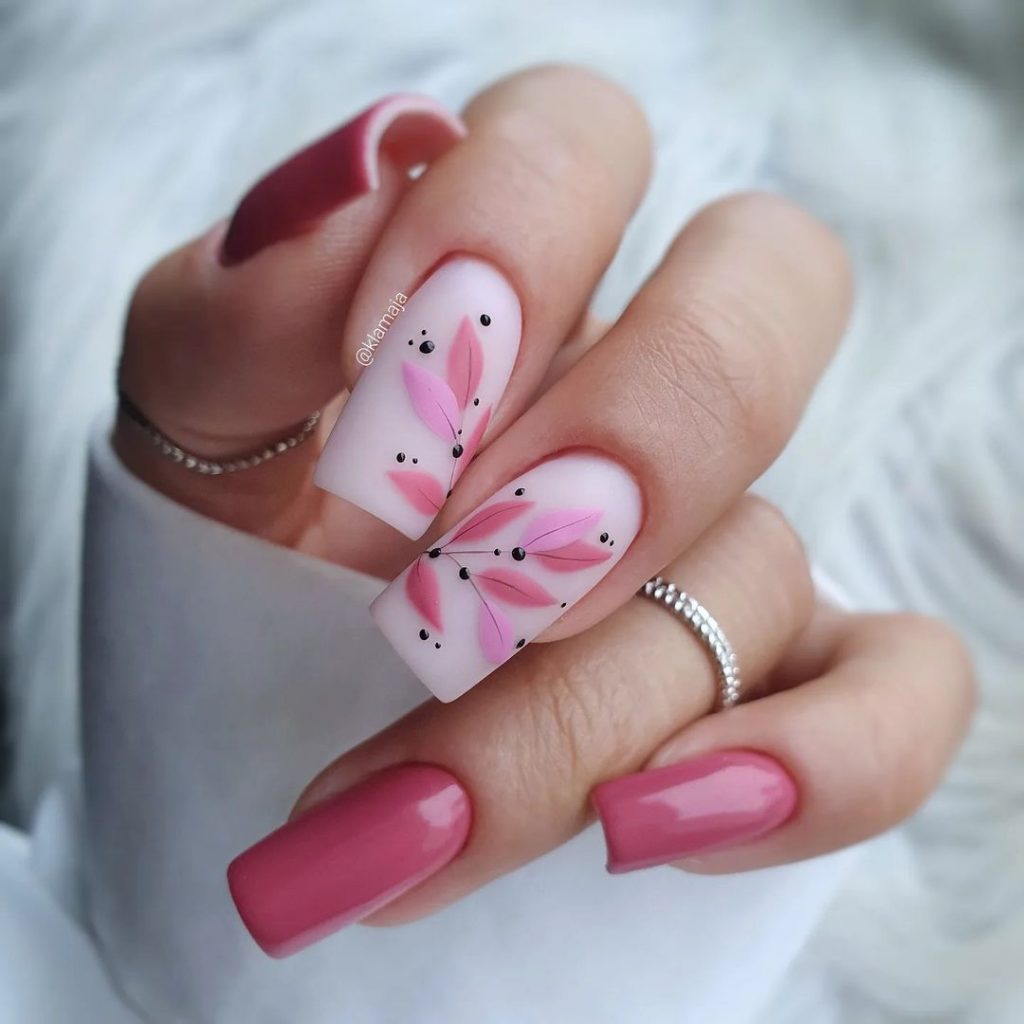
Pink Leafy Delicacy
This design combines soft, feminine pink tones with delicate leaf patterns for a graceful, understated look. The square-shaped nails feature a matte finish, with the leaf designs delicately painted in shades of pink and accented by small black dots. This manicure is perfect for those who want a subtle yet elegant design that complements any outfit.
Consumables
- Base coat: OPI Natural Nail Base Coat
- Soft pink polish: Essie “Ballet Slippers”
- Matte top coat: Zoya Matte Velvet Top Coat
- Black nail art pen: Maniology Nail Art Pen in Black
- Detail brush for leaves: Beetles Gel Polish Nail Art Brush Set
DIY Tutorial
- Start by applying a base coat to prep and protect your nails.
- Apply two coats of soft pink polish, allowing each to dry fully.
- Use a detail brush and a slightly darker pink polish to paint delicate leaf patterns on the accent nails.
- Add small black dots for additional detail, then finish with a matte top coat to seal the design.
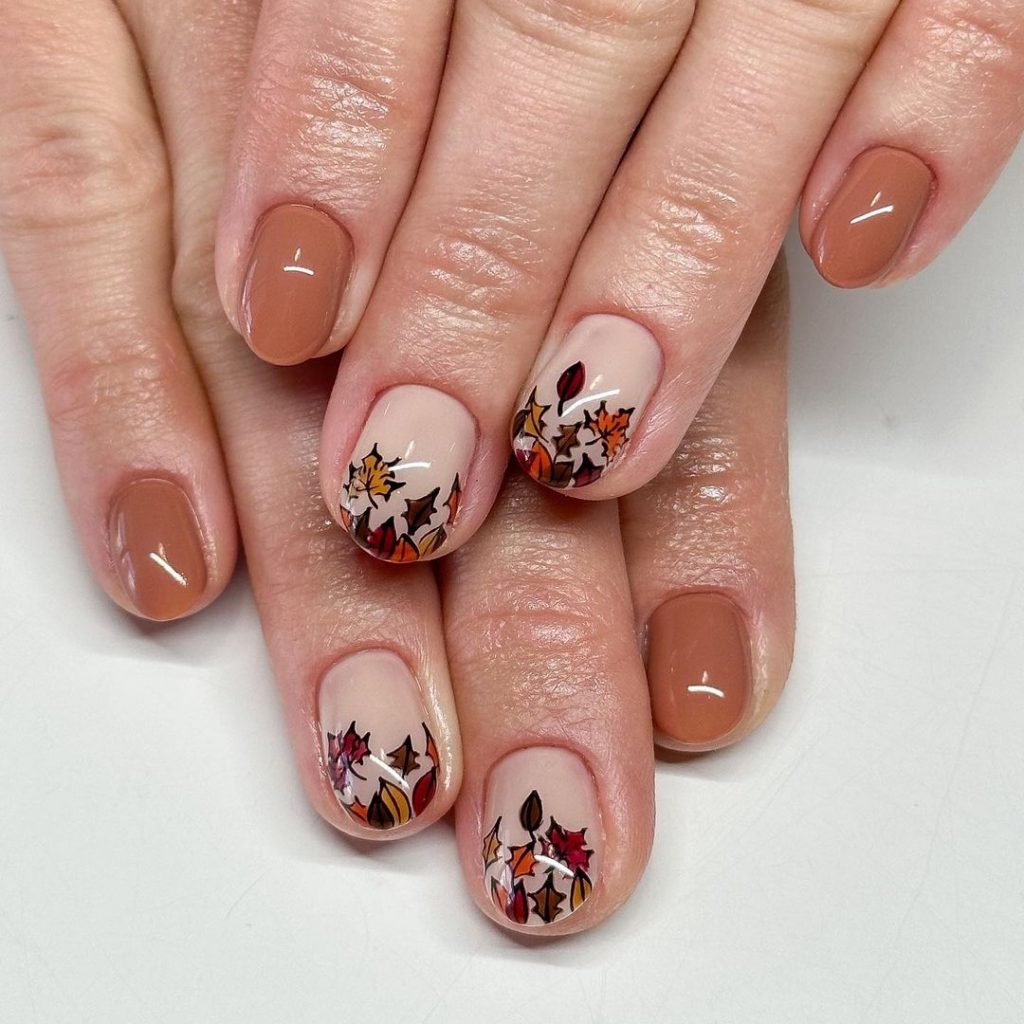
Autumn Leaves and Neutrals
This manicure brings the essence of autumn to your fingertips with a rich palette of fall leaf designs. The short, rounded nails are adorned with a mix of brown and nude tones, providing a warm backdrop for the intricate leaf patterns in shades of red, orange, and yellow. This design is ideal for those who want to embrace the full beauty of the fall season.
Consumables
- Base coat: Essie “First Base”
- Nude polish: OPI “Samoan Sand”
- Brown polish: Essie “Cliff Hanger”
- Nail art pens in autumn colors: Winstonia Nail Art Pens in Red, Orange, and Yellow
- Top coat: Seche Vite Dry Fast Top Coat
DIY Tutorial
- Start with a base coat to protect your nails.
- Apply nude polish to the accent nails and brown polish to the rest, allowing them to dry thoroughly.
- Use nail art pens to create detailed autumn leaf patterns on the nude nails.
- Finish with a top coat to add shine and durability to the design.
Sage Green Elegance
This design features a calming sage green paired with intricate leaf patterns, creating a sophisticated and serene manicure. The almond-shaped nails are painted in a soft green shade, with the accent nails showcasing detailed leaf designs in black. This manicure is perfect for those who love earthy tones and a touch of nature-inspired elegance.

Consumables
- Base coat: Deborah Lippmann Gel Lab Pro Base Coat
- Sage green polish: Zoya “Sage”
- Black nail art pen: Sally Hansen Nail Art Pen in Black
- Top coat: CND Vinylux Weekly Top Coat
DIY Tutorial
- Begin with a base coat to prep your nails.
- Apply two coats of sage green polish to all nails, letting each layer dry completely.
- Use a black nail art pen to draw intricate leaf patterns on the accent nails.
- Seal the design with a top coat for a glossy and lasting finish.
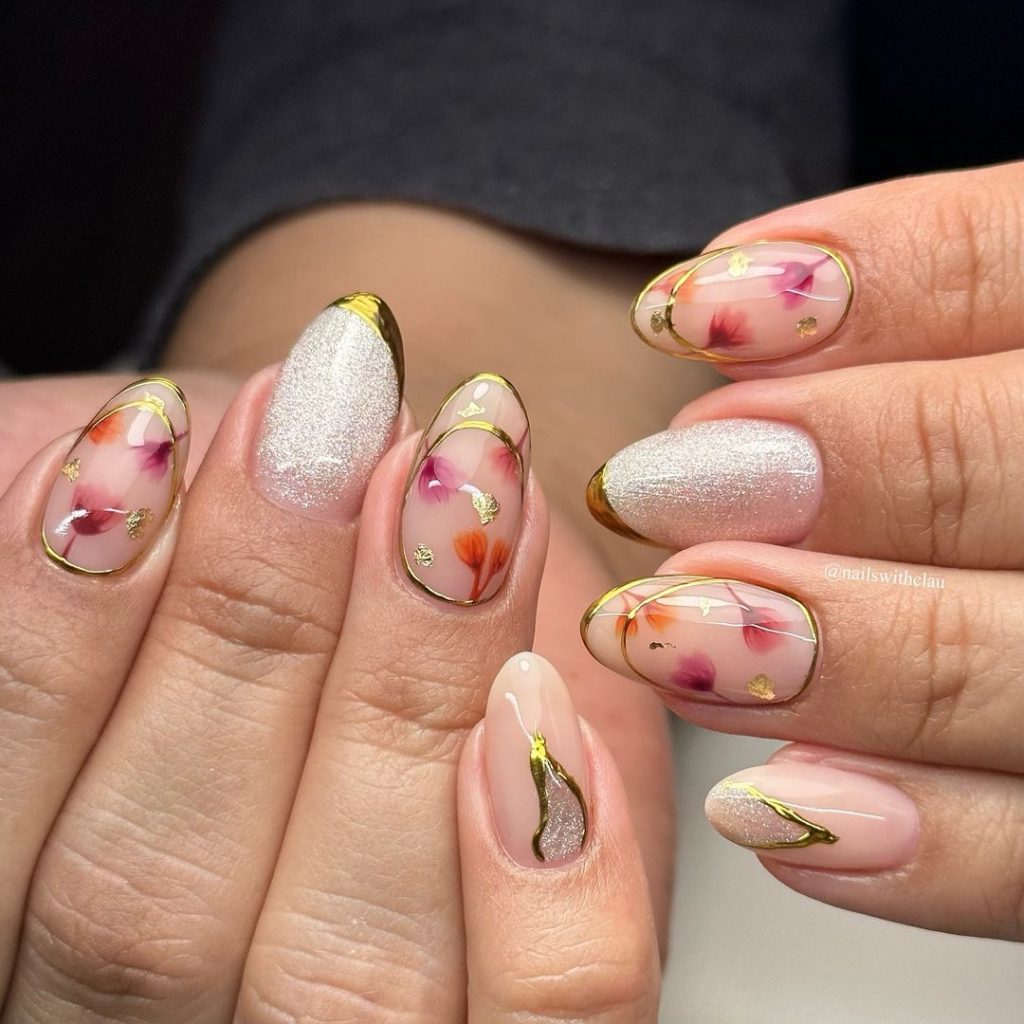
Floral Gold Accents
This design merges delicate floral elements with elegant gold accents for a truly luxurious fall look. The almond-shaped nails are adorned with soft floral patterns in pink and orange, highlighted with gold leaf and outlined in gold. This manicure is perfect for special occasions or when you want to add a touch of glamour to your everyday style.
Consumables
- Base coat: OPI Nail Envy
- Nude polish: Essie “Mademoiselle”
- Floral nail decals: Dashing Diva Gloss Ultra Shine Gel Palette in Florals
- Gold leaf foil: Daily Charme Gold Leaf Flakes
- Gold nail art pen: Winstonia Nail Art Pen in Gold
- Top coat: Essie Gel Couture Top Coat
DIY Tutorial
- Start by applying a base coat to protect your nails.
- Apply two coats of nude polish, allowing each to dry.
- Place floral decals on the accent nails, smoothing out any bubbles.
- Use gold leaf foil and a fine brush to add gold accents around the floral patterns.
- Outline the flowers with a gold nail art pen, then seal the design with a top coat.
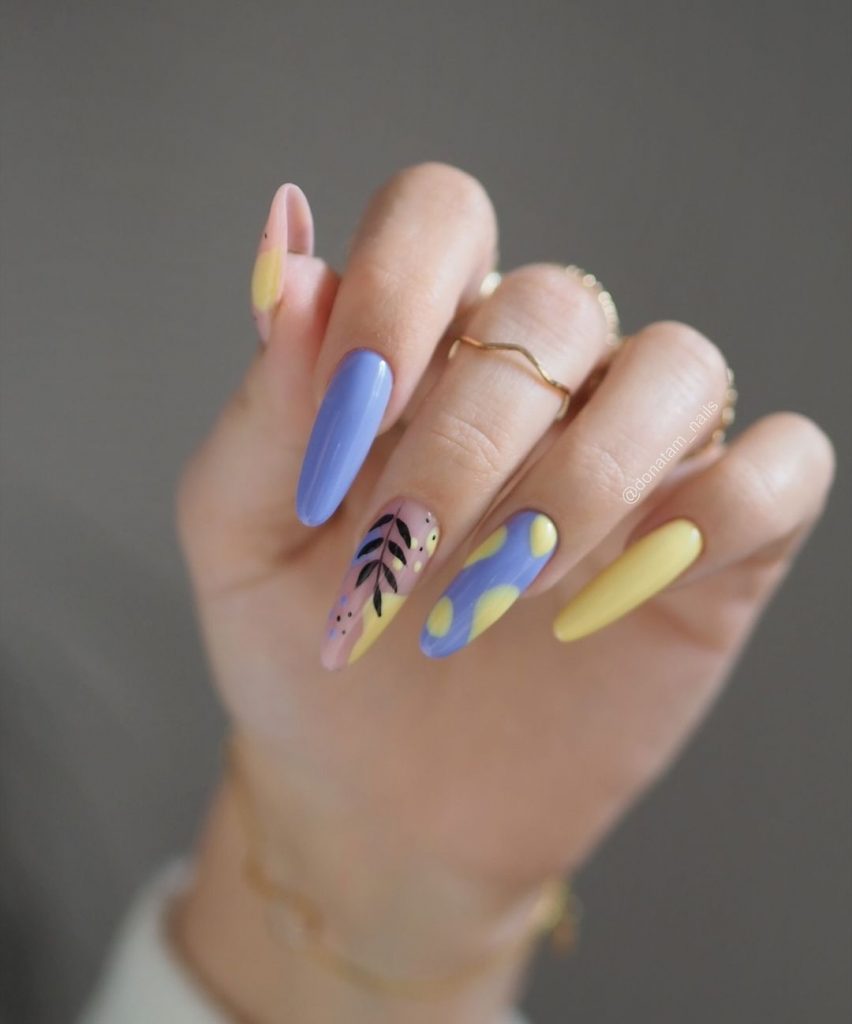
Playful Pastel Leaves
This vibrant and playful design combines pastel tones with modern leaf patterns for a fun and eye-catching look. The long almond-shaped nails are painted in a mix of pastel blue, yellow, and nude, with accent nails featuring bold leaf designs and polka dots. This design is ideal for those who love to experiment with color and want a manicure that stands out.
Consumables
- Base coat: CND Stickey Base Coat
- Pastel blue polish: OPI “It’s a Boy!”
- Pastel yellow polish: Essie “Lemonade”
- Nude polish: Zoya “Taylor”
- Black nail art pen: Maniology Dual-Ended Nail Art Pen in Black
- Top coat: Sally Hansen Miracle Gel Top Coat
DIY Tutorial
- Apply a base coat to start.
- Paint your nails in alternating shades of pastel blue, yellow, and nude, allowing each to dry fully.
- Use the black nail art pen to draw bold leaf patterns and polka dots on the nude accent nails.
- Seal the design with a top coat for a glossy, protective finish.
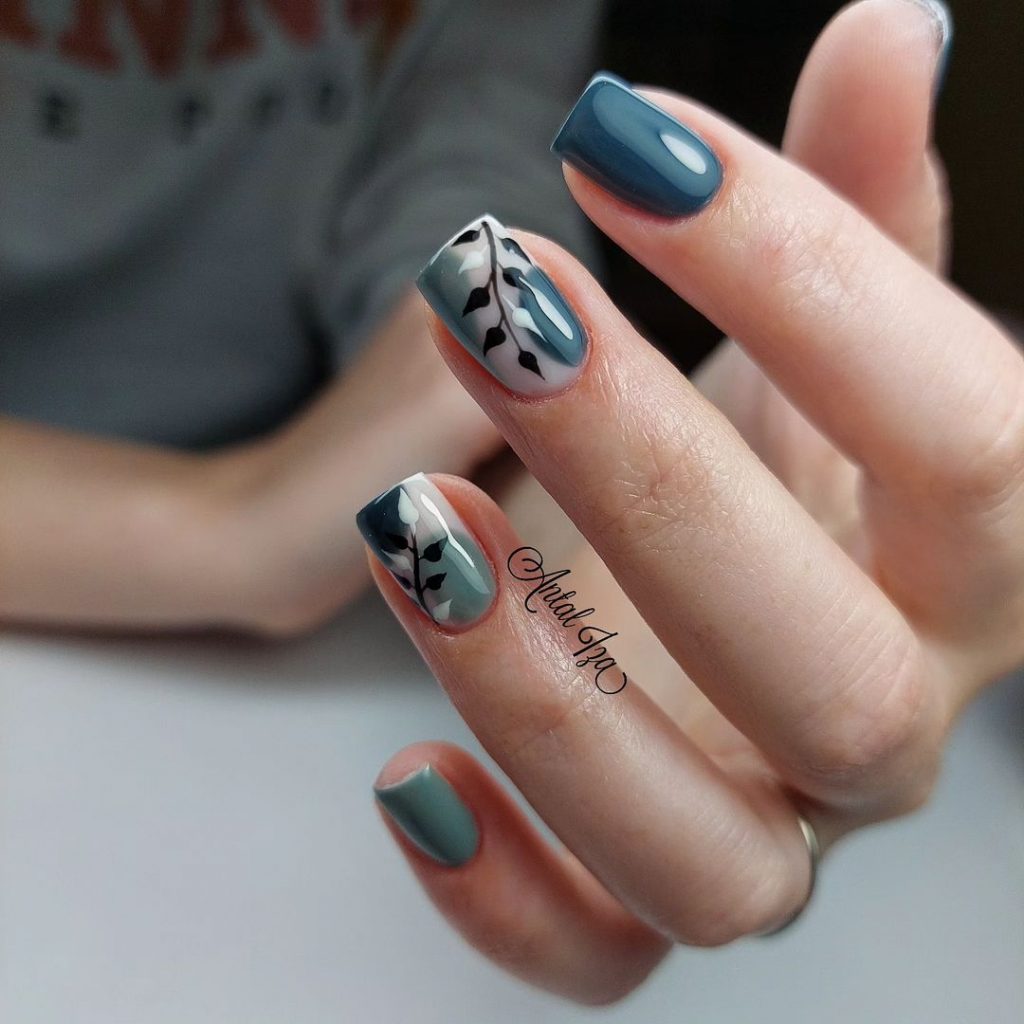
Muted Blue and Gray Elegance
This design features a sophisticated combination of muted blue and gray tones with abstract leaf patterns. The square-shaped nails add a touch of modernity, while the alternating colors create a harmonious balance. The abstract leaves, painted in black on a gray base, add an artistic flair to this otherwise minimalist look.
Consumables
- Base coat: OPI Natural Nail Base Coat
- Muted blue polish: Essie “Bobbing for Baubles”
- Gray polish: Zoya “Dove”
- Black nail art pen: Sally Hansen Nail Art Pen in Black
- Top coat: Essie Gel Couture Top Coat
DIY Tutorial
- Apply a base coat to protect your nails.
- Paint your nails alternately in muted blue and gray, allowing them to dry fully.
- Use the black nail art pen to create abstract leaf patterns on the gray nails.
- Finish with a top coat to seal the design and add a glossy finish.
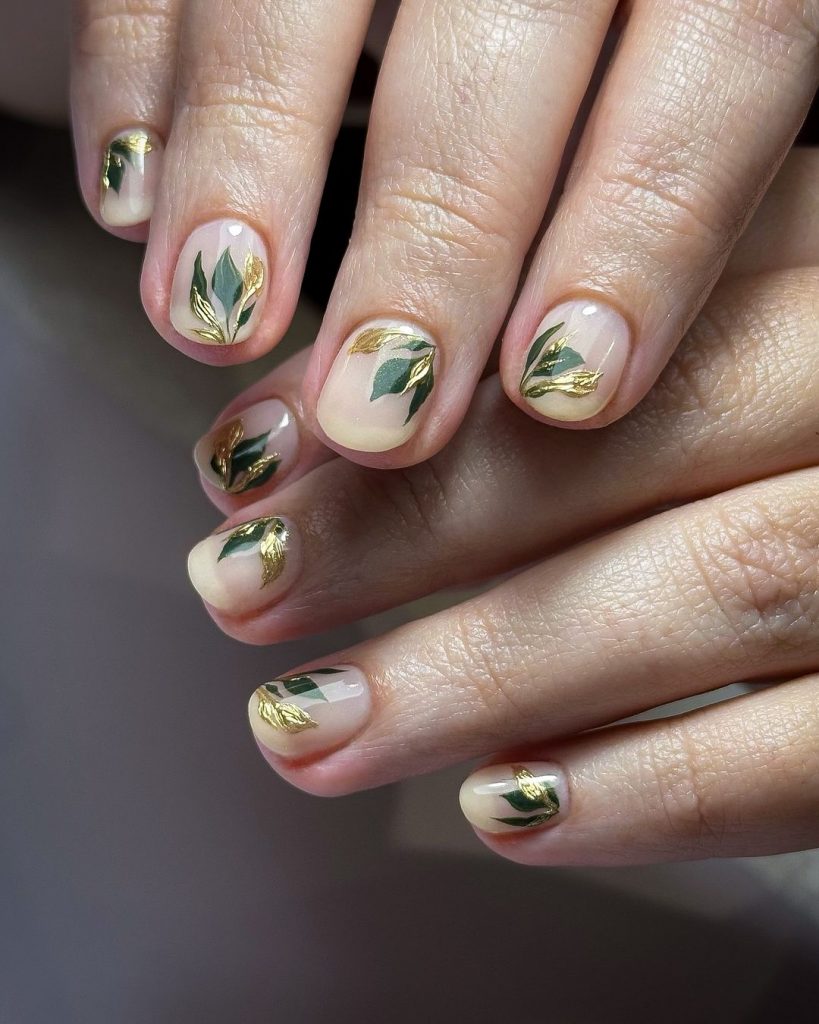
Golden Green Leafy Details
This design is all about understated luxury with golden and green leaf accents on a transparent nude base. The short, rounded nails keep the look delicate and elegant. The golden leaf details catch the light beautifully, while the green leaves add a touch of nature-inspired charm.
Consumables
- Base coat: CND Stickey Base Coat
- Transparent nude polish: Essie “Sugar Daddy”
- Green nail art pen: Maniology Nail Art Pen in Green
- Gold leaf foil: Born Pretty Gold Nail Foil
- Top coat: Seche Vite Dry Fast Top Coat
DIY Tutorial
- Start by applying a base coat to your nails.
- Apply two coats of transparent nude polish and let them dry.
- Use the green nail art pen to draw leaf patterns and add gold foil accents on each nail.
- Seal the design with a top coat for added durability and shine.
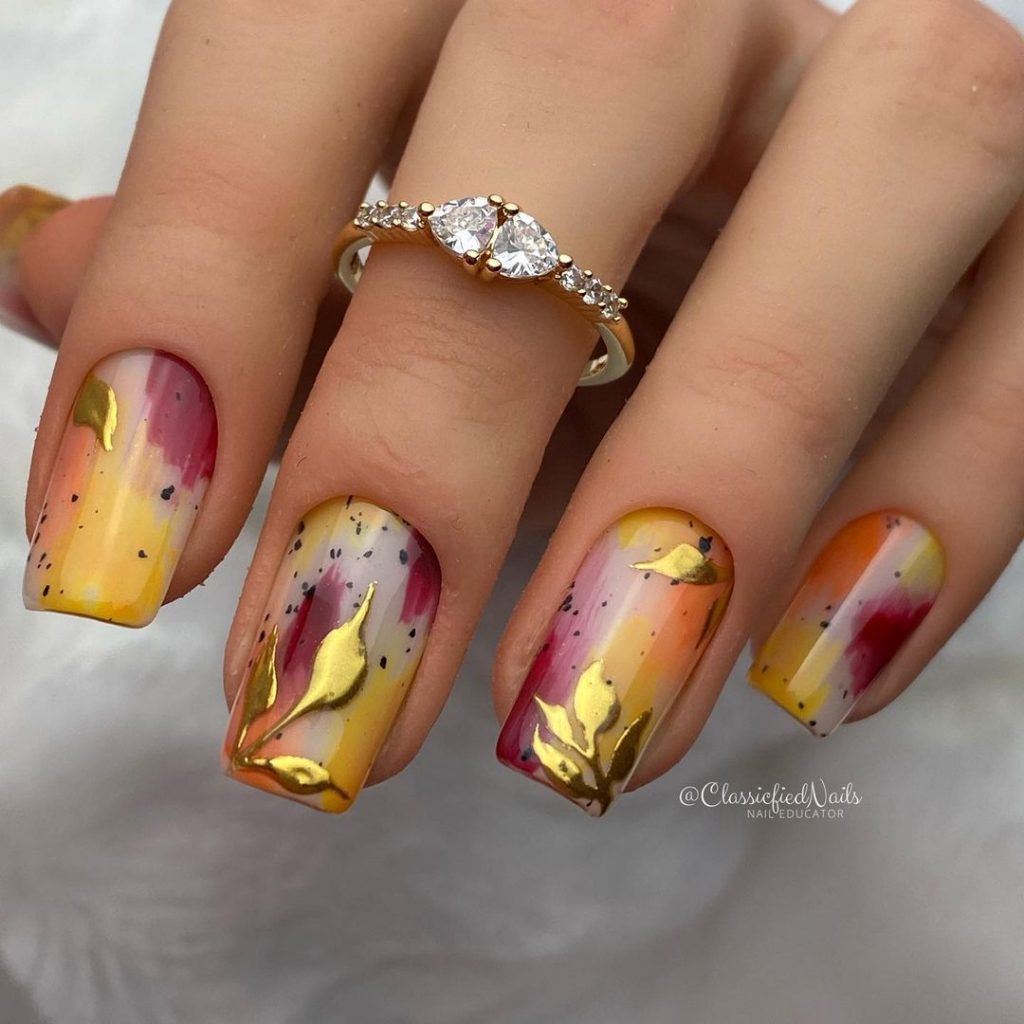
Sunset Ombre with Gold Accents
This bold design captures the colors of a sunset, transitioning from warm yellow to deep pink with delicate gold accents. The square-shaped nails serve as a canvas for this ombre effect, while the gold leaf details add an extra layer of sophistication. This manicure is ideal for those who want to make a statement with their fall look.
Consumables
- Base coat: OPI Nail Envy
- Yellow polish: Essie “Sunshine State of Mind”
- Pink polish: China Glaze “Pink Voltage”
- Gold leaf foil: Daily Charme Gold Leaf Flakes
- Top coat: Sally Hansen Miracle Gel Top Coat
DIY Tutorial
- Begin with a base coat to strengthen your nails.
- Create an ombre effect by blending yellow and pink polishes on a sponge and dabbing it onto your nails.
- Apply gold leaf accents near the tips of each nail for added glamour.
- Seal the design with a top coat to enhance shine and protect your manicure.
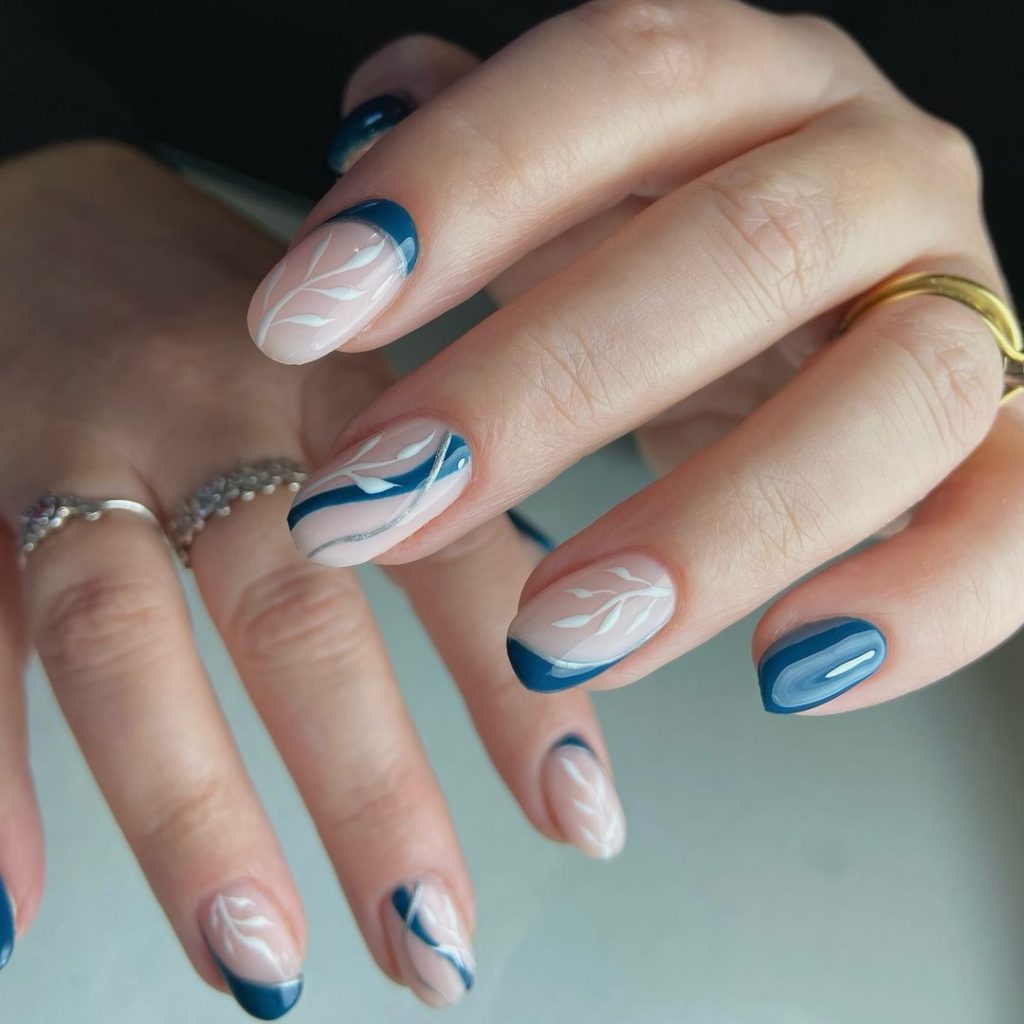
Navy Blue and Nude Floral Contrast
This design is a stunning mix of navy blue and nude, accentuated by delicate white floral patterns. The almond-shaped nails lend an air of elegance, while the navy blue French tips and swirling lines add a modern twist. This manicure is perfect for those who appreciate classic designs with a contemporary edge.
Consumables
- Base coat: Deborah Lippmann Hard Rock Base Coat
- Navy blue polish: OPI “Russian Navy”
- Nude polish: Essie “Ballet Slippers”
- White nail art pen: Sally Hansen Nail Art Pen in White
- Top coat: INM Out the Door Top Coat
DIY Tutorial
- Start with a base coat to prep your nails.
- Apply nude polish as the base, and use the navy blue polish to create French tips and swirling lines.
- Use the white nail art pen to add floral patterns on the nude base.
- Seal the design with a top coat for a glossy, professional finish.
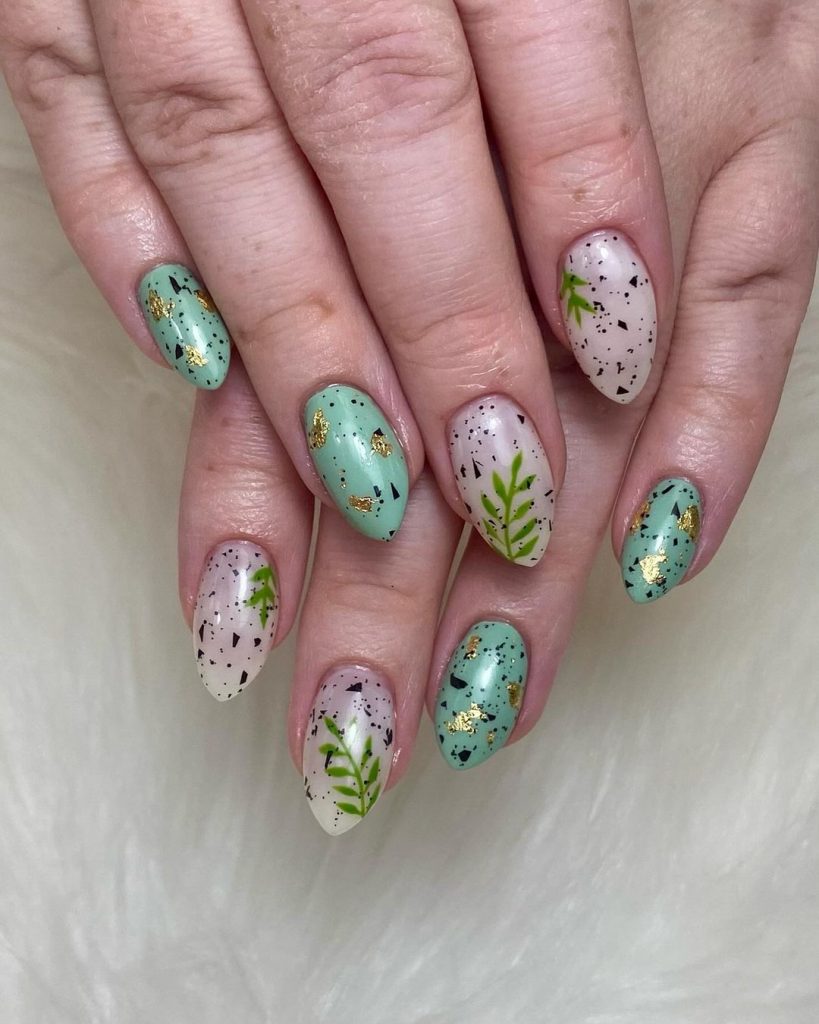
Minty Green with Splatter and Leaf Accents
This design combines a minty green base with black splatter effects and vibrant green leaf accents, creating a fresh and playful look. The almond-shaped nails are perfect for showcasing the intricate details, while the splatter effect adds a touch of artistic flair. This manicure is ideal for those who love creative, nature-inspired designs.
Consumables
- Base coat: Zoya Anchor Base Coat
- Mint green polish: Essie “Mint Candy Apple”
- Black splatter effect: OPI “Black Onyx” (use a toothbrush to create the effect)
- Green nail art pen: Maniology Nail Art Pen in Green
- Top coat: Essie Gel Couture Top Coat
DIY Tutorial
- Apply a base coat to protect your nails.
- Paint your nails with mint green polish and allow them to dry.
- Create a splatter effect using black polish and a toothbrush by flicking the bristles onto your nails.
- Use the green nail art pen to draw leaf accents on select nails.
- Finish with a top coat to protect the design and add shine.
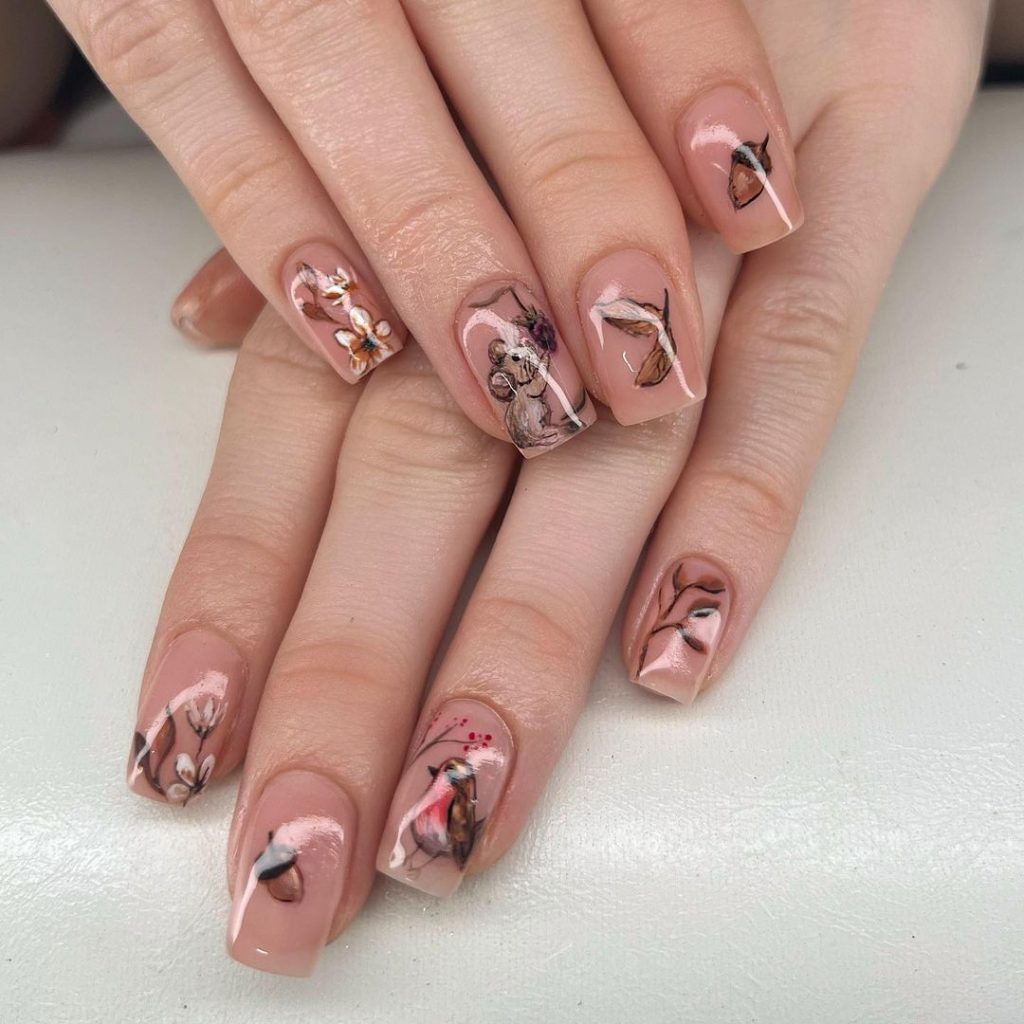
Woodland Creature Charm
This adorable design features a mix of woodland creatures and fall foliage on a soft nude base. The square-shaped nails serve as the perfect backdrop for the intricate illustrations, including delicate flowers, leaves, and charming animals. This manicure is perfect for those who want to embrace the cozy, whimsical side of fall.
Consumables
- Base coat: OPI Natural Nail Base Coat
- Nude polish: Zoya “Taylor”
- Nail art brushes: Beetles Gel Polish Nail Art Brush Set
- Acrylic paint: Arteza Acrylic Paint Set (for detailed illustrations)
- Top coat: Seche Vite Dry Fast Top Coat
DIY Tutorial
- Start with a base coat to protect your nails.
- Apply two coats of nude polish and allow them to dry.
- Use fine nail art brushes and acrylic paint to create detailed illustrations of woodland creatures and foliage on each nail.
- Seal the design with a top coat to preserve the artwork and add shine.
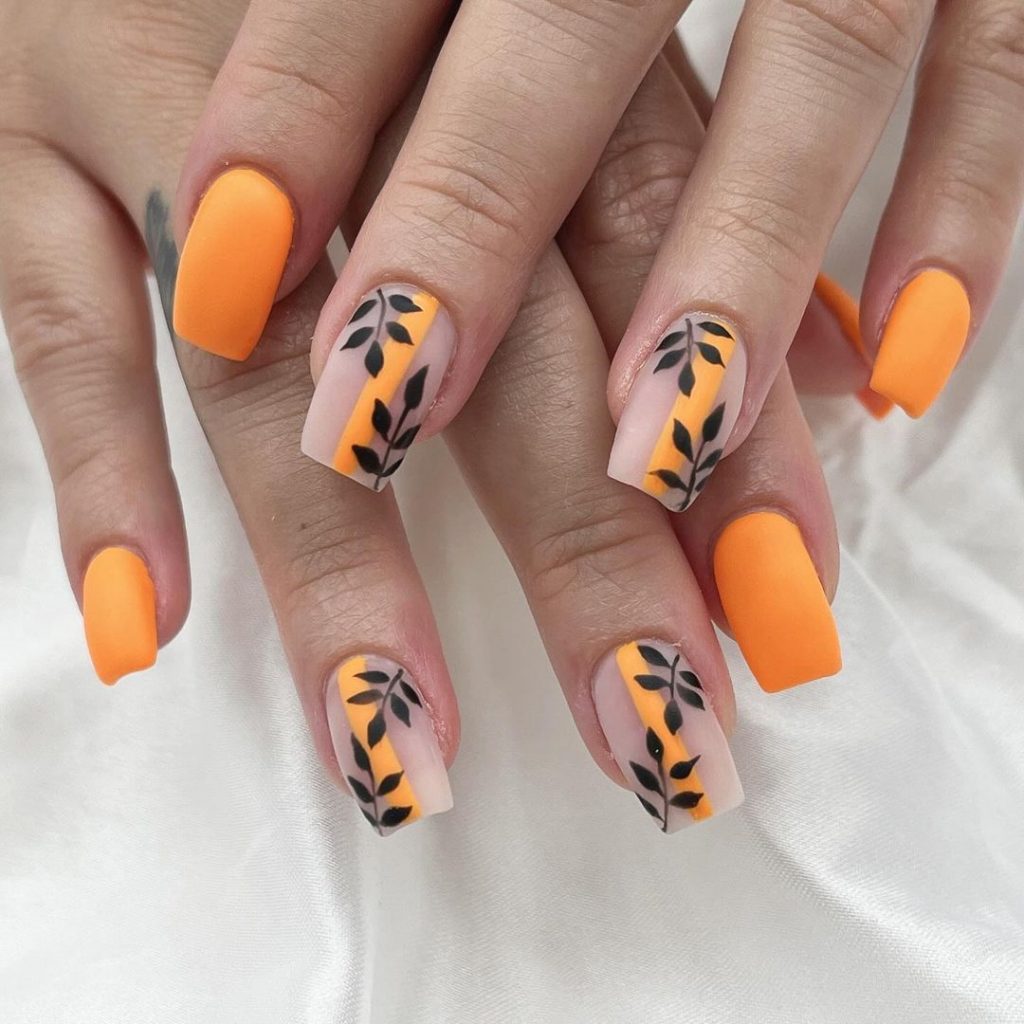
Bright Orange Autumn Vibes
This bold and bright manicure features vivid orange nails with black leaf accents, perfect for autumn. The square-shaped nails are painted in a matte finish, giving the bright orange a more sophisticated look. The black leaf designs provide a striking contrast, making this manicure ideal for those who want to stand out during the fall season.
Consumables
- Base coat: Essie “First Base”
- Orange polish: OPI “A Good Man-darin is Hard to Find”
- Matte top coat: Zoya Matte Velvet Top Coat
- Black nail art pen: Winstonia Nail Art Pen in Black
- Top coat: Sally Hansen Miracle Gel Top Coat (optional for accents)
DIY Tutorial
- Apply a base coat to protect your nails.
- Paint all nails with bright orange polish and allow them to dry fully.
- Use a black nail art pen to create leaf designs on the accent nails.
- Apply a matte top coat for a sophisticated finish, and use a regular top coat on the leaf designs if you want them to stand out with a glossy finish.
Save Pin