When it comes to fall nail trends, burnt orange is undeniably one of the season’s hottest colors. But what makes it so appealing, and how can you incorporate this rich, autumnal shade into your manicure routine? From trendy minimalist designs to elaborate art, burnt orange is a versatile color that pairs beautifully with other Autumn tones like olive green, brown, and even blue. Let’s explore some stunning nail designs that will have you reaching for your polish collection faster than a pumpkin spice latte.
Warm Burnt Orange Minimalism
This burnt orange nail design showcases simplicity at its finest. The rich, warm tone of the polish complements the short, rounded nails, creating a look that is both elegant and understated. This minimalist approach is perfect for those who prefer a more subtle yet sophisticated style that can easily transition from day to night.
Consumables
- Polish: Zoya “Autumn”
- Base Coat: Orly Bonder Base Coat
- Top Coat: Seche Vite Dry Fast Top Coat
DIY Instructions
- Prep the nails by shaping them into a rounded form and buffing the surface for smoothness.
- Apply a base coat to ensure the polish adheres well and lasts longer.
- Apply two coats of burnt orange polish, allowing each coat to dry thoroughly.
- Finish with a top coat to seal the polish and add a high-shine finish.
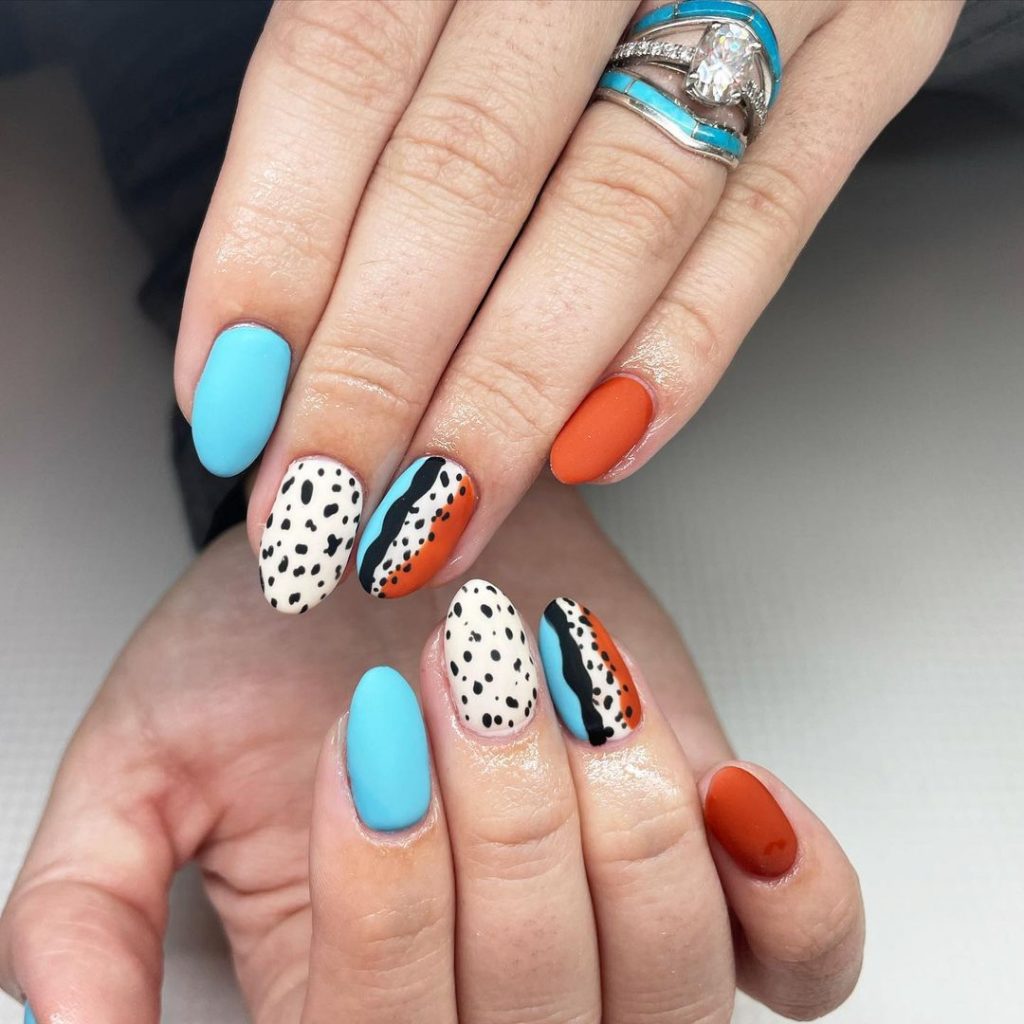
Playful Patterns with Burnt Orange Accents
This nail design is a fun mix of patterns and colors, incorporating burnt orange as a bold accent. The combination of light blue, black, and white patterns with dots and stripes adds a playful touch, while the burnt orange brings warmth and ties the look together. This design is ideal for someone who loves to experiment with colors and patterns.
Consumables
- Polish: OPI “No Room for the Blues”
- Polish: Essie “Playing Koi”
- Nail Art Pen: Sally Hansen Nail Art Pen in Black
- Matte Top Coat: China Glaze Matte Magic
DIY Instructions
- Start by applying a base coat to protect your nails.
- Apply the base colors on each nail as desired, using light blue and white.
- Use a nail art pen to create the dot and stripe patterns on select nails.
- Paint one or two nails with burnt orange to add contrast.
- Finish with a matte top coat for a unique, non-glossy finish.
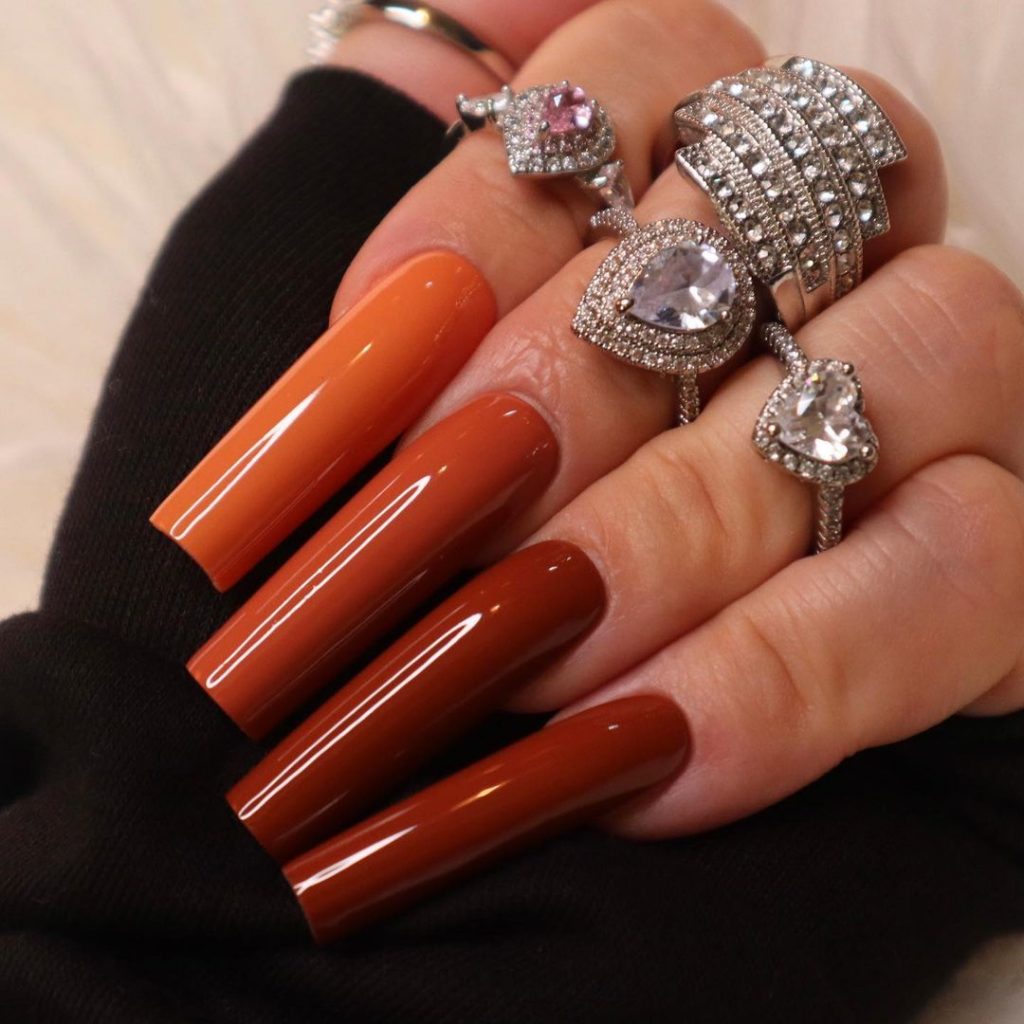
Ombre Burnt Orange Glam
This ombre design transitions from a lighter burnt orange at the tips to a deeper, more intense shade at the base, creating a glamorous gradient effect. The long, square-shaped nails enhance the elegance of this look, making it perfect for special occasions or when you want to make a bold statement.
Consumables
- Polish: Essie “Playing Koi”
- Polish: OPI “My Private Jet”
- Ombre Sponge: PUEEN Latex-Free Cosmetic Sponges
- Top Coat: Sally Hansen Miracle Gel Top Coat
DIY Instructions
- Apply a base coat to prep the nails.
- On a cosmetic sponge, apply both shades of polish in stripes, blending them where they meet.
- Dab the sponge onto your nails to create the ombre effect, starting with lighter burnt orange at the tips.
- Apply two or three layers for full opacity, letting each layer dry before applying the next.
- Finish with a top coat to smooth out the gradient and add shine.
Burnt Orange French Tips with a Starry Twist
This design features a modern take on the classic French tip, using burnt orange instead of the traditional white. The starry accents on the tips add a whimsical touch, making this a fun and trendy choice for autumn. The clear base allows the tips to stand out while keeping the overall look light and airy.
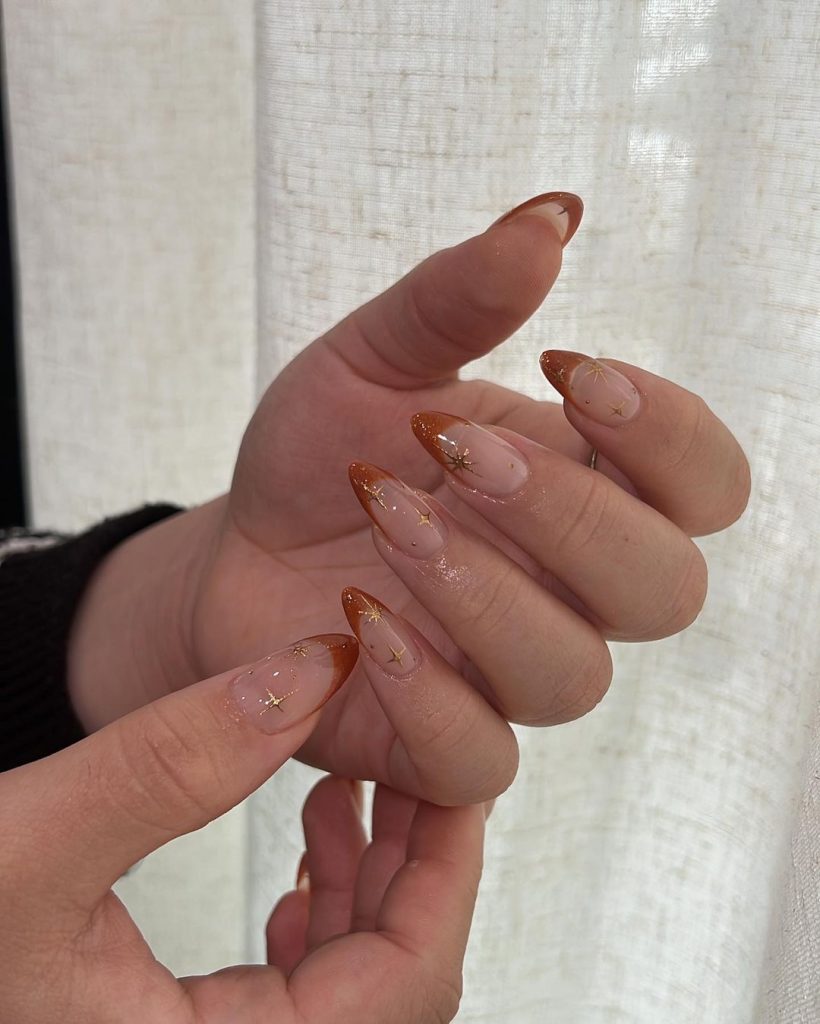
Consumables
- Polish: OPI “It’s a Piazza Cake”
- Star Stickers: Makartt Nail Art Stickers
- Top Coat: Essie Gel Couture Top Coat
DIY Instructions
- Apply a clear base coat to start.
- Paint the tips of your nails with burnt orange polish, following the natural curve of your nail.
- Place star stickers on the tips for added flair.
- Seal with a top coat to secure the stickers and add a glossy finish.
Retro Burnt Orange and Black Floral Design
This retro-inspired design pairs burnt orange with bold black and white floral patterns. The mix of geometric shapes and floral accents creates a look that is both playful and chic, perfect for those who want to stand out with a unique manicure. The combination of colors is reminiscent of vintage autumn styles, adding a nostalgic touch.
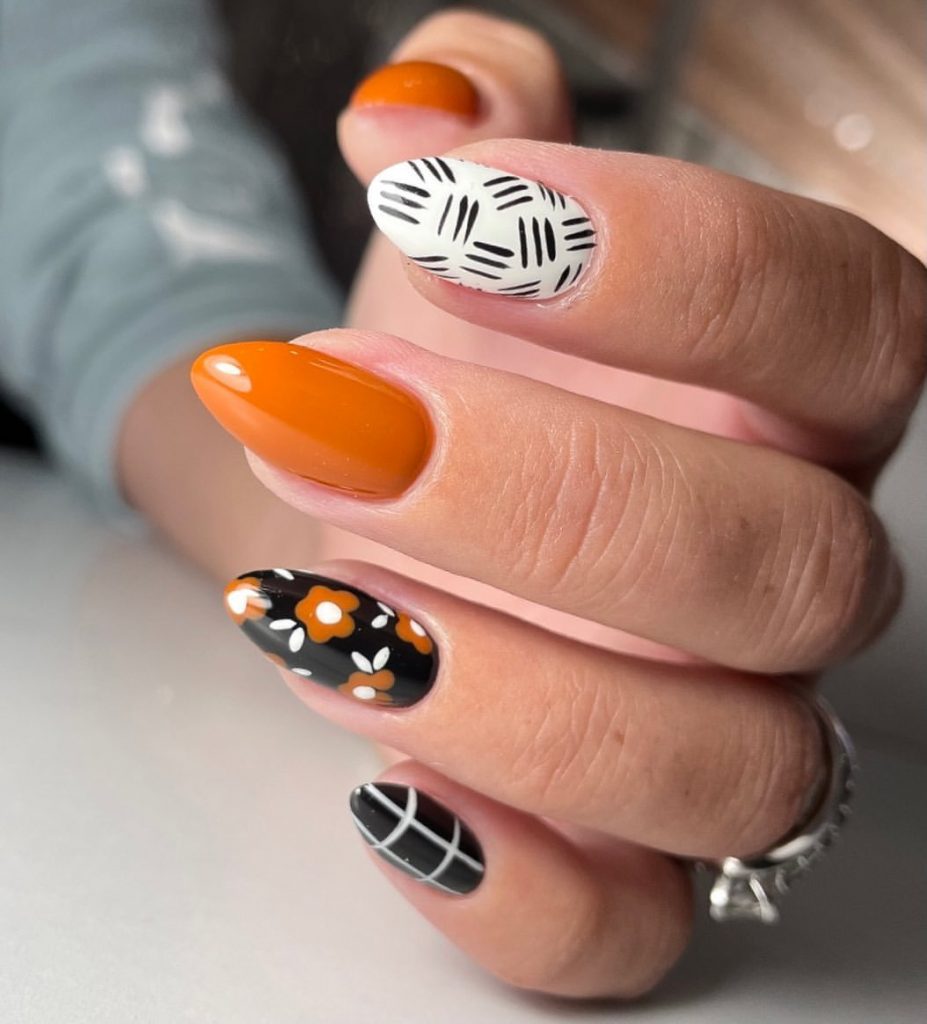
Consumables
- Polish: Essie “Playing Koi”
- Polish: OPI “Black Onyx”
- Nail Art Brushes: Beetles Nail Art Brush Set
- Top Coat: CND Vinylux Weekly Top Coat
DIY Instructions
- Start with a base coat to protect your nails.
- Apply the burnt orange polish on a few nails and black polish on others, alternating for a balanced look.
- Use a fine brush to paint floral patterns and geometric shapes on the nails with black and white polish.
- Finish with a top coat to seal the design and add shine.
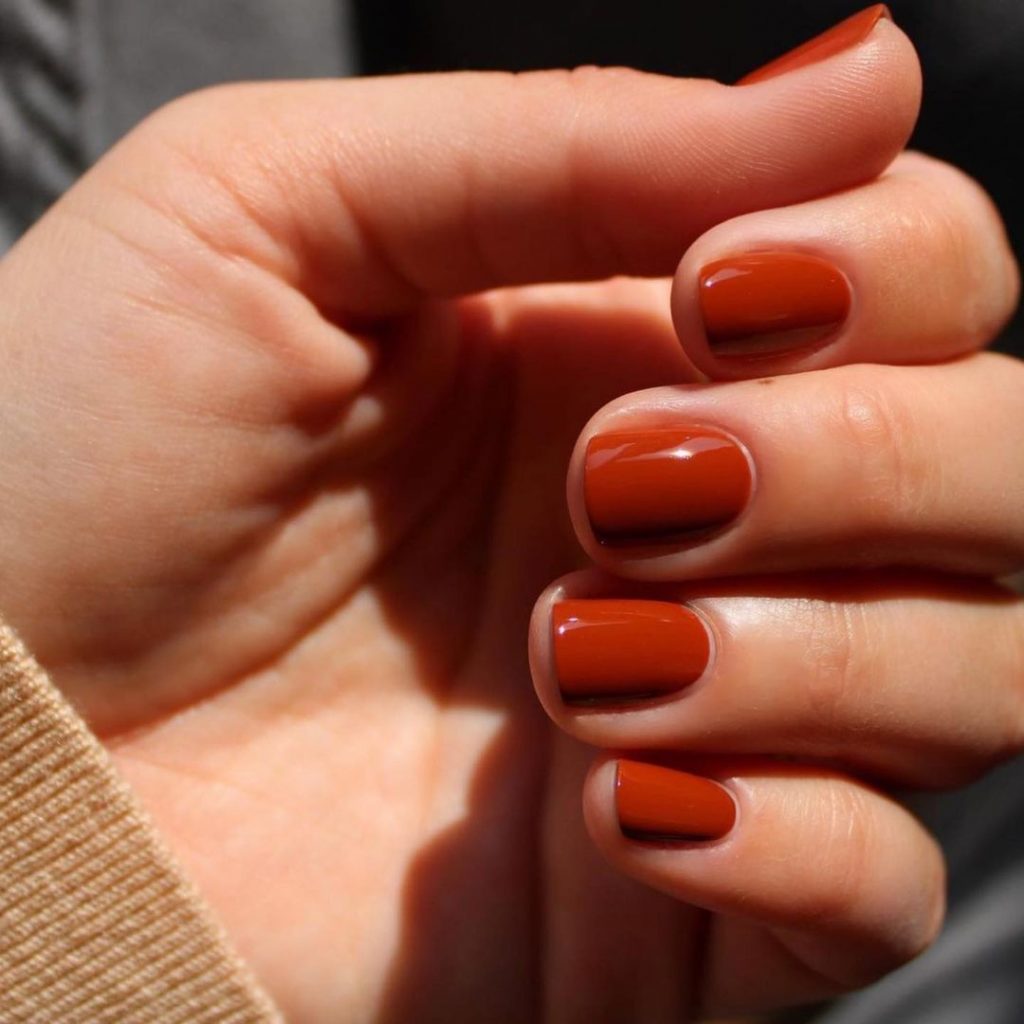
Classic Burnt Orange Simplicity
This design features a pure, burnt orange hue that stands out for its simplicity and classic appeal. The nails are short and neatly trimmed, making this look perfect for everyday wear. The even coat of burnt orange polish gives a clean and polished appearance, making it ideal for those who prefer a minimalist yet impactful look.
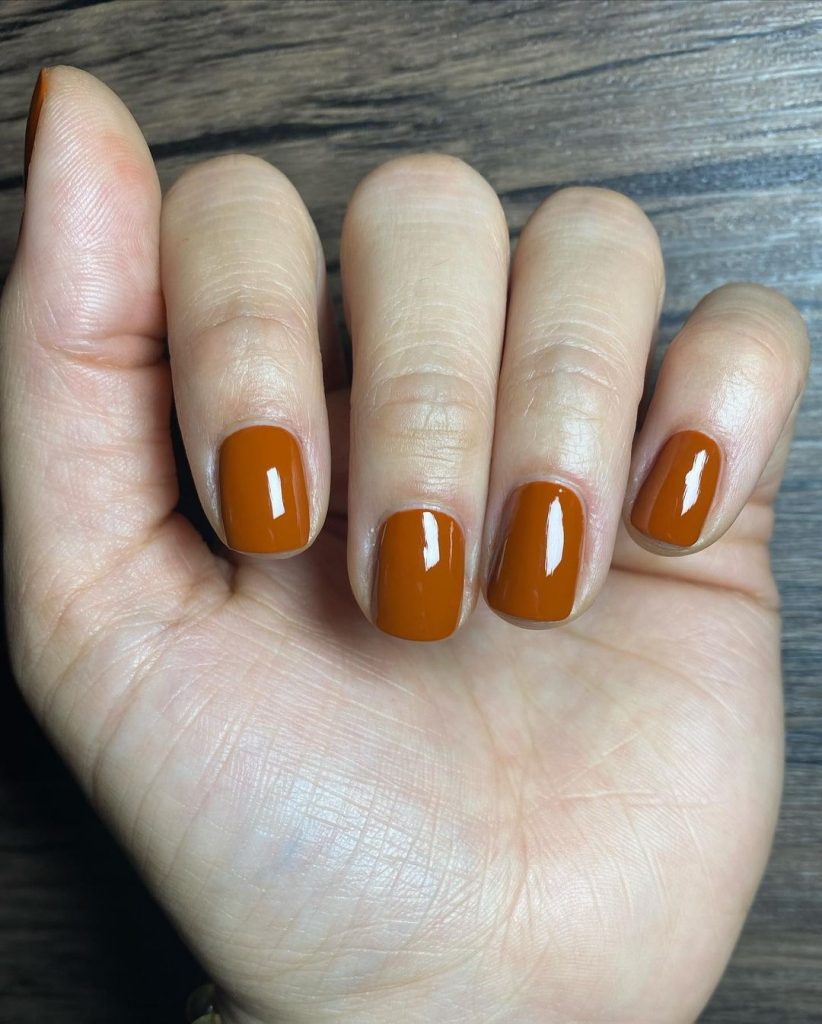
Consumables
- Polish: OPI “It’s a Piazza Cake”
- Base Coat: Essie Here to Stay Base Coat
- Top Coat: Sally Hansen Insta-Dri Anti-Chip Top Coat
DIY Instructions
- Start by shaping and buffing the nails for a smooth surface.
- Apply a base coat to protect the nails and ensure the polish lasts longer.
- Apply two even coats of the burnt orange polish, allowing each coat to dry fully.
- Finish with a top coat to seal in the color and add shine.
Bold and Dazzling Burnt Orange
This nail design takes burnt orange to the next level by incorporating metallic accents and bold geometric patterns. The use of glittering chrome adds a dazzling effect, making these nails a standout choice for special occasions. The combination of orange, white, and gold with precise lines gives this look a modern and trendy vibe.
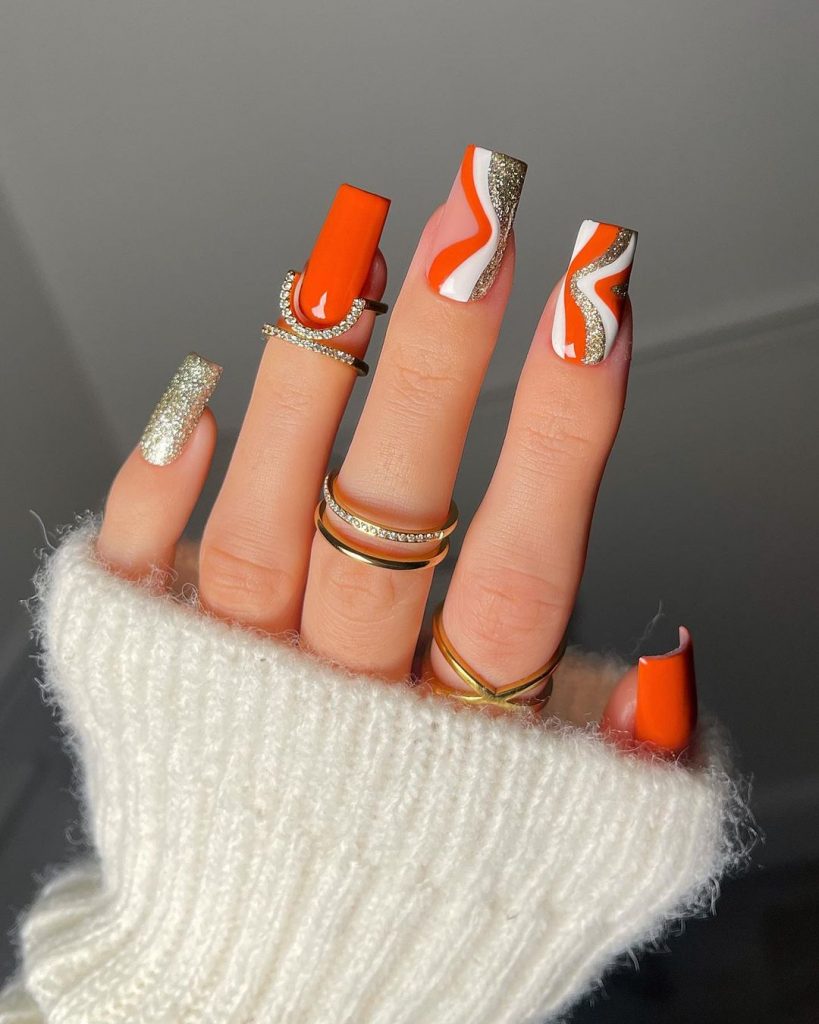
Consumables
- Polish: China Glaze “Stoked to be Soaked”
- Gold Glitter: Born Pretty Chrome Powder
- Nail Art Brushes: Beetles Gel Polish Nail Art Brush Set
- Top Coat: Kiara Sky Non-Wipe Top Coat
DIY Instructions
- Start with a base coat to protect your nails.
- Apply the burnt orange polish to the middle fingers, leaving space for the design.
- Use a fine brush to create geometric lines with white polish and add gold chrome powder accents.
- Apply glitter on the pinky nails for extra sparkle.
- Seal the design with a glossy top coat to make it last.
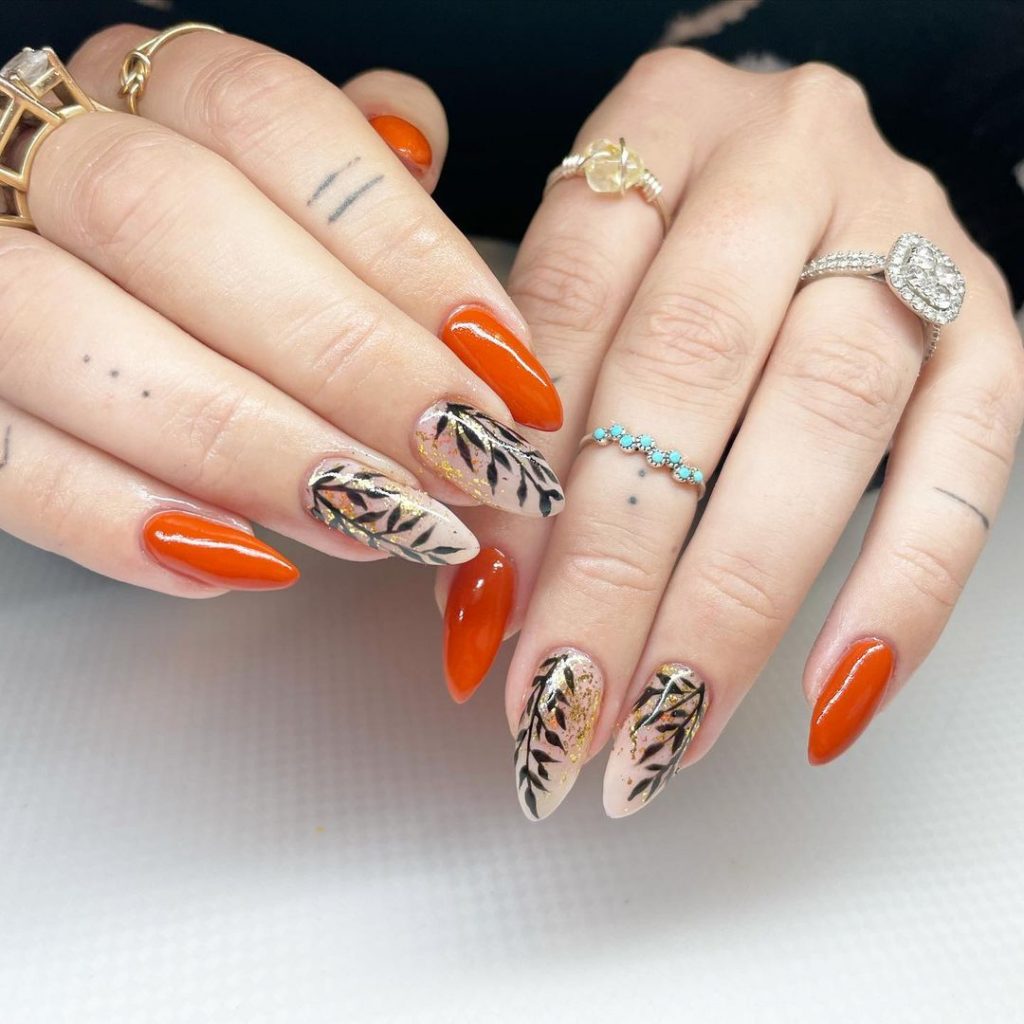
Autumn Leaves on Burnt Orange
This design combines the rich tones of burnt orange with intricate leaf patterns, capturing the essence of fall. The leaves are delicately painted on two accent nails, with a mix of black and gold detailing that adds depth and texture. This manicure is perfect for those who want to embrace the season in a subtle yet stylish way.
Consumables
- Polish: Essie “Playing Koi”
- Nail Art Pen: Sally Hansen Nail Art Pen in Black
- Gold Foil: Gellen Gold Foil Flakes
- Top Coat: CND Vinylux Weekly Top Coat
DIY Instructions
- Begin with a base coat to protect your nails.
- Apply two coats of the burnt orange polish.
- Use the nail art pen to draw leaf patterns on the ring and middle fingers.
- Apply gold foil accents to the leaves for a luxurious touch.
- Finish with a top coat to protect the design and add a glossy finish.
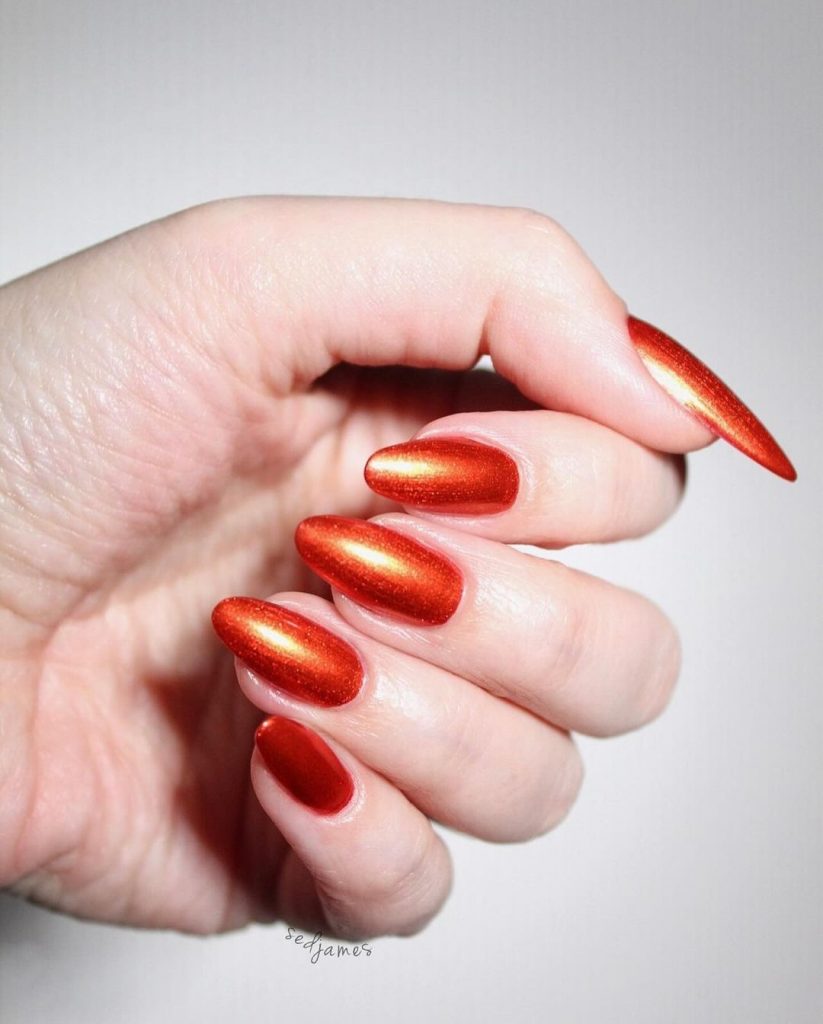
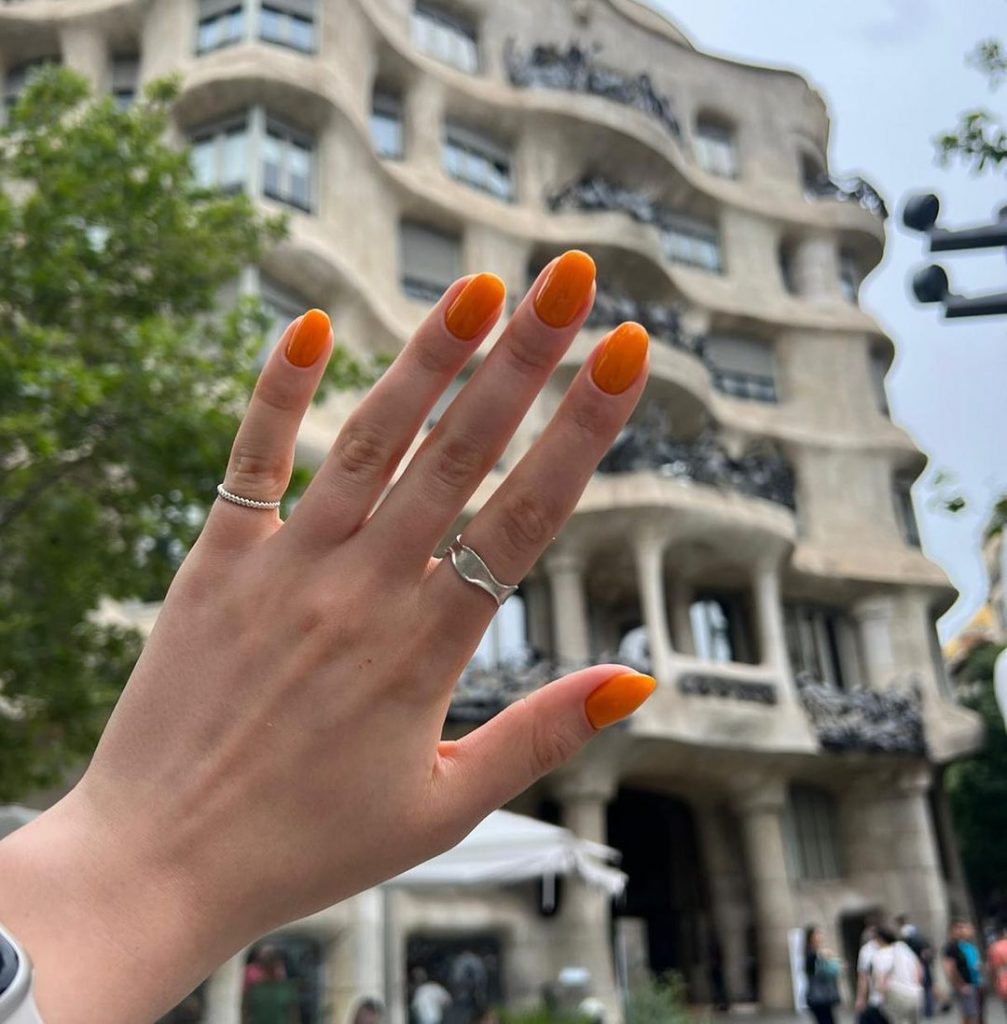
Metallic Burnt Orange Shine
For a more sophisticated look, this design uses a metallic burnt orange polish that adds a reflective, high-shine finish to almond-shaped nails. The metallic sheen gives the nails a rich, luxurious feel, making this design perfect for evening events or a stylish autumn day out.
Consumables
- Polish: Zoya “Autumn”
- Base Coat: Deborah Lippmann Hard Rock Nail Strengthening Base & Top Coat
- Top Coat: Essie Gel Setter Top Coat
DIY Instructions
- Shape your nails into an almond shape and buff the surface.
- Apply a base coat to prevent staining and enhance durability.
- Apply two coats of the metallic burnt orange polish, allowing each layer to dry.
- Seal with a top coat to enhance the shine and protect the polish.
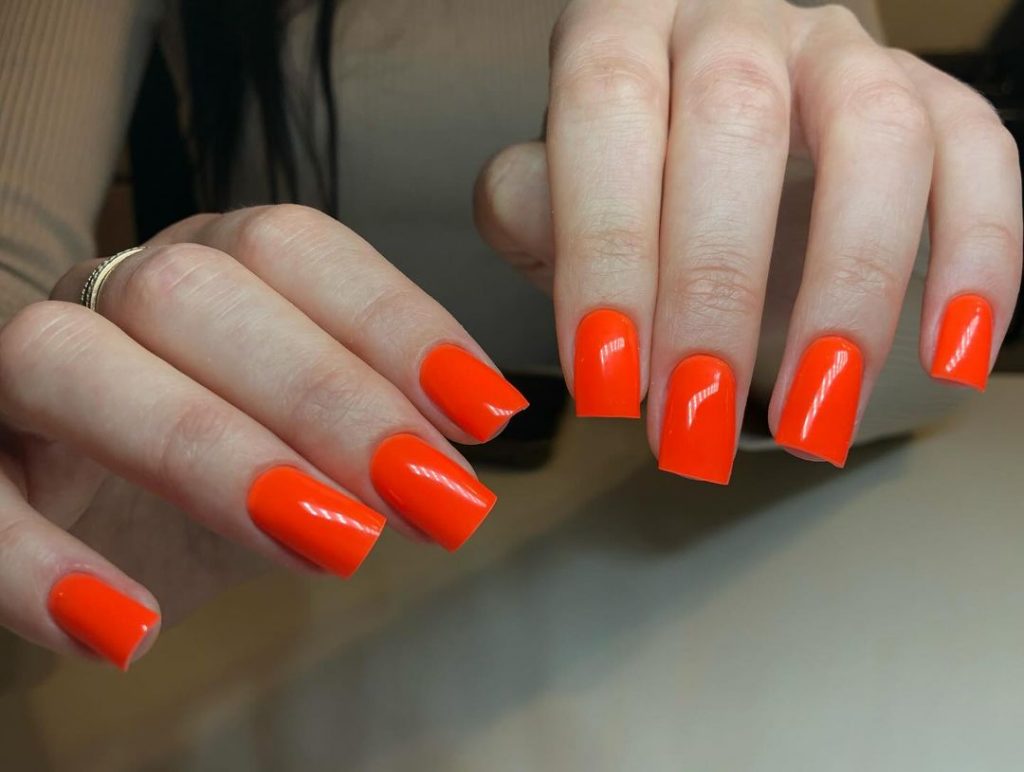
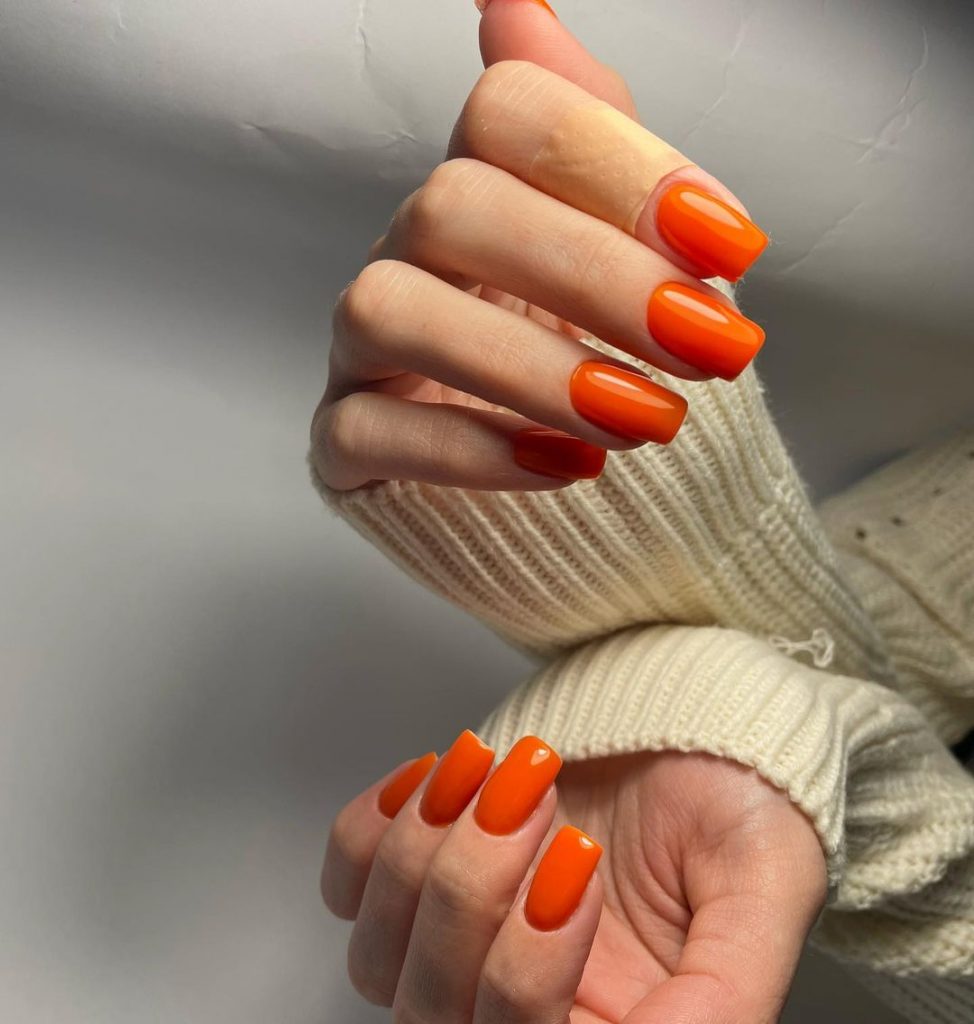
Bright Burnt Orange Square Nails
This vibrant burnt orange manicure is all about making a statement. The square-shaped nails are painted with a bold, solid color, drawing attention to the hands instantly. The bright orange hue is perfect for those who want their nails to pop and is an excellent choice for adding a splash of color to any fall outfit.
Consumables
- Polish: OPI “A Red-Vival City”
- Base Coat: Orly Bonder Base Coat
- Top Coat: Seche Vite Top Coat
DIY Instructions
- File your nails into a square shape and buff the surface.
- Apply a base coat to prepare the nails.
- Apply two coats of bright burnt orange polish, ensuring even coverage.
- Finish with a top coat to add shine and durability.
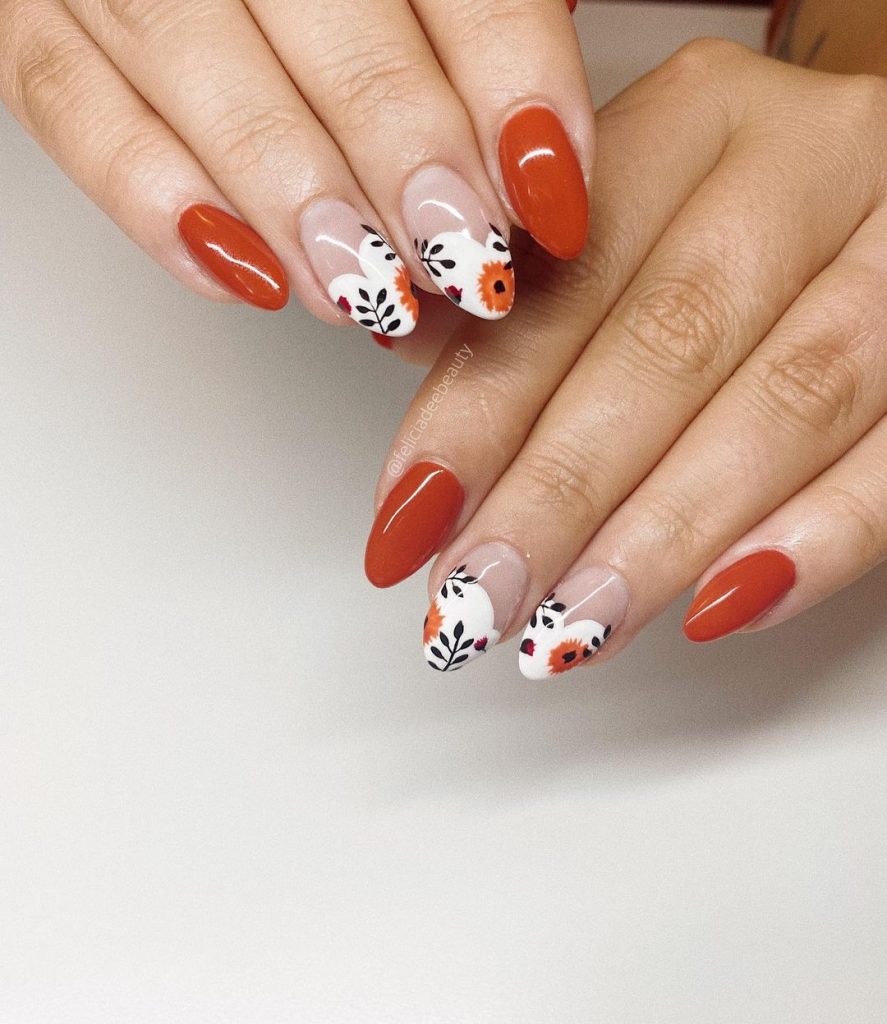
Floral Burnt Orange Accents
This beautiful design pairs a neutral base with vibrant burnt orange floral accents. The floral patterns are delicately painted on two accent nails, adding a touch of artistry while keeping the look fresh and modern. The balance between the soft base and the bold orange creates a visually appealing contrast that is perfect for autumn.
Consumables
- Polish: OPI “It’s a Piazza Cake”
- Nail Art Brushes: Saviland Detail Nail Art Brush Set
- Black Nail Art Pen: Sally Hansen I Love Nail Art Pen
- Top Coat: Essie Gel Couture Top Coat
DIY Instructions
- Start with a base coat, followed by a neutral beige polish on all nails except the accent nails.
- Use the nail art brush and black nail art pen to draw floral patterns on the accent nails.
- Fill in the flowers with burnt orange polish.
- Apply a top coat to seal the design and add shine.
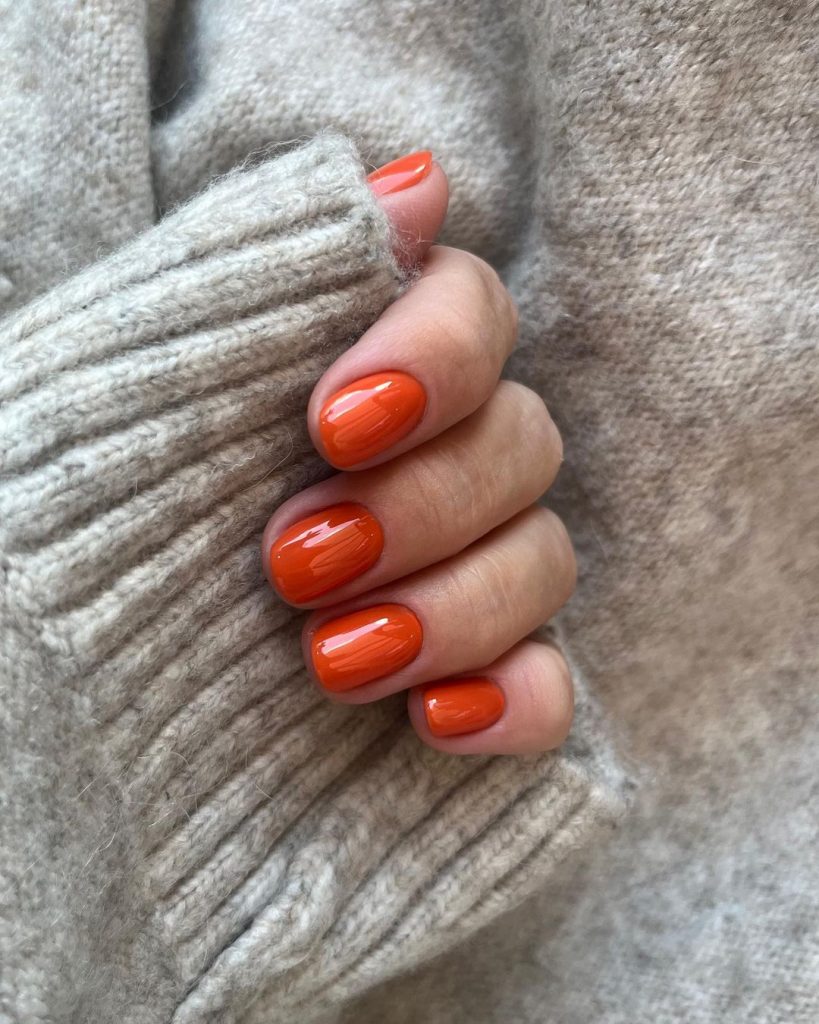
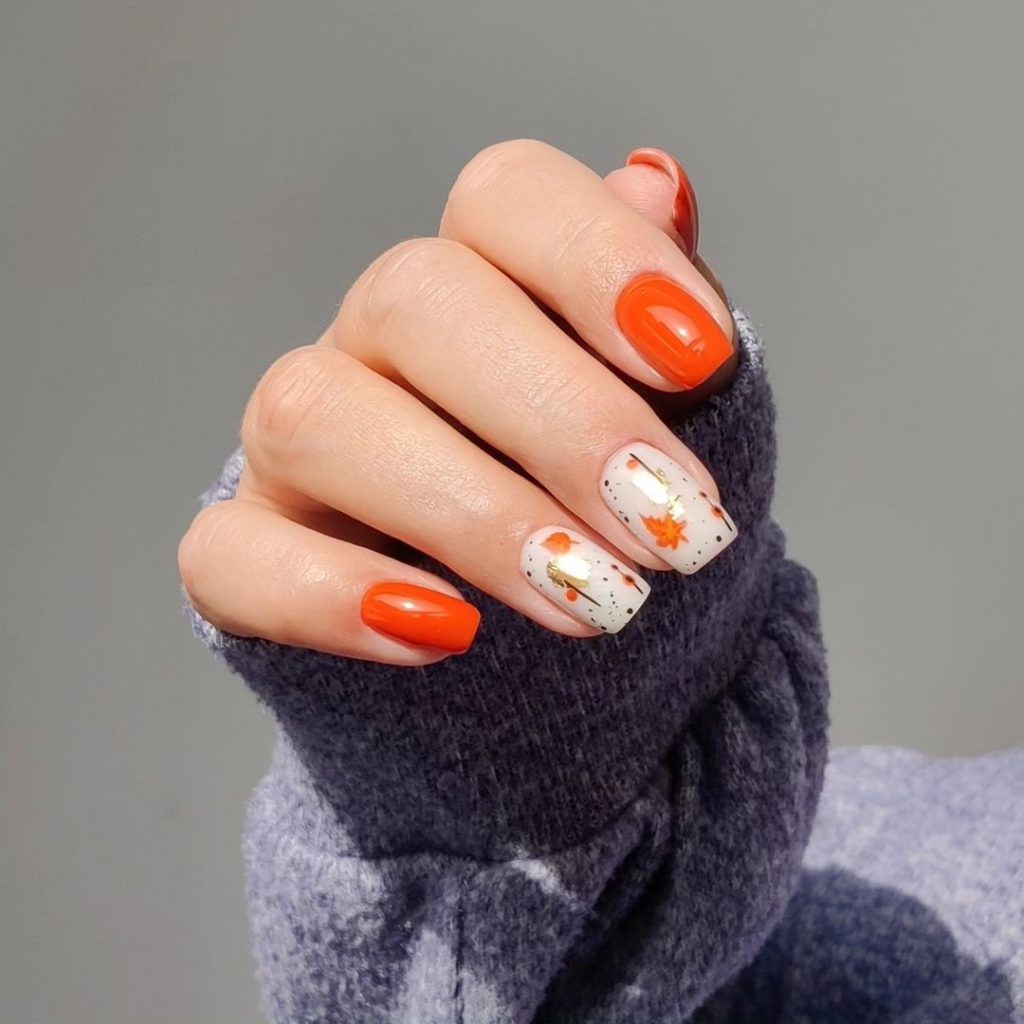
Cozy Burnt Orange for Short Nails
This look features a simple yet cozy burnt orange manicure on short, rounded nails. The warm tone of the polish is perfect for autumn, evoking feelings of comfort and warmth, especially when paired with a cozy sweater. This design is ideal for those who prefer a straightforward, no-fuss manicure that still captures the essence of the season.
Consumables
- Polish: Zoya “Autumn”
- Base Coat: Deborah Lippmann All About That Base
- Top Coat: Sally Hansen Mega Shine Top Coat
DIY Instructions
- Shape your nails into a short, rounded form and buff the surface.
- Apply a base coat to protect your nails.
- Apply two coats of burnt orange polish, letting each layer dry thoroughly.
- Finish with a top coat for added shine and protection.
Vibrant Burnt Orange for Autumn Adventures
This vibrant burnt orange manicure is all about capturing the spirit of autumn adventures. The bright and bold color stands out beautifully, making it a perfect choice for those who love to embrace the season with confidence. The oval-shaped nails add elegance to this fun and eye-catching design.
Consumables
- Polish: OPI “A Red-Vival City”
- Base Coat: Essie Here to Stay Base Coat
- Top Coat: Seche Vite Top Coat
DIY Instructions
- File your nails into an oval shape and smooth the surface.
- Apply a base coat to ensure longevity.
- Apply two coats of vibrant burnt orange polish, ensuring even coverage.
- Seal with a top coat to lock in the color and add shine.
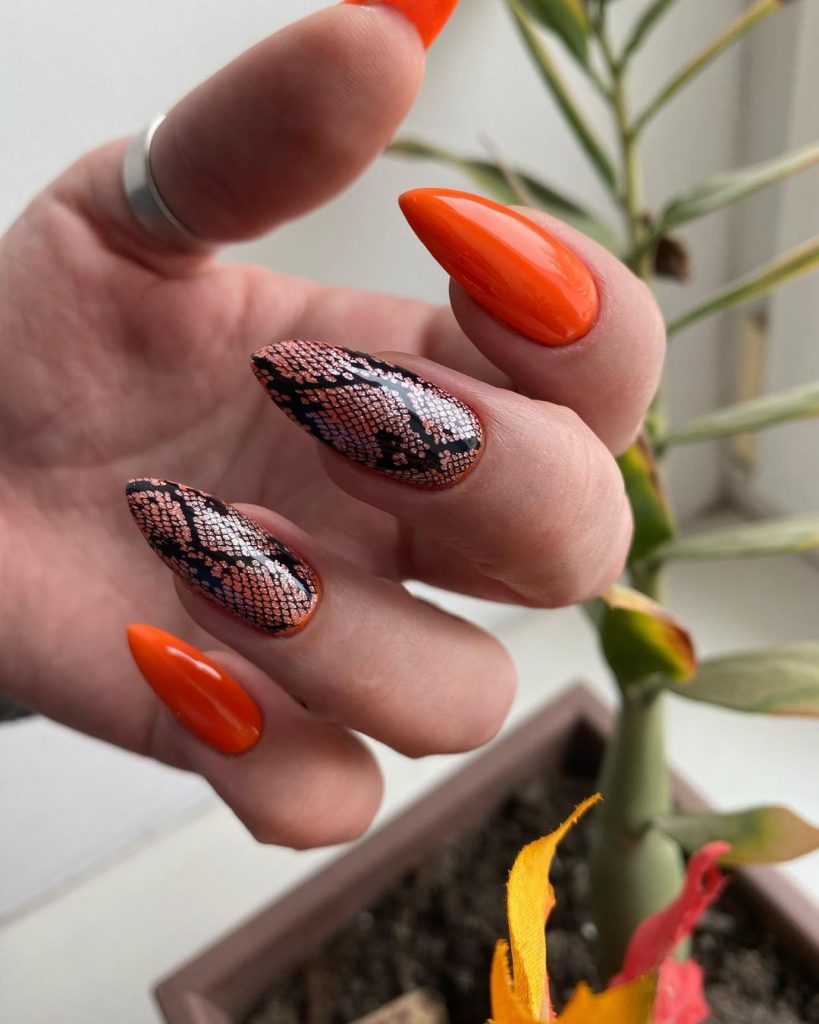
Burnt Orange with Snake Print Accents
This edgy design combines burnt orange polish with snake print accents on select nails. The combination of the bright orange and the intricate black and gray snake print creates a bold and stylish look that’s perfect for those who like to make a statement with their manicure. This design is ideal for a night out or when you want to add a bit of wild flair to your style.
Consumables
- Polish: Essie “Playing Koi”
- Snake Print Foil: Makartt Snake Skin Nail Art Foil
- Top Coat: CND Vinylux Weekly Top Coat
DIY Instructions
- Apply a base coat to start.
- Paint the nails with burnt orange polish, leaving one or two nails for the snake print design.
- Apply the snake print foil to the selected nails, following the instructions for transfer.
- Finish with a top coat to secure the foil and add a glossy finish.
Bold Burnt Orange with Square Nails
This look showcases a bold burnt orange polish on square-shaped nails. The high-shine finish and intense color make this manicure a standout choice for the fall season. The square shape adds a touch of modernity and sharpness, making it perfect for someone who wants their nails to have a clean, edgy look.
Consumables
- Polish: OPI “Hot & Spicy”
- Base Coat: Orly Bonder Base Coat
- Top Coat: Seche Vite Dry Fast Top Coat
DIY Instructions
- File your nails into a square shape and buff the surface.
- Apply a base coat to prepare your nails.
- Apply two coats of burnt orange polish, letting each coat dry thoroughly.
- Seal with a top coat for a long-lasting, glossy finish.
Festive Autumn Nail Art with Burnt Orange
This festive manicure combines the rich tones of burnt orange with contrasting black and deep green accents. The highlight of this design is the detailed autumn-themed art on the ring finger, featuring a cute woodland creature surrounded by seasonal foliage. The varying colors make this manicure perfect for embracing the festive spirit of the autumn season.
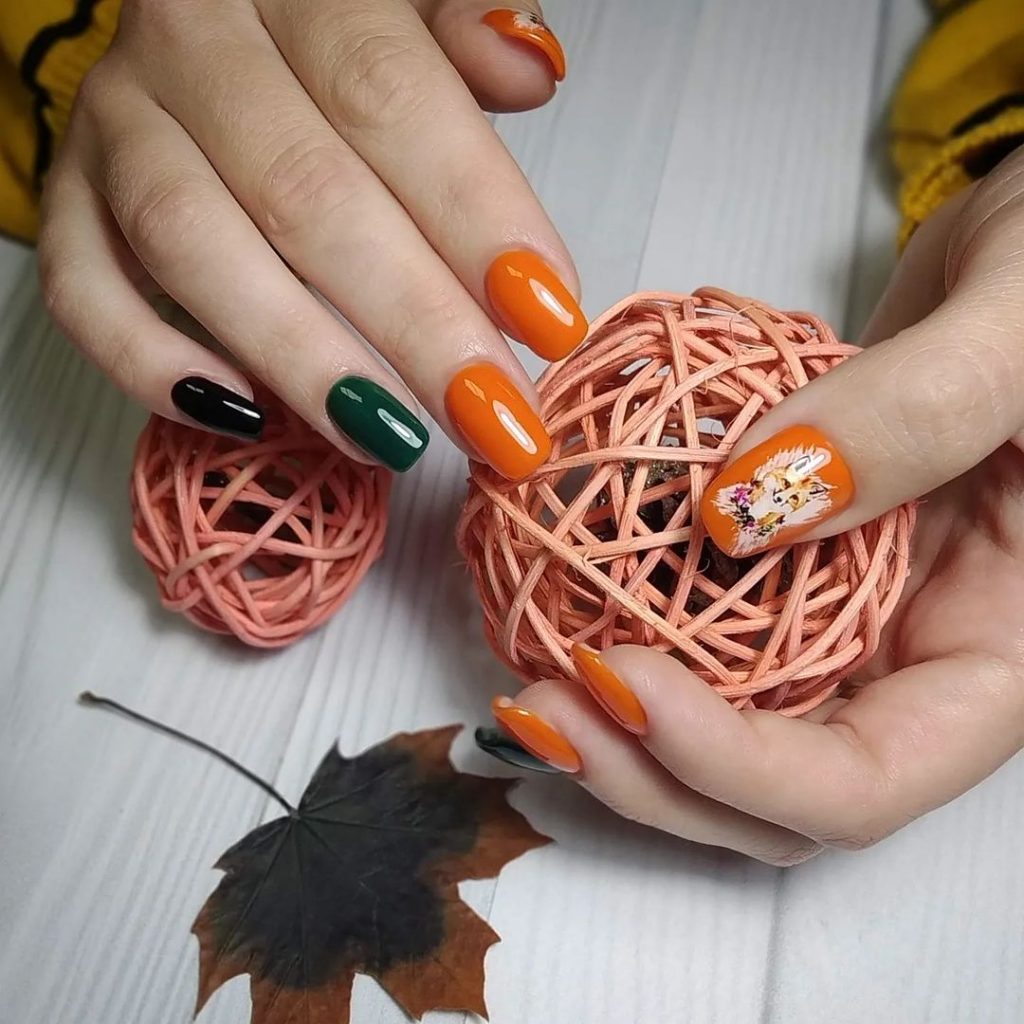
Consumables
- Polish: OPI “A Good Man-darin is Hard to Find”
- Polish: Essie “Off Tropic”
- Black Polish: OPI “Black Onyx”
- Nail Art Stickers: Born Pretty Autumn Collection
- Top Coat: Essie Gel Couture Top Coat
DIY Instructions
- Apply a base coat to prep your nails.
- Paint different nails with the burnt orange, black, and deep green polishes, alternating the colors.
- Use nail art stickers or a fine brush to create the detailed autumn scene on the ring finger.
- Seal with a top coat to protect the design and add shine.
Neon Burnt Orange with Dreamcatcher Accents
This design pairs a bold neon burnt orange with delicate dreamcatcher accents on a few nails. The combination of bright orange and soft, intricate art creates a striking contrast that’s both modern and whimsical. The neon shade brings a vibrant energy to the look, perfect for standing out in the crowd.
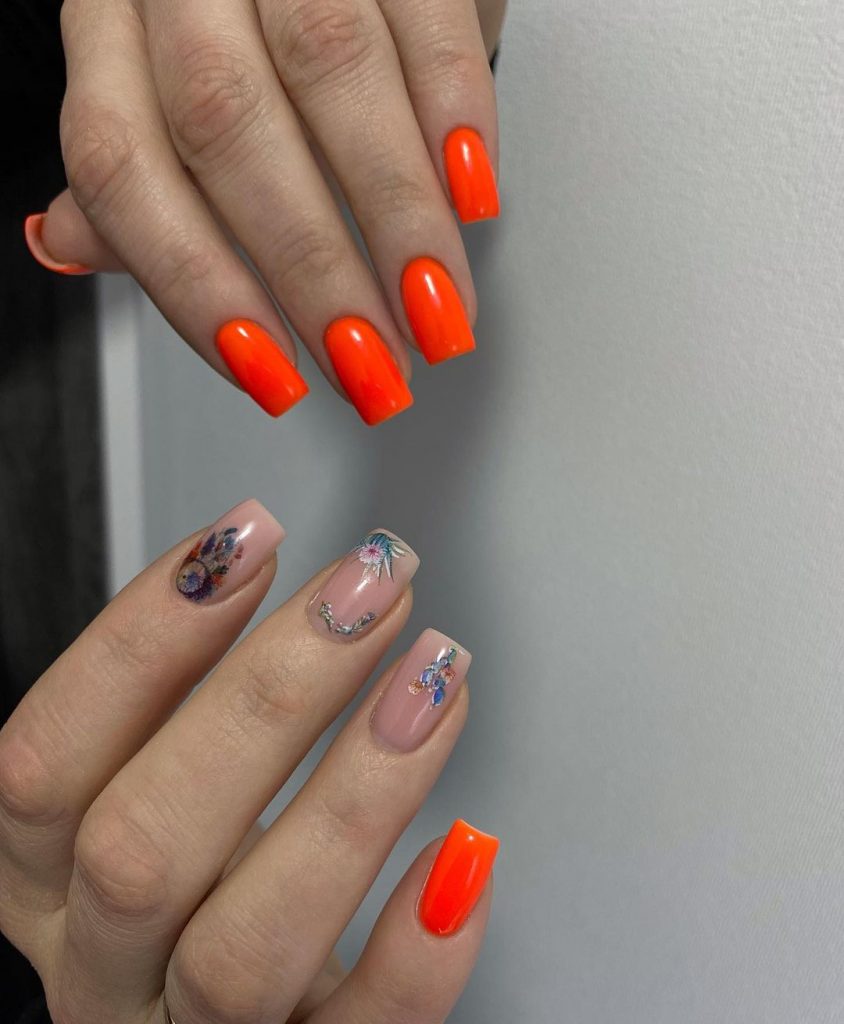
Consumables
- Polish: China Glaze “Orange Knockout”
- Base Color: OPI “Bubble Bath”
- Nail Art Stickers: Born Pretty Dreamcatcher Collection
- Top Coat: Sally Hansen Insta-Dri Top Coat
DIY Instructions
- Start by applying a base coat to all nails.
- Paint the neon burnt orange polish on a few nails, leaving the others with a neutral base.
- Apply dreamcatcher nail art stickers to the neutral nails, or paint them with a fine nail art brush.
- Finish with a top coat to secure the design and add a glossy finish.
Elegant Burnt Orange with Leaf Details
This design combines a classic burnt orange polish with elegant leaf details, perfect for capturing the essence of fall. The leaves, painted in black, add a sophisticated touch to the bold orange base. This look is ideal for those who want a stylish yet understated manicure that celebrates the season.
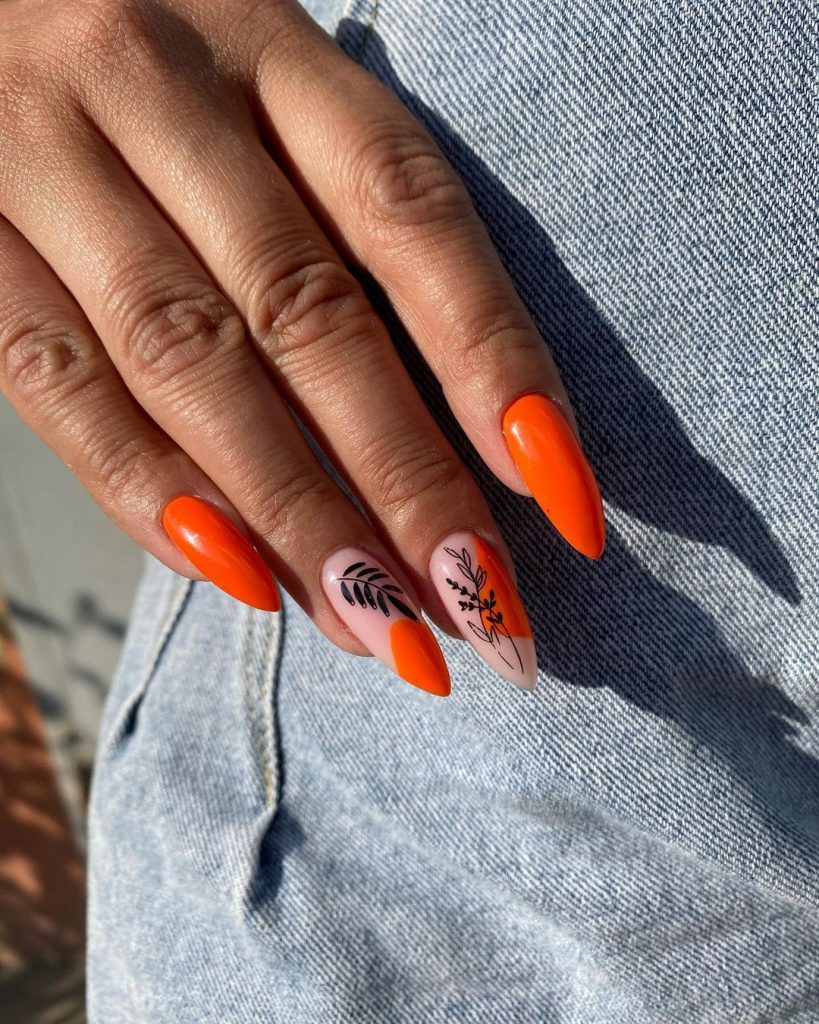
Consumables
- Polish: Essie “Playing Koi”
- Black Nail Art Pen: Sally Hansen I Love Nail Art Pen
- Top Coat: CND Vinylux Weekly Top Coat
DIY Instructions
- Apply a base coat to protect your nails.
- Paint all nails with burnt orange polish, except for the accent nails where you will add leaf details.
- Use a nail art pen to draw delicate leaf designs on the accent nails.
- Seal the design with a top coat for a glossy finish.
Classic Burnt Orange and Black Combo
This classic look combines burnt orange with black accents for a striking, modern manicure. The square-shaped nails add a contemporary feel to this bold color combination. This design is perfect for those who prefer a more edgy and stylish look, ideal for both casual and formal occasions.
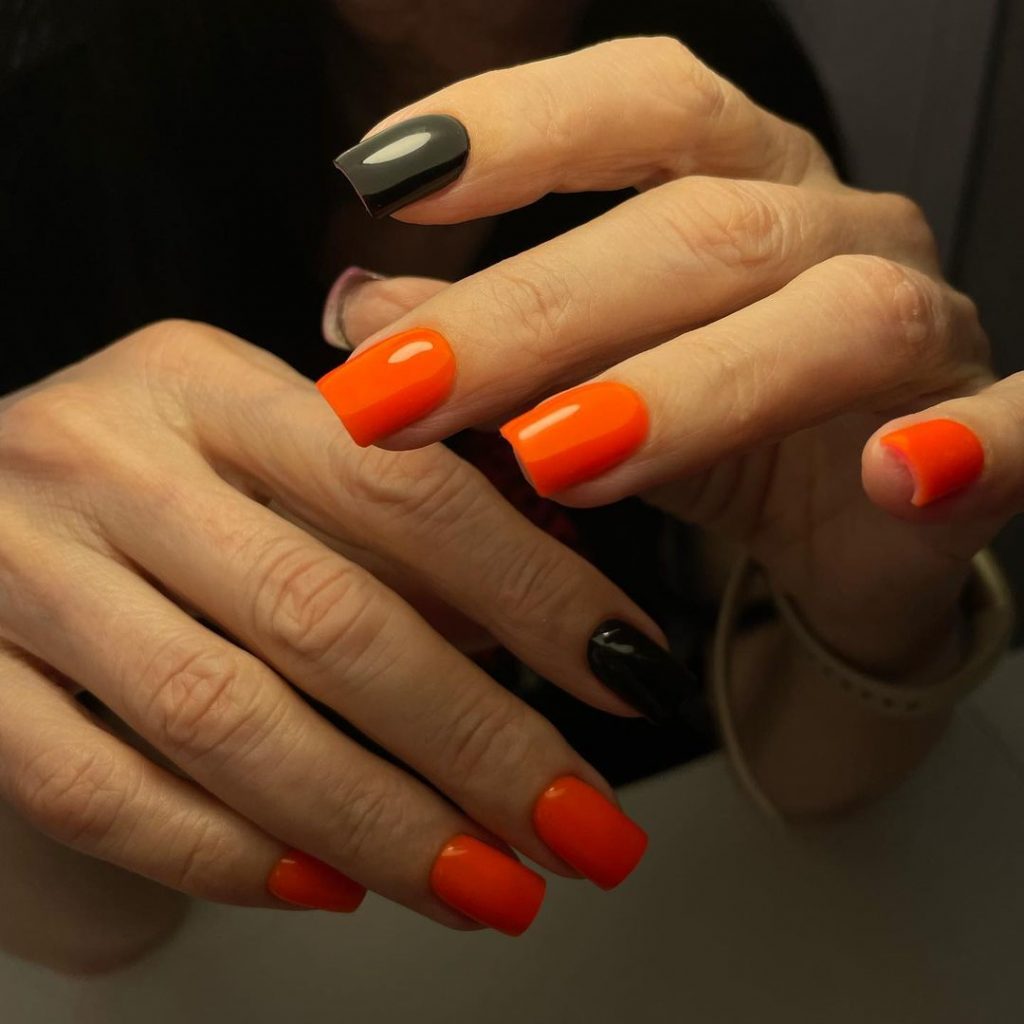
Consumables
- Polish: OPI “Hot & Spicy”
- Black Polish: OPI “Black Onyx”
- Base Coat: Deborah Lippmann All About That Base
- Top Coat: Essie Gel Couture Top Coat
DIY Instructions
- Shape your nails into a square form and buff the surface.
- Apply a base coat to prep your nails.
- Paint most nails with the burnt orange polish, and select a few for the black polish to create a bold contrast.
- Finish with a top coat to seal the polish and add shine.
Autumn Leaves with Burnt Orange Accents
This manicure features a delightful mix of autumn leaves on a soft white base, paired with vibrant burnt orange accents. The leaves, painted in shades of orange and gold, bring the essence of autumn to life. This design is perfect for those who want to embrace the seasonal changes with a stylish and charming look.
Consumables
- Polish: OPI “It’s a Piazza Cake”
- White Polish: Essie “Blanc”
- Gold Foil: Gellen Gold Foil Flakes
- Nail Art Brushes: Beetles Gel Polish Nail Art Brush Set
- Top Coat: Seche Vite Dry Fast Top Coat
DIY Instructions
- Begin with a base coat on all nails.
- Paint the accent nails with a white polish to make the leaf designs pop.
- Use a fine brush to create autumn leaves in burnt orange and gold foil accents on the white base.
- Paint the remaining nails with burnt orange polish for contrast.
- Finish with a top coat to protect your design and give it a glossy finish.
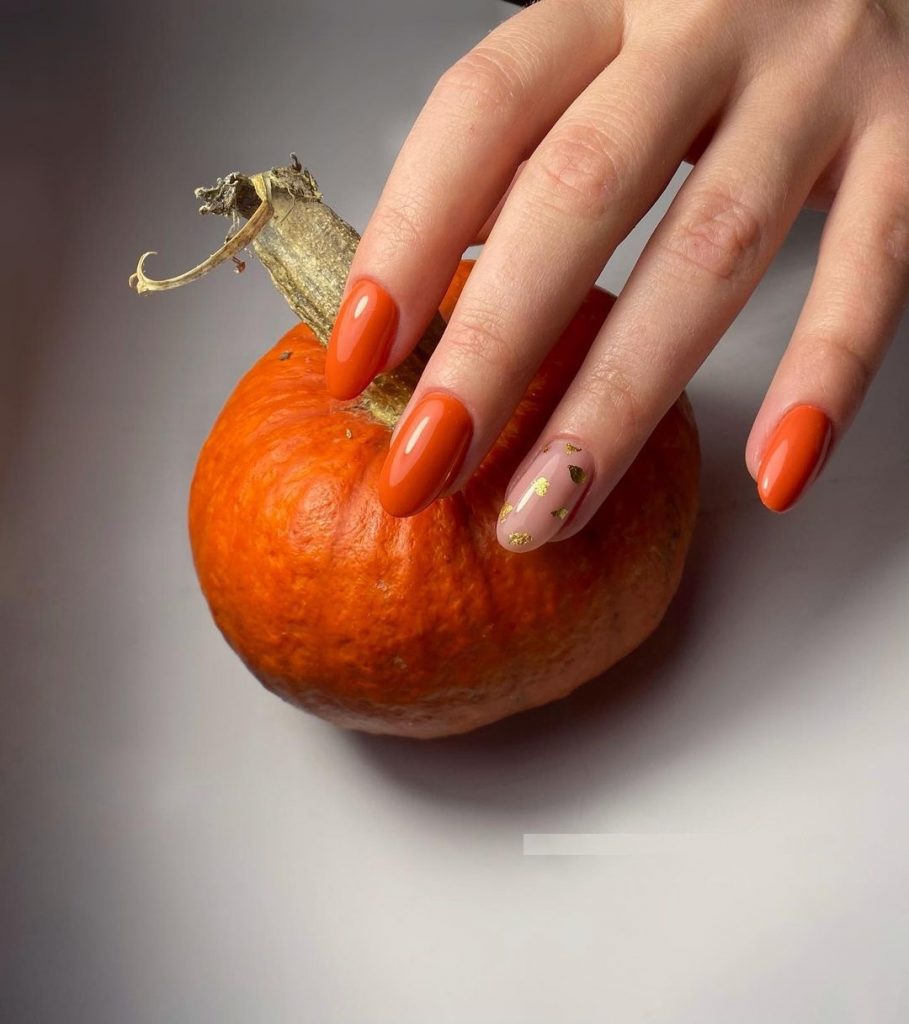
Burnt Orange with Gold Foil Accent
This manicure elegantly pairs a solid burnt orange with a nude accent nail adorned with gold foil. The design is both simple and luxurious, offering a subtle nod to the autumn season while maintaining a chic and polished look. The gold foil on the nude base adds just the right amount of sparkle, making it ideal for special occasions or an everyday look with a bit of flair.
Consumables
- Polish: OPI “It’s a Piazza Cake”
- Nude Polish: Essie “Topless & Barefoot”
- Gold Foil: Gellen Gold Foil Flakes
- Top Coat: Seche Vite Dry Fast Top Coat
DIY Instructions
- Start with a base coat on all nails to protect your natural nails.
- Paint all nails with the burnt orange polish, except for the ring finger.
- Apply the nude polish to the ring finger and let it dry completely.
- Use a small brush or tweezers to place the gold foil onto the nude nail.
- Seal the look with a top coat to ensure the foil stays in place and the color shines.
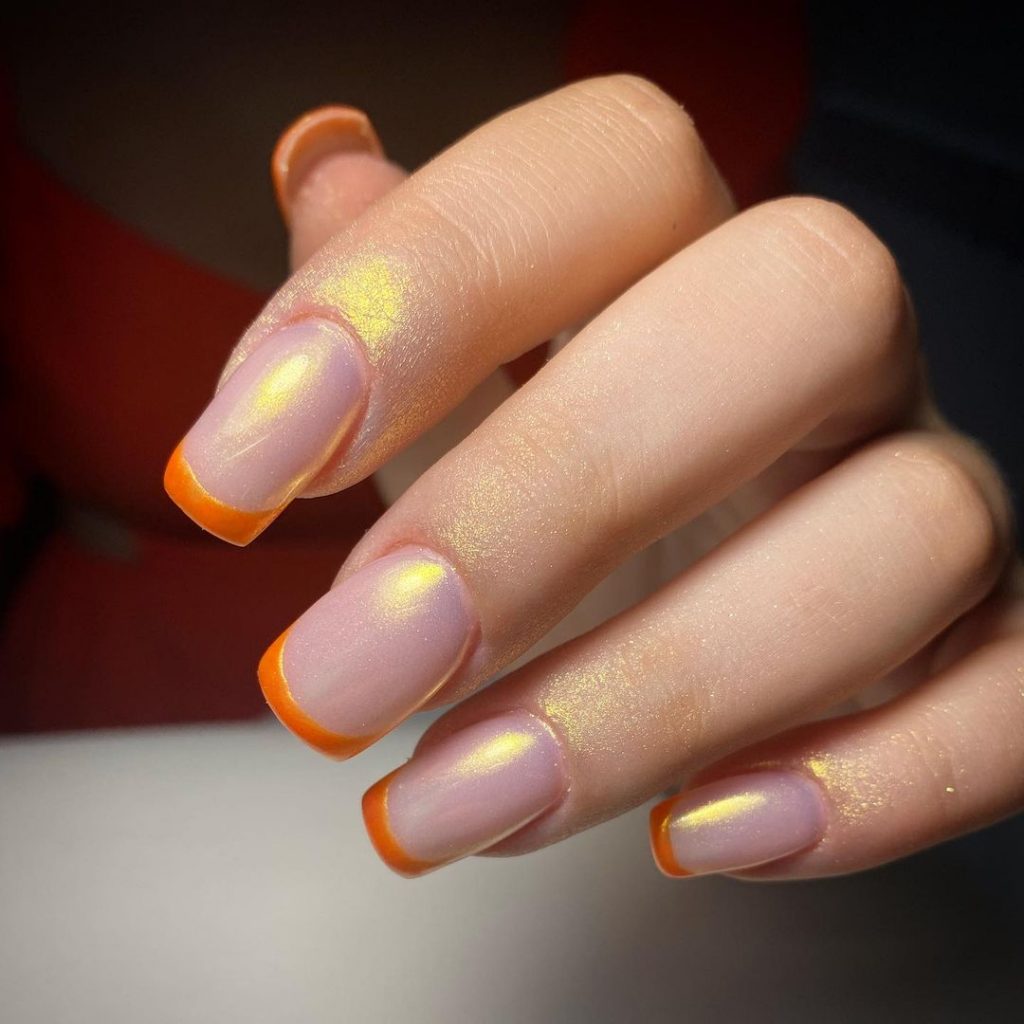
Shimmery French Tips with Burnt Orange
This look combines the classic French tip with a shimmery twist, perfect for autumn. The tips are painted in a vibrant burnt orange, complemented by a subtle gold shimmer across the entire nail. The result is a sophisticated yet playful design, ideal for those who love the elegance of a French manicure but want something a bit more festive for the fall season.
Consumables
- Base Polish: Essie “Mademoiselle”
- French Tip Polish: OPI “A Good Man-darin is Hard to Find”
- Shimmer Top Coat: Sally Hansen Miracle Gel in “Golden Glow”
- French Tip Guide Stickers
- Top Coat: Essie Gel Couture Top Coat
DIY Instructions
- Apply a base coat to all nails, followed by a light nude polish.
- Once dry, use French tip guide stickers to create a clean line, and paint the tips with burnt orange polish.
- Apply a gold shimmer top coat over the entire nail, blending it slightly into the tip for a seamless look.
- Finish with a top coat to seal and protect the design.
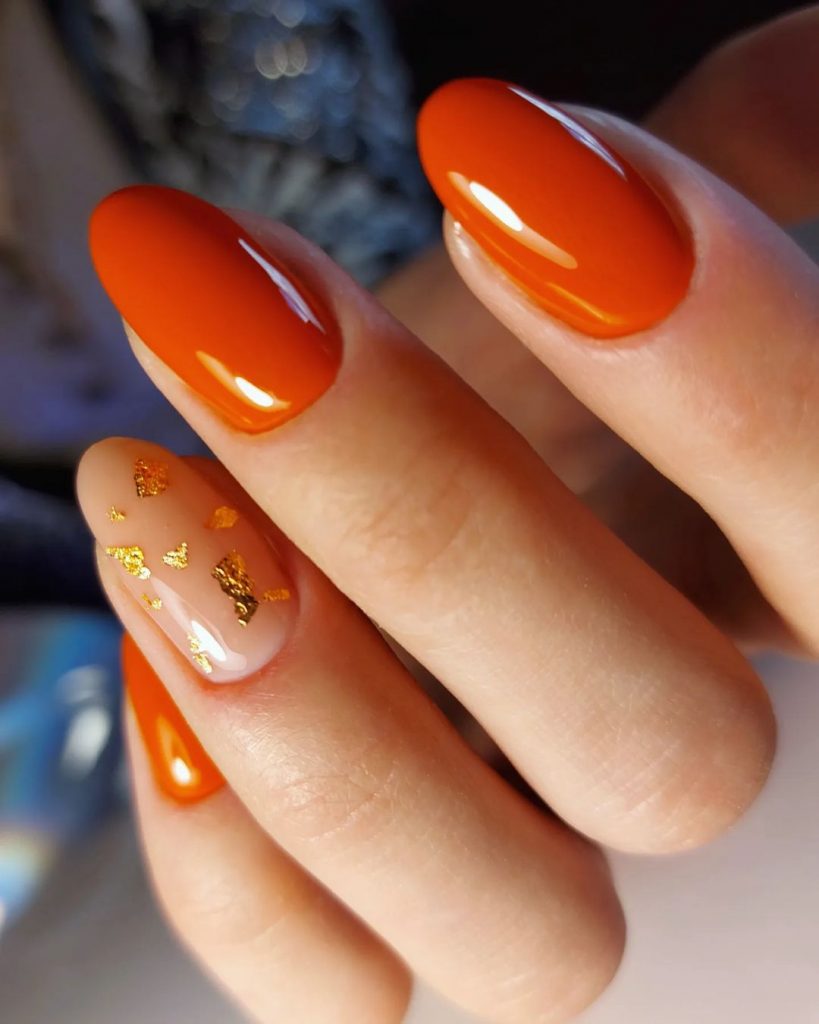
Classic Burnt Orange with Gold Leaf Accents
This classic burnt orange manicure gets a glamorous upgrade with the addition of gold leaf accents on a couple of nails. The warm, rich hue of the burnt orange is perfectly complemented by the luxurious gold details, making this design a must-try for autumn.
Consumables
- Polish: OPI “It’s a Piazza Cake”
- Gold Leaf: Gellen Gold Foil Flakes
- Top Coat: Essie Gel Couture Top Coat
DIY Instructions
- Begin with a base coat on all nails.
- Apply the burnt orange polish to all nails, except for the accent nails.
- Carefully apply gold leaf to the accent nails while the polish is still tacky.
- Finish with a top coat to ensure the gold leaf stays in place and the polish shines.
Bright Burnt Orange Almond Nails
This manicure showcases the beauty of a bright burnt orange on long almond-shaped nails. The simplicity of the design highlights the vibrant color, making it the perfect choice for anyone who loves bold and vivid nails. The glossy finish enhances the overall look, making it ideal for autumn.
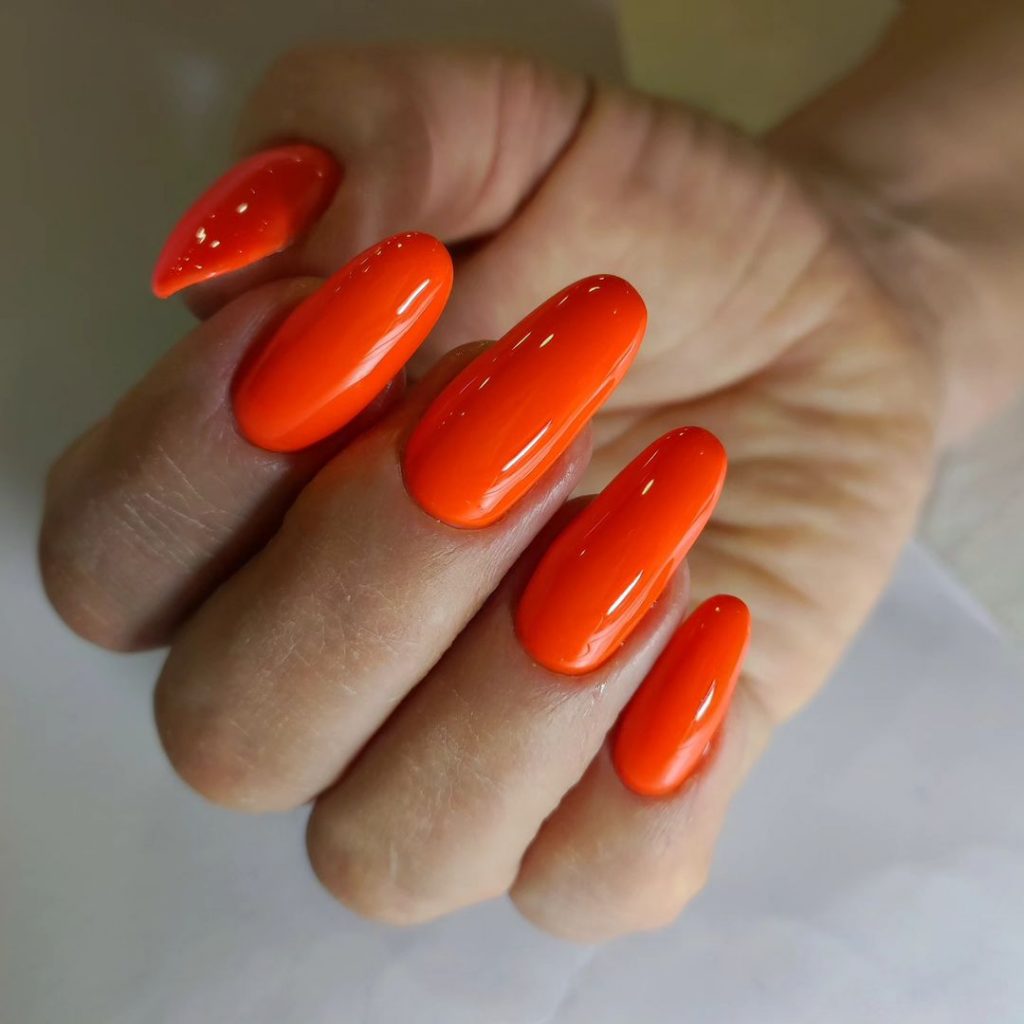
Consumables
- Polish: OPI “Hot & Spicy”
- Base Coat: Deborah Lippmann All About That Base
- Top Coat: Seche Vite Dry Fast Top Coat
DIY Instructions
- Shape your nails into a smooth almond shape using a nail file.
- Apply a base coat to protect your nails from staining.
- Paint your nails with a bright burnt orange polish, ensuring even coverage.
- Finish with a top coat to give the nails a glossy finish.
Matte Burnt Orange Nails
For a modern and trendy take on burnt orange nails, this design uses a matte finish to create a chic, understated look. The matte texture adds a contemporary edge to the classic autumn shade, making it perfect for those who want to keep their manicure minimalistic yet stylish.
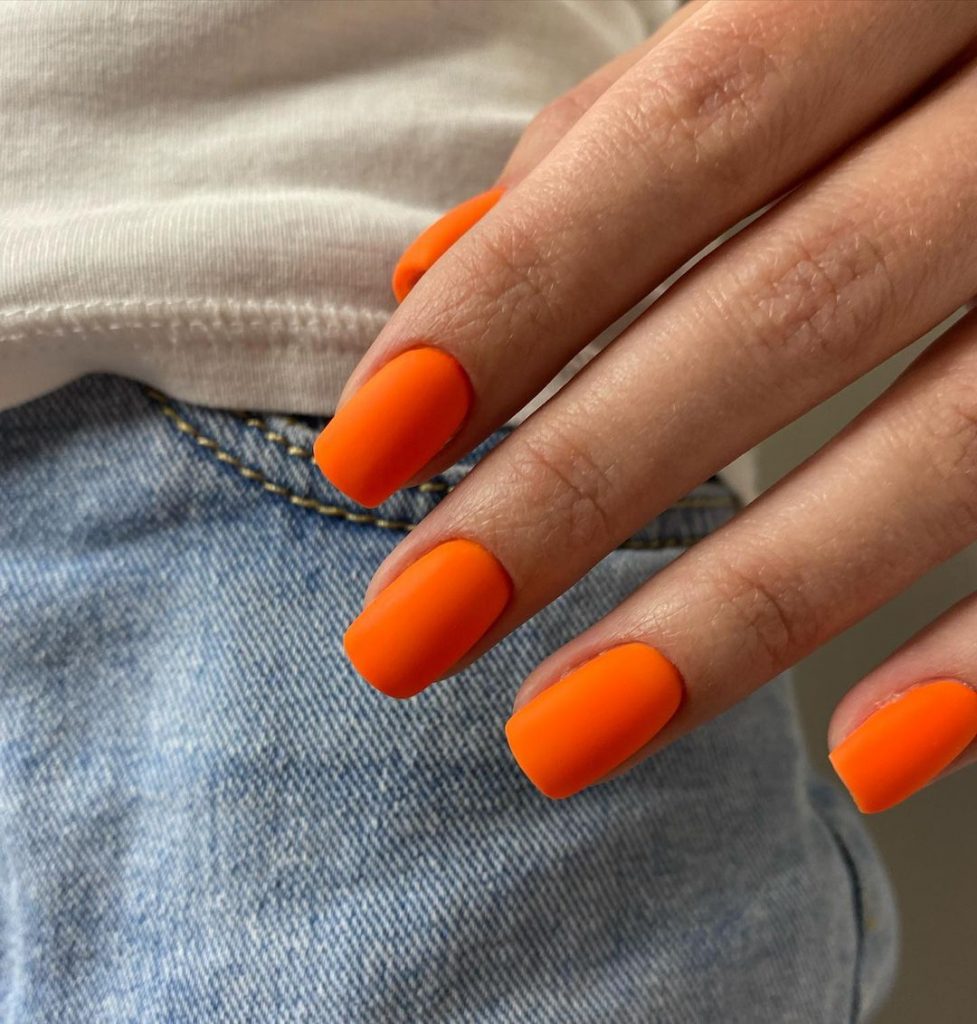
Consumables
- Polish: Essie “Playing Koi”
- Matte Top Coat: OPI Matte Top Coat
DIY Instructions
- Apply a base coat to all nails.
- Paint your nails with the burnt orange polish, allowing them to dry completely.
- Apply a matte top coat to create a smooth, velvety finish.
Save Pin