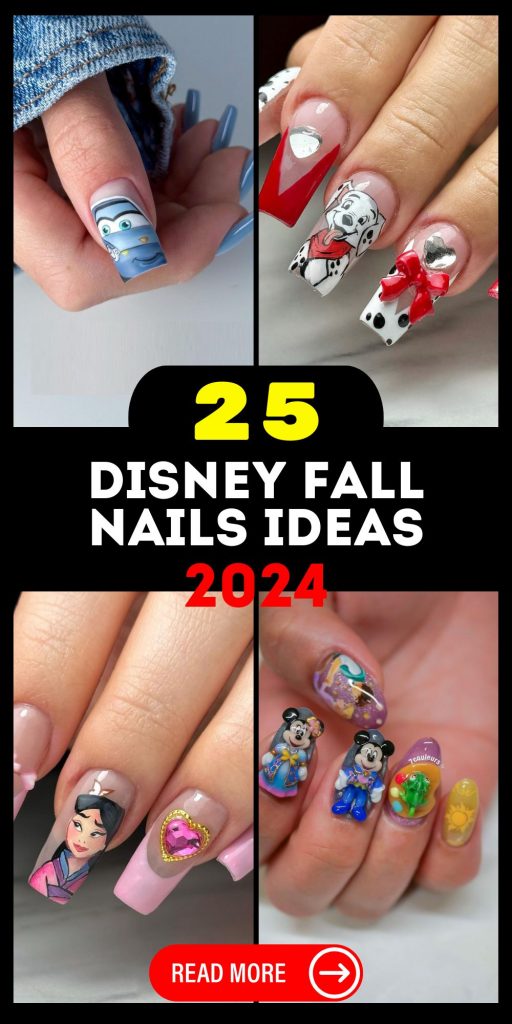
When it comes to nail art, what better way to celebrate the fall season of 2024 than with a dash of Disney magic? Whether you’re heading to the parks or just want to carry a bit of that enchanting spirit with you, Disney-inspired nail designs are the perfect way to blend nostalgia with this year’s trends. Curious about how to create the perfect Disney fall nails 2024? Let’s dive into the details of each captivating look.
Whimsical Princess Vibes with a Modern Twist
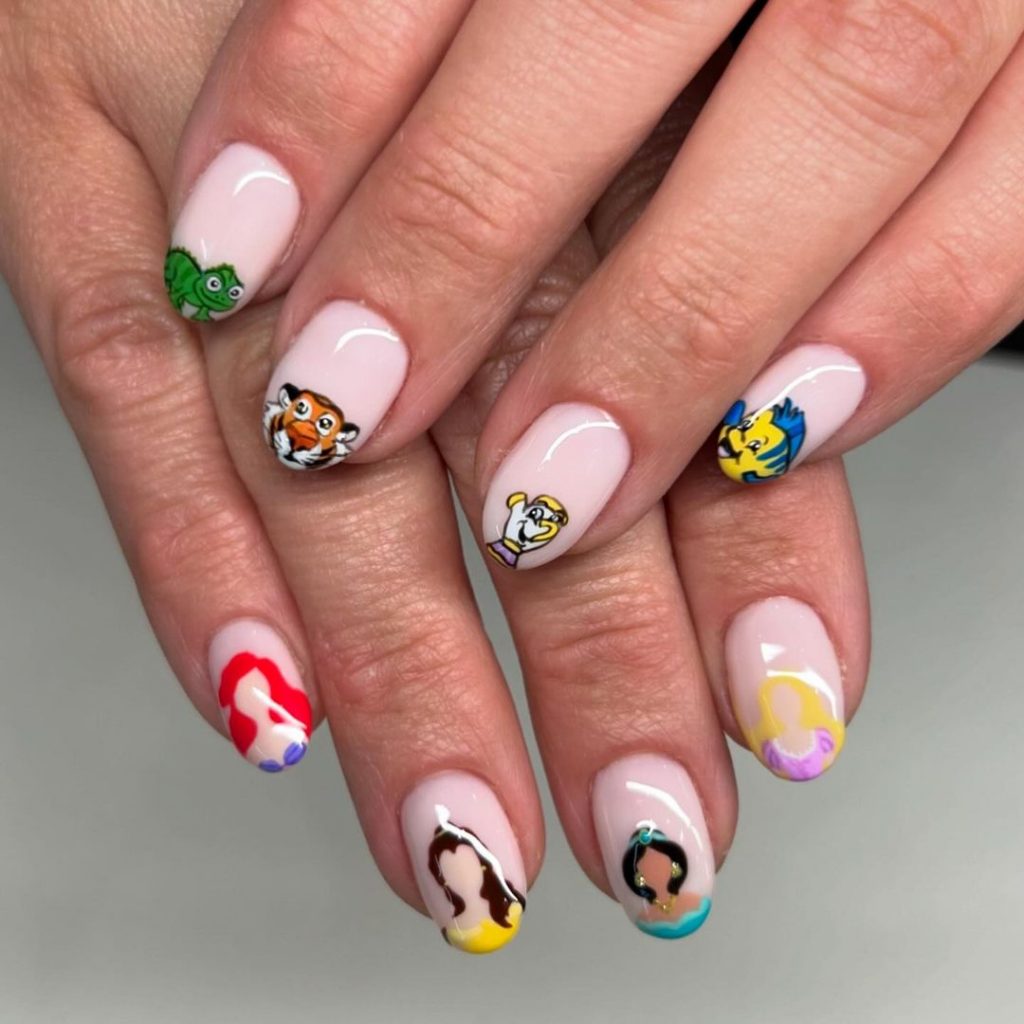
Disney princesses have always been the epitome of grace and beauty, and this nail design brings that elegance to your fingertips. The intricate detailing of characters like Belle, Cinderella, and Snow White is paired with soft, pastel tones that evoke a subtle, fairytale-inspired aesthetic. The use of acrylic to craft these long, almond-shaped nails adds a touch of modernity, making this design both timeless and trendy.
For this look, you’ll need:
- An acrylic nail kit. Consider brands like Kiara Sky or Mia Secret for a smooth application.
- Pastel nail polishes like OPI’s “Do You Lilac It?” and Essie’s “Ballet Slippers”.
- Fine detailing brushes. A must for creating those delicate character outlines; Winstonia offers a great set.
- A top coat like Seche Vite for a high-gloss finish.
- Character decals or stickers if you prefer not to freehand paint; DecalbyMelissa on Etsy has great Disney-themed options.
To create this design at home:
- Start by prepping your nails with the acrylic application. Shape them into an almond tip for a classy, elongated look.
- Apply two coats of your base pastel colors, letting each layer dry thoroughly.
- Using fine detailing brushes, carefully paint the outlines of your chosen Disney princesses. If you’re not confident in your freehand skills, apply decals instead.
- Add tiny, glittering accents with a fine glitter polish or nail gems to highlight certain features, like the princesses’ tiaras or jewelry.
- Finish with a durable top coat to protect your design and add a glossy finish.
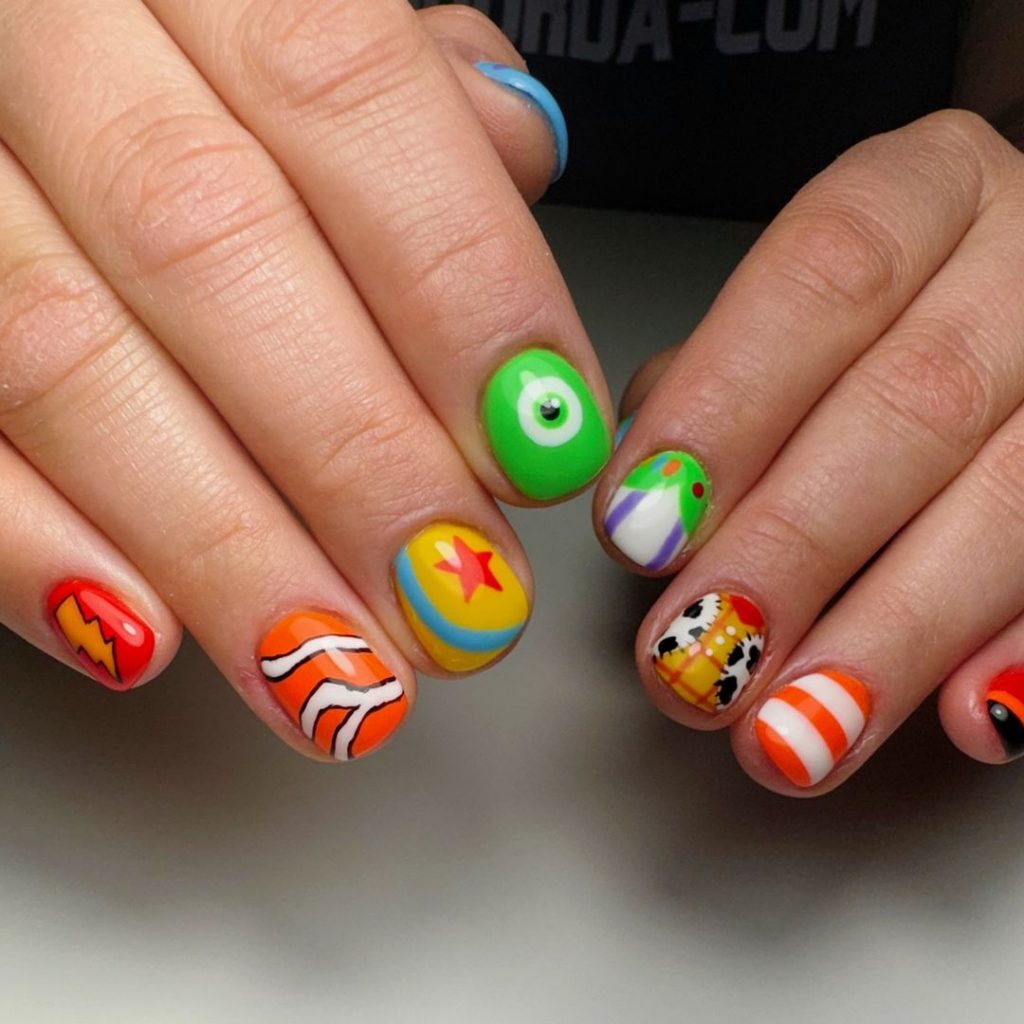
Toy Story Fun with a Fall Twist
Channel your inner child with these playful, Toy Story-inspired nails. The vibrant colors and bold patterns bring each character to life, from Buzz Lightyear’s iconic suit to Woody’s cowboy hat. This fun and whimsical design is perfect for anyone who wants to add a bit of nostalgia to their fall nail art, while still keeping it trendy and fresh.
For this look, you’ll need:
- Nail polishes in bright colors like green, yellow, and purple. Try Essie or Sally Hansen for a wide range of shades.
- Nail art brushes to create the fine details, especially for characters’ faces and clothing details.
- Matte top coat to give the design a modern, understated finish.
- Stencils or guides to help create the character silhouettes, especially if freehand isn’t your strong suit.
To recreate this design:
- Begin by shaping your nails into a square tip for a bold and structured look.
- Apply a base coat, followed by your chosen background colors. Allow each coat to dry fully before proceeding.
- Use your nail art brushes to carefully paint the character details. If needed, use stencils to ensure crisp lines.
- Once the characters are fully dry, apply a matte top coat to give the design a chic, modern finish.
- Clean up any edges with a small brush dipped in nail polish remover for a professional look.
Mickey and Friends in Fall Hues
Celebrate the classics with this Mickey and Friends nail design, perfectly attuned to the fall 2024 color palette. The rich reds, warm browns, and hints of gold create a sophisticated yet fun look. The nail shape here is a slightly rounded square, making it versatile and comfortable for everyday wear.
To achieve this look:
- Nail polishes in rich fall colors such as deep reds, browns, and golds. OPI’s “Malaga Wine” and Essie’s “Good as Gold” are great options.
- Character decals or fine art brushes for painting Mickey, Minnie, and the gang.
- Gold foil or glitter to add a touch of sparkle and elegance.
- Gel top coat for long-lasting wear and added shine.
To recreate this design at home:
- Start with shaping your nails into a slightly rounded square for a modern look.
- Apply two coats of your chosen fall-inspired base colors, making sure to let each coat dry completely.
- Use fine art brushes or apply decals to create the characters. Adding small accents like Mickey’s ears or Minnie’s bow in glitter or gold foil will elevate the look.
- Seal everything with a gel top coat for durability and an extra glossy finish.
- Allow your nails to cure fully under a UV or LED lamp if using gel polish.
Villainous Elegance for Halloween
For those who prefer a bit of an edge, this Maleficent-inspired nail design is perfect for Halloween. The dramatic purple and green color scheme, coupled with long stiletto nails, creates a bold, fierce look. The addition of subtle glitter adds a touch of dark glamour, making this a standout design for any fall event.
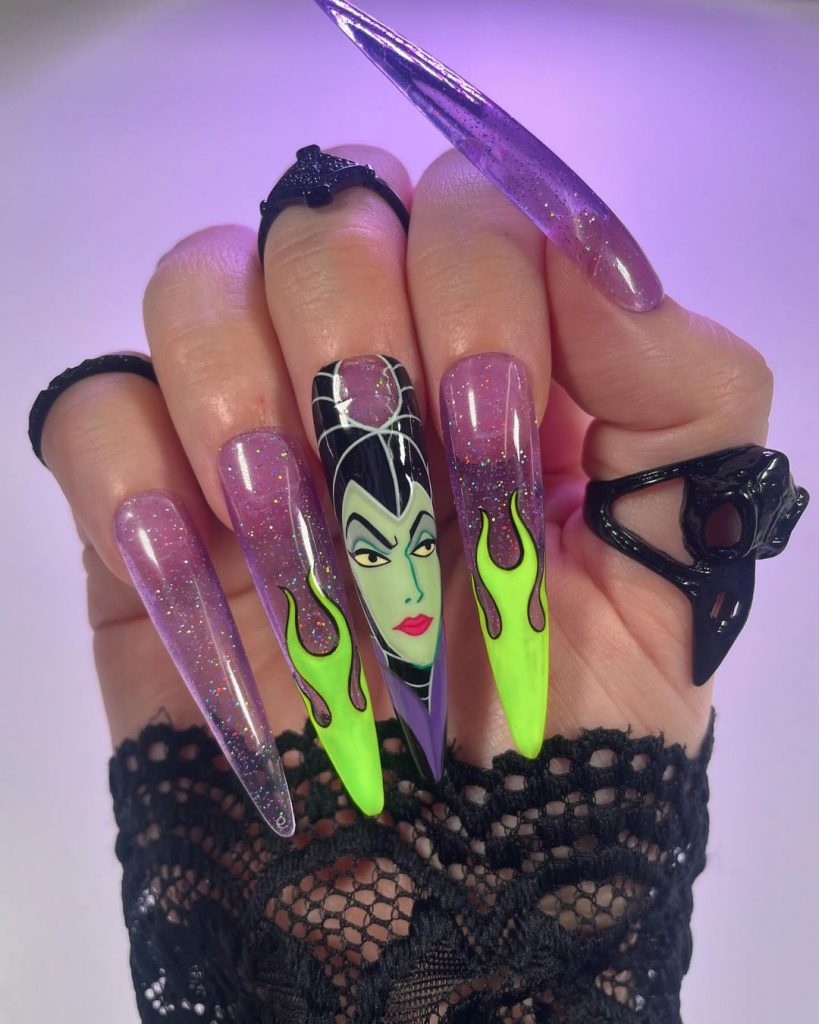
To get this look, you’ll need:
- Acrylic nail kit to achieve the long stiletto shape.
- Purple and green polishes with a slight shimmer, such as Zoya’s “Fiji” and China Glaze’s “Celtic Sun”.
- Nail art brushes for painting Maleficent’s iconic features.
- Black glitter or rhinestones to add extra flair.
- Matte top coat for a velvety finish.
To recreate this at home:
- Begin by applying the acrylic nails and shaping them into sharp stilettos.
- Paint each nail with two coats of purple or green polish, allowing each coat to dry fully.
- Use nail art brushes to paint Maleficent’s face or features on an accent nail. Add black glitter or rhinestones for extra drama.
- Apply a matte top coat to all nails for a sophisticated, velvety finish.
- For an even bolder look, add a high-gloss top coat to select nails to contrast with the matte finish.
Inside Out Inspired Fun
Bright, colorful, and full of character, these Inside Out-inspired nails are a joyful addition to your fall manicure lineup. The vibrant colors and expressive characters make this design both playful and eye-catching. The combination of 3D elements and intricate painting brings the emotions from Inside Out to life, making this design a real conversation starter.
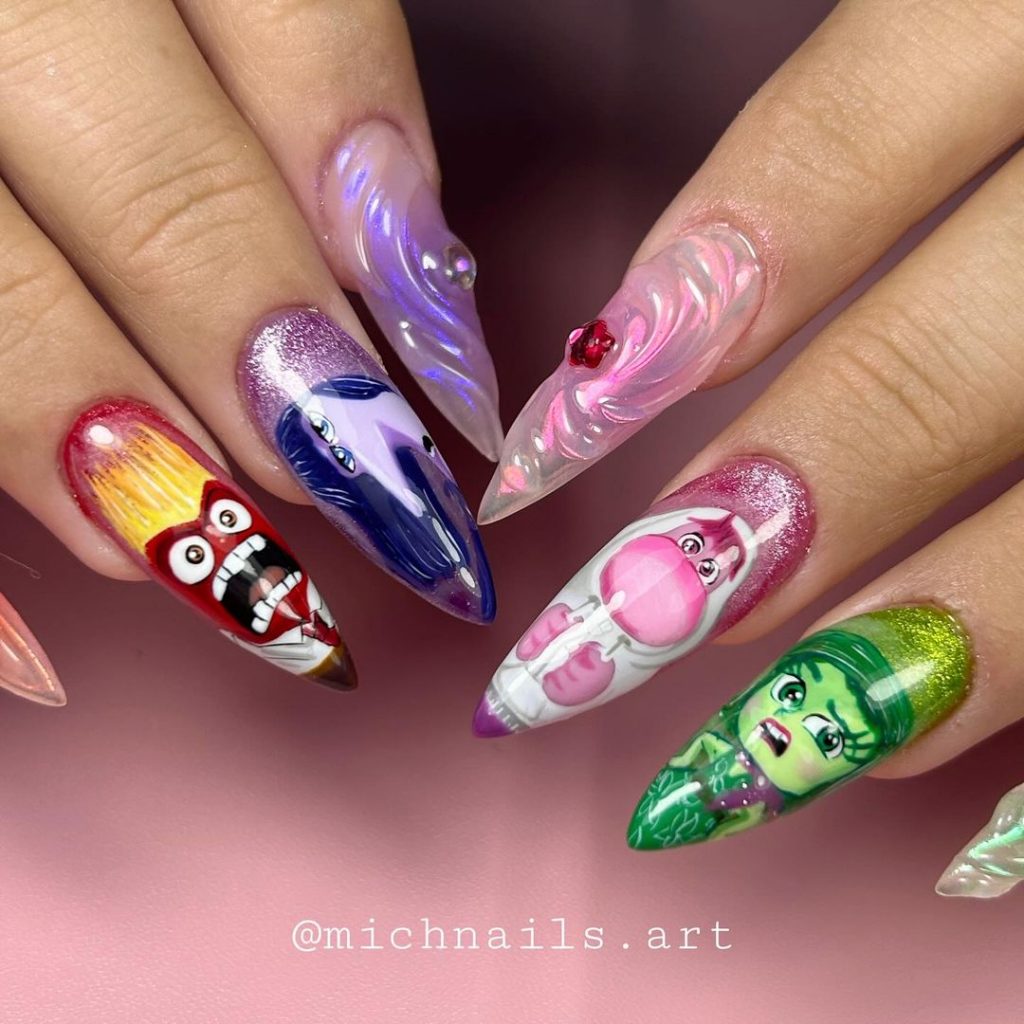
For this design, you’ll need:
- Bright nail polishes in colors that match the Inside Out characters. OPI’s “I Just Can’t Cope-acabana” and Essie’s “Play Date” work well.
- 3D gel for adding dimension to the design.
- Detailing brushes to capture the emotions’ expressive faces.
- Nail gems or beads to add texture and sparkle.
- High-shine top coat to bring everything together.
To create this look at home:
- Shape your nails into a rounded almond shape for a softer, more playful look.
- Paint each nail in a color that corresponds to an Inside Out character, using two coats for full opacity.
- Use detailing brushes to carefully paint the characters’ faces, adding 3D gel for dimension where needed.
- Apply nail gems or beads to add extra sparkle and texture.
- Finish with a high-shine top coat to ensure the design lasts and catches the light beautifully.
Winnie the Pooh’s Sweet Pastel Dream
This delightful design brings the beloved characters of Winnie the Pooh and Piglet to life in a soft, pastel palette that’s both charming and subtle. The short, rounded nails feature delicate details like honey drips, tiny bees, and heart accents that add a touch of whimsy without overwhelming the overall look. This design is perfect for those who love a cute and understated manicure that still showcases a bit of fun Disney flair.
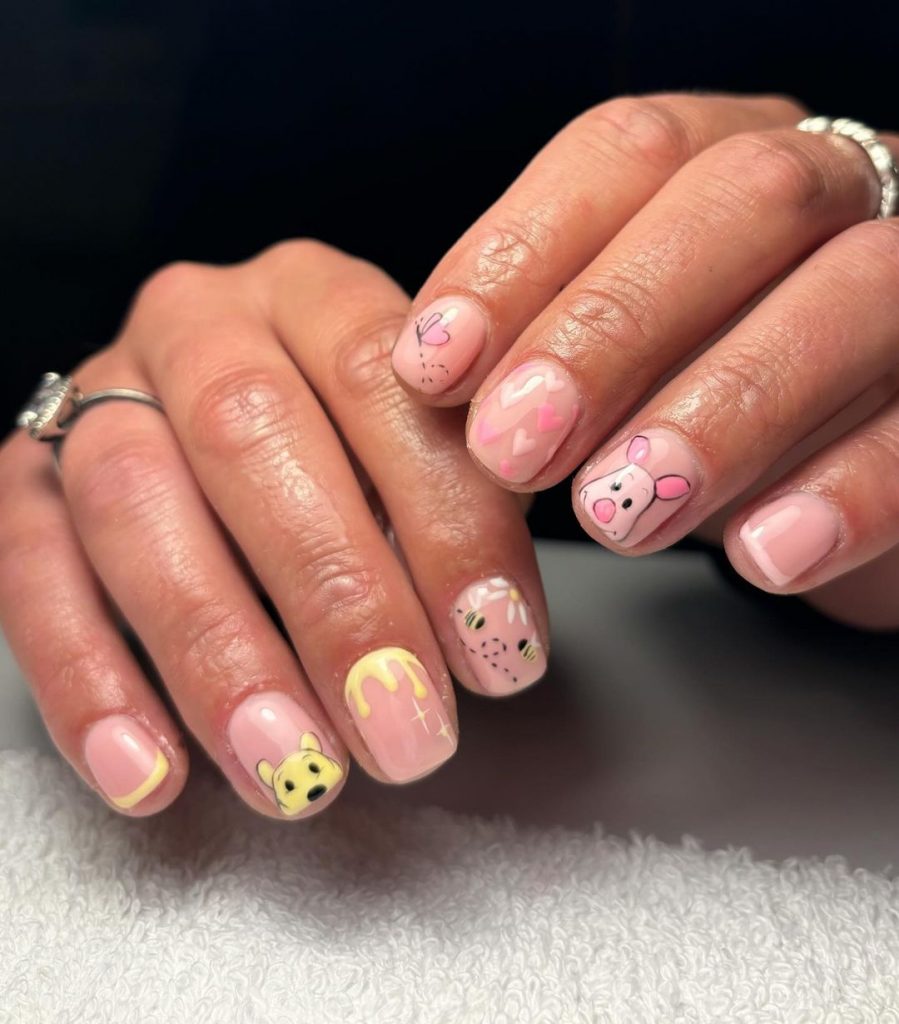
For this look, you’ll need:
- Soft pink and yellow nail polishes like Essie’s “Fiji” and Sally Hansen’s “Mellow Yellow.”
- Fine detailing brushes for precise character painting.
- Nail art stickers of Winnie the Pooh and Piglet, available on Etsy for ease of application.
- Top coat like Seche Vite to seal the design and add shine.
To create this design at home:
- Start by shaping your nails into a short, rounded shape that’s both practical and stylish.
- Apply a soft pink base color, allowing it to dry completely before adding details.
- Use fine brushes to paint the honey drips and bees. If freehand isn’t your strength, apply stickers for Winnie the Pooh and Piglet on your accent nails.
- Add the tiny hearts and additional accents with a contrasting color like pastel yellow or white.
- Seal everything with a glossy top coat to protect your design and ensure it lasts.
Mulan’s Blossoming Strength
Celebrate Mulan’s courage and elegance with this stunning design that features delicate cherry blossoms and a portrait of Mulan herself. The long, square acrylic nails provide a perfect canvas for detailed art, while the soft pink tones keep the look feminine and refined. A 3D heart gem adds a touch of glamour, making this design a standout for any Disney fan.
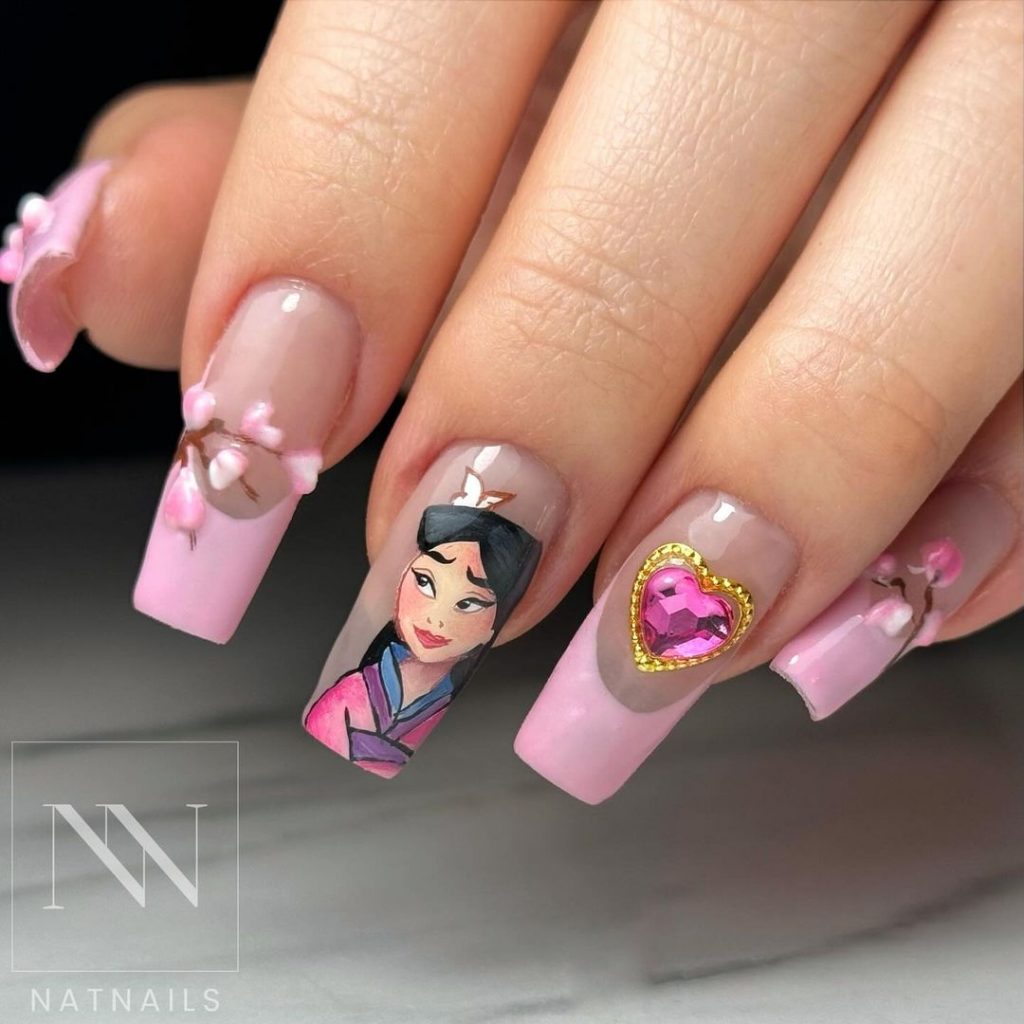
For this look, you’ll need:
- Acrylic nail kit to create the long square shape.
- Soft pink polish like OPI’s “Mod About You.”
- Fine detailing brushes for Mulan’s portrait and cherry blossoms.
- 3D nail art decorations such as a heart gem, available from Swarovski or similar brands.
- Gel top coat to ensure a glossy and durable finish.
To create this design at home:
- Begin by applying the acrylic nails and shaping them into a long square.
- Paint your nails with a soft pink base color, letting it dry thoroughly.
- Using detailing brushes, carefully paint Mulan’s face on one nail and the cherry blossoms on the others. If you prefer, you can also use decals for the portrait.
- Attach the 3D heart gem using nail glue, ensuring it’s securely in place.
- Finish with a gel top coat to lock in the design and give it a professional shine.
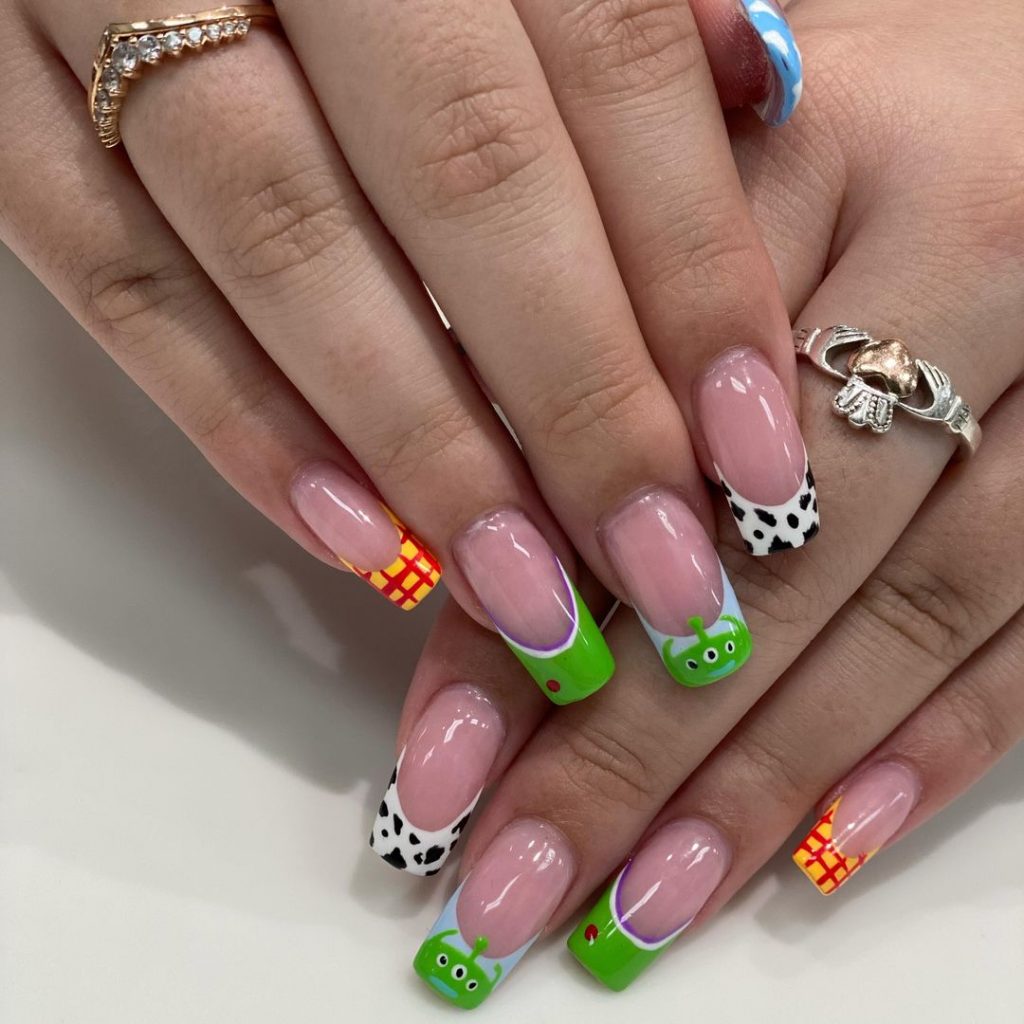
Toy Story Adventure
This vibrant and playful Toy Story-inspired design is perfect for adding a pop of color to your fall nails. Each nail features a different character or element from the Toy Story universe, from Buzz Lightyear to Woody’s cowboy outfit, all brought to life with bright and bold colors. This design is especially great for those who want a fun, themed manicure that’s still simple enough for everyday wear.
For this look, you’ll need:
- Bright nail polishes in primary colors like Essie’s “Butler Please” and OPI’s “Red Hot Rio.”
- Nail art brushes for detailing the characters and patterns.
- Matte top coat to give the design a modern, smooth finish.
- Nail art stickers for characters like Buzz and Woody, available online for easy application.
To create this design at home:
- Shape your nails into a short, rounded style for a playful, comfortable look.
- Apply a different base color to each nail, corresponding to the Toy Story character or element you want to depict.
- Use nail art brushes to carefully paint the character details, or apply pre-made stickers for ease.
- Once your design is complete, finish with a matte top coat for a smooth, modern look.
- Clean up any edges with a small brush dipped in nail polish remover for a professional finish.
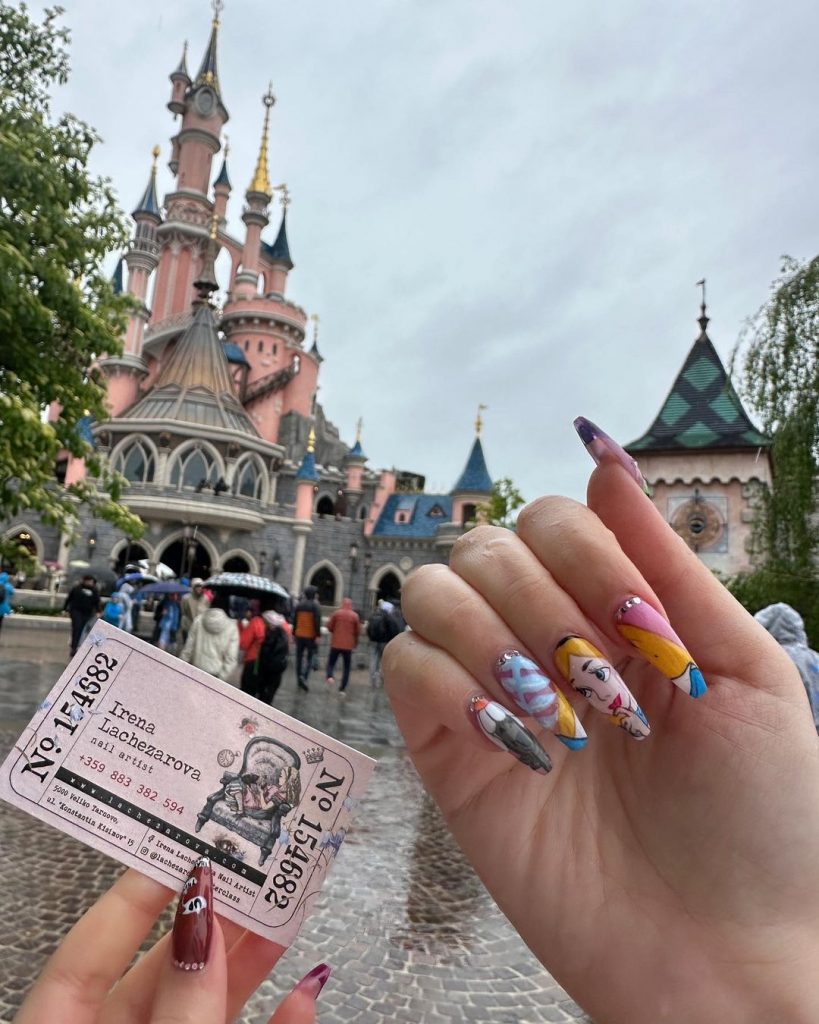
Alice’s Enchanting Wonderland
Step into Wonderland with this enchanting Alice in Wonderland-inspired nail design. The long, square nails provide a large canvas for intricate details like Alice’s curious gaze, the White Rabbit’s clock, and sparkling glitter that captures the magical essence of Wonderland. The transparent tips with tiny 3D elements add depth and whimsy, making this design a true work of art.
For this look, you’ll need:
- Acrylic nail kit for the long square shape.
- Blue and white polishes like China Glaze’s “Too Yacht to Handle” and Essie’s “Blanc.”
- Fine detailing brushes for painting Alice and the other Wonderland details.
- 3D nail art pieces such as tiny teacups and cakes, available on Etsy or specialty nail art stores.
- Glitter top coat to add sparkle and seal the design.
To create this design at home:
- Apply the acrylic nails and shape them into a long square, then apply a base coat.
- Paint the nails with a gradient of blue and white, letting each coat dry thoroughly.
- Use fine brushes to paint Alice and the Wonderland details, or apply decals if you prefer.
- Attach 3D nail art pieces to the transparent tips, adding a touch of Wonderland whimsy.
- Seal with a glitter top coat to add sparkle and protect your design.
101 Dalmatians’ Classic Spots
This 101 Dalmatians-inspired nail design brings together classic red and white tones with playful dalmatian spots and a pop of metallic for a fun and classy look. The long, coffin-shaped nails add a modern twist, while the detailed artwork of the dalmatian puppy and the red bow give it a charming, Disney vibe.
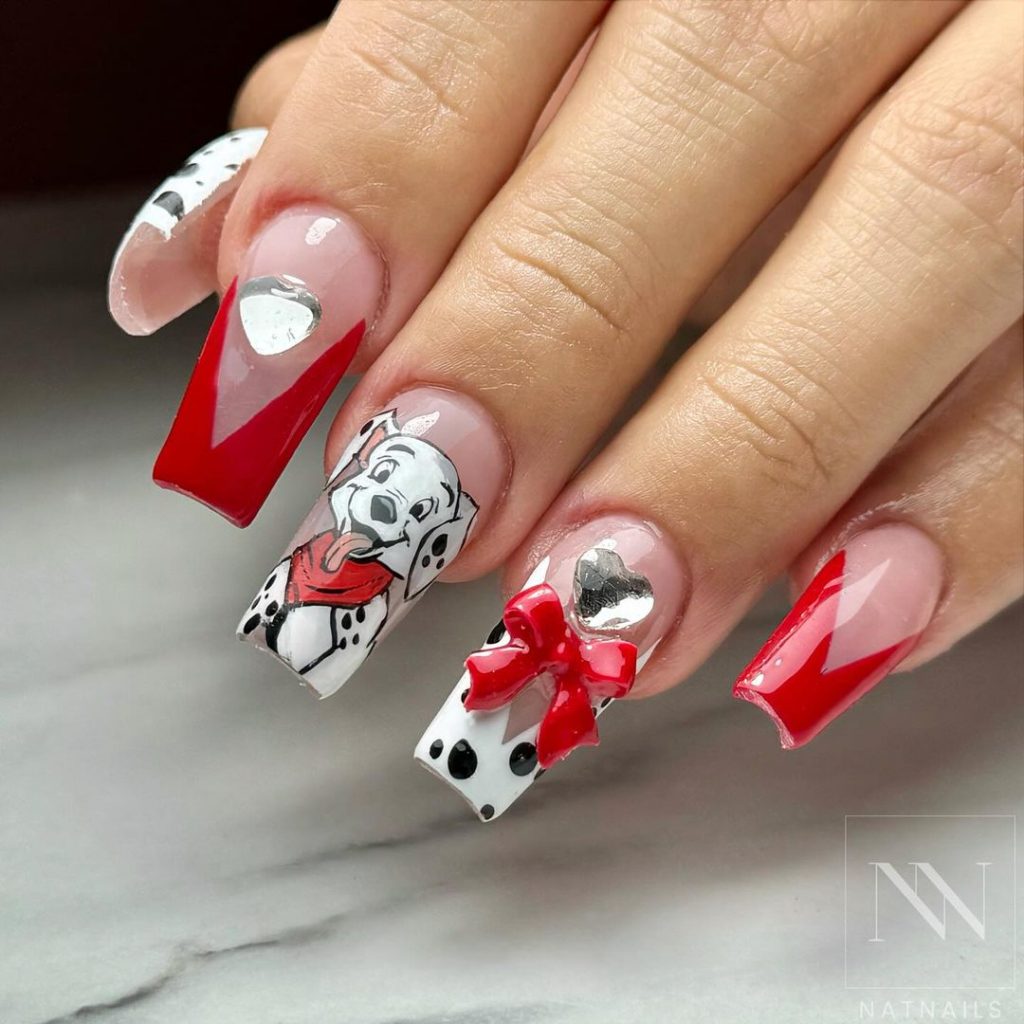
For this look, you’ll need:
- Acrylic nail kit for the long coffin shape.
- Red and white polishes like OPI’s “Big Apple Red” and Essie’s “Blanc.”
- Fine detailing brushes for painting the dalmatian and spots.
- Metallic silver polish like Zoya’s “Trixie” for added shine.
- 3D red bow decorations, available from various nail art suppliers.
To create this design at home:
- Start by applying the acrylic nails and shaping them into a long coffin shape.
- Paint the nails with alternating red and white base colors, allowing each coat to dry completely.
- Use fine brushes to paint the dalmatian puppy and spots on the white nails, and add metallic accents to the red nails.
- Attach the 3D red bow decoration to one of the accent nails for a playful touch.
- Finish with a top coat to seal the design and add shine.
Evil Queen’s Poisonous Glam
This bold and dramatic design features the iconic Evil Queen from Snow White, along with elements like the poisonous apple and dripping red gloss that create a striking, almost sinister look. The almond-shaped nails provide a perfect balance between elegance and edge, making this design ideal for Disney fans who love a bit of dark glamour. The glossy red drip effect adds a 3D texture that enhances the overall impact.
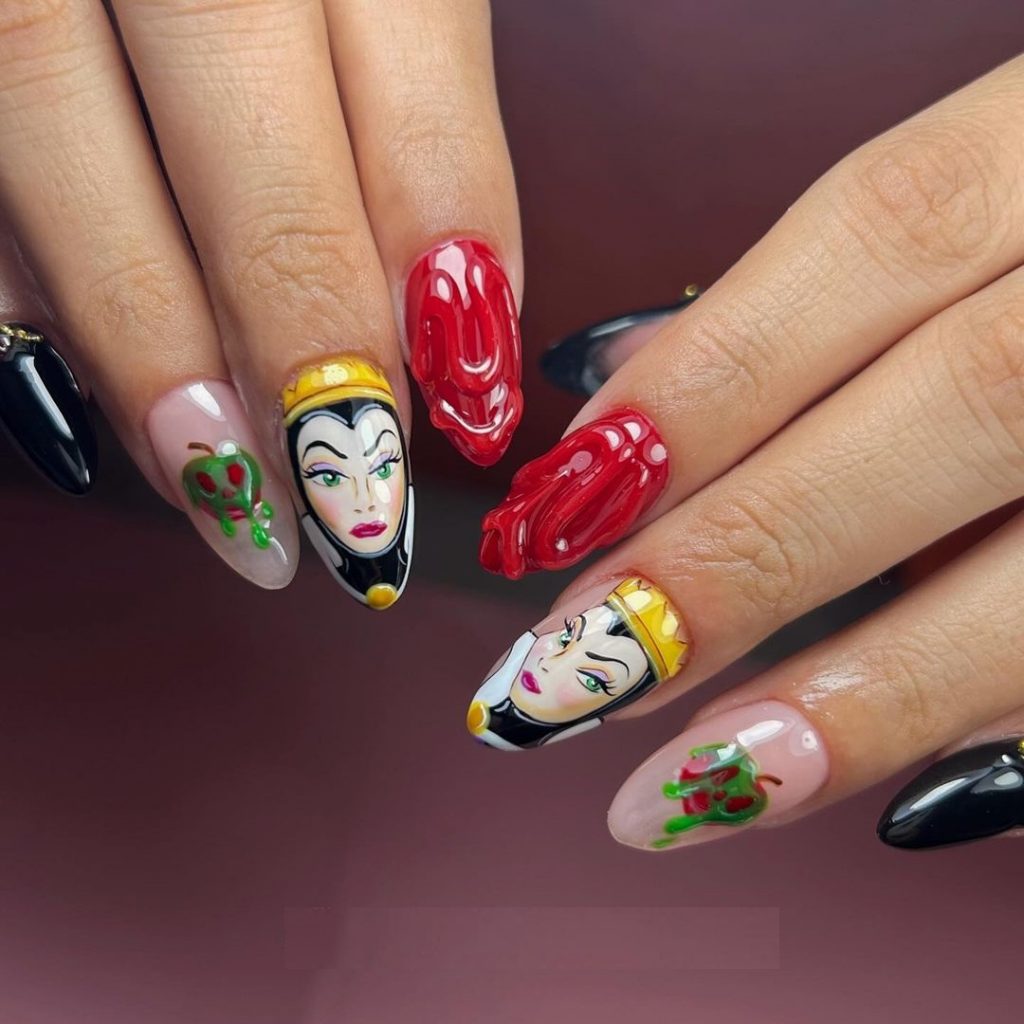
For this look, you’ll need:
- Black, red, and nude polishes like OPI’s “Big Apple Red” and Essie’s “Licorice.”
- Fine detailing brushes for painting the Evil Queen and the poison apple.
- 3D gel for creating the glossy red drip effect.
- Matte and glossy top coats to create a contrast in textures.
To create this design at home:
- Start by shaping your nails into an almond shape that is both elegant and sharp.
- Apply a nude base color, allowing it to dry completely before adding details.
- Use fine detailing brushes to paint the Evil Queen’s face and the poison apple on accent nails. For the red drip effect, apply 3D gel and cure it under a UV lamp for the best results.
- Apply a matte top coat on the nails with the Queen’s face for a sophisticated finish, and use a glossy top coat on the red drip nails to enhance the 3D effect.
- Clean up the edges with a small brush dipped in nail polish remover for a polished look.
Disney Villains Extravaganza
This design brings together multiple Disney villains in one edgy and vibrant nail set. Each stiletto-shaped nail features a different villain or element, from the red and black of Cruella de Vil to the green glow of Maleficent. The varied textures and colors make this a fun and dynamic manicure that’s perfect for those who love the darker side of Disney.
For this look, you’ll need:
- Black, red, gold, and green polishes like China Glaze’s “Emerald Sparkle” and Zoya’s “Poppy.”
- Nail art brushes for detailing each villain’s unique features.
- 3D gel and rhinestones for added texture and sparkle.
- Glossy top coat to seal the design and add shine.
To create this design at home:
- Shape your nails into long stilettos for a dramatic effect.
- Apply different base colors to each nail, corresponding to the villain or element you’re depicting.
- Use nail art brushes to carefully paint each villain’s features. You can also add 3D gel or rhinestones to certain nails for extra texture.
- Finish with a glossy top coat to seal the design and make it last.
- If needed, use a small brush with nail polish remover to clean up the edges and achieve a professional finish.
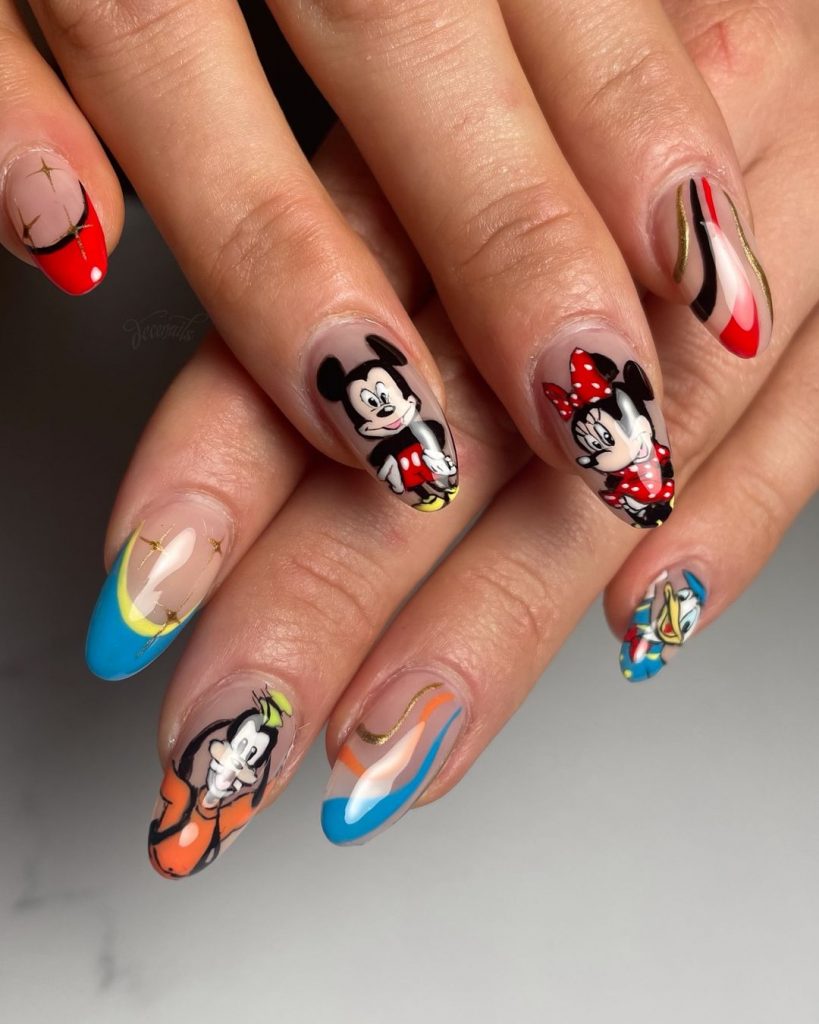
Mickey and Minnie Romance
This sweet and playful design captures the love between Mickey and Minnie Mouse with adorable portraits and heart accents. The medium-length almond-shaped nails are painted in soft pinks, with the portraits of Mickey and Minnie taking center stage on the middle nails. Tiny white hearts and delicate pink glitter add a subtle touch of romance, making this design perfect for any Disney-loving couple.

For this look, you’ll need:
- Soft pink and white polishes like OPI’s “Pink-ing of You” and Essie’s “Blanc.”
- Fine detailing brushes for painting Mickey and Minnie’s faces.
- Pink glitter and heart stickers for additional accents.
- Glossy top coat to seal and protect the design.
To create this design at home:
- Start by shaping your nails into a medium-length almond shape, which is both elegant and playful.
- Apply a soft pink base color, letting it dry completely before adding the details.
- Use fine detailing brushes to carefully paint Mickey and Minnie’s faces on the middle nails. Add tiny white hearts and pink glitter to the surrounding nails for a cohesive, romantic look.
- Seal everything with a glossy top coat to ensure your design lasts and shines.
- If needed, clean up the edges with a small brush dipped in nail polish remover for a flawless finish.
Disney Princess Minimalism
This minimalist design is perfect for those who love Disney princesses but prefer a more subtle approach. Each nail features a small, simplified portrait of a different Disney princess, set against a soft pastel background. The short, rounded nails are easy to wear and maintain, making this design both cute and practical.
For this look, you’ll need:
- Pastel nail polishes in various colors like Essie’s “Mint Candy Apple” and OPI’s “Alpine Snow.”
- Fine detailing brushes for painting the princess portraits.
- Matte top coat to create a soft, velvety finish.
To create this design at home:
- Shape your nails into short, rounded tips for a practical and comfortable look.
- Apply different pastel base colors to each nail, allowing each coat to dry thoroughly.
- Use fine detailing brushes to paint small, simplified portraits of your favorite Disney princesses on each nail.
- Apply a matte top coat to achieve a soft, velvety finish that complements the pastel tones.
- Clean up any edges with a small brush dipped in nail polish remover to ensure a neat and professional appearance.
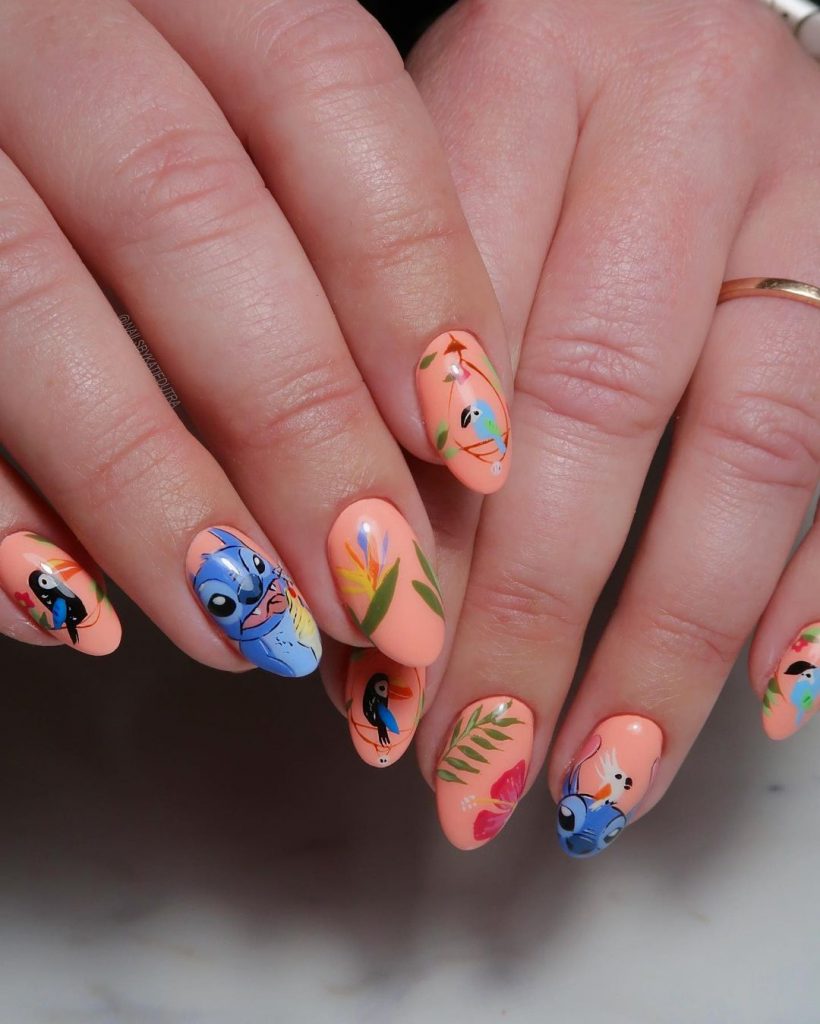
Lilo & Stitch Island Vibes
This vibrant and tropical design inspired by Lilo & Stitch is perfect for bringing some island vibes to your fall manicure. The bright coral base color sets the stage for detailed illustrations of Stitch, tropical flowers, and leaves. The medium-length almond-shaped nails provide the perfect balance between style and practicality, making this design both fun and wearable.
For this look, you’ll need:
- Bright coral polish like OPI’s “Aloha from OPI.”
- Nail art brushes for painting Stitch and the tropical elements.
- Green and blue polishes for the leaves and Stitch’s details, such as China Glaze’s “Four Leaf Clover.”
- Glossy top coat to protect the design and add shine.
To create this design at home:
- Shape your nails into medium-length almond tips, which are both stylish and practical.
- Apply a bright coral base color, allowing it to dry completely.
- Use nail art brushes to carefully paint Stitch, tropical flowers, and leaves on each nail. Take your time to ensure each detail is crisp and vibrant.
- Finish with a glossy top coat to protect the design and give it a polished look.
- Clean up any stray polish with a small brush dipped in nail polish remover for a clean, professional finish.
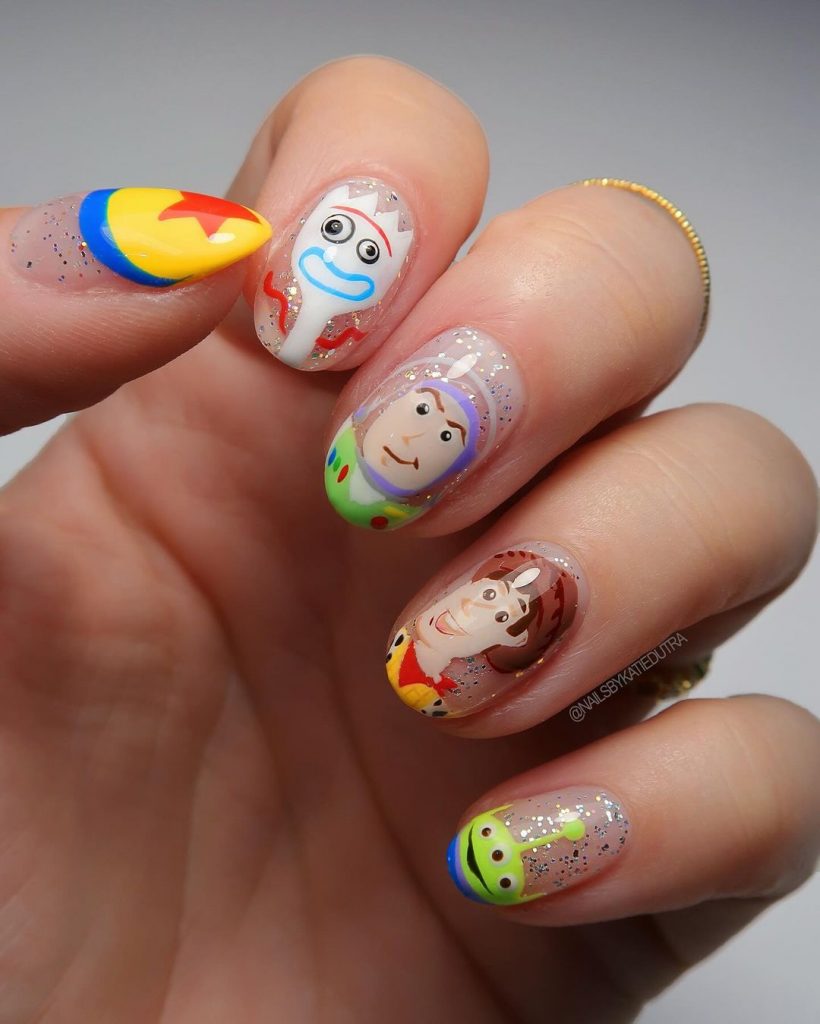
Toy Story Fun on Short Nails
This playful Toy Story-inspired manicure brings your favorite characters to life on short, rounded nails. Each nail features a different character, including Buzz Lightyear, Woody, Forky, and the iconic alien, all set against a backdrop of subtle glitter that adds a touch of sparkle without overwhelming the design. The bright, cheerful colors make this manicure perfect for anyone who loves a bit of Disney fun.
For this look, you’ll need:
- Bright polishes in primary colors like Essie’s “Butler Please” and OPI’s “Big Apple Red.”
- Fine detailing brushes for painting each character’s face.
- Subtle glitter polish like Zoya’s “Pixie Dust” to add sparkle.
- Top coat to seal and protect the design.
To create this design at home:
- Shape your nails into short, rounded tips for a cute and practical look.
- Apply a clear base coat with a subtle glitter polish to create a sparkling backdrop.
- Use fine detailing brushes to paint each character on a different nail. Take your time to ensure each character is recognizable and detailed.
- Finish with a top coat to protect your design and add shine.
- Clean up any edges with a small brush dipped in nail polish remover to achieve a polished finish.
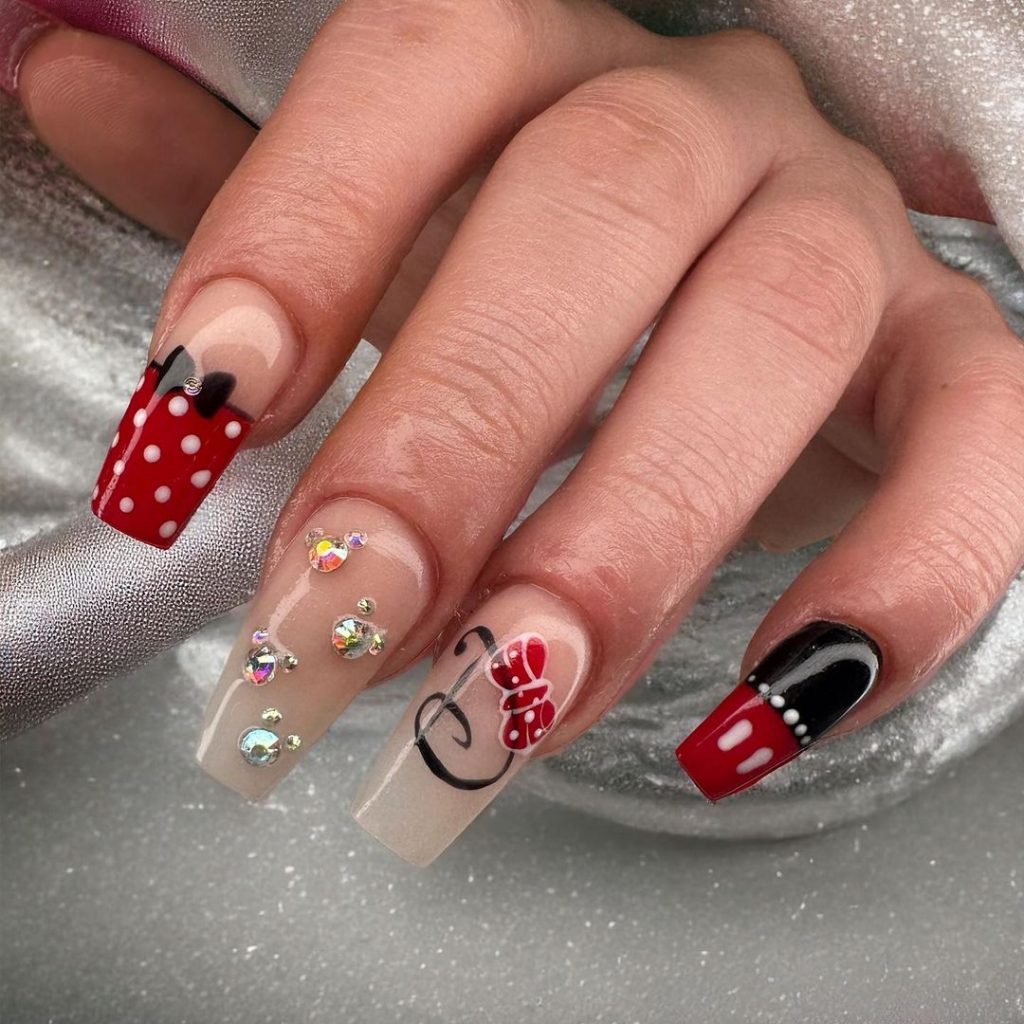
Minnie Mouse Elegance
This Minnie Mouse-inspired manicure combines classic red, black, and white tones with a touch of sparkle for a design that’s both fun and elegant. The long, square-shaped nails provide a canvas for Minnie’s iconic polka dots, bows, and even a bit of glitter. This design is perfect for fans of Minnie Mouse who want a manicure that’s playful yet chic.
For this look, you’ll need:
- Red, black, and white polishes like OPI’s “Big Apple Red” and Essie’s “Licorice.”
- Fine detailing brushes for the polka dots and bow designs.
- Rhinestones for added sparkle, available from various nail art suppliers.
- Glossy top coat to seal and protect the design.
To create this design at home:
- Shape your nails into long, square tips for a sophisticated look.
- Paint the nails with alternating red and black base colors, allowing each coat to dry completely.
- Use fine brushes to create Minnie’s polka dots and bows, adding rhinestones for extra sparkle.
- Finish with a glossy top coat to seal the design and ensure it lasts.
- If needed, clean up the edges with a small brush dipped in nail polish remover for a neat finish.
Under the Sea Adventure
Dive into an oceanic adventure with this Little Mermaid-inspired manicure. The medium-length almond-shaped nails are painted in deep, gradient blues with bubbles and sea creatures like Flounder and Sebastian. The dark background creates a mysterious underwater effect, while the detailed characters bring a playful element to the design.
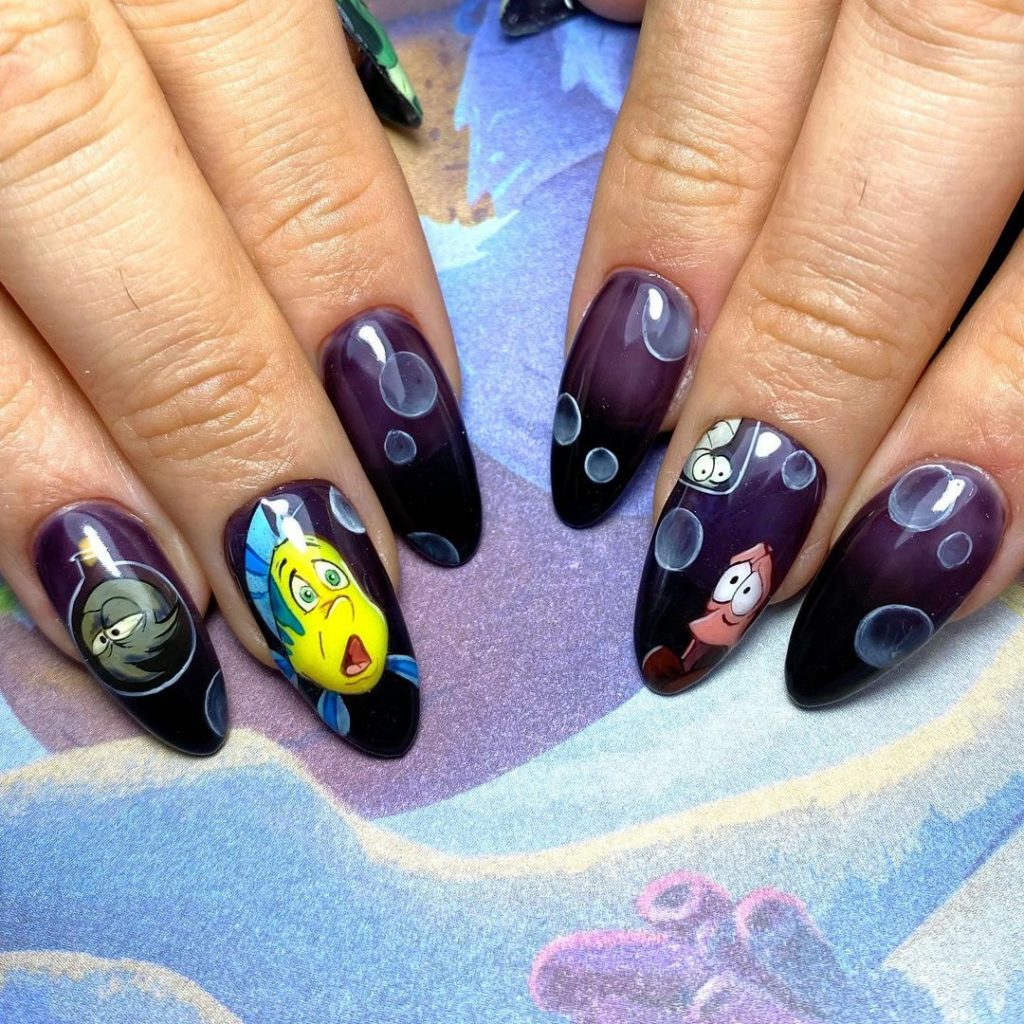
For this look, you’ll need:
- Deep blue and purple polishes like China Glaze’s “First Mate” and Essie’s “No More Film.”
- Fine detailing brushes for painting the characters and bubbles.
- White polish for highlighting the bubbles and other details.
- Glossy top coat to protect the design and add shine.
To create this design at home:
- Shape your nails into medium-length almond tips for a stylish and comfortable look.
- Apply a gradient of deep blue and purple polishes to create an underwater effect.
- Use fine brushes to carefully paint Flounder, Sebastian, and the bubbles on the nails.
- Add highlights with white polish to make the bubbles pop.
- Finish with a glossy top coat to protect your design and give it a polished look.
Disney Villains Collection
This bold and colorful design features some of Disney’s most iconic villains, including Cruella de Vil, Ursula, and Maleficent. Each nail showcases a different villain’s face, creating a dramatic and eye-catching look. The short, rounded nails make this design practical for everyday wear, while the detailed artwork adds a touch of drama.
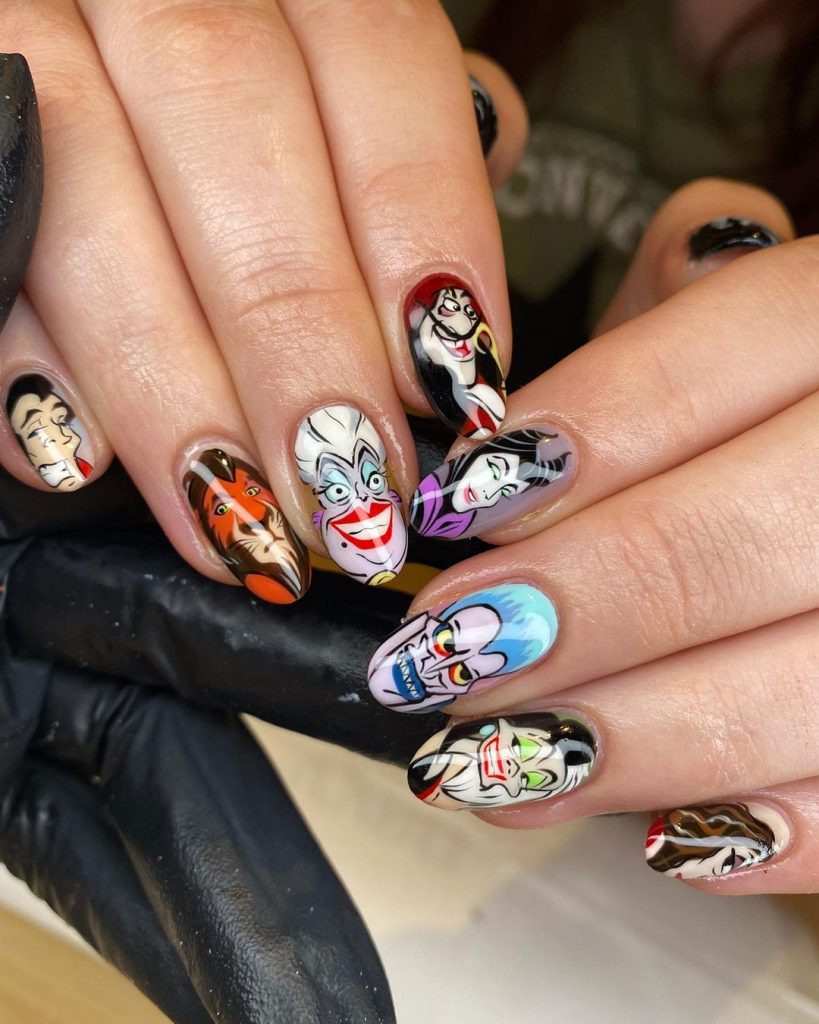
For this look, you’ll need:
- Various polishes in bold colors like OPI’s “Black Onyx” and Essie’s “Russian Roulette.”
- Fine detailing brushes for painting each villain’s face.
- Matte top coat to create a soft, velvety finish.
To create this design at home:
- Shape your nails into short, rounded tips for a practical and comfortable look.
- Apply a base color that complements each villain’s color scheme, allowing each coat to dry thoroughly.
- Use fine brushes to carefully paint each villain’s face on a different nail. Take your time to ensure each character is detailed and recognizable.
- Apply a matte top coat to create a soft, velvety finish that enhances the bold colors.
- Clean up the edges with a small brush dipped in nail polish remover for a professional finish.
Genie’s Magical Swirls
This Aladdin-inspired manicure features the playful and magical Genie, along with swirling blue and purple designs that capture the essence of his mystical powers. The medium-length almond-shaped nails provide a perfect canvas for the swirling designs, which are highlighted with a touch of glitter to add sparkle and depth.
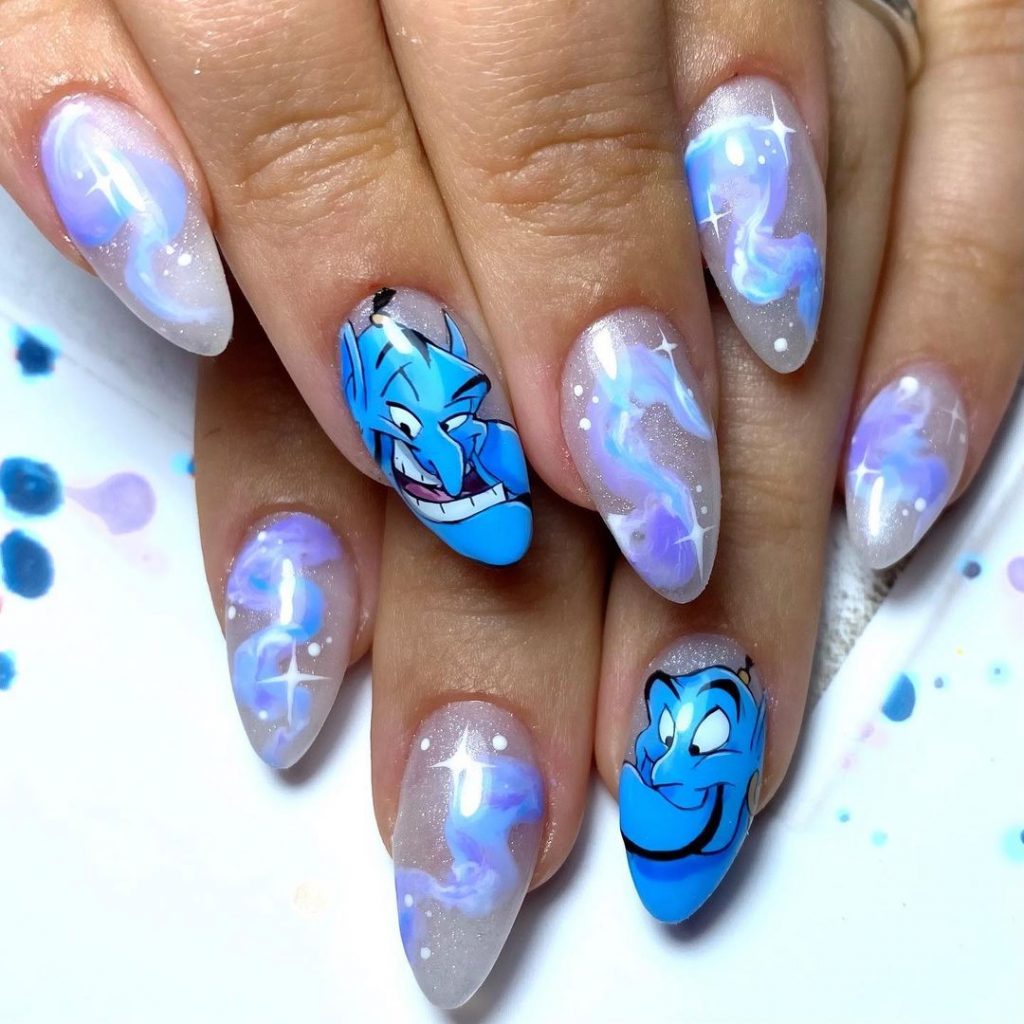
For this look, you’ll need:
- Blue and purple polishes like OPI’s “Do You Lilac It?” and China Glaze’s “I Sea the Point.”
- Fine detailing brushes for painting the Genie and the swirling designs.
- Glitter polish to add sparkle to the swirls.
- Glossy top coat to protect the design and add shine.
To create this design at home:
- Shape your nails into medium-length almond tips for a stylish and practical look.
- Apply a gradient of blue and purple polishes, allowing each coat to dry thoroughly.
- Use fine brushes to paint the Genie and swirling designs on the nails, adding glitter polish to highlight the swirls.
- Finish with a glossy top coat to seal the design and add a magical shine.
- Clean up any stray polish with a small brush dipped in nail polish remover for a clean, professional finish.
Cinderella’s Charming Companions
This enchanting design features characters from Cinderella, including her adorable mouse friends and, of course, Cinderella herself. The medium-length almond-shaped nails are a perfect canvas for this playful yet elegant design. The iridescent nails add a touch of magic, reminiscent of Cinderella’s glass slipper, while the character illustrations bring a sense of nostalgia and charm.
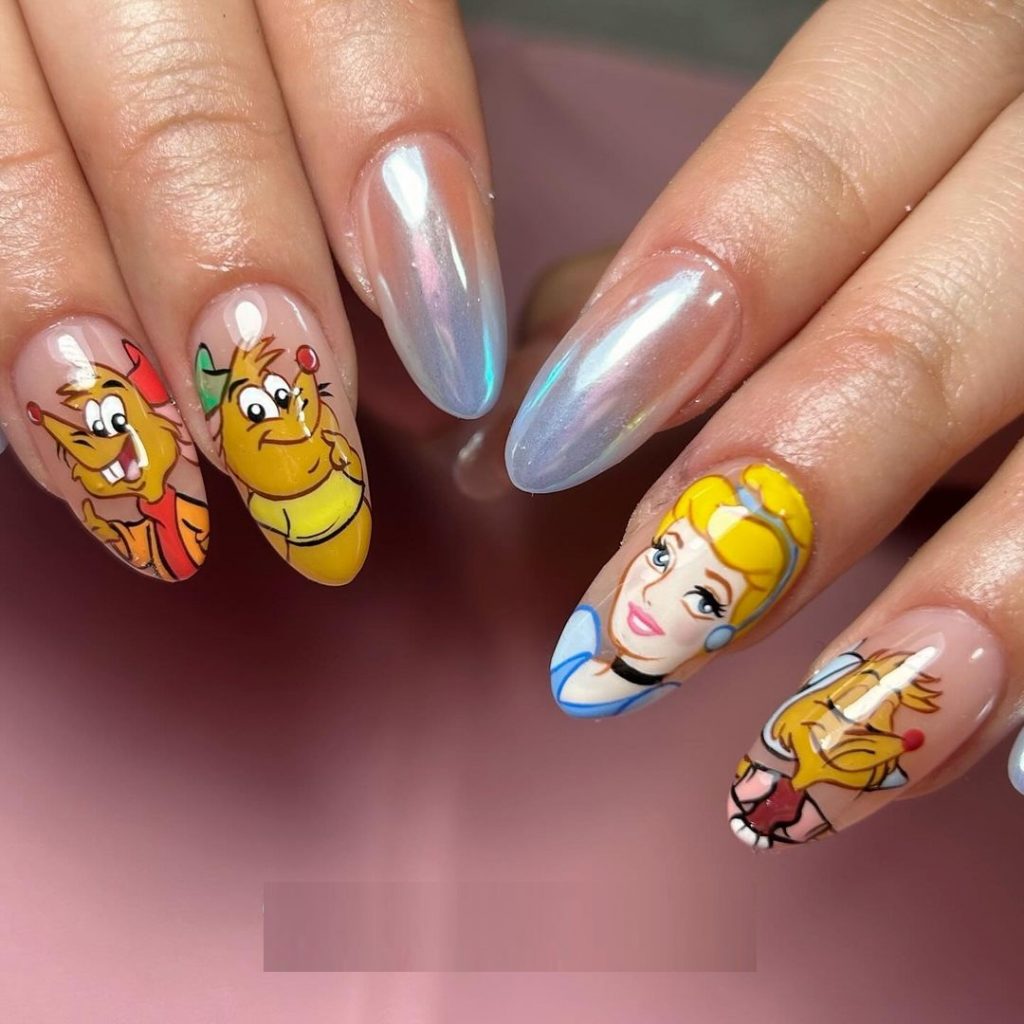
For this look, you’ll need:
- Nude and iridescent polishes like OPI’s “Bubble Bath” and Essie’s “Pearly White.”
- Fine detailing brushes for painting Cinderella and the mice.
- Gel top coat to enhance the iridescent effect and protect the design.
To create this design at home:
- Shape your nails into medium-length almond tips, which are both elegant and practical.
- Apply a nude base coat, allowing it to dry completely.
- Use fine brushes to paint the characters on select nails, leaving others with an iridescent polish for contrast.
- Finish with a gel top coat to enhance the shine and protect the artwork.
- Clean up any excess polish with a small brush dipped in nail polish remover to ensure a neat finish.
Lightning McQueen’s Cool Companion
This fun and simple design pays tribute to the Cars series with a focus on Lightning McQueen’s loyal friend, Tow Mater. The bold, square-shaped nails are painted in a sleek blue-grey, with Tow Mater’s smiling face taking center stage on the thumbnail. This design is perfect for Disney fans who love a minimal yet character-driven manicure.
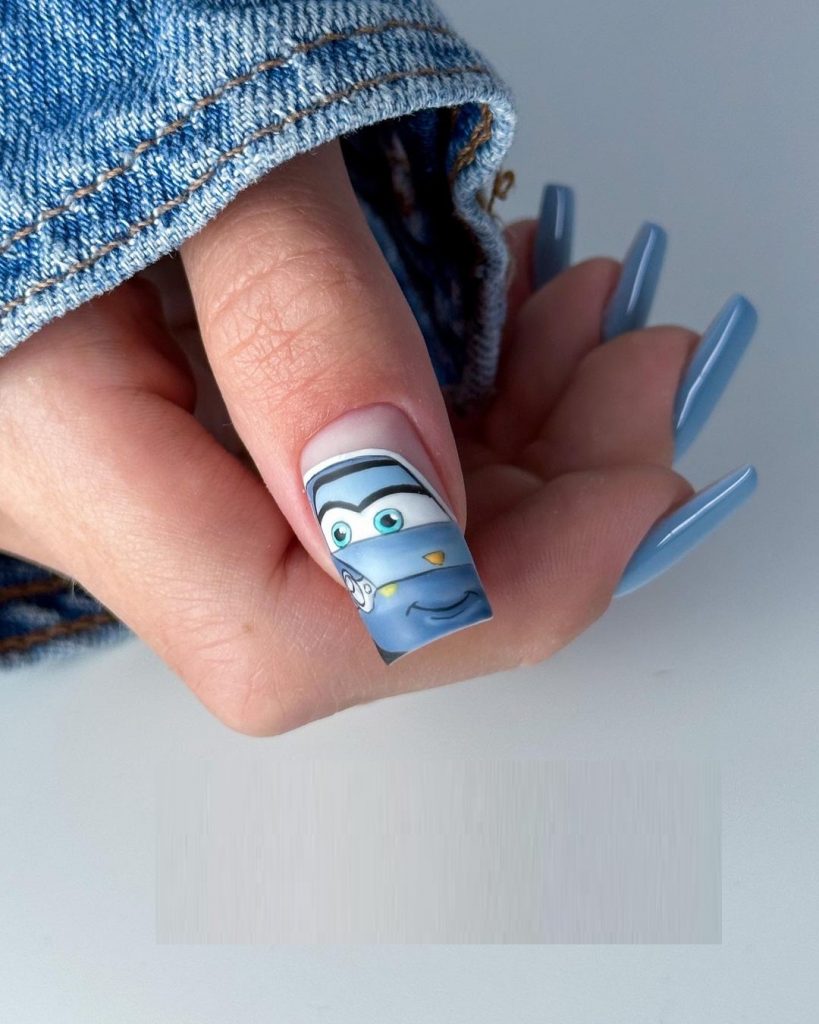
For this look, you’ll need:
- Blue-grey polish like Essie’s “Petal Pushers.”
- Fine detailing brushes for painting Tow Mater’s face.
- Matte top coat to create a smooth, velvety finish.
To create this design at home:
- Shape your nails into square tips for a bold, modern look.
- Apply the blue-grey base color to all nails, letting it dry thoroughly.
- Use fine brushes to paint Tow Mater’s face on the thumbnail, keeping the other nails simple.
- Finish with a matte top coat for a smooth and polished finish.
- If needed, clean up the edges with a small brush dipped in nail polish remover for a professional look.
Tinkerbell’s Glittering Garden
This magical design features Tinkerbell surrounded by a glittering garden, with dark, mysterious greens and blacks creating a mystical atmosphere. The medium-length oval-shaped nails are ideal for this detailed design, with Tinkerbell’s image sparkling against the deep background, bringing the magic of Pixie Hollow to your fingertips.
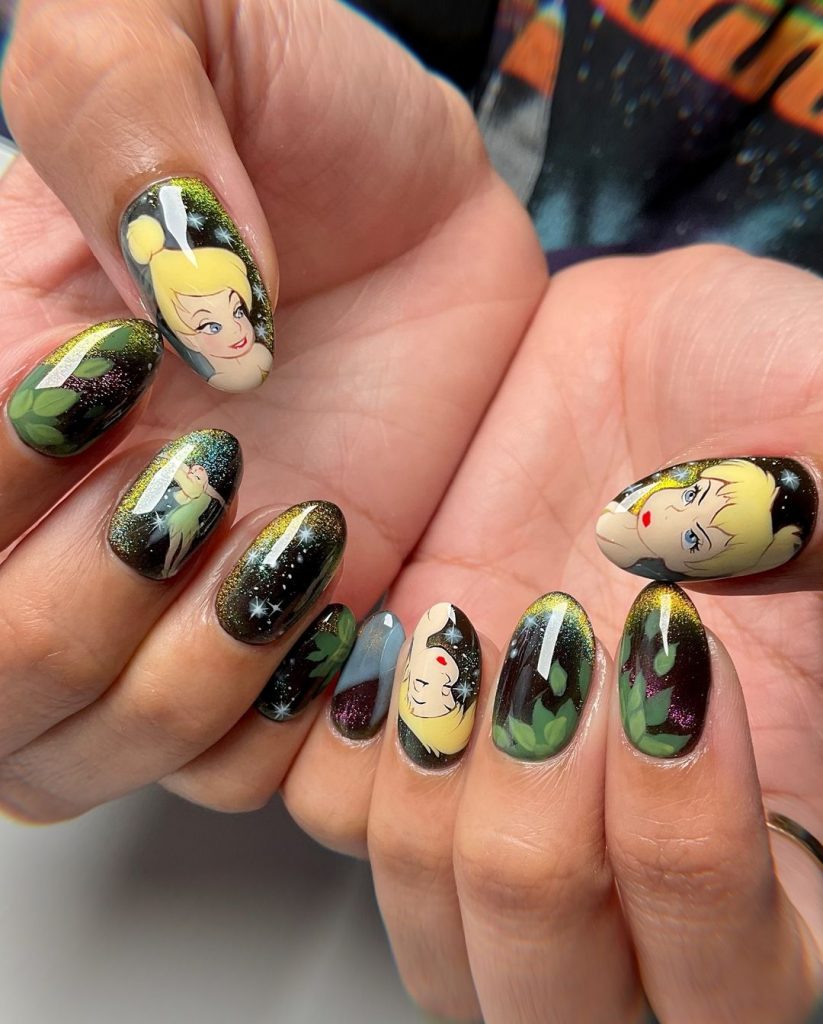
For this look, you’ll need:
- Deep green and black polishes like China Glaze’s “Emerald Sparkle” and OPI’s “Black Onyx.”
- Fine detailing brushes for painting Tinkerbell and the garden elements.
- Glitter polish to add a sparkling effect.
- Glossy top coat to seal and protect the design.
To create this design at home:
- Shape your nails into medium-length oval tips for a stylish and versatile look.
- Apply a deep green base color, adding a gradient effect with black polish for depth.
- Use fine brushes to paint Tinkerbell and the garden elements on select nails.
- Add glitter polish to highlight Tinkerbell and the magical surroundings.
- Finish with a glossy top coat to protect your design and add shine.
Mickey and Friends in 3D
This 3D design features Mickey and Minnie Mouse in their most adorable forms, brought to life with vibrant colors and playful elements. The medium-length nails are perfect for showing off the detailed 3D characters, while the surrounding nails feature soft, pastel designs that complement the overall look. This manicure is a true work of art and a must for any Disney fan.
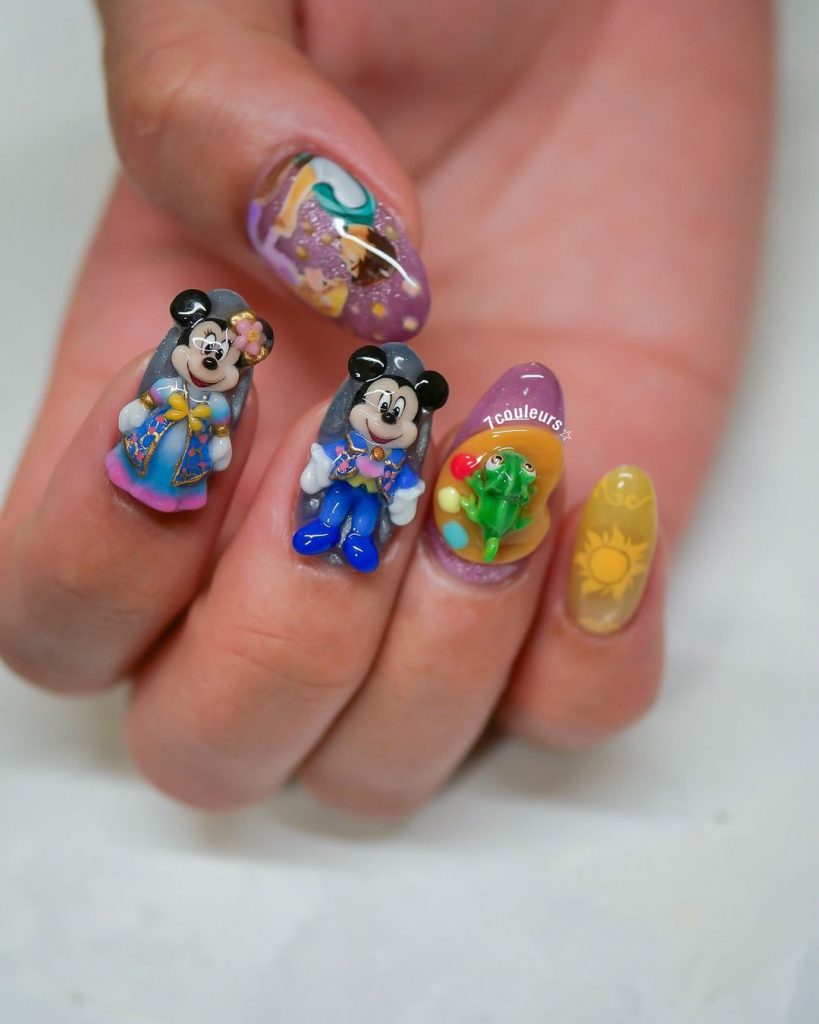
For this look, you’ll need:
- Pastel polishes like OPI’s “Gelato on My Mind” and Essie’s “Lilacism.”
- 3D nail art decorations of Mickey and Minnie Mouse.
- Fine detailing brushes for painting additional characters and elements.
- Glossy top coat to seal the design and add shine.
To create this design at home:
- Shape your nails into medium-length almond tips for a playful and practical look.
- Apply pastel base colors, allowing each coat to dry thoroughly.
- Use fine brushes to paint additional characters and elements on the surrounding nails.
- Attach the 3D Mickey and Minnie decorations using nail glue, ensuring they’re securely in place.
- Finish with a glossy top coat to protect your design and give it a polished look.
Minnie Mouse Classic Dots
This classic Minnie Mouse-inspired design features her iconic red and white polka dots, complemented by a soft nude base. The medium-length almond-shaped nails are simple yet striking, with Minnie’s face and signature bow taking center stage on one nail. This design is perfect for those who love a bit of classic Disney charm with a modern twist.

For this look, you’ll need:
- Red and white polishes like OPI’s “Big Apple Red” and Essie’s “Blanc.”
- Fine detailing brushes for painting Minnie’s face and bow.
- Matte top coat to create a smooth, velvety finish.
To create this design at home:
- Shape your nails into medium-length almond tips for a chic and comfortable look.
- Apply a nude base color, letting it dry completely.
- Use fine brushes to paint Minnie’s face and bow on one nail, with red and white polka dots on the others.
- Finish with a matte top coat to achieve a soft, velvety finish.
- Clean up any edges with a small brush dipped in nail polish remover to ensure a professional appearance.
Save Pin