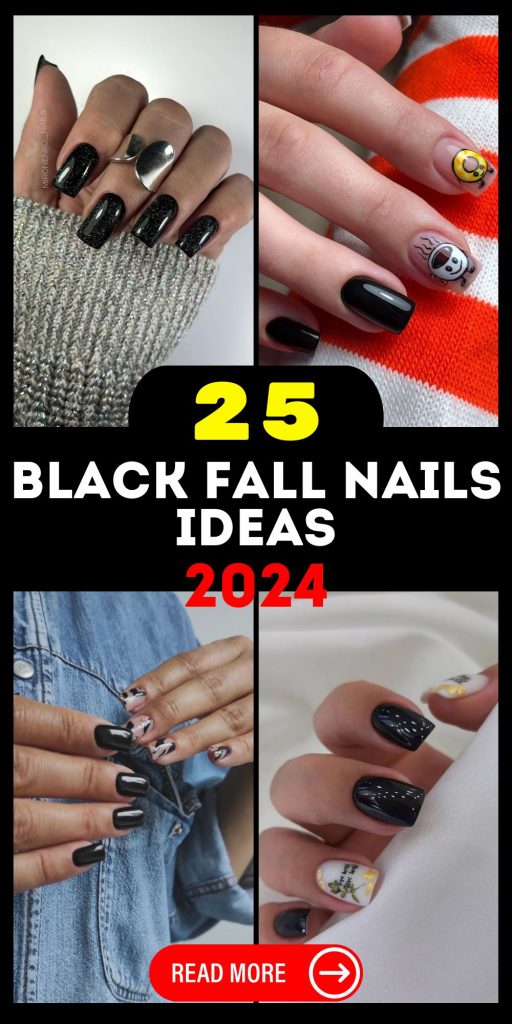
As the leaves begin to fall and the air turns crisp, it’s time to transition your manicure game to reflect the rich, dark hues of the season. Black nails have always been a staple for fall, but in 2024, they’re getting a fresh update with unexpected color combinations, intricate designs, and a variety of finishes that cater to every taste. Whether you’re into matte textures, acrylic enhancements, or prefer a simple yet sophisticated look, this guide will walk you through the top trends and ideas for black fall nails 2024. Let’s dive in!
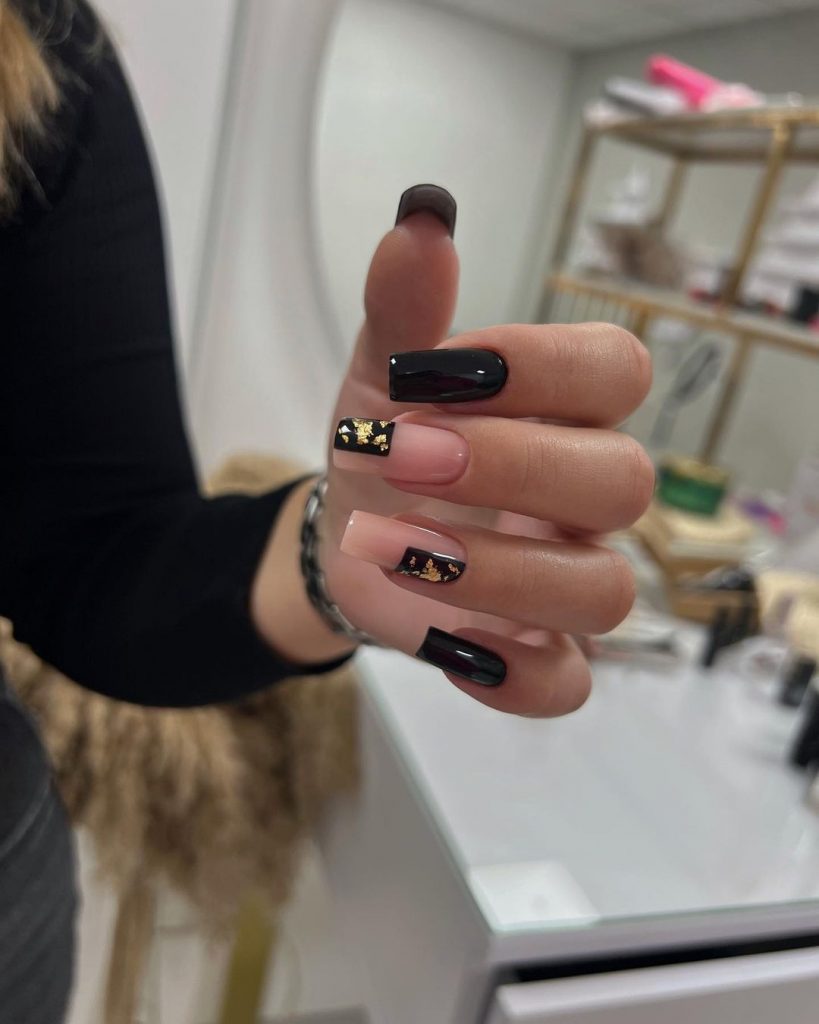
Bold and Gold: A Luxurious Touch
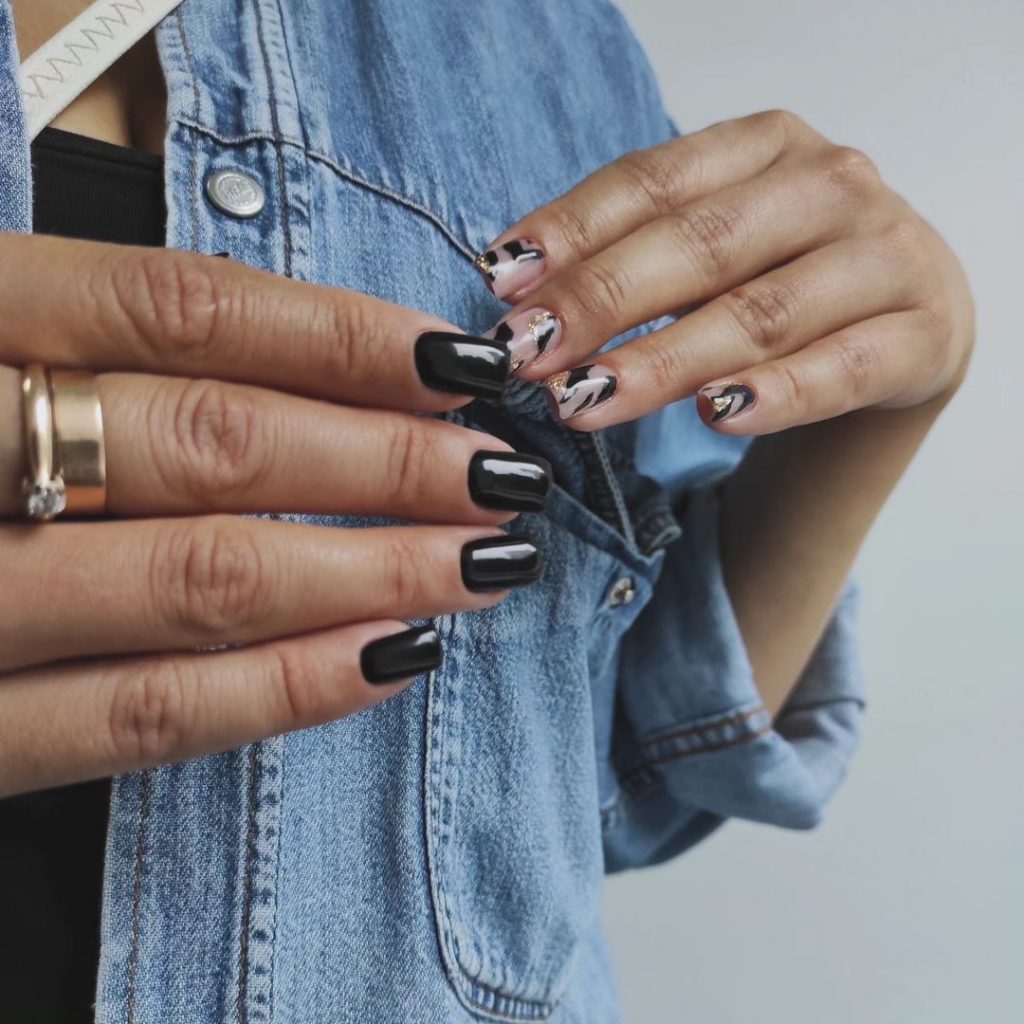
The first look we’re exploring is a stunning blend of bold black with gold accents that scream luxury. The jet-black base on these short nails is the perfect canvas for the snake-skin inspired accent nail that glimmers with gold. The overall effect is both fierce and elegant, making it a standout design for fall.

Consumables Needed:
-
- Black nail polish: I recommend using OPI Black Onyx for its rich and glossy finish.
- Gold foil or snake-skin nail stickers: Daily Charme Snake Skin Nail Wraps offer a realistic texture.
- Top coat: Seche Vite Dry Fast Top Coat ensures long-lasting wear.
How to Create This Design:
-
- Start by applying a base coat to protect your nails.
- Apply two coats of black polish, allowing each to dry completely.
- Place the snake-skin sticker on the accent nail or use a fine brush to apply the gold foil delicately.
- Seal the design with a top coat, and you’re all set with a manicure that exudes opulence!
Matte Magic: Sleek and Sophisticated
For those who prefer a matte finish, this next look is for you. These sleek black nails are paired with a nude accent nail that features delicate gold leaf detailing, creating a harmonious balance between edgy and classy. The contrast between the gloss of the black nails and the soft matte of the accent nail is what makes this design truly unique.
Consumables Needed:
-
- Black matte polish: Try Zoya’s Willa for a smooth finish.
- Nude polish: Essie Ballet Slippers is a perfect subtle shade.
- Gold leaf: Gold Foil Flakes by Beetles adds a touch of glamour.
- Matte top coat: OPI Matte Top Coat to lock in that matte finish.
How to Create This Design:
-
- Apply your base coat to start.
- Paint four nails with the black matte polish and one with the nude polish.
- Gently place gold leaf on the nude accent nail while the polish is still tacky.
- Finish with a matte top coat on all nails except for the accent nail to maintain the contrast.
Artistic Expression: Minimalist Meets Chic
In this third look, we see the power of simplicity paired with creative art. The black nails are clean and sleek, but the accent nails add a playful touch with white and gold elements that are both minimalist and impactful. The delicate floral designs against the stark black backdrop create a visual interest without overwhelming the overall look.
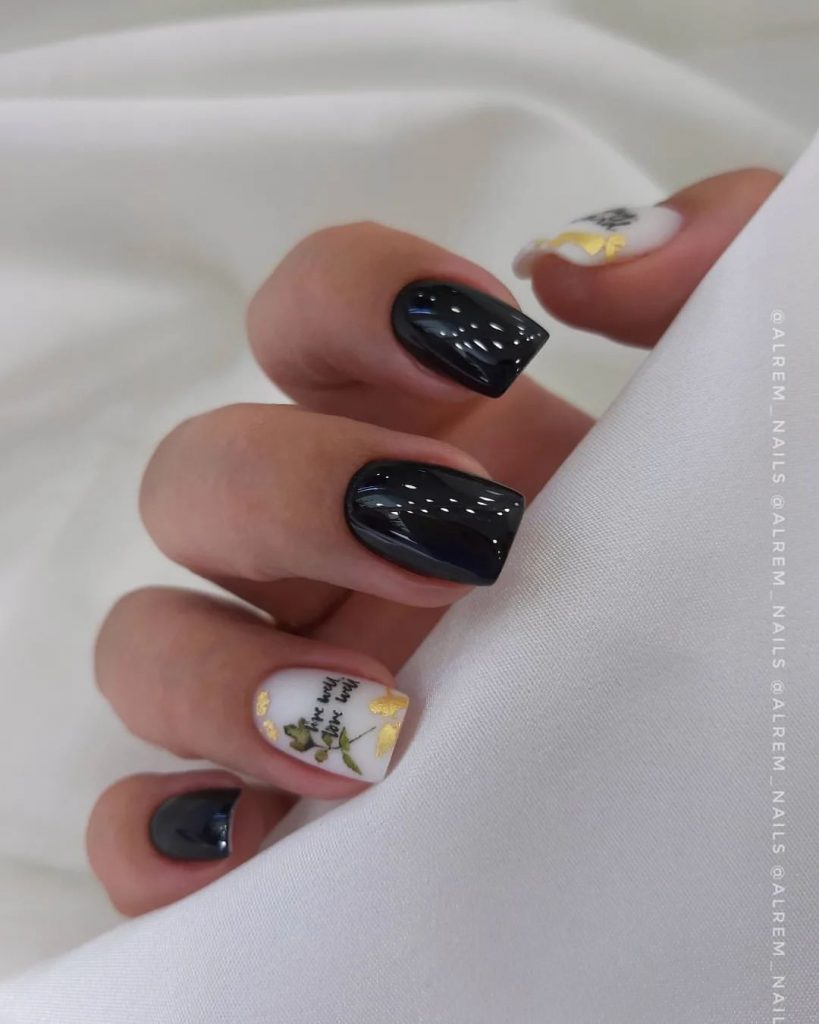
Consumables Needed:
-
- Black nail polish: Sally Hansen Insta-Dri in Black to Black for a quick-drying option.
- White nail polish: OPI Alpine Snow is perfect for detailed work.
- Nail art brush: Winstonia Nail Art Brushes for precise designs.
- Gold nail stickers: Kiss Salon Secrets Nail Art Stickers for easy application.
How to Create This Design:
-
- Prep your nails with a base coat.
- Apply two coats of black polish to all nails.
- Use the white polish and a fine brush to create small floral designs on the accent nails.
- Add gold details using stickers or a thin brush dipped in gold polish.
- Seal everything with a glossy top coat for durability.
Matte Elegance: Understated and Chic
If you’re after a look that’s both understated and sophisticated, these matte black nails are the epitome of simple elegance. The rounded nail shape is timeless, and the matte finish adds a modern twist to a classic black manicure. It’s the perfect choice for those who appreciate a minimalist approach to their nails.
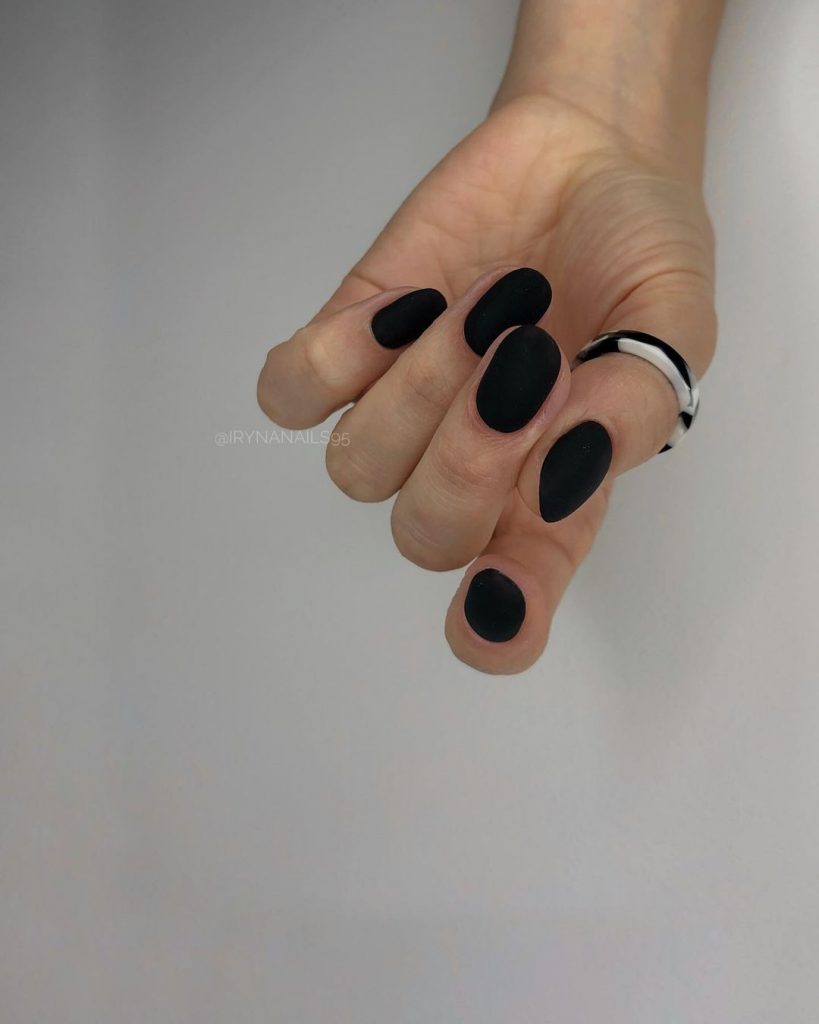
Consumables Needed:
-
- Matte black polish: Essie Matte About You for a velvet-like finish.
- Base coat: Orly Bonder Base Coat to prevent chipping.
- Matte top coat: Sally Hansen Big Matte Top Coat to maintain the matte effect.
How to Create This Design:
-
- Apply a base coat to clean, dry nails.
- Apply two coats of the matte black polish, making sure each coat dries fully.
- Finish with a matte top coat to enhance the texture.
- Keep nails rounded using a fine-grit nail file for a polished look.
Stiletto Glam: Dark and Dramatic
For the bold and daring, stiletto nails are always a statement. This design takes it a step further with a marbled effect on a few accent nails, blending black and gray for a moody, inspo-driven manicure. The sharp nail shape adds drama, while the subtle marble pattern keeps it sophisticated.
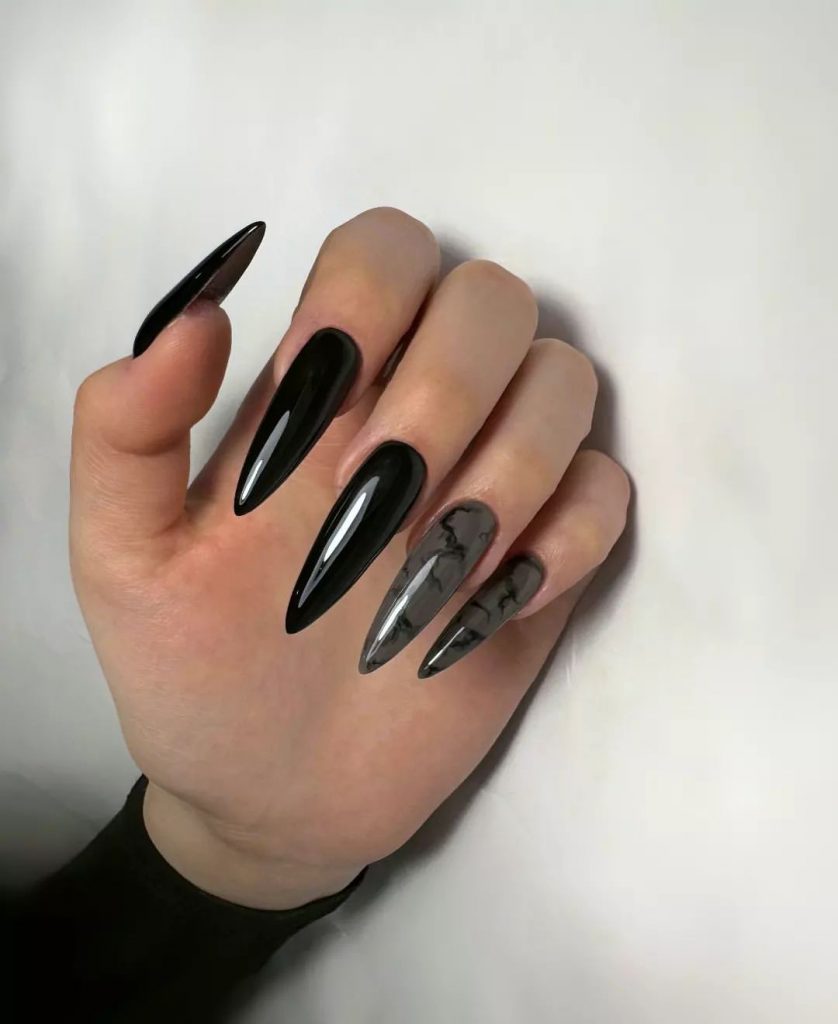
Consumables Needed:
-
- Black nail polish: Zoya Raven is a deep, shiny black.
- Gray polish: China Glaze Recycle for a true gray tone.
- Nail art brush: Orly Detailer Brush for creating the marble effect.
- Top coat: CND Vinylux Weekly Top Coat for a long-lasting shine.
How to Create This Design:
-
- Begin with a base coat to ensure your nails are protected.
- Apply black polish to all nails except the accent ones.
- For the marble effect, use a thin brush to swirl gray polish over the black base on the accent nails.
- Seal everything with a top coat to enhance the marble pattern and add durability.
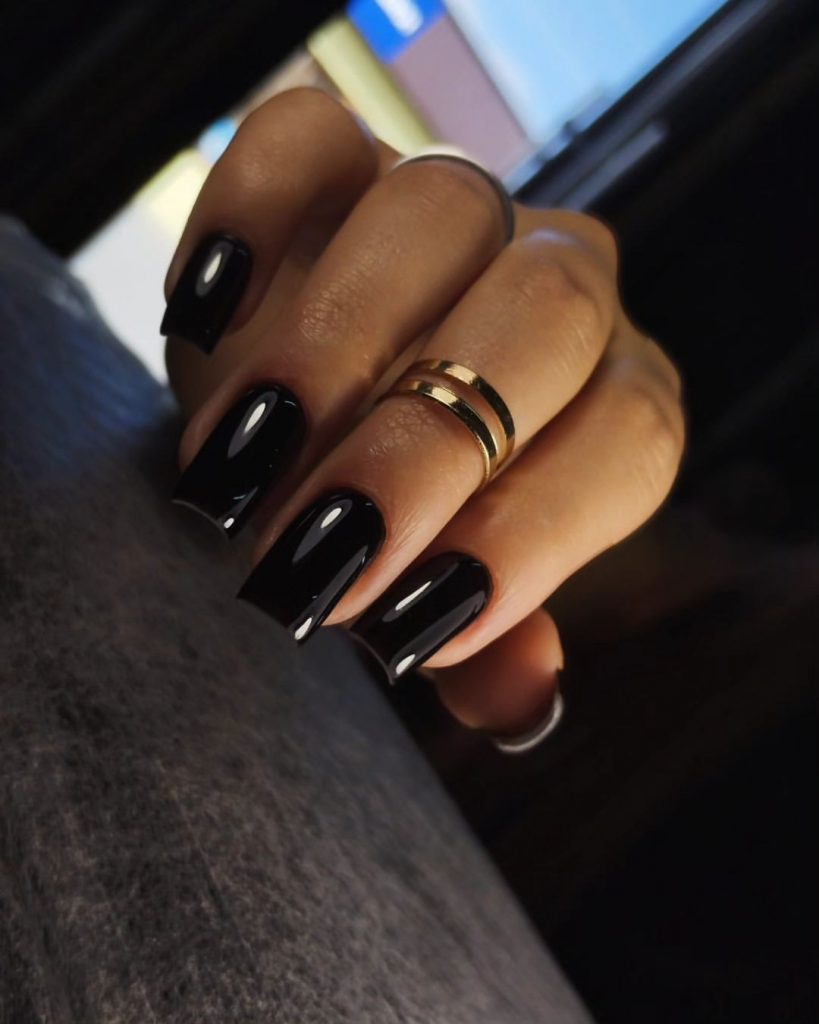
Classic and Chic: The Timeless Black Manicure
The next design is a perfect example of the classic black manicure that never goes out of style. These short, square-shaped nails are painted with a glossy black polish, giving off a sleek and polished look. The simplicity of this design makes it incredibly versatile and easy to pair with any outfit, especially cozy fall sweaters.
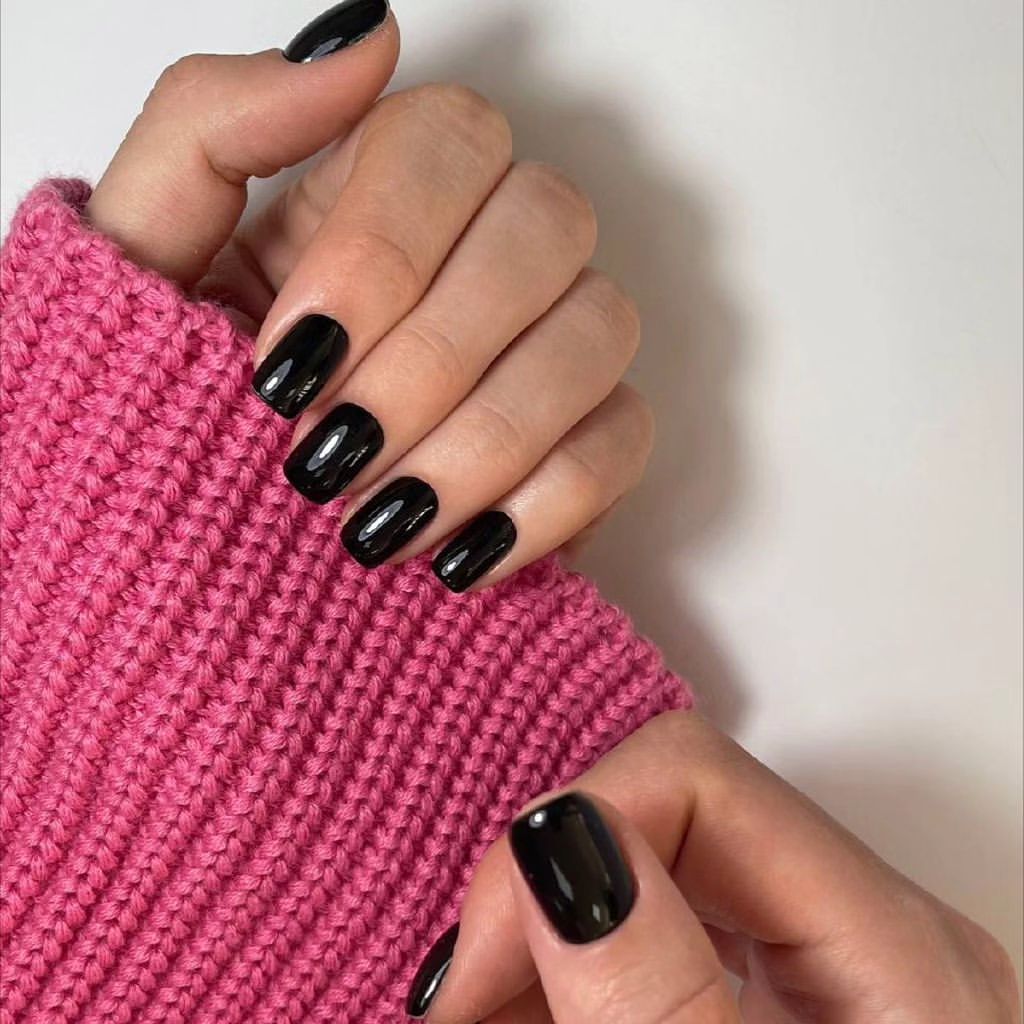
Consumables Needed:
- Black nail polish: Essie Licorice for a deep, rich black.
- Base coat: Orly Bonder Base Coat for better adhesion.
- Top coat: Seche Vite Dry Fast Top Coat for a high-shine finish.
How to Create This Design:
- Apply a base coat to your nails to protect them and extend the life of your manicure
- Paint your nails with two coats of the black polish, allowing each coat to dry fully between applications
- Finish with a top coat to seal in the color and add an extra layer of shine
Marble Accent: A Touch of Luxury
This design introduces a subtle yet luxurious touch to the classic black manicure with a marble accent nail. The combination of matte black and glossy marble creates a stunning contrast, making this design both modern and sophisticated. The almond-shaped nails enhance the elegance of the look, making it a great choice for those who want something different yet refined.
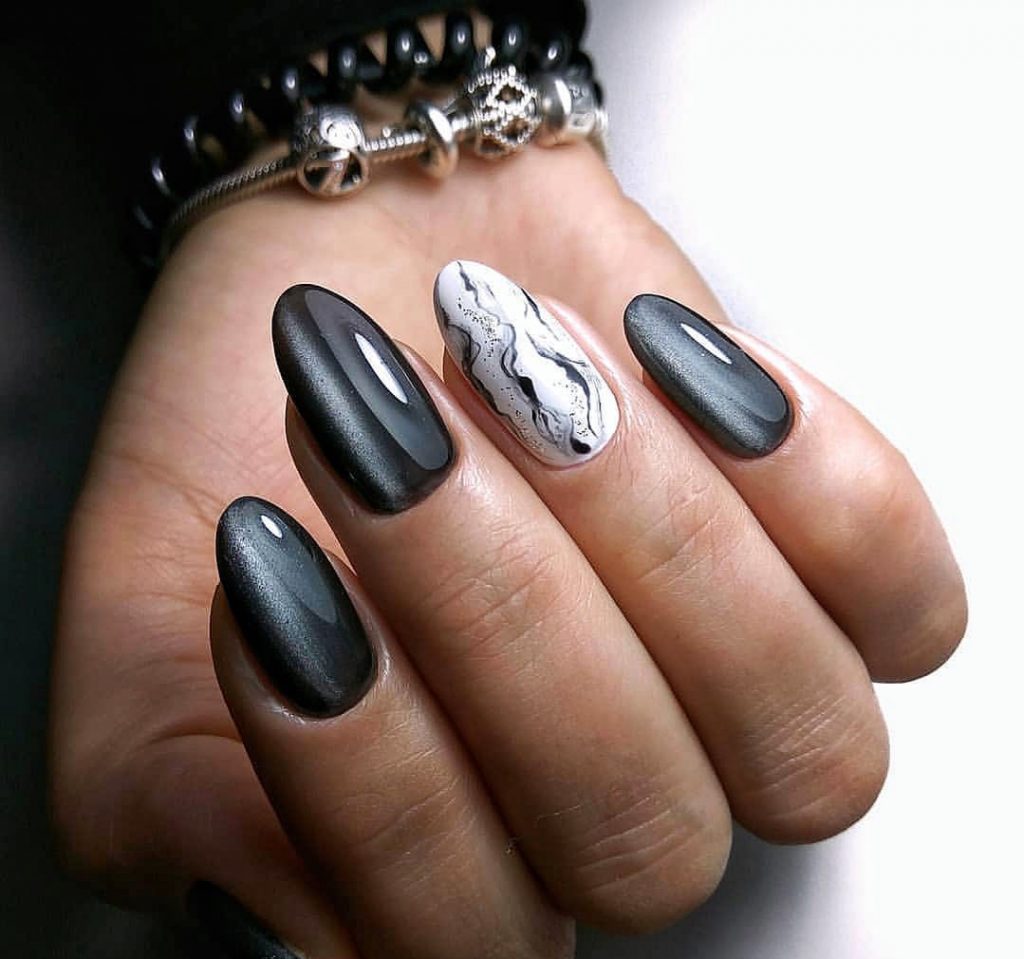
Consumables Needed:
- Matte black polish: OPI Black Onyx with a matte top coat for a smooth finish.
- White polish: Essie Blanc for the marble effect.
- Fine nail art brush: Winstonia Detailer Brush for precise lines.
- Top coat: CND Vinylux Weekly Top Coat to protect the design.
How to Create This Design:
- Start with a base coat to prepare your nails
- Apply the matte black polish to all nails except the accent nail, which will be white
- Use a fine brush to create the marble effect on the white nail, blending in a bit of black for a realistic look
- Finish with a top coat on all nails to seal the design and protect the marble effect
Playful and Fun: Black Cat Nail Art
For those who love to add a bit of whimsy to their nails, this design is perfect. Featuring cute black cat silhouettes on a nude base, this nail art is playful and fun, making it ideal for casual outings or Halloween events. The short, rounded nails keep the design simple and cute, allowing the cat details to stand out.
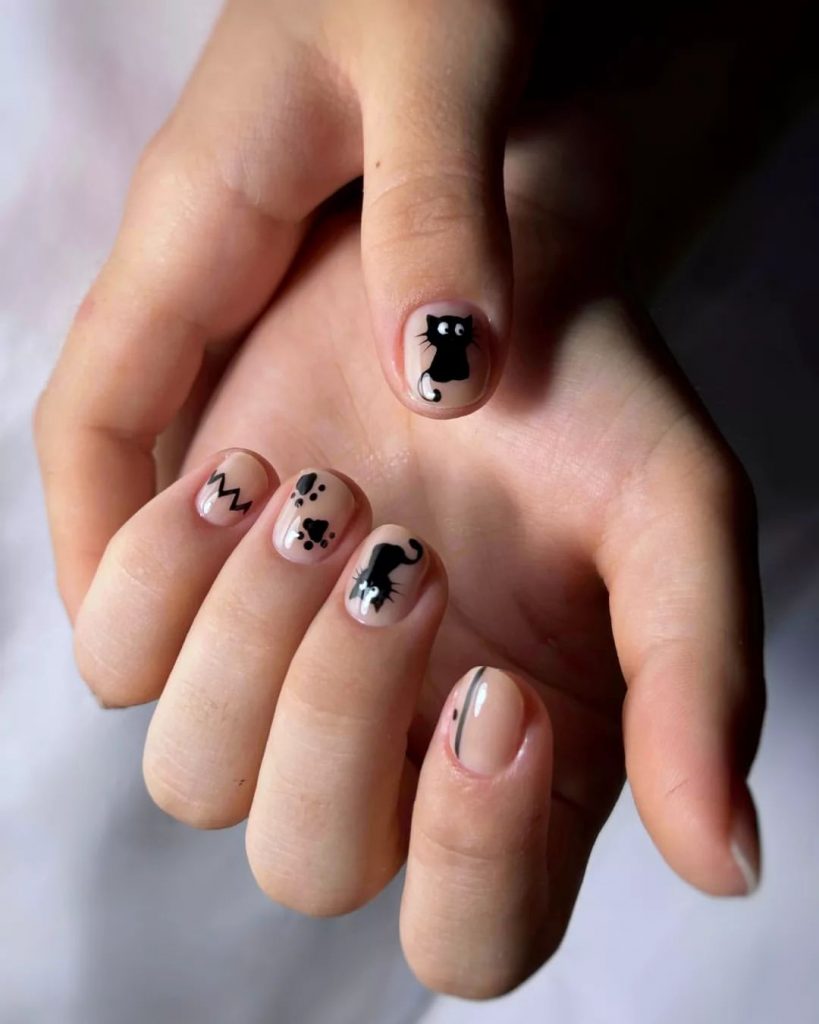
Consumables Needed:
- Nude polish: OPI Bubble Bath for a soft, neutral base.
- Black polish: China Glaze Liquid Leather for the cat silhouettes.
- Nail art stickers or a fine brush: Kiss Nail Art Paint for easy application.
- Top coat: Essie Gel Setter Top Coat for a glossy finish.
How to Create This Design:
- Apply a base coat to your nails to ensure a smooth surface
- Paint your nails with the nude polish and let it dry completely
- Use nail art stickers or a fine brush to create the black cat silhouettes on each nail
- Seal the design with a top coat to keep the cats looking sharp and prevent chipping
Cute and Quirky: Fun Black Nail Art
This design is for those who love to have a bit of fun with their nails. Featuring playful designs on a nude base with two solid black nails, this manicure is both cute and quirky. The mix of colors and patterns, like the tiny egg and hot coffee, adds a touch of whimsy that’s perfect for the fall season.
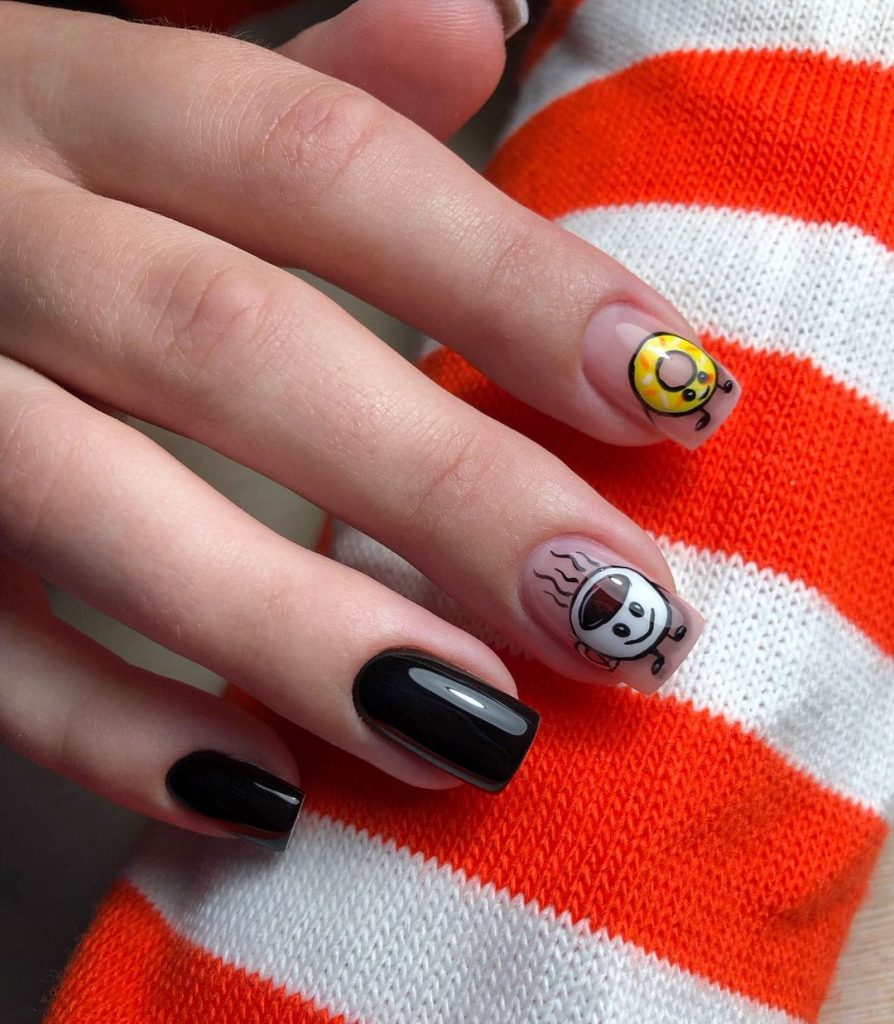
Consumables Needed:
- Nude polish: Sally Hansen Sheer Ecstasy for the base.
- Black polish: Revlon Blackout for the solid nails and some of the details.
- Nail art pens or stickers: Sally Hansen I Heart Nail Art Pens for easy drawing.
- Top coat: Orly Sec’n Dry for a fast-drying finish.
How to Create This Design:
- Apply a base coat to protect your natural nails
- Paint all nails with the nude polish, except for the two that will be solid black
- Use nail art pens or stickers to draw the playful designs on the nude nails
- Finish with a top coat to protect your artwork and add shine
Leopard Print: A Bold Statement
Leopard print is always a bold choice, and this design takes it to the next level with a black and gold twist. The almond-shaped nails feature a nude base with black and gold leopard spots, creating a chic and trendy look. This design is perfect for those who love to make a statement with their nails.
Consumables Needed:
- Nude polish: Zoya Avril for a soft, neutral base.
- Black polish: OPI Lincoln Park After Dark for the leopard spots.
- Gold glitter polish: Deborah Lippmann Boom Boom Pow for a touch of sparkle.
- Fine nail art brush: Mia Secret Nail Art Brush for precise application.
How to Create This Design:
- Apply a base coat to start with a smooth foundation
- Paint your nails with the nude polish, allowing it to dry fully
- Use a fine brush to create black and gold leopard spots on each nail
- Seal with a top coat to protect the design and add a glossy finish
Iridescent Shine: A Touch of Elegance
This stunning design brings a touch of elegance with its iridescent sheen. The deep black base is enhanced with a shift of purple and pink, giving the nails a unique and captivating look. The square shape of the nails adds to the sophistication, making this design perfect for a night out or a special occasion.
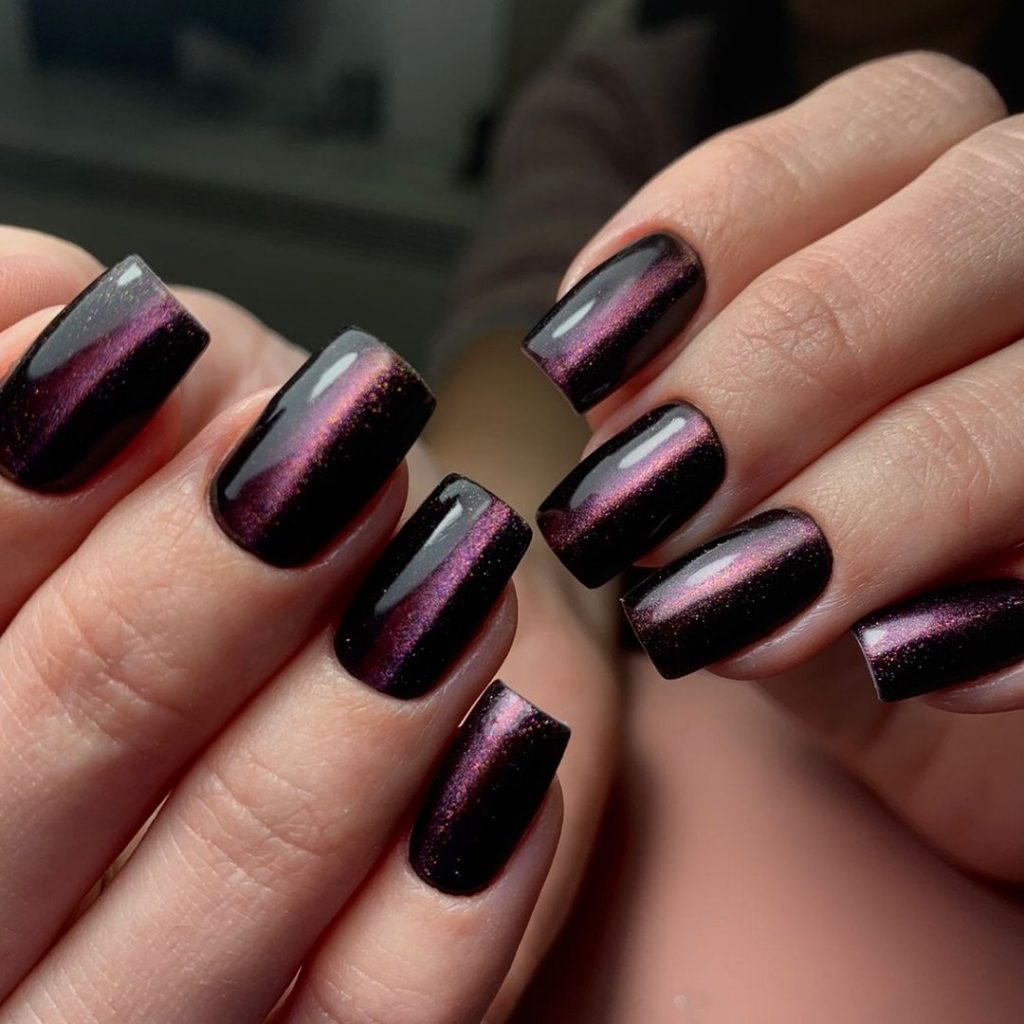
Consumables Needed:
- Black polish: ILNP Eclipse for a deep, glossy finish.
- Iridescent top coat: China Glaze Fairy Dust to add that magical shimmer.
- Base coat: Orly Bonder Base Coat for better adhesion.
- Top coat: Seche Vite Dry Fast Top Coat to seal in the iridescence.
How to Create This Design:
- Start by applying a base coat to protect your nails
- Apply two coats of the black polish, allowing each coat to dry completely
- Add the iridescent top coat, focusing on the tips to create a gradient effect
- Finish with a top coat to seal the look and add a glossy finish
Speckled Perfection: Matte and Glossy Contrast
This design plays with textures, combining matte black nails with speckled pink accents. The almond shape enhances the elegance of the design, while the speckled effect adds a playful touch. It’s a chic and modern look that’s perfect for those who like to experiment with different textures.
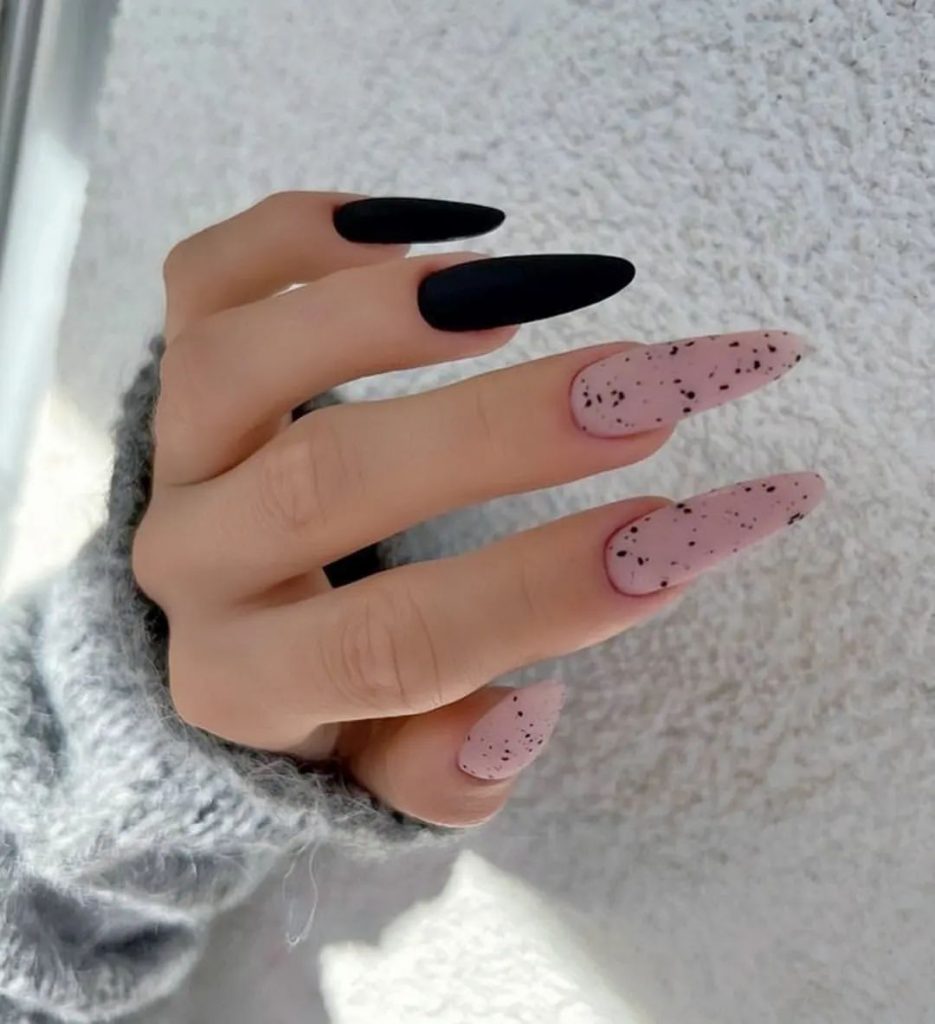
Consumables Needed:
- Matte black polish: OPI Matte Onyx for a sleek matte finish.
- Pink polish: Essie Ballet Slippers for a soft pink base.
- Black speckle polish: Sally Hansen Insta-Dri Speckled for the unique speckled effect.
- Base coat: Orly Bonder Base Coat to ensure long-lasting wear.
How to Create This Design:
- Apply a base coat to your nails to start
- Paint three nails with the matte black polish and the other two with the pink polish
- Add the speckled effect to the pink nails using the speckle polish or a fine brush dipped in black polish
- Seal the look with a matte top coat for the black nails and a glossy top coat for the speckled nails
Electric Blue: Striking Lightning Design
This electrifying design features a bold lightning strike on a glossy black background. The contrast between the black and the vibrant blue creates a dramatic effect that is sure to turn heads. The square shape of the nails adds to the impact, making this design a perfect statement look.
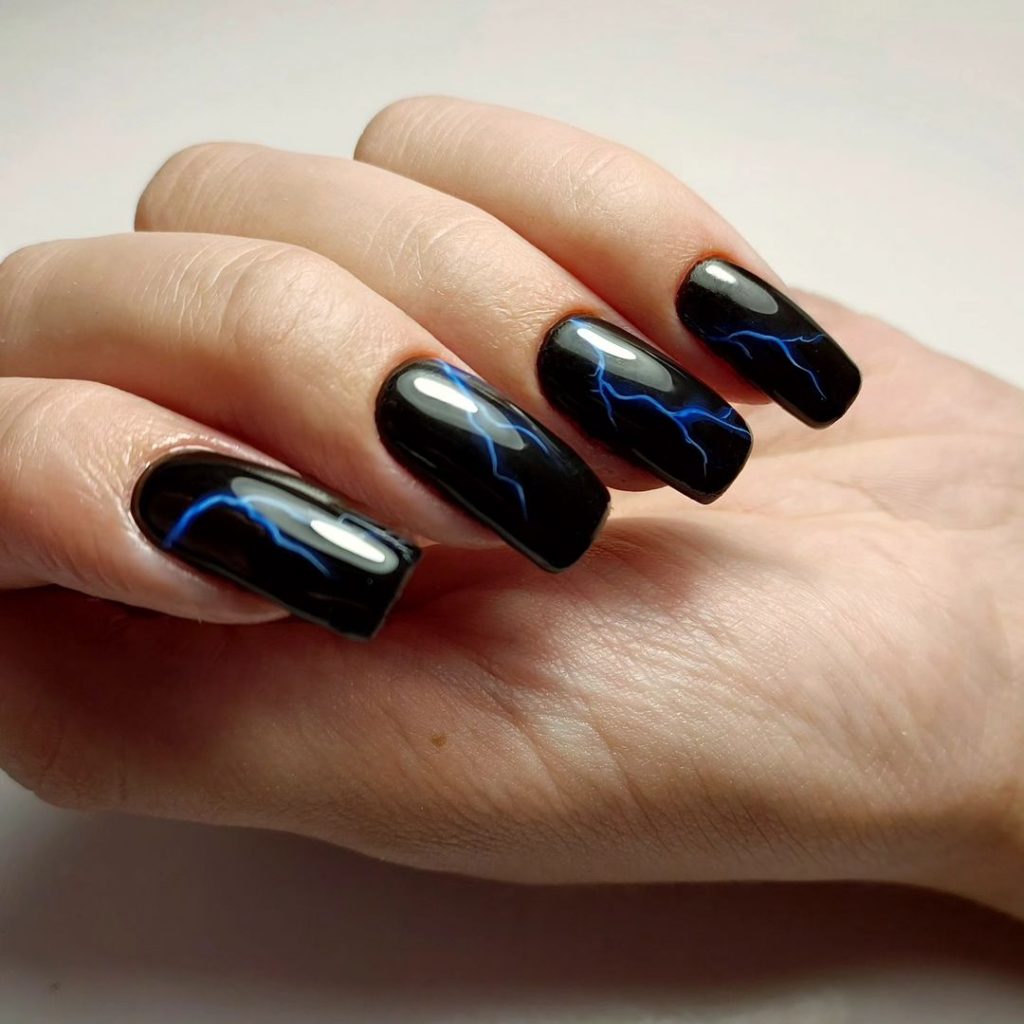
Consumables Needed:
- Black polish: Sally Hansen Black Out for a deep, glossy base.
- Blue nail art pen: Kiss Nail Art Pen in Blue for precise lightning details.
- Base coat: CND Stickey Base Coat to ensure the polish adheres well.
- Top coat: Sally Hansen Miracle Gel Top Coat for a long-lasting shine.
How to Create This Design:
- Start with a base coat to protect your nails
- Apply two coats of black polish, allowing each to dry fully
- Use the blue nail art pen to draw lightning strikes on each nail
- Finish with a top coat to seal the design and add a glossy finish
Black Glitter: Sparkle and Shine
This design brings the glam with a mix of glossy black nails and glittery accents. The glitter adds a festive touch, making it perfect for parties or special occasions. The square-shaped nails enhance the chic look, creating a design that’s both glamorous and sophisticated.

Consumables Needed:
- Black polish: Essie Licorice for a rich, glossy finish.
- Black glitter polish: Deborah Lippmann Happy Birthday for a dazzling effect.
- Base coat: OPI Natural Nail Base Coat to protect your nails.
- Top coat: Seche Vite Dry Fast Top Coat to seal in the glitter.
How to Create This Design:
- Start by applying a base coat to your nails
- Paint four nails with the black polish, and use the glitter polish on one accent nail
- For extra sparkle, apply a second coat of glitter polish
- Finish with a top coat to seal the design and add extra shine
Marble and Black: A Trendy Combination
This design combines the classic black manicure with a trendy marble effect. The long, coffin-shaped nails are perfect for showcasing the intricate marble design, which adds depth and dimension to the look. The mix of black and marble makes this design both modern and timeless.
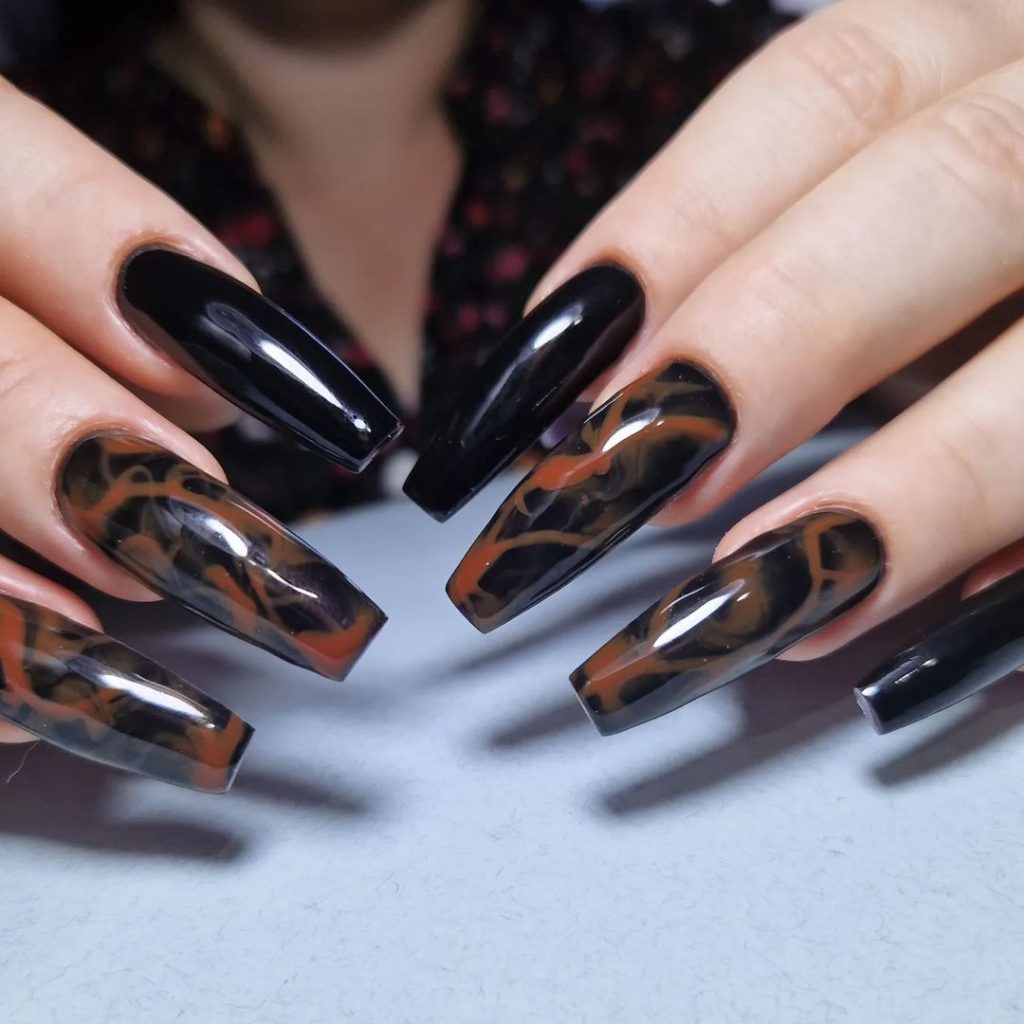
Consumables Needed:
- Black polish: OPI Black Onyx for the base.
- White polish: China Glaze White on White for the marble effect.
- Fine nail art brush: Winstonia Nail Art Brushes for creating the marble design.
- Top coat: CND Vinylux Weekly Top Coat for a long-lasting finish.
How to Create This Design:
- Start with a base coat to protect your nails
- Paint your nails with the black polish, leaving a few nails for the marble design
- Create the marble effect using the white polish and a fine brush to swirl the colors together
- Finish with a top coat to seal the design and add a glossy finish
Subtle Sparkle: A Hint of Stardust
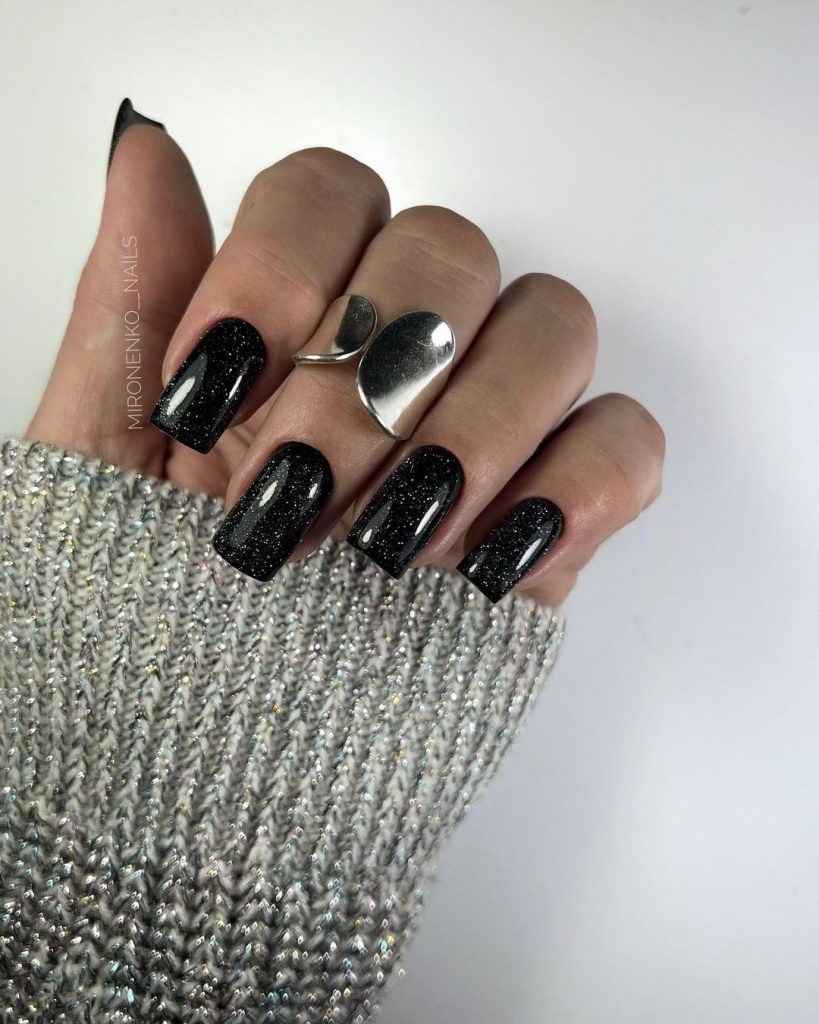
This design combines the elegance of a black manicure with a subtle sparkle that resembles stardust. The fine glitter embedded in the glossy black polish adds a touch of magic without overpowering the simplicity of the design. The oval shape of the nails enhances the delicate and refined look, making it a perfect choice for those who love understated beauty.
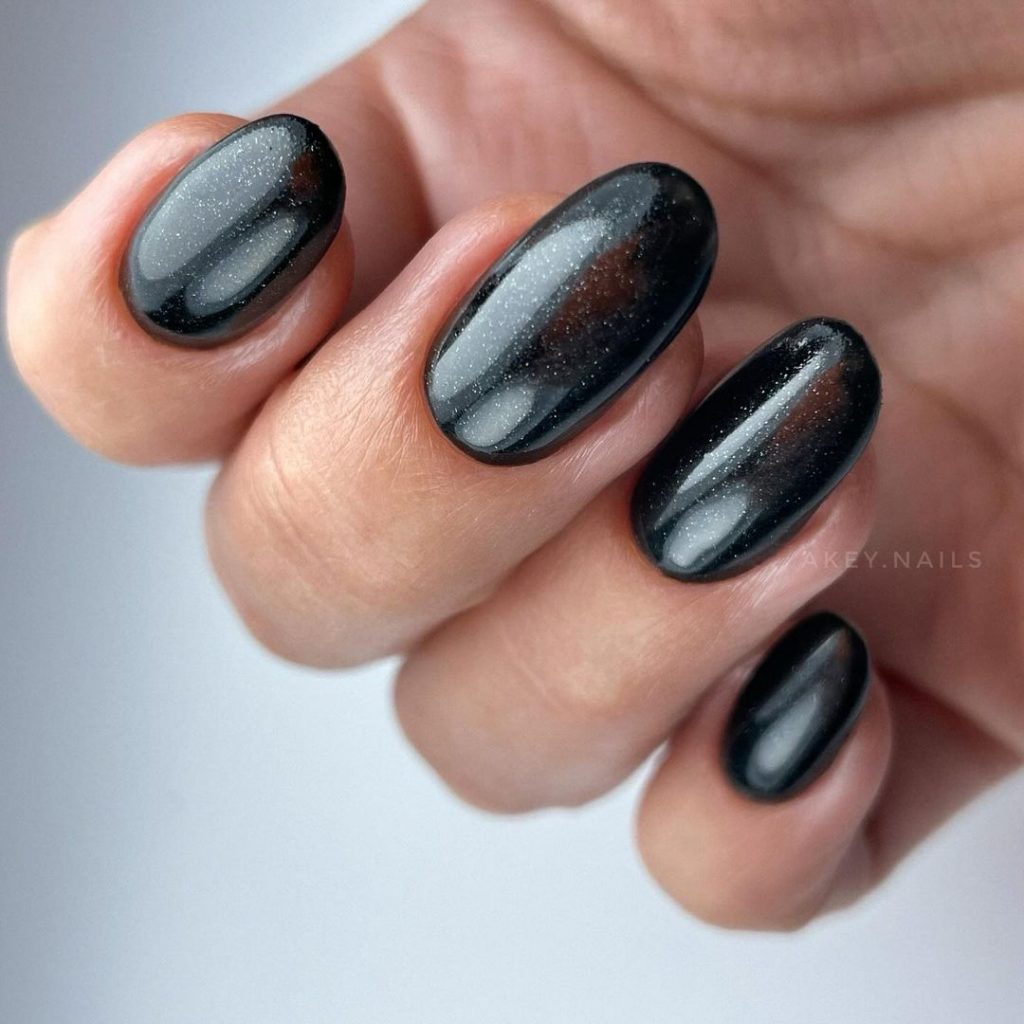
Consumables Needed:
- Black polish: Essie Licorice for a deep, glossy finish.
- Fine silver glitter polish: Zoya Pixie Dust in Tomoko for a subtle shimmer.
- Base coat: Orly Bonder Base Coat to protect your nails.
- Top coat: Seche Vite Dry Fast Top Coat for a high-shine finish.
How to Create This Design:
- Start with a base coat to protect your nails
- Apply two coats of black polish, allowing each coat to dry fully
- Lightly dust the nails with fine silver glitter, focusing on the tips to create a gradient effect
- Finish with a top coat to seal the design and add a glossy finish
Black and Glitter: A Glamorous Contrast
This glamorous design pairs glossy black nails with glittery silver accents, creating a striking contrast. The combination of textures makes this manicure perfect for special occasions or a night out. The square shape of the nails adds a modern touch, while the glittery accents provide a pop of sparkle that catches the light beautifully.
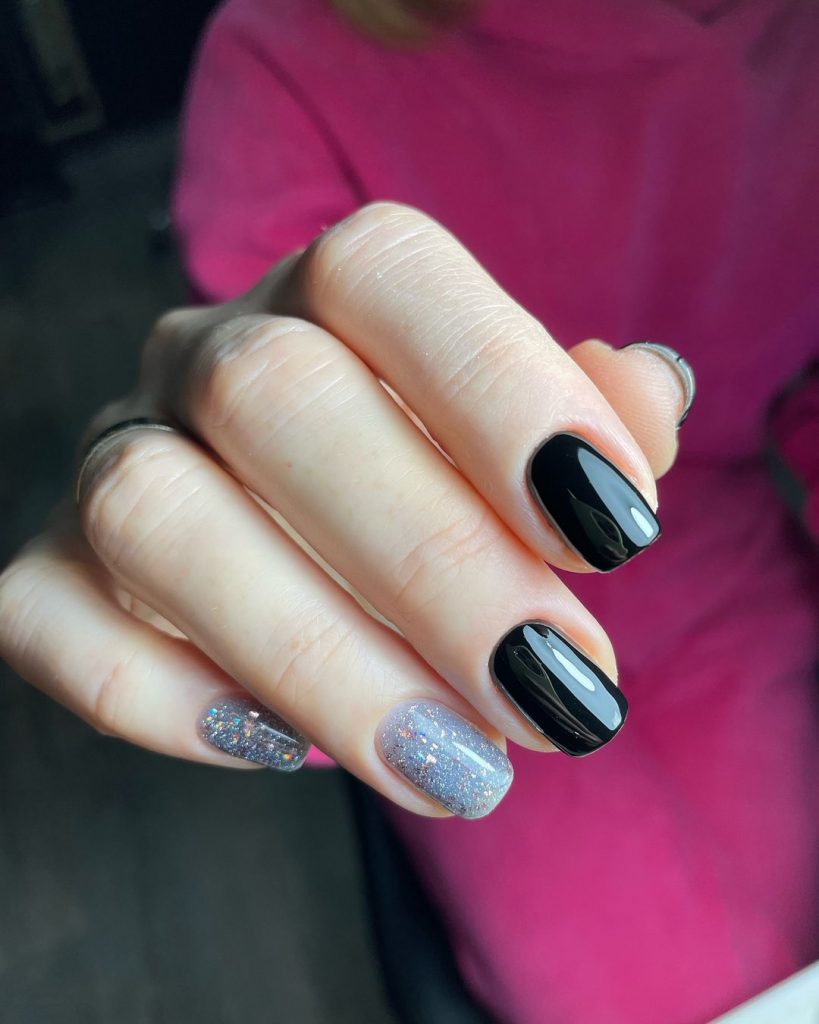
Consumables Needed:
- Black polish: OPI Black Onyx for a rich, glossy finish.
- Silver glitter polish: China Glaze Glistening Snow for a dazzling effect.
- Base coat: CND Stickey Base Coat for better polish adhesion.
- Top coat: Essie Gel Setter Top Coat to seal in the shine and glitter.
How to Create This Design:
- Apply a base coat to your nails for a smooth foundation
- Paint three nails with the black polish and two with the silver glitter polish
- For added sparkle, apply a second coat of glitter polish to the accent nails
- Finish with a top coat to seal the design and add a glossy finish
French Twist: Classic with a Black Edge
This design is a modern take on the classic French manicure, replacing the traditional white tips with bold black ones. The almond shape of the nails adds an elegant touch, making this design both chic and contemporary. It’s a perfect choice for those who want to maintain a classic look with a bit of an edge.
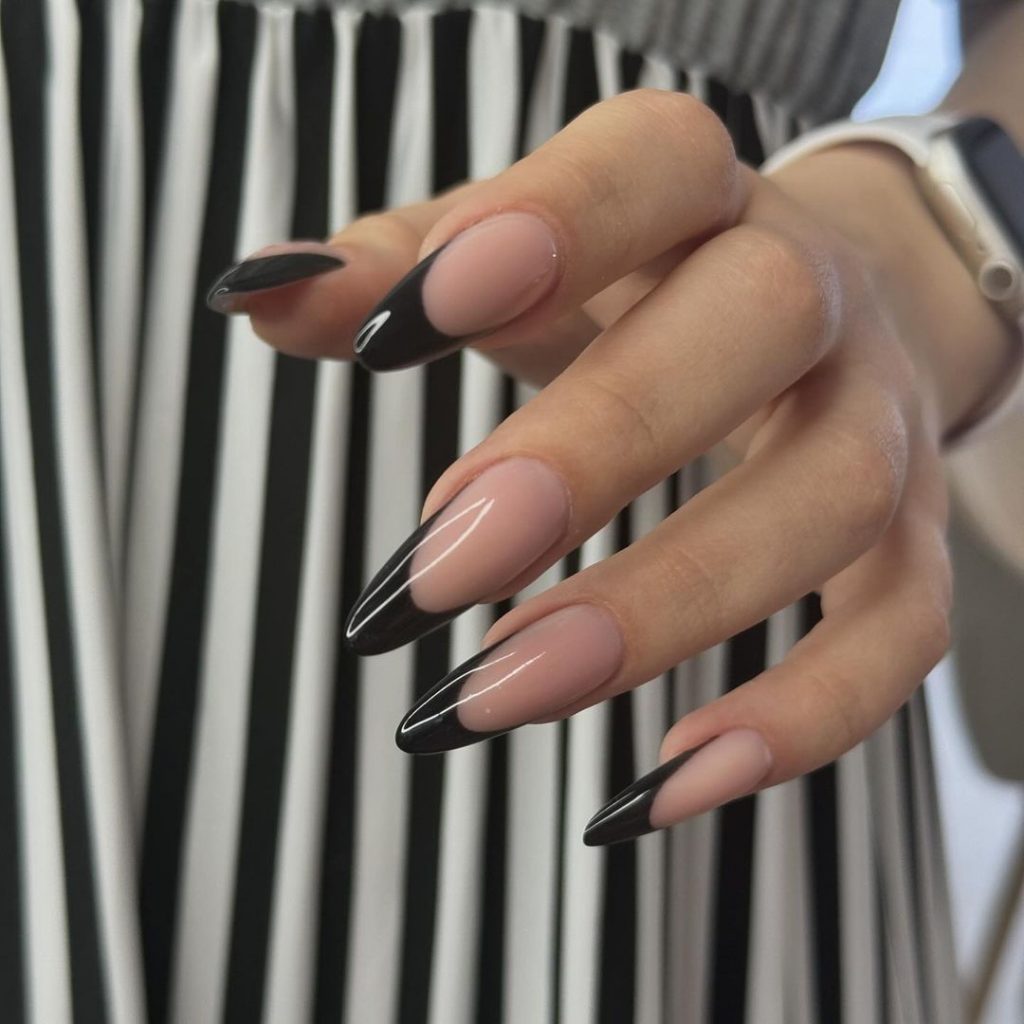
Consumables Needed:
- Nude polish: OPI Bubble Bath for a soft, neutral base.
- Black polish: Essie Licorice for the French tips.
- Fine nail art brush: Winstonia Nail Art Brushes for precise application.
- Base coat: Orly Bonder Base Coat to protect your nails.
How to Create This Design:
- Start with a base coat to ensure your manicure lasts longer
- Apply the nude polish to all nails, allowing it to dry completely
- Use a fine brush to carefully paint the black tips, following the natural curve of your nails
- Seal the design with a top coat to add shine and durability
Abstract Art: A Playful Mix of Patterns
This design combines the sleekness of glossy black nails with playful abstract art on the accent nails. The combination of black, white, and gold creates a striking visual contrast, making this manicure a standout. The short square nails keep the design modern and easy to wear, while the abstract patterns add a touch of creativity.
Consumables Needed:
- Black polish: Sally Hansen Black to Black for a glossy finish.
- White polish: OPI Alpine Snow for the base of the abstract art.
- Gold foil: Daily Charme Gold Foil for a touch of luxury.
- Fine nail art brush: Mia Secret Nail Art Brush for detailed designs.
How to Create This Design:
- Start by applying a base coat to protect your nails
- Paint three nails with the black polish, and use the white polish on the accent nails
- Use a fine brush to create abstract patterns with black polish, and add gold foil for extra flair
- Finish with a top coat to seal the design and add a glossy finish
Textured Black: A Bold Statement
For those who love making a statement with their nails, this textured black design is perfect. The raised texture creates a 3D effect, adding depth and interest to the manicure. The long stiletto shape adds drama, making this design a bold choice for those who aren’t afraid to stand out.
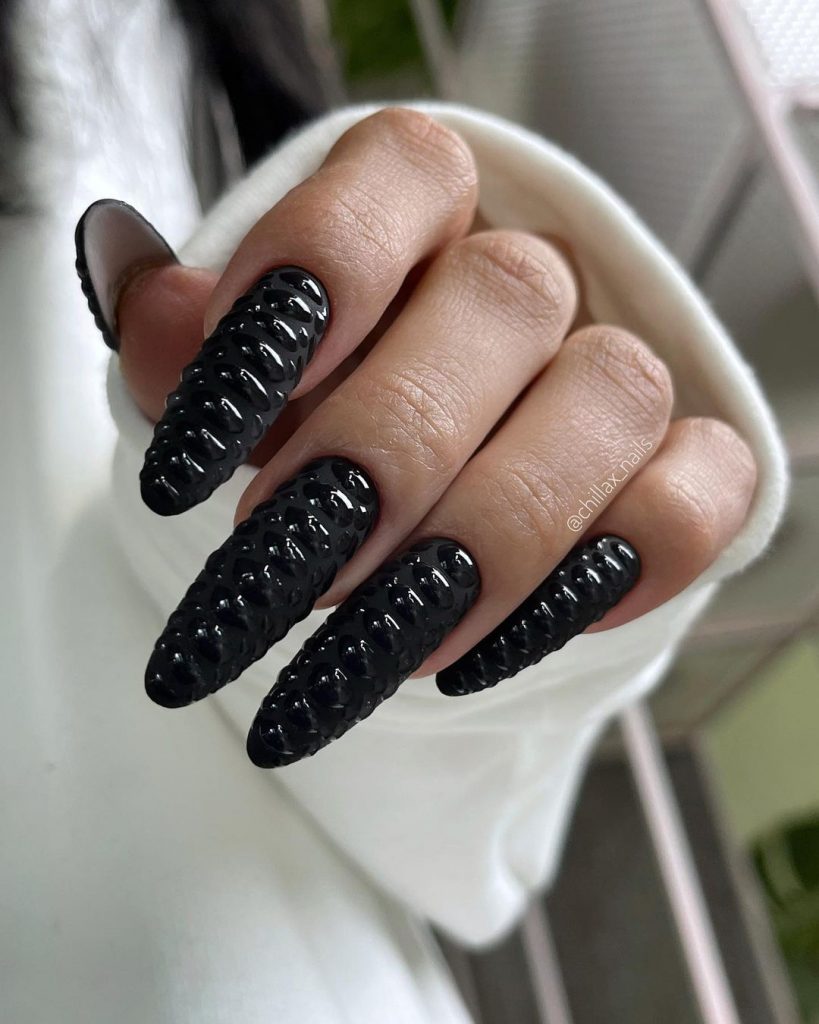
Consumables Needed:
- Black polish: Essie Licorice for the base.
- Textured gel polish: Orly Epix in Black Magic for the 3D effect.
- Fine detail brush: Winstonia Nail Art Brushes for creating the raised texture.
- Base coat: CND Stickey Base Coat to ensure the polish adheres well.
How to Create This Design:
- Apply a base coat to protect your nails and prepare for the texture
- Paint your nails with the black polish, allowing it to dry completely
- Use the textured gel polish and a fine brush to create the raised patterns on each nail
- Finish with a top coat to seal the design and enhance the 3D effect
Matte and Gloss: The Perfect Combination
This nail design perfectly balances matte and gloss textures for a sophisticated and modern look. The matte black base is accented with glossy 3D geometric patterns, creating a striking contrast. The long, square-shaped nails provide an ideal canvas for this design, making it a statement piece for any occasion.
Consumables Needed:
- Matte black polish: OPI Matte Onyx for a smooth, matte finish.
- Glossy black gel polish: Gelish Black Shadow for the 3D accents.
- Fine detail brush: Winstonia Nail Art Brushes for precise application.
- Base coat: Orly Bonder Base Coat to protect your nails.
How to Create This Design:
- Start with a base coat to ensure long-lasting wear
- Apply the matte black polish to all nails, allowing it to dry completely
- Use a fine brush to apply the glossy black gel in geometric patterns, creating the 3D effect
- Cure the gel polish under a UV lamp to set the design, and skip the top coat to maintain the matte contrast
Classic Black: Simple and Elegant
This design showcases the timeless elegance of a classic black manicure. The short, square-shaped nails are painted with a glossy black polish, creating a sleek and sophisticated look. This minimalist design is perfect for any occasion, adding a touch of class to your overall style.
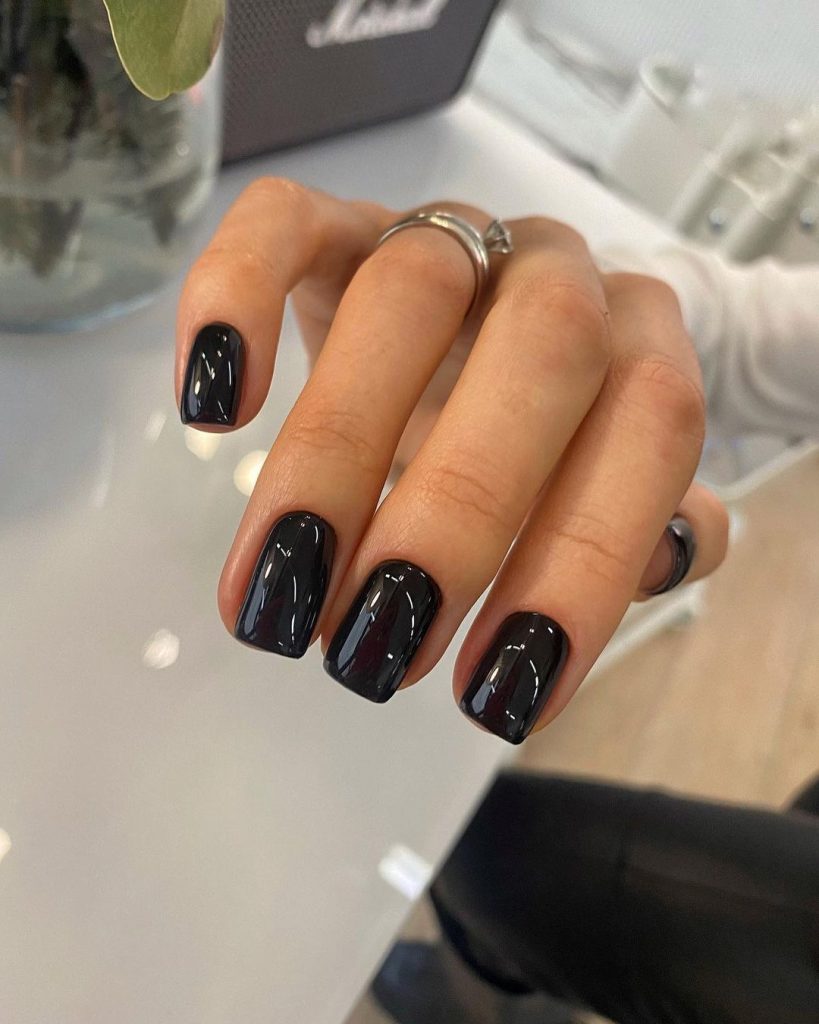
Consumables Needed:
- Black polish: Essie Licorice for a deep, glossy finish.
- Base coat: CND Stickey Base Coat to ensure the polish adheres well.
- Top coat: Seche Vite Dry Fast Top Coat to seal in the shine.
How to Create This Design:
- Apply a base coat to protect your nails
- Paint your nails with two coats of the black polish, allowing each coat to dry fully
- Finish with a top coat to seal the design and add a glossy finish
Leopard Accents: Wild and Chic
This design combines the boldness of glossy black nails with the wild flair of leopard print accents. The almond-shaped nails provide an elegant silhouette, while the leopard print adds a fun and trendy touch. This design is perfect for those who want to add a bit of edge to their classic black manicure.
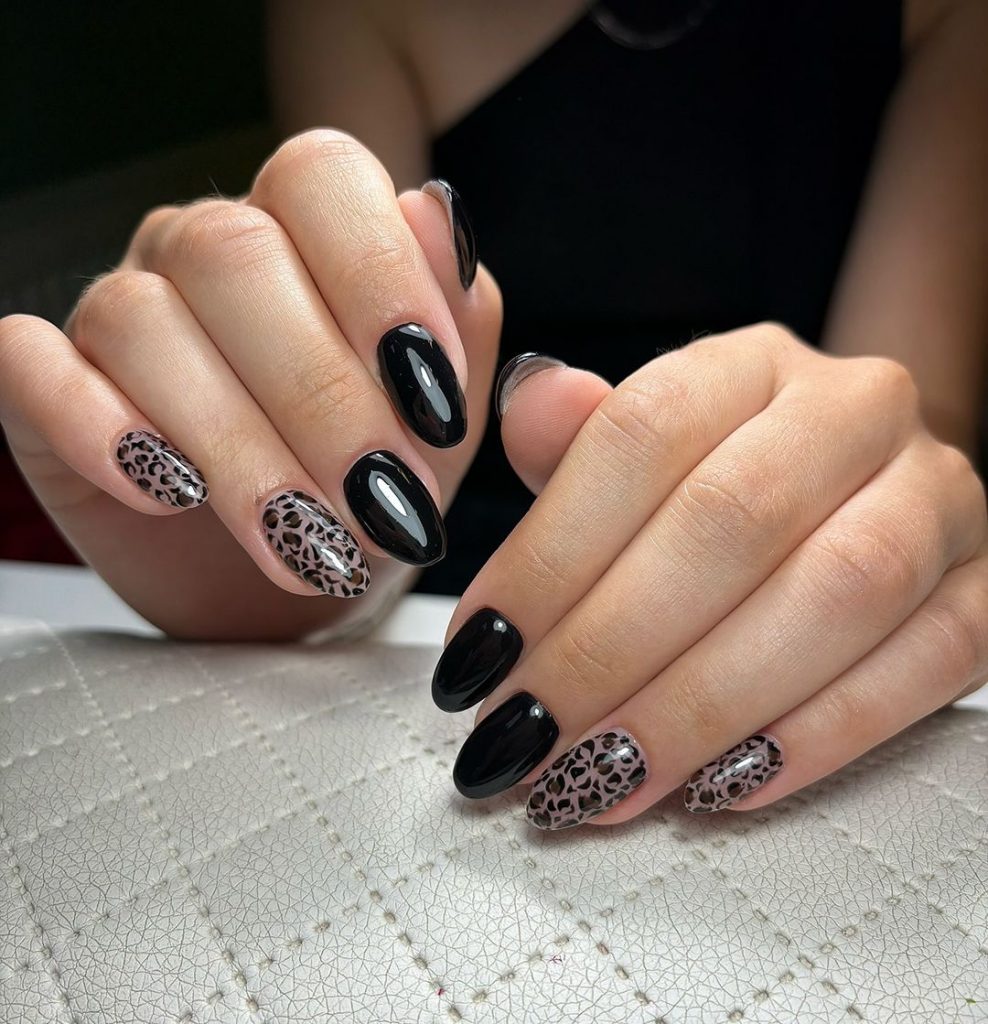
Consumables Needed:
- Black polish: OPI Black Onyx for the base.
- Nude polish: Essie Ballet Slippers for the base of the accent nails.
- Leopard print nail stickers or a fine brush: Kiss Nail Art Stickers for easy application.
- Top coat: CND Vinylux Weekly Top Coat to protect the design.
How to Create This Design:
- Apply a base coat to start with a smooth foundation
- Paint most of your nails with the black polish, leaving two for the leopard print
- Use the nude polish as the base for the accent nails, then apply leopard print stickers or paint the pattern with a fine brush
- Seal the design with a top coat to add shine and durability
Glittery Glam: Sparkle All the Way
This design is all about glamour and sparkle. The glossy black nails are paired with glittery accents, creating a dazzling effect that’s perfect for special occasions. The square shape adds a modern touch, while the glitter makes the nails stand out in any crowd.
Consumables Needed:
- Black polish: China Glaze Liquid Leather for a glossy finish.
- Black glitter polish: Zoya Pixie Dust in Dahlia for a sparkling effect.
- Base coat: OPI Natural Nail Base Coat to protect your nails.
- Top coat: Essie Gel Setter Top Coat to seal in the glitter and add extra shine.
How to Create This Design:
- Start by applying a base coat to your nails
- Paint most of your nails with the black polish, using the glitter polish on one or two accent nails
- Apply a second coat of glitter for extra sparkle, if desired
- Finish with a top coat to protect the design and add a glossy finish
High Gloss Black: Sleek and Modern
This design is all about the high gloss finish. The short, square-shaped nails are painted with a deep, glossy black polish, creating a sleek and modern look. This minimalist design is perfect for those who love the simplicity of a classic black manicure but want it to shine with a high-gloss finish.
Consumables Needed:
- Black polish: Essie Licorice for a deep, glossy finish.
- Base coat: CND Stickey Base Coat to ensure the polish adheres well.
- Top coat: Seche Vite Dry Fast Top Coat to add a high-gloss shine.
How to Create This Design:
- Apply a base coat to protect your nails and enhance polish adhesion
- Paint your nails with two coats of the black polish, allowing each coat to dry fully
- Finish with a top coat to seal the design and add a glossy finish
Save Pin