When it comes to yellow fall nails 2024, the color palette is as vibrant and varied as the season itself. Are you ready to explore the latest trends and designs that will make your nails the talk of the town? From mustard hues to intricate art, this season promises a spectrum of creativity. Let’s dive into some stunning nail ideas that will keep your manicure game strong throughout the autumn months.
Mustard Yellow Elegance
Nothing says fall quite like a rich mustard yellow. This bold color is perfect for making a statement while keeping your look sophisticated. The square shape of these nails adds a modern touch to the classic hue, creating a balance that’s both trendy and timeless.
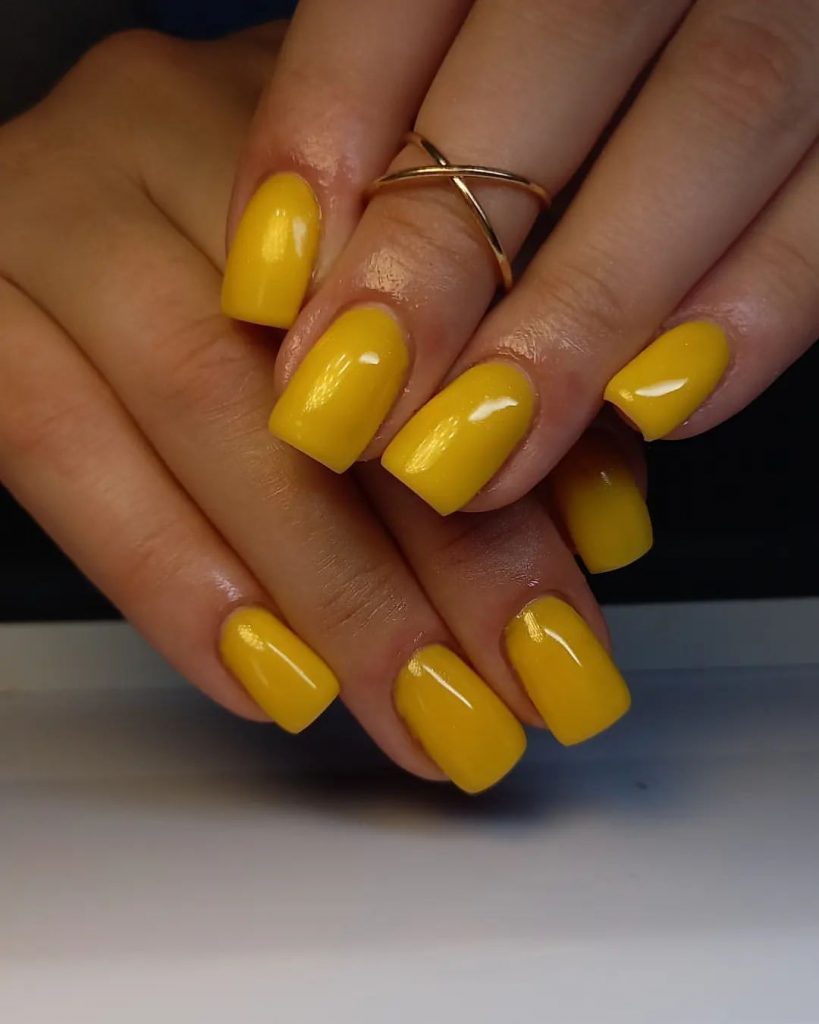
This nail design is all about elegance with a twist. The mustard yellow color is vibrant yet muted enough to fit the fall aesthetic perfectly. The smooth, glossy finish gives it a polished look that’s ideal for both casual and formal occasions. The square nail shape enhances the neatness of this manicure, making it a versatile choice for any outfit.
To achieve this look, you will need:
- Base coat: OPI Natural Nail Base Coat
- Mustard yellow polish: Essie “Mustard the Courage”
- Top coat: Seche Vite Dry Fast Top Coat
Here’s how to create this stylish manicure at home:
- Apply a base coat to protect your natural nails.
- Paint two coats of mustard yellow polish, allowing each coat to dry thoroughly.
- Finish with a top coat to seal the color and add shine.
Mixed Yellow and Leafy Accents
This nail design combines a bright yellow base with delicate leafy accents, capturing the essence of autumn leaves. The mix of yellow and black creates a striking contrast that’s both playful and chic.
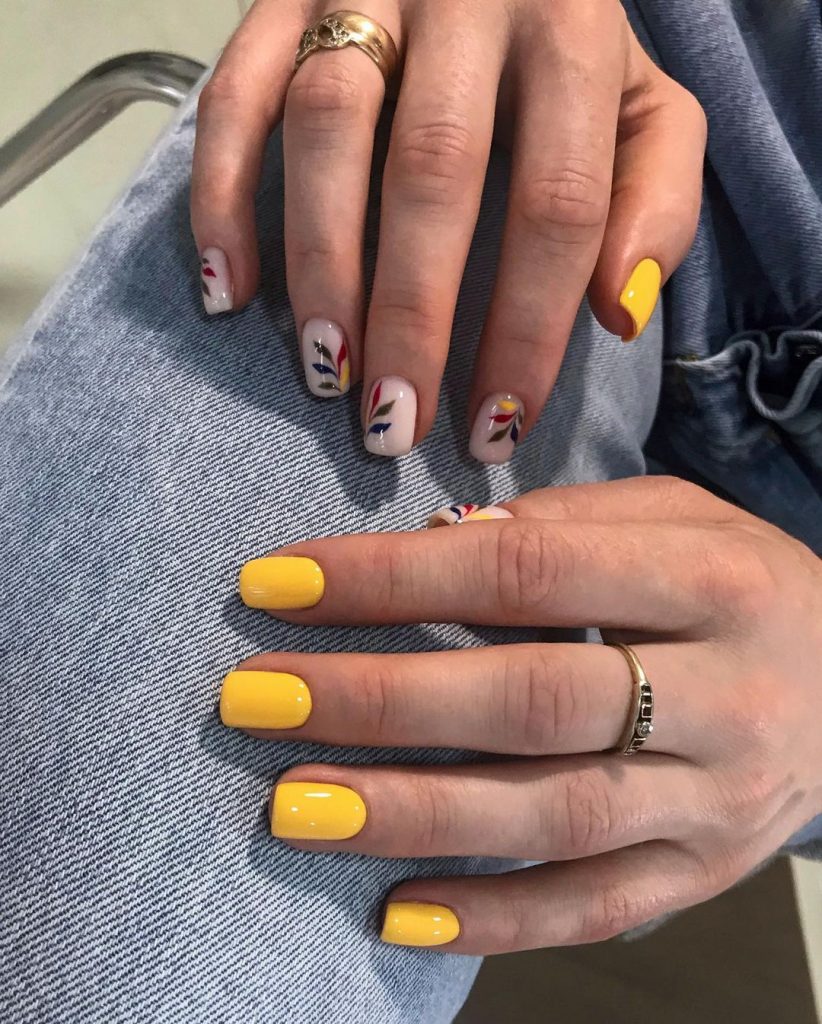
This manicure is a delightful blend of bold color and intricate detail. The bright yellow polish serves as a vibrant canvas for the black leaf designs, which add a touch of nature-inspired elegance. This design is perfect for those who love a bit of art on their nails without going overboard.
To recreate this look, you will need:
- Base coat: Sally Hansen Double Duty Base & Top Coat
- Yellow polish: OPI “Sun, Sea, and Sand in My Pants”
- Black nail art pen: Sally Hansen I Heart Nail Art Pen in Black
- Top coat: Essie Gel-Setter Top Coat
Follow these steps to achieve the look:
- Start with a base coat to ensure your nails are protected.
- Apply two coats of yellow polish, letting each layer dry completely.
- Use the black nail art pen to draw delicate leaf patterns on a few accent nails.
- Seal your design with a top coat for long-lasting wear.
Golden Highlights with Yellow Base
A yellow base with golden highlights brings a touch of luxury to your fall nails. The almond shape adds elegance, making this design perfect for both everyday wear and special occasions.
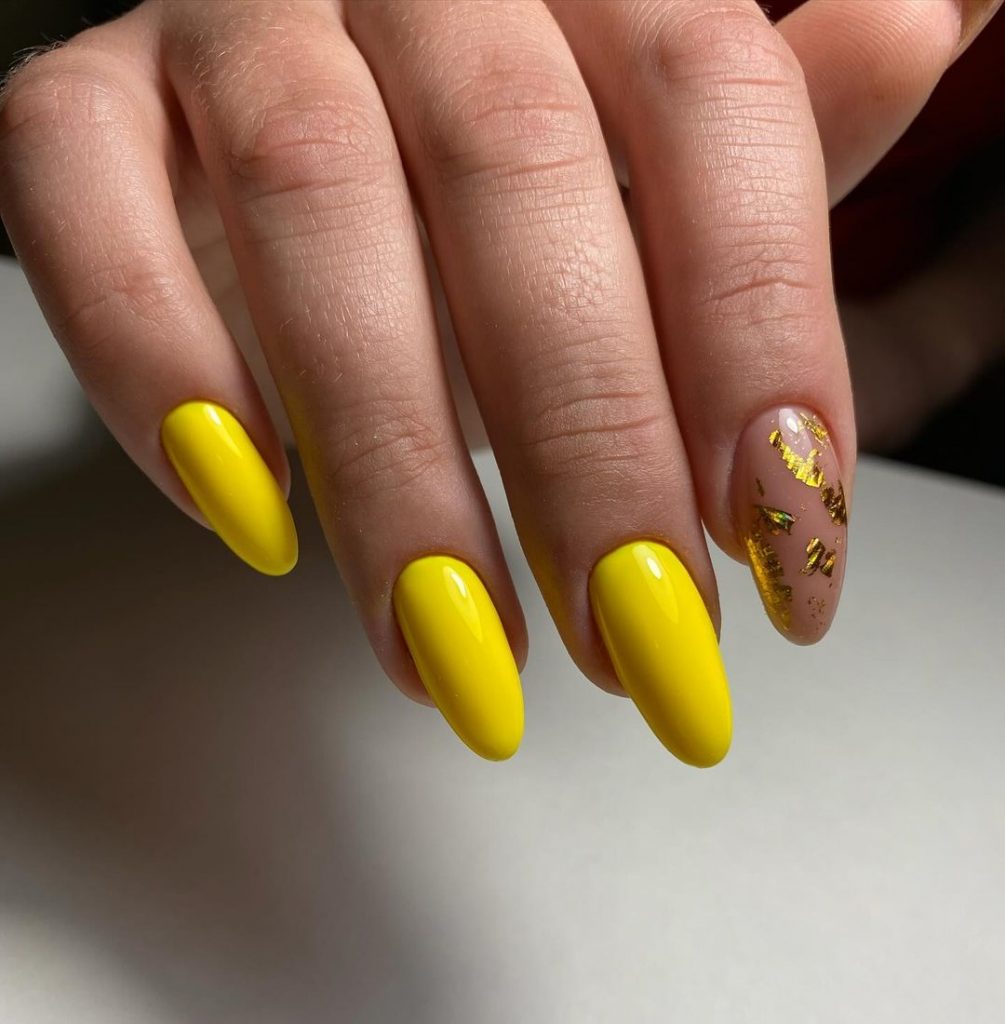
The golden accents on the ring finger create a focal point, adding a hint of glamour without overwhelming the overall look. This design is ideal for those who want a sophisticated manicure with a subtle touch of shine.
To create this luxurious look, you will need:
- Base coat: CND Stickey Base Coat
- Yellow polish: China Glaze “Happy Go Lucky”
- Gold foil: Twinkled T Gold Nail Foil
- Top coat: INM Out the Door Top Coat
Here’s how to get this look at home:
- Apply a base coat to your nails.
- Paint all nails with two coats of yellow polish, allowing each coat to dry.
- On the ring finger, apply the gold foil while the polish is still slightly tacky.
- Finish with a top coat to ensure everything stays in place and shines beautifully.
Yellow and Leafy French Tips
For a unique twist on the classic French manicure, try yellow tips with leafy accents. This design combines a fresh, modern color with timeless elegance.
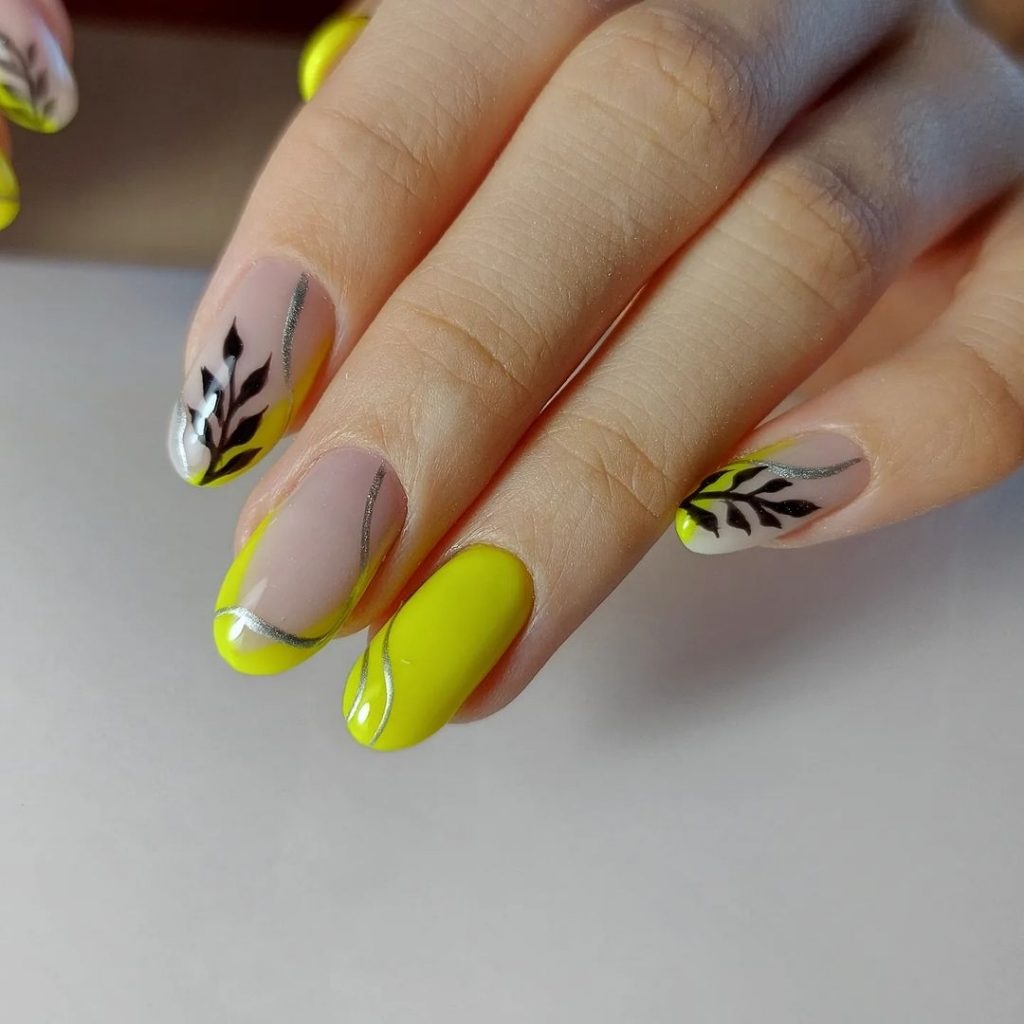
The yellow tips stand out beautifully against the nude base, while the black leafy accents add a touch of sophistication. This look is perfect for anyone looking to update the traditional French manicure with a trendy twist.
To achieve this design, you will need:
- Base coat: Essie First Base Coat
- Nude polish: OPI “Bubble Bath”
- Yellow polish: Zoya “Pippa”
- Black nail art pen: Winstonia Fine Liner Nail Art Pen in Black
- Top coat: Seche Vite Dry Fast Top Coat
Here’s how to create this elegant look:
- Apply a base coat to your nails.
- Paint a nude polish as the base color and let it dry completely.
- Use the yellow polish to create French tips on each nail.
- Add black leafy accents with the nail art pen on a few nails.
- Seal with a top coat to finish.
Mixed Matte and Glossy Black with Yellow Art
Combine matte and glossy finishes for a striking contrast that’s sure to turn heads. The mix of textures, along with the vibrant yellow art, creates a bold and unique manicure.
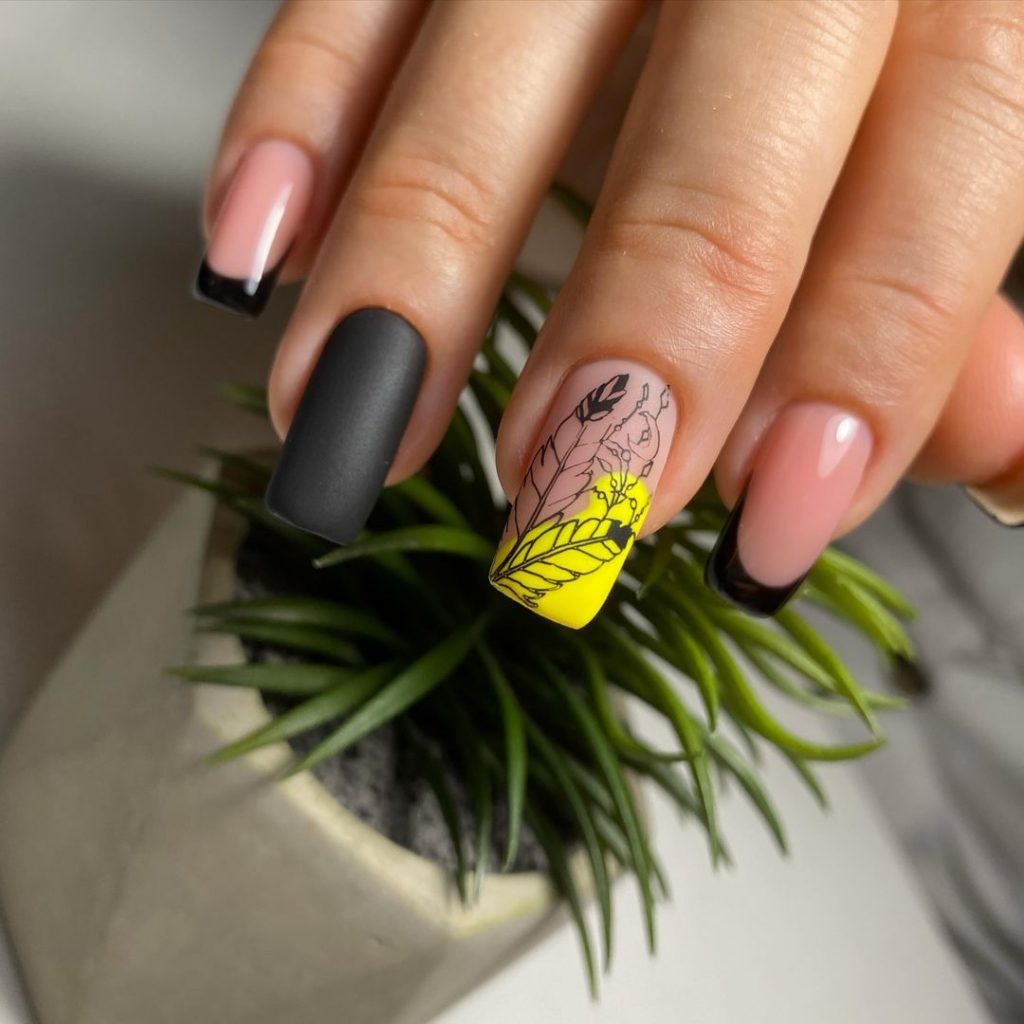
The matte black nails provide a chic backdrop for the glossy yellow art, making the design pop. This look is perfect for anyone who loves to experiment with different textures and bold colors.
To recreate this design, you will need:
- Base coat: OPI Nail Envy
- Matte black polish: Zoya “Dovima”
- Yellow polish: Essie “Hay There”
- Glossy top coat: Essie Gel-Setter Top Coat
- Nail art brush: Twinkled T Nail Art Brushes
Here’s how to get this look:
- Start with a base coat to protect your nails.
- Apply the matte black polish on all nails and let it dry.
- Use the yellow polish to create art on a few accent nails.
- Finish with a glossy top coat on the yellow art to make it stand out.
Butter Yellow Simplicity
A soft, buttery yellow hue encapsulates the essence of autumn in the most delicate manner. This square-shaped nail design is both understated and chic, offering a versatile look that can seamlessly transition from day to night.
This manicure showcases a buttery yellow polish that exudes warmth and subtlety, making it perfect for fall. The glossy finish adds a touch of elegance, while the simplicity of the design ensures it complements any outfit effortlessly.
To recreate this look, you’ll need:
- Base coat: OPI Natural Nail Base Coat
- Butter yellow polish: Essie “Sunny Business”
- Top coat: Seche Vite Dry Fast Top Coat
Steps to achieve this manicure at home:
- Start with a base coat to protect your nails.
- Apply two coats of the butter yellow polish, letting each layer dry completely.
- Finish with a top coat for a glossy and long-lasting finish.
Yellow and Purple Fall Mix
Combining vibrant yellow with deep purple creates a stunning fall manicure that’s both bold and artistic. The addition of delicate black leaf accents enhances the autumnal feel, making this design truly stand out.
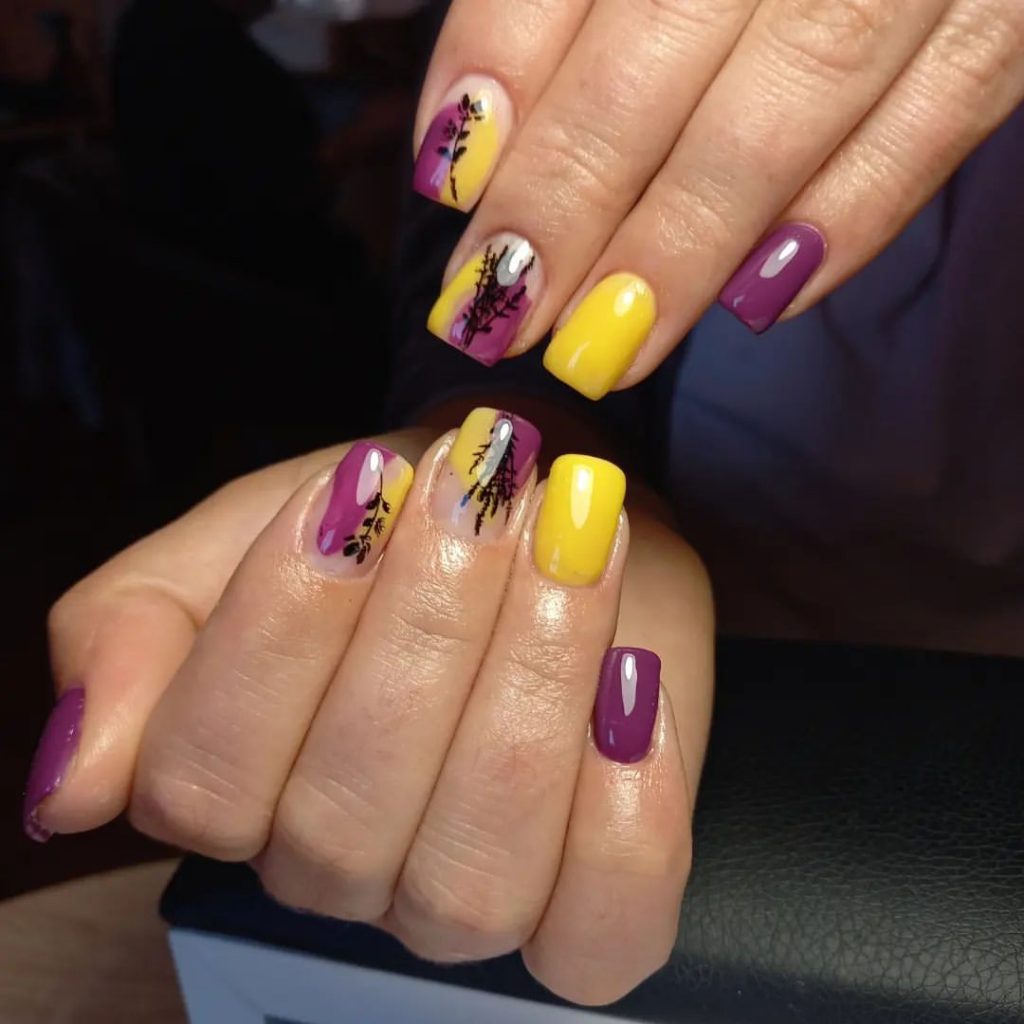
This design blends bright yellow and rich purple with intricate black leaf patterns. The contrast between the colors adds depth and interest, while the leafy accents give it a nature-inspired touch that’s perfect for fall.
To achieve this look, you’ll need:
- Base coat: Sally Hansen Double Duty Base & Top Coat
- Yellow polish: OPI “Sun, Sea, and Sand in My Pants”
- Purple polish: Zoya “Malia”
- Black nail art pen: Sally Hansen I Heart Nail Art Pen in Black
- Top coat: Essie Gel-Setter Top Coat
Creating this design at home involves:
- Apply a base coat to your nails.
- Paint your nails with alternating coats of yellow and purple polish, allowing each to dry.
- Use the black nail art pen to draw delicate leaf patterns on selected nails.
- Seal your design with a top coat.
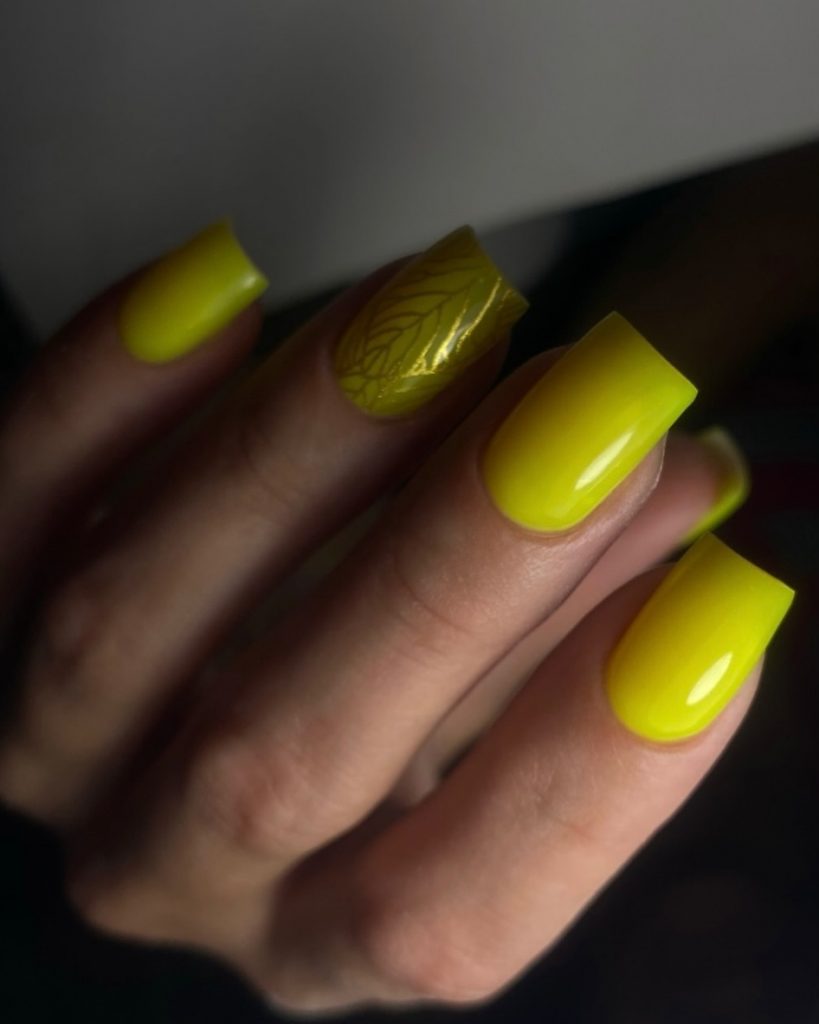
Yellow Leaf Pattern
This nail design features a subtle yellow leaf pattern on a pale yellow base, perfect for those who prefer a more delicate and intricate manicure.
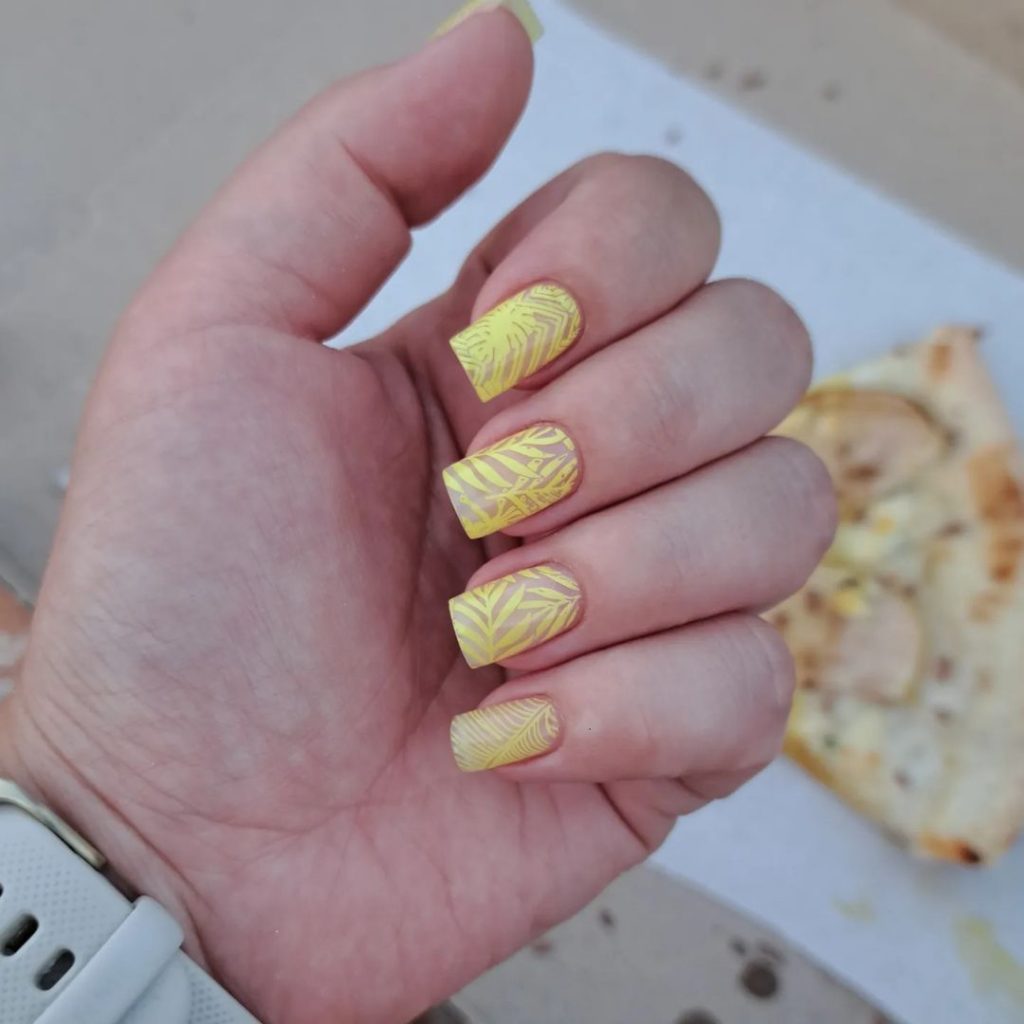
The pale yellow base color combined with the leaf pattern creates a soft, understated look that is perfect for everyday wear. This design is ideal for those who want to embrace the fall season in a subtle yet stylish way.
To recreate this look, you’ll need:
- Base coat: CND Stickey Base Coat
- Pale yellow polish: China Glaze “Lemon Fizz”
- Yellow stamping polish: Born Pretty Stamping Polish in Yellow
- Leaf pattern stamping plate: MoYou London “Tropical Collection”
- Top coat: INM Out the Door Top Coat
Steps to achieve this manicure:
- Apply a base coat to your nails.
- Paint all nails with two coats of pale yellow polish, letting each layer dry.
- Use the stamping plate and yellow stamping polish to apply the leaf pattern.
- Finish with a top coat to protect your design.
Yellow and Black Cow Print
A playful take on the classic cow print design, this manicure combines bright yellow and black for a bold and trendy look.
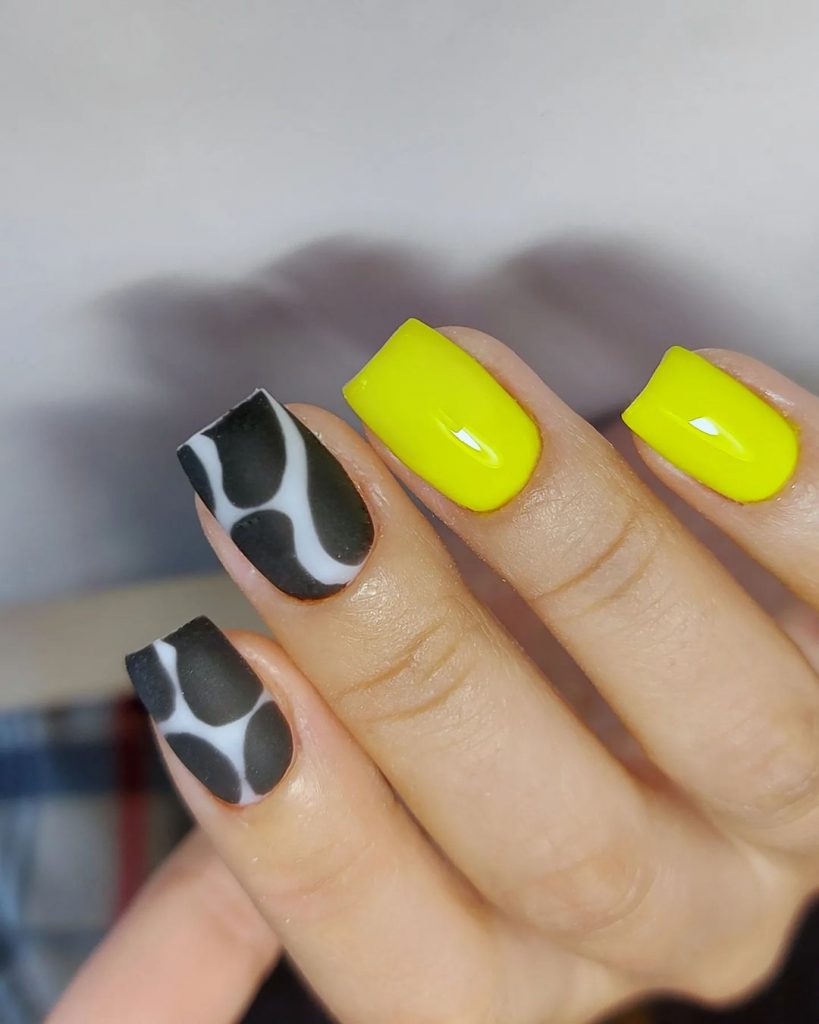
The mix of bright yellow and black cow print creates a striking contrast that’s sure to draw attention. This design is perfect for those who love to make a statement with their nails.
To achieve this look, you’ll need:
- Base coat: Essie First Base Coat
- Yellow polish: Essie “Hay There”
- Black polish: OPI “Black Onyx”
- White polish: Essie “Blanc”
- Top coat: Seche Vite Dry Fast Top Coat
Creating this design at home involves:
- Apply a base coat to your nails.
- Paint alternating nails with yellow and white polish, allowing each to dry.
- Use a dotting tool or nail art brush to create black cow print spots on the white nails.
- Finish with a top coat for a glossy look.
Yellow Ombre with Orange Accents
This manicure features a beautiful yellow ombre with orange accents, capturing the vibrant colors of fall foliage.
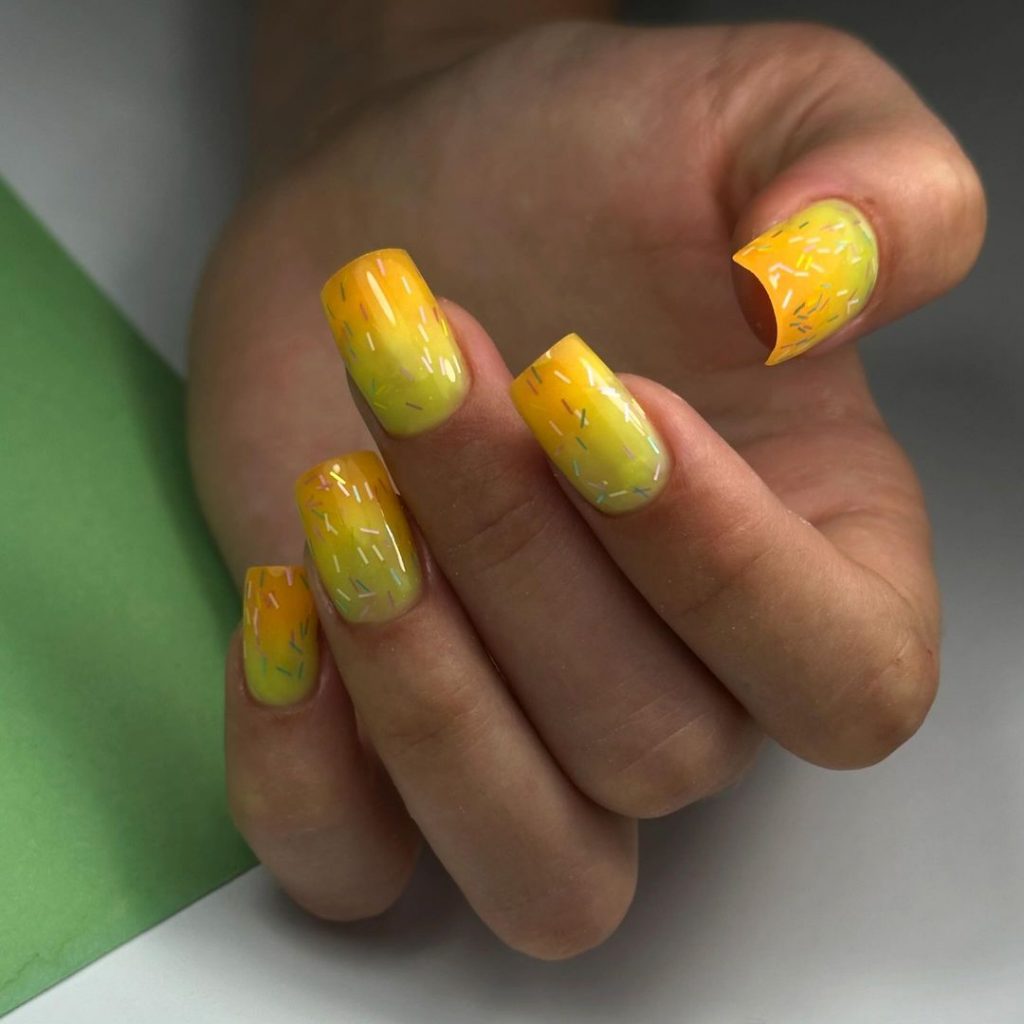
The yellow ombre effect transitioning to orange at the tips creates a stunning gradient that’s perfect for autumn. The subtle orange accents add depth and interest to the design, making it ideal for the season.
To recreate this look, you’ll need:
- Base coat: Sally Hansen Hard As Nails Base Coat
- Yellow polish: Zoya “Pippa”
- Orange polish: China Glaze “Orange Knockout”
- Sponge: Nail art sponge for ombre effect
- Top coat: Essie Gel-Setter Top Coat
Steps to achieve this manicure:
- Apply a base coat to your nails.
- Paint all nails with two coats of yellow polish, letting each layer dry.
- Use the sponge to apply the orange polish to the tips, creating a gradient effect.
- Finish with a top coat to blend the colors and add shine.
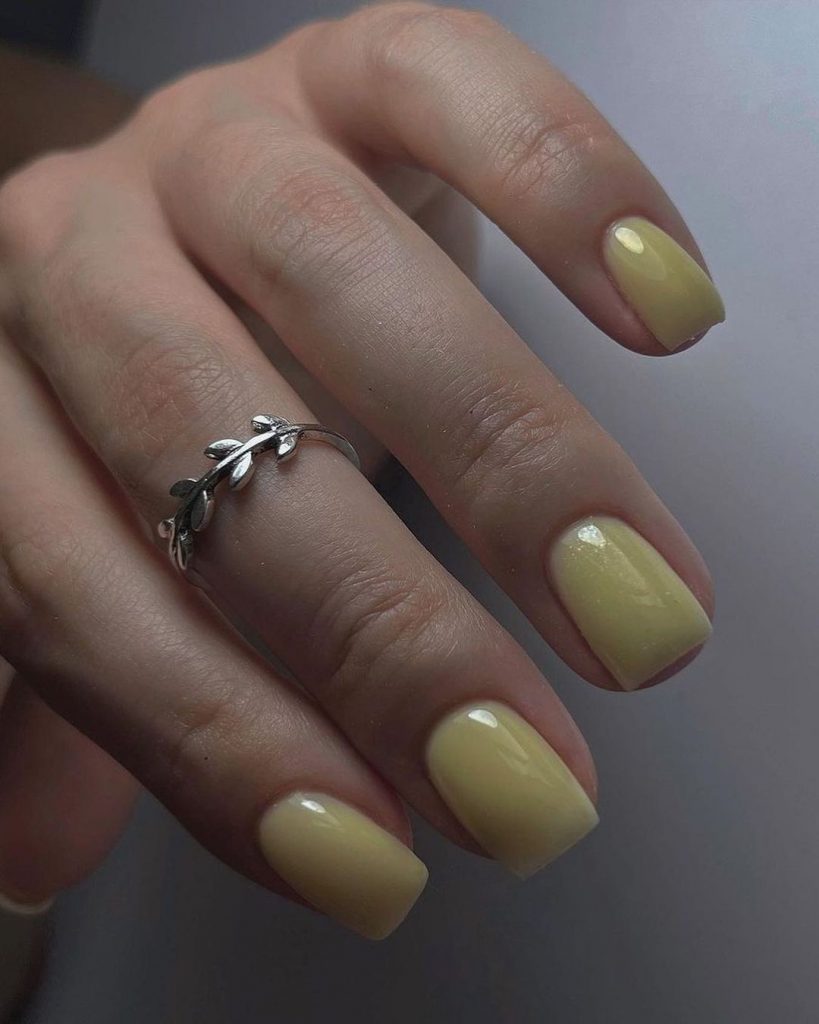
Soft Yellow Sophistication
This elegant nail design features a soft yellow hue, perfect for adding a touch of subtle sophistication to your fall look. The medium-length square nails ensure the color stands out without being overpowering.
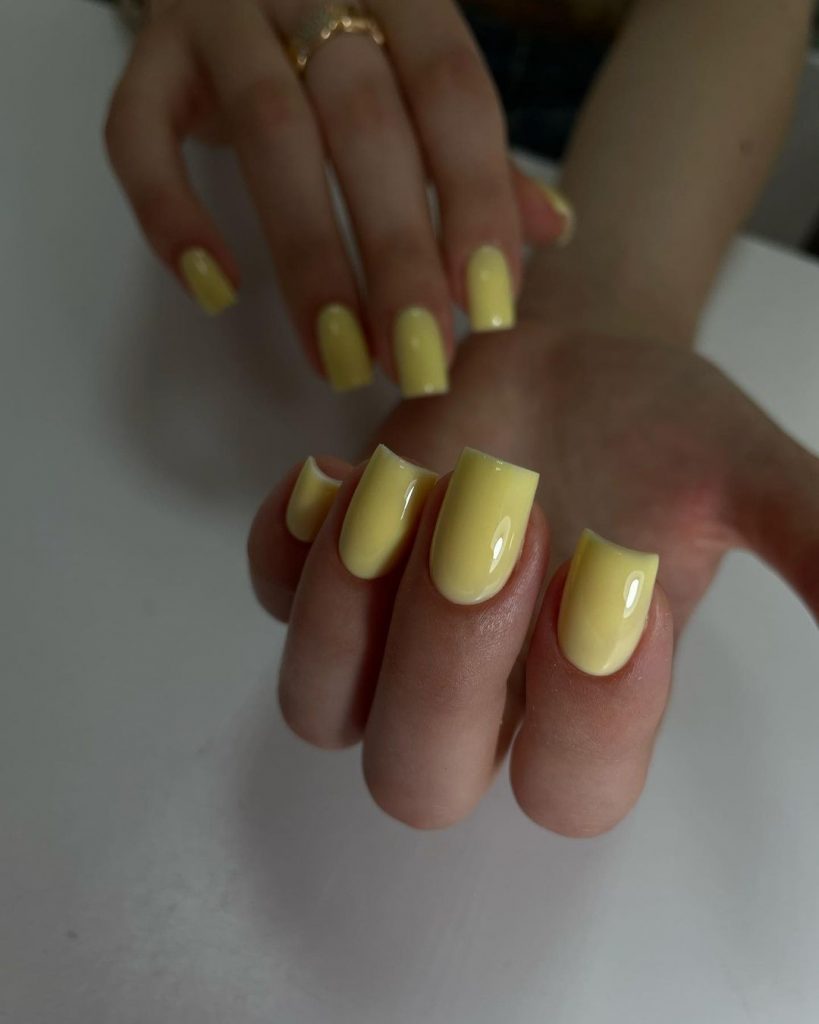
The soft yellow polish is perfect for those who prefer a more understated manicure. The smooth, glossy finish adds a touch of class, making this design versatile enough for both everyday wear and special occasions.
To achieve this look, you’ll need:
- Base coat: OPI Natural Nail Base Coat
- Soft yellow polish: Essie “Mellow Yellow”
- Top coat: Seche Vite Dry Fast Top Coat
Steps to recreate this manicure:
- Apply a base coat to protect your nails.
- Paint two coats of the soft yellow polish, allowing each layer to dry completely.
- Finish with a top coat for a glossy and long-lasting finish.
Yellow and Black Elegance
Combining bright yellow with classic black and delicate floral accents, this manicure offers a bold yet sophisticated look. The mix of colors and designs makes it perfect for those who love a bit of variety in their nails.

The vibrant yellow paired with black and a floral accent nail creates a striking and trendy look. This design is ideal for making a statement while keeping an elegant and stylish appearance.
To recreate this look, you’ll need:
- Base coat: Sally Hansen Double Duty Base & Top Coat
- Yellow polish: OPI “Sun, Sea, and Sand in My Pants”
- Black polish: Essie “Licorice”
- Floral nail decals or nail art brush: KADS Nail Art Stamping Plates
- Top coat: Essie Gel-Setter Top Coat
Steps to achieve this design:
- Apply a base coat to your nails.
- Paint your nails with two coats of yellow polish, except for one accent nail.
- Paint the accent nail with black polish.
- Use floral nail decals or a nail art brush to add delicate floral designs.
- Seal the design with a top coat.
Neon Yellow Glow
For those who love a pop of color, this neon yellow nail design is perfect. The vibrant hue is sure to turn heads and add a fun element to your fall style.
The bright neon yellow polish is bold and eye-catching, making it perfect for those who want to stand out. This design is simple yet striking, ideal for anyone looking to add a touch of brightness to their look.
To achieve this look, you’ll need:
- Base coat: CND Stickey Base Coat
- Neon yellow polish: China Glaze “Yellow Polka Dot Bikini”
- Top coat: INM Out the Door Top Coat
Steps to recreate this manicure:
- Apply a base coat to protect your nails.
- Paint two coats of neon yellow polish, letting each layer dry thoroughly.
- Finish with a top coat for a glossy and durable finish.
Subtle Yellow Waves
This nail design features a nude base with subtle yellow wave accents, offering a modern and minimalist look that’s perfect for fall.
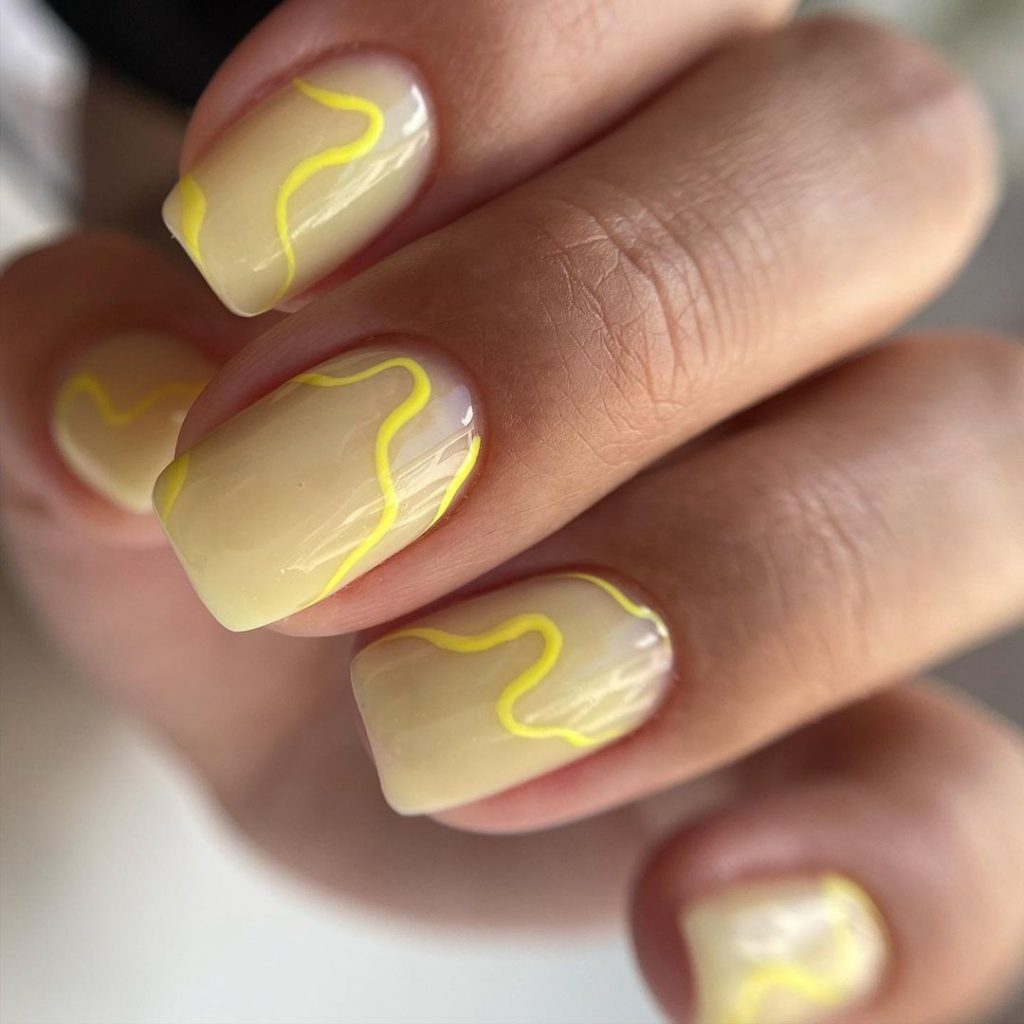
The nude base color combined with delicate yellow waves creates a soft, elegant look that’s ideal for those who prefer minimalist designs. This manicure is perfect for adding a touch of color while keeping things sophisticated.
To recreate this look, you’ll need:
- Base coat: Essie First Base Coat
- Nude polish: OPI “Bubble Bath”
- Yellow nail art pen: Winstonia Fine Liner Nail Art Pen in Yellow
- Top coat: Seche Vite Dry Fast Top Coat
Steps to achieve this design:
- Apply a base coat to your nails.
- Paint all nails with two coats of nude polish, allowing each layer to dry.
- Use the yellow nail art pen to draw subtle wave patterns on each nail.
- Seal with a top coat to protect the design.
Yellow and Gold Glamour
This glamorous nail design features a vibrant yellow polish paired with gold accents, perfect for adding a touch of luxury to your fall look.
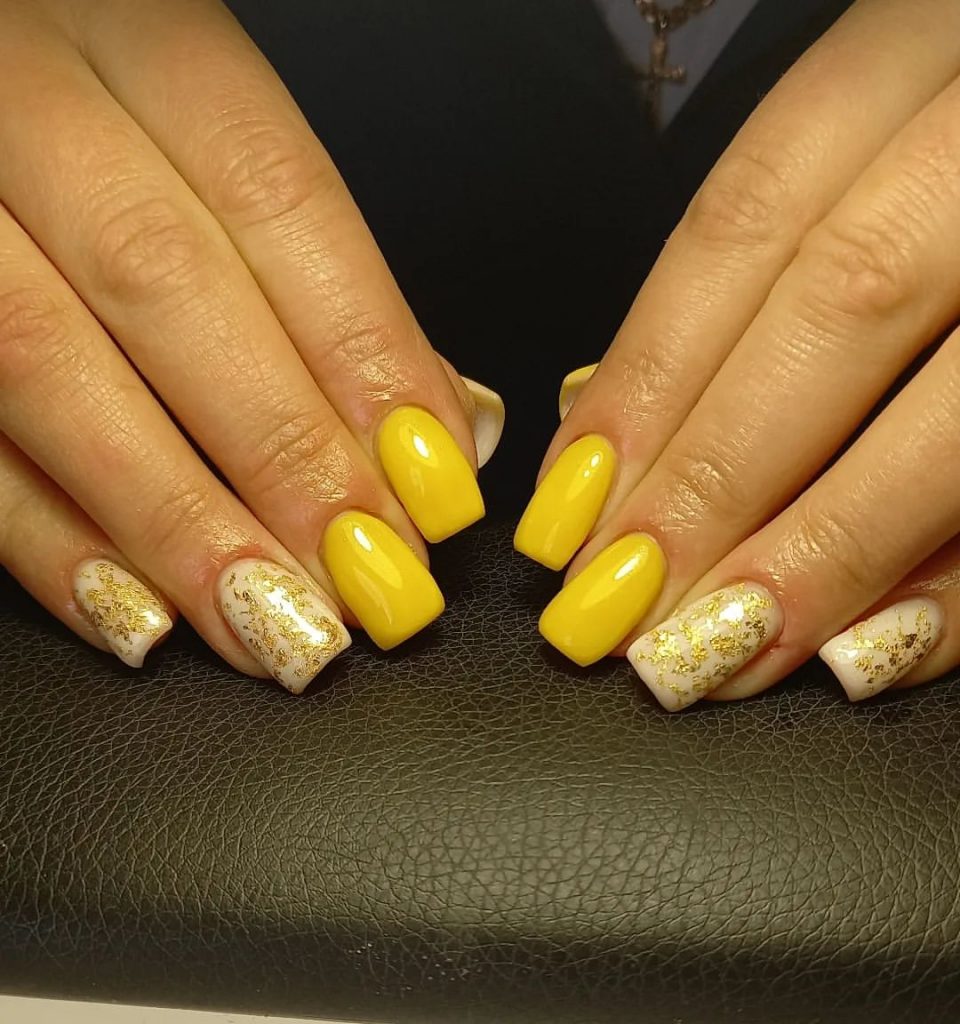
The combination of bright yellow and gold creates a rich and luxurious look. The gold accents add a touch of glamour, making this design ideal for special occasions or when you want to add a bit of sparkle to your style.
To achieve this look, you’ll need:
- Base coat: Sally Hansen Hard As Nails Base Coat
- Yellow polish: Zoya “Pippa”
- Gold foil: Twinkled T Gold Nail Foil
- Top coat: Essie Gel-Setter Top Coat
Steps to recreate this design:
- Apply a base coat to protect your nails.
- Paint all nails with two coats of yellow polish, letting each layer dry.
- Apply gold foil to accent nails while the polish is still slightly tacky.
- Finish with a top coat to ensure everything stays in place and shines beautifully.
Pale Yellow Simplicity
This manicure features a pale yellow hue that is both elegant and understated. The short, square-shaped nails add a classic touch, making this design perfect for those who prefer a minimalist look.
The pale yellow polish is soft and subtle, ideal for everyday wear. The glossy finish adds a hint of sophistication, ensuring your nails look polished and well-groomed.
To achieve this look, you’ll need:
- Base coat: OPI Natural Nail Base Coat
- Pale yellow polish: Essie “Sunny Daze”
- Top coat: Seche Vite Dry Fast Top Coat
Steps to recreate this manicure:
- Apply a base coat to protect your nails.
- Paint two coats of the pale yellow polish, allowing each layer to dry completely.
- Finish with a top coat for a glossy and long-lasting finish.
Yellow Lemons Accent
This creative design incorporates a yellow base with delicate lemon accents, bringing a touch of playfulness to your nails. The combination of the lemon art with the pale yellow polish makes this design fresh and unique.
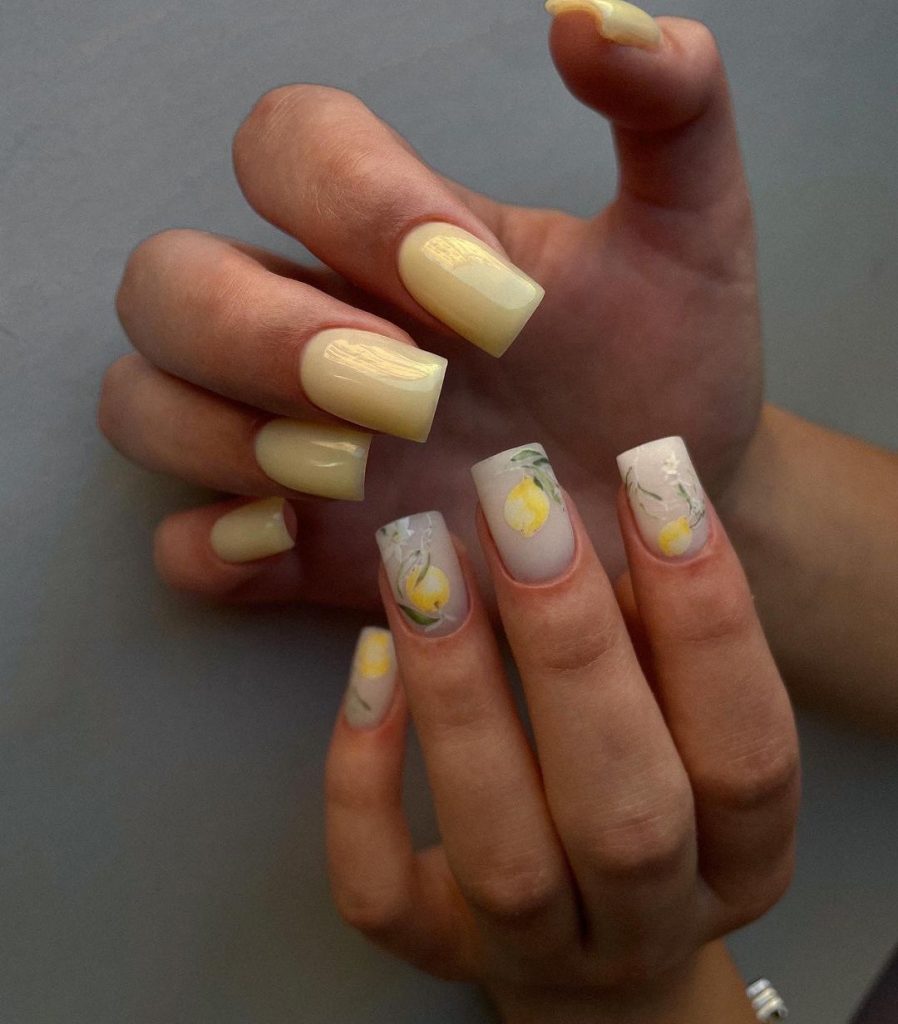
The detailed lemon art adds a whimsical touch to the pale yellow base, making it a fun and eye-catching design. This look is perfect for those who love nature-inspired nail art.
To recreate this look, you’ll need:
- Base coat: Sally Hansen Double Duty Base & Top Coat
- Pale yellow polish: OPI “Be There in a Prosecco”
- Lemon nail decals: Born Pretty Fruit Nail Stickers
- Top coat: Essie Gel-Setter Top Coat
Steps to achieve this design:
- Apply a base coat to your nails.
- Paint all nails with two coats of pale yellow polish, letting each layer dry.
- Apply lemon nail decals to a few accent nails.
- Seal the design with a top coat.
Matte Yellow with Rhinestones
This chic design features matte yellow nails adorned with small rhinestones, adding a touch of glamor. The simplicity of the matte finish combined with the sparkle of the rhinestones creates a sophisticated look.
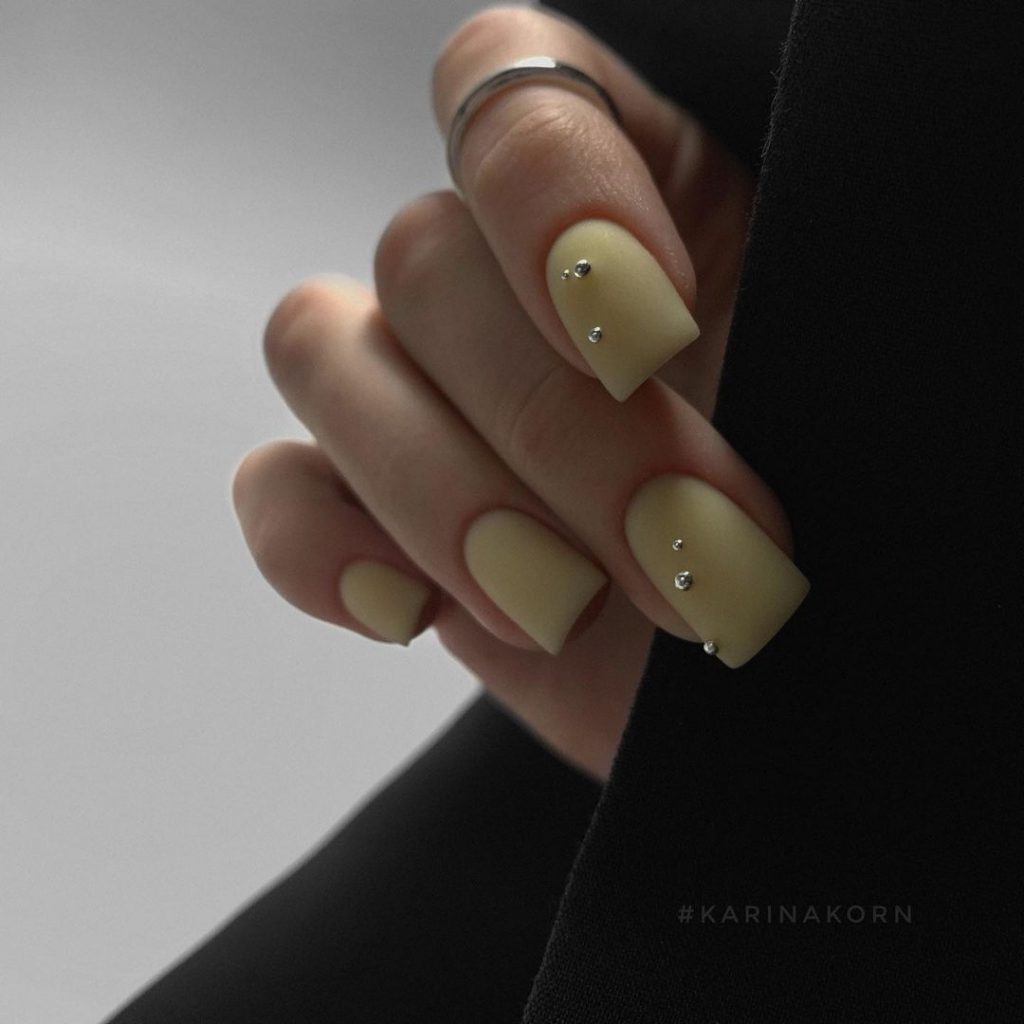
The matte yellow base is modern and trendy, while the rhinestones add a bit of sparkle. This design is perfect for special occasions or when you want to add a touch of luxury to your look.
To achieve this look, you’ll need:
- Base coat: CND Stickey Base Coat
- Matte yellow polish: China Glaze “Metro Pollen-Tin”
- Small rhinestones: Twinkled T Nail Art Rhinestones
- Top coat: INM Out the Door Top Coat
Steps to recreate this manicure:
- Apply a base coat to your nails.
- Paint two coats of matte yellow polish, allowing each layer to dry completely.
- Apply small rhinestones to a few nails using nail glue.
- Finish with a top coat to secure the rhinestones.
Yellow Ombre with White
This beautiful design features a yellow ombre effect transitioning to white, capturing the essence of a soft, glowing autumn day. The gradient effect is subtle yet stunning, perfect for a chic and elegant look.
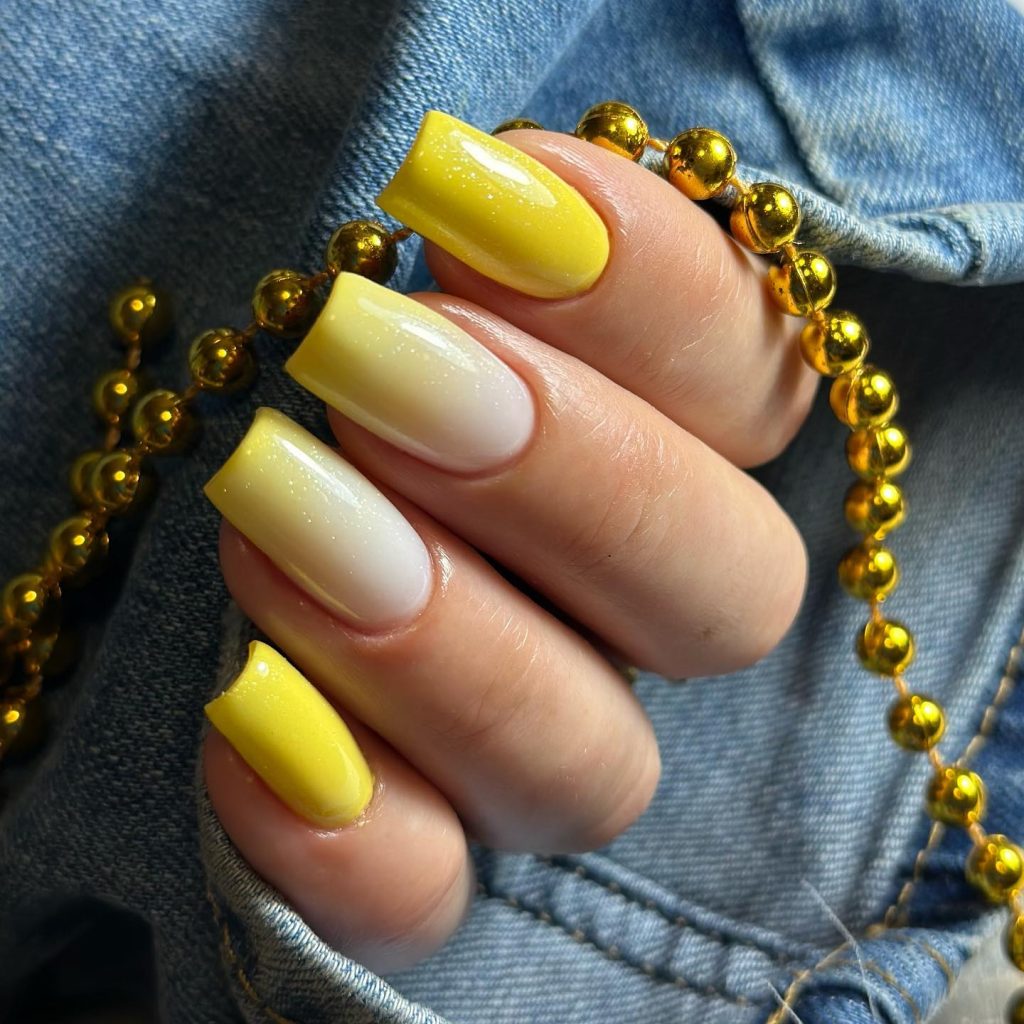
The yellow to white ombre creates a smooth transition that’s both eye-catching and sophisticated. This design is ideal for those who want a unique yet elegant manicure.
To recreate this look, you’ll need:
- Base coat: Essie First Base Coat
- Yellow polish: Zoya “Pippa”
- White polish: OPI “Alpine Snow”
- Sponge: Nail art sponge for ombre effect
- Top coat: Seche Vite Dry Fast Top Coat
Steps to achieve this design:
- Apply a base coat to your nails.
- Paint all nails with a base coat of white polish, letting it dry.
- Use a sponge to dab the yellow polish onto the tips of the nails, creating a gradient effect.
- Finish with a top coat to blend the colors and add shine.
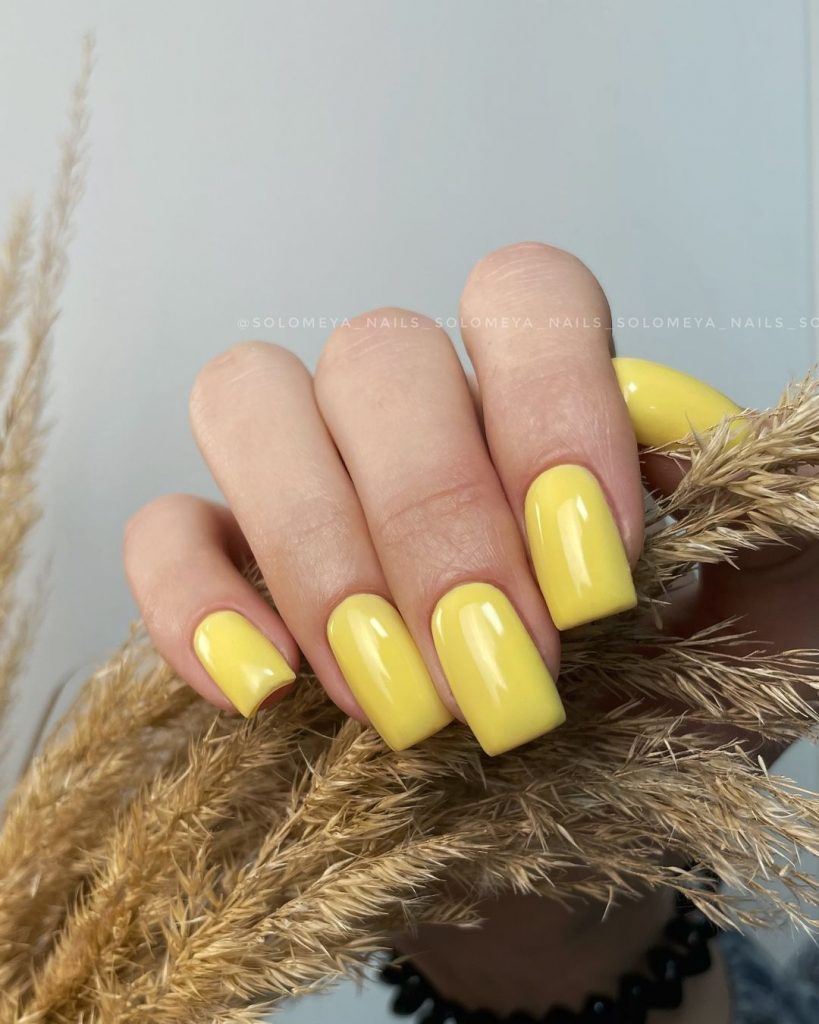
Bright Yellow Short Nails
This vibrant design features bright yellow polish on short, neatly filed nails. It’s a simple yet bold look that adds a pop of color to any outfit.
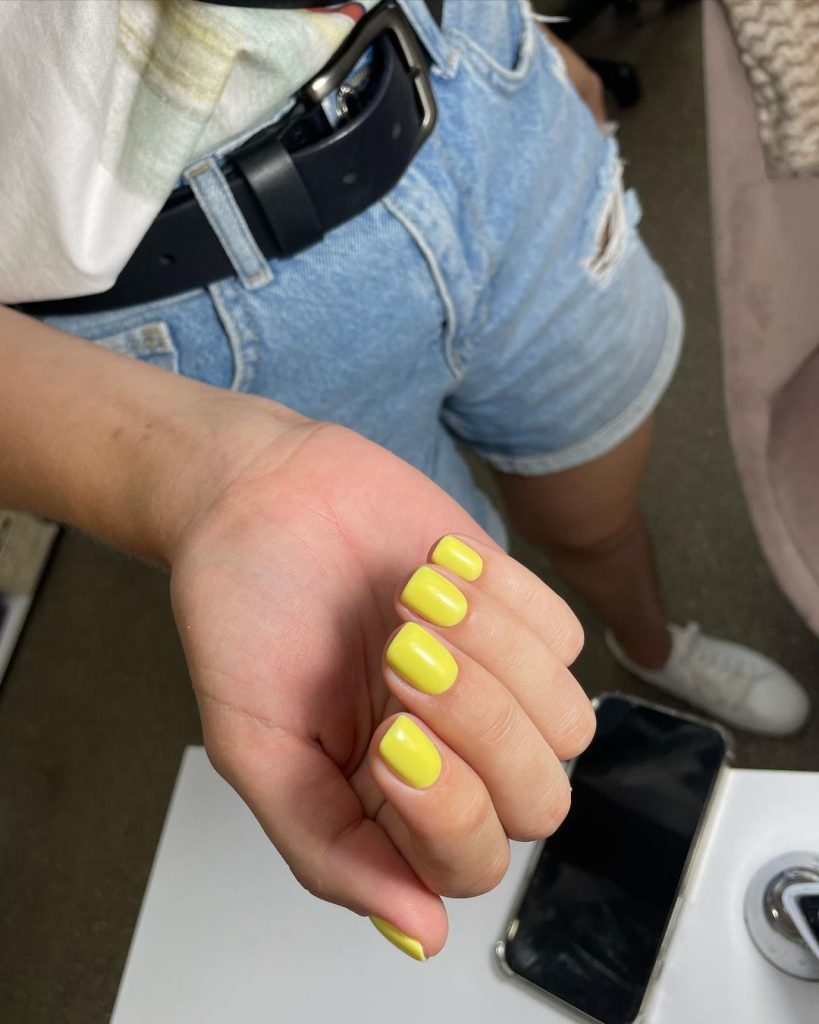
The bright yellow polish is cheerful and eye-catching, making it perfect for those who love bold colors. The short nail length is practical and stylish, suitable for everyday wear.
To achieve this look, you’ll need:
- Base coat: Sally Hansen Hard As Nails Base Coat
- Bright yellow polish: Essie “Hay There”
- Top coat: Essie Gel-Setter Top Coat
Steps to recreate this manicure:
- Apply a base coat to protect your nails.
- Paint two coats of bright yellow polish, allowing each layer to dry completely.
- Finish with a top coat for a glossy and durable finish.
Yellow with Leaf Accent
This manicure combines vibrant yellow with a delicate leaf accent on one nail, creating a fresh and stylish look. The almond shape adds a touch of elegance, making this design perfect for any occasion.
The bright yellow polish paired with the intricate black leaf design on a nude base creates a visually appealing contrast. This design is ideal for those who love nature-inspired nail art with a modern twist.
To recreate this look, you’ll need:
- Base coat: OPI Natural Nail Base Coat
- Yellow polish: Essie “Sunny Business”
- Black nail art pen: Sally Hansen I Heart Nail Art Pen in Black
- Top coat: Seche Vite Dry Fast Top Coat
Steps to achieve this manicure:
- Apply a base coat to protect your nails.
- Paint all nails with two coats of yellow polish, except for one accent nail.
- On the accent nail, use the black nail art pen to draw a delicate leaf design.
- Finish with a top coat for a glossy and long-lasting finish.
Yellow and Green with Autumn Leaves
This manicure features a combination of yellow and green nails with an autumn leaf accent. The mix of colors and the leaf design capture the essence of the fall season beautifully.
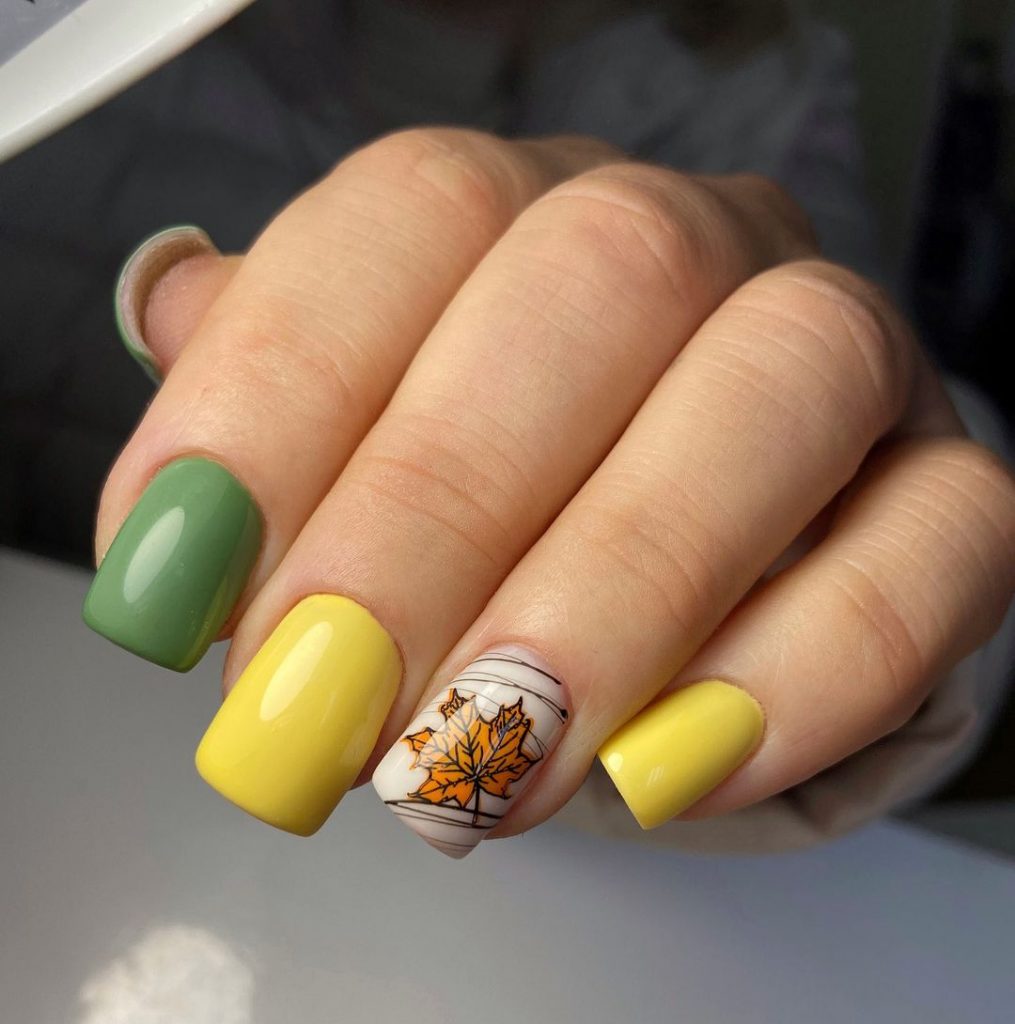
The yellow and green polishes create a harmonious and earthy look, while the orange leaf design on a nude base adds a seasonal touch. This design is perfect for embracing the autumn vibes in a stylish way.
To recreate this look, you’ll need:
- Base coat: Sally Hansen Double Duty Base & Top Coat
- Yellow polish: OPI “Sun, Sea, and Sand in My Pants”
- Green polish: Essie “Mojito Madness”
- Leaf nail decals: Born Pretty Autumn Nail Stickers
- Top coat: Essie Gel-Setter Top Coat
Steps to achieve this design:
- Apply a base coat to your nails.
- Paint your nails with alternating coats of yellow and green polish, allowing each to dry.
- Apply leaf nail decals to one accent nail.
- Seal the design with a top coat.
Yellow and Leopard Print
This bold manicure combines bright yellow polish with a chic leopard print accent. The short, square-shaped nails make the design both trendy and practical.
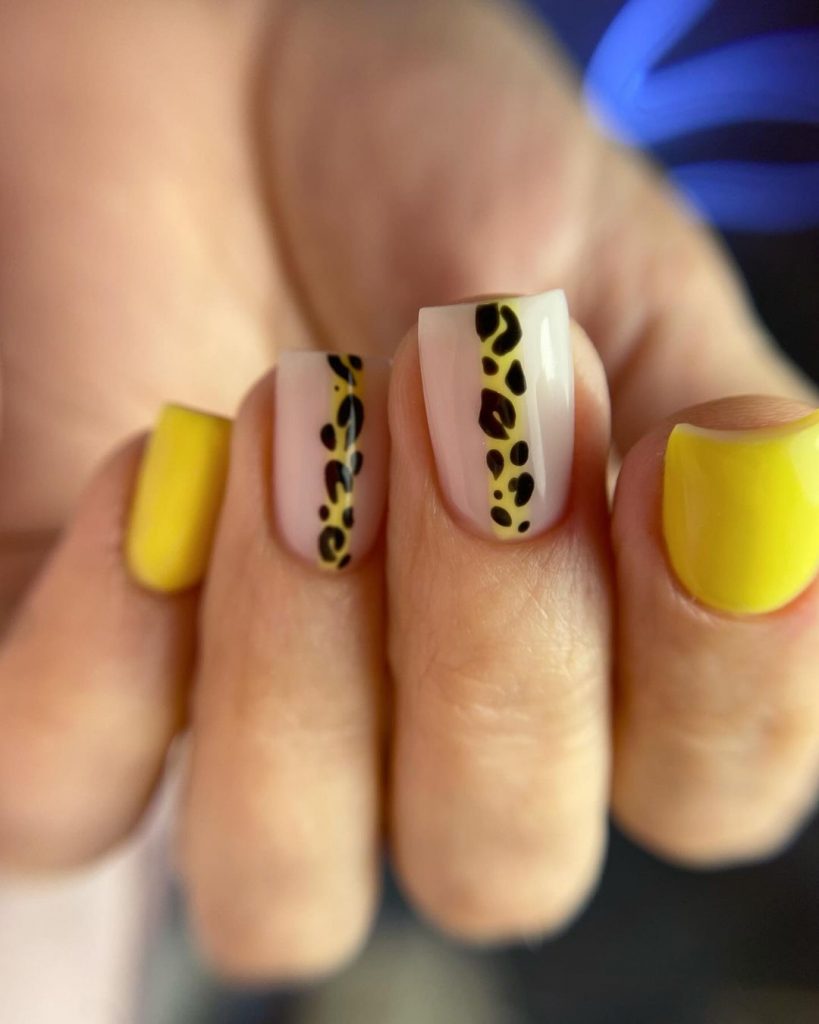
The bright yellow polish is complemented by the stylish leopard print on a nude base, adding a touch of wild sophistication. This design is perfect for those who love to make a fashion statement with their nails.
To achieve this look, you’ll need:
- Base coat: CND Stickey Base Coat
- Yellow polish: China Glaze “Happy Go Lucky”
- Black and brown nail art pens: Sally Hansen I Heart Nail Art Pens
- Top coat: INM Out the Door Top Coat
Steps to recreate this manicure:
- Apply a base coat to protect your nails.
- Paint all nails with two coats of yellow polish, except for one or two accent nails.
- Use the black and brown nail art pens to create a leopard print design on the accent nails.
- Finish with a top coat for a glossy and durable finish.
Yellow with Black Abstract Lines
This modern nail design features bright yellow polish with black abstract lines, creating a striking and artistic look. The oval shape adds a touch of elegance, making this design perfect for any occasion.
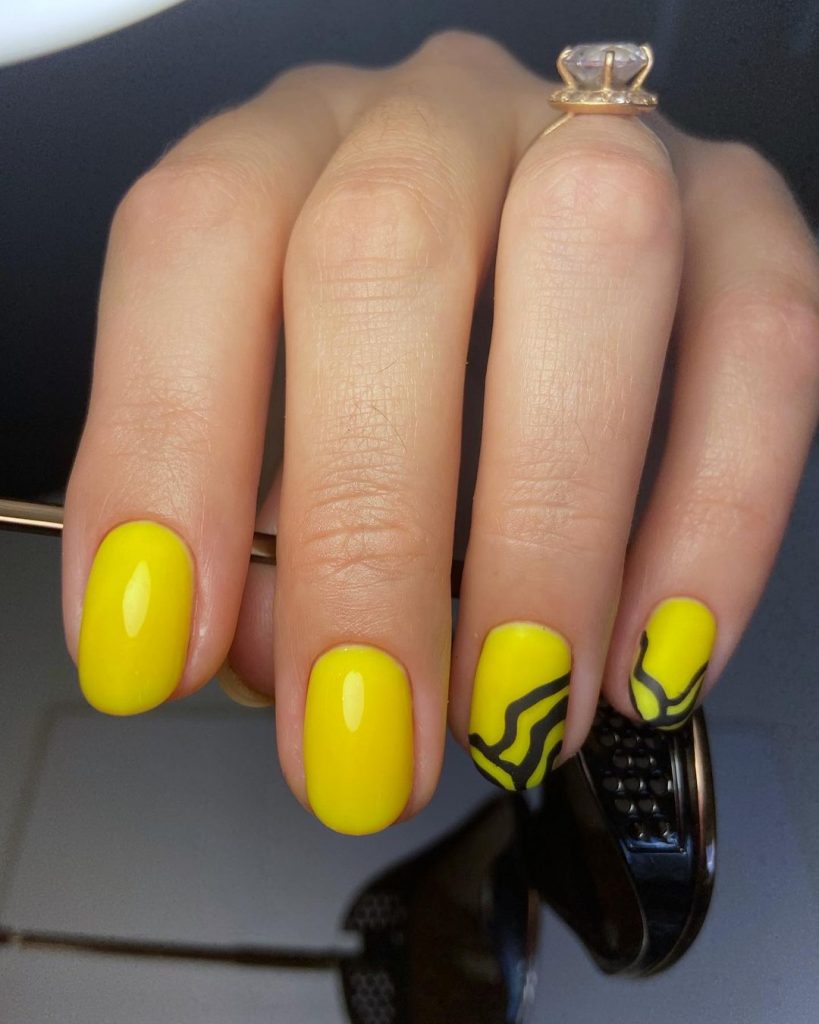
The bright yellow base paired with the black abstract lines creates a bold and eye-catching contrast. This design is ideal for those who love to experiment with modern and artistic nail art.
To recreate this look, you’ll need:
- Base coat: Essie First Base Coat
- Yellow polish: Essie “Hay There”
- Black nail art pen: Winstonia Fine Liner Nail Art Pen in Black
- Top coat: Seche Vite Dry Fast Top Coat
Steps to achieve this design:
- Apply a base coat to your nails.
- Paint all nails with two coats of yellow polish, letting each layer dry.
- Use the black nail art pen to draw abstract lines on a few accent nails.
- Seal with a top coat to protect the design.
Yellow French Tips
This elegant design features nude nails with yellow French tips, offering a modern twist on the classic French manicure. The almond shape adds sophistication, making this design perfect for both everyday wear and special occasions.
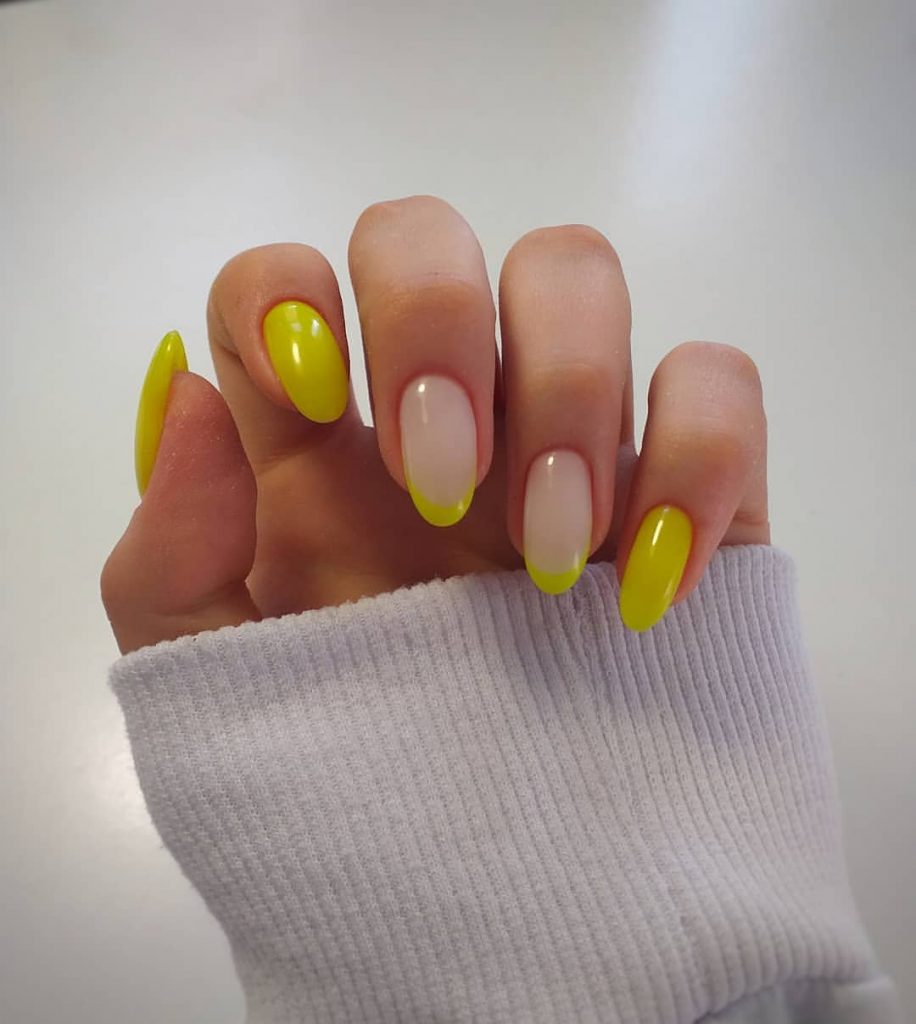
The nude base with yellow tips creates a clean and stylish look. This design is ideal for those who prefer a subtle yet trendy manicure.
To achieve this look, you’ll need:
- Base coat: Sally Hansen Hard As Nails Base Coat
- Nude polish: OPI “Bubble Bath”
- Yellow polish: Zoya “Pippa”
- Top coat: Essie Gel-Setter Top Coat
Steps to recreate this manicure:
- Apply a base coat to protect your nails.
- Paint all nails with two coats of nude polish, letting each layer dry.
- Use the yellow polish to create French tips on each nail.
- Finish with a top coat for a glossy and long-lasting finish.
Save Pin