Are you ready to dive into the exciting world of fall nail designs 2024? This year, the trends are all about blending creativity with simplicity, giving you stunning yet manageable nail designs. From bold colors to intricate patterns, there’s something for everyone. Let’s explore some of the most captivating designs that will elevate your fall look.
Pumpkin Perfection
When it comes to fall nail designs, nothing says autumn quite like this pumpkin-inspired look. The mix of vibrant orange and subtle nude base creates a perfect balance of boldness and elegance. The delicate pumpkin and leaf details add a whimsical touch, making this design both fun and sophisticated. The glossy finish enhances the overall look, making your nails stand out in any fall setting.

Consumables:
- Orange nail polish (e.g., OPI’s “A Good Man-darin is Hard to Find”)
- Nude base coat (e.g., Essie’s “Ballet Slippers”)
- Nail art brushes
- Black nail polish for detailing (e.g., Sally Hansen’s “Black Out”)
- Glossy top coat (e.g., Seche Vite)
Creating This Look:
- Start with a clean, dry nail.
- Apply a nude base coat and let it dry completely.
- Use the orange polish to paint the pumpkins and black polish for the leaves and details with a fine nail art brush.
- Finish with a glossy top coat to seal the design and add shine.
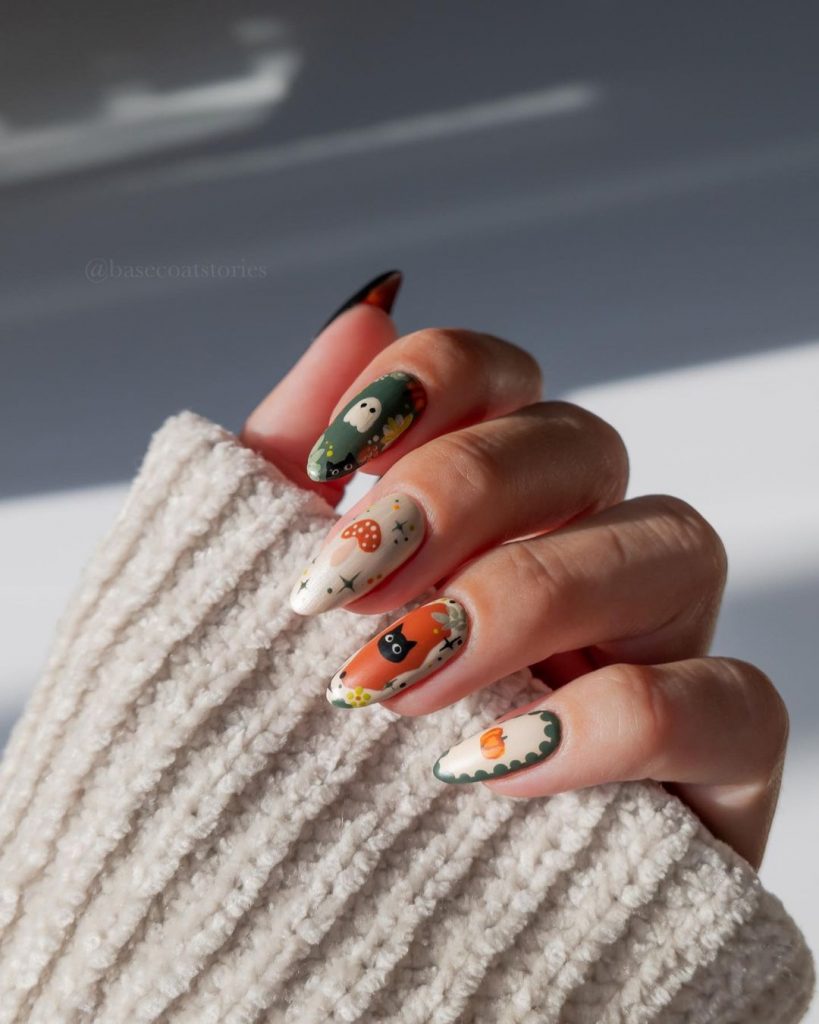
Autumn Whimsy
This design captures the essence of fall with playful, whimsical elements. The combination of rich green, warm oranges, and cute patterns like pumpkins, ghosts, and mushrooms bring a cozy, festive vibe to your nails. Perfect for the season, these nails are sure to get you in the autumn spirit.
Consumables:
- Green nail polish (e.g., Essie’s “Off Tropic”)
- White nail polish (e.g., OPI’s “Alpine Snow”)
- Orange nail polish (e.g., China Glaze’s “Orange Knockout”)
- Nail art pens for detailing (various colors)
- Matte top coat (e.g., Butter London’s “Matte Finish”)
Creating This Look:
- Prep your nails with a base coat.
- Paint each nail with different base colors: green, white, and orange.
- Use nail art pens to draw the whimsical designs on each nail.
- Seal the design with a matte top coat for a modern finish.
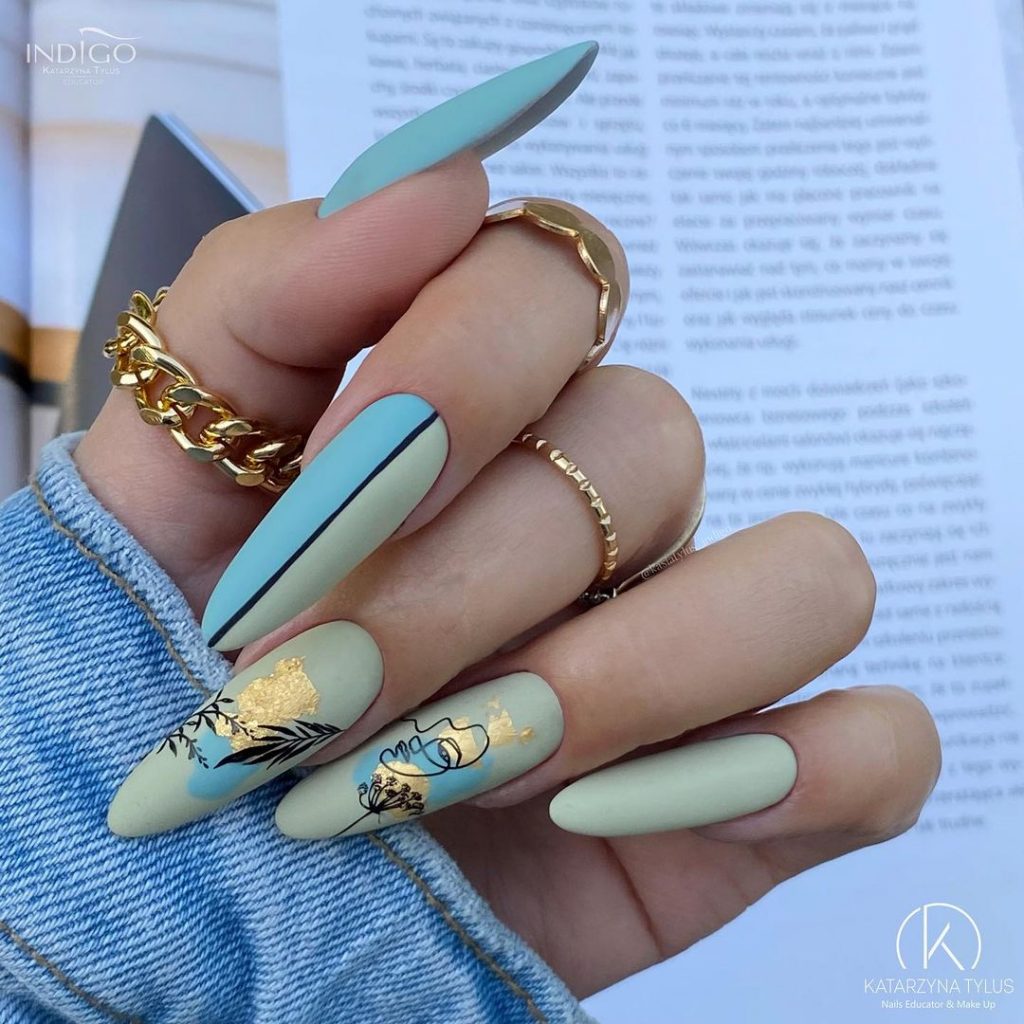
Elegant Minimalism
For those who prefer a more sophisticated look, this elegant minimalistic design is perfect. Featuring muted tones of green and blue with fine gold accents, these nails are chic and understated. The long, almond shape adds a touch of glamour, making them ideal for both everyday wear and special occasions.
Consumables:
- Light green nail polish (e.g., Zoya’s “Neely”)
- Pastel blue nail polish (e.g., Essie’s “Bikini So Teeny”)
- Gold leaf foil
- Nail art brushes
- Matte top coat (e.g., OPI’s “Matte Top Coat”)
Creating This Look:
- Apply a light green base coat on half the nails and pastel blue on the other half.
- Use a nail art brush to apply gold leaf accents on each nail.
- Finish with a matte top coat to complete the look.
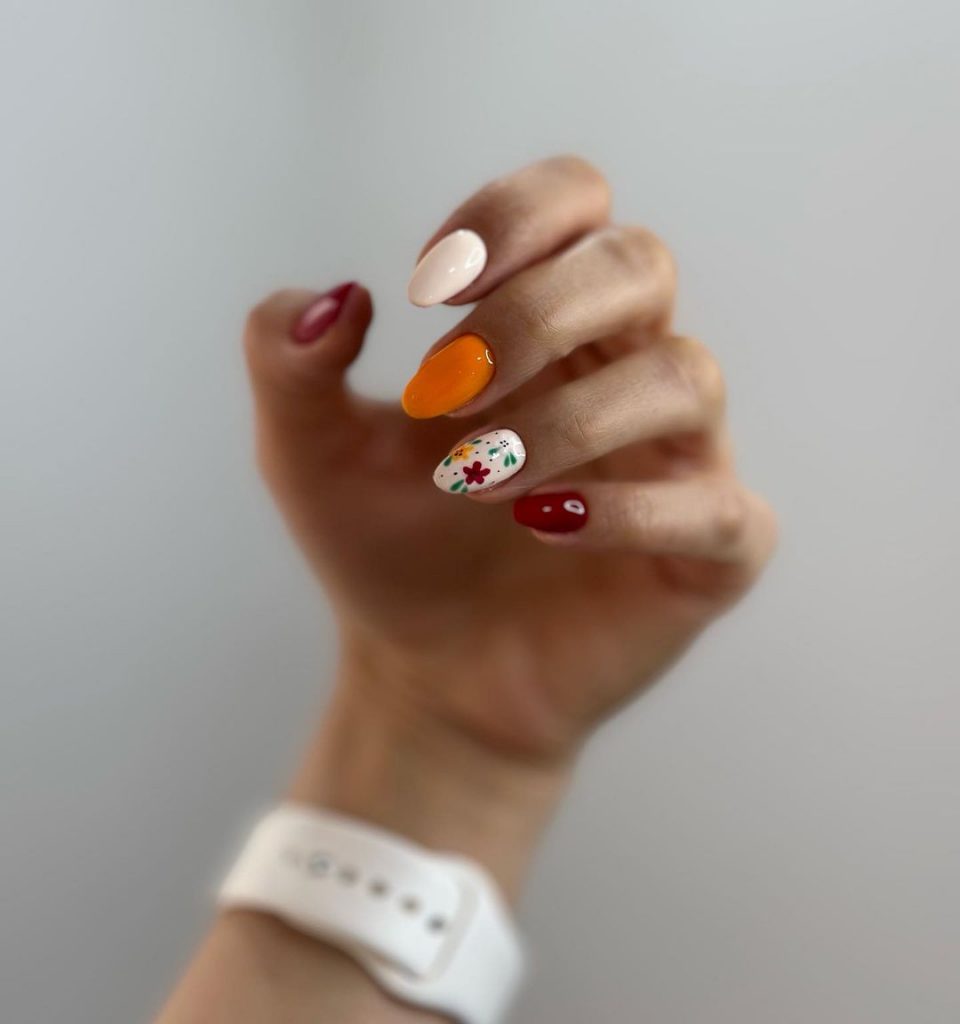
Fall Florals
This floral-inspired design brings a splash of color to the autumn palette. The mix of red, orange, and white nails, accented with tiny flowers, offers a fresh take on fall nails. It’s a cheerful design that’s perfect for those who love a pop of color.
Consumables:
- Red nail polish (e.g., OPI’s “Big Apple Red”)
- Orange nail polish (e.g., Zoya’s “Arizona”)
- White nail polish (e.g., Essie’s “Blanc”)
- Nail art brushes
- Dotting tools for flowers
- Glossy top coat (e.g., Sally Hansen’s “Insta-Dri”)
Creating This Look:
- Paint your nails with red, orange, and white polishes alternately.
- Use a dotting tool and nail art brush to create small floral patterns on the nails.
- Apply a glossy top coat to protect the design and add shine.
Deep Sea Elegance
Dive into a sea-inspired fall look with these deep teal nails. The rich, glossy finish and elegant simplicity make them a standout choice for the season. Paired with gold jewelry, these nails exude a luxurious feel that’s perfect for any occasion.

Consumables:
- Teal nail polish (e.g., Essie’s “Go Overboard”)
- Glossy top coat (e.g., Seche Vite)
Creating This Look:
- Start with a base coat to protect your nails.
- Apply two coats of teal polish for full coverage.
- Finish with a glossy top coat to enhance the color and shine.
Foxy Fall Fun
Embrace the playful side of fall with this foxy design. The bright orange nails, combined with the cute fox face and autumn leaves, create a fun and whimsical look. The vibrant colors are perfect for making a statement and bringing a bit of joy to your fall style.
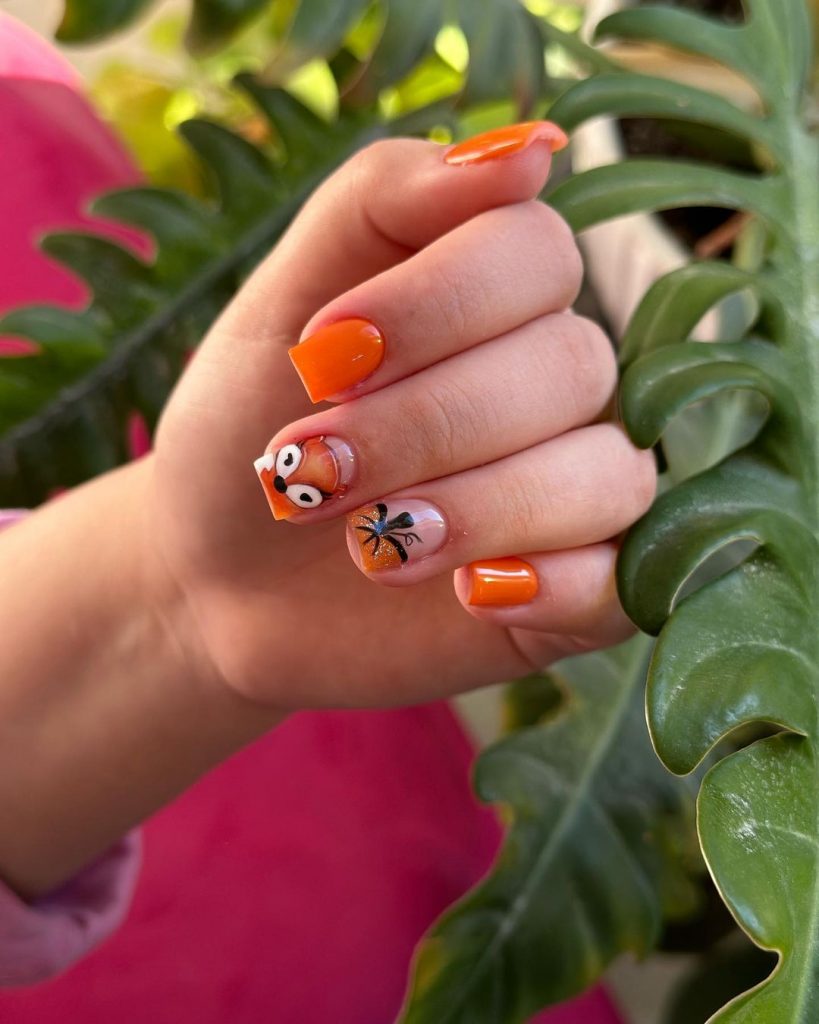
Consumables:
- Bright orange nail polish (e.g., Essie’s “Tangerine Tease”)
- Nude base coat (e.g., OPI’s “Bubble Bath”)
- Black and white nail polish for detailing (e.g., Sally Hansen’s “Black Out” and “White On”)
- Nail art brushes
- Glossy top coat (e.g., Seche Vite)
Creating This Look:
- Begin with a nude base coat on all nails.
- Paint the ring finger and thumb with orange polish.
- Use black and white polish to draw the fox face and autumn leaves on the accent nails.
- Finish with a glossy top coat to seal and protect the design.
Speckled Serenity
This serene blue speckled design brings a calm, wintery vibe to your fall nails. The delicate speckles add a unique touch without overpowering the simplicity of the blue base. It’s a perfect choice for those who love a subtle yet stylish manicure.

Consumables:
- Light blue nail polish (e.g., Essie’s “Mint Candy Apple”)
- Dark blue speckled top coat (e.g., Zoya’s “Mosheen”)
- Glossy top coat (e.g., Sally Hansen’s “Insta-Dri”)
Creating This Look:
- Apply a light blue base coat to all nails.
- Once dry, add a layer of dark blue speckled top coat.
- Finish with a glossy top coat to enhance the shine and longevity of the manicure.
Forest Ferns
For a more nature-inspired look, this forest fern design is perfect. The green and white swirls mimic the look of fern leaves, giving your nails a fresh and earthy feel. It’s a great design for anyone who loves the outdoors and wants to reflect that in their manicure.
Consumables:
- Dark green nail polish (e.g., OPI’s “Stay Off the Lawn”)
- White nail polish (e.g., Essie’s “Blanc”)
- Nail art brushes
- Glossy top coat (e.g., Seche Vite)
Creating This Look:
- Start with a dark green base coat on all nails.
- Use a fine nail art brush to create white swirls that resemble fern leaves.
- Apply a glossy top coat to finish the look.
Autumn Leaves
Capture the essence of fall with this vibrant autumn leaves design. The orange and green colors, along with the leaf patterns, make for a bold and festive manicure. It’s a fantastic choice for celebrating the changing seasons.

Consumables:
- Orange nail polish (e.g., Essie’s “Clambake”)
- Green nail polish (e.g., Zoya’s “Hunter”)
- White nail polish for detailing (e.g., OPI’s “Alpine Snow”)
- Nail art brushes
- Glossy top coat (e.g., Sally Hansen’s “Insta-Dri”)
Creating This Look:
- Apply an orange base coat to all nails.
- Use green and white polish to paint the leaf designs with a nail art brush.
- Seal the design with a glossy top coat for a polished finish.
Earthy Tones
This design features a beautiful mix of earthy tones, perfect for the fall season. The combination of muted greens and browns creates a chic and understated look. It’s ideal for those who prefer a more subtle and sophisticated manicure.
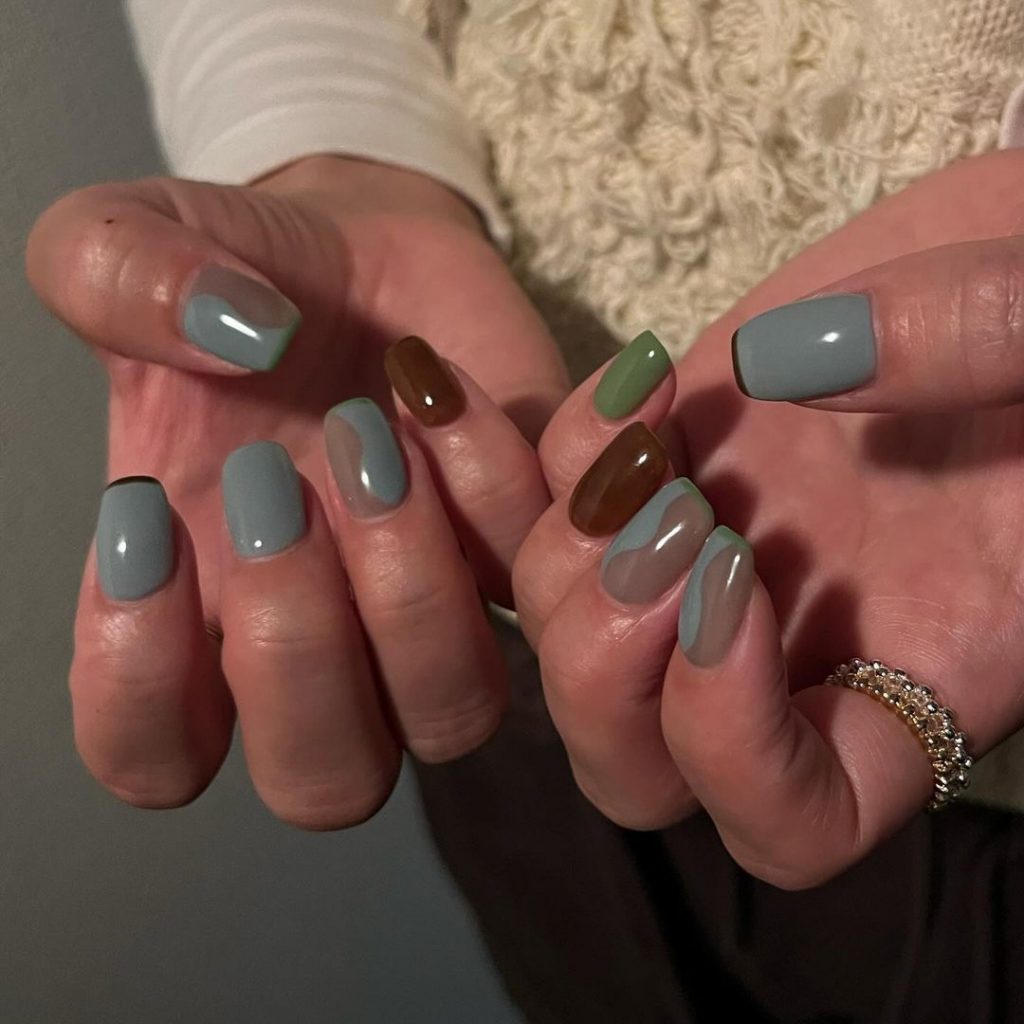
Consumables:
- Muted green nail polish (e.g., OPI’s “Suzi – The First Lady of Nails”)
- Brown nail polish (e.g., Essie’s “Partner in Crime”)
- Glossy top coat (e.g., Seche Vite)
Creating This Look:
- Start with alternating green and brown polish on each nail.
- For an added touch, create minimalist designs with the contrasting color on each nail using a fine brush.
- Finish with a glossy top coat to seal and protect the design.
Warm Autumn Browns
This rich brown manicure perfectly captures the essence of fall. The warm, chocolatey tones combined with a delicate leaf accent on a nude base create a sophisticated and stylish look. The glossy finish adds depth to the colors, making them pop and giving your nails a luxurious feel.
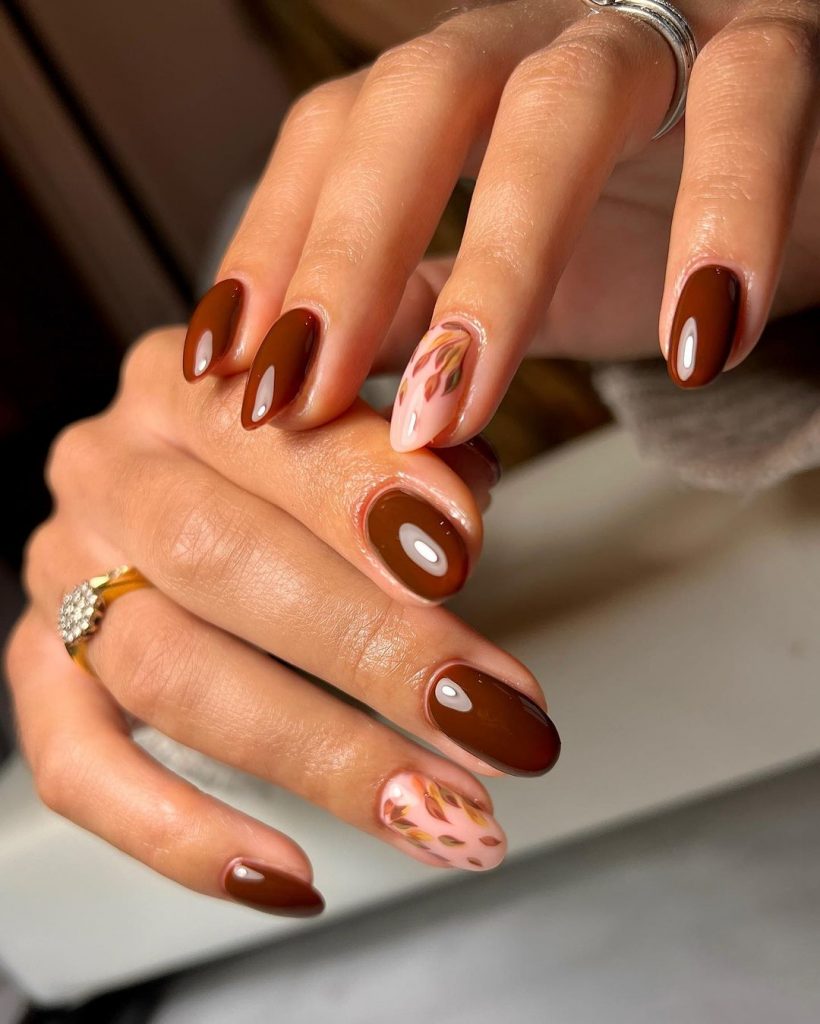
Consumables:
- Dark brown nail polish (e.g., Essie’s “Cliff Hanger”)
- Nude base coat (e.g., OPI’s “Put It In Neutral”)
- Gold and brown nail polish for detailing (e.g., Sally Hansen’s “Golden-I” and “Bittersweet”)
- Nail art brushes
- Glossy top coat (e.g., Seche Vite)
Creating This Look:
- Apply a nude base coat to all nails.
- Paint most of the nails with dark brown polish.
- Use gold and brown polish with a fine nail art brush to create the leaf accent on the ring finger.
- Finish with a glossy top coat to seal and enhance the design.
Plum Elegance
This deep plum manicure is a classic choice for fall. The rich, glossy color is both elegant and versatile, perfect for any occasion. The simplicity of the design lets the beautiful plum shade take center stage, making your nails look polished and refined.
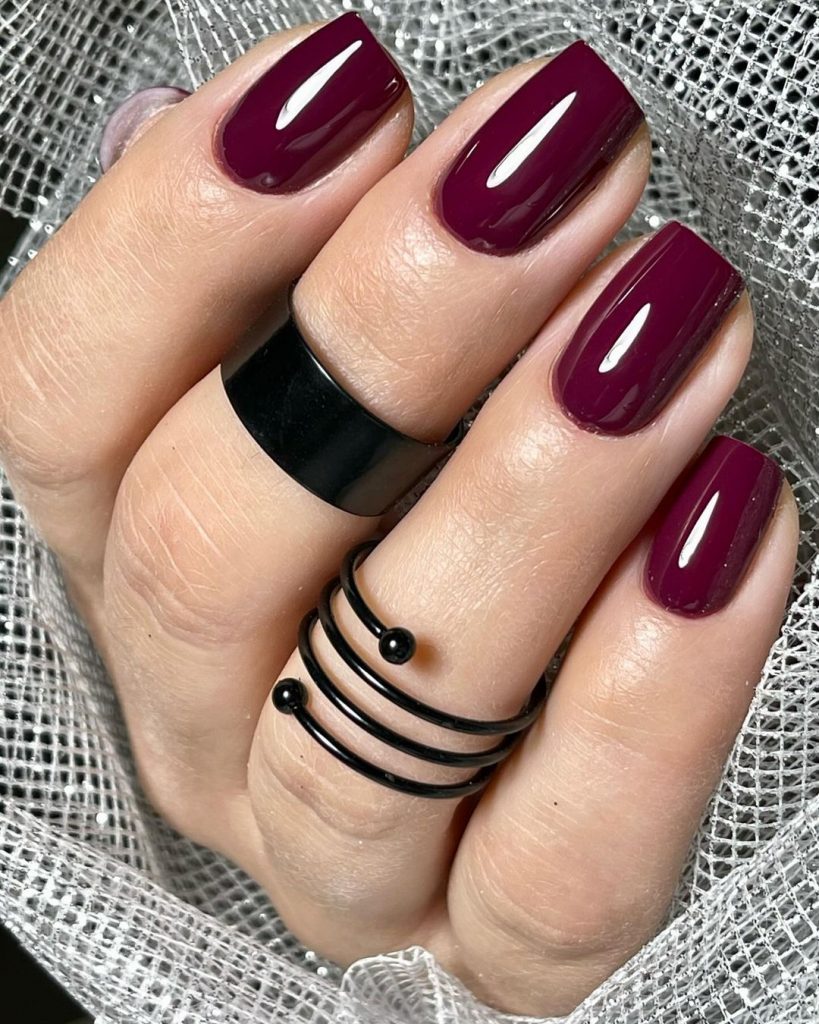
Consumables:
- Plum nail polish (e.g., Essie’s “Wicked”)
- Glossy top coat (e.g., Sally Hansen’s “Insta-Dri”)
Creating This Look:
- Start with a base coat to protect your nails.
- Apply two coats of plum nail polish for full coverage.
- Finish with a glossy top coat to add shine and protect the color.
Smoky Fall Nights
This smoky, abstract design is perfect for adding a bit of drama to your fall manicure. The dark, moody colors blend beautifully, creating a marbled effect that is both unique and eye-catching. It’s an ideal look for evening events or whenever you want to make a bold statement.

Consumables:
- Black nail polish (e.g., OPI’s “Black Onyx”)
- Metallic bronze nail polish (e.g., Essie’s “Leggy Legend”)
- Red nail polish for accents (e.g., China Glaze’s “Ravishing, Dahling”)
- Nail art brushes
- Glossy top coat (e.g., Seche Vite)
Creating This Look:
- Apply a black base coat on all nails.
- Use metallic bronze and red polishes to create the smoky, marbled effect with a nail art brush.
- Finish with a glossy top coat to seal the design and add shine.
Glitter Glam
Add some sparkle to your fall nails with this glitter glam design. The combination of purple and silver glitter polishes creates a dazzling effect that is perfect for parties and festive occasions. The glittery finish will catch the light and make your nails the center of attention.
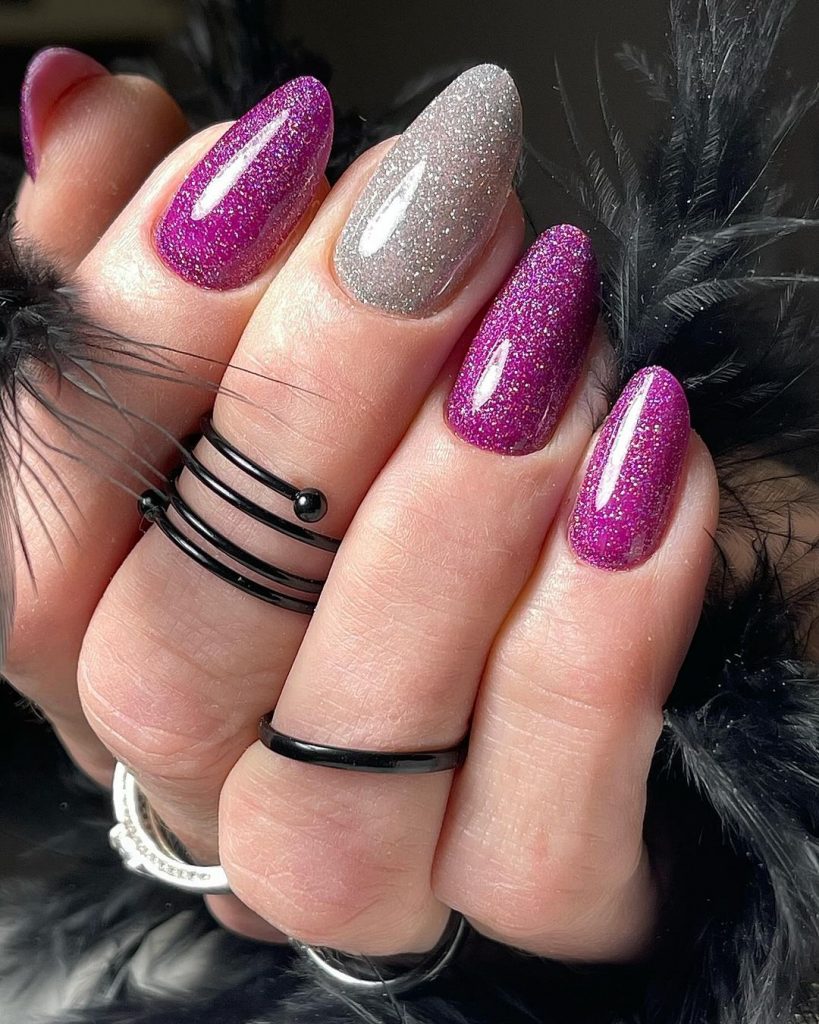
Consumables:
- Purple glitter nail polish (e.g., Zoya’s “Thea”)
- Silver glitter nail polish (e.g., Essie’s “Set in Stones”)
- Glossy top coat (e.g., Sally Hansen’s “Insta-Dri”)
Creating This Look:
- Start with a clear base coat.
- Apply purple glitter polish to most of the nails, and silver glitter to one accent nail.
- Finish with a glossy top coat to enhance the sparkle and protect the design.
Floral Fantasy
This vibrant floral design is perfect for adding a touch of spring to your fall manicure. The bright colors and intricate floral patterns make for a lively and eye-catching look. It’s a great way to bring some warmth and cheer to the cooler months.
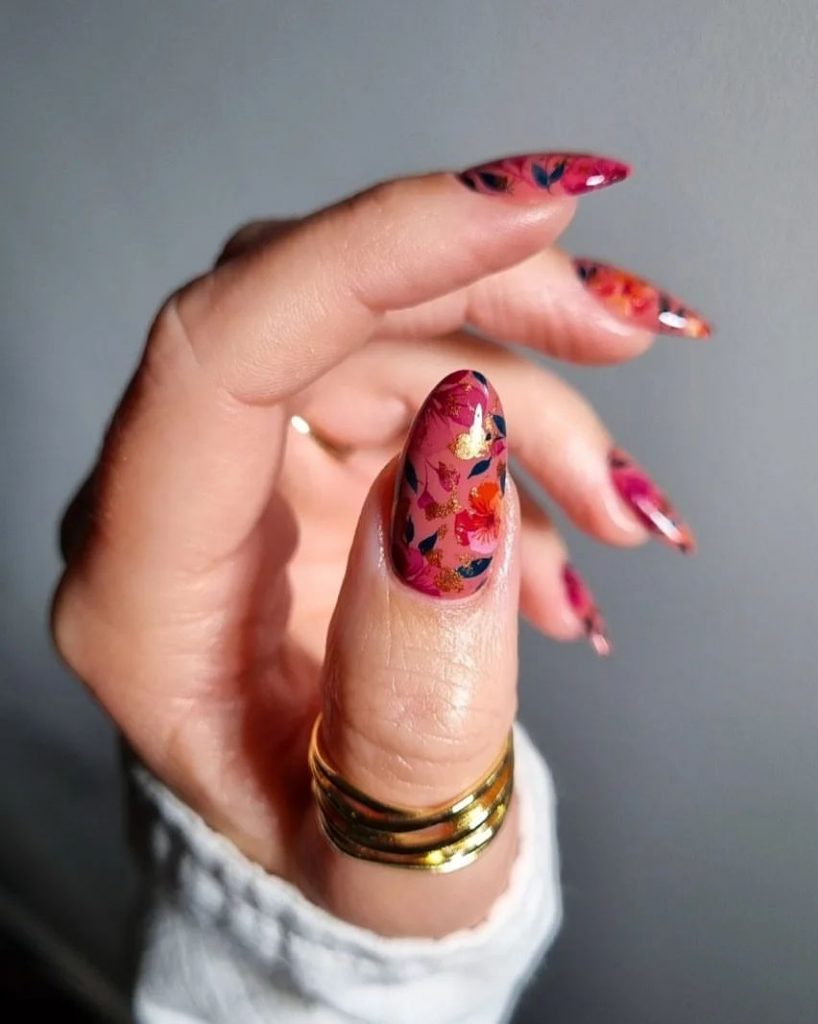
Consumables:
- Pink nail polish (e.g., Essie’s “Mod Square”)
- Red, blue, and gold polishes for floral details (e.g., OPI’s “Big Apple Red”, Zoya’s “Sia”, Essie’s “Penny Talk”)
- Nail art brushes
- Glossy top coat (e.g., Seche Vite)
Creating This Look:
- Apply a pink base coat to all nails.
- Use red, blue, and gold polishes to create intricate floral patterns with a fine nail art brush.
- Finish with a glossy top coat to seal and protect the design.
Autumn Harvest
Celebrate the season with this vibrant autumn harvest design. The bright orange nails are complemented by intricate fall-themed art on a couple of accent nails. The detailed leaves and acorns add a playful and seasonal touch, making this manicure perfect for any fall festivity.
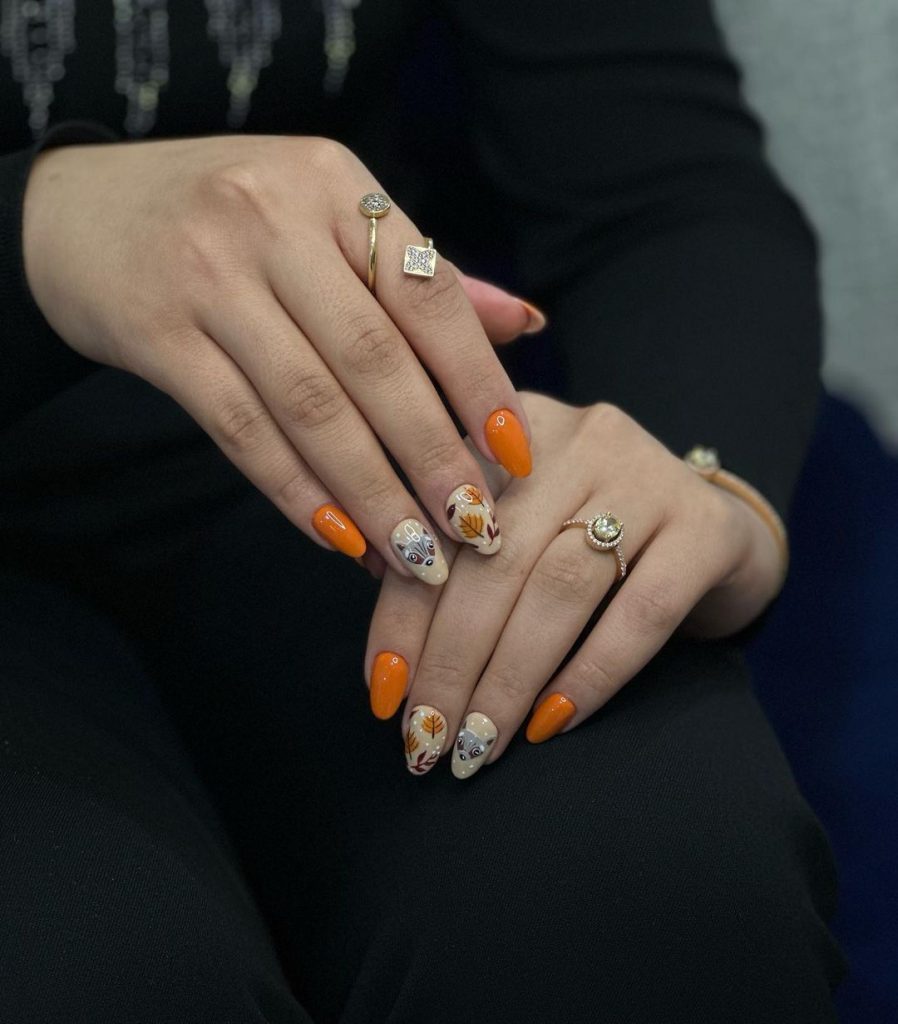
Consumables:
- Bright orange nail polish (e.g., OPI’s “A Good Man-darin is Hard to Find”)
- Nude base coat (e.g., Essie’s “Ballet Slippers”)
- Various colors for detailing (e.g., brown, yellow, and green polishes)
- Nail art brushes
- Glossy top coat (e.g., Seche Vite)
Creating This Look:
- Apply a nude base coat on the accent nails and orange polish on the rest.
- Use different colors and nail art brushes to draw detailed leaves and acorns.
- Finish with a glossy top coat to seal and protect the design.
Abstract Waves
This manicure features abstract waves in warm tones, perfectly capturing the essence of fall. The mix of brown, yellow, and white on a nude base creates a modern and artistic look. The design is both unique and stylish, making it a great choice for those looking to make a fashion statement.

Consumables:
- Nude base coat (e.g., OPI’s “Bubble Bath”)
- Brown, yellow, and white nail polishes for detailing (e.g., Essie’s “Chocolate Cakes”, “Sunshine State of Mind”, and “Blanc”)
- Nail art brushes
- Glossy top coat (e.g., Seche Vite)
Creating This Look:
- Apply a nude base coat on all nails.
- Use a nail art brush to create abstract waves with brown, yellow, and white polishes.
- Finish with a glossy top coat to enhance the design.
Classic Orange
This simple yet striking design features a bold orange polish, perfect for the fall season. The glossy finish adds depth and shine, making your nails look chic and vibrant. It’s a versatile look that works well for both casual and formal settings.

Consumables:
- Orange nail polish (e.g., Essie’s “Clambake”)
- Glossy top coat (e.g., Sally Hansen’s “Insta-Dri”)
Creating This Look:
- Start with a base coat to protect your nails.
- Apply two coats of orange polish for full coverage.
- Finish with a glossy top coat to add shine and durability.
Glitter Accent
Add some sparkle to your fall nails with this glitter accent design. The combination of rich brown and red polishes with a glittery accent nail creates a fun and festive look. It’s perfect for adding a bit of glam to your everyday style.
Consumables:
- Brown nail polish (e.g., OPI’s “Chocolate Moose”)
- Red nail polish (e.g., Essie’s “Russian Roulette”)
- Glitter polish (e.g., China Glaze’s “Fairy Dust”)
- Glossy top coat (e.g., Seche Vite)
Creating This Look:
- Apply brown and red polish alternately on your nails.
- Use a glitter polish on one accent nail.
- Finish with a glossy top coat to seal and protect the design.
Black and Nude Art
This chic and modern design combines black and nude tones with abstract art. The matte finish adds a sophisticated touch, making this manicure perfect for fashion-forward individuals. The bold black lines on a nude base create a striking contrast that’s both stylish and edgy.
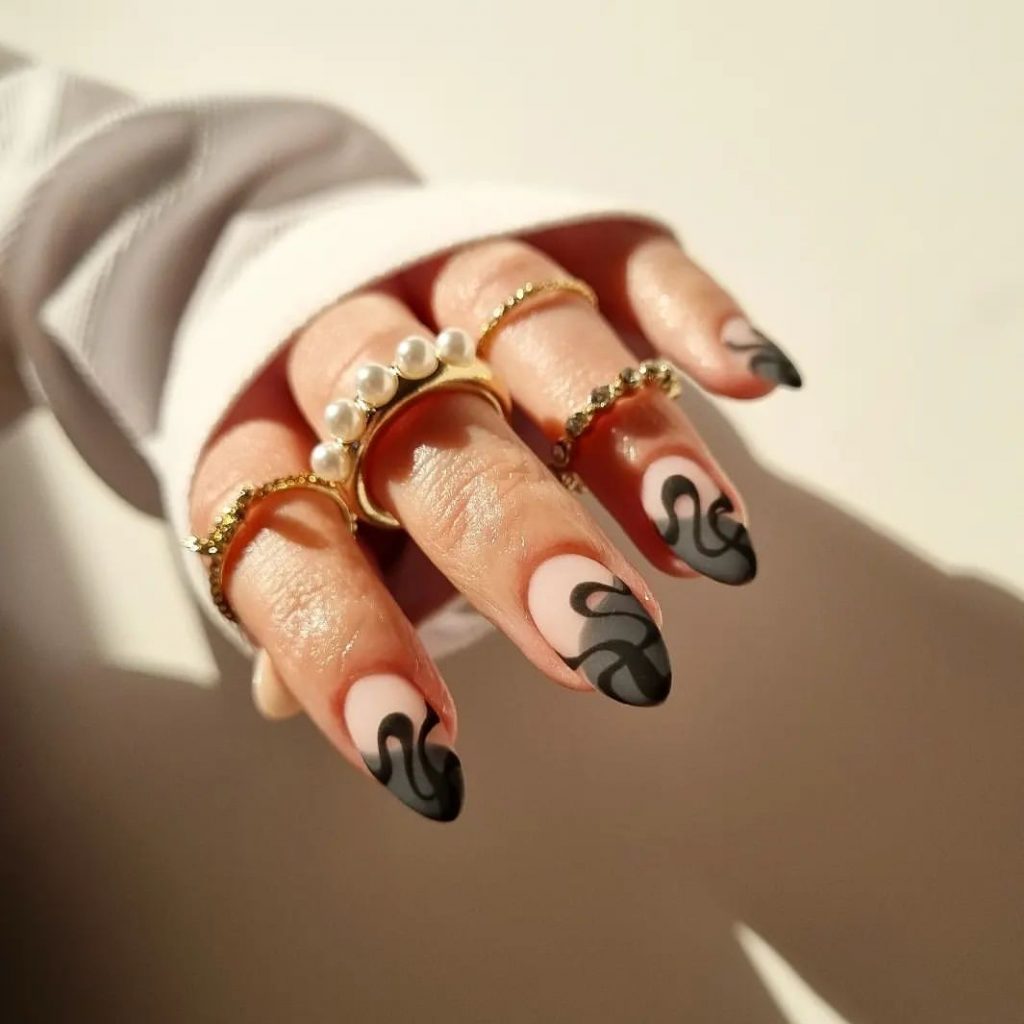
Consumables:
- Nude base coat (e.g., OPI’s “Bare My Soul”)
- Black nail polish for detailing (e.g., Sally Hansen’s “Black Heart”)
- Nail art brushes
- Matte top coat (e.g., Essie’s “Matte About You”)
Creating This Look:
- Apply a nude base coat on all nails.
- Use black polish and a fine nail art brush to create abstract lines and shapes.
- Finish with a matte top coat for a modern, sophisticated look.
These stunning fall nail designs 2024 will surely inspire you to get creative with your nails this season. Whether you prefer bold colors or subtle elegance, there’s a design here for everyone. Happy styling!
Neon French Tips
This modern twist on the classic French manicure features neon green tips on a nude base. The vibrant neon color adds a playful and trendy touch, making this design perfect for those who want to stand out. The simplicity of the nude base complements the bold tips, creating a balanced and stylish look.

Consumables:
- Nude base coat (e.g., Essie’s “Ballet Slippers”)
- Neon green nail polish (e.g., China Glaze’s “Lime After Lime”)
- Glossy top coat (e.g., Seche Vite)
Creating This Look:
- Apply a nude base coat to all nails.
- Use the neon green polish to carefully paint the tips of each nail.
- Finish with a glossy top coat to seal and protect the design.
Ocean Waves
Dive into this ocean-inspired design featuring deep teal nails with marble-like accent nails. The combination of rich teal and the swirling blue and white patterns creates a stunning, watery effect. This design is perfect for those who love the sea and want to carry a piece of it with them.
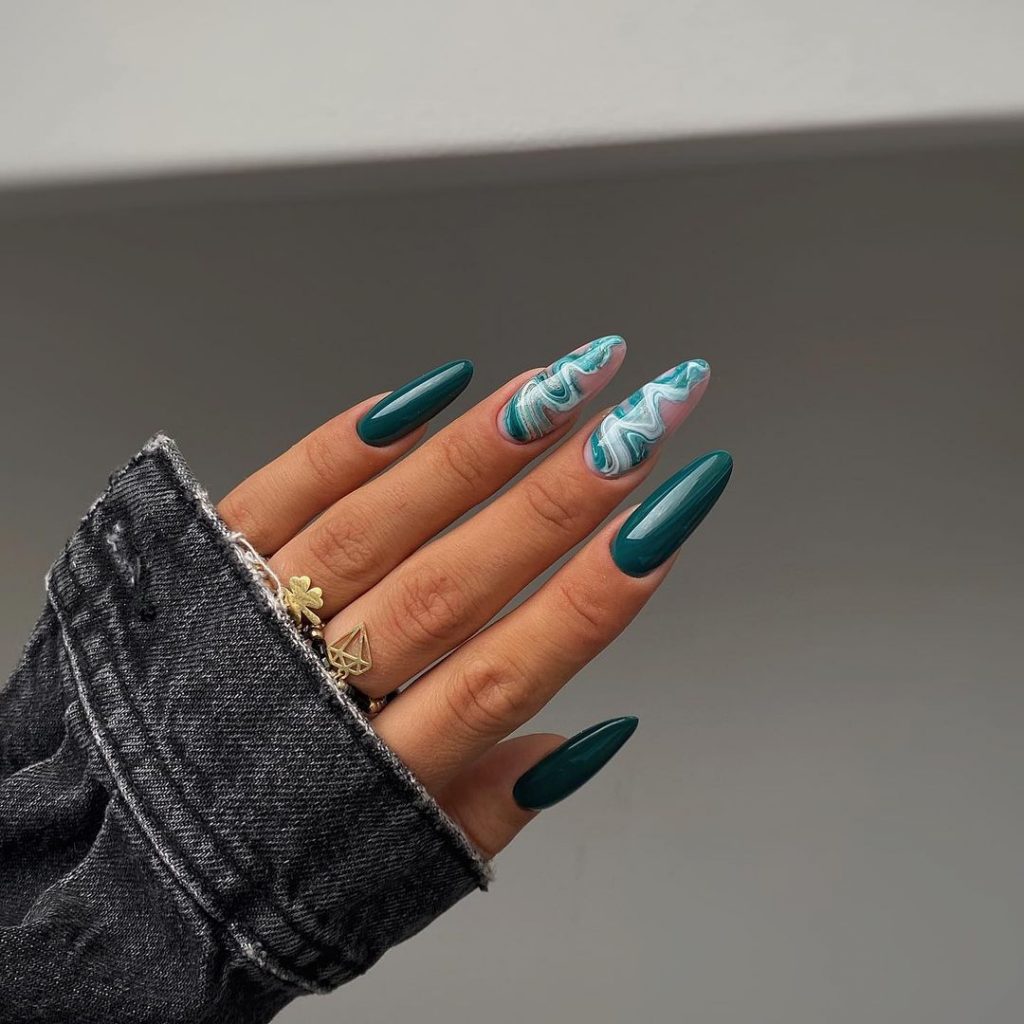
Consumables:
- Teal nail polish (e.g., OPI’s “CIA = Color is Awesome”)
- Blue and white polishes for marbling (e.g., Essie’s “Butler Please” and “Blanc”)
- Nail art brushes
- Glossy top coat (e.g., Sally Hansen’s “Insta-Dri”)
Creating This Look:
- Apply teal polish to most of the nails.
- On the accent nails, use blue and white polishes to create a marble effect by swirling the colors together with a nail art brush.
- Finish with a glossy top coat to enhance the design.
Burgundy Elegance
This sophisticated manicure features a rich burgundy polish with a modern twist. The nude base with burgundy tips and gold accents adds a touch of elegance and refinement. It’s a perfect choice for those who want a classic look with a bit of flair.
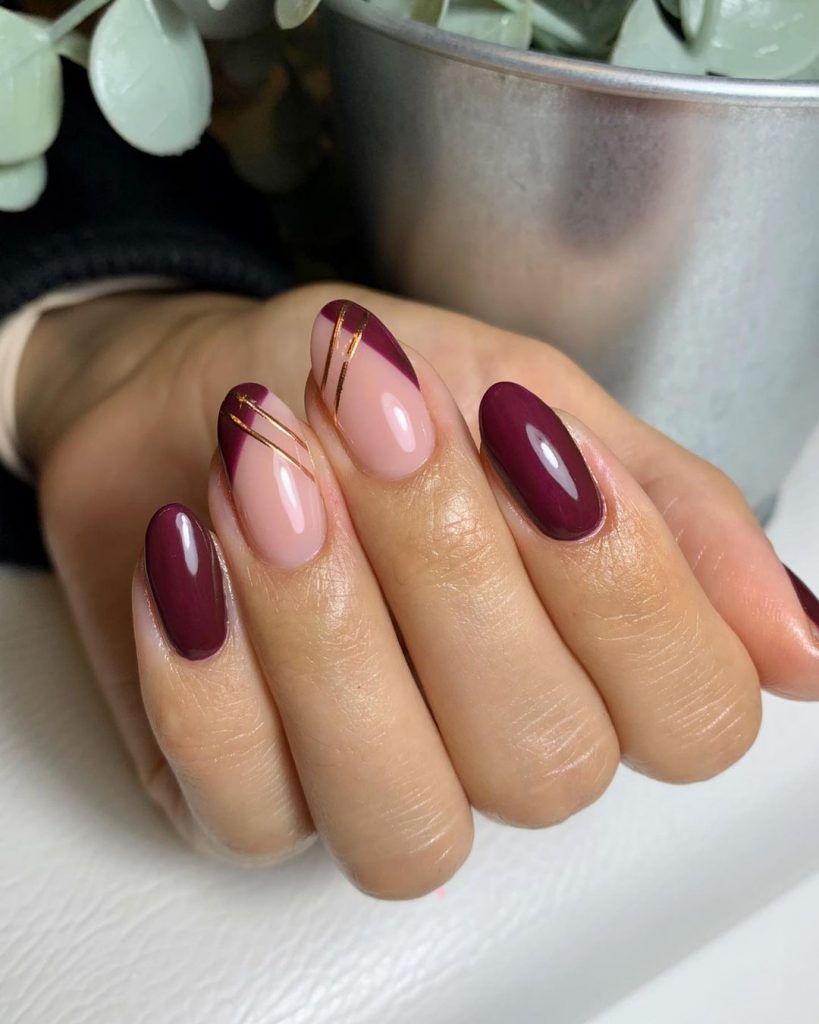
Consumables:
- Nude base coat (e.g., OPI’s “Bubble Bath”)
- Burgundy nail polish (e.g., Essie’s “Bahama Mama”)
- Gold striping tape or polish
- Glossy top coat (e.g., Seche Vite)
Creating This Look:
- Apply a nude base coat to all nails.
- Paint the tips with burgundy polish.
- Add gold accents using striping tape or a fine nail art brush.
- Finish with a glossy top coat to seal and protect the design.
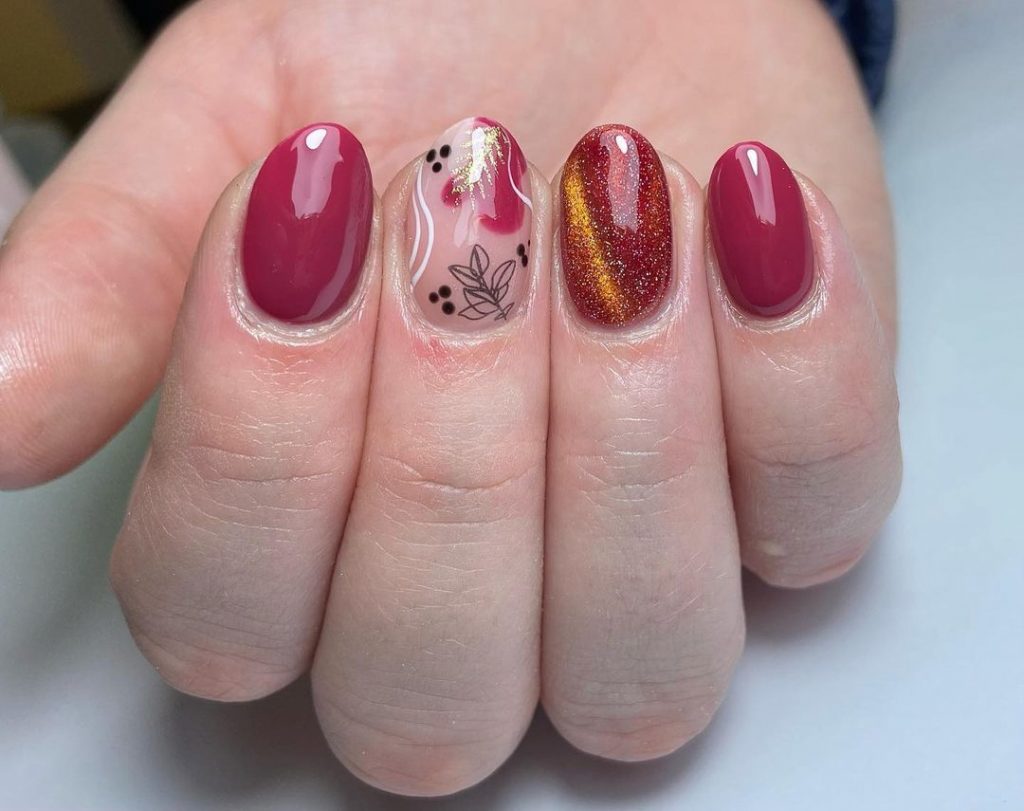
Fall Leaves
Capture the essence of fall with this autumn leaves design. The combination of brown, gold, and orange polishes with detailed leaf patterns brings the beauty of the season to your nails. This design is both festive and elegant, perfect for any fall occasion.
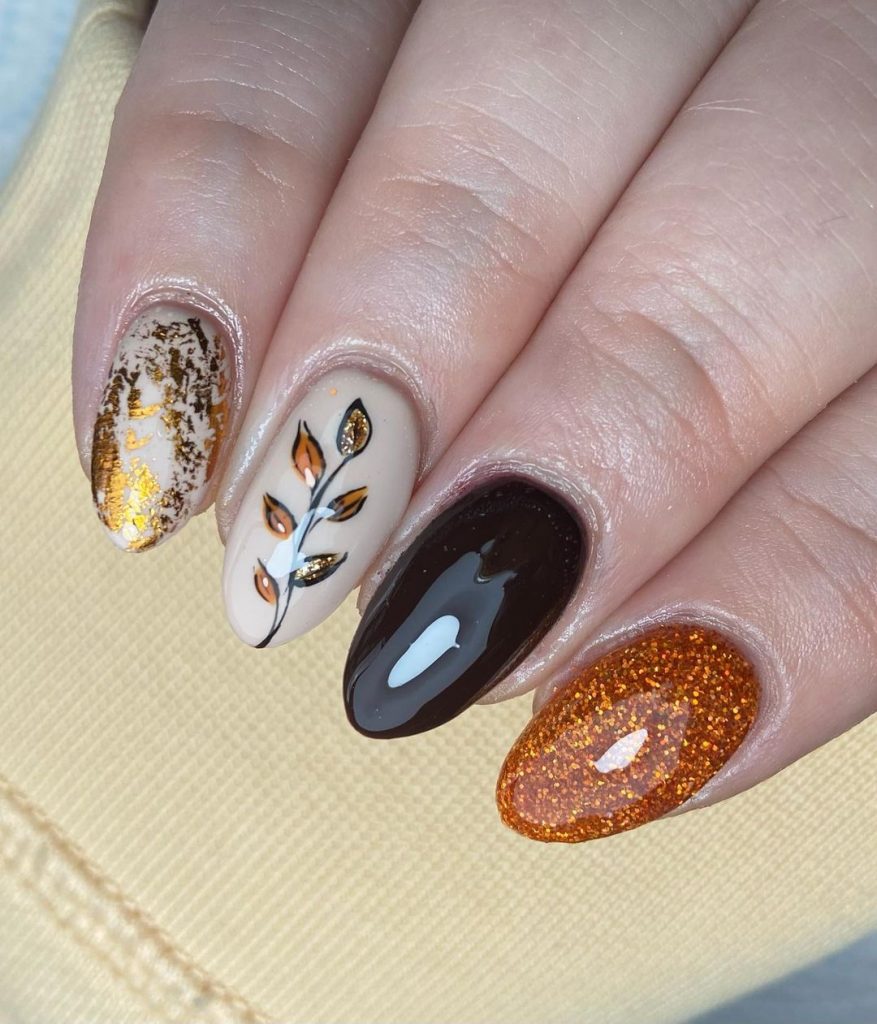
Consumables:
- Brown nail polish (e.g., OPI’s “Chocolate Moose”)
- Gold foil or polish (e.g., Essie’s “Good as Gold”)
- Orange glitter polish (e.g., China Glaze’s “I Herd That”)
- Nail art brushes
- Glossy top coat (e.g., Seche Vite)
Creating This Look:
- Apply a brown base coat to most of the nails.
- Use gold foil or polish to create a textured effect on one nail.
- Paint leaves on another nail using orange glitter polish and a nail art brush.
- Finish with a glossy top coat to enhance and protect the design.
Berry Bliss
This vibrant berry manicure combines rich berry tones with glitter and delicate floral accents. The mix of solid and glittery nails adds depth and interest, while the floral design brings a touch of femininity. It’s a beautiful and versatile look for the fall season.
Consumables:
- Berry nail polish (e.g., Essie’s “Berry Naughty”)
- Glitter polish (e.g., China Glaze’s “Fairy Dust”)
- Black polish for detailing (e.g., Sally Hansen’s “Black Heart”)
- Nail art brushes
- Glossy top coat (e.g., Seche Vite)
Creating This Look:
- Apply berry polish to most of the nails.
- Use glitter polish on one accent nail.
- Paint delicate floral designs on another nail using black polish and a nail art brush.
- Finish with a glossy top coat to seal and protect the design.
Save Pin