
When it comes to nail art, there’s a world of creativity to explore, especially for those with dark skin tones. As we transition into fall 2024, the array of nail designs, colors, and ideas specifically tailored for dark skin tones is both exciting and versatile. Let’s dive into the latest trends and find out which designs will make your nails stand out this season.
Elegant Floral Accents
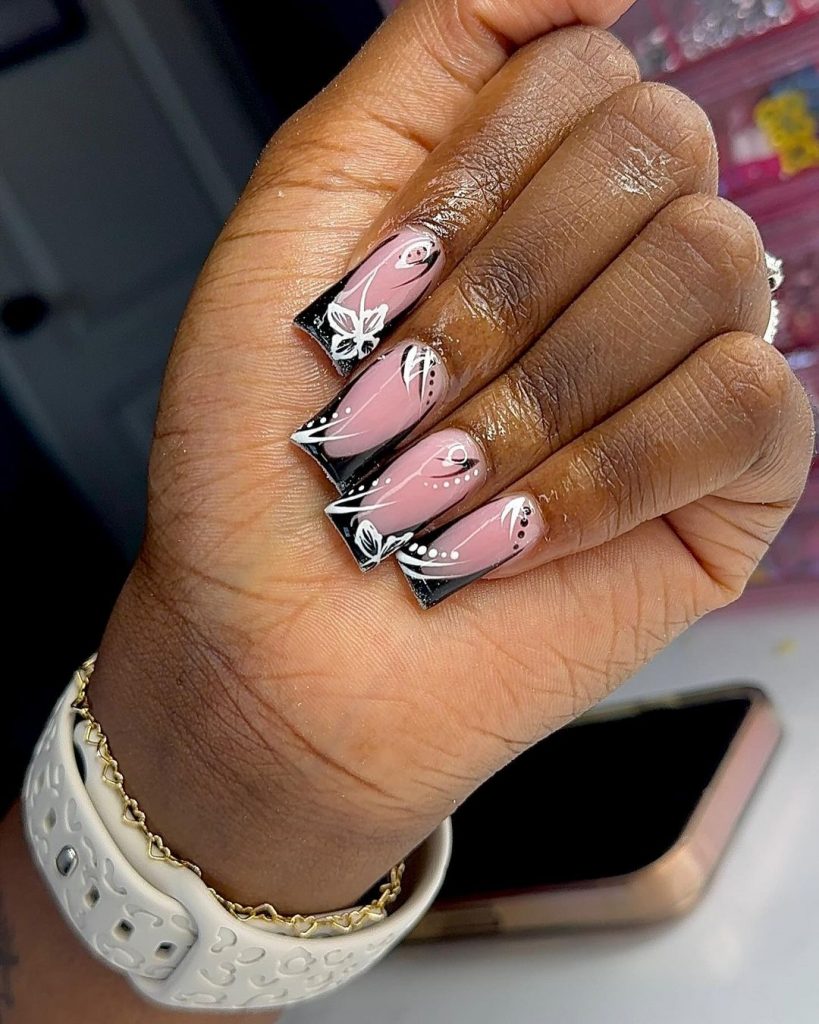
This nail design is all about the elegance of floral accents on a sophisticated base. The nails are painted with a soft pink hue, which perfectly complements darker skin tones. The floral patterns in white add a touch of delicacy, creating a beautiful contrast that makes the design pop. The combination of subtle pink and bold white floral details strikes the perfect balance for a chic fall look.
- Soft pink base color: Essie ‘Ballet Slippers’
- White floral accents: OPI ‘Alpine Snow’
- Top coat: Seche Vite Dry Fast Top Coat
Materials:
- Soft pink nail polish
- White nail polish
- Thin nail art brush or nail stamping kit
- Top coat
Creating at Home:
- Start with a clean, dry nail.
- Apply a base coat to protect your nails.
- Paint the nails with two coats of the soft pink polish, allowing each coat to dry thoroughly.
- Using a thin nail art brush, draw delicate white floral patterns on each nail. Alternatively, use a nail stamping kit for more intricate designs.
- Finish with a top coat to seal the design and add a glossy finish.
Bold and Beautiful Tortoiseshell Tips
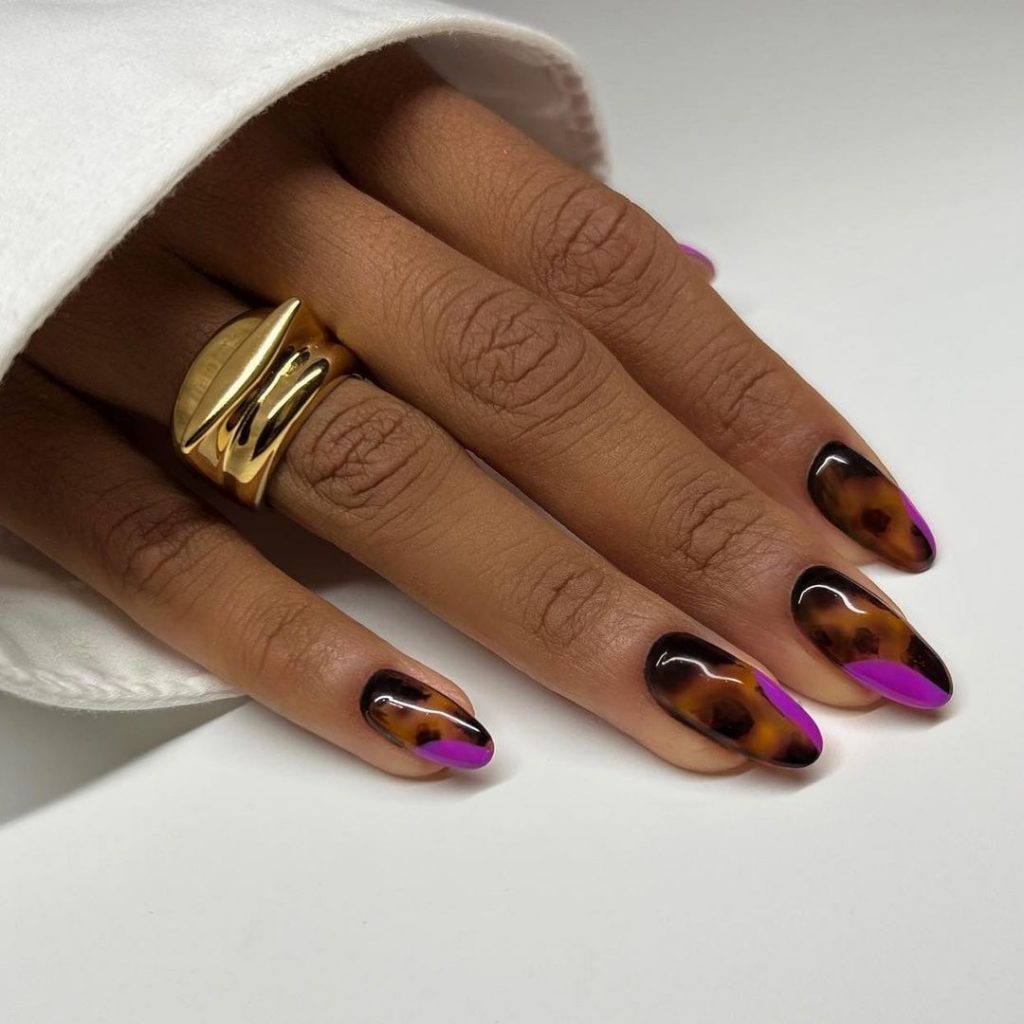
Tortoiseshell nails are making a bold comeback this fall, and they look stunning against darker skin tones. This design features a tortoiseshell pattern with a splash of bright pink to add a pop of color. The tortoiseshell effect creates a warm, rich texture, while the pink accent adds a modern twist to the classic look. It’s a perfect combination for those who want to make a statement with their nails this season.
- Tortoiseshell base color: Sally Hansen ‘Tortoiseshell’
- Bright pink accent: China Glaze ‘Pink Voltage’
- Top coat: Seche Vite Dry Fast Top Coat
Materials:
- Tortoiseshell nail polish
- Bright pink nail polish
- Thin nail art brush
- Top coat
Creating at Home:
- Begin with a clean, dry nail.
- Apply a base coat to protect your nails.
- Paint the nails with the tortoiseshell polish, creating a marbled effect by blending different shades of brown and black.
- Add a bright pink accent on the tips or as a stripe for a bold contrast.
- Finish with a top coat to seal the design and give it a glossy finish.
Matte Green Ombre
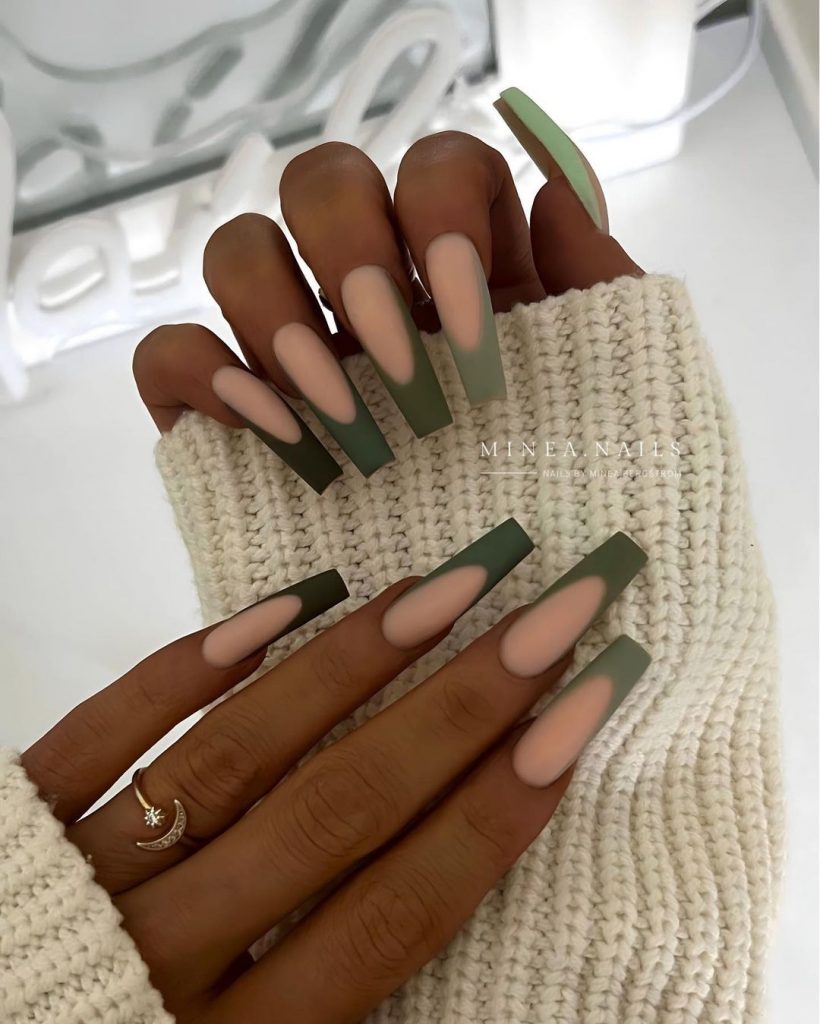
Matte nails are a great switch-up from the usual glossy mani, and this green ombre design is both trendy and sophisticated. The nails transition from a deep, forest green to a soft, pastel green, creating a beautiful gradient effect. Matte finishes can make any color look more refined, and this combination is perfect for fall, complementing the rich tones of the season.
- Deep forest green: Essie ‘Off Tropic’
- Pastel green: OPI ‘Sage Simulation’
- Matte top coat: Sally Hansen ‘Big Matte Top Coat’
Materials:
- Deep forest green nail polish
- Pastel green nail polish
- Sponge for ombre effect
- Matte top coat
Creating at Home:
- Start with a clean, dry nail.
- Apply a base coat to protect your nails.
- Paint the entire nail with the pastel green polish as the base color.
- Using a sponge, dab the deep forest green polish at the tips, blending it towards the middle for a smooth gradient effect.
- Apply a matte top coat to finish the look and give it a chic, velvety finish.
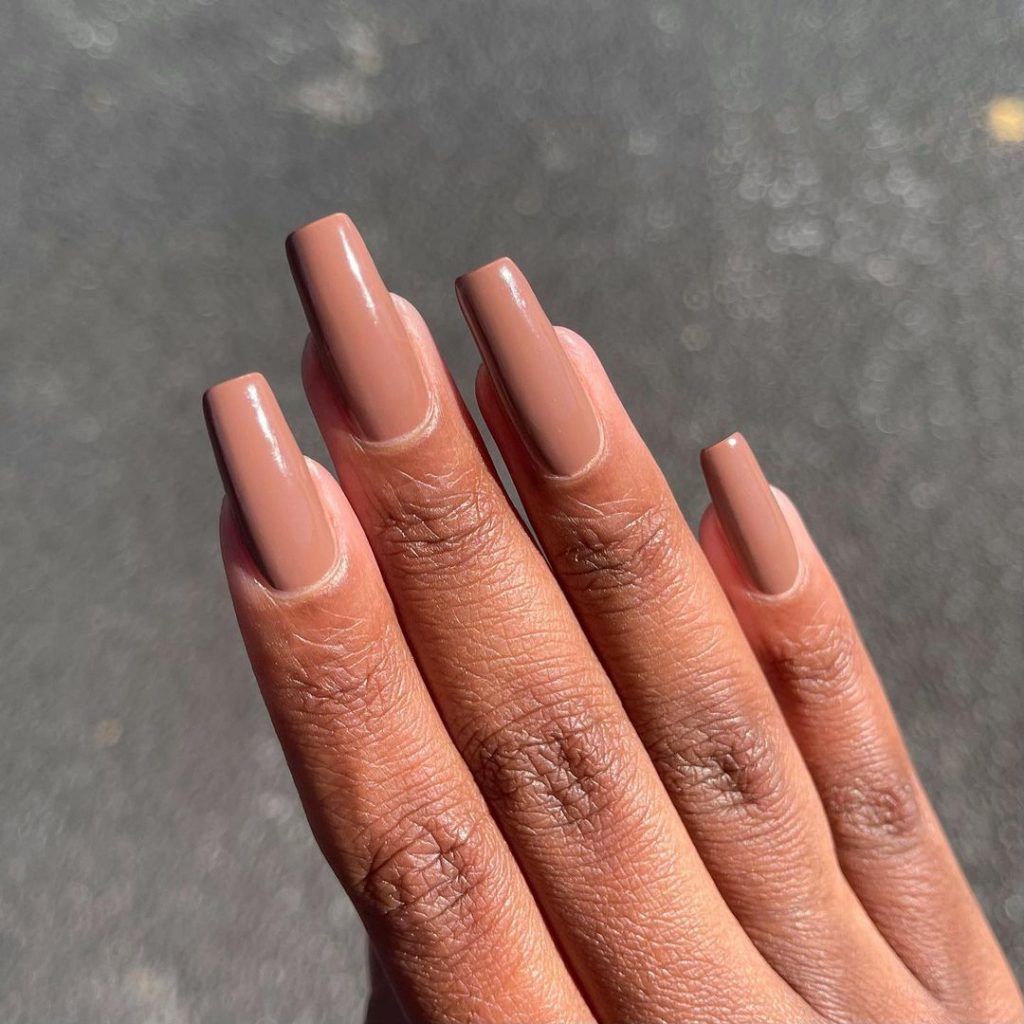
Warm Autumn Browns
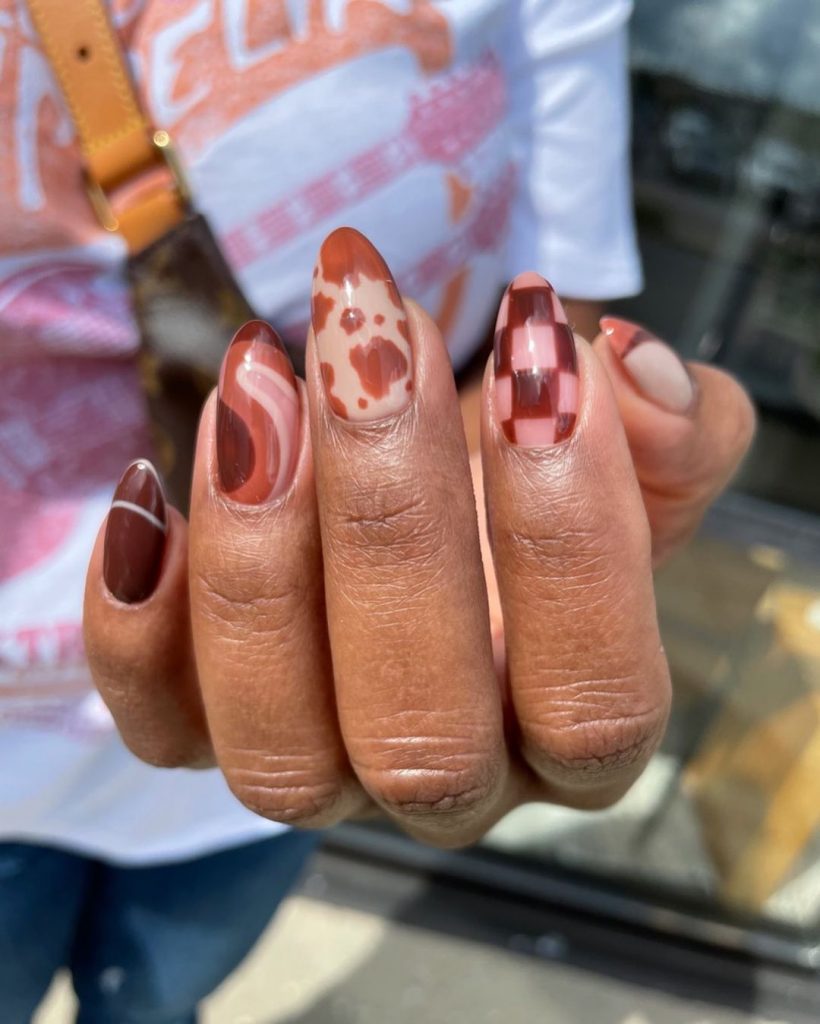
Embrace the rich, warm tones of autumn with this brown-themed nail design. Various shades of brown are used to create a stunning mosaic-like pattern on the nails. This design is perfect for fall, as it mirrors the beautiful, earthy colors of the season. It’s a great way to incorporate neutral tones into your manicure while still making a statement.
- Base brown color: Essie ‘Partner in Crime’
- Lighter brown accents: OPI ‘Samoan Sand’
- Top coat: Seche Vite Dry Fast Top Coat
Materials:
- Multiple shades of brown nail polish
- Thin nail art brush
- Top coat
Creating at Home:
- Begin with a clean, dry nail.
- Apply a base coat to protect your nails.
- Paint the nails with the base brown color.
- Use a thin nail art brush to create mosaic-like patterns with different shades of brown.
- Finish with a top coat to seal the design and add a glossy finish.
Sunset Ombre
Capture the essence of a fall sunset with this stunning ombre design. The nails feature a gradient from deep maroon to a soft peach, creating a warm and inviting look. This ombre effect is perfect for those who want a simple yet eye-catching design that reflects the changing colors of the season.

- Deep maroon: Essie ‘Maki Me Happy’
- Soft peach: OPI ‘Crawfishin’ for a Compliment’
- Top coat: Seche Vite Dry Fast Top Coat
Materials:
- Deep maroon nail polish
- Soft peach nail polish
- Sponge for ombre effect
- Top coat
Creating at Home:
- Start with a clean, dry nail.
- Apply a base coat to protect your nails.
- Paint the entire nail with the soft peach polish as the base color.
- Using a sponge, dab the deep maroon polish at the tips, blending it towards the middle for a smooth gradient effect.
- Finish with a top coat to seal the design and give it a glossy finish.
Earthy Tones and Checkered Patterns
This nail design beautifully incorporates earthy tones and checkered patterns, making it a standout choice for fall. The nails feature a mix of warm browns, soft greens, and subtle nudes, each accentuated with a unique pattern. The checkered designs and geometric shapes add a playful yet sophisticated touch, perfect for the season.
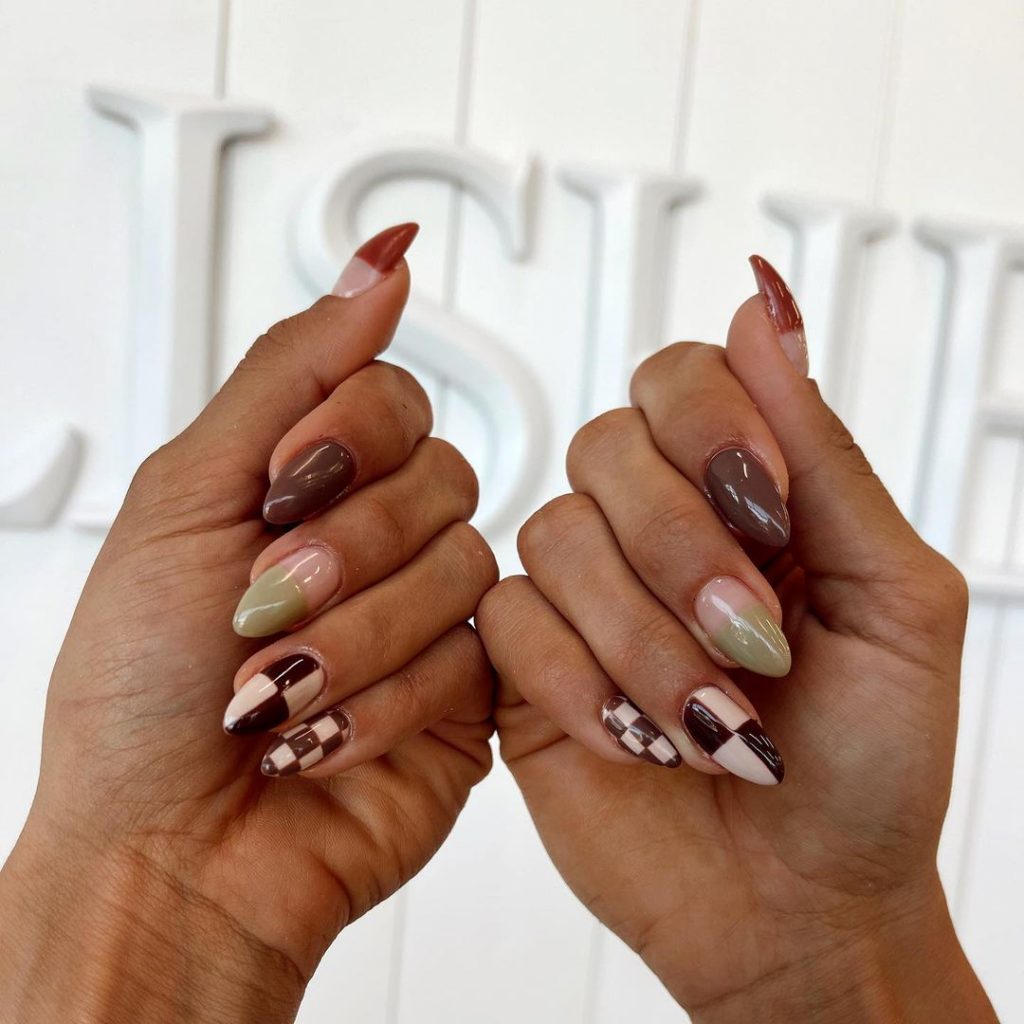
- Brown base color: Essie ‘Partner in Crime’
- Soft green accent: OPI ‘Sage Simulation’
- Nude polish: Sally Hansen ‘Bare It All’
- Top coat: Seche Vite Dry Fast Top Coat
Materials:
- Various shades of brown, green, and nude nail polishes
- Thin nail art brush or striping tape
- Top coat
Creating at Home:
- Start with clean, dry nails.
- Apply a base coat to protect your nails.
- Paint each nail with a different base color (brown, green, nude).
- Using a thin nail art brush or striping tape, create checkered and geometric patterns on each nail.
- Seal with a top coat to finish the look and add shine.
Iridescent Shimmer
These nails feature an iridescent shimmer that catches the light beautifully, making them perfect for both casual and formal occasions. The metallic effect, combined with a subtle green hue, gives a modern twist to a classic shimmer polish. This design is simple yet eye-catching, ideal for those who prefer a low-maintenance yet stylish look.
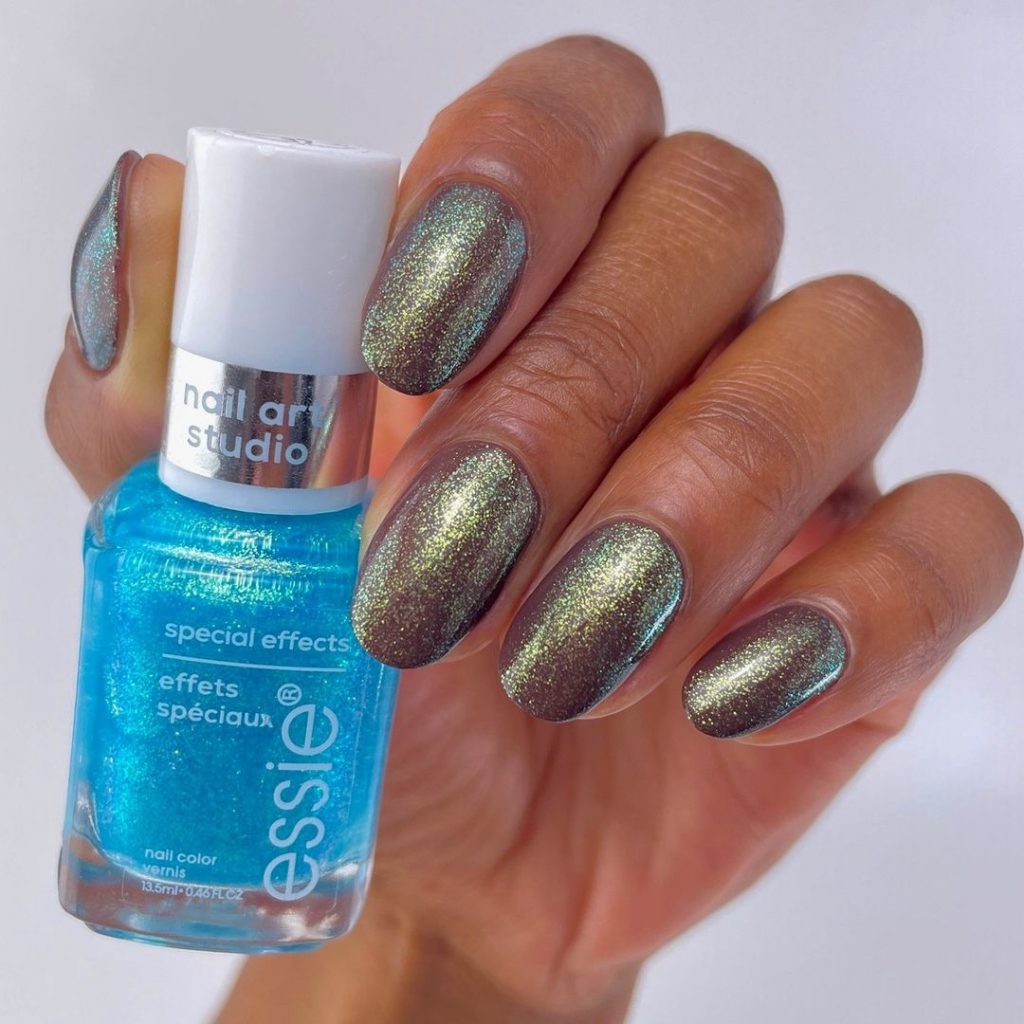
- Base color: Essie ‘For the Twill of It’
- Top coat: Seche Vite Dry Fast Top Coat
Materials:
- Iridescent shimmer nail polish
- Top coat
Creating at Home:
- Begin with clean, dry nails.
- Apply a base coat to protect your nails.
- Paint the nails with two coats of the iridescent shimmer polish, allowing each coat to dry thoroughly.
- Finish with a top coat to seal the design and enhance the shine.
Rich Chocolate Brown with Gems
Rich chocolate brown nails adorned with sparkling gems create a luxurious and glamorous look. The deep brown color complements darker skin tones beautifully, while the gold and amber gems add a touch of elegance and sophistication. This design is perfect for special occasions or when you want to add a bit of sparkle to your everyday style.
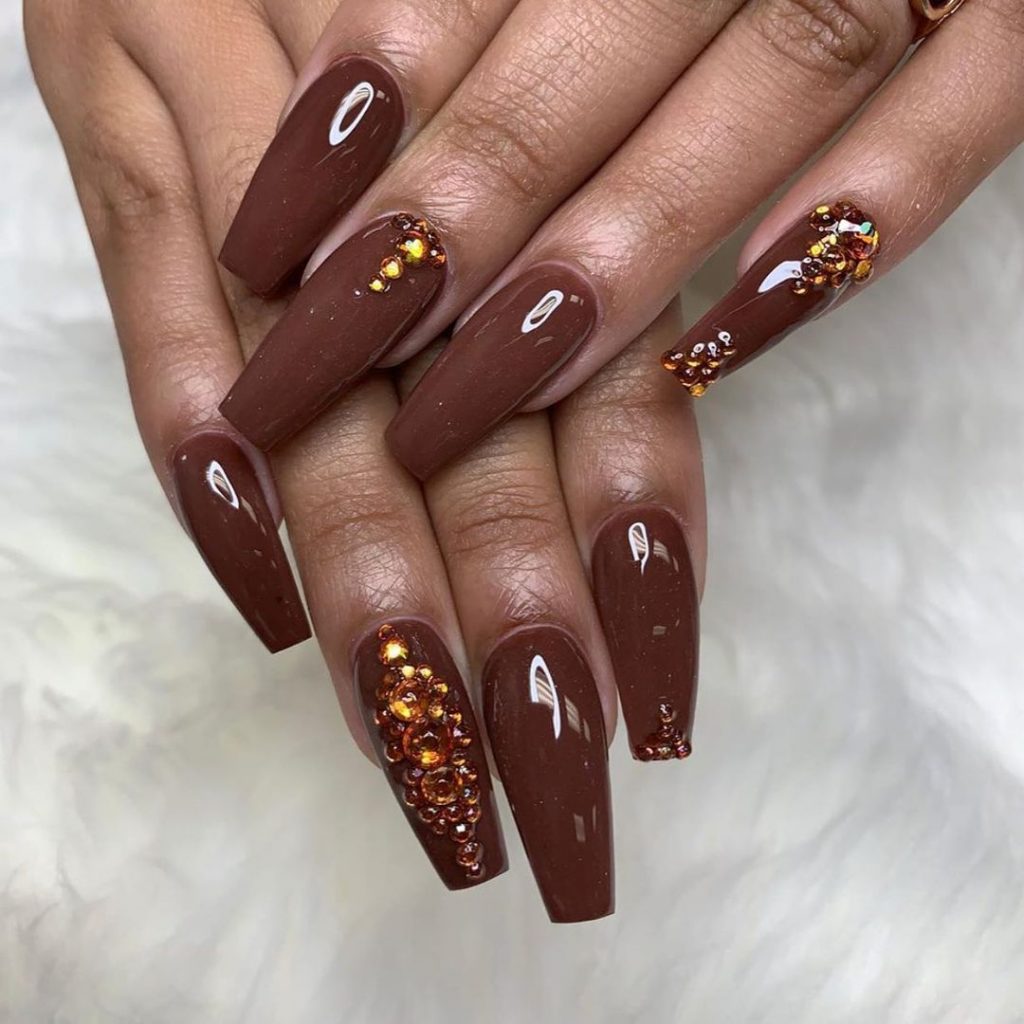
- Base color: OPI ‘Chocolate Moose’
- Gems: Swarovski Crystal Pixie Petite in ‘Cute Mood’
- Top coat: Seche Vite Dry Fast Top Coat
Materials:
- Deep brown nail polish
- Gold and amber nail gems
- Nail glue
- Top coat
Creating at Home:
- Start with clean, dry nails.
- Apply a base coat to protect your nails.
- Paint the nails with two coats of the deep brown polish, allowing each coat to dry thoroughly.
- Using nail glue, carefully place the gold and amber gems on the nails.
- Finish with a top coat to seal the design and keep the gems in place.
Royal Blue and Gold Accents
These nails combine royal blue glitter with striking gold accents, creating a regal and eye-catching design. The contrast between the rich blue and the bright gold makes for a bold statement that is perfect for fall. This design is ideal for those who want to stand out and embrace the vibrant colors of the season.
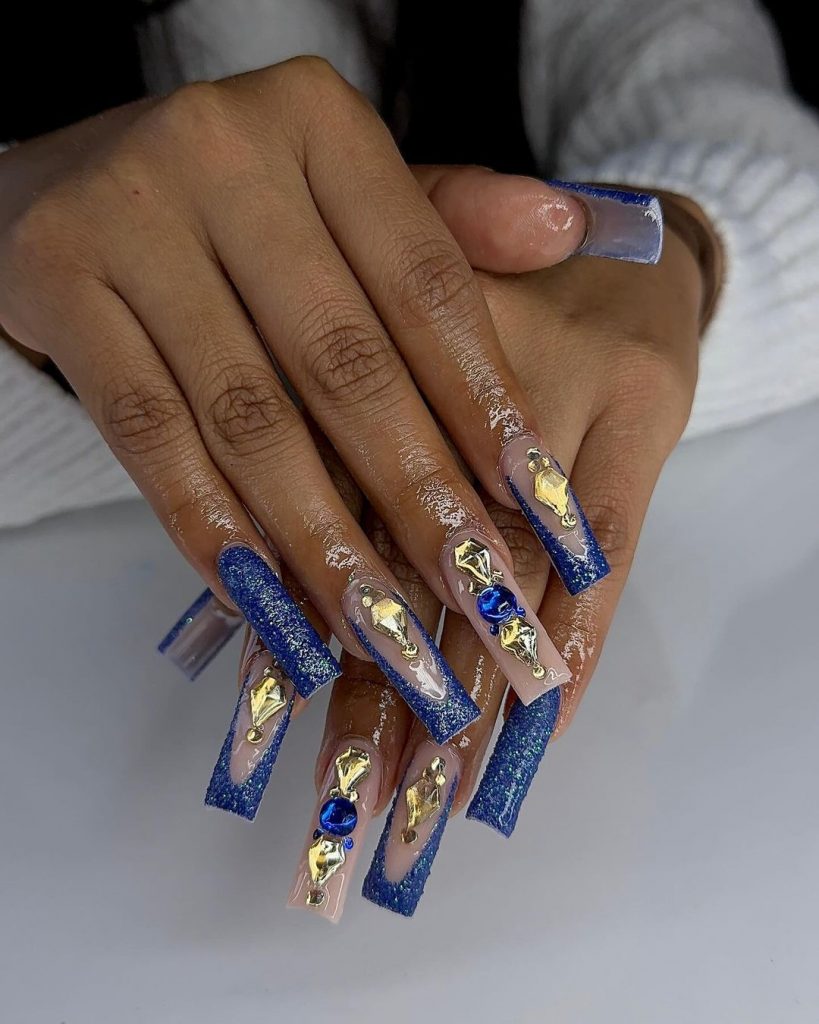
- Blue glitter polish: China Glaze ‘Turned Up Turquoise’
- Gold accents: Ciaté London ‘Gold Digga’
- Top coat: Seche Vite Dry Fast Top Coat
Materials:
- Blue glitter nail polish
- Gold nail polish
- Thin nail art brush
- Top coat
Creating at Home:
- Begin with clean, dry nails.
- Apply a base coat to protect your nails.
- Paint the nails with the blue glitter polish, allowing it to dry thoroughly.
- Using a thin nail art brush, add gold accents to the design.
- Finish with a top coat to seal the design and add a glossy finish.
Soft Olive Green
This soft olive green nail design is simple yet sophisticated, making it perfect for everyday wear. The muted green shade complements dark skin tones beautifully and offers a neutral yet stylish option for fall. This design is ideal for those who prefer a minimalist and understated look.
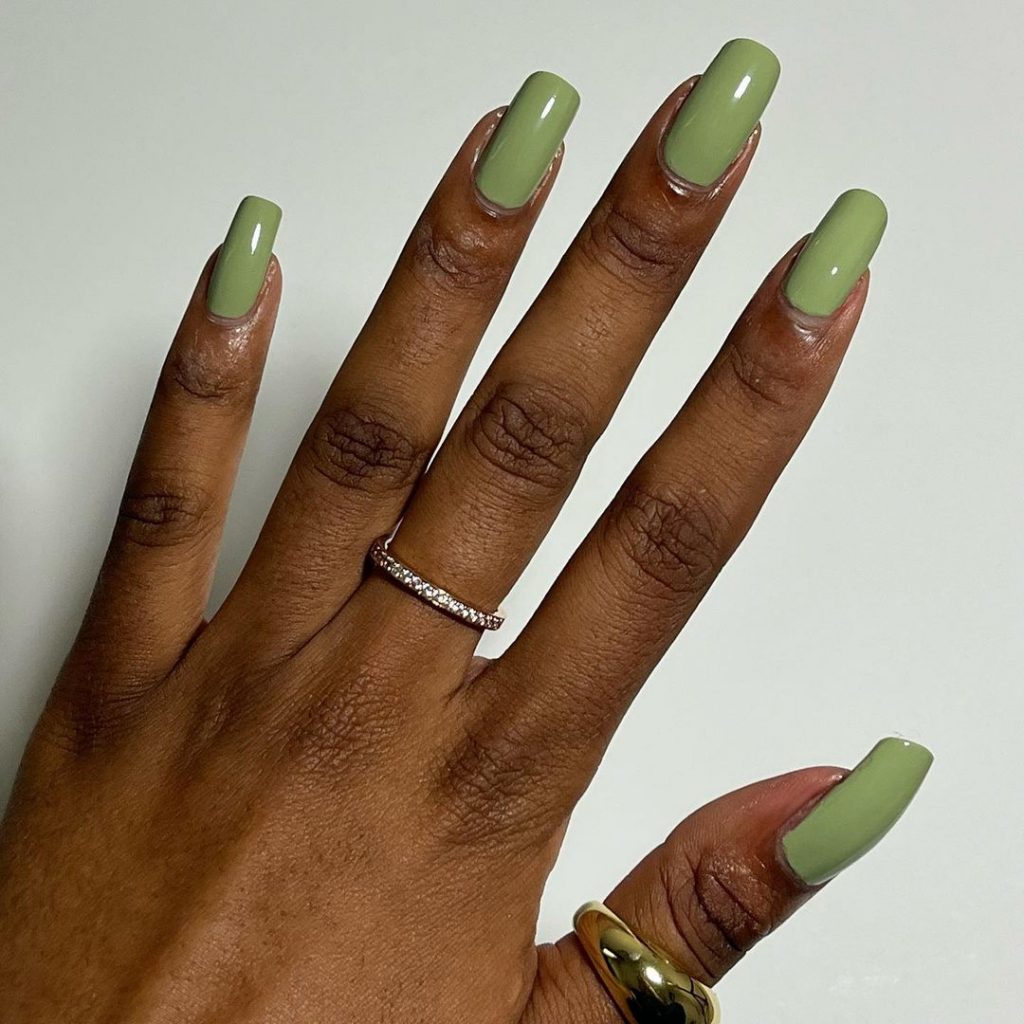
- Base color: OPI ‘This Isn’t Greenland’
- Top coat: Seche Vite Dry Fast Top Coat
Materials:
- Olive green nail polish
- Top coat
Creating at Home:
- Start with clean, dry nails.
- Apply a base coat to protect your nails.
- Paint the nails with two coats of the olive green polish, allowing each coat to dry thoroughly.
- Finish with a top coat to seal the design and add a glossy finish.
Marble and Matte Brown
This design is a stunning combination of glossy marble and matte brown finishes. The contrast between the shiny, marbled effect and the muted, matte brown creates a sophisticated and unique look. The marbled nails feature rich caramel and toffee swirls, adding depth and elegance, while the matte brown nails provide a balanced, modern touch.

- Matte brown polish: Essie ‘Fierce, No Fear’
- Marble effect polish: OPI ‘Brown to Earth’ mixed with white polish for the marbled effect
- Top coat: Seche Vite Dry Fast Top Coat for the marbled nails
Materials:
- Matte brown nail polish
- Brown and white nail polishes for the marbled effect
- Nail art brush for creating marble swirls
- Top coat for the marbled nails
Creating at Home:
- Start with clean, dry nails.
- Apply a base coat to protect your nails.
- Paint the matte brown nails and allow them to dry.
- For the marbled nails, mix brown and white polish on a palette. Use a nail art brush to create swirls on the nails.
- Seal the marbled nails with a top coat to enhance the glossy effect.
Bright Yellow
This bright yellow nail design is perfect for adding a pop of color to your fall look. The vibrant yellow shade is cheerful and eye-catching, making it a great choice for those who want to stand out. It’s a simple yet bold design that complements dark skin tones beautifully.
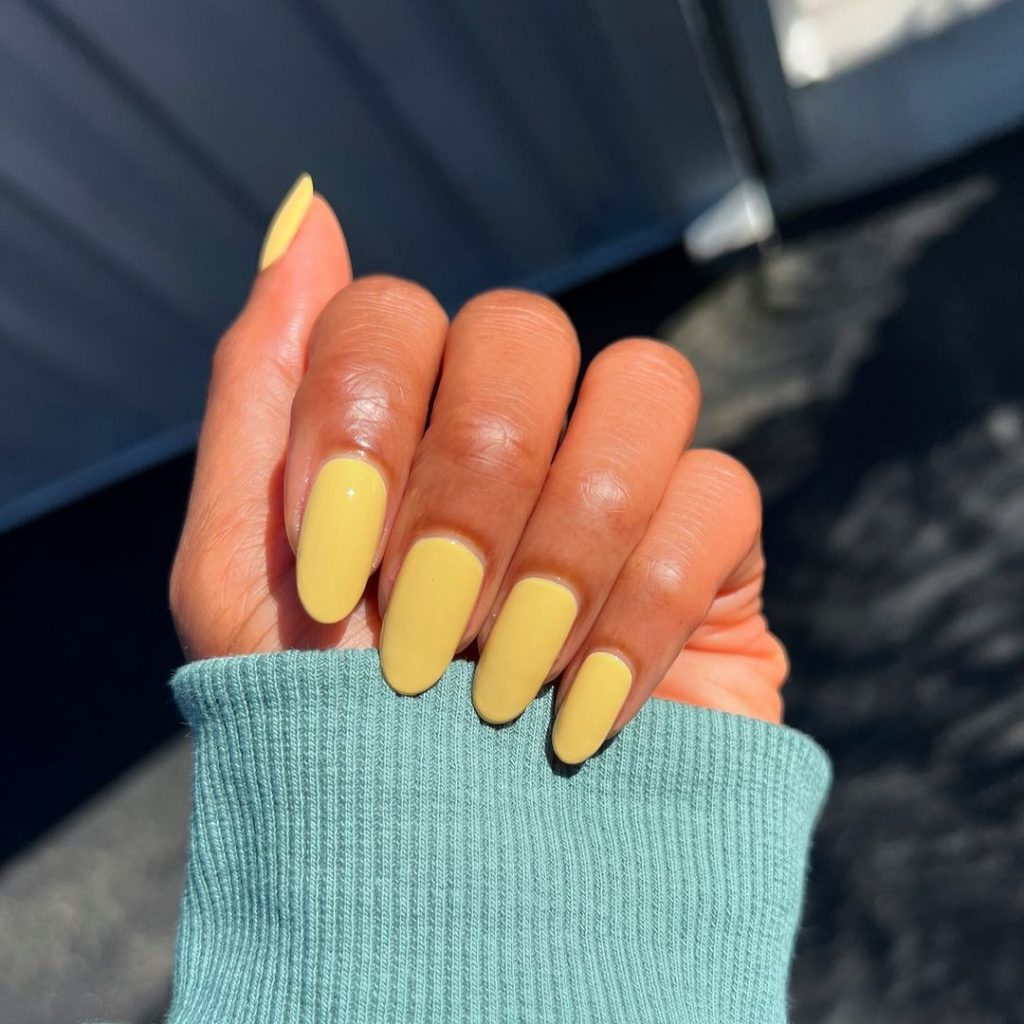
- Base color: Essie ‘Sunny Business’
- Top coat: Seche Vite Dry Fast Top Coat
Materials:
- Bright yellow nail polish
- Top coat
Creating at Home:
- Begin with clean, dry nails.
- Apply a base coat to protect your nails.
- Paint the nails with two coats of the bright yellow polish, allowing each coat to dry thoroughly.
- Finish with a top coat to seal the design and add a glossy finish.
Shimmering Green
This shimmering green nail design is both vibrant and elegant, making it perfect for fall. The metallic green polish catches the light beautifully, adding a touch of glamour to your nails. This color is ideal for those who want a striking yet sophisticated look.
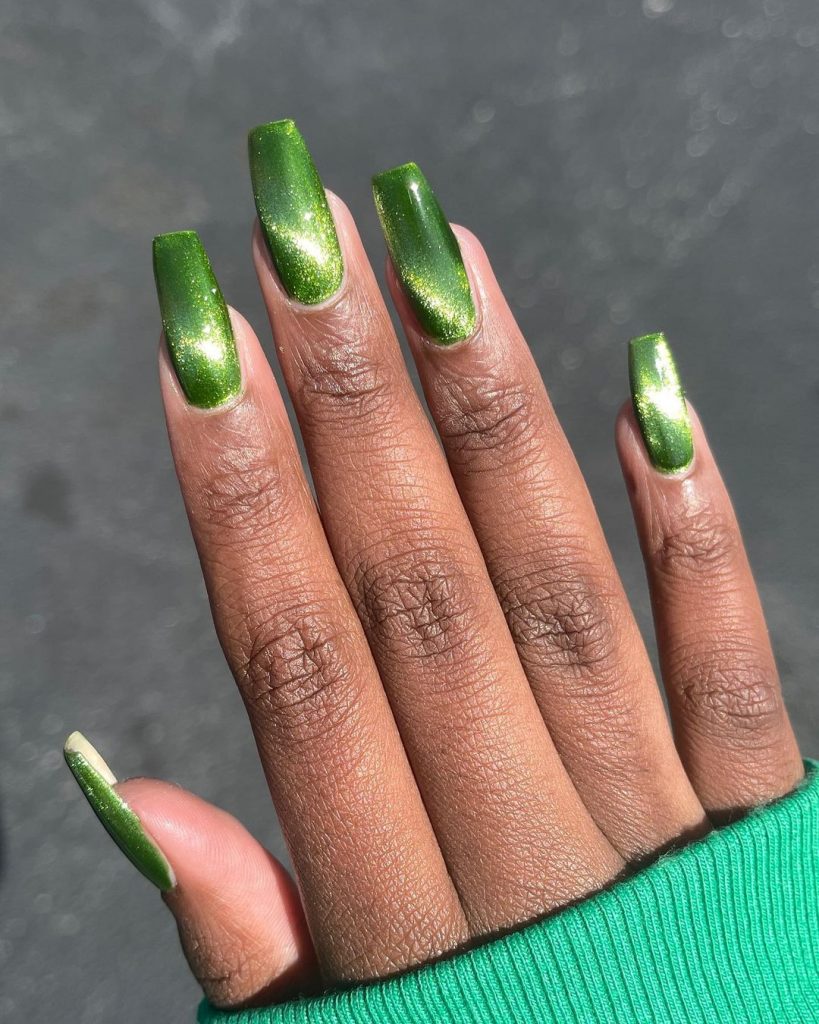
- Base color: OPI ‘Emerald Illusion’
- Top coat: Seche Vite Dry Fast Top Coat
Materials:
- Shimmering green nail polish
- Top coat
Creating at Home:
- Start with clean, dry nails.
- Apply a base coat to protect your nails.
- Paint the nails with two coats of the shimmering green polish, allowing each coat to dry thoroughly.
- Finish with a top coat to seal the design and enhance the shine.
Classic Red
A classic red manicure never goes out of style, and it’s perfect for fall. The bold red color is timeless and elegant, adding a touch of sophistication to any look. This design is simple yet impactful, making it a must-try for the season.
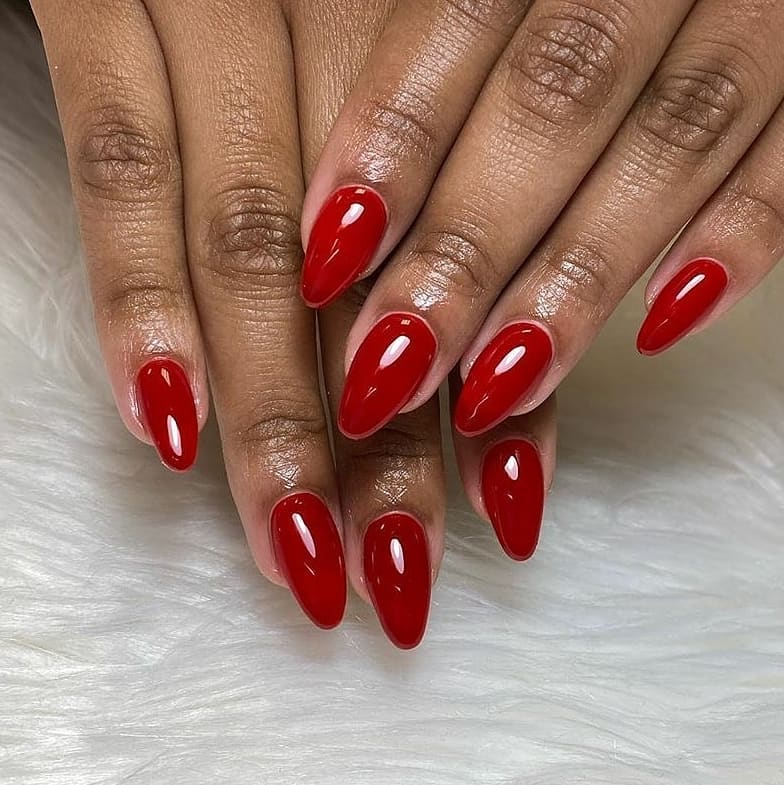
- Base color: Essie ‘Really Red’
- Top coat: Seche Vite Dry Fast Top Coat
Materials:
- Classic red nail polish
- Top coat
Creating at Home:
- Begin with clean, dry nails.
- Apply a base coat to protect your nails.
- Paint the nails with two coats of the classic red polish, allowing each coat to dry thoroughly.
- Finish with a top coat to seal the design and add a glossy finish.
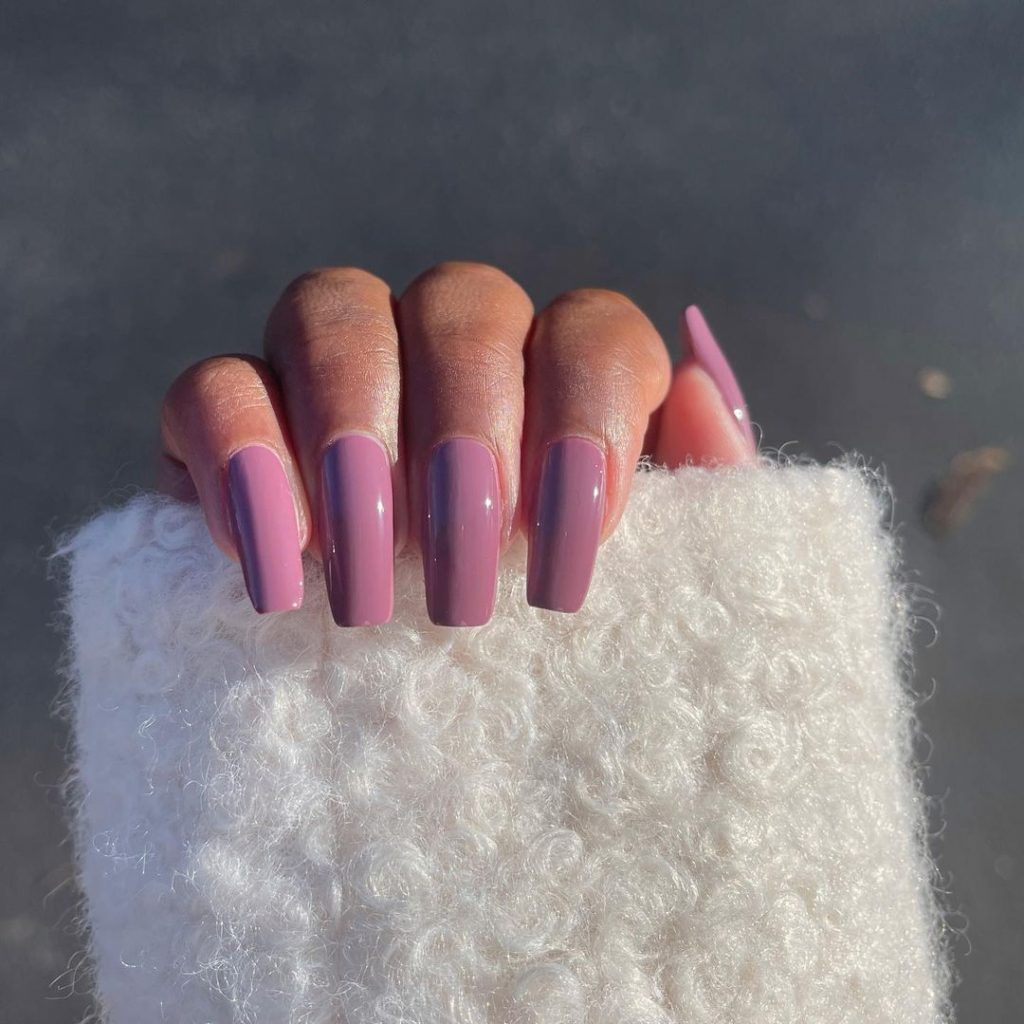
Soft Mauve
This soft mauve nail design is perfect for those who prefer a more understated look. The muted mauve shade is both elegant and versatile, making it suitable for any occasion. It’s a chic and sophisticated option that complements darker skin tones beautifully.
- Base color: OPI ‘Do You Lilac It?’
- Top coat: Seche Vite Dry Fast Top Coat
Materials:
- Soft mauve nail polish
- Top coat
Creating at Home:
- Start with clean, dry nails.
- Apply a base coat to protect your nails.
- Paint the nails with two coats of the soft mauve polish, allowing each coat to dry thoroughly.
- Finish with a top coat to seal the design and add a glossy finish.
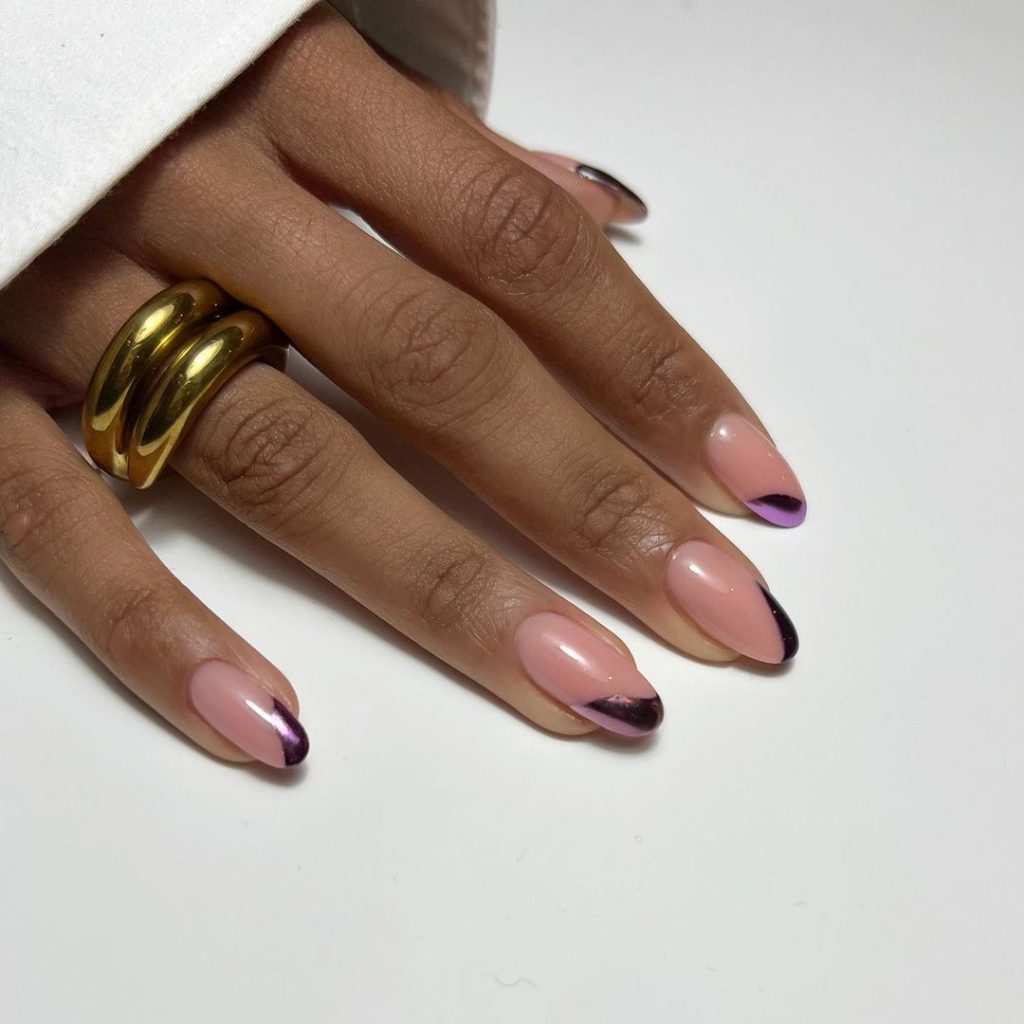
Subtle Gradient with a Twist
This elegant design features a subtle pink gradient with a twist of dark purple at the tips. The smooth transition from a soft pink base to a deep purple accent creates a chic and modern look. It’s a perfect design for those who want something unique yet understated.
- Base color: Essie ‘Ballet Slippers’
- Purple accent: OPI ‘Lincoln Park After Dark’
- Top coat: Seche Vite Dry Fast Top Coat
Materials:
- Soft pink nail polish
- Deep purple nail polish
- Thin nail art brush
- Top coat
Creating at Home:
- Start with clean, dry nails.
- Apply a base coat to protect your nails.
- Paint the nails with the soft pink polish as the base color.
- Using a thin nail art brush, apply the deep purple polish to the tips, creating a gradient effect.
- Finish with a top coat to seal the design and add a glossy finish.
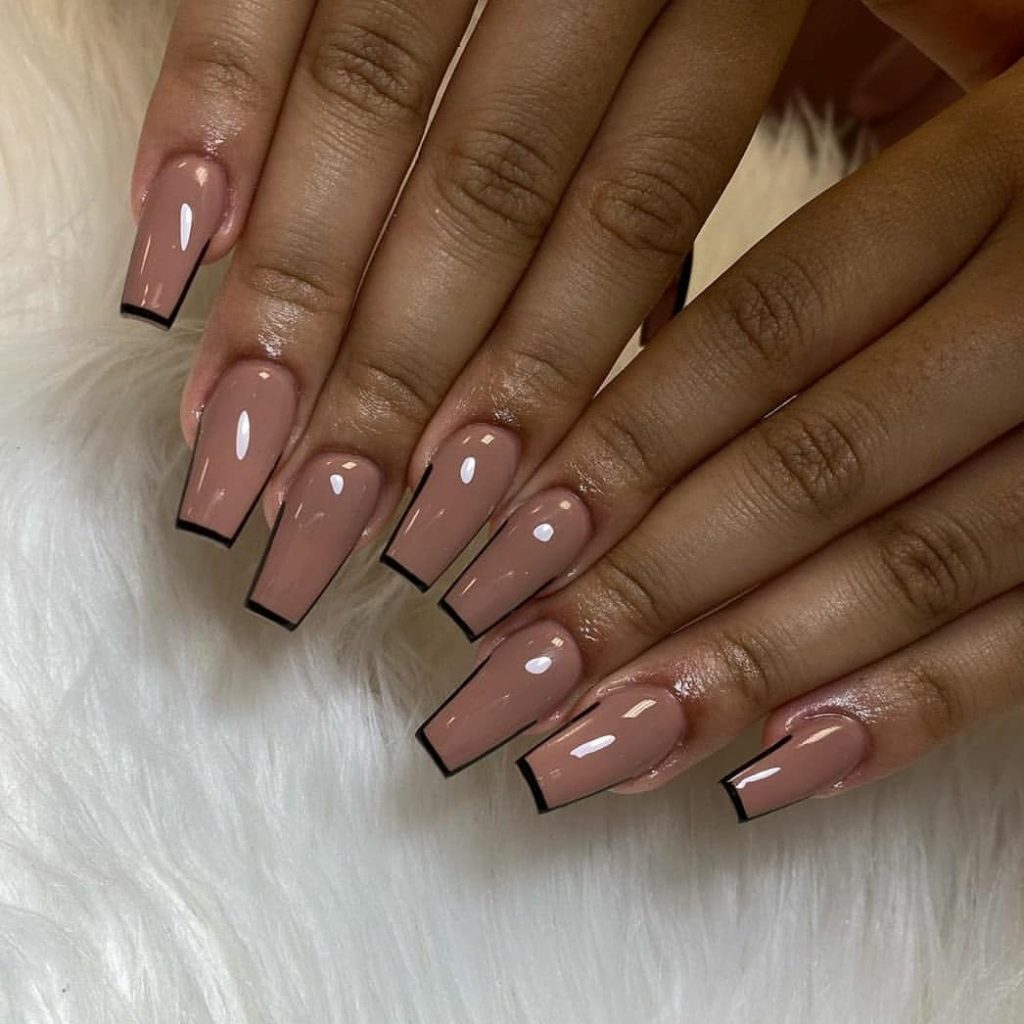
Nude Nails with Black Tips
This nude nail design with black tips is a modern take on the classic French manicure. The nude base color beautifully complements dark skin tones, while the sharp black tips add a touch of sophistication and edge. It’s a versatile design that works for both casual and formal settings.
- Base color: OPI ‘Bare My Soul’
- Black tips: Essie ‘Licorice’
- Top coat: Seche Vite Dry Fast Top Coat
Materials:
- Nude nail polish
- Black nail polish
- Thin nail art brush or striping tape
- Top coat
Creating at Home:
- Begin with clean, dry nails.
- Apply a base coat to protect your nails.
- Paint the nails with the nude polish as the base color.
- Using a thin nail art brush or striping tape, paint the tips with black polish.
- Finish with a top coat to seal the design and add a glossy finish.
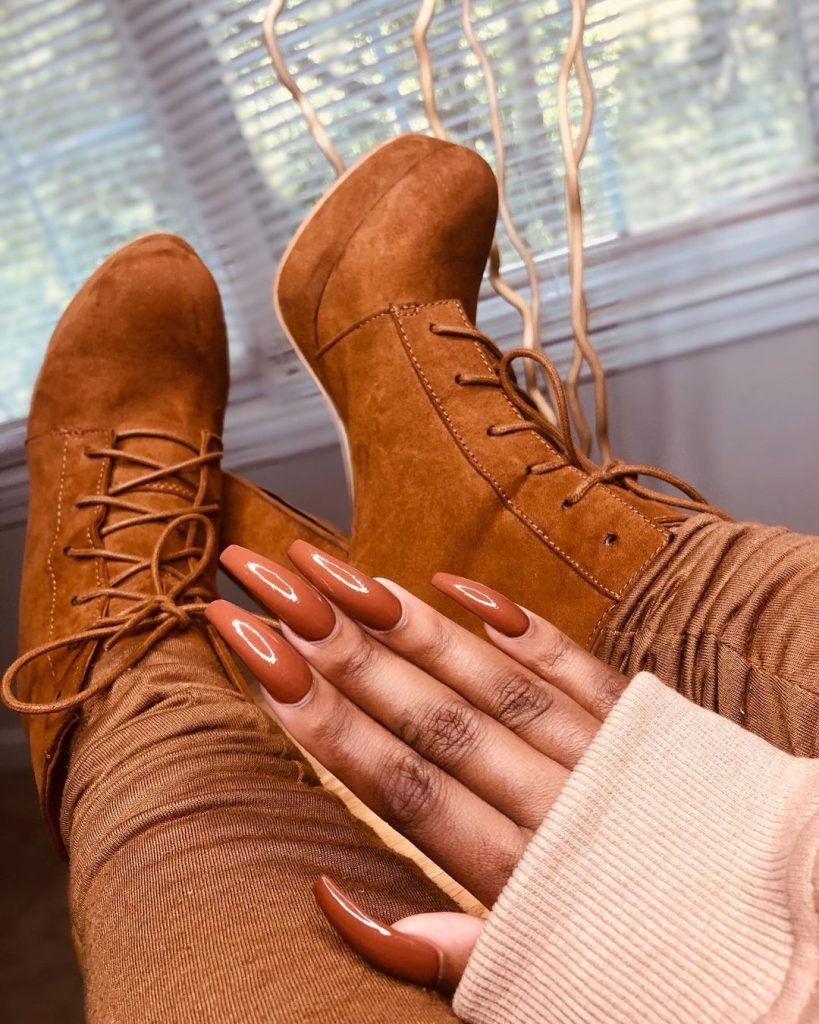
Terracotta Glam
This terracotta nail design perfectly captures the warm, earthy tones of fall. The rich terracotta color is both bold and sophisticated, making it an excellent choice for the season. It’s a glamorous design that adds a touch of warmth and style to any look.
- Base color: Essie ‘Cliff Hanger’
- Top coat: Seche Vite Dry Fast Top Coat
Materials:
- Terracotta nail polish
- Top coat
Creating at Home:
- Start with clean, dry nails.
- Apply a base coat to protect your nails.
- Paint the nails with two coats of the terracotta polish, allowing each coat to dry thoroughly.
- Finish with a top coat to seal the design and add a glossy finish.
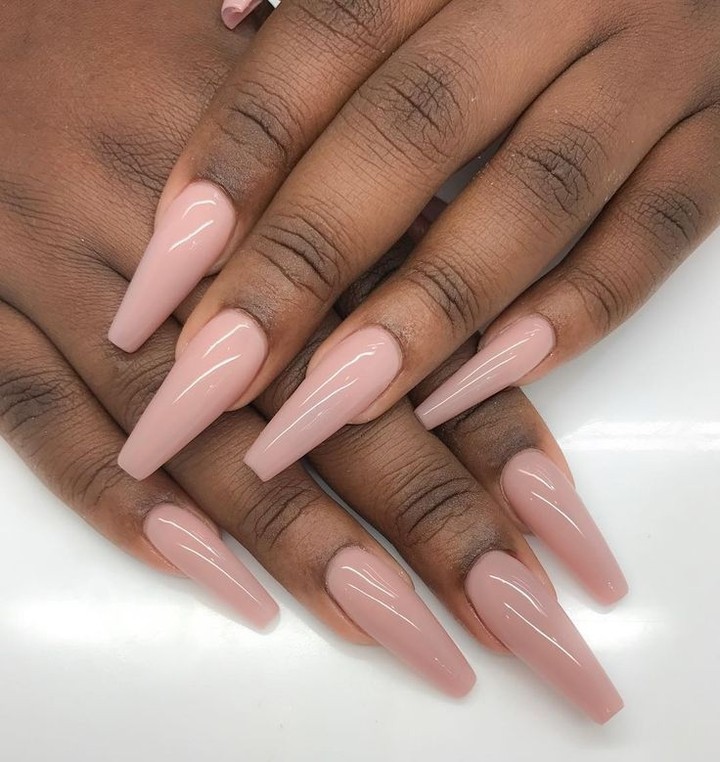
Soft Nude Elegance
This soft nude nail design is perfect for those who prefer a minimalist and elegant look. The subtle nude shade is sophisticated and versatile, making it suitable for any occasion. It’s a simple yet chic design that complements dark skin tones beautifully.
- Base color: OPI ‘Dulce de Leche’
- Top coat: Seche Vite Dry Fast Top Coat
Materials:
- Nude nail polish
- Top coat
Creating at Home:
- Begin with clean, dry nails.
- Apply a base coat to protect your nails.
- Paint the nails with two coats of the nude polish, allowing each coat to dry thoroughly.
- Finish with a top coat to seal the design and add a glossy finish.
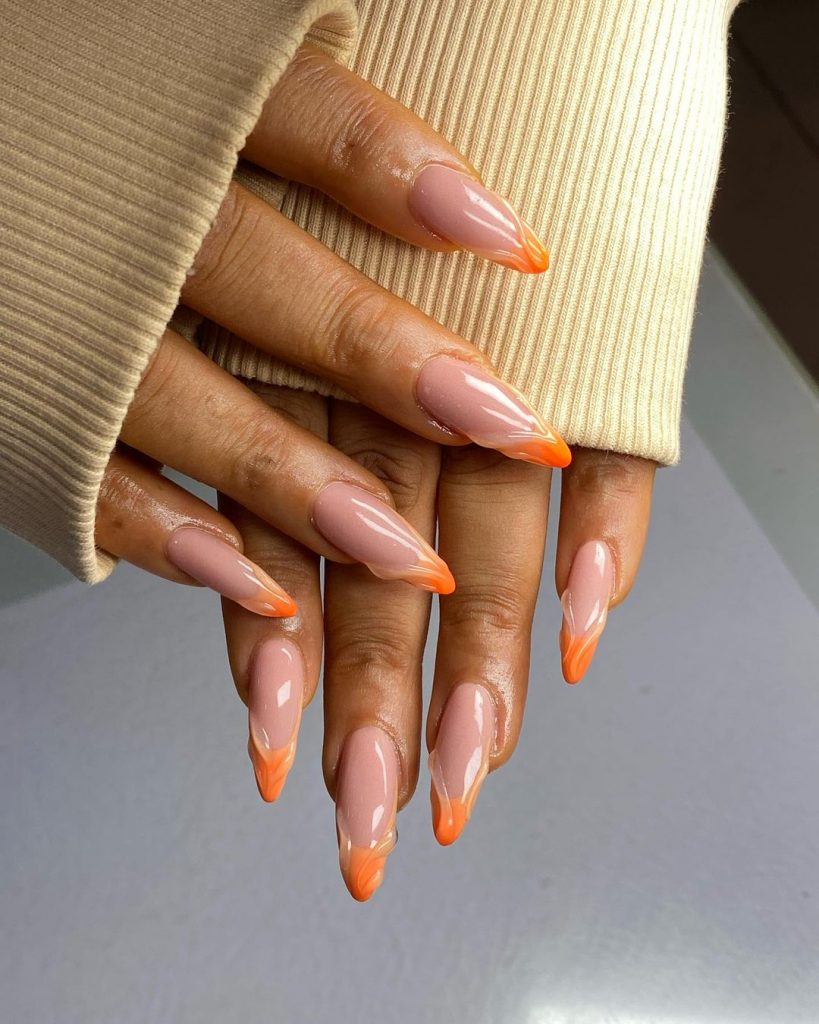
Orange Flames
This vibrant nail design features bold orange flames on a nude base, creating a striking and dynamic look. The contrast between the bright orange and the neutral base makes this design stand out, perfect for those who want to make a statement this fall.
- Base color: Essie ‘Bare With Me’
- Orange flames: OPI ‘A Good Man-Darin is Hard to Find’
- Top coat: Seche Vite Dry Fast Top Coat
Materials:
- Nude nail polish
- Bright orange nail polish
- Thin nail art brush
- Top coat
Creating at Home:
- Start with clean, dry nails.
- Apply a base coat to protect your nails.
- Paint the nails with the nude polish as the base color.
- Using a thin nail art brush, create flame patterns with the orange polish.
- Finish with a top coat to seal the design and add a glossy finish.
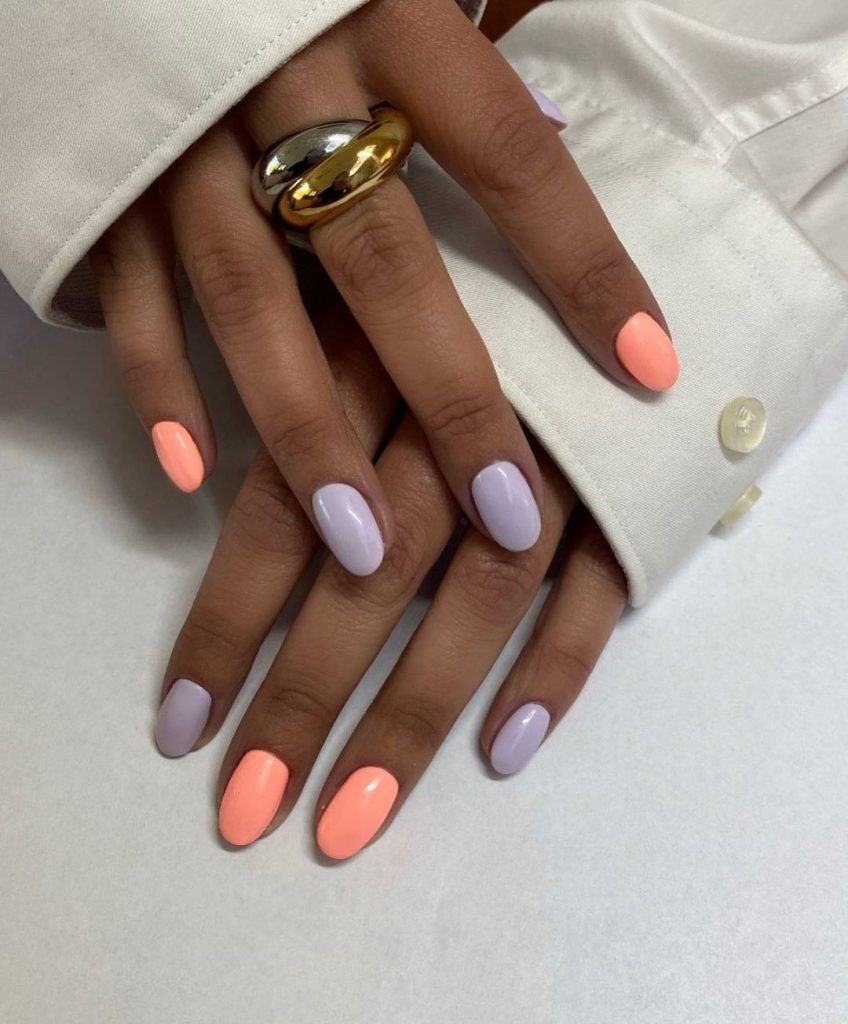
Pastel Perfection
This pastel nail design combines soft lavender and peach hues to create a delicate and charming look. The alternating colors on each nail add a playful touch, perfect for a cheerful fall aesthetic. The pastel shades are flattering on dark skin tones, making this a great option for a subtle yet stylish manicure.
- Lavender polish: Essie ‘Lilacism’
- Peach polish: OPI ‘Crawfishin’ for a Compliment’
- Top coat: Seche Vite Dry Fast Top Coat
Materials:
- Lavender nail polish
- Peach nail polish
- Top coat
Creating at Home:
- Start with clean, dry nails.
- Apply a base coat to protect your nails.
- Paint alternating nails with lavender and peach polish, using two coats of each color.
- Finish with a top coat to seal the design and add a glossy finish.
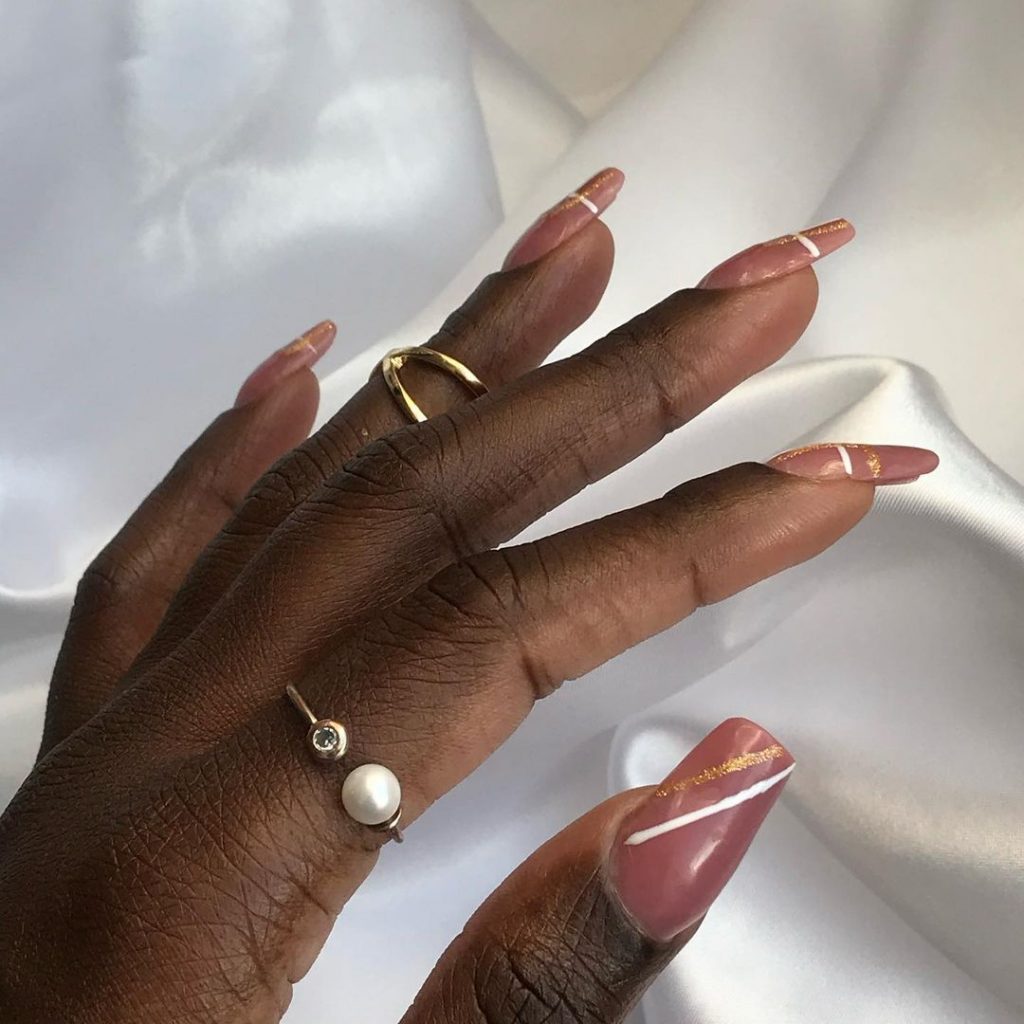
Elegant Stripes
This elegant design features nude nails with delicate white and gold stripes, adding a touch of sophistication and class. The subtle base color complements dark skin tones beautifully, while the gold and white accents provide a refined and luxurious look.
- Nude polish: Essie ‘Ballet Slippers’
- White stripes: OPI ‘Alpine Snow’
- Gold stripes: Ciaté London ‘Gold Digga’
- Top coat: Seche Vite Dry Fast Top Coat
Materials:
- Nude nail polish
- White nail polish
- Gold nail polish
- Thin nail art brush or striping tape
- Top coat
Creating at Home:
- Start with clean, dry nails.
- Apply a base coat to protect your nails.
- Paint the nails with the nude polish as the base color.
- Using a thin nail art brush or striping tape, add white and gold stripes to each nail.
- Finish with a top coat to seal the design and add a glossy finish.
Classic Nude
This classic nude nail design is timeless and versatile. The soft nude shade is perfect for any occasion, offering a clean and elegant look. It’s a great choice for those who prefer a minimalist style while still wanting to make a statement.
- Base color: OPI ‘Samoan Sand’
- Top coat: Seche Vite Dry Fast Top Coat
Materials:
- Nude nail polish
- Top coat
Creating at Home:
- Begin with clean, dry nails.
- Apply a base coat to protect your nails.
- Paint the nails with two coats of the nude polish, allowing each coat to dry thoroughly.
- Finish with a top coat to seal the design and add a glossy finish.
Golden Glitz
This nail design features a dazzling gold glitter polish that adds a touch of glamour and luxury. The sparkling gold color catches the light beautifully, making it perfect for festive occasions or when you want to add a bit of sparkle to your look.
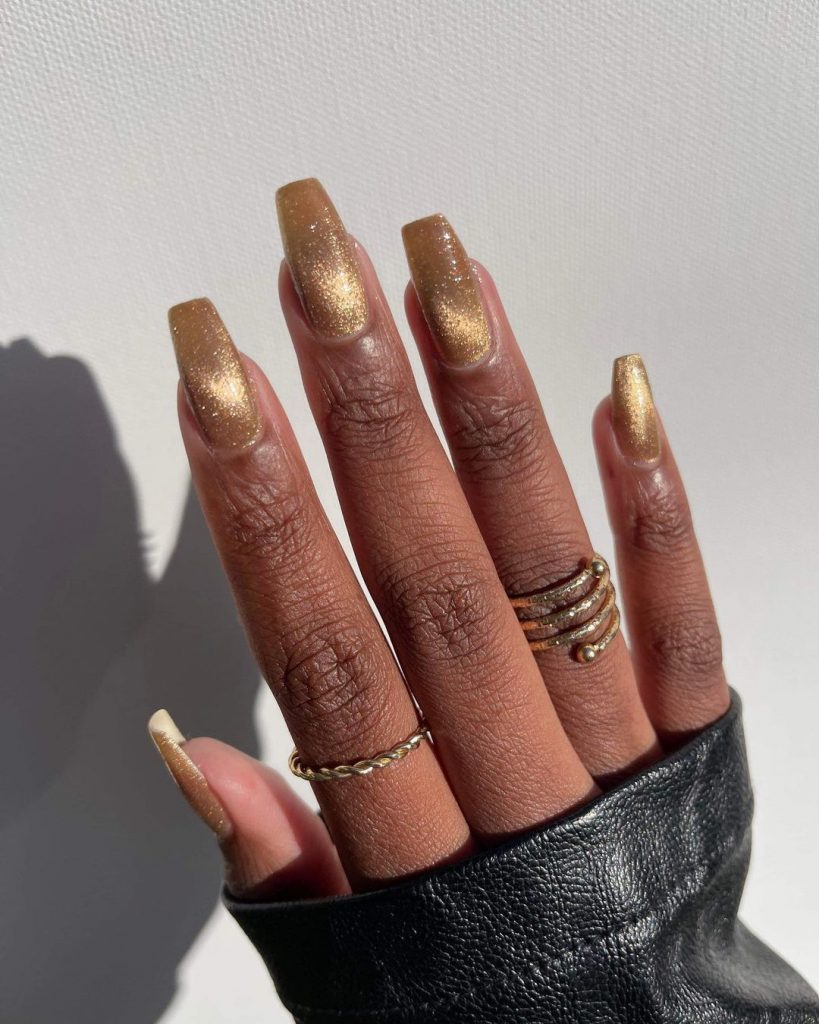
- Base color: Essie ‘Summit of Style’
- Top coat: Seche Vite Dry Fast Top Coat
Materials:
- Gold glitter nail polish
- Top coat
Creating at Home:
- Start with clean, dry nails.
- Apply a base coat to protect your nails.
- Paint the nails with two coats of the gold glitter polish, allowing each coat to dry thoroughly.
- Finish with a top coat to seal the design and enhance the sparkle.
Marbled Gold Accents
This sophisticated design features clear nails with marbled white and gold accents. The combination of the marbled effect with gold details creates an elegant and unique look, perfect for special occasions. The clear base allows the intricate design to stand out beautifully.
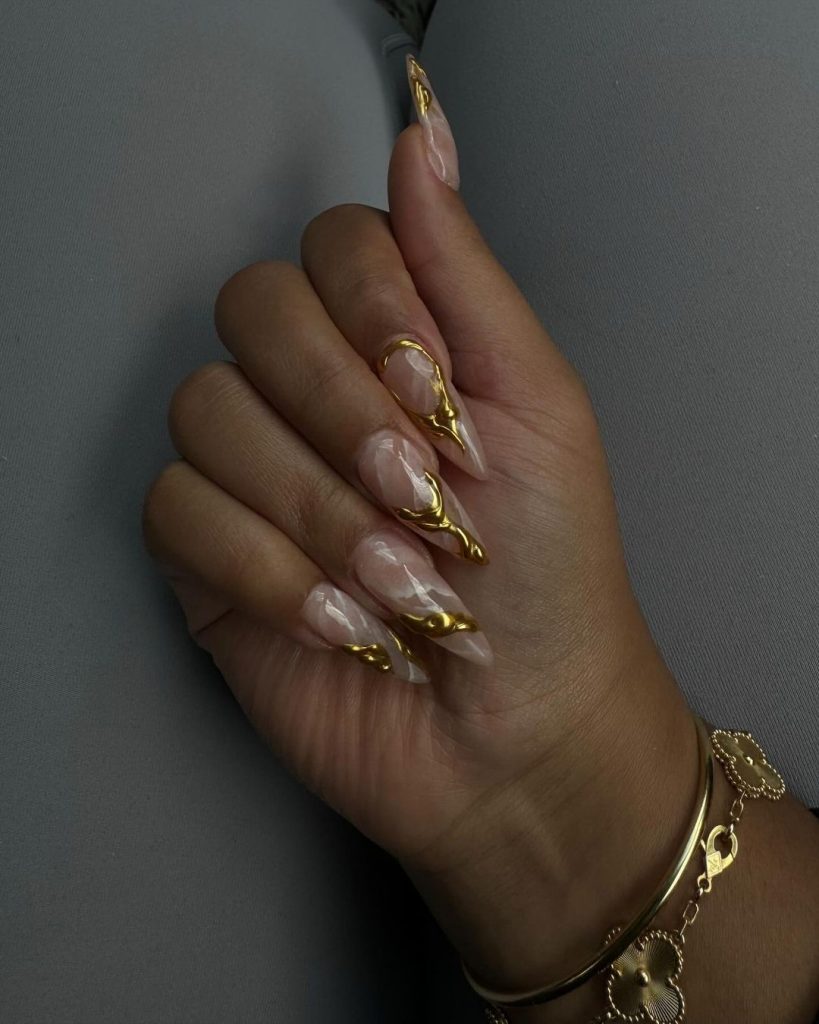
- Clear polish: Essie ‘Gel Couture Top Coat’
- White marble effect: OPI ‘Funny Bunny’
- Gold accents: Ciaté London ‘Gold Digga’
- Top coat: Seche Vite Dry Fast Top Coat
Materials:
- Clear nail polish
- White nail polish
- Gold nail polish
- Thin nail art brush
- Top coat
Creating at Home:
- Start with clean, dry nails.
- Apply a clear base coat to protect your nails.
- Using a thin nail art brush, create marbled patterns with white polish.
- Add gold accents to enhance the marbled effect.
- Finish with a top coat to seal the design and add a glossy finish.
Artistic Color Mix
This nail design features a mix of colors and patterns, creating an artistic and eclectic look. The combination of green, yellow, and black and white patterns offers a bold and trendy style. It’s perfect for those who love to experiment with different designs and make a statement with their nails.
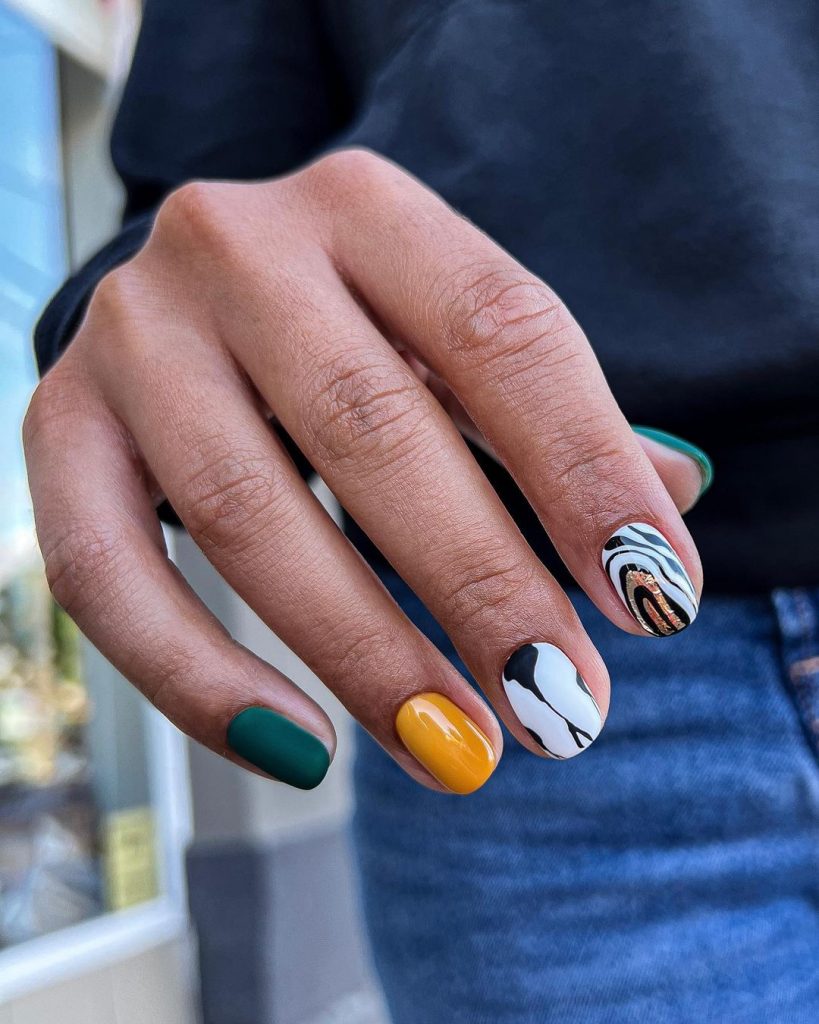
- Green polish: OPI ‘Envy the Adventure’
- Yellow polish: Essie ‘Sunny Business’
- Black and white patterns: Sally Hansen ‘Blacky O’ and ‘White On’
- Top coat: Seche Vite Dry Fast Top Coat
Materials:
- Green nail polish
- Yellow nail polish
- Black and white nail polishes
- Thin nail art brush
- Top coat
Creating at Home:
- Start with clean, dry nails.
- Apply a base coat to protect your nails.
- Paint each nail with different base colors (green, yellow).
- Using a thin nail art brush, create patterns with black and white polish on selected nails.
- Finish with a top coat to seal the design and add a glossy finish.
Save Pin
