
As the summer rays dance upon us, how do we enhance our style quotient to match the vibrant season? Are you looking for new ways to refresh your manicure with some summer oval nail designs & colors ideas? Whether you’re a fan of subtle elegance or bold statements, this season’s trends offer a delightful palette to choose from. Dive into a world of colorful and bright options that promise to complement your summer adventures, from beach outings to late-night parties. Let’s explore some of the hottest nail designs that will not only look fabulous but also stand the test of summer fun!
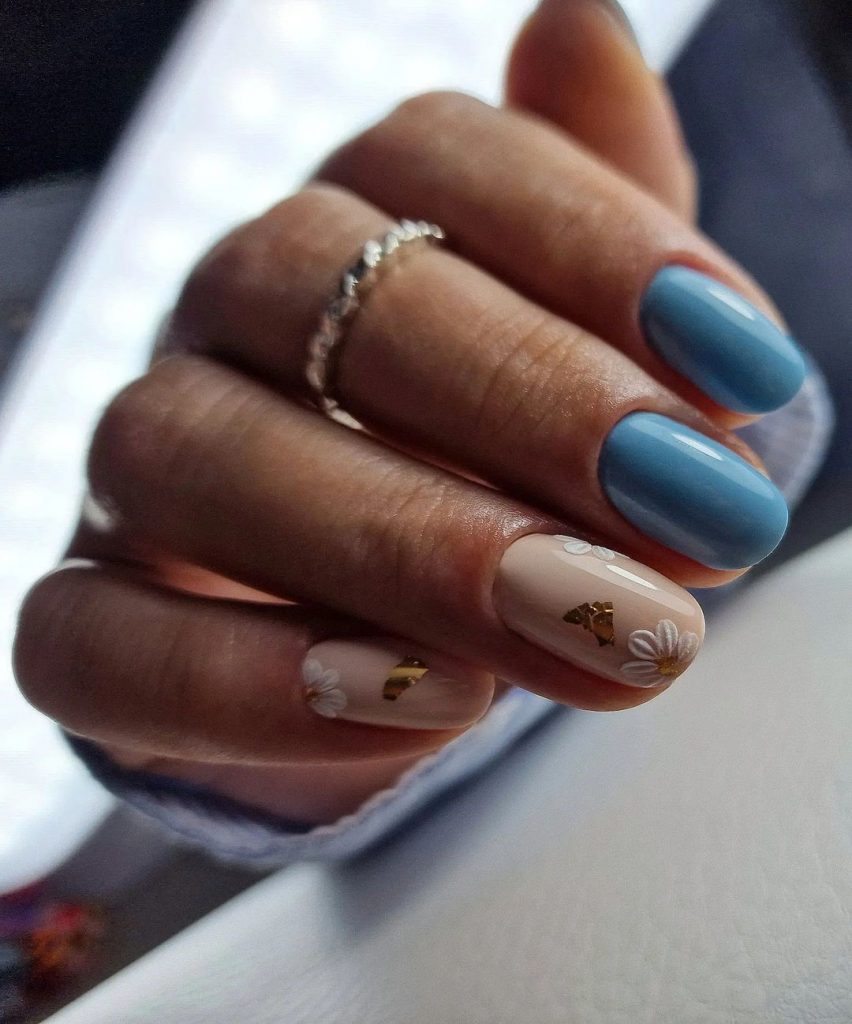
Soft Pastels and Floral Elegance
This nail design captures the essence of spring with its soft pastel tones and delicate floral accents. The serene blue paired with the neutral cream creates a subtle yet sophisticated backdrop for the tiny flower and gold leaf accents, making it perfect for both casual and formal occasions.
Essential Products for Pastel Floral Nails
- Cream Gel Polish: Essie Gel Couture ‘Sheer Fantasy’
- Pastel Blue Polish: OPI ‘It’s a Boy!’
- Gold Leaf Accents
- Tiny Floral Stickers
- Top Coat: Seche Vite Dry Fast Top Coat
DIY Tips for Creating Floral Pastel Nails
- Apply the cream polish as a base, and add pastel blue on the tips.
- Carefully place floral stickers and gold leaf accents.
- Seal with a high-gloss top coat for durability and shine.
This elegant design is perfect for those who appreciate a touch of nature’s beauty on their fingertips.
Classic Red Sophistication
The bold red polish in this design exudes classic glamour and sophistication. The smooth, glossy finish and full coverage demonstrate expert application, suitable for any elegant event or a powerful statement in the workplace.

Essential Products for Classic Red Nails
- Red Gel Polish: OPI ‘Big Apple Red’
- Top Coat: Gelish ‘Top It Off’ Gel Top Coat
DIY Steps for Perfect Red Nails
- Apply two coats of red gel polish for rich color.
- Finish with a shiny top coat for a lasting glossy look.
This timeless style is a must-have for anyone looking to add a touch of classic elegance to their look.
Modern Metallic and Pastel
This nail design uses a chic gradient effect transitioning from a metallic silver to a soft pastel pink, creating a modern and stylish look. The addition of silver glitter enhances the transition, making it a perfect choice for those who love a bit of sparkle.
Essential Products for Metallic Gradient Nails
- Pastel Pink Polish: Essie ‘Muchi, Muchi’
- Metallic Silver Polish: Sally Hansen ‘Celeb City’
- Silver Glitter
- Sponge for Gradient Effect
- Top Coat: INM Out The Door Super Fast Drying Top Coat
DIY Gradient Technique
- Apply pastel pink as the base color.
- Use a sponge to apply metallic silver from the nail base upwards.
- While still wet, sprinkle silver glitter for a seamless gradient effect.
- Seal with a top coat for a smooth finish.
This design is great for those who enjoy a contemporary look with a hint of glamour.
Vibrant Summer Orange
This nail art features a vibrant orange, perfect for summer. The matte finish on the nails adds a modern twist to the bright color, making it stand out even more. This look is great for beach days or as a fun pop of color to a casual outfit.
Essential Products for Matte Orange Nails
- Orange Matte Polish: OPI ‘Hot & Spicy’
- Matte Top Coat: Matte Top Coat by OPI
DIY Steps for Vibrant Matte Nails
- Apply two coats of orange polish.
- Finish with a matte top coat for a trendy, non-glossy look.
This vibrant matte style is perfect for those who want to make a bold statement during the summer months.
Floral and Stripes on Blue
This playful design combines deep blue with bright floral patterns and sophisticated stripes, creating a striking contrast. Accents of gold leaf add a luxurious touch, making this design suited for creative events or just to brighten up a regular day.

Essential Products for Floral and Striped Nails
- Deep Blue Polish: Essie ‘After School Boy Blazer’
- White and Gold Stripes: Striping Tape
- Floral Decals
- Gold Leaf
- Top Coat: Seche Vite Dry Fast Top Coat
DIY Tips for Patterned Nails
- Paint the base in deep blue.
- Apply striping tape for precise white and gold stripes.
- Place floral decals and gold leaf as accents.
- Seal with a top coat to enhance durability and shine.
This combination of florals and stripes is ideal for those who love intricate and detailed nail designs.
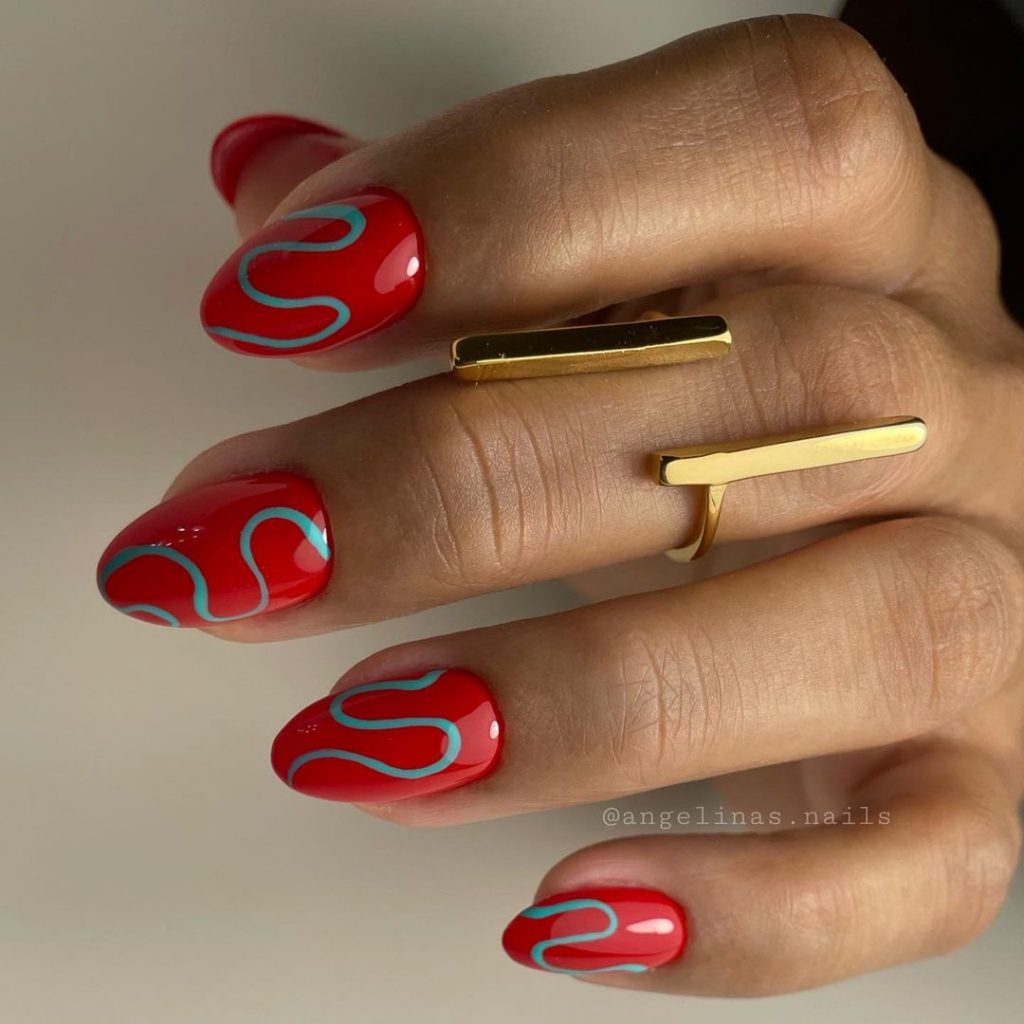
Retro Vibes with Modern Twist
The bright red base with whimsical Tiffany blue squiggles in this design captures a playful yet retro vibe perfect for a summer outing. This unique nail art makes a bold statement while retaining an air of sophistication, making it a fun choice for those who enjoy a splash of nostalgia with a modern twist.
Essential Products for Retro Squiggles
- Base Coat: Essie Here To Stay Base Coat
- Red Polish: OPI ‘Big Apple Red’
- Blue Polish: Essie ‘Bikini So Teeny’
- Detail Brush: Winstonia Fine Line Nail Art Brush
- Top Coat: Seche Vite Dry Fast Top Coat These selections are ideal for achieving sharp, clean lines and a lasting finish.
DIY Manicure Steps
- Apply the base coat to protect your nails.
- Paint the nails with the red polish and let dry.
- Using the detail brush, carefully paint blue squiggles.
- Apply a top coat for a smooth, glossy finish.
This playful design is easy to achieve at home with steady hands and a bit of creativity.
Soft Hues Meet Minimalist Chic
The soft, muted tones of gray and blue in this design offer a minimalist but chic look that pairs well with any summer wardrobe. The understated elegance of these nails makes them perfect for those who prefer a simple, classy look that speaks volumes through subtlety.

Essential Products for Minimalist Nails
- Base Coat: OPI Natural Nail Base Coat
- Gray Polish: Zoya ‘Dove’
- Blue Polish: Zoya ‘Blu’
- Top Coat: Sally Hansen Miracle Gel Top Coat These products are known for their long-lasting wear and rich, opaque colors perfect for a minimalist design.
DIY Tips for Crafting Minimalist Nails
- Start with a base coat to protect your nails.
- Apply two coats of gray polish as the base color.
- Use blue polish at the tips or as a subtle accent.
- Finish with a clear top coat for a lasting shine.
This design is incredibly easy to replicate at home, offering a professional look with minimal effort.
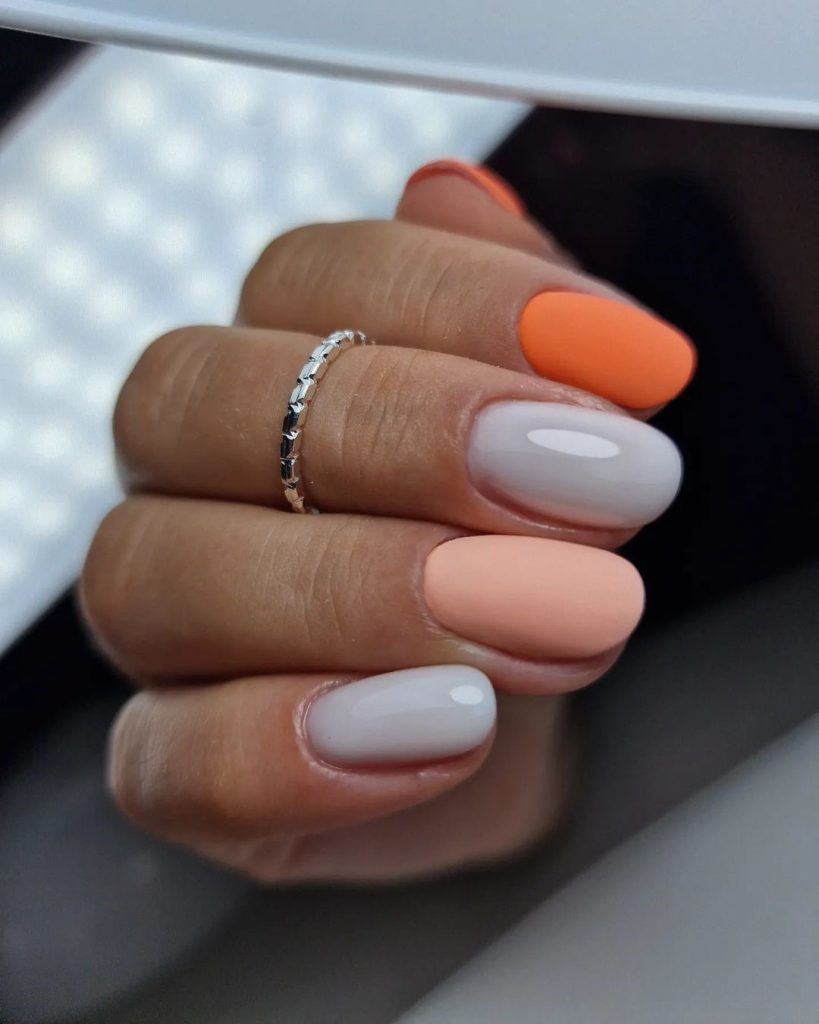
Vibrant Summer Pink
This hot pink shade is the epitome of summer fun. The solid gel finish gives the nails a shiny, eye-catching look that is both vibrant and durable, perfect for any summer activity. The simplicity of the color and finish makes these nails a go-to choice for anyone looking to make a bold yet uncomplicated statement.

Essential Products for Vibrant Pink Nails
- Gel Polish: Gelish ‘Manga-round With Me’
- Base Coat: Gelish Foundation Base Gel
- Top Coat: Gelish Top It Off Gel Sealer
- UV Lamp: Gelish 18G Professional LED Light These choices ensure a vibrant color that lasts long without chipping, ideal for the active summer months.
DIY Steps for Vibrant Pink Nails
- Apply the base coat and cure under UV light.
- Apply two coats of pink gel polish, curing after each.
- Seal with a top coat for a glossy finish and cure.
This straightforward method provides a professional-grade finish at home, perfect for a bold summer look.
Elegant Lavender with a Metallic Twist
The soothing lavender shade of this design is beautifully complemented by a metallic and jeweled accent nail, adding an element of luxury and uniqueness. This look is ideal for both daytime elegance and nighttime sophistication, making it a versatile choice for any summer occasion.
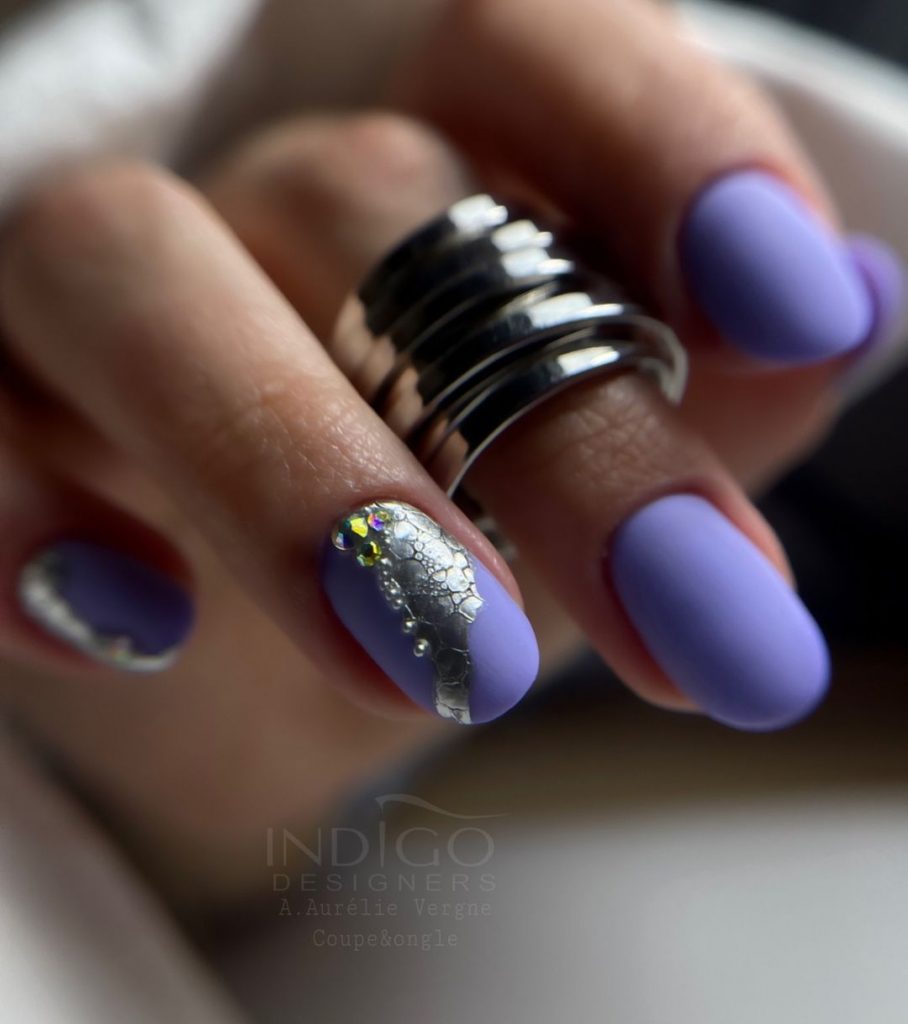
Essential Products for Lavender and Metallic Nails
- Lavender Polish: Essie ‘Go Ginza’
- Metallic Polish: Sally Hansen ‘Steel My Heart’
- Jewels: Swarovski Clear Nail Crystals
- Top Coat: INM Out The Door Top Coat
- Adhesive for Jewels: Nail Glue or Gem Gel These products help achieve a refined look with just the right amount of sparkle.
DIY Instructions for Lavender and Metallic Design
- Apply lavender polish as the base.
- Use metallic polish to create a gradient or accent.
- Adorn one nail with jewels using nail glue or gem gel.
- Finish with a fast-drying top coat to secure the design.
This method allows for creative expression, combining simplicity with luxurious accents.
Dreamy Pastel Ombre
The dreamy blend of pastel colors in this design offers a soft and whimsical look, perfect for embodying the playful spirit of summer break. The seamless transition between pink, blue, and lilac shades captures the essence of a summer sunset, making it a stunning choice for those who appreciate colorful and unique nail art.
Essential Products for Pastel Ombre Nails
- Pastel Polishes: OPI ‘Pastel Power’ Collection
- Sponge: Makeup sponge for gradient application
- Base Coat: ORLY Bonder Rubberized Basecoat
- Top Coat: CND Vinylux Weekly Top Coat
- Detailing Brush: For any fine corrections or enhancements These products are selected for their ability to blend smoothly and for their enduring quality, ensuring a beautiful finish that lasts.
DIY Tips for Creating Pastel Ombre Nails
- Apply a base coat to protect the nails and ensure polish adhesion.
- Apply a white base coat to enhance the pastel colors’ vibrancy.
- Dab different pastel polishes on a sponge and press onto the nail for the ombre effect.
- Use a detailing brush to blend or touch up any harsh lines.
Seal with a top coat for a glossy and durable finish. This technique might require some practice to perfect, but the end result is a breathtakingly soft and intricate look ideal for any summer event.
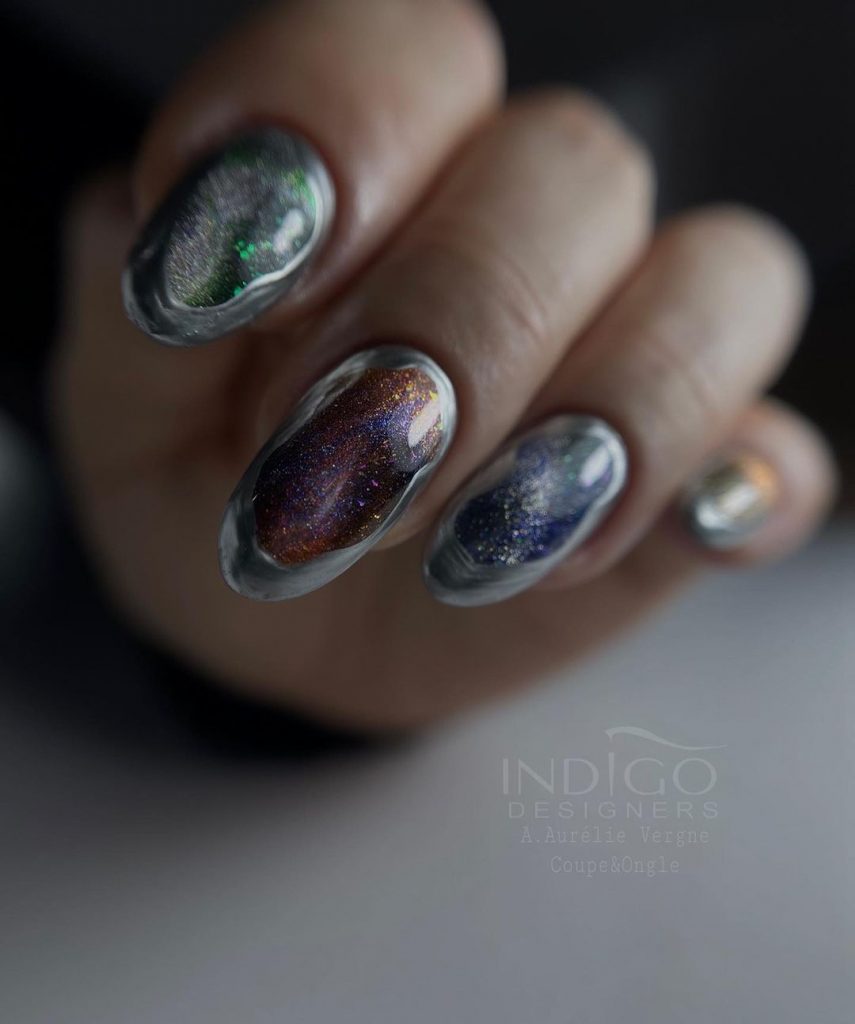
Galactic Charm with Holographic Glitter
This nail art brings the night sky to your fingertips, featuring a range of dark, holographic glitters that create a mesmerizing, cosmic effect. This design is perfect for those who love to stand out with a unique and edgy look that captures the mystique of the galaxy.
Essential Products for Holographic Nails
- Base Coat: CND Stickey Base Coat
- Holographic Glitter Polish: ILNP ‘Mega X’
- Black Gel Polish: Gelish ‘Black Shadow’
- Top Coat: INM Out The Door Top Coat
- UV Lamp: SUNUV SUN2C UV LED Lamp These selections are known for their brilliant sparkle and deep, impactful base that enhance the holographic effect.
DIY Steps for Holographic Design
- Apply a base coat to protect your nails.
- Layer black gel polish and cure under UV light for a solid, dark background.
- Apply holographic glitter polish for a shimmering finish.
- Seal with a top coat for lasting shine and protection.
This design offers a breathtaking look that’s both futuristic and stylish, suitable for any bold fashion statement.
Vivid Red with Textured Accents
This vibrant bright red design is taken to the next level with textured bright overlays that mimic a three-dimensional honeycomb pattern. Ideal for adding an interesting twist to a classic color, this style is summery and playful, perfect for a standout look at any summer break event.

Essential Products for Textured Red Nails
- Red Gel Polish: Essie Gel Couture ‘Rock the Runway’
- Texturing Top Coat: OPI Matte Top Coat
- Detailing Tool: Dotting Tool or Fine Brush
- UV Lamp: LED UV Nail Lamp These products are crucial for creating and maintaining the textured look that catches light and shadow perfectly.
DIY Instructions for Textured Design
- Apply and cure the red gel polish.
- Use the texturing top coat to apply the honeycomb pattern.
- Cure under UV light to set the design.
- Optional: Apply a matte top coat for a different finish.
This nail design is an exciting way to play with textures and add dimension to your nails.
Elegant Floral on Soft Pink
The soft pink base of this design is beautifully enhanced with white floral patterns, offering a delicate and classy look ideal for any summer gathering or a casual outing. It’s a simple, yet sophisticated way to wear flowers on your nails, perfect for those who appreciate pastel and floral aesthetics.

Essential Products for Floral Pink Nails
- Pink Gel Polish: CND Shellac ‘Pink Bikini’
- White Art Paint: Sally Hansen Nail Art Pen in White
- Top Coat: Essie Gel Setter Top Coat
- UV Lamp: CND LED Lamp These products ensure a smooth application and durable wear, necessary for maintaining the intricate floral details.
DIY Floral Application Tips
- Apply the pink gel polish and cure.
- Draw the floral designs using the white art paint.
- Cure and seal with a top coat for durability and shine.
This approach allows for artistic expression while keeping the look elegant and understated.
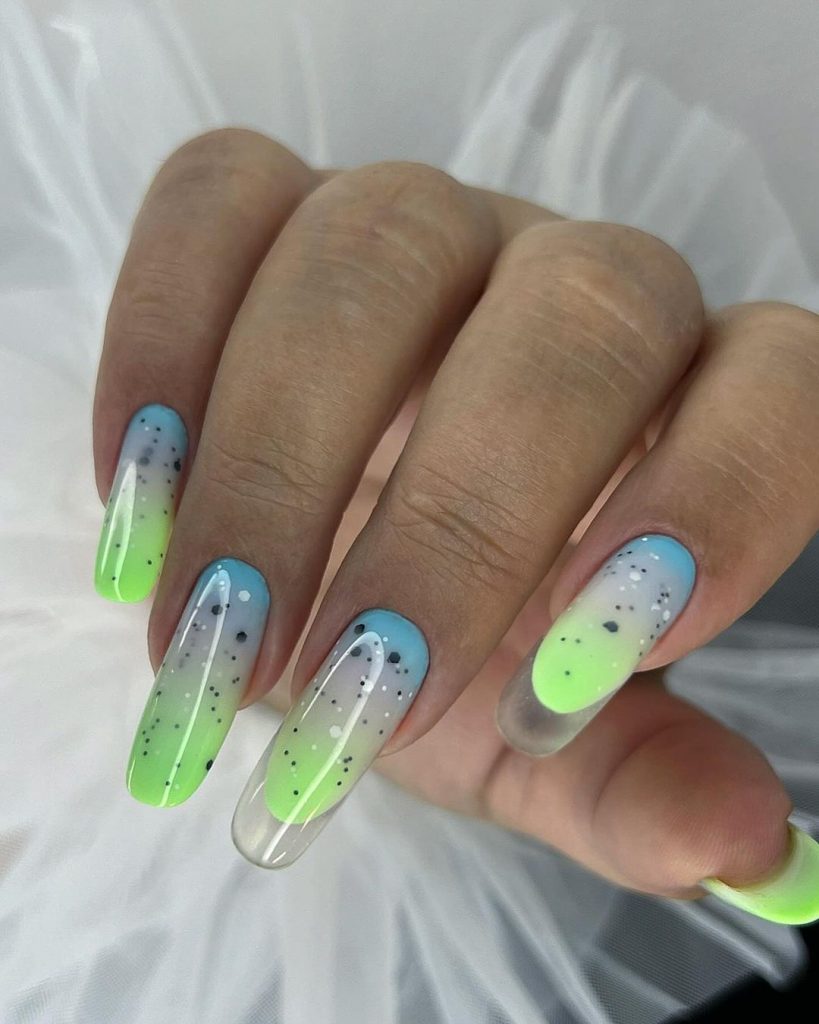
Fresh Lime Ombre with Speckled Accents
The transition from bright lime to soft blue in this ombre design is fresh and lively, symbolizing the vibrant energy of summer. Speckled accents give it a playful yet unique touch, making it a perfect choice for beach parties or sunny day outings.
Essential Products for Lime Ombre Nails
- Lime Green Polish: China Glaze ‘Lime After Lime’
- Blue Polish: Essie ‘Bikini So Teeny’
- Speckle Top Coat: Nails Inc. London Speckled Polish
- Sponge for Ombre: Makeup Sponge
- Top Coat: Seche Vite Dry Fast Top Coat These choices are excellent for their vibrant color and ease of use in achieving a smooth ombre effect.
DIY Ombre and Speckling Steps
- Apply a base coat for protection.
- Sponge on the lime and blue polishes to create an ombre effect.
- Apply the speckled top coat for an added texture.
- Seal with a top coat for lasting wear.
This method is fun and creative, perfect for those who love experimenting with colors and patterns.
Neon Marble and Gold Line Art
This design features a stunning combination of neon pink and purple marble effects, intricately detailed with gold line art. It is vibrant and eye-catching, perfect for making a bold statement during summer. The use of gold lines adds a luxurious touch, making this design both unique and classy.

Essential Products for Neon Marble Nails
- Neon Pink Polish: China Glaze ‘Pink Voltage’
- Purple Polish: OPI ‘Do You Have this Color in Stock-holm?’
- Gold Striping Tape: Thin Adhesive Gold Line Tape
- Marbleizing Tool: Dotting Tool or Fine Brush
- Top Coat: Essie Gel Setter Top Coat These products provide the necessary vibrant base and precision tools for creating detailed marble effects and crisp gold lines.
DIY Marble and Gold Line Art Steps
- Apply a base coat to protect your nails.
- Use neon pink and purple polishes to create a marble effect with a dotting tool or fine brush.
- Once dry, apply gold striping tape to create thin, elegant lines.
- Seal everything with a top coat for a glossy finish and extended wear.
This design is perfect for those looking to explore creative and luxurious nail art styles at home.
Neon Flare
The electrifying shade of neon orange on these almond-shaped nails screams summer fun and neon fun. The matte finish gives the color a modern edge, making it a standout choice for those looking to make a vibrant statement during their summer break.
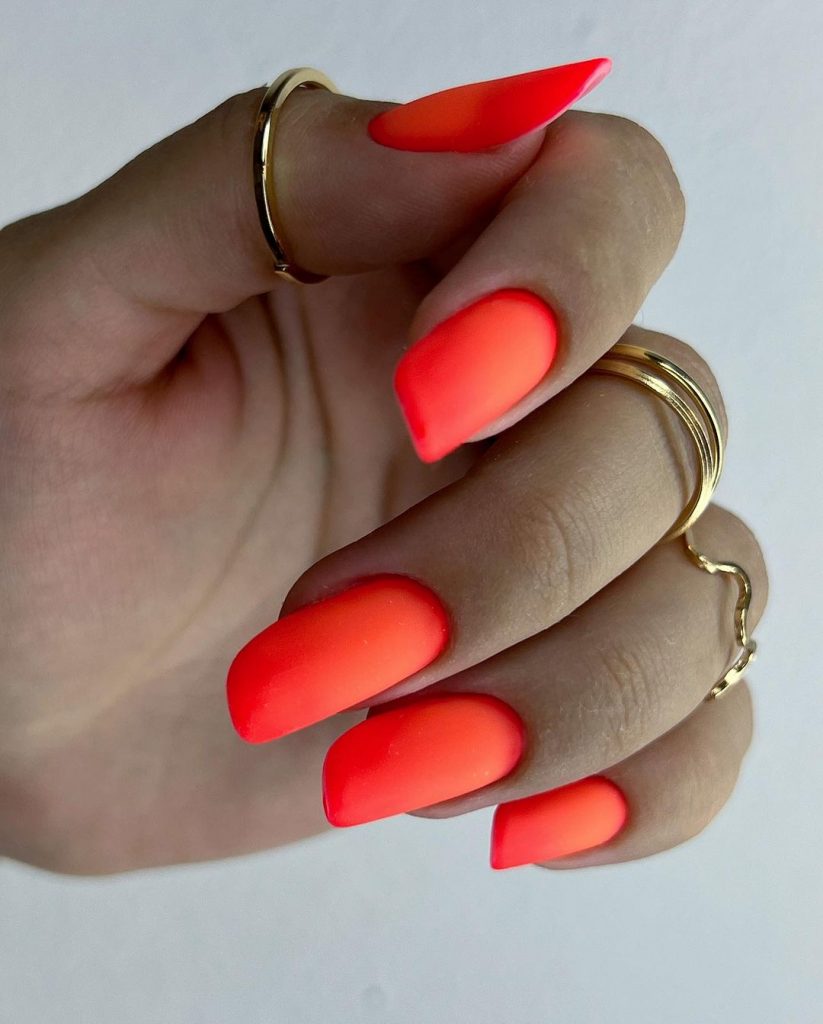
Essential Products for Neon Matte Nails
- Neon Polish: China Glaze ‘Orange Knockout’
- Matte Top Coat: OPI Matte Top Coat
- Base Coat: Orly Bonder Rubberized Basecoat Each product is selected for its high-quality and ability to deliver a stunning matte finish, ensuring your neon nails catch everyone’s attention.
DIY Steps for Neon Matte Look
- Apply the base coat to prepare the nails.
- Paint two coats of neon polish for full coverage.
- Finish with a matte top coat to transform the shine into a chic matte look.
This simple yet bold style is perfect for those who want nails as vivid as their summer adventures.
Tranquil Tiffany Blue
The soothing Tiffany blue offers a breath of fresh air, perfect for a summer day. Its glossy finish highlights the flawless application, suitable for both a relaxed beach day and a classy evening event.
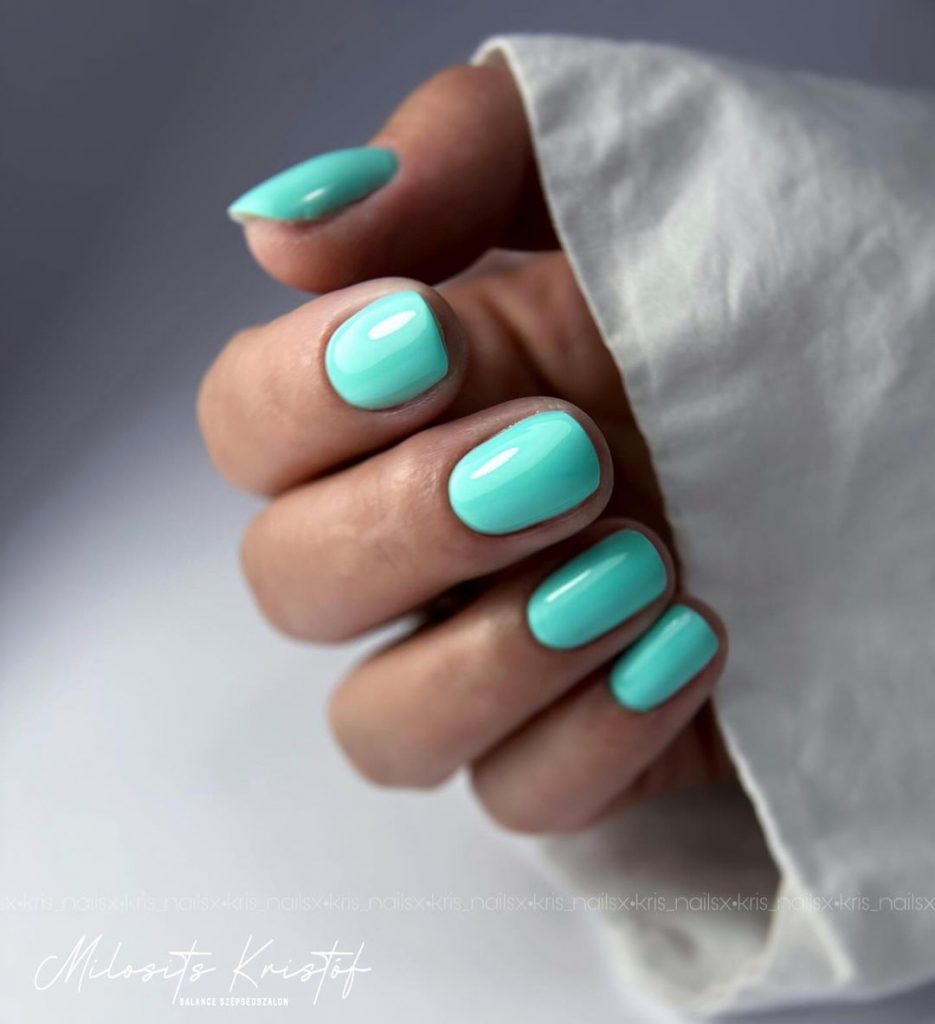
Essential Products for Tiffany Blue Nails
- Blue Polish: Essie ‘Mint Candy Apple’
- Top Coat: Seche Vite Dry Fast Top Coat
- Base Coat: Sally Hansen Double Duty Base & Top Coat These selections ensure a glossy finish and long-lasting wear, essential for keeping your nails looking perfect throughout the season.
DIY Manicure Tips
- Start with a protective base coat.
- Apply two coats of Tiffany blue polish for even coverage.
- Seal with a glossy top coat for a durable and shiny finish.
This look is effortlessly elegant, easy to achieve at home for those who prefer a more subdued but chic nail color.
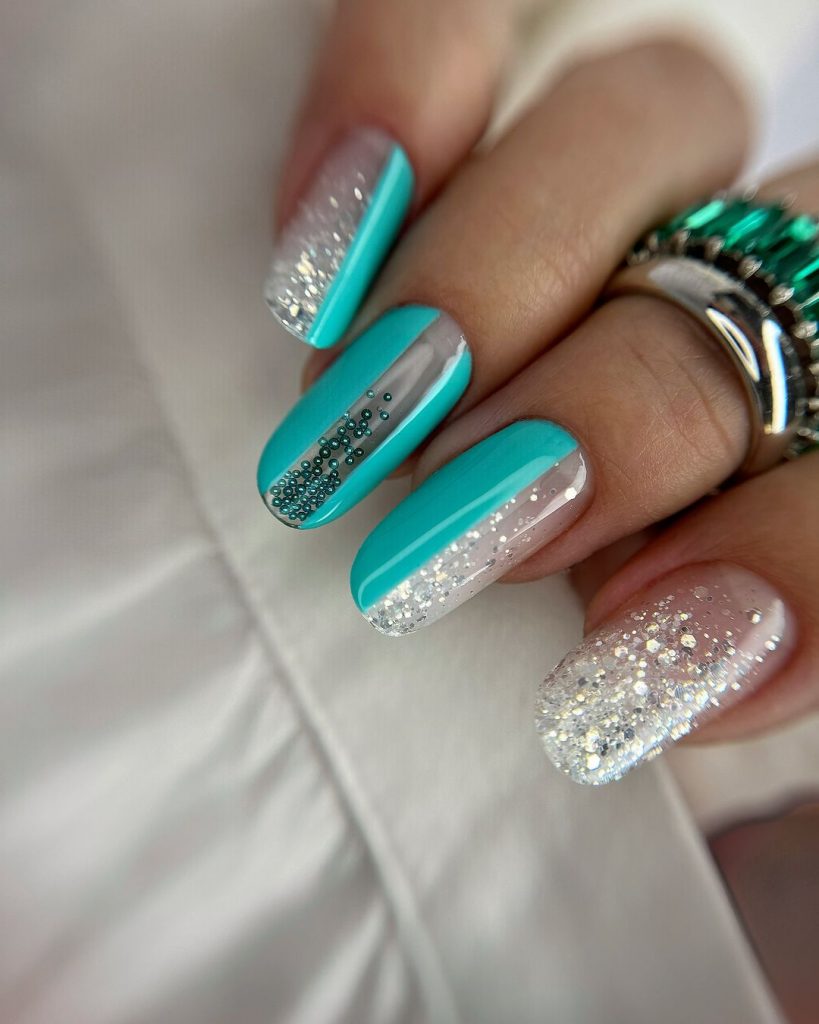
Emerald and Accents
This design features a vivid emerald green paired with a playful decorated accent nail. The crystal embellishments add a touch of luxury, making this style perfect for those who love to combine bold colors with unique elements.
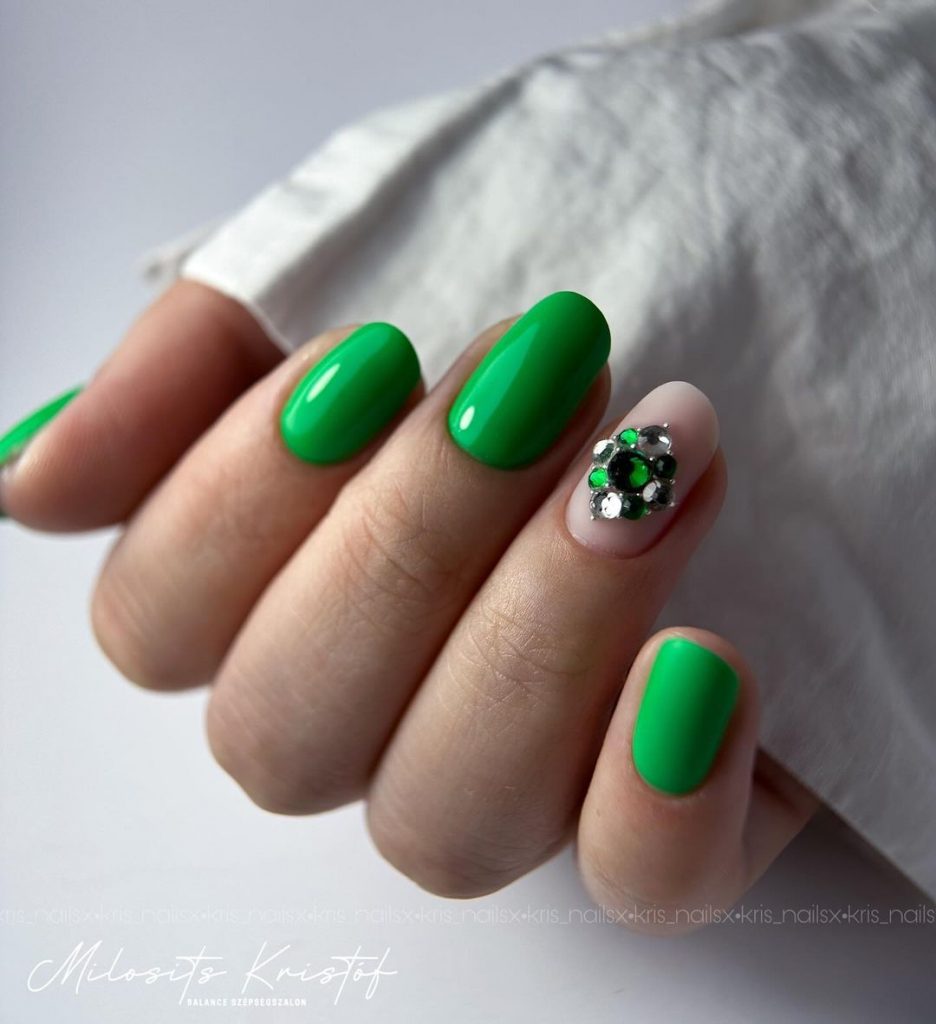
Essential Products for Green and Embellished Nails
- Green Polish: OPI ‘Jade is the New Black’
- Embellishments: Swarovski Crystals
- Top Coat: INM Out The Door Top Coat
- Adhesive for Crystals: Nail Glue These products are ideal for achieving a vibrant color with eye-catching details that are sure to turn heads.
DIY Steps for Emerald and Crystal Nails
- Apply green polish as the base.
- Place crystals on the accent nail using nail glue.
- Finish with a top coat to secure the embellishments and enhance shine.
This nail design is a fun way to experiment with color and textures, offering a stylish twist to your summer nail wardrobe.
Bold Orange and Leopard Print
Combining a brilliant orange with a leopard print accent nail provides a trendy and bright look. This combination is energetic and perfect for making a fashion statement, capturing the essence of summertime.
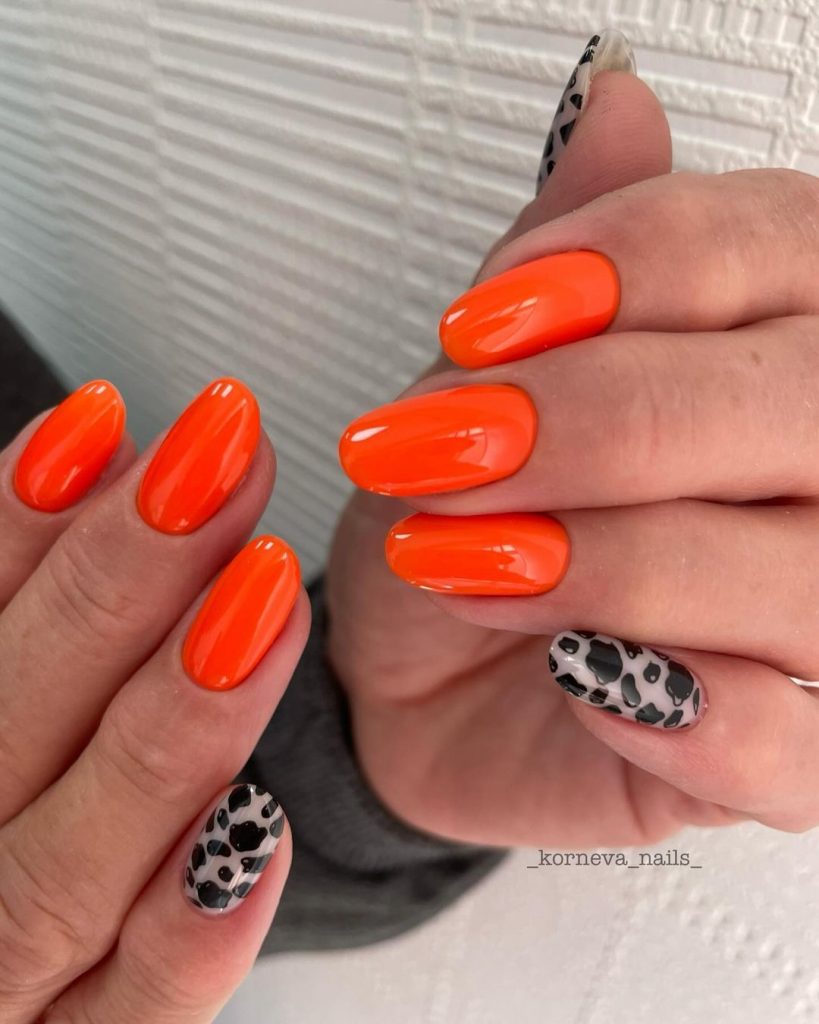
Essential Products for Orange and Print Nails
- Orange Polish: Sally Hansen ‘Sun Kissed’
- Black and White Polishes for Detailing: Essie ‘Licorice’ and ‘Blanc’
- Top Coat: Seche Vite Dry Fast Top Coat These products offer the perfect palette for creating sharp, detailed designs that last.
DIY Instructions for Bold and Patterned Nails
- Paint the nails orange and let them dry.
- Use black and white polishes to add leopard spots on one or two accent nails.
- Apply a top coat to protect the design and add a glossy finish.
This bold and playful look is great for those who love to express their vibrant personality through their nail art.
Pastel Perfection with Sparkles
These nails feature a soft pastel purple dusted with iridescent sparkles, offering a magical and classy look. The subtle sparkle catches the light beautifully, making it a perfect choice for those who prefer a more understated yet enchanting nail design.

Essential Products for Sparkly Pastel Nails
- Pastel Purple Polish: OPI ‘Do You Lilac It?’
- Sparkle Top Coat: ILNP ‘Fairy Dust’
- Base Coat: Essie Ridge Filling Base Coat These choices are designed for their gentle hues and sparkling effects, ensuring your nails look elegant and festive.
DIY Steps for Sparkly Pastel Look
- Apply a base coat to smooth any imperfection in the nails.
- Apply two coats of pastel purple polish, allowing each coat to dry completely.
- Finish with a layer of sparkle top coat to add that magical shimmer.
- Seal everything with a top coat for extra shine and durability.
This style is wonderfully suited for those who love a bit of glitter but prefer it to be subtle and sophisticated, perfect for both day and evening wear.
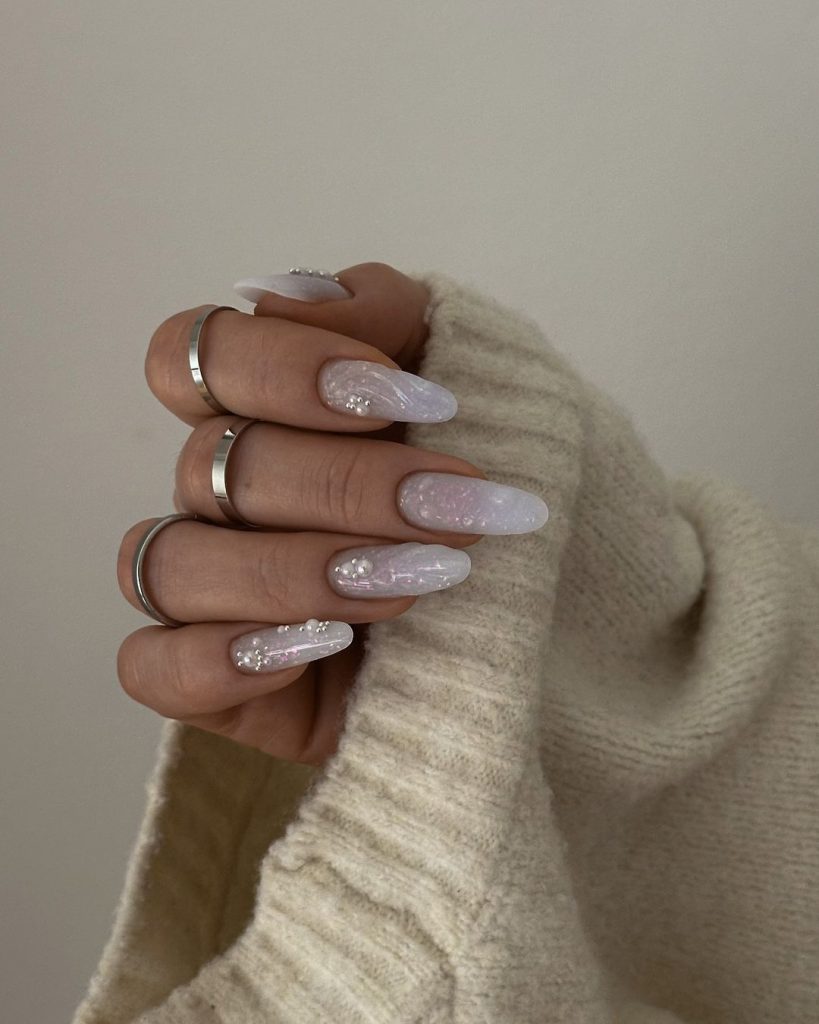
Cloudy Skies and Crystal Droplets
These nails transport one to a dreamy cloudscape with soft blue and white marbling that resembles a tranquil sky. Embellished with small crystal accents, they capture the light and add a delicate sparkle, perfect for anyone looking for a unique and classy summer nail design.

Essential Products for Sky-Inspired Nails
- White Gel Polish: Gelish ‘Arctic Freeze’
- Sky Blue Gel Polish: CND Shellac ‘Azure Wish’
- Crystals: Swarovski Small Flatback Rhinestones
- Top Coat: Glisten & Glow Top Coat These products ensure a smooth, ethereal finish with a touch of sparkle that lasts.
DIY Manicure Steps
- Start with a base coat and cure.
- Sponge on white and sky blue polish to create a marbled effect.
- Add crystals for a raindrop look.
- Seal with a top coat for durability and extra shine.
This look is ideal for adding a touch of fantasy to your summer style.
Gradient Pink and Floral Art
The gradient from soft white to vibrant pink sets a romantic tone, while delicate pink flowers on the accent nails introduce a floral touch that’s both summery and elegant. This design is great for those who enjoy simple yet visually appealing nails with a hint of nature.
Essential Products for Gradient Floral Nails
- White and Pink Gel Polishes: Essie Gel Couture ‘Pre-Show Jitters’ and ‘Fiji’
- Tiny Brushes for Detailing: Nail Art Detail Brushes
- Top Coat: Essie Gel Setter The chosen products provide the perfect tools for precise and lasting floral designs.
DIY Floral Gradient Tips
- Apply a white base and cure.
- Use a sponge to apply the pink gradient.
- Paint small flowers on the accent nails.
- Finish with a top coat to protect and enhance the art.
This technique is excellent for those looking to blend simple gradients with detailed art.
Serene Beachside Palette
This nail design uses a soothing palette of seafoam green and sandy beige, adorned with precise dotting and glitter accents that mimic a sparkling shoreline. It’s a perfect match for a beach outing or a casual summer day.
Essential Products for Beach-Inspired Nails
- Seafoam Green Polish: OPI ‘That’s Hula-rious!’
- Beige Polish: Zoya ‘Farah’
- Silver Glitter Polish: Sally Hansen ‘Diamond Strength’
- Dotting Tools These products are chosen for their ability to create a clean, beach-inspired look that’s both playful and sophisticated.
DIY Beachside Nail Art Tips
- Paint the base in seafoam green.
- Add beige accents with a brush.
- Use dotting tools to apply glitter dots.
- Finish with a protective top coat.
This look is easy to achieve and perfect for anyone wishing to carry the calmness of the beach on their fingertips.
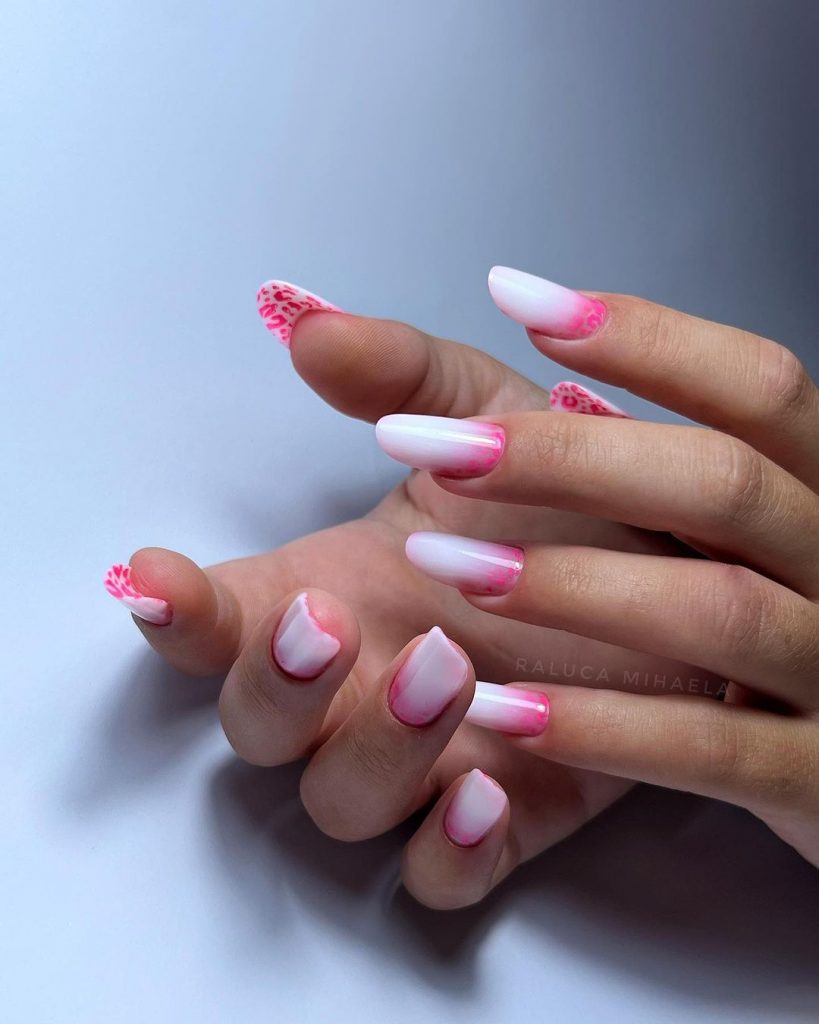
Soft Pink Elegance with Leopard Accents
These nails blend soft pink with bold leopard print accents, creating a striking contrast. The addition of a jeweled ring finger elevates the entire design, making it perfect for both daytime charm and evening elegance.

Essential Products for Pink and Leopard Nails
- Soft Pink Gel Polish: CND Shellac ‘Romantique’
- Leopard Print Stickers or Hand-Painted with Black and Brown Polishes: Born Pretty Nail Art Paint
- Jewels: Gold Microbeads
- Top Coat: OPI Glossy Top Coat These selections help achieve a delicate balance between subtlety and bold pattern, ensuring a glamorous look.
DIY Instructions for Elegant Leopard Design
- Apply soft pink polish as the base.
- Add leopard print on select nails using stickers or hand painting.
- Embellish the ring finger with gold microbeads.
- Seal with a top coat for durability and shine.
This design is great for those who love to mix classic soft tones with edgy patterns.
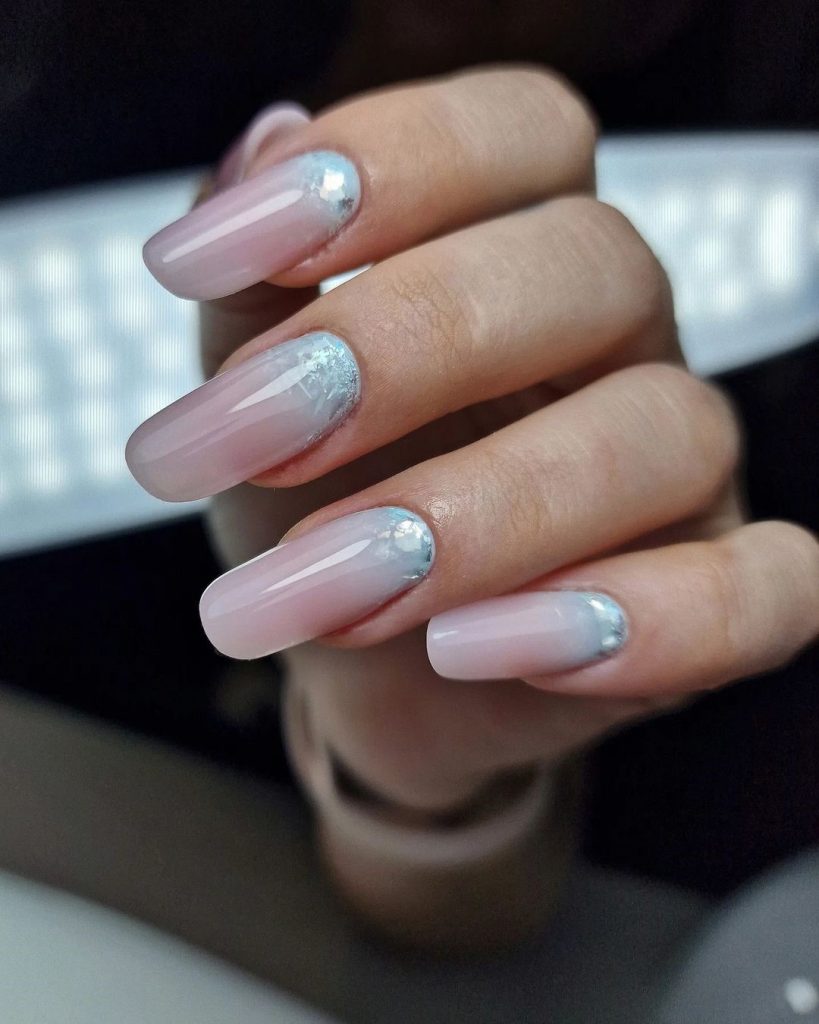
Winter Sparkle
Embodying the quiet sparkle of a frosty winter morning, these nails use a translucent base with iridescent glitter that catches the light with every movement. Perfect for winter festivities or adding a touch of sparkle to everyday looks.
Essential Products for Sparkling Winter Nails
- Translucent Gel Polish: Essie Gel Couture ‘Sheer Fantasy’
- Iridescent Glitter Top Coat: ILNP ‘Fairy Dust’
- Base Coat: Essie Ridge Filling Base Coat These selections are ideal for achieving a subtle yet sparkling look that mimics the enchanting shimmer of snow.
DIY Steps for Winter Sparkle Nails
- Start with a ridge-filling base coat to ensure a smooth application.
- Apply the translucent gel polish as the base color.
- Layer with the iridescent glitter top coat to achieve the sparkling effect.
- Finish with a top coat to seal the glitter and enhance durability.
This look is beautifully understated and perfect for winter events or as a seasonal staple, adding a touch of magic to your nails.
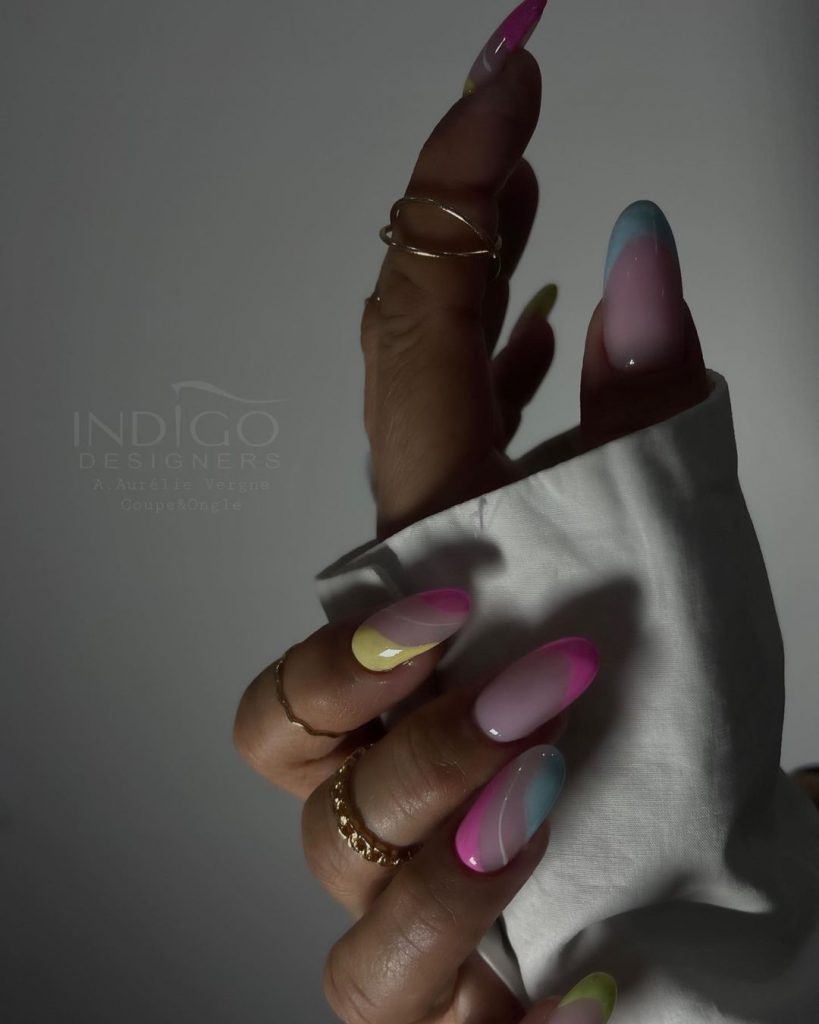
Psychedelic Swirls
This design features a playful array of pastel swirls, creating a psychedelic effect that is both eye-catching and fun. The use of multiple colors in a swirling pattern on a white base makes each nail a unique piece of art, perfect for summer festivals or creative outings.

Essential Products for Swirl Nail Art
- White Gel Polish: OPI ‘Alpine Snow’
- Pastel Polishes: Various shades from Essie and OPI
- Detailing Brushes: Fine nail art brushes
- Top Coat: Seche Vite Dry Fast Top Coat These products ensure crisp lines and vibrant colors, essential for detailed nail art.
DIY Steps for Creating Swirls
- Apply a white gel polish as the base and cure.
- Use detailing brushes to add pastel swirls in various colors.
- Seal with a top coat for a smooth, lasting finish.
This artistic approach is great for those who enjoy expressing their playful side through their nail design.
Neon Elegance
This design uses striking neon yellow to make a bold statement, combined with soft white and detailed nail art that adds a sophisticated touch. The contrasting colors make this a vibrant choice for those looking to blend classic and modern styles.

Essential Products for Neon and White Nail Design
- Neon Yellow Polish: China Glaze ‘Celtic Sun’
- White Gel Polish: Gelish ‘Arctic Freeze’
- Detailing Tape and Brushes
- Top Coat: INM Out The Door Top Coat These selections help achieve a precise and clean look with a pop of neon color.
DIY Tips for Neon Nail Art
- Paint the nails with white gel polish and cure.
- Apply neon yellow on selected areas or tips.
- Use detailing tape to create sharp lines.
- Finish with a top coat for enhanced durability and shine.
This style is perfect for adding a vibrant touch to a minimalist design, ideal for summer parties or casual outings.
Sparkling Butterfly Charm
Soft pink nails dusted with glitter create a magical backdrop for the intricate butterfly details on this design. It’s a romantic and feminine look, enhanced by the subtle sparkle that makes it perfect for wedding events or date nights.

Essential Products for Butterfly Nail Art
- Pink Glitter Gel Polish: Gelish ‘Pink Smoothie’
- Butterfly Decals: Nail Art Stickers
- Top Coat: Glisten & Glow Top Coat
- Microfine Glitter These products are selected for their quality and suitability for creating detailed and delicate nail art.
DIY Steps for Creating Butterfly Nails
- Apply the pink glitter gel polish as the base.
- Carefully place butterfly decals on the nails.
- Add a layer of microfine glitter for extra sparkle.
- Seal everything with a top coat for a smooth finish and lasting wear.
This look is ideal for those who love detailed, thematic designs that express personality and style.
Save Pin
