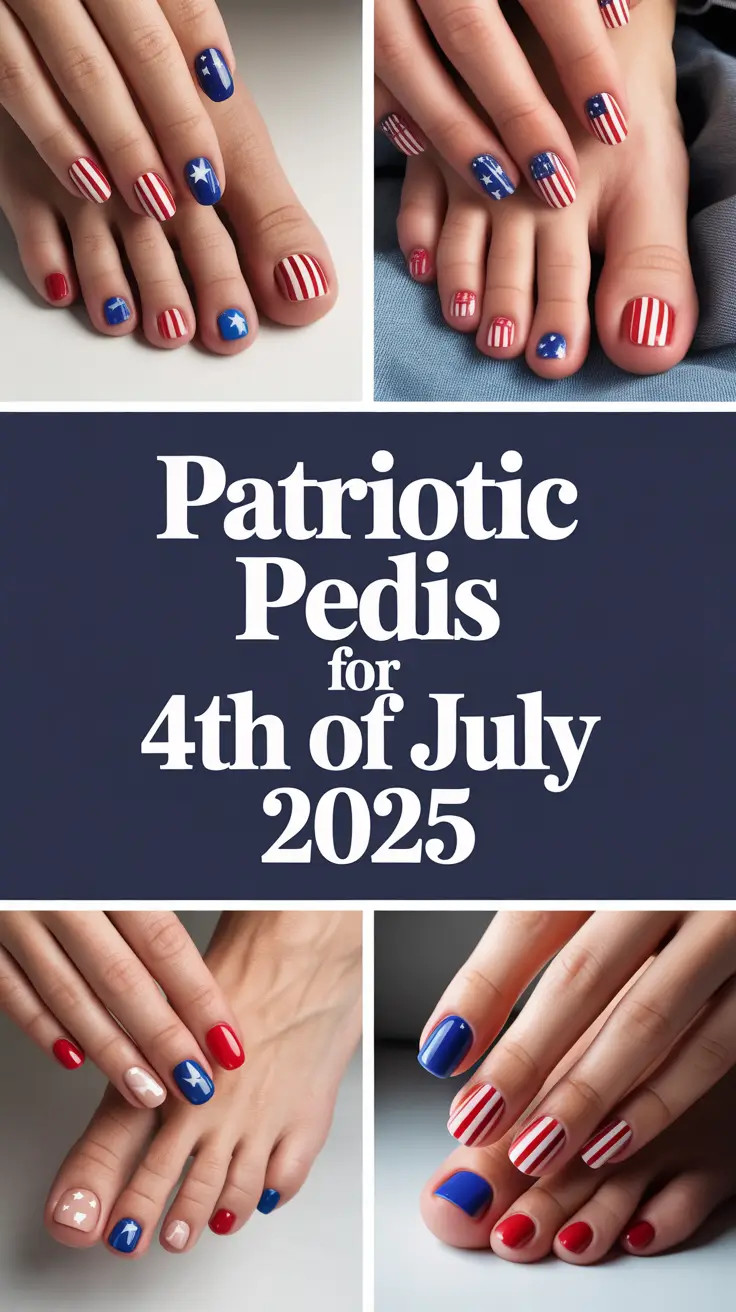
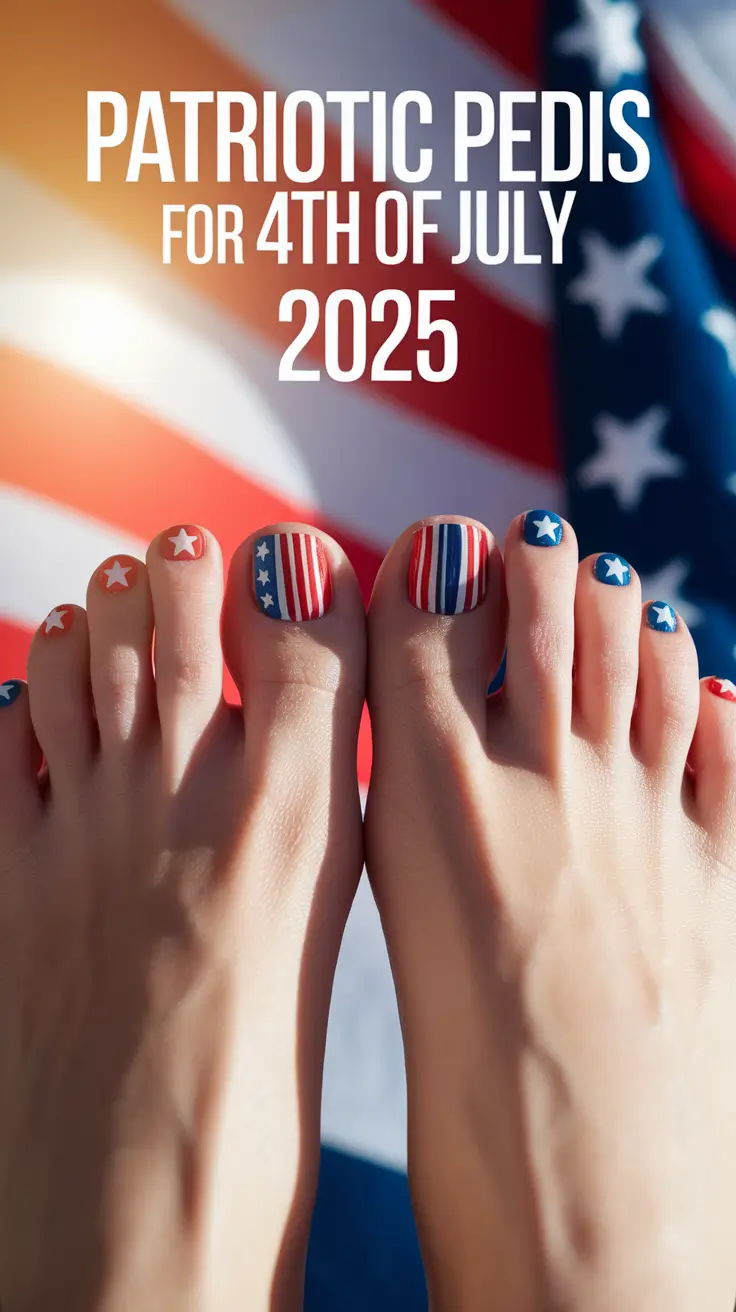
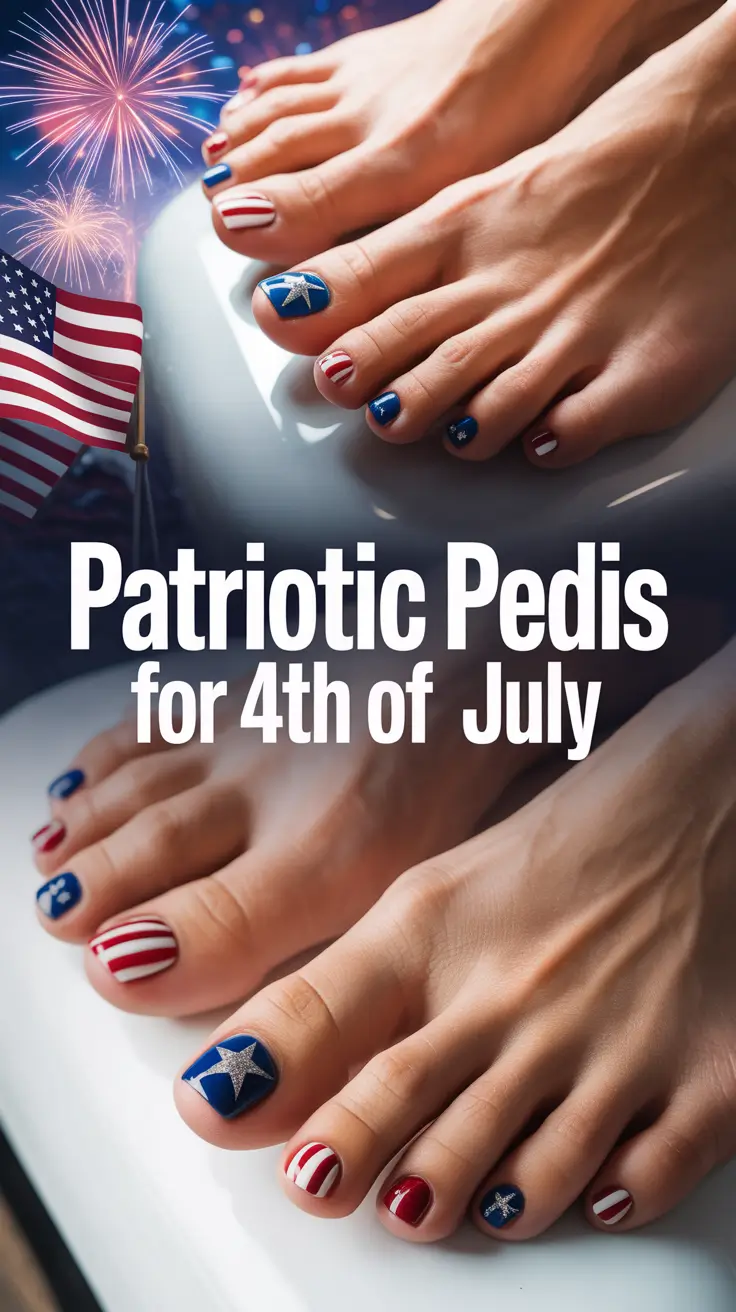
Patriotic Pedis for 4th of July 2025: Festive Mani Pedi Ideas to Show Your Stars and Stripes
 Fireworks? Check. Hot dogs on the grill? Of course. A breezy sundress and your favorite flip-flops? Naturally. However, before you go off, make sure your toes are ready to grab the spotlight, too. If you’re anything like me, the Fourth of July is more than a backyard BBQ—it’s a chance to go full-on festive, head to toe (literally). Why not mark the holiday with a bold and colorful mani pedi?
Patriotic pedicures are on trend, featuring star-studded designs, simple stripes and sometimes, glitter. You can wear these outfits anywhere, from the rooftop to the pool and make your summer truly American. I’m going to show you the most fun and lovable Fourth of July pedicure ideas I’ve gathered for you.
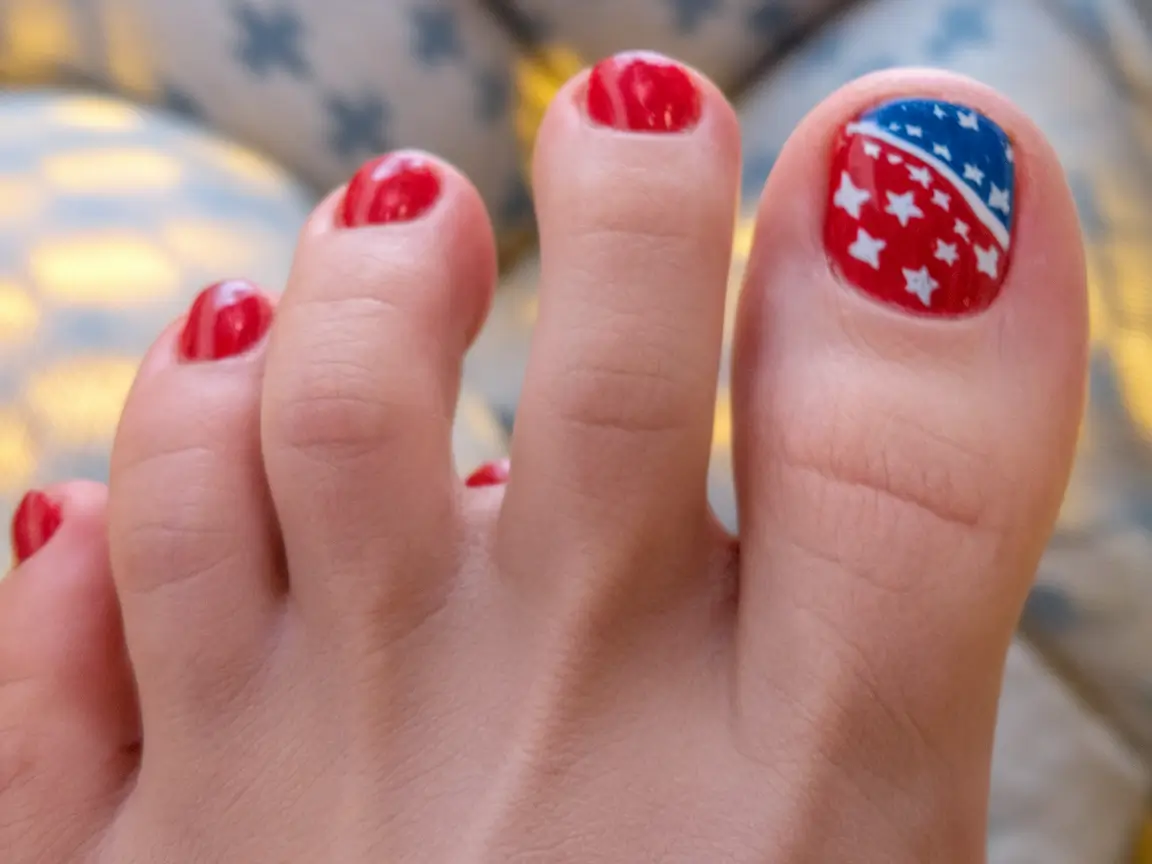
Classic Red With a Starry Statement
The main design element here is timeless red, but it also has a bit of firecracker fun. The big toe is painted a different color than the other toes which are all cherry red. The centerpiece of any flag, it has a bright blue and red section divided by straight white stars and is completed by a white border. It brings together the style of a flag and the playfulness of fashion and it just works.
To recreate this look, I like using OPI’s “Big Apple Red” and “My Pal Joey” for the base shades. The stars can be drawn in with a white striping polish or added with pre-cut nail vinyls if you’re not steady with a brush. Make sure to finish with a good top coat and try Seche Vite to protect your nail color.
To get a similar effect at home, I use striping tape to make the diagonal line clear. Pro tip? Put on the tape when the polish feels dry to the touch so that the lines stay sharp and the color is not lifted.
There’s something about a red polish that makes me feel instantly polished (pun totally intended), and the stars? They make me think of my childhood, sparklers and warm summer evenings. It’s great that this outfashion references the flag, but not in a direct way. Just enough pop to catch attention without screaming costume.
Fireworks Burst of Stars
If you really want to go for Americana glam, this is the one. All the toes have red, white and blue star patterns which are layered over a base that swirls with two colors in an abstract starburst. It’s impossible to ignore this one—it’s lively, colorful and it definitely feels like a rooftop party in New York.
You should use three polishes: Essie’s “Forever Yummy” for the crimson, ILNP’s “Harbour Island” for the royal blue and Zoya’s “Purity” for the white. Using star-shaped nail stickers makes this look much simpler than you might think. Apply red and blue paint in several spots, take off the stars and finish it by sealing the painting with glitter or a clear coat.
Not gonna lie, I’ve attempted this style after one too many coffee refills, and it’s surprisingly forgiving. If the design is busy, it can help hide little flaws. For those who want to avoid freehanding, a dotting tool and a tiny brush are very useful.
I wore it last summer at a friend’s lake house and people waiting in line for ice cream told me how much they liked it. This is a pedicure that makes your feet a center of attention—just what you hope for when wearing sandals and a white summer dress.
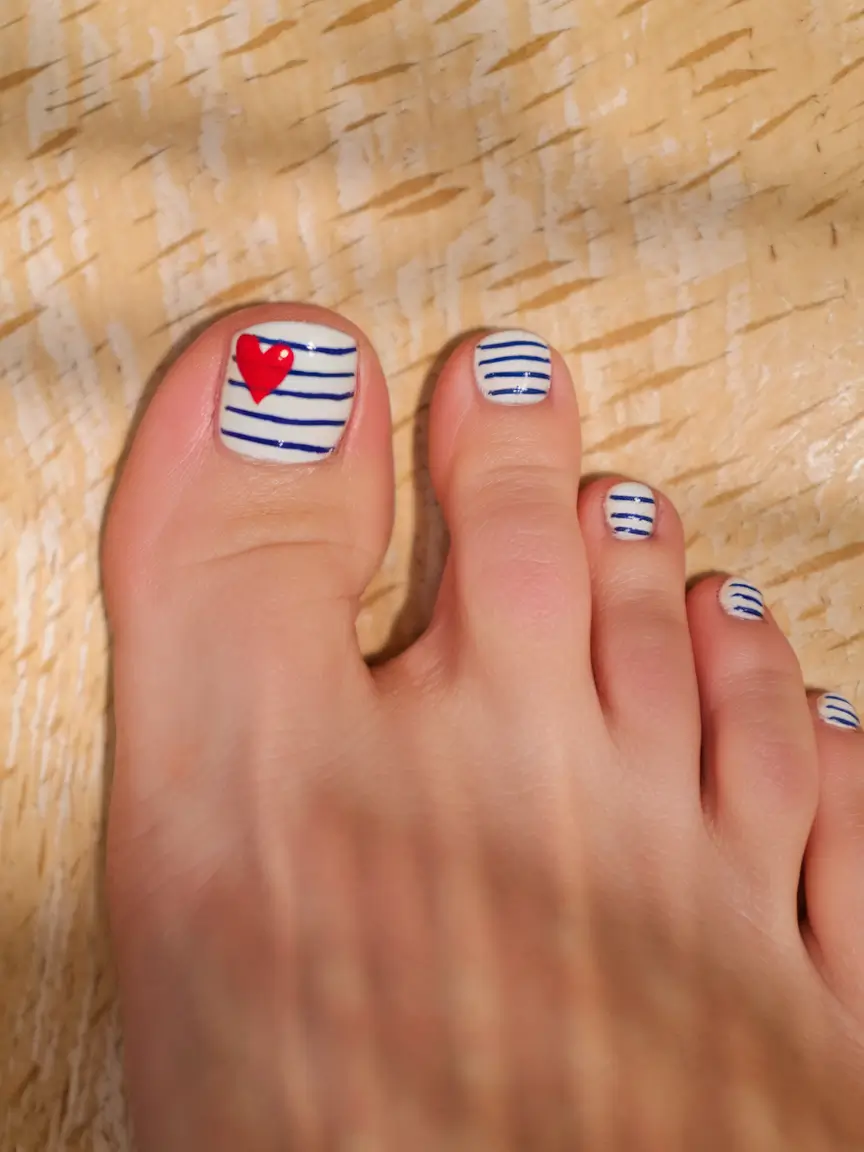
Striped Heartbeat
Now here’s a fresh twist on nautical-meets-patriotic. All toes are painted in solid red—except for one. The accent toe has horizontal stripes of blue and white and there is a single red heart in the center. It’s cute. It’s cheeky. It’s really meant for enjoying rosé on a boat deck or walking along a boardwalk.
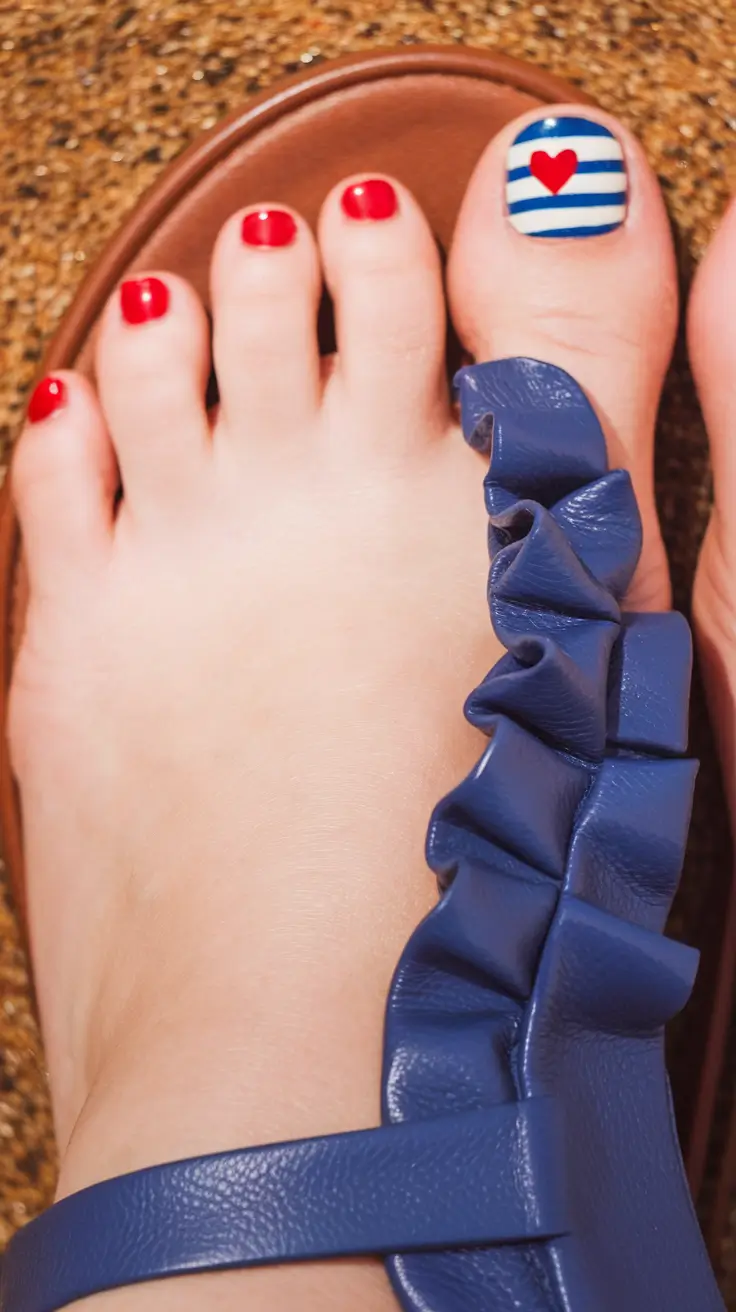
If you want to try nail art but not something too bold, this is the style for you. You could use Butter London’s “Come to Bed Red” for a base and have a navy like “Royal Navy” by Nails Inc. Try using a fine nail art brush for the heart or use a small sticker if you’re in a hurry.
For stripes, I swear by nail striping tape. It keeps everything clean and symmetrical, especially if you’re layering white over blue (which can be tricky opacity-wise). Don’t rush drying between layers—this one’s all about patience.
For me, this combination comes out looking chic and kitschy at the same time without a lot of work. It shows that I pay attention to the little things, but in a relaxed way which is what I’m all about in the summer.
Stars and Stripes Forever
This one is pure patriotism with a wink. All the little toes have red and white stripes, but the big toe is navy blue with five white stars on it. It’s like the American flag’s chic younger cousin.
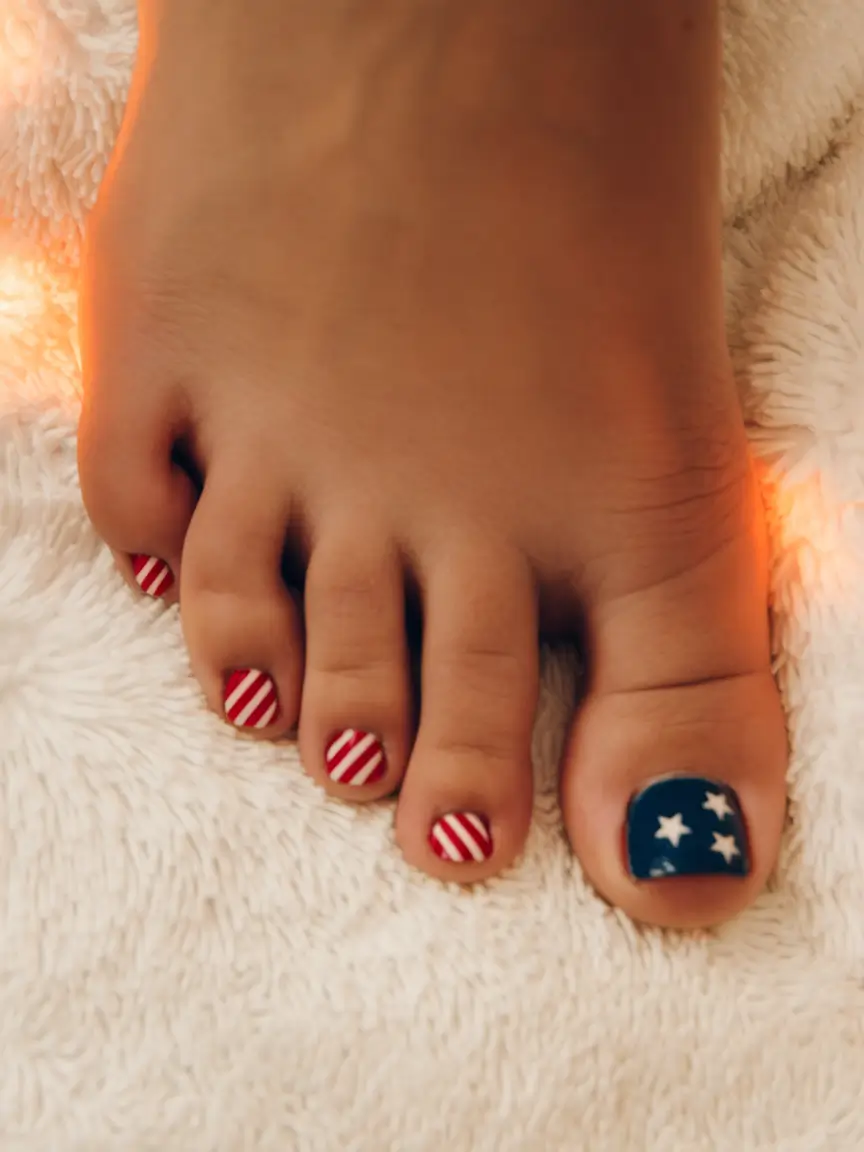
To achieve those clean stripes, I’d use a white base (try Sally Hansen’s “White On”) with a striping brush dipped in red like Essie’s “A-List.” To get the blue, use a color like OPI’s “Russian Navy,” and use a stamping plate or dotting tool to add the stars.
To get even stripes, lay the brush down and move your toe, not the brush. A YouTube tutorial I saw years back taught me this and it completely changed how I do nail art.
One time I wore a similar design with a striped romper and it looked great, even though I’d done my nails while watching TV. It looks festive, but also a bit preppy, as if Ralph Lauren was the one making the nail polish.

Glitz and Glory
And finally, the glam queen of all patriotic pedis. There are red, white, blue and silver glitter on this one and each toe is decorated differently. There is glitter on one toe, a tiny flag on another and white stars over red on the third. It’s maximalist in the best way.
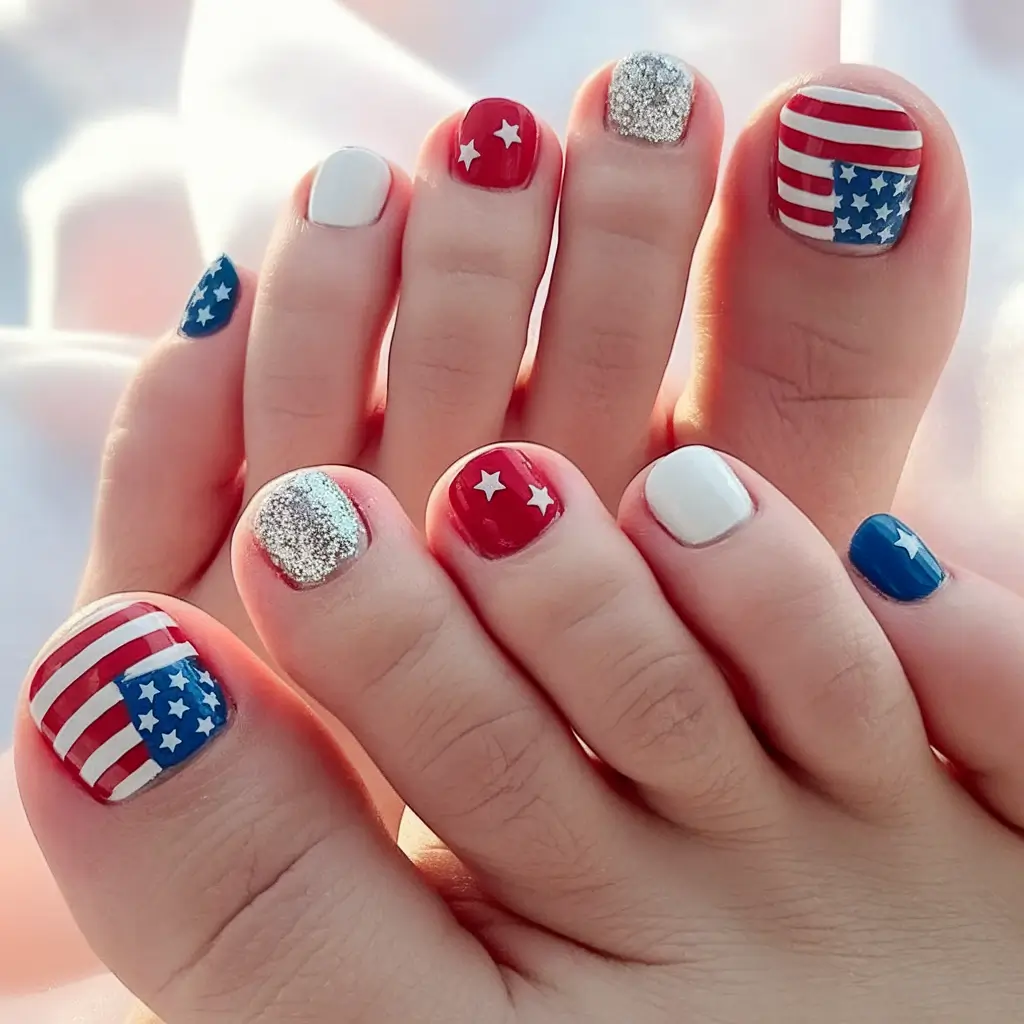
Materials-wise, you’ll want a variety pack: a chunky silver glitter (I love Deborah Lippmann’s “Happy Birthday”), plus your trusty reds, blues, and whites. Apply stars and stripes to the bigger nails with thin brushes or by using stamping plates.
You can’t quickly finish this kind of design in 20 minutes. If you’re going on a long weekend or want your nails to look as good as your ring, taking a little longer is really worth it.
I like that this style isn’t afraid to be noticed. It sounds like a celebration and isn’t that what the Fourth of July is all about?
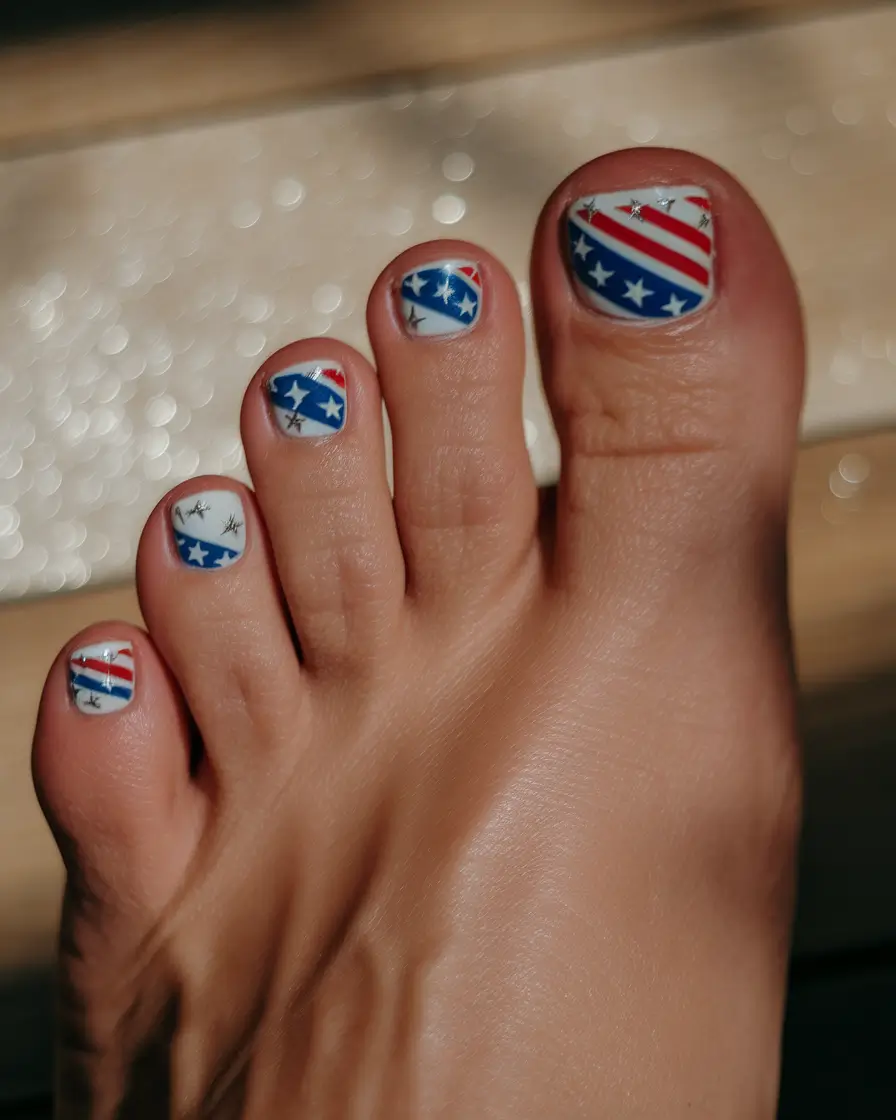
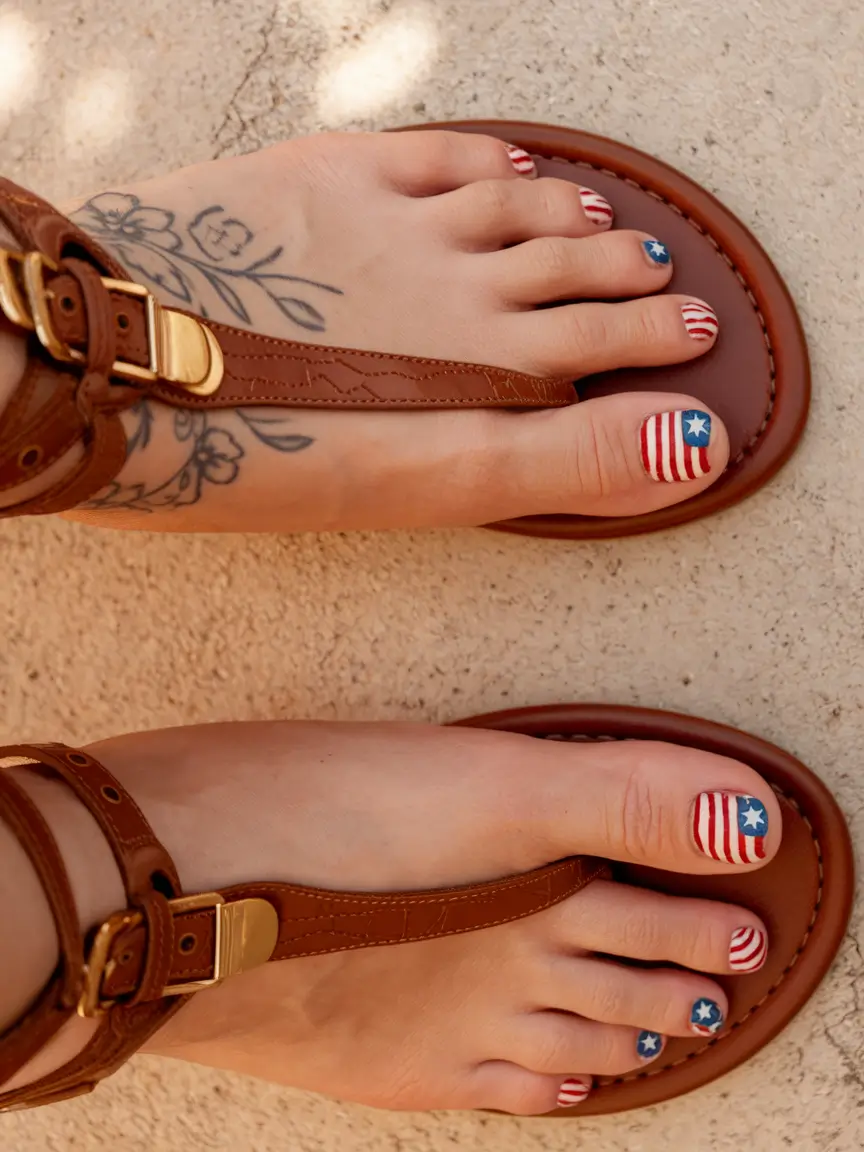
All-American Flag Vibes
A pedicure inspired by the American flag is hard to miss and truly stands out. The stripes on the nails are red and white and the background is navy with white stars, making your toes a symbol of independence. It’s striking, well-planned and just right for people who want to celebrate the Fourth of July in style.
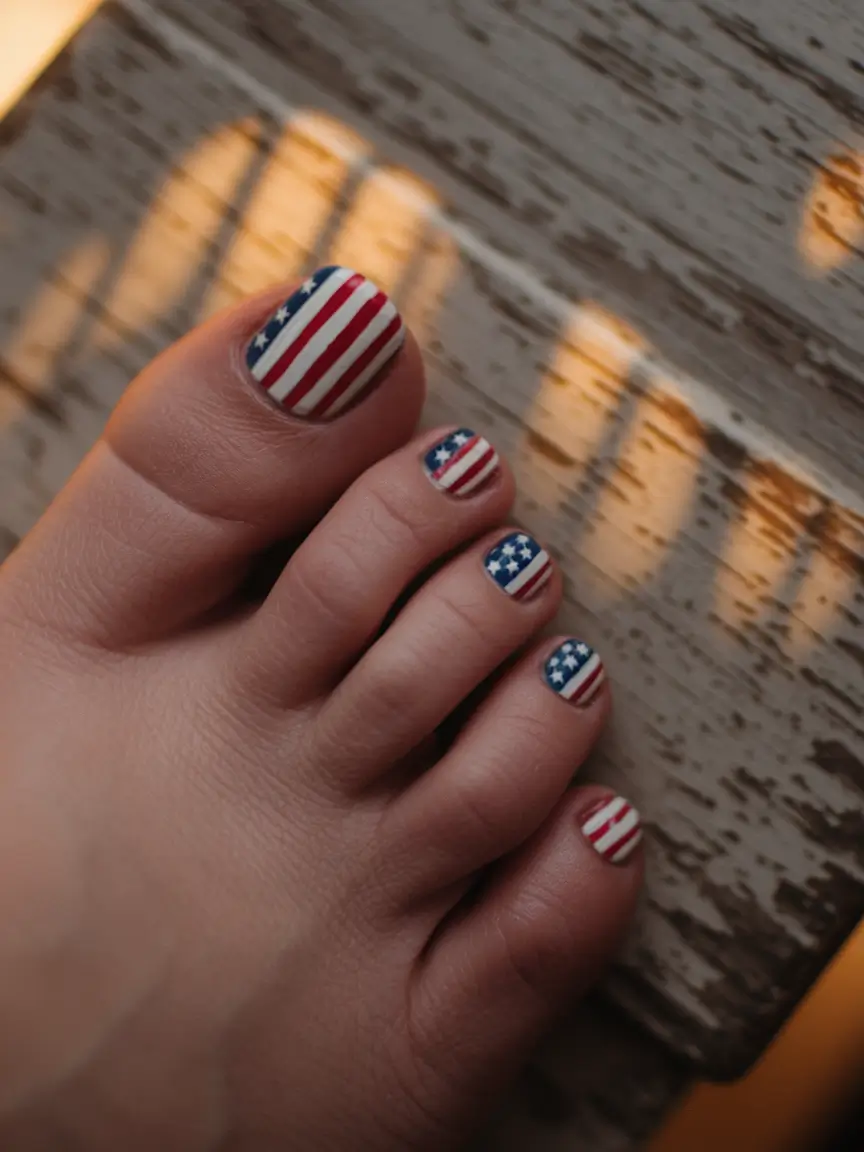
This design is most effective when you have tools that make it easy to be precise. I think using nail striping tape is a good idea to keep your design straight. I began by using OPI “Alpine Snow” and next added Essie’s “Really Red” to only the stripes. I recommend Zoya’s “Ryan” for the blue, as it stays navy in low light which is a favorite feature.
I begin by making all the nails white, let them dry, add the striping tape and then paint the red stripes. The stars are applied after the patches dry, one by one, using a fine brush and a stencil.
I made this style for a picnic and I spent most of the day walking barefoot on the grass. I was able to show my feet and I felt more proud than ever. My nails stayed colorful even after sunscreen, sweat and watermelon which is really all I care about for my 4th of July mani pedi.
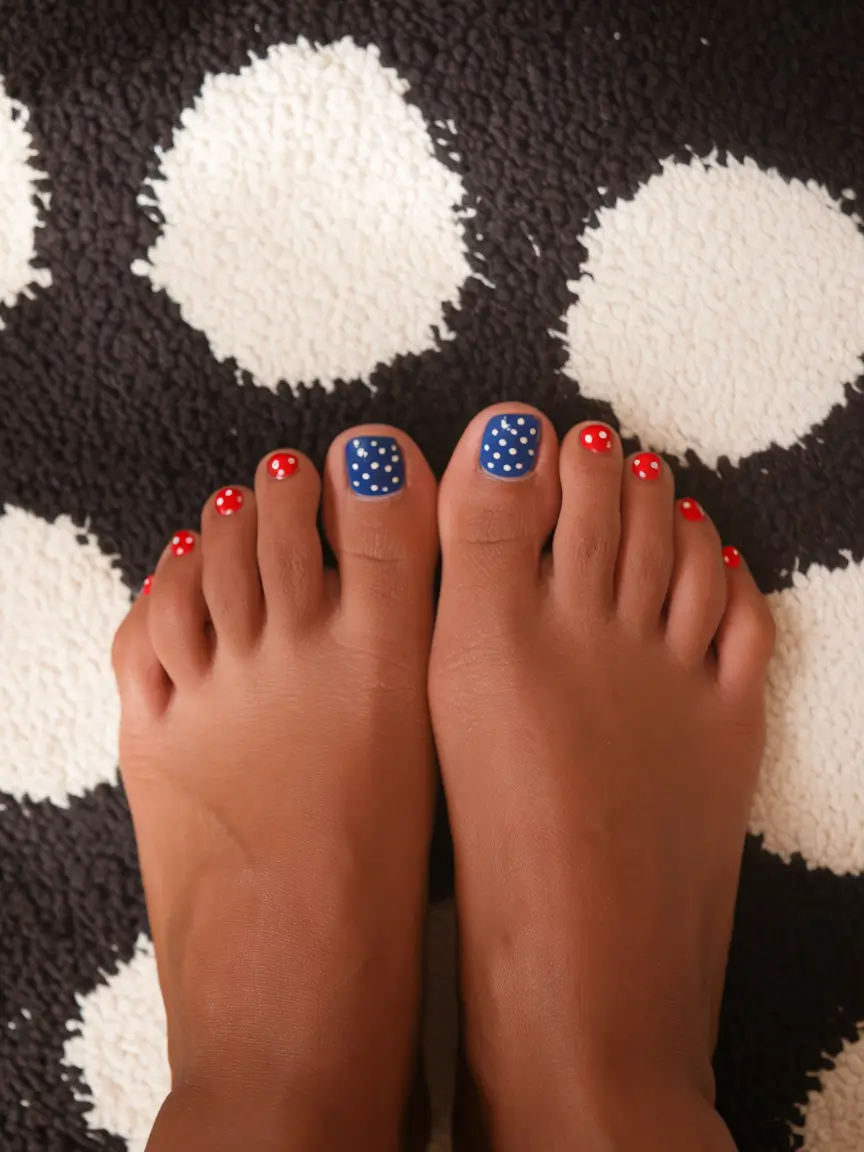
Retro Pop Polka Patriot
If you’re more into pop art than politics, this bright and playful design brings the fun. Most of the toes are painted red and the big toes are painted blue with white polka dots on top. It’s giving vintage swimsuit vibes meets backyard party. Simple? Yes. Adorable? Absolutely.
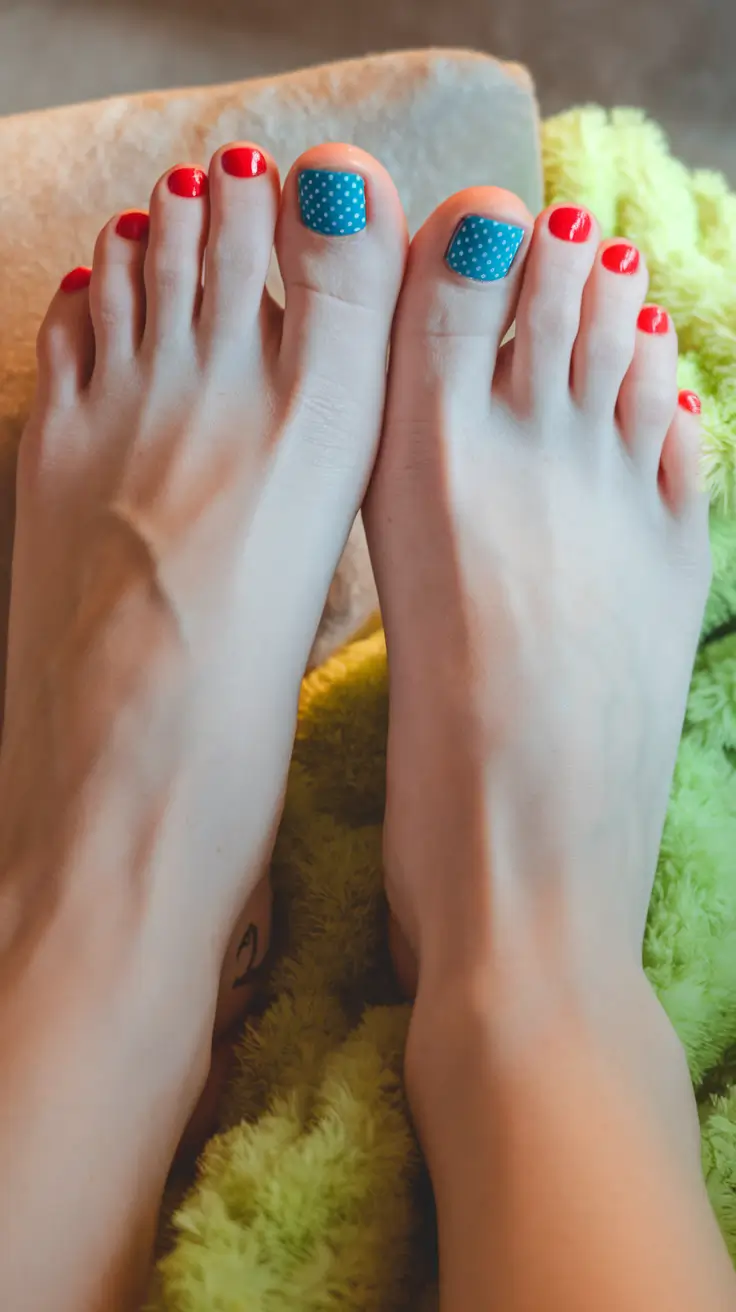
I applied Essie’s “Fifth Avenue” for the red part and “Butler Please” for the blue part. The dots are just dots—literally. I dipped the end of a bobby pin in white polish, but using a dotting tool will give you even spacing.
I skip tape entirely on this one. Paint with just two layers, wait for the first to dry, then put dots on top. A top coat gives everything a glossy finish and really makes the red stand out. Actually, it’s a perfect activity to do when you’re watching your favorite show.
This one reminds me of my childhood, with fireworks and bomb pops. It’s not overly serious which is perfect if you simply want to join in the fun without being an expert.
Rhinestone Rebel in Red
You don’t have to wear stars and stripes every Fourth of July. Independence is shown by the fiery red main color, the wavy black designs and the sparkle of the tiny rhinestones on top. It’s making sure your style is bold, confident and sometimes a bit rock-and-roll.
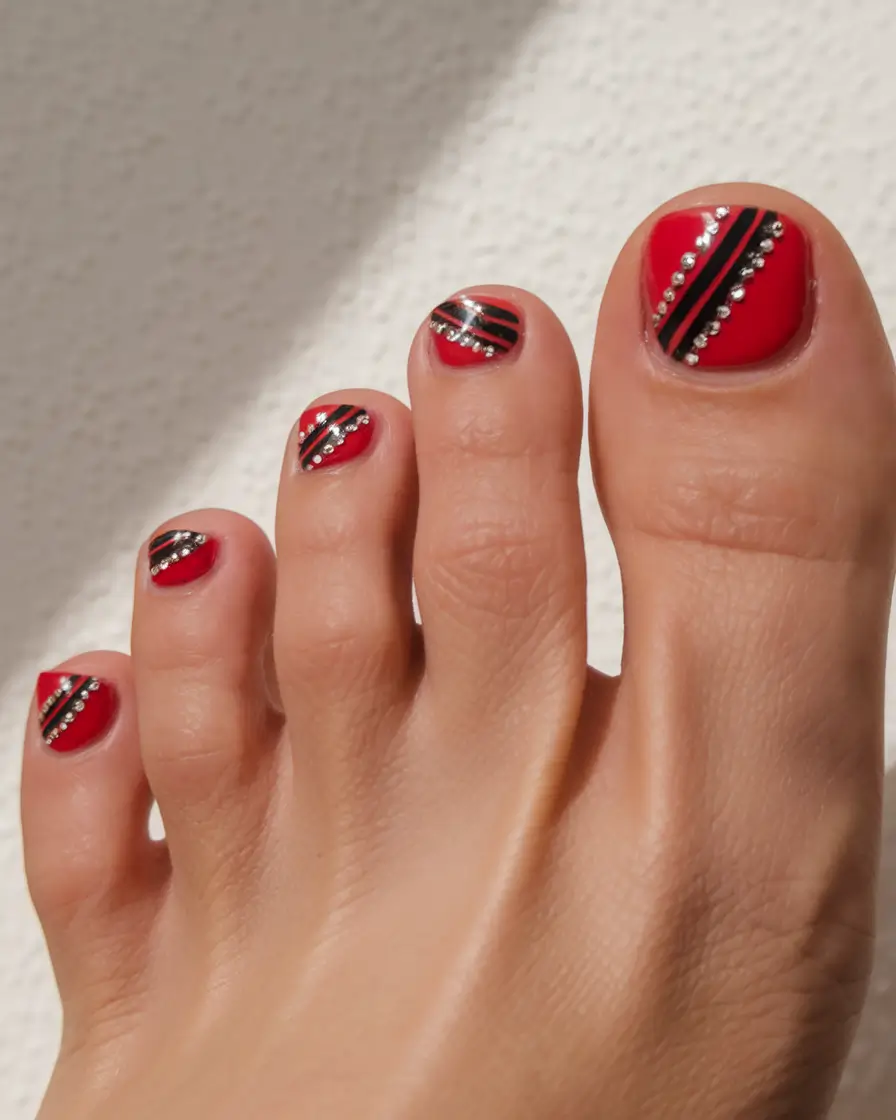
I go for Sally Hansen’s “Red-ical Rockstar” and add thin vinyls to get the black lines as clean as possible. Kiss Nail Art rhinestones are used and you can apply them with a toothpick that has topcoat on it. Applying a gel top coat will make your color stay strong for a longer period.
If you’re trying this at home, I recommend working one nail at a time. Place the stripe, put the rhinestones on with tweezers and finally cover everything with two coats of top coat.
It can still feel like fun to have my toes be bright when the outfit is subdued. This design turns sandals into accessories. Once, I paired this with a black sundress and red lipstick and I got compliments all day, even from someone at Trader Joe’s I’d never met before.
Starlight Americana
A cool white base lets the abstract American flag designs take center stage. Stripes? Check. Stars? Double check. Each toe is special—some have star-spangled designs, some have bold flags and some have a touch of sparkle. It’s artsy but still unmistakably 4th of July.
You’ll need a crisp white polish (I used Orly’s “White Tips”), a deep blue (try Olive & June “OMG”), and a bold red like “Cherry Flame” by Lights Lacquer. You can use a fine brush to draw the straight lines and a sparkle liner pen gives the eye a bit of sparkle.
Plan what you want your toes to look like before you begin. I drew the shapes on paper before I started to make sure I didn’t overdo it. A thin glitter top coat on the toes added a little sparkle without making the feet look busy.
I really enjoy that this one seems both organized and unpredictable. If someone is looking for a modern alternative or is going out for Fourth of July in a funky dress and stylish sandals, this is the collection to check out.
Sapphire Sparkler
Now this one brings the drama. All toes are covered in a glossy sapphire blue shade with sparkle and the big toes show a firework design in silver, red and white. It’s easy to dress up and it fits right in at any summer party, from a backyard bonfire to a party on the beach.
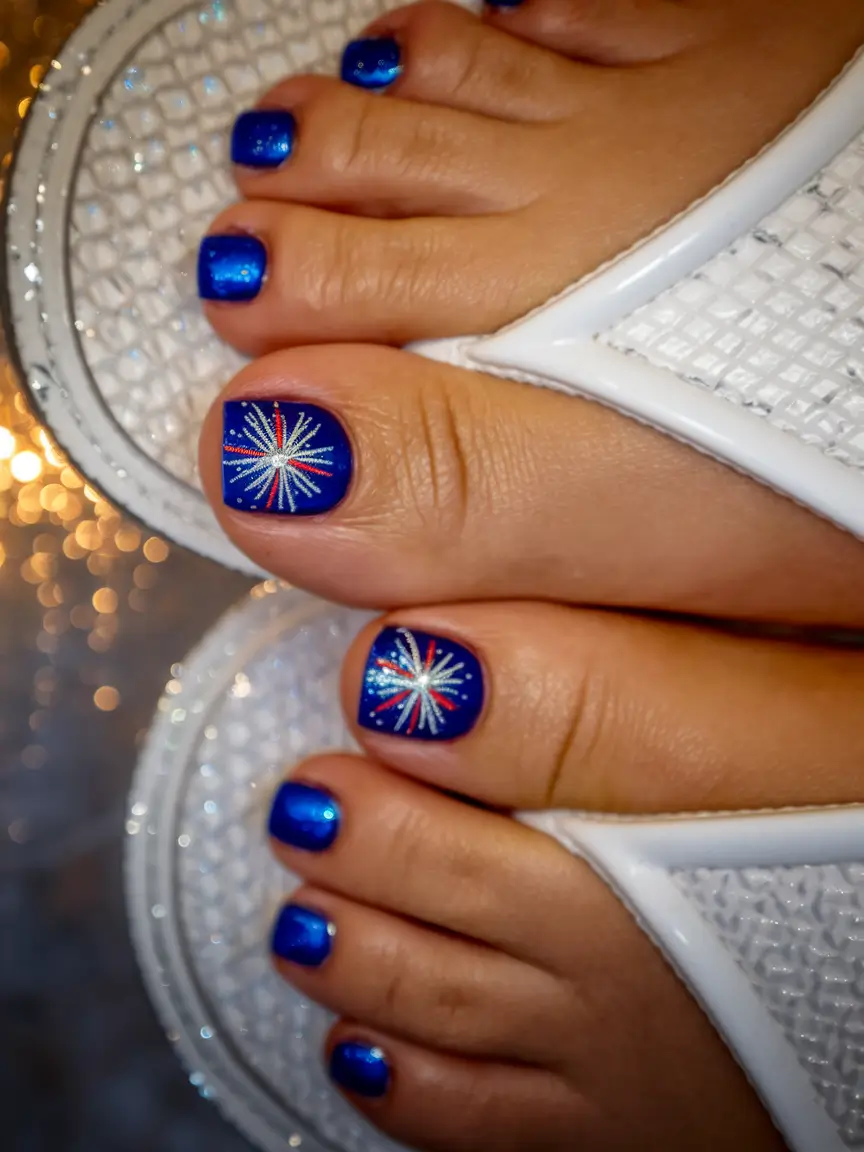
I chose ILNP’s “Arctic Lights” because of its beautiful blue base and I drew the firework with a silver nail art pen by Sally Hansen. Our explanation today features how to add tiny red and white details with a toothpick or the smallest paintbrush you can find.
The trick here is layering the sparkle. Work on your base first, allow it to dry and then make the burst by working outwards. Draw the firework rays by flicking your pen quickly and try not to worry too much about making them all the same.
It makes you feel as if your toes are shining in the dark. It’s really hard not to feel good when you look at your shoes and see fireworks. This is for people who think glitter should be used all year, but it feels extra special on the 4th of July.
Firecracker Burst on Red
This design is perfect when you want something easy but with lots of energy. The nail is coated in a rich red and the center of the big toe gets a bright white-and-blue firework look, with a soft echo on the pinky. It has a lively feel but doesn’t get out of control, just like watching that first sparkle in a firework display.
I use OPI’s “Got the Blues for Red” and Essie’s “Bikini So Teeny” to get the firework look. A fine liner brush helps you make the rays thin and precise. If time is short, striping pens will help you finish quickly.
When doing it myself, I begin with two layers of red, mark the center with a dot and draw the rays radiating from it, like sun rays. Wait for each color to dry before you add the next one so they remain clear.
I put these on when I want to be comfortable and still get positive comments. It’s simple, fun and reminds me of watching fireworks from a lawn chair which is just one of the best ways to spend the Fourth of July.
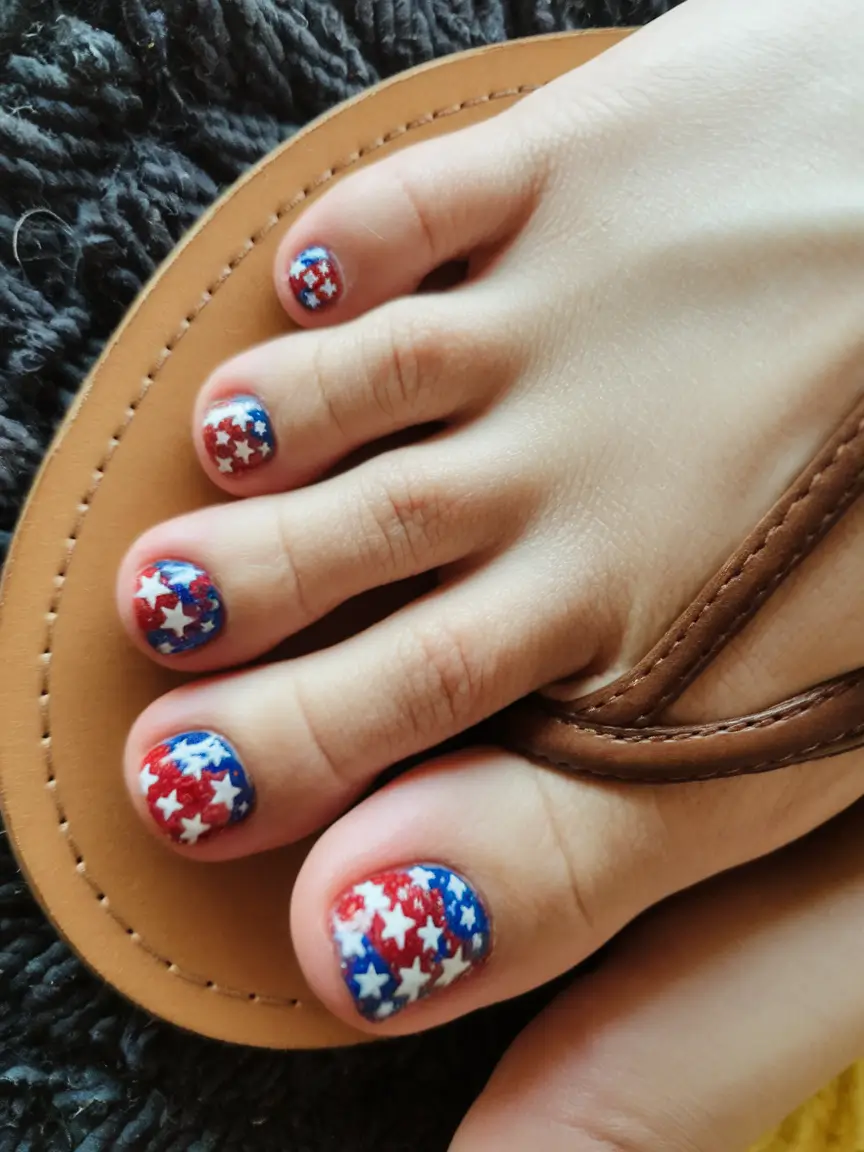
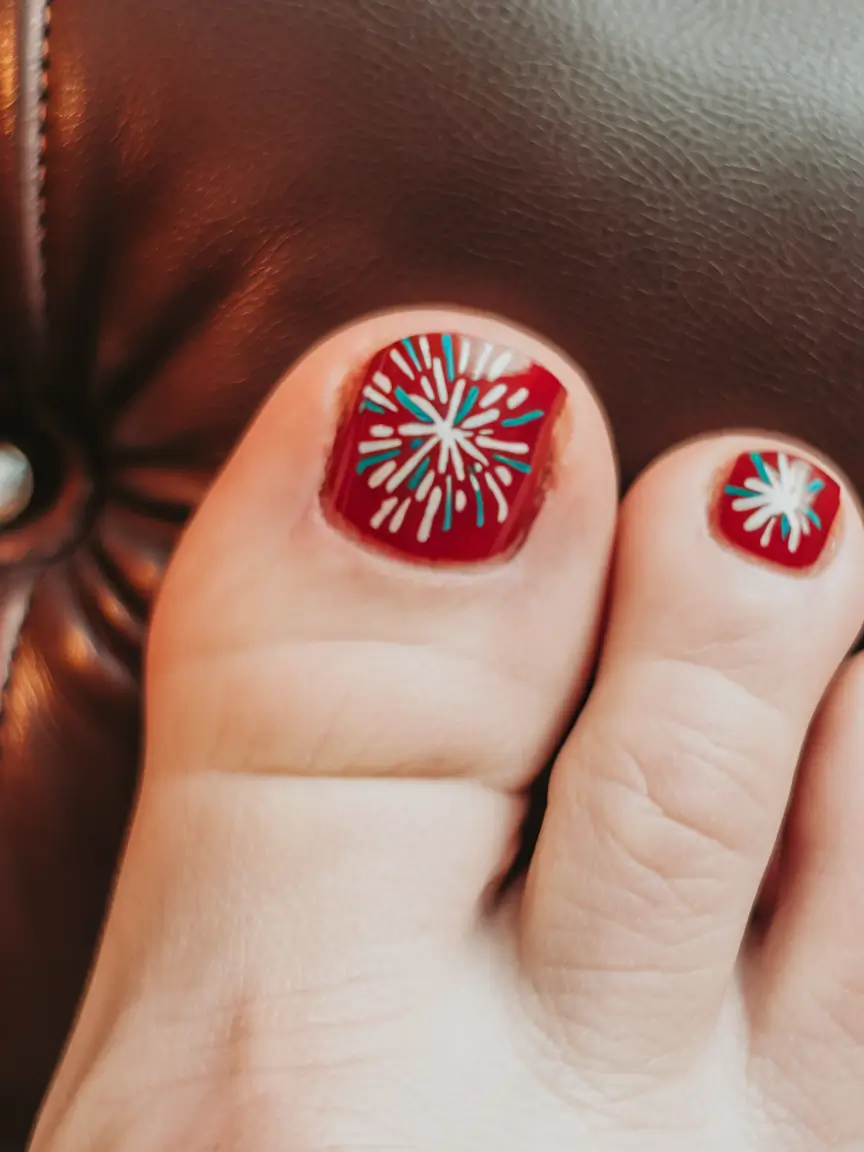
Red Sky Full of Stars
The pedicure makes your toes look like they are covered in the night sky. All the nails are painted with a rich cherry red, but the stars are what really make them special—the stars come in different sizes and brightness. The big toe stands out with a bright firework in red, blue and white. It’s a summer night celebration in nail form.
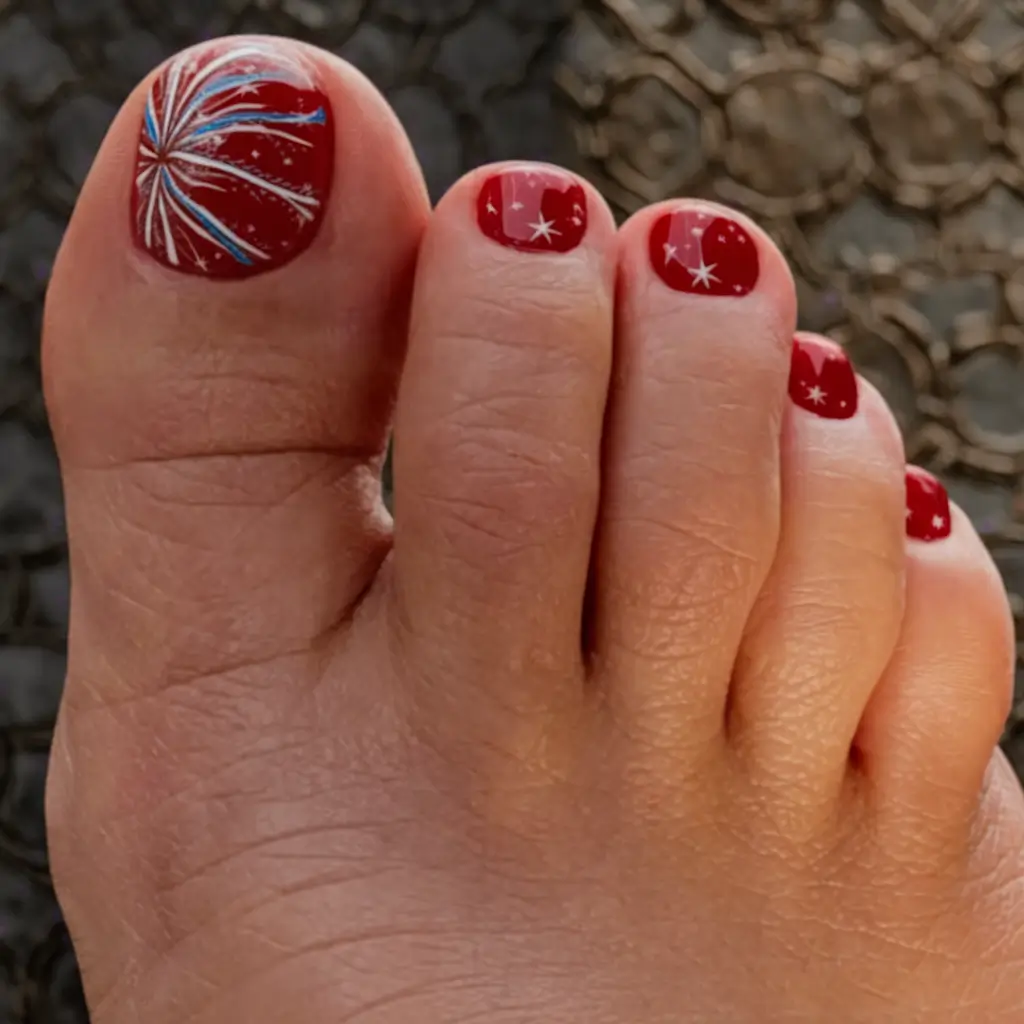
This one is all about layering. Start with Essie’s “A-List” as your base. The stars and fireworks are best done using fine-tip brushes and a steady hand, or even a stamping plate if you’re more into tools than freehand design.
I make my fireworks by starting with a thin line in one part and sweeping out, switching between white and blue strokes. You can add little white stars using a nail pen or stick on decals if you’re particular about getting them all aligned.
I feel this style manages to be both dramatic and dreamy at the same time. When you’re going to a night party or a dinner outdoors, this pedicure will shine under the twinkle lights.
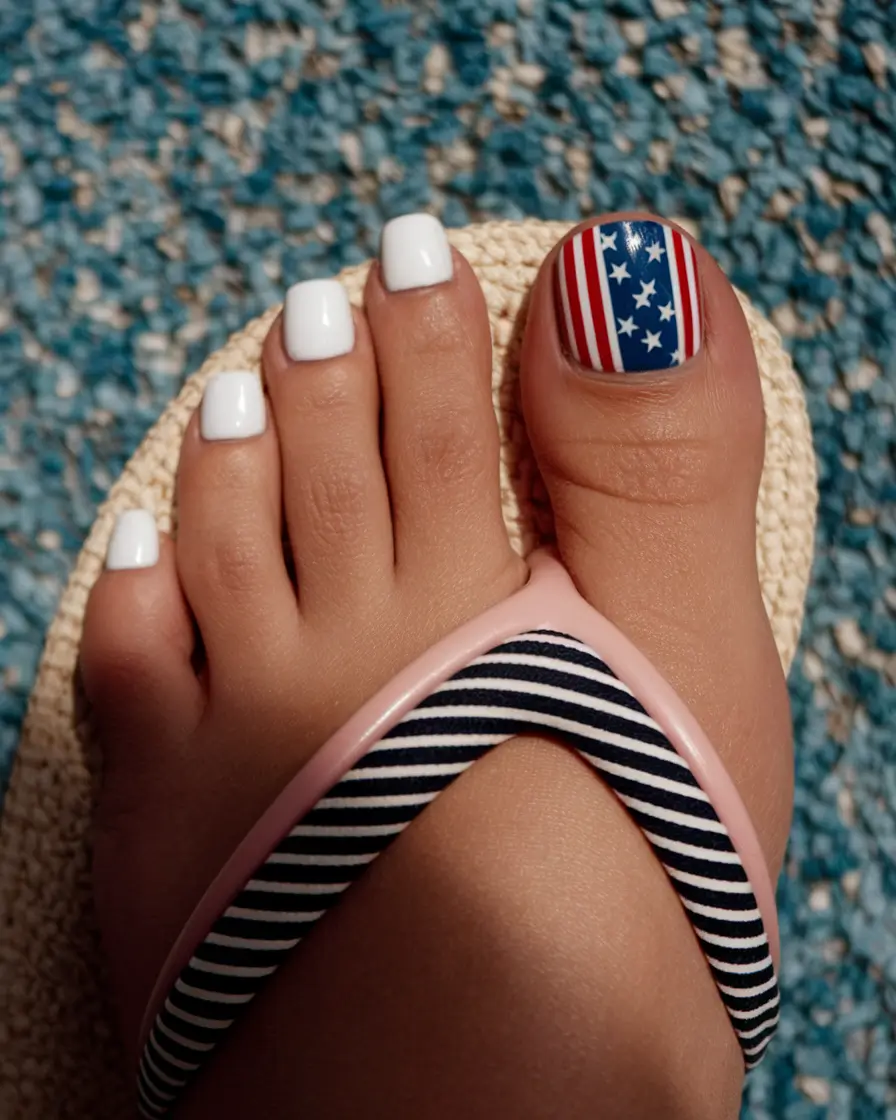
Flag Detail with Modern Whites
The design is simple and clean, with a white polish on every toe except the big one which is decorated with red, white and blue stripes and stars in the shape of an American flag. The combination of the flag detail and simple white is clean, sharp and very stylish. Think Hamptons picnic or rooftop party in L.A.
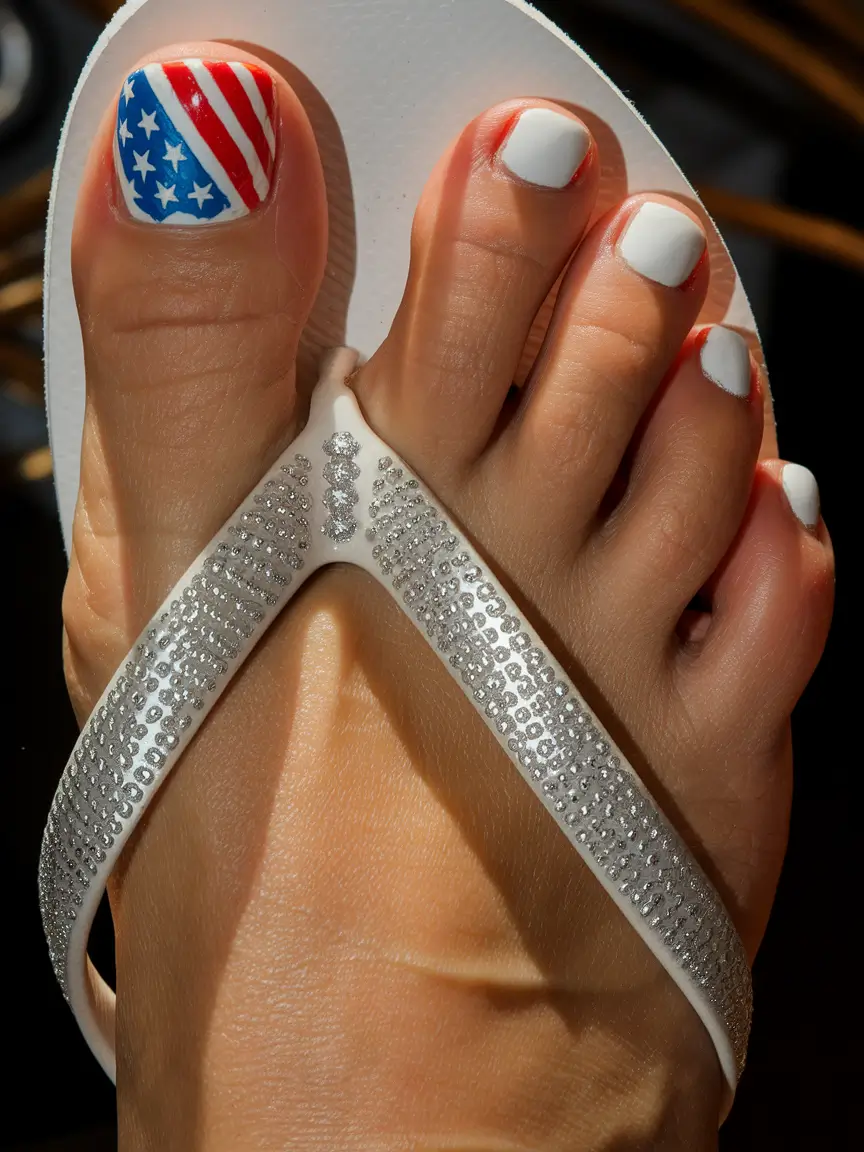
Use Zoya “Purity” for that creamy white base. I use a fine detail brush and the colors “Big Apple Red” and “My Pal Joey” from OPI for the flag. The stars can be placed using a stamp or a small sticker.
This trend needs some preparations to get ready. Paint every toe white at first and then use the tape to protect the accent toe for the diagonal lines and stars. Dry each layer completely to stop it from smudging.
This way of being patriotic has a soft touch instead of being very loud about it. If you like a low-key look, this mani pedi will let you celebrate the holiday in the best way.
Preppy Star-Spangled Simplicity
In this design, your white pedicure is made special by the big toe which is painted red and white stripes and has a navy blue corner with white stars. It’s bold, eye-catching and surprisingly goes well with sandals that have a nautical or retro style.
White polish can be difficult which is why I suggest applying two thin layers of Essie “Blanc” and then using a quick-dry top coat. I applied nail art tape and a stencil to make sure the stripes and starry patch were neat. You need to spend a little more time, but the result is perfect preppy style.
I first paint the base white and then I use tape to separate areas for the red and blue colors. The stars are added by dabbing them with a dotting tool and white polish that has a little shimmer.
This one makes me think of striped towels at the beach and ice cream cones. I think it’s great that anyone can wear it, even those who usually avoid nail art. It’s bold without being busy.
Mixed Palette Americana
Here’s a pedicure that’s playful and free-spirited. The toes go from bright red, dark blue and white and one nail stands out with a white base and a blue star pattern. It cleverly mixes patriotic colors and gives a playful, DIY-like feel, like tying a shoelace with a dye.
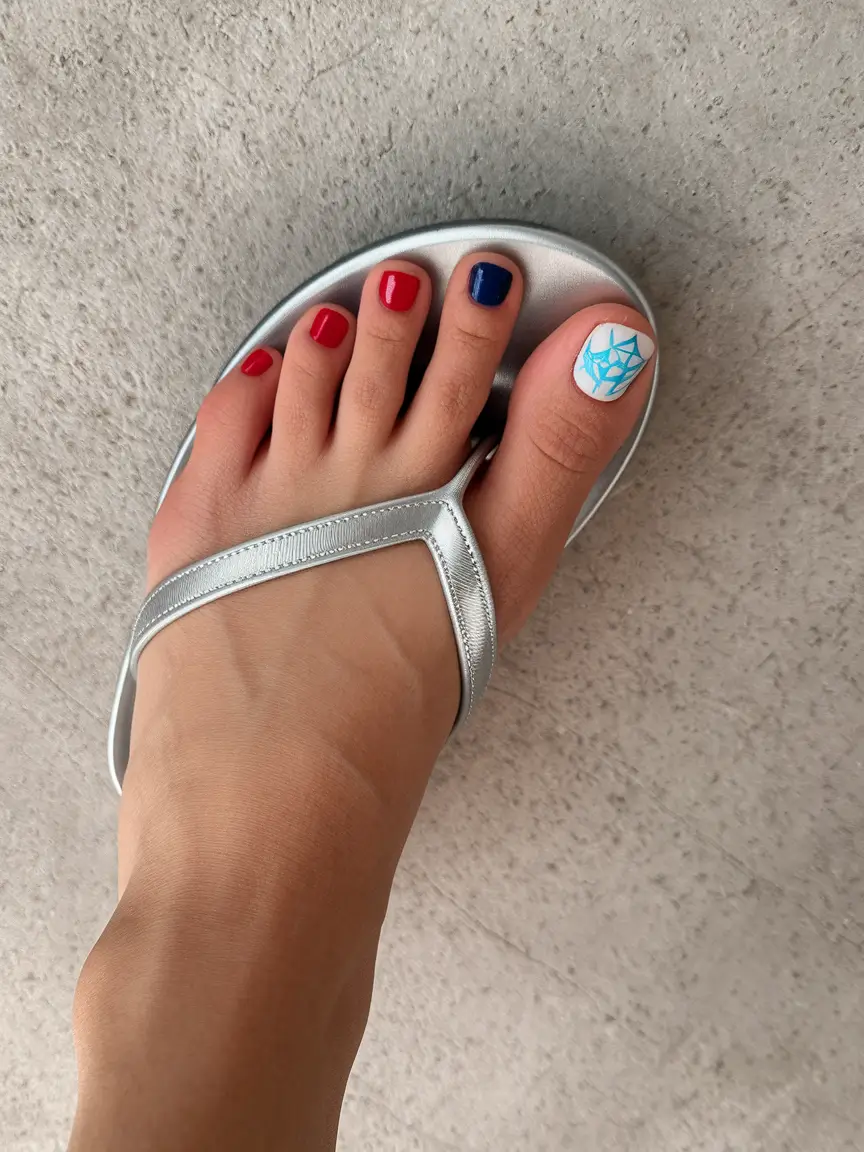
Be sure to select polishes with a strong opacity so that no streaks show up. For the red, I used ILNP’s “Misbehaving,” Sally Hansen’s “Pacific Blue” for the blue and OPI’s “Alpine Snow.” You can draw the baby blue star art by hand or stamp it with a plate.
This design is super beginner-friendly. Paint all your nails the same solid color and use your imagination on the big toe. I put a sticker on the canvas in the shape of a star, painted over it and then peeled it off to show the empty space left behind.
The thing I like best about this pedi is that it doesn’t try to be fancy. It’s easy to wear, fun to use and you can look great without going to a salon. A great choice for your favorite silver flip-flops and a light sundress when you’re watching the Fourth of July parade.
Minimalist Nautical Love
All you need is a navy stripe and a small red heart to make your toes seem as if they are on a yacht deck near Nantucket. The navy lines and soft white background give it a nautical look and a single heart adds a hint of patriotism without being too obvious.
I first applied Essie “Blanc” as the base, then added thin lines of navy polish which I got from Nails Inc. That tiny red heart? I put a dot on the nails with a dotting tool and connected the dots using OPI’s “Coca-Cola Red” with a toothpick.
The main advantage of this design is that it is very easy for beginners to use. If you want, you can skip the heart on the little toes or you can paint hearts on all ten. If you want a vintage sailor look, apply a matte top coat.
This one reminds me of the feeling of sand on my feet, old-fashioned swimsuits and letters written on red-white-and-blue paper. It’s for the girl who’s having a rosé picnic in her sun hat instead of going to a fireworks show—but she still wants to look festive.
Classic Flag Accent with Ruby Red Shine
Red nail polish is always in fashion. But if you add one well-done American flag accent nail, it feels just like the Fourth of July. All the toes are bold red and the big toe has white stripes over navy with white stars.
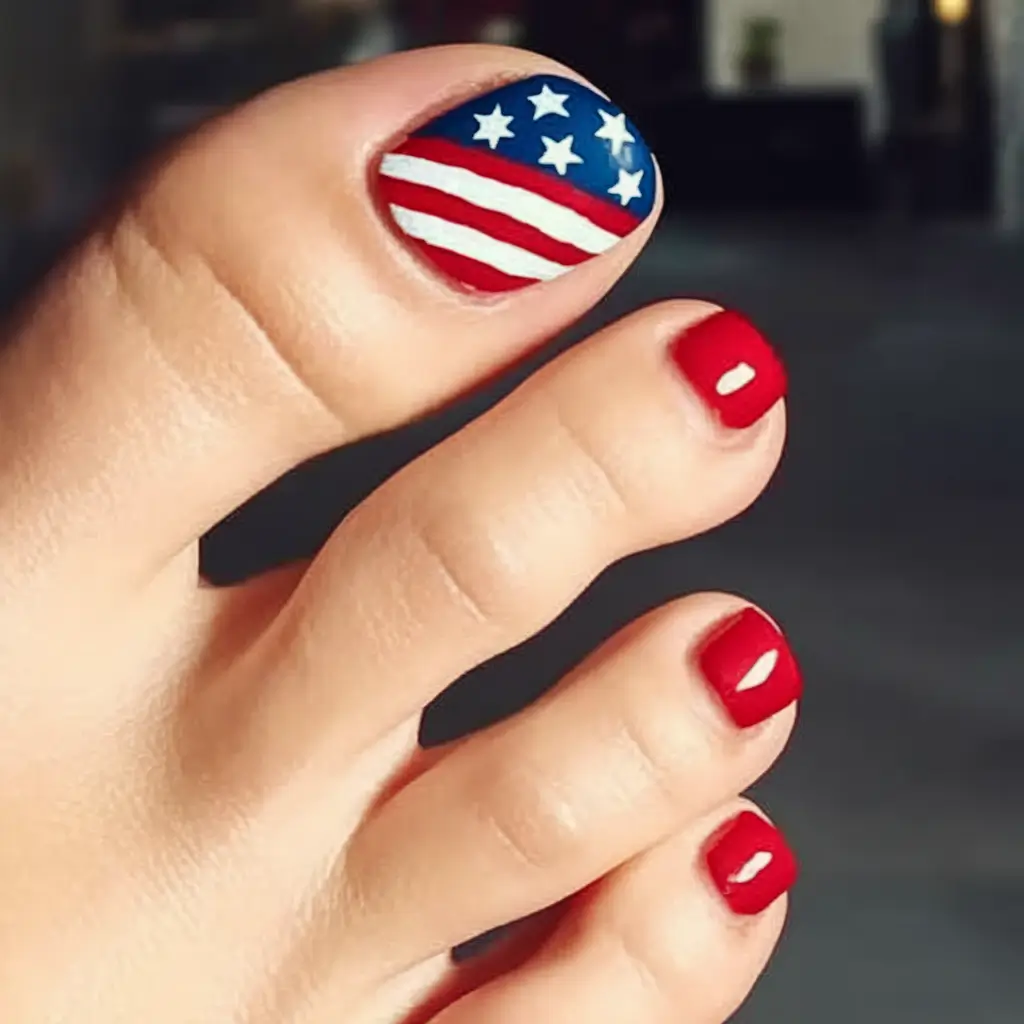
I chose Essie’s “Forever Yummy” because I wanted a lovely red. The accent nail needed some patience and a fine nail brush to get it right. For the blue I used Butter London’s “Union Jack Black” and for the stars and stripes, I chose Zoya’s “Snow White.”
To DIY, start with red across all nails. Tape the lines for the flag design and then paint the corner with blue paint. Use a toothpick or stickers to create the white stars if you want a neat polished appearance.
I go to this pedi when I want a classic look but something that will still stand out. It’s great for all skin tones, looks super fresh in open-toed heels, and makes you feel like you’re walking into a summer cookout with total confidence.
Retro Dots & Starry Blues
Here’s a quirky twist that’s both playful and patriotic. The nails are painted bright red, with small white polka dots and the big toe is painted blue with white polka dots. It’s easy, happy and really brings to mind vintage pin-up fashion.
This one is all about contrast. For the red nails I picked “Sooki” by Zoya and Sally Hansen’s “Pacific Blue” for the big toes. To get clean circles, use a dotting tool, dip it into “Alpine Snow,” and tap it across your nails.
Choose to space your dots randomly or make them all the same using a dotting grid. Apply a clear sticky base before the top coat to make sure the dots remain in place.
There’s something about dots that makes me smile. They have a retro and playful touch which makes them ideal for a 4th of July picnic when you’re barefoot in the grass and looking for something fun.
Stripes and Stars in Harmony
They make the American flag look as if it belongs on the runway. The big toes have a full flag design, but the smaller toes are navy blue below and have red-and-white stripes diagonally. Patriotic? Yes. But also really well-designed.
Apply Lights Lacquer “Cherry Jelly” for the red nails and use OPI “Dating a Royal” for the pink nails to make them look balanced. Using decals is the best for stars, but you can also use a detail brush and a steady hand to paint them.
It helps me to plan the pedi on paper before starting. If you don’t have much time, this is a great style to show your nail technician. Ensure every toe is different but still connected to the others which will make this design really stand out.
Last year, I paired this with gladiator sandals and a white linen dress and it made me feel like an Americana goddess. It’s meant for the girl who takes over the backyard party instead of just going to it.
Modern Americana Stripes
This might be what a minimalist wants if they are into striking patterns. The graphic stripes on each toe are in red, white and blue, giving the shoe a modern, not traditional, feel. The thick navy stripe on the big toe is flanked by red and white. It’s architectural and fresh.
I applied “Daytripper” from Deborah Lippmann, “Arctic Blue” from ILNP and “Blanc” from Essie. Use striping tape to make the lines sharp and straight before you put on any colors.
Prevent bleeding by using strong pressure when putting on the tape and peel it at an slanted angle right after applying the polish.
This one’s a conversation starter. It reminds me of the French Riviera, pop art and everything Fourth of July. Pair it with a red lip and oversized shades? You’ve just won summer.