As the leaves change color and the crisp autumn air settles in, it’s time to transition your manicure to something that reflects the season’s essence. This year, olive green fall nails 2024 are making a statement, blending nature’s beauty with chic designs that suit every nail type and length. But what makes olive green such a perfect choice for fall? How can you bring this trend into your own nail routine? Let’s dive in and explore the hottest nail designs for the season, each offering a unique take on the beloved olive green hue.
Glossy Olive Green Perfection
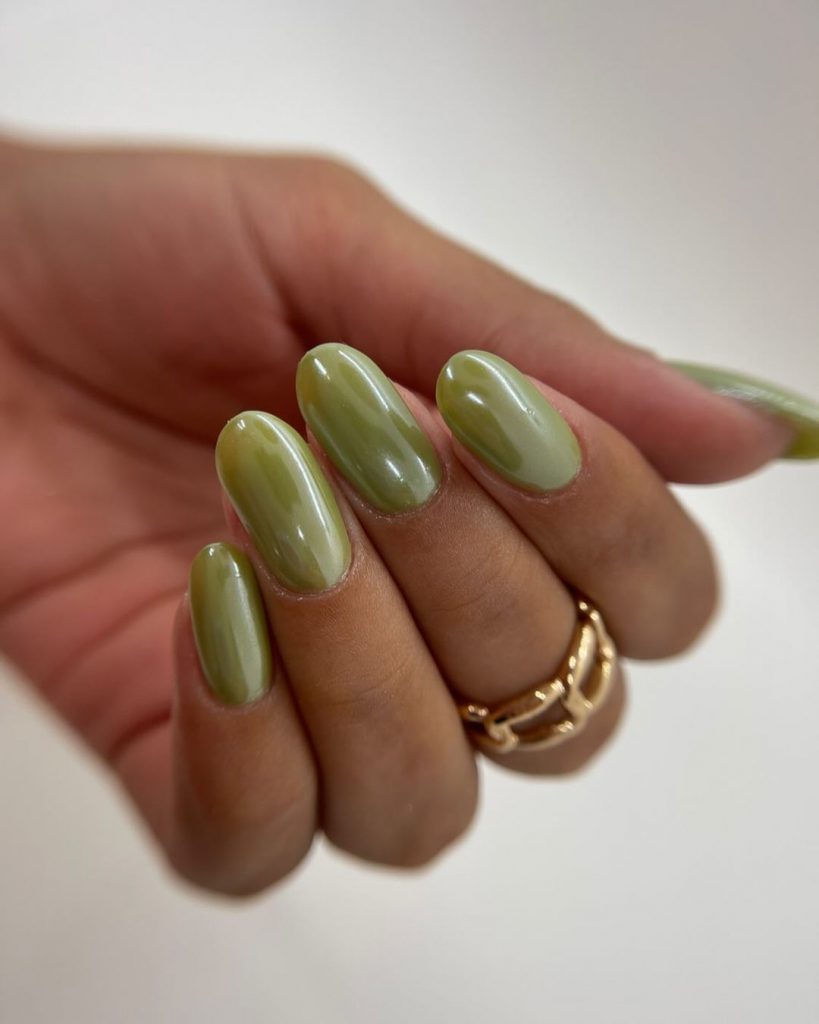
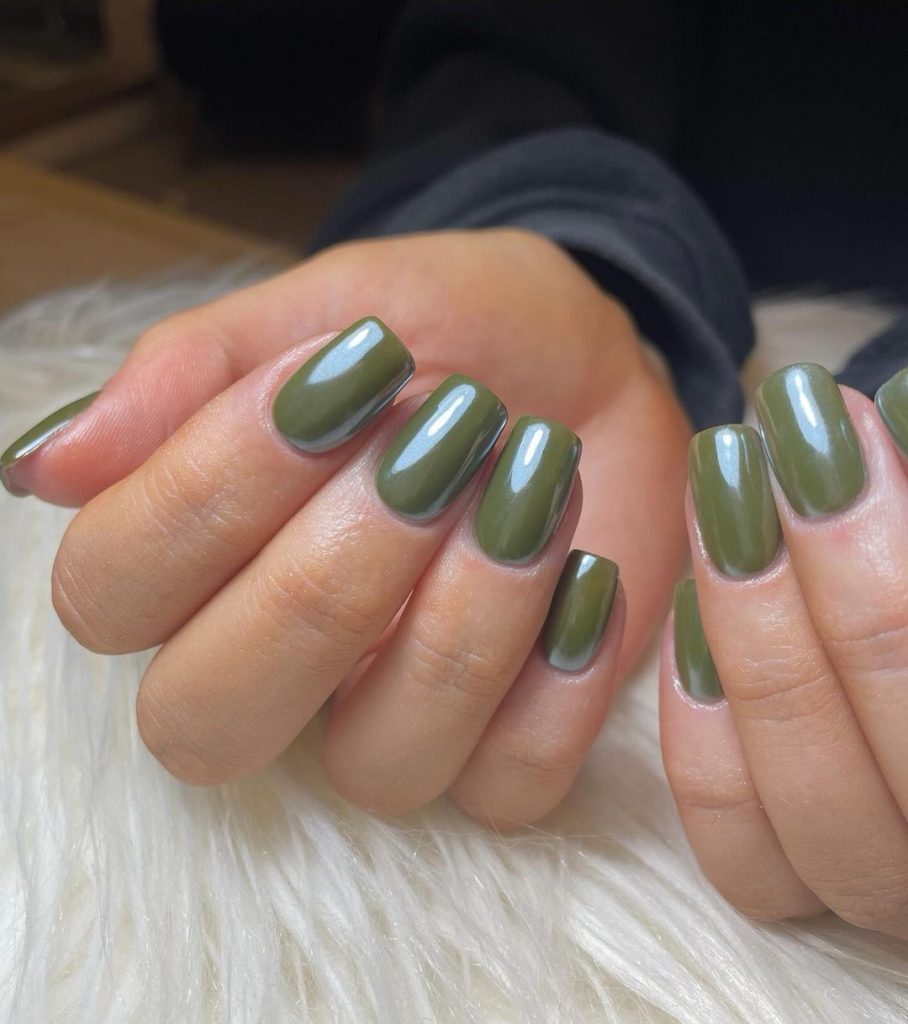
This stunning manicure features a glossy olive green finish that is both understated and elegant. The acrylic almond nails are perfectly shaped to enhance the simplicity of the design, allowing the rich color to take center stage. This look is ideal for those who prefer a minimalist yet sophisticated nail style for fall.
Tools & Products
- Polish: Essie “Olive For Green”
- Top coat: Seche Vite Dry Fast Top Coat
- Base coat: OPI Natural Nail Base Coat
DIY Tips
- Apply the base coat to protect your nails and ensure the polish adheres smoothly.
- Paint your nails with two coats of the olive green polish, allowing each coat to dry completely.
- Finish with a glossy top coat to enhance the shine and longevity of your manicure.
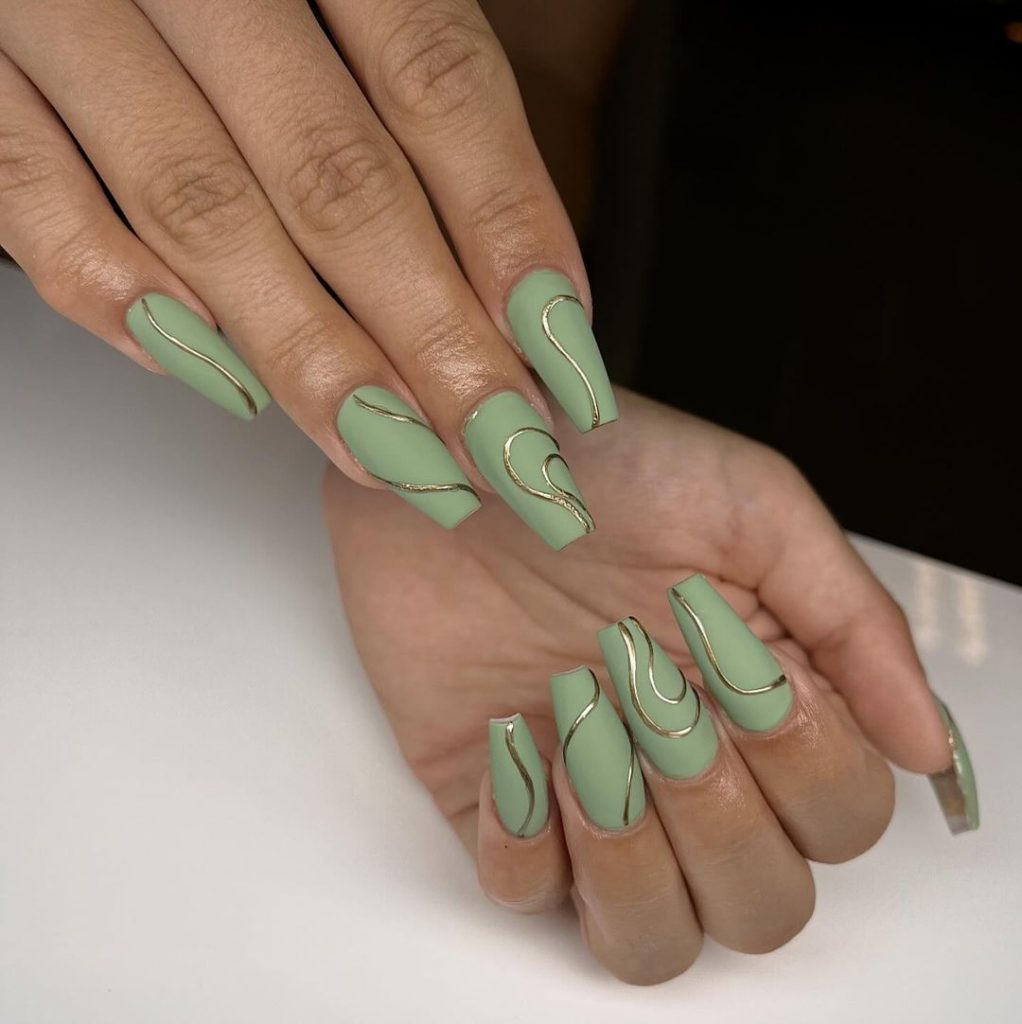
Matte Olive Green with Gold Outlines
This manicure features a matte olive green base adorned with sleek gold outlines, creating a modern and luxurious look. The acrylic coffin nails provide a large canvas for this bold design, making it perfect for those who love to make a statement with their nails.
Tools & Products
- Polish: China Glaze “Central Parka” (Matte Olive Green)
- Gold liner: Art Club Nail Art Liner in Gold
- Matte top coat: Butter London Matte Finish
DIY Tips
- Start with a base coat to protect your nails and create a smooth surface.
- Apply the matte olive green polish in two coats, letting each coat dry thoroughly.
- Use a fine nail art brush to add the gold outlines, ensuring clean and precise lines.
- Finish with a matte top coat to seal the design without adding shine.
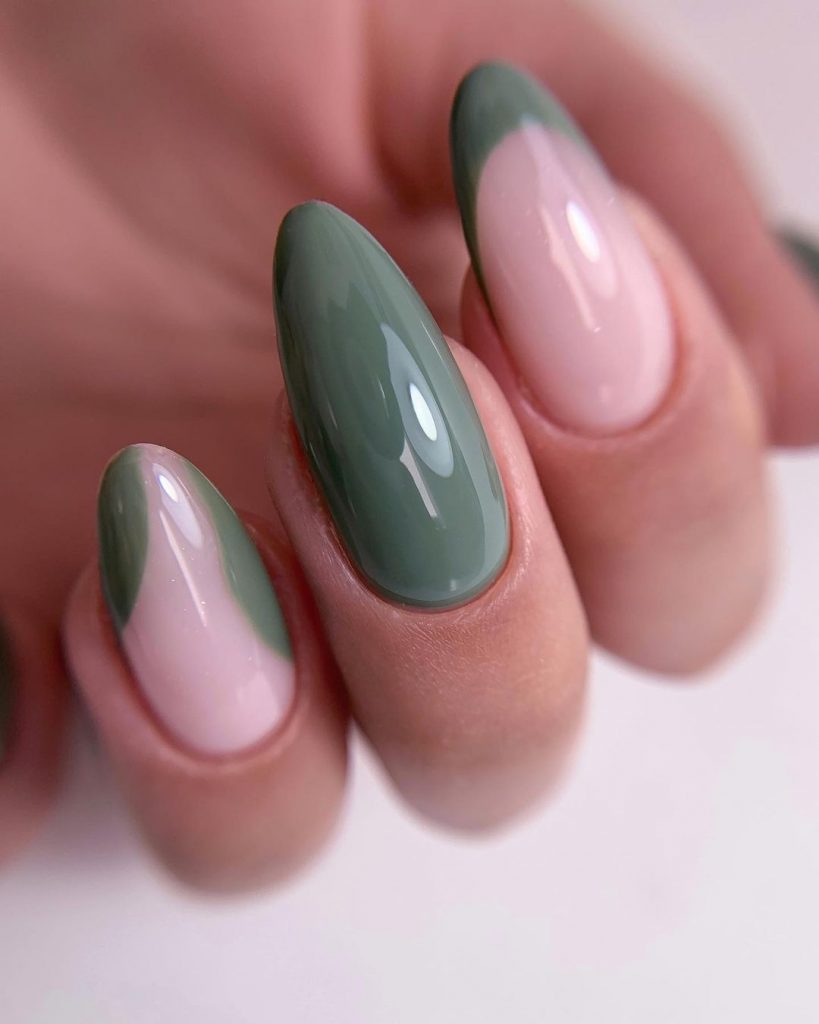
Olive Green and Nude Gradient
This design blends olive green tips with a nude base, creating a soft and elegant gradient effect. The acrylic almond nails are perfectly suited for this delicate style, which adds a touch of sophistication to any look.
Tools & Products
- Polish: Essie “Sage Me Later” (Olive Green) and OPI “Samoan Sand” (Nude)
- Gradient sponge: Kiss Professional Makeup Sponge
- Top coat: Sally Hansen Miracle Gel Top Coat
DIY Tips
- Start with a base coat to ensure the polish adheres evenly.
- Apply the nude polish as your base color and let it dry.
- Use the gradient sponge to blend the olive green polish from the tips downward, creating a seamless transition.
- Seal the look with a glossy top coat to smooth out the gradient and add shine.
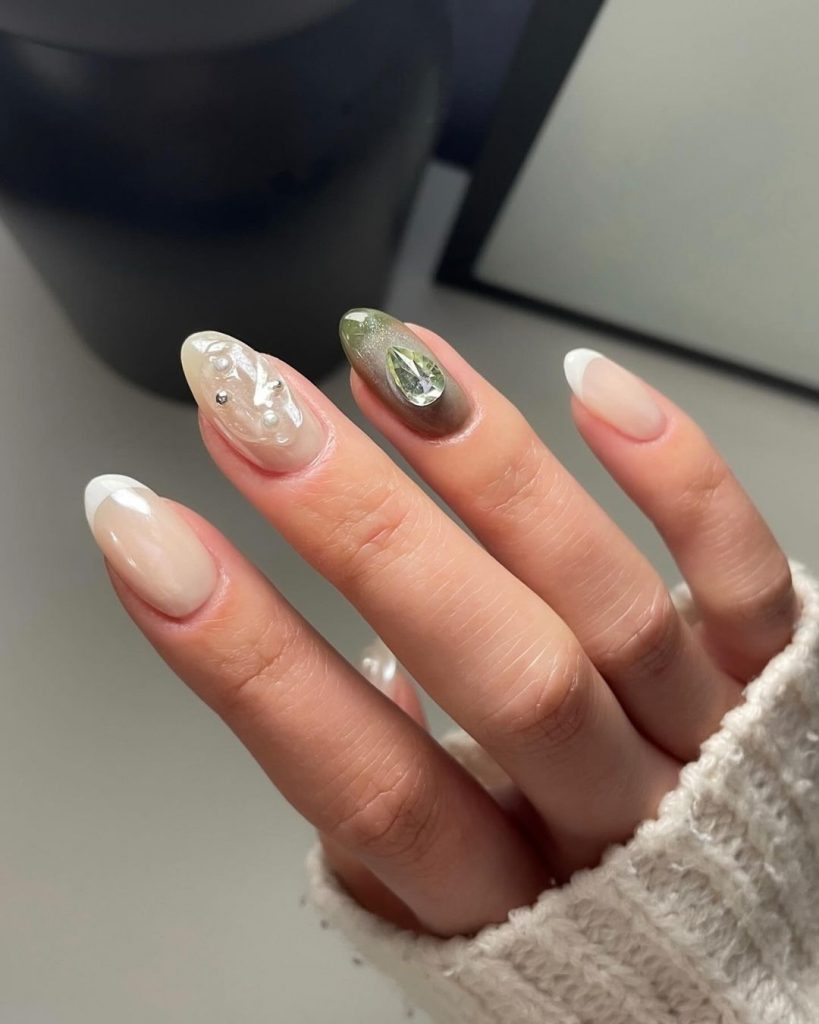
Sophisticated Olive Green Accent
This design pairs olive green with nude and white accents, elevated by a shimmering gem detail. The acrylic almond nails are the perfect canvas for this sophisticated and feminine design, ideal for both everyday wear and special occasions.
Tools & Products
- Polish: Essie “Olive You” (Olive Green), OPI “Alpine Snow” (White)
- Gem accents: Swarovski Nail Crystals
- Top coat: Zoya Armor Top Coat
DIY Tips
- Apply the base coat to protect your nails.
- Paint the accent nail with olive green, while using white or nude on the other nails.
- Add the gem detail to the accent nail for a touch of glamour.
- Finish with a top coat to secure the gems and add a high-shine finish.
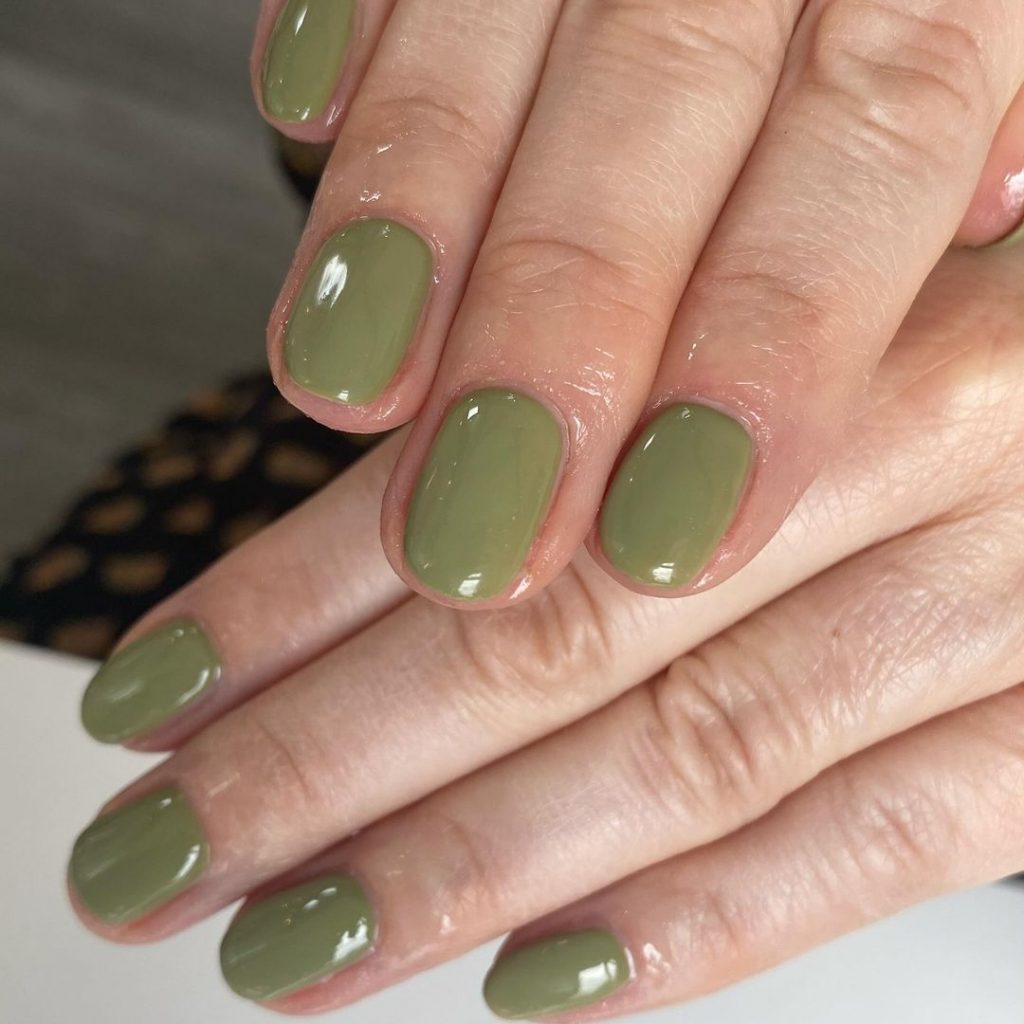
Simple Olive Green for Short Nails
For a more understated look, this manicure features a solid olive green on short square nails. The simplicity of the design makes it versatile and easy to wear, while the glossy finish keeps it looking fresh and polished.
Tools & Products
- Polish: Essie “Olive Branch”
- Top coat: Orly Glosser High Shine Topcoat
- Base coat: Nail Tek Foundation II Ridge Filler
DIY Tips
- Start with the base coat to ensure an even application of the polish.
- Apply two coats of the olive green polish, allowing each coat to dry thoroughly.
- Finish with a glossy top coat to give your nails a polished, professional look.
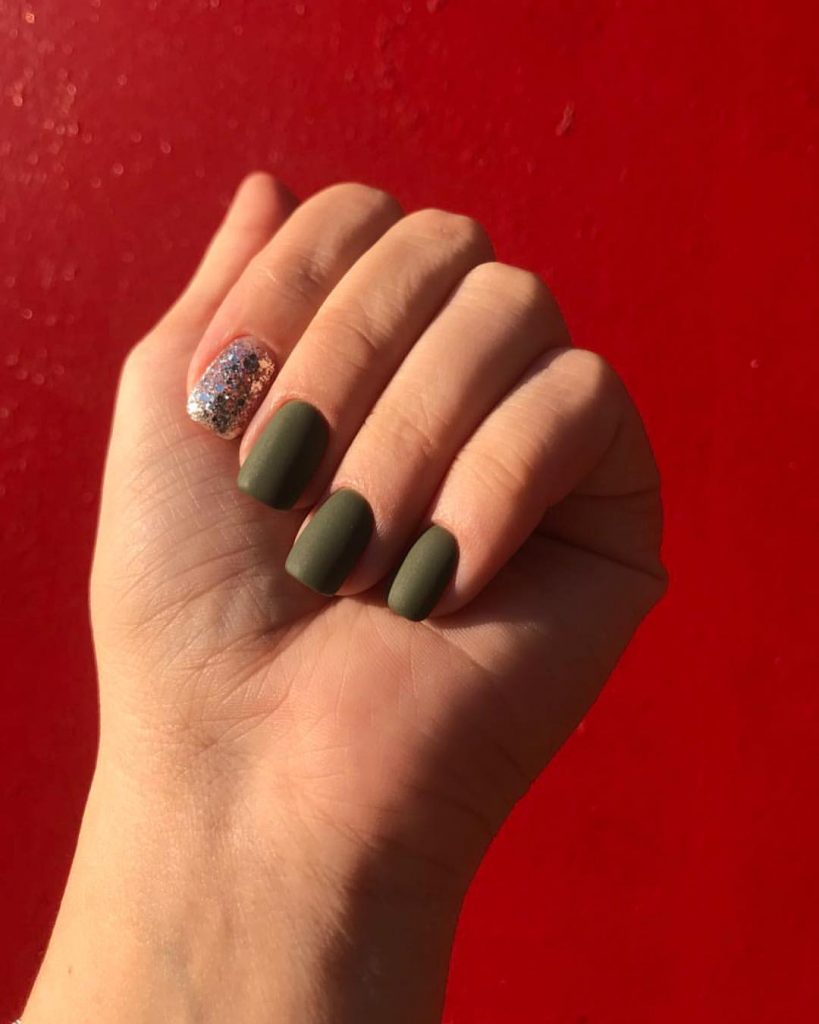
Bold Matte Olive with Glitter Accent
This short square nail design is a stunning combination of a matte olive green finish with a single accent nail coated in glitter. The contrast between the rich, flat color and the sparkling glitter creates a chic yet playful vibe. The dark olive matte nails provide a sophisticated base, while the glitter accent adds a touch of bling that’s perfect for making a subtle statement.
Tools & Products
- Polish: Essie “Winters Calling” Matte Olive Green
- Glitter polish: OPI “Merry Midnight” Silver Glitter
- Matte top coat: Zoya Matte Velvet Topcoat
- Base coat: Orly Bonder Rubberized Base Coat
DIY Tips
- Start with the base coat to ensure your nails are protected and the polish lasts longer.
- Apply two coats of the matte olive polish on all nails except for the ring finger.
- On the ring finger, apply the glitter polish in two layers for a dense, sparkling finish.
- Seal the olive nails with a matte top coat to maintain the non-glossy effect.
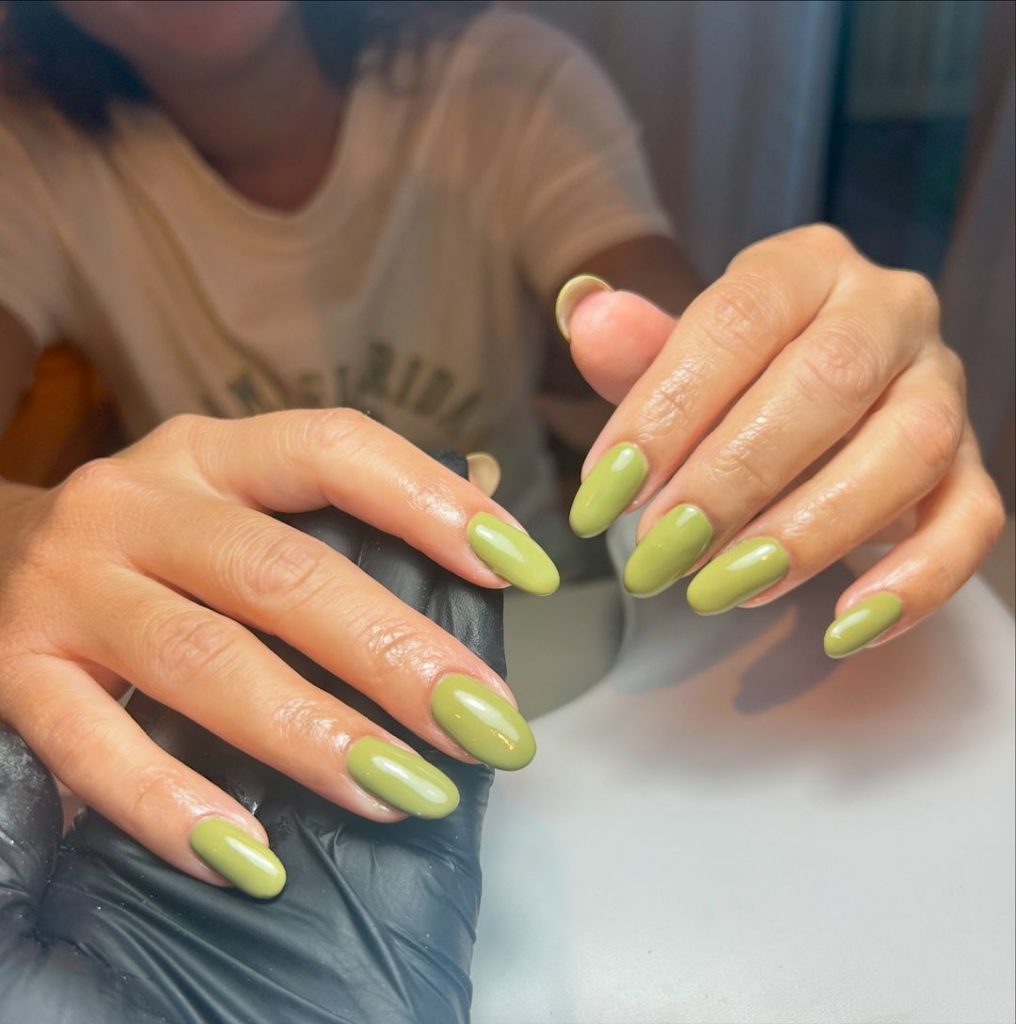
Glossy Olive Green for Long Almond Nails
For those who prefer long almond nails, this glossy light olive green manicure is an excellent choice. The soft and creamy shade is perfect for the fall, offering a fresh and modern twist on traditional autumn colors. The gloss adds a sleek finish, making this look both elegant and easy to wear with any outfit.
Tools & Products
- Polish: CND Vinylux Long Wear Polish in “Sage Scarf”
- Base coat: Sally Hansen Insta-Grip Fast Dry Base Coat
- Top coat: OPI Infinite Shine ProStay Gloss
DIY Tips
- Prep your nails with the base coat to ensure smooth application.
- Apply two coats of the light olive polish, letting each layer dry completely.
- Finish with a top coat for a glossy, long-lasting shine that will keep your manicure looking fresh.
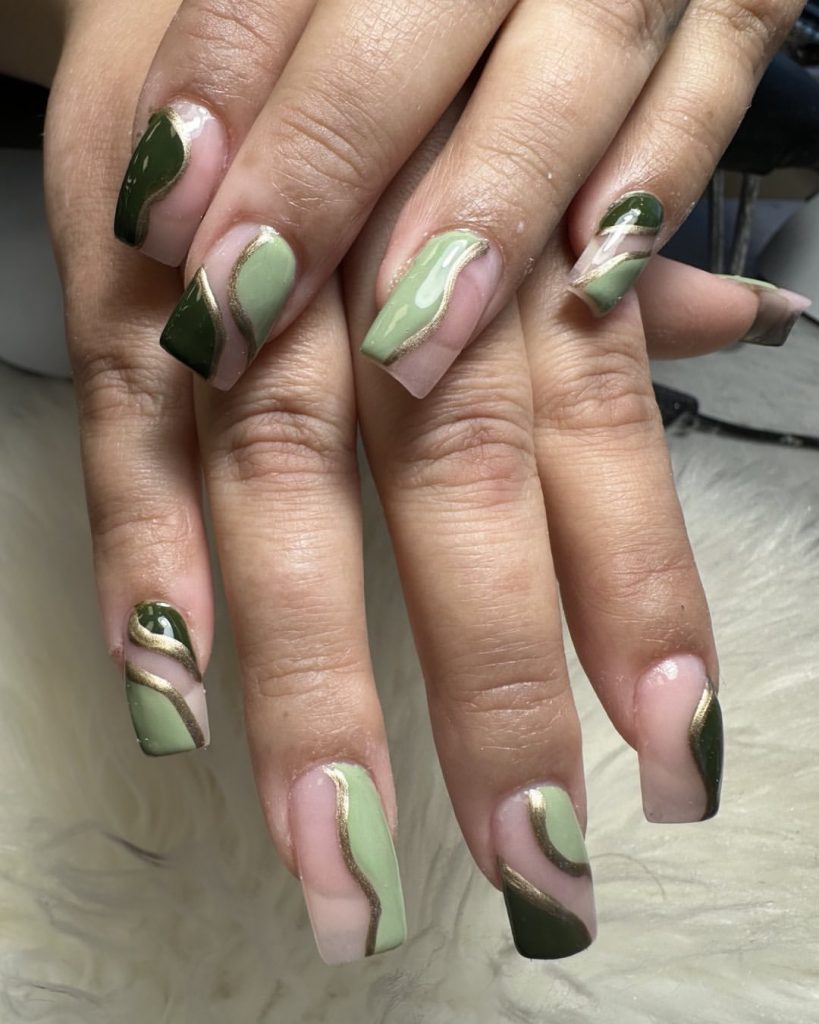
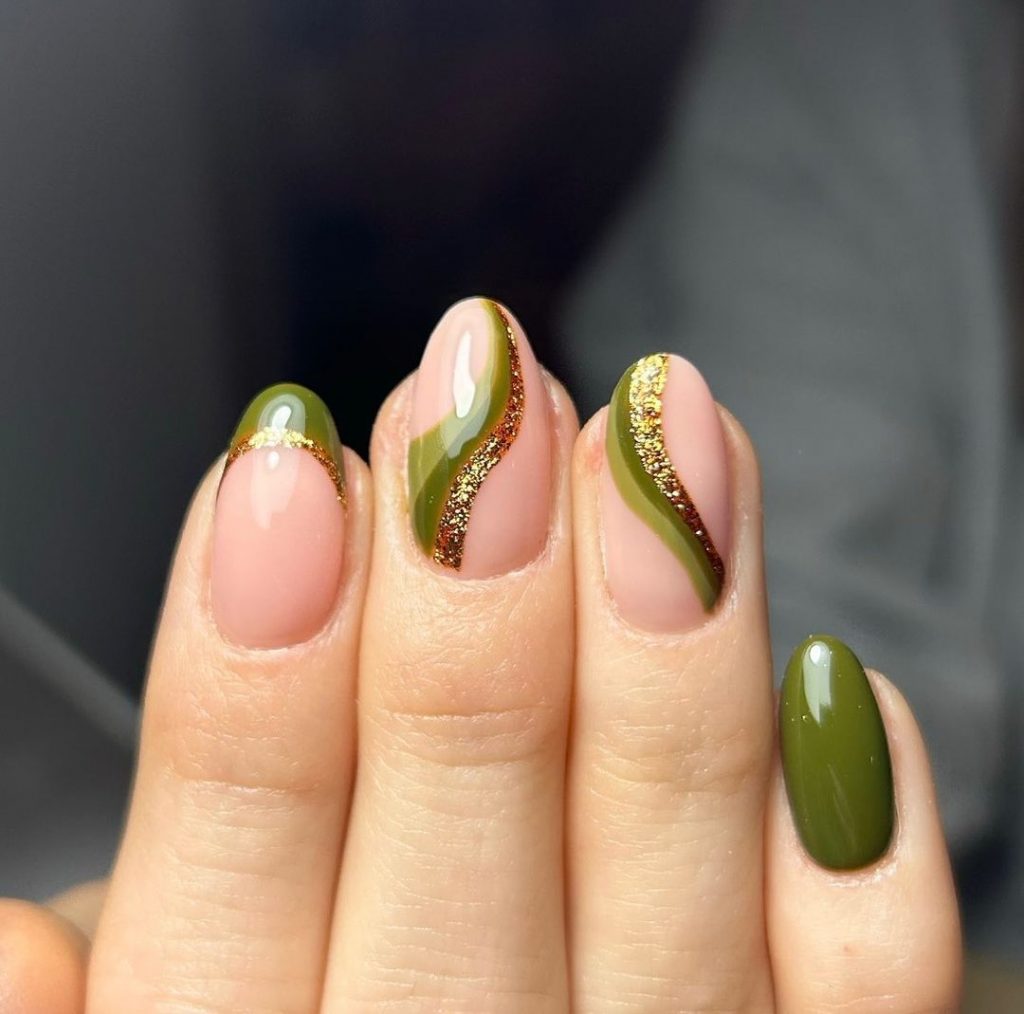
Geometric Olive Green Art with Gold Accents
This acrylic almond design features a mix of olive green shades with a geometric twist, enhanced by delicate gold accents. The varying shades of green create a designs fall look that is both modern and artistic. The gold lines add a touch of luxury, making this a great choice for those who want to stand out with art designs.
Tools & Products
- Polish: Essie Gel Couture in “Sage You Love Me”
- Gold accent liner: Sally Hansen I Heart Nail Art Pen in Gold
- Top coat: Essie Gel Setter Top Coat
- Base coat: Deborah Lippmann Gel Lab Pro Base Coat
DIY Tips
- After applying the base coat, use the lightest olive shade on alternating nails.
- For the geometric shapes, use a thin nail art brush or a nail art pen to create clean lines with the darker olive green.
- Apply the gold accent lines carefully along the edges of the shapes to add definition.
- Seal the look with a top coat to keep the design intact.
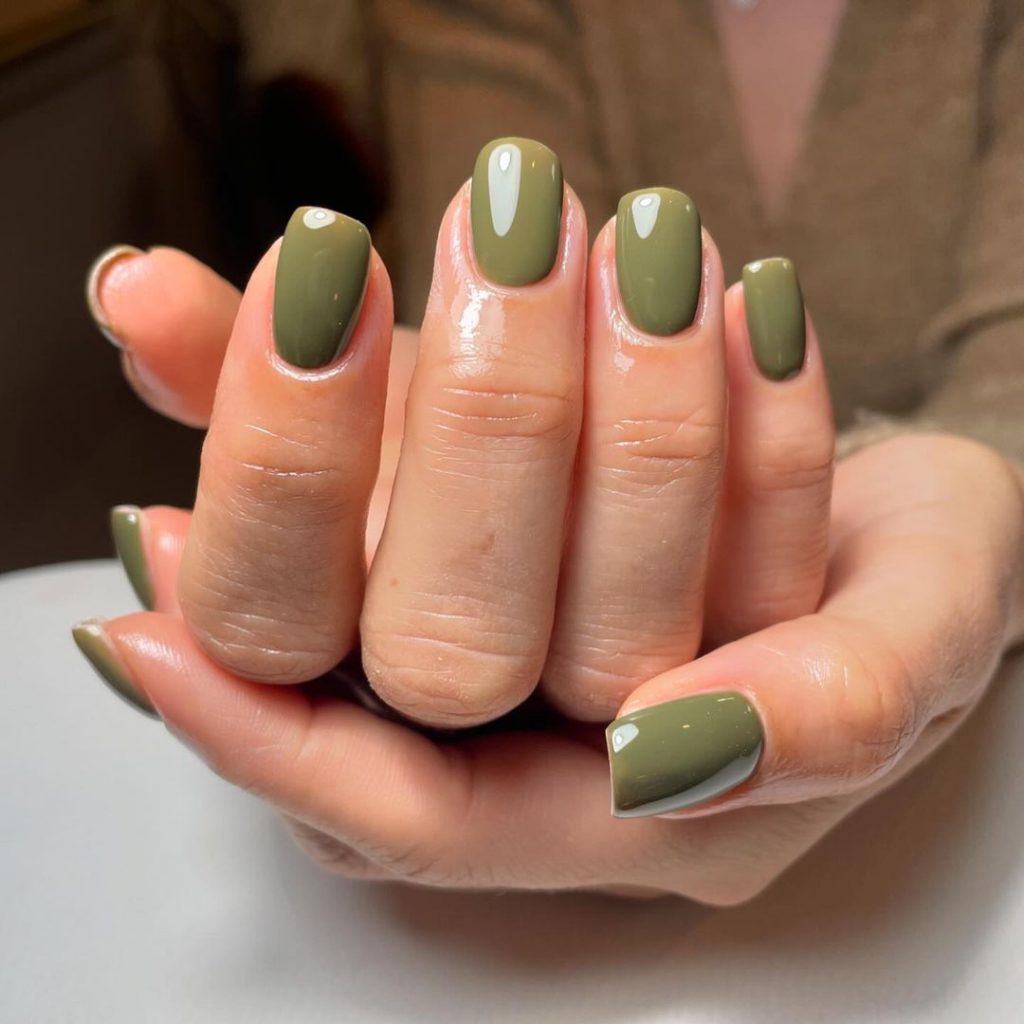
Classic Glossy Olive Green Short Square Nails
These short square nails offer a timeless look with a simple, glossy olive green polish. The shade is deep and rich, ideal for fall, while the acrylic square shape provides a clean and modern finish. This design is perfect for those who prefer something minimalist yet elegant.
Tools & Products
- Polish: OPI “Olive For Green” Infinite Shine
- Base coat: Essie First Base Coat
- Top coat: Seche Vite Fast Dry Top Coat
DIY Tips
- Begin with a base coat to protect your natural nails.
- Apply two thin coats of the olive green polish, allowing each coat to dry.
- Seal with a glossy top coat to ensure a high-shine finish that will last.
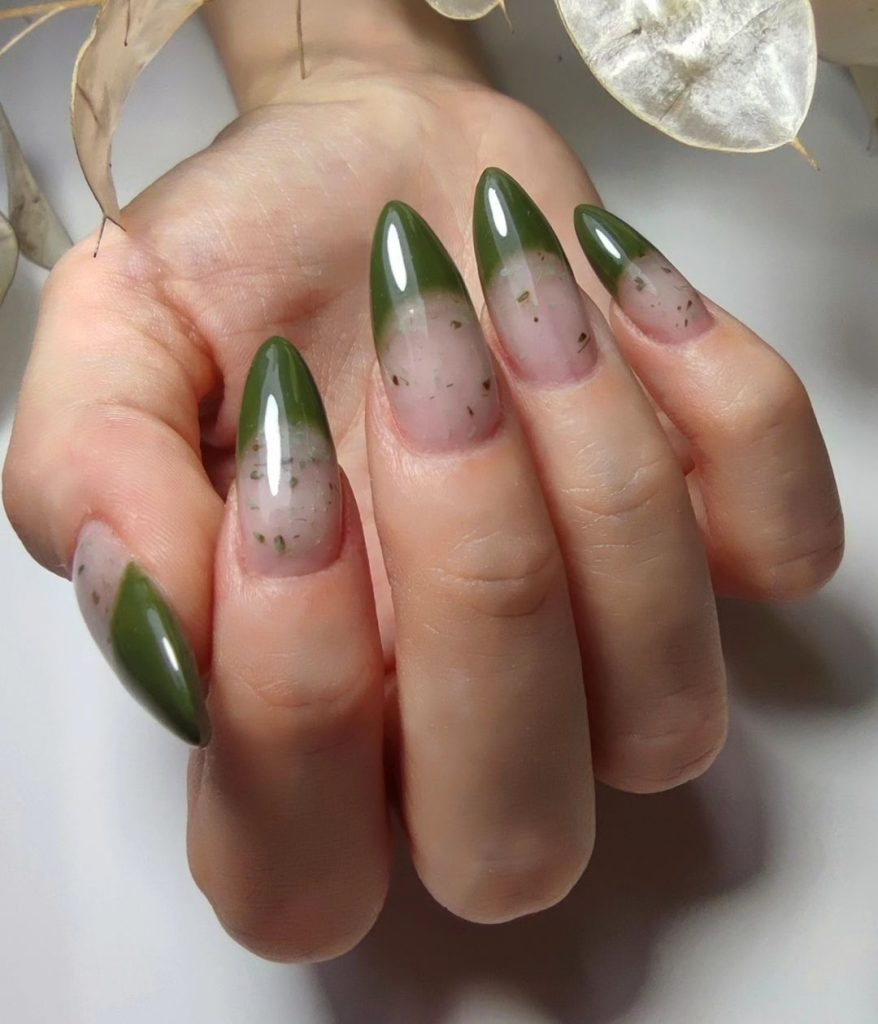
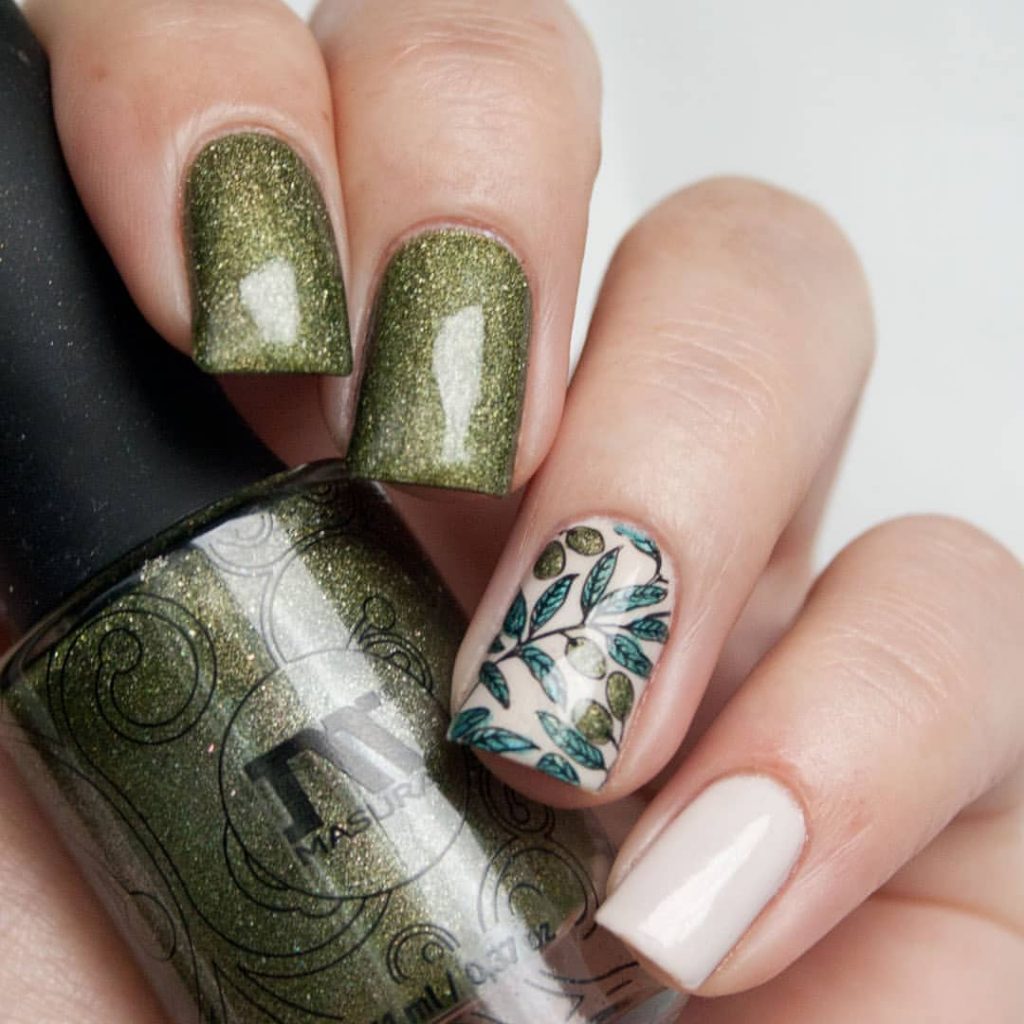
Glitter Olive Green with Leaf Nail Art
This design is all about texture and detail, combining a glitter olive green base with a delicate leaf pattern on one nail. The dark olive shade adds depth, while the glitter offers a festive touch. The leaves design on the accent nail adds a nature-inspired element, making this a perfect manicure for fall.
Tools & Products
- Polish: Masura “Olive Grove” Magnetic Polish
- Leaf pattern stamp: MoYou London Tropical Collection
- White polish: Zoya “Snow White”
- Top coat: INM Out The Door Top Coat
DIY Tips
- Apply the base coat to all nails.
- Use the magnetic olive polish for the main color, applying two coats for full coverage.
- Stamp the leaf pattern onto the accent nail using white polish.
- Finish with a top coat to protect the design and add a glossy finish.
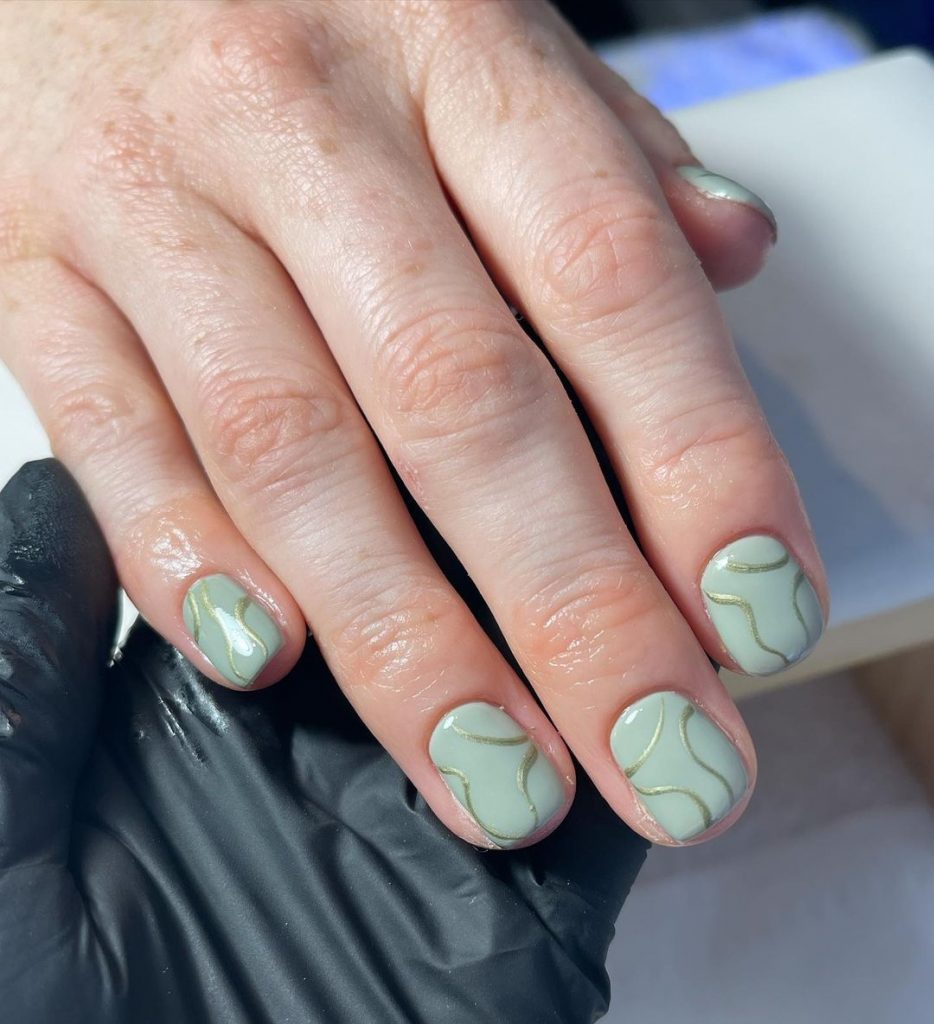
Swirled Olive Green with Gold Flakes
This elegant design features swirling olive green lines accented with gold flakes over a neutral nude base. The combination of the gold accents with the green gives the nails a luxurious feel, making them perfect for special occasions or those days when you want to feel extra glamorous. The swirl pattern is sophisticated and adds movement to the design, which complements the almond nail shape beautifully.
Tools & Products
- Polish: China Glaze “Show Em Who’s Blossom”
- Gold flakes: Born Pretty Gold Foil Flakes
- Top coat: Sally Hansen Miracle Gel Top Coat
- Base coat: Orly Bonder Base Coat
DIY Tips
- Begin with the base coat for a smooth application.
- Use a thin brush to create the swirling green lines, adding the gold flakes while the polish is still wet.
- Seal the design with a top coat to ensure the flakes stay in place and the finish remains glossy.
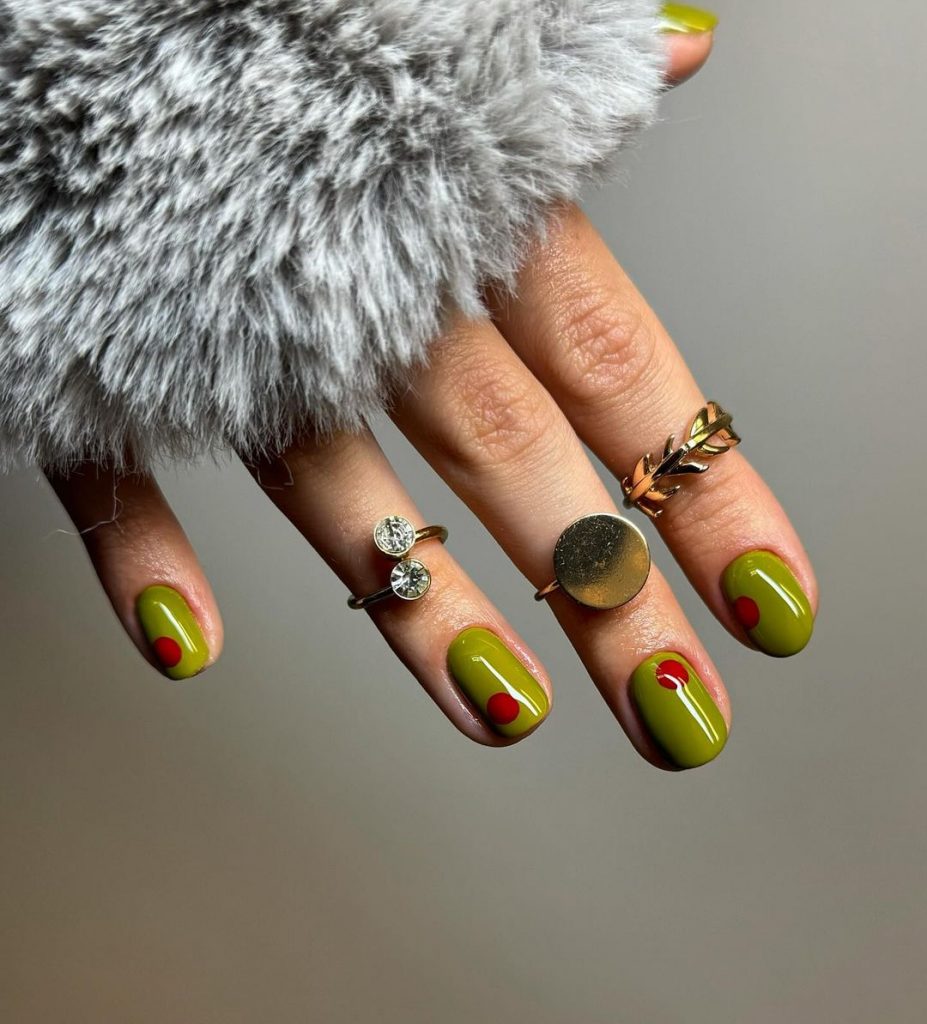
Olive Green with Red Dot Accents
This quirky and cute olive green manicure is highlighted by small red dot accents placed strategically on each nail. The short nail shape makes this design not only trendy but also practical for everyday wear. The minimalist approach with just a pop of red adds an element of fun while keeping the overall look chic and stylish.
Tools & Products
- Polish: OPI “This Isn’t Greenland”
- Red dot polish: Essie “Forever Yummy”
- Top coat: Deborah Lippmann Addicted to Speed
- Base coat: Essie Here to Stay Base Coat
DIY Tips
- Apply the base coat to protect your nails.
- Use the olive green polish as the base, applying two coats.
- Once dry, use a dotting tool to place the red dots precisely on each nail.
- Finish with a top coat to lock in the design and add a shine.
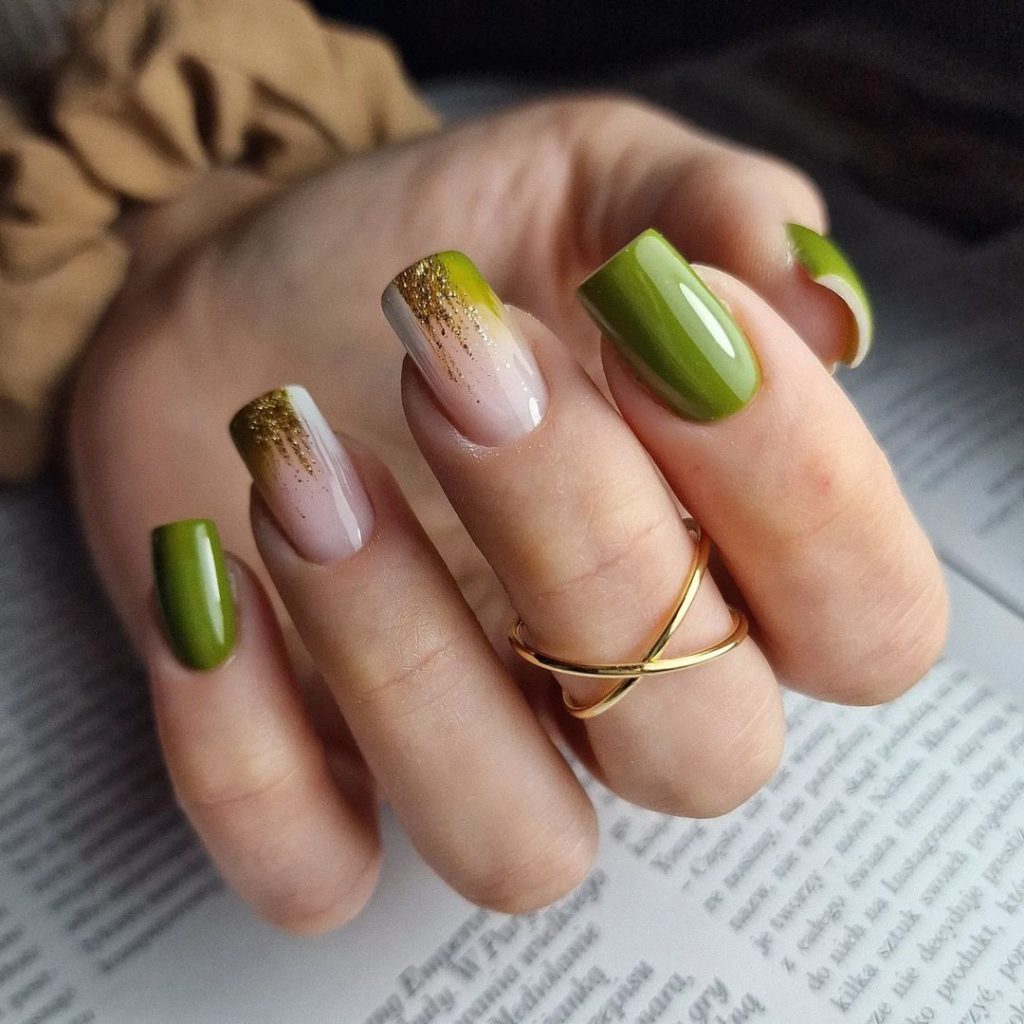
Olive Green Ombre with Gold Glitter Tips
This stunning design features a soft ombre effect with olive green transitioning into a nude base, topped with gold glitter at the tips. The acrylic almond nails provide a perfect canvas for this elegant and trendy look, making it a great choice for fall. The glitter adds just the right amount of sparkle, elevating the overall design.
Tools & Products
- Polish: Zoya “Gemma”
- Gold glitter polish: China Glaze “Counting Carats”
- Sponge applicator: Real Techniques Miracle Complexion Sponge
- Top coat: Essie Speed Setter
DIY Tips
- Start with the nude base coat and let it dry completely.
- Apply the olive green polish to a makeup sponge and dab onto the tips for an ombre effect.
- Add gold glitter to the very tips for a gradient effect, and seal with a top coat.
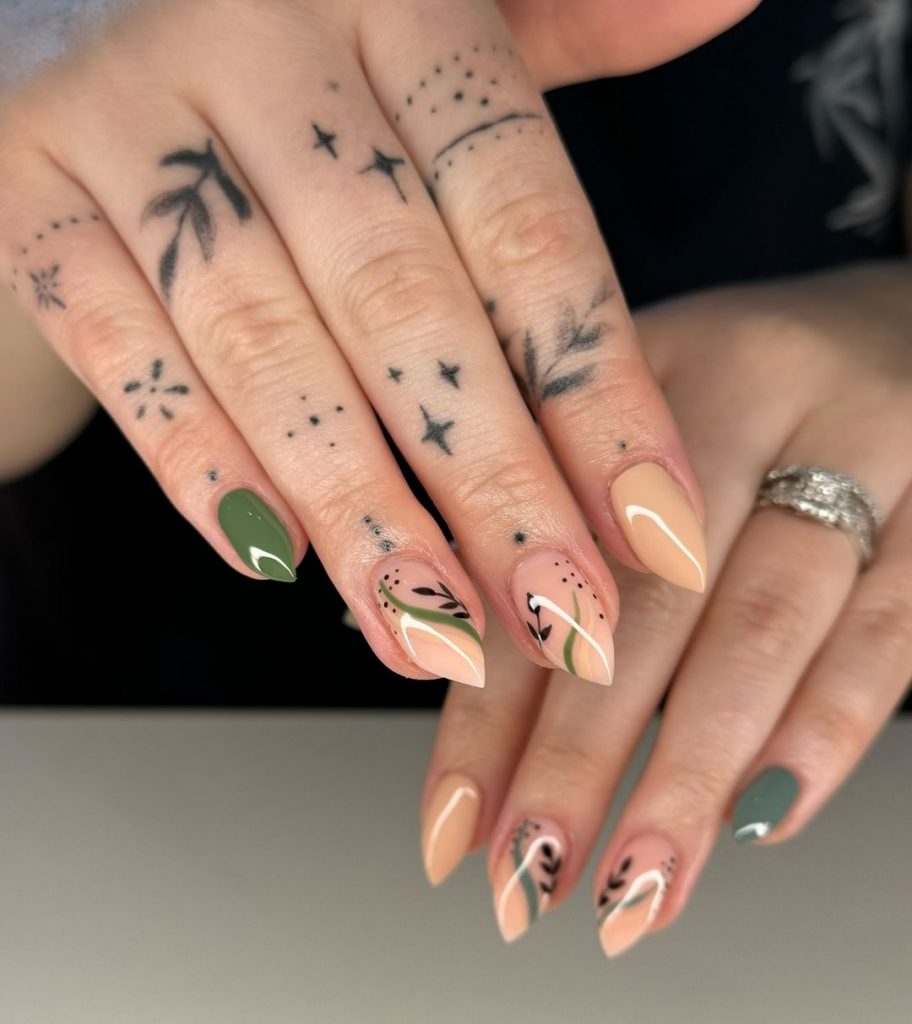
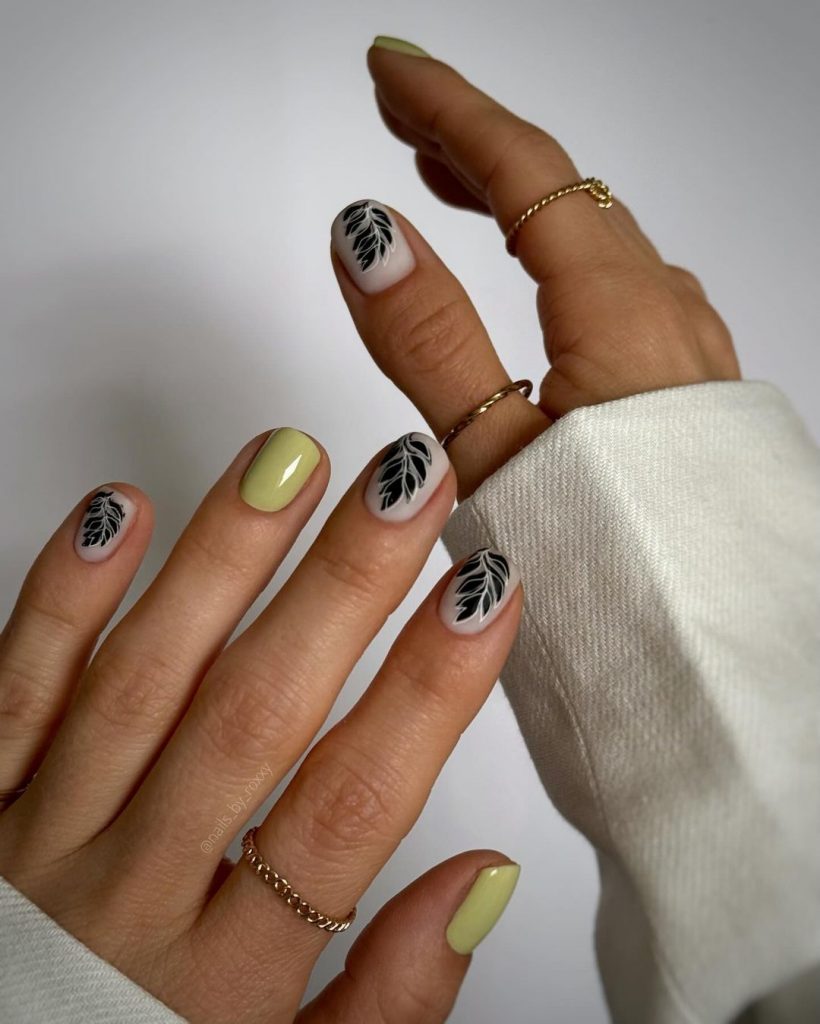
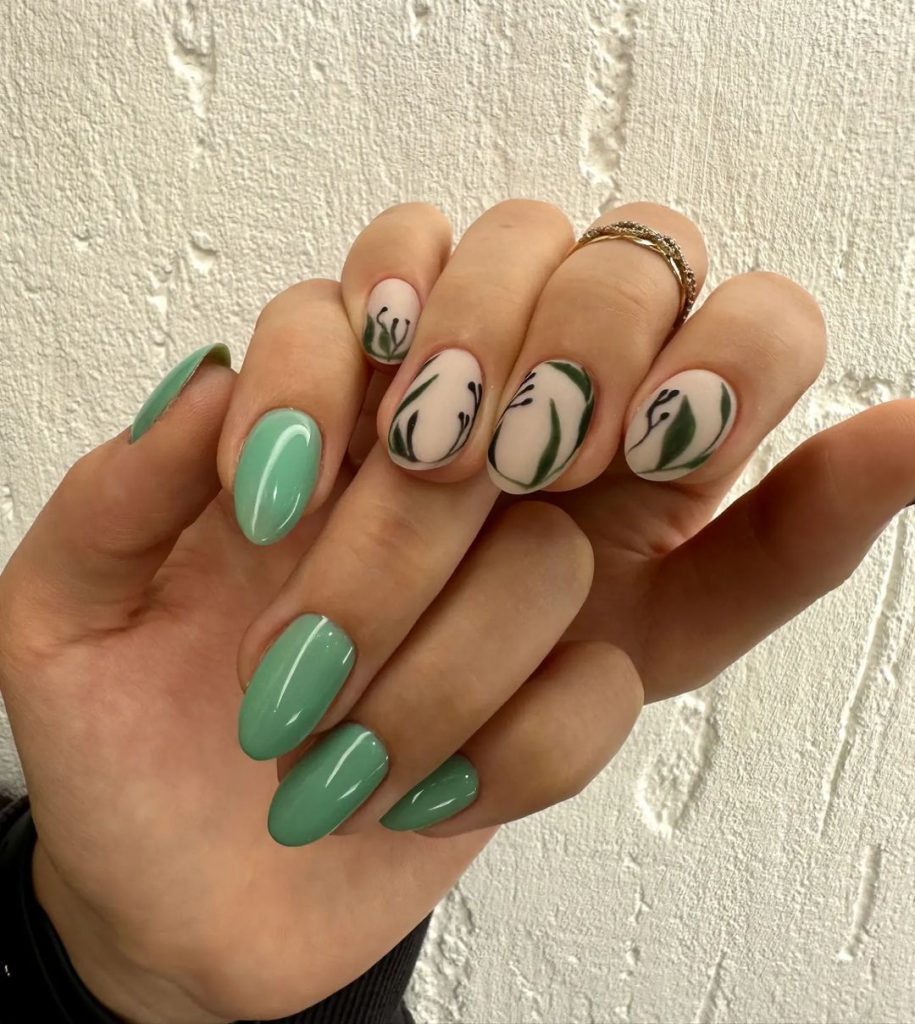
Olive Green with Nude and Leaf Design
This artistic design pairs olive green with nude shades and intricate black leaf patterns. The almond shape of the nails adds elegance to the overall look, while the combination of green and nude creates a harmonious balance between boldness and subtlety. This design is perfect for those who love a mix of nature-inspired elements with a modern twist.
Tools & Products
- Polish: OPI “Suzi – The First Lady of Nails”
- Leaf pattern stamp: MoYou London Tropical Collection
- Nude polish: Essie “Topless & Barefoot”
- Top coat: INM Out The Door Top Coat
DIY Tips
- Apply the nude polish as a base.
- Use the olive green polish to create a simple accent nail or as part of the design on multiple nails.
- Stamp the black leaf pattern onto the nude polish using a stamping tool.
- Finish with a top coat to protect the design and add a lasting shine.
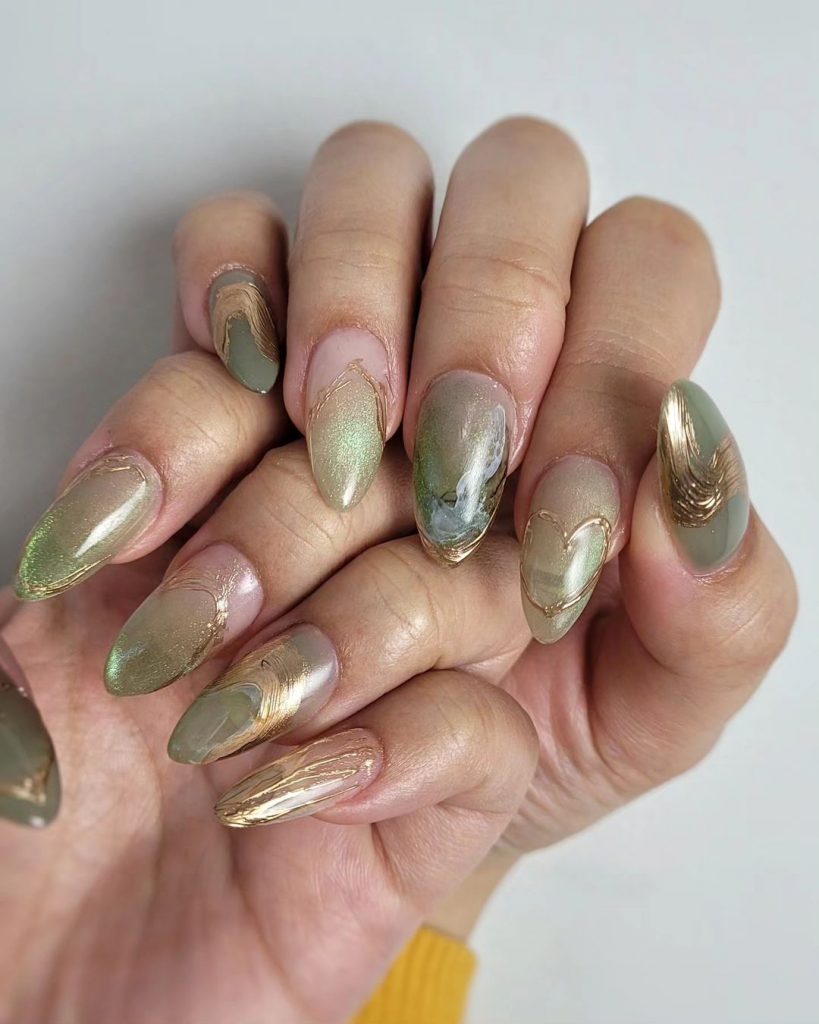
Metallic Olive Green with Gold Accents
This metallic olive green manicure is highlighted with subtle gold accents, making it a true show-stopper. The almond shape complements the reflective nature of the polish, which gives the nails a futuristic yet sophisticated look. The gold detailing adds a luxurious touch, making this design perfect for evening wear or special events.
Tools & Products
- Polish: Essie “Exposed”
- Gold accent polish: Zoya “Ziv”
- Top coat: Seche Vite Dry Fast Top Coat
- Base coat: CND Stickey Base Coat
DIY Tips
- Apply the base coat and let it dry completely.
- Use the metallic olive green polish on all nails, applying two coats for full coverage.
- Add the gold accents using a fine brush or striping tape for precise lines.
- Seal with a top coat to ensure the design stays in place and shines.
Glossy Olive Green with Gold Leaf Accents
This glossy olive green manicure is a timeless choice, enhanced with a touch of gold leaf accents on one nail. The short square shape keeps the design practical and modern while the gold flakes add an artistic flair that catches the light beautifully. This look is perfect for those who want a subtle yet eye-catching design that’s easy to maintain.
Tools & Products
- Polish: ANNY “Walking Boots”
- Gold leaf flakes: Nail Art Gold Foil from Born Pretty
- Top coat: Seche Vite Fast Dry Top Coat
- Base coat: Essie Ridge Filling Base Coat
DIY Tips
- Start by applying the base coat to protect and smooth the nail surface.
- Apply two coats of the olive green polish for full coverage.
- Add the gold leaf accents to the chosen nail while the polish is still wet for better adhesion.
- Seal with a glossy top coat to keep the design intact and shiny.
Olive Green Negative Space Design
This chic olive green manicure features a negative space design that allows for a modern and trendy look. The design uses a combination of green polish and the natural nail, creating a balanced contrast that works well with the short almond shape. This minimalist approach is perfect for those who want something unique yet simple.

Tools & Products
- Polish: CND Vinylux in “Sage Scarf”
- Top coat: OPI Infinite Shine Gloss
- Base coat: Essie First Base Coat
DIY Tips
- Begin with the base coat to prep your nails.
- Use nail guides or tape to create clean lines for the negative space design.
- Apply the olive green polish, making sure to keep the lines sharp and precise.
- Finish with a top coat to protect the design and add shine.
Olive Green with Black Leaf Patterns
This design combines olive green polish with black leaf patterns over a soft nude base. The contrast between the green and black adds depth and interest, making this a perfect design for those who love nature-inspired art. The short square nails keep the design neat and wearable, suitable for both casual and formal occasions.
Tools & Products
- Polish: Essie “Chinchilly”
- Leaf pattern stamp: MoYou London Tropical Collection
- Top coat: Sally Hansen Insta-Dri Top Coat
- Base coat: Deborah Lippmann Hard Rock Base Coat
DIY Tips
- Apply the nude polish as a base and allow it to dry.
- Use the olive green polish on alternating nails for added contrast.
- Stamp the black leaf pattern onto the nude nails using a stamping tool.
- Seal the design with a top coat to ensure longevity and a smooth finish.
Classic Olive Green Short Square Nails
These short square nails offer a timeless olive green manicure with a high-shine finish. The glossy polish enhances the richness of the green, making it a perfect match for fall. This classic design is ideal for those who appreciate simplicity and elegance in their nail art.
Tools & Products
- Polish: OPI “Suzi – The First Lady of Nails”
- Top coat: Seche Vite Dry Fast Top Coat
- Base coat: CND Stickey Base Coat
DIY Tips
- Start by applying the base coat to protect your nails.
- Apply two coats of the olive green polish for an even, opaque finish.
- Seal with a top coat to add shine and protect the polish from chipping.
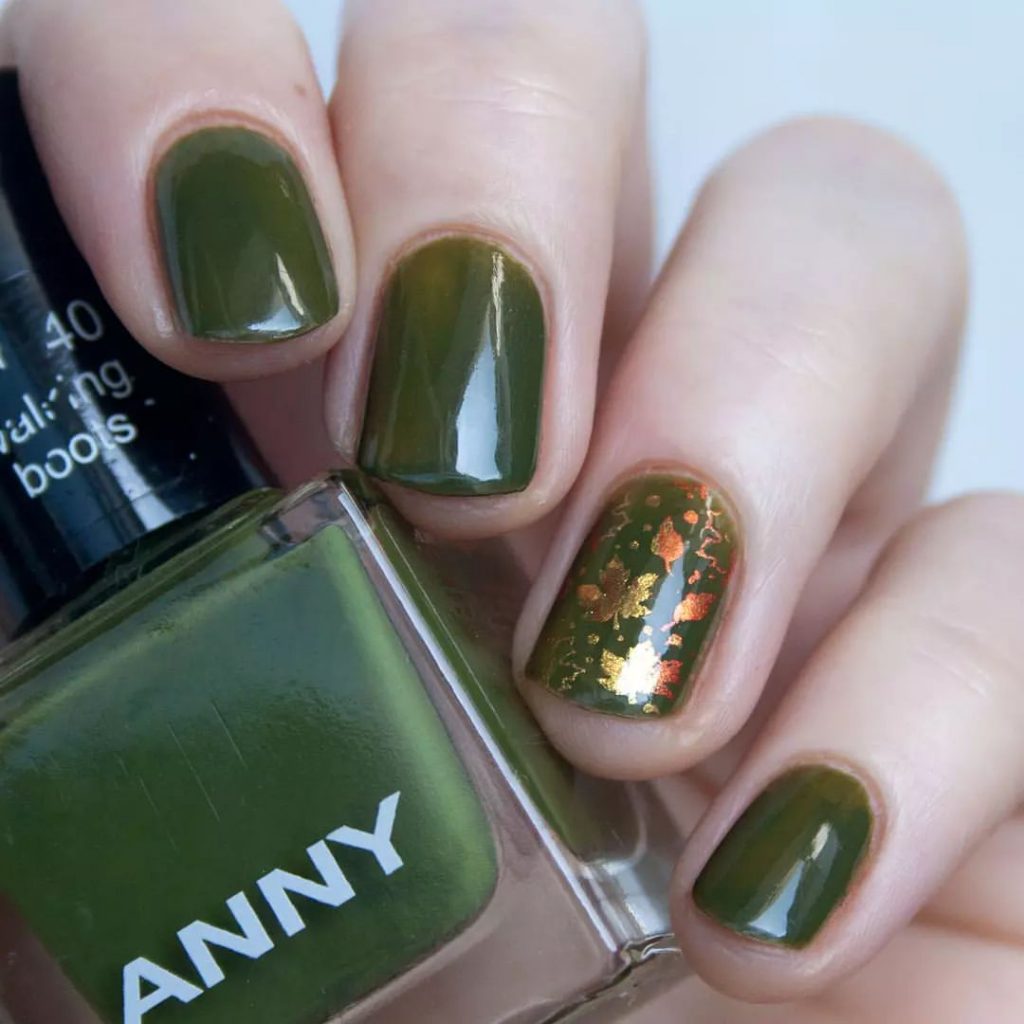
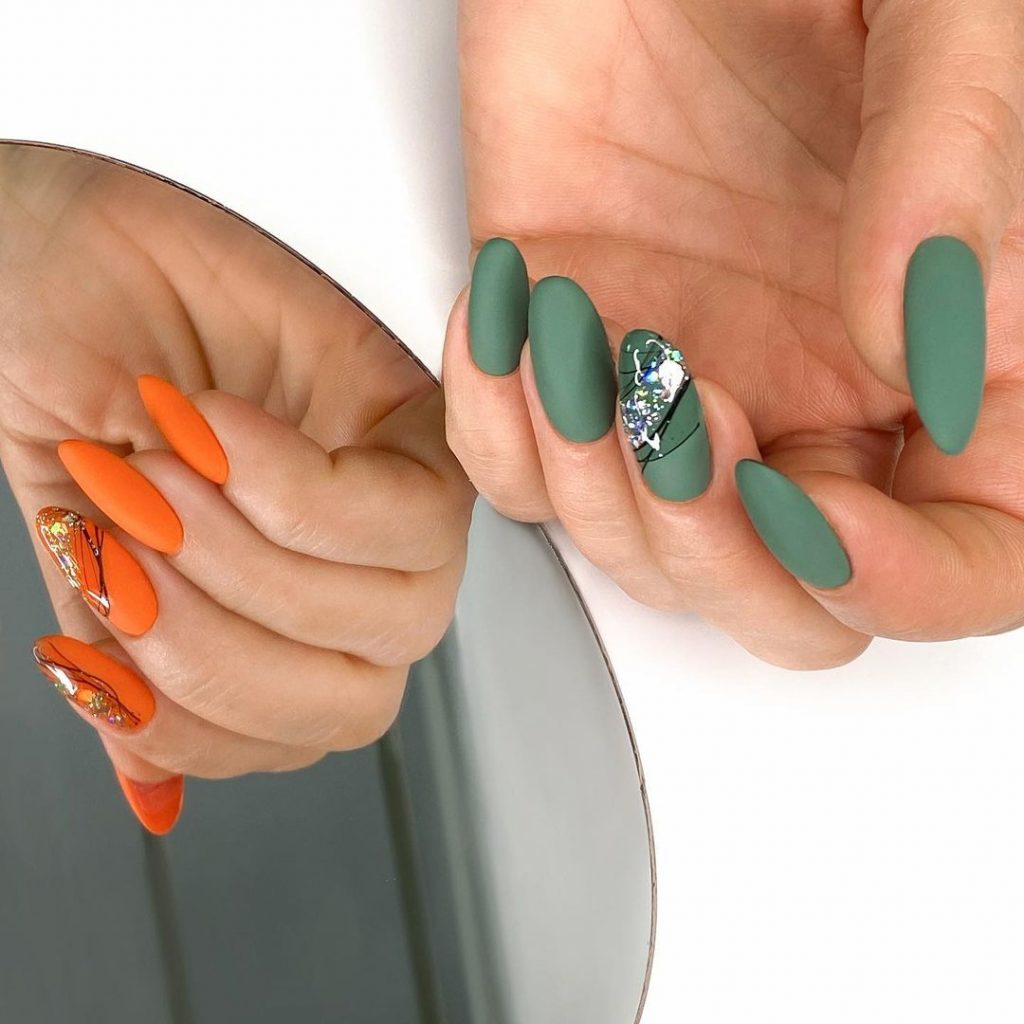
Matte Olive Green with Orange Accent
This bold design pairs matte olive green nails with striking orange accents, creating a vibrant contrast that’s perfect for fall. The acrylic almond nails provide a chic shape, while the matte finish adds a modern twist. The orange accents, combined with a touch of glitter, make this design perfect for those who love to experiment with color and texture.
Tools & Products
- Polish: Zoya “Hunter” (Olive Green)
- Matte top coat: Essie Matte About You
- Orange polish: China Glaze “Orange Knockout”
- Glitter accent polish: OPI “Shine For Me”
- Base coat: Orly Bonder Base Coat
DIY Tips
- Apply the base coat to ensure the polish adheres well and lasts longer.
- Paint the nails with the olive green and orange polishes, using two coats for each color.
- Apply the matte top coat over the olive green nails to achieve the desired matte finish.
- Add the glitter polish as an accent for extra sparkle and finish with a top coat on the orange nails for a contrasting shine.
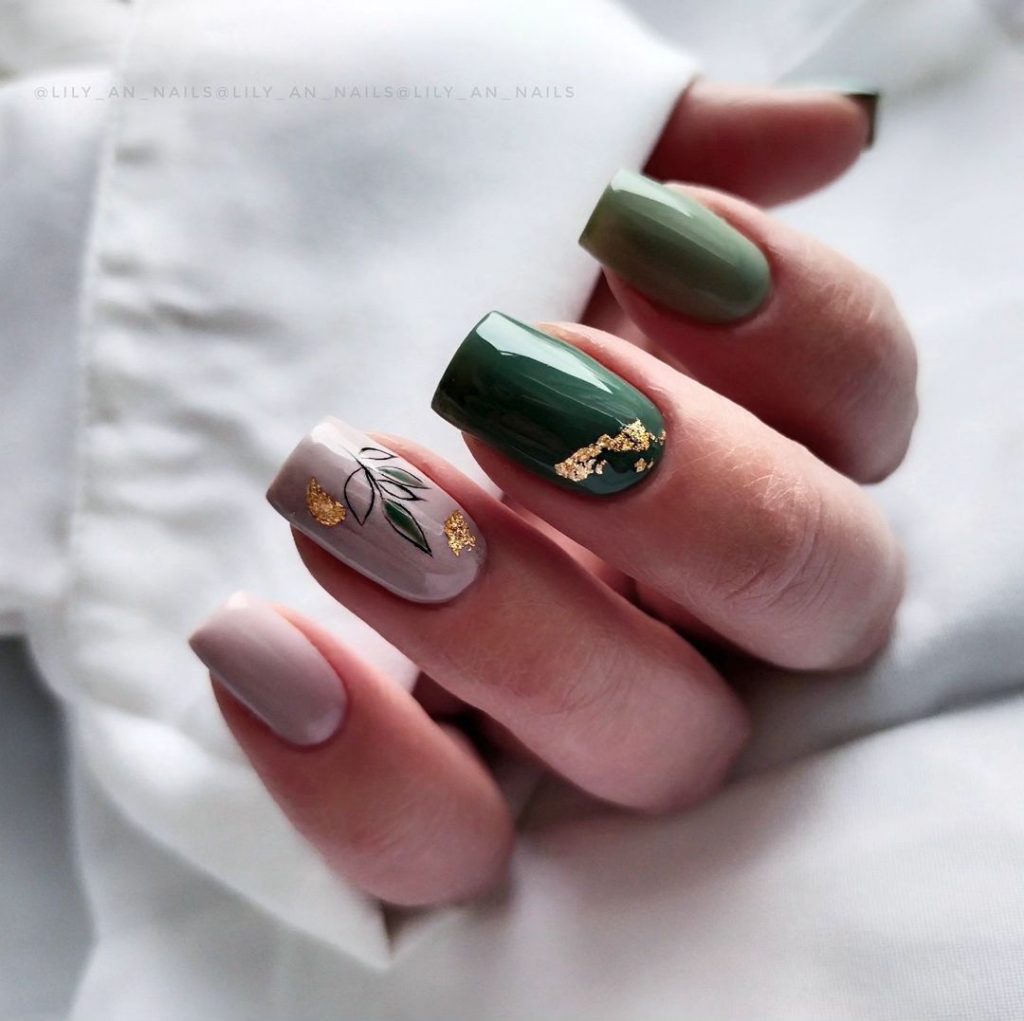
Olive Green with Nude and Gold Leaf Accent
This elegant olive green manicure features a combination of nude and green shades, accented with delicate gold leaf details. The acrylic square nails are the perfect canvas for this sophisticated design, where the gold accents add a touch of luxury, and the leaf art brings in a natural, autumnal feel. This look is ideal for both everyday wear and special occasions.
Tools & Products
- Polish: Zoya “Hunter”
- Gold leaf accents: Born Pretty Gold Foil
- Leaf pattern decal: MoYou London Tropical Collection
- Top coat: Essie Gel Couture Top Coat
DIY Tips
- Start with the base coat to protect your nails and create a smooth surface.
- Apply the nude polish on one or two nails and the olive green on the rest.
- Add the gold leaf accents and leaf decals to the designated nails, pressing them gently to adhere.
- Finish with a top coat to seal in the design and add a glossy shine.
Light Olive Green with Gold Outlines
This design is a modern take on the classic olive green manicure, featuring light olive tones outlined with gold details. The short square nails create a chic and understated look, while the gold outlines add just the right amount of elegance, making this a versatile design for any occasion.
Tools & Products
- Polish: OPI “Sage You Love Me”
- Gold liner: Sally Hansen Nail Art Pen in Gold
- Top coat: Seche Vite Fast Dry Top Coat
- Base coat: Essie Ridge Filling Base Coat
DIY Tips
- Apply the base coat to all nails and let it dry completely.
- Use the light olive green polish as the base color, applying two coats for even coverage.
- Carefully outline the edges of each nail with the gold liner for a clean, defined look.
- Seal the design with a top coat to ensure it lasts and maintains its shine.
Olive Green Half-Moon Design
This olive green manicure features a stylish half-moon design that combines nude and green shades. The acrylic almond nails offer a perfect shape for this classic design, which is both modern and timeless. The half-moon effect gives a subtle nod to vintage styles while remaining fresh and on-trend for 2024.
Tools & Products
- Polish: Essie “Can’t Wait” (Nude) and “Fall For Me” (Olive Green)
- Top coat: CND Vinylux Weekly Top Coat
- Base coat: OPI Nail Envy
DIY Tips
- Start with a base coat to protect your nails.
- Apply the nude polish to the entire nail and allow it to dry.
- Use a curved nail stencil to create the half-moon shape, then paint the rest of the nail with the olive green polish.
- Finish with a top coat to keep the design sharp and shiny.
Olive Green with Floral Art
This design combines a soft olive green base with delicate floral art, perfect for those who appreciate a nature-inspired look. The short square nails keep the design practical and elegant, while the floral patterns add a touch of whimsy. This manicure is great for adding a subtle yet stylish flair to your everyday look.
Tools & Products
- Polish: Essie “Sage Me Later”
- Floral art decals: Whats Up Nails Spring Garden Decals
- Top coat: Sally Hansen Miracle Gel Top Coat
- Base coat: Deborah Lippmann Hard Rock Base Coat
DIY Tips
- Begin by applying the base coat to all nails.
- Paint two nails with the olive green polish and leave two for the floral art.
- Apply the floral decals to the designated nails, pressing down firmly to ensure they stick.
- Finish with a top coat to seal in the design and add a glossy finish.
Save Pin