When it comes to summer manicures, neon shades and bright designs take the spotlight. Neon summer nails are not only eye-catching but also bring a burst of fun and energy to your look. Whether you prefer short, long, almond, or acrylic nails, there’s a neon design that will perfectly complement your style. In this article, we’ll explore 25 vibrant and trendy neon summer nail ideas that will inspire your next manicure. From simple and cute patterns to intricate and artistic designs, get ready to dive into a world of bold colors and creative nail art.
Neon Abstract Art
When it comes to neon summer nails, nothing beats a bold and vibrant design. This abstract art-inspired look features a striking orange base with irregular blue shapes, creating a dynamic and eye-catching effect. The nail shape is short and rounded, making it a practical yet stylish option for everyday wear. The matte finish adds a contemporary twist, ensuring that your nails stand out in any setting.
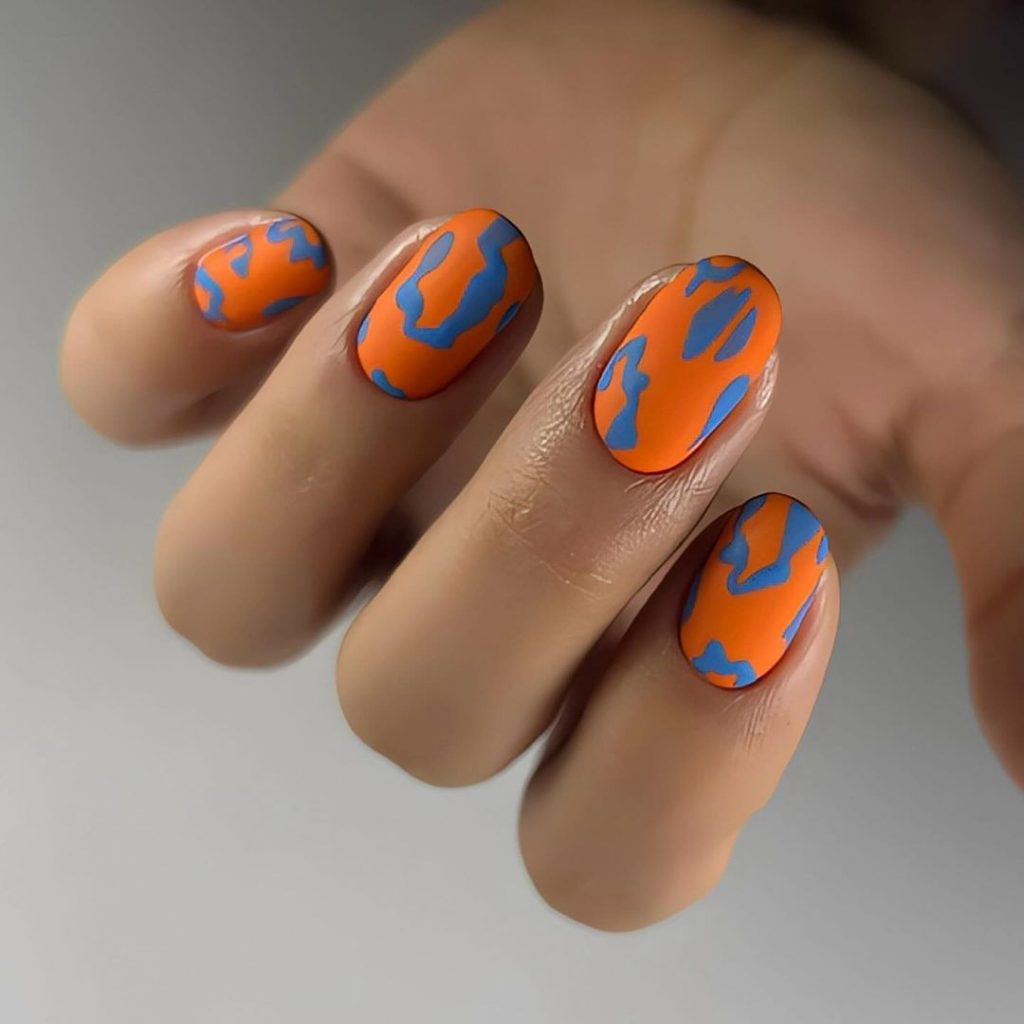
- Consumables:
- Orange base polish: OPI Neon Orange
- Blue accent polish: Essie Butler Please
- Matte top coat: Sally Hansen Miracle Gel Matte
- Detail brush for creating shapes
Home Instructions:
- Start with a base coat to protect your natural nails.
- Apply two coats of the orange polish and let it dry completely.
- Using the detail brush, create irregular shapes with the blue polish on each nail.
- Finish with a matte top coat for a modern look.
Neon Green Elegance
For a neon nail look that’s both bright and elegant, this neon green design is perfect. The solid color is bold and impactful, making a statement without needing additional embellishments. The nail type here is long and oval, giving a sleek and sophisticated appearance.
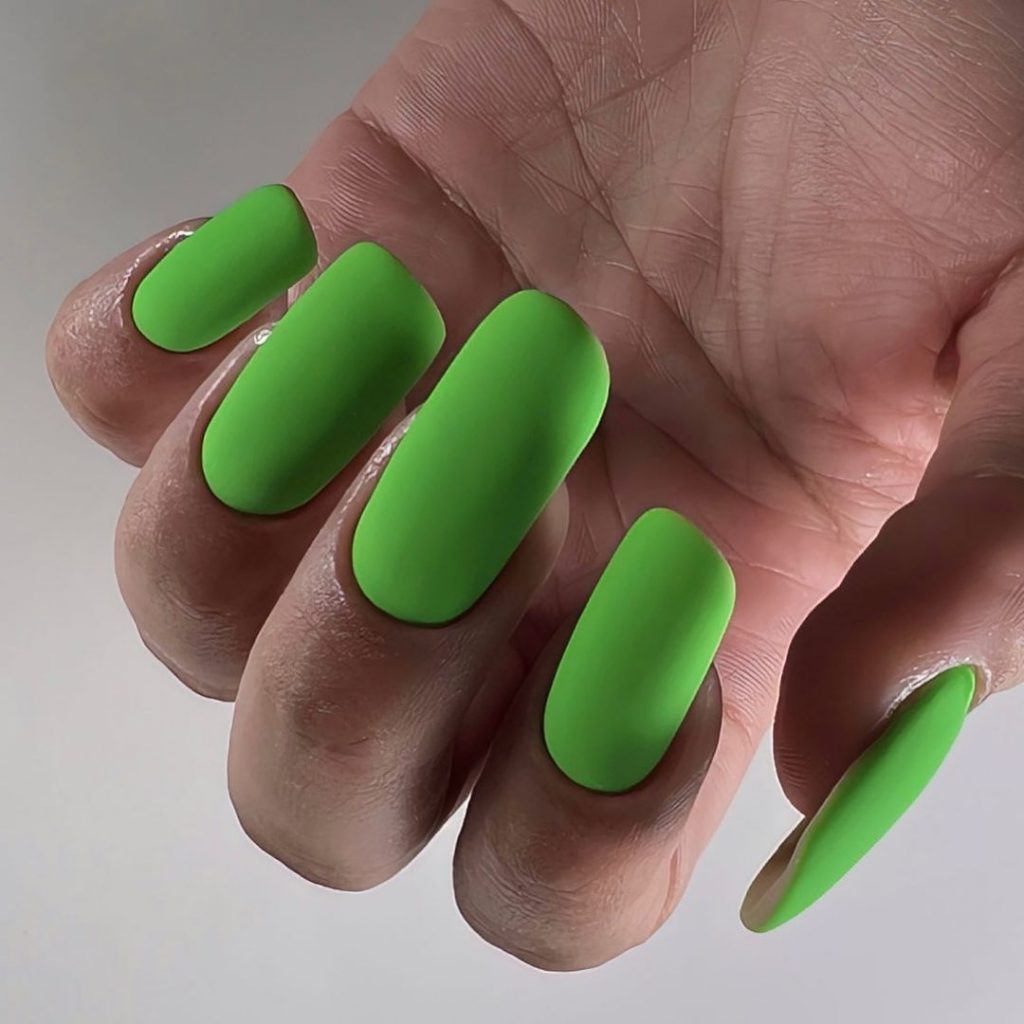
- Consumables:
- Neon green polish: China Glaze Celtic Sun
- Base coat: Essie First Base
- Top coat: Seche Vite Dry Fast
Home Instructions:
- Apply a base coat to each nail.
- Apply two to three coats of neon green polish, allowing each layer to dry in between.
- Finish with a high-gloss top coat to seal the color and add shine.
Tropical Neon
This fun and cute nail design combines neon pink with tropical leaf accents, perfect for summer. The nail shape is almond, offering a stylish yet practical length. The tropical leaf design adds a playful touch, making these nails ideal for summer vacations or beach outings.
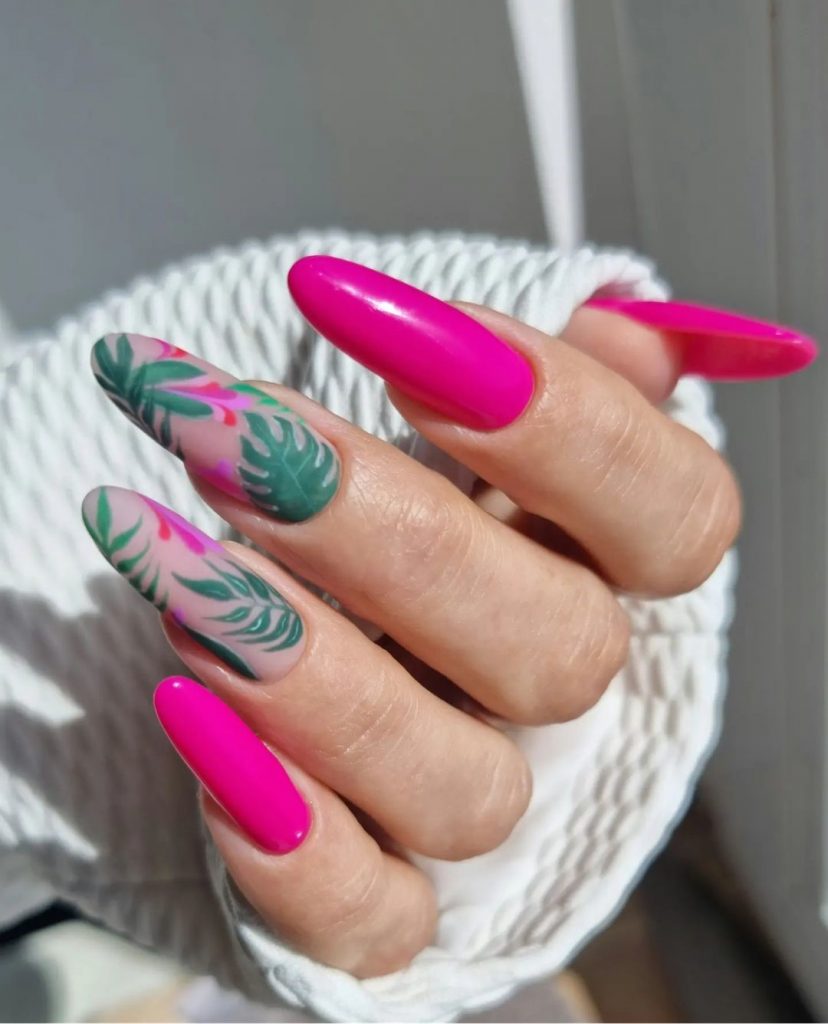
- Consumables:
- Neon pink polish: Orly Beach Cruiser
- Green polish for leaves: Sally Hansen Green Thumb
- Nail art brush for detailing
- Top coat: Essie Gel Couture
Home Instructions:
- Apply a base coat to your nails.
- Paint all nails with two coats of neon pink polish.
- Using the nail art brush, create leaf shapes on the accent nails with the green polish.
- Finish with a top coat to protect your design.
Chevron Turquoise
This trendy turquoise design features a subtle chevron pattern on the accent nails, combining style and simplicity. The nail type is long and oval, which is perfect for showcasing the chevron art. The turquoise color is refreshing, making it an excellent choice for summer.
- Consumables:
- Turquoise polish: Zoya Zuza
- White polish for chevron: OPI Alpine Snow
- Chevron nail stickers or stencil
- Top coat: Revlon ColorStay Gel Envy
Home Instructions:
- Start with a base coat.
- Apply two coats of turquoise polish.
- Place the chevron stickers on the accent nails and paint over them with white polish.
- Remove the stickers carefully to reveal the chevron pattern.
- Seal the design with a top coat.
Green and Yellow Stripes
For a simple yet vibrant design, these green and yellow striped nails are a fantastic option. The nail shape is almond, and the combination of bright green and yellow stripes creates a fresh, lively look. This design is perfect for adding a pop of color to your summer style.

- Consumables:
- Green polish: Essie Mojito Madness
- Yellow polish: China Glaze Sun Worshiper
- Striping tape for clean lines
- Top coat: Sally Hansen Insta-Dri
Home Instructions:
- Apply a base coat.
- Paint all nails with a base color (choose either green or yellow).
- Once dry, place striping tape on the nails to create stripes.
- Paint over the tape with the second color.
- Remove the tape carefully and finish with a top coat.
Rainbow Neon
For those who can’t choose just one color, this rainbow neon manicure is the perfect solution. Featuring bright yellow, orange, red, pink, and purple, each nail is painted a different vibrant shade, creating a fun and trendy look. The nail shape is almond, offering a smooth and elegant silhouette that showcases each bright color beautifully.

- Consumables:
- Neon yellow polish: China Glaze Celtic Sun
- Neon orange polish: Essie Brights Collection Orange
- Neon red polish: OPI A Red-vival City
- Neon pink polish: Orly Beach Cruiser
- Neon purple polish: Color Club Disco Dress
- Top coat: Seche Vite Dry Fast
Home Instructions:
- Apply a base coat to protect your natural nails.
- Paint each nail with a different neon color, applying two coats for full opacity.
- Allow the polish to dry completely between coats.
- Finish with a high-gloss top coat to seal in the colors and add shine.
Neon Green with Zebra Stripes
This bold design features neon green nails paired with zebra stripes on the accent nails, creating a striking contrast. The nail shape is oval, which works well with the art and adds a touch of sophistication to the playful design. This black and green combination is perfect for those who love unique art designs.
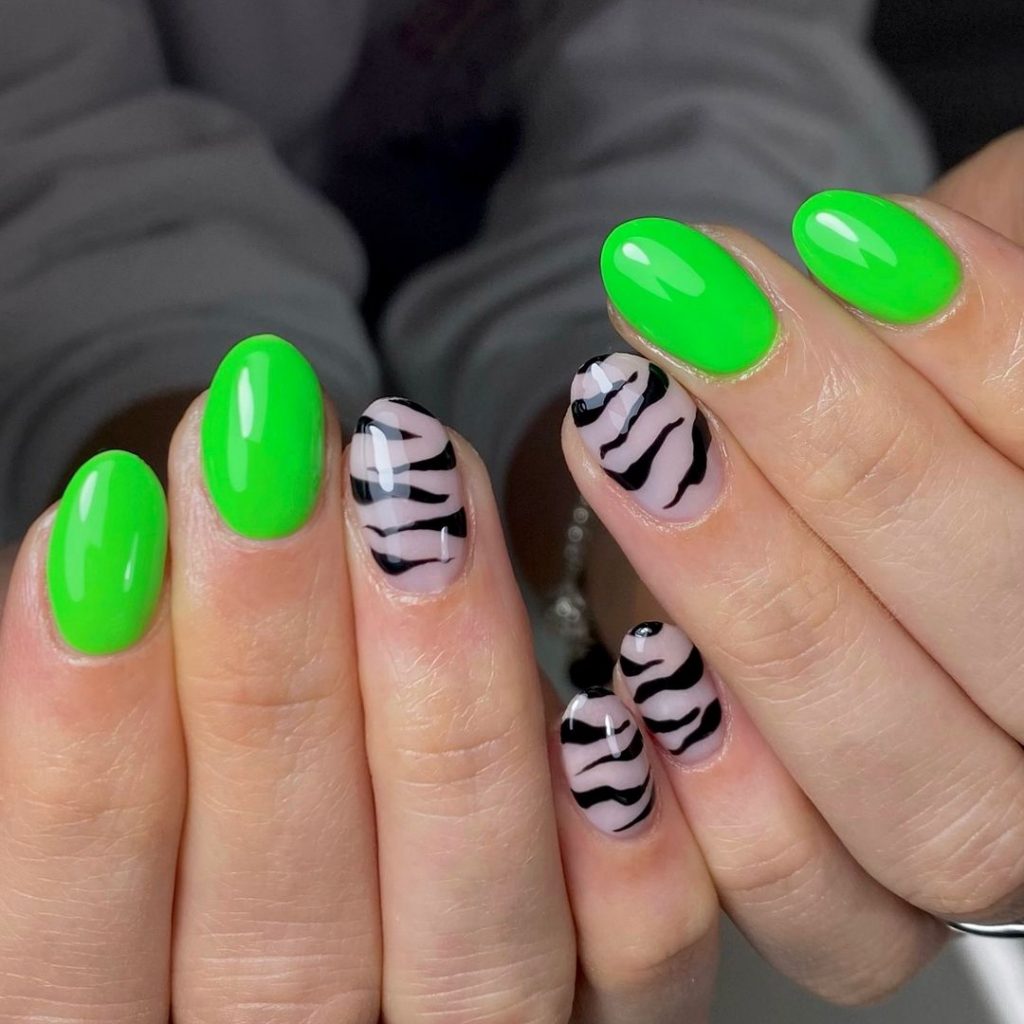
- Consumables:
- Neon green polish: China Glaze I’m With the Lifeguard
- Black polish for stripes: Sally Hansen Black Out
- White base polish: OPI Alpine Snow
- Thin striping brush for creating zebra stripes
- Top coat: Revlon ColorStay Gel Envy
Home Instructions:
- Start with a base coat.
- Paint the base of the accent nails with white polish.
- Use a thin striping brush to paint black zebra stripes over the white base.
- Paint the remaining nails with neon green polish.
- Finish with a top coat to seal and protect the design.
Neon Swirls and Jewels
Combining neon summer nails shades & designs, this look features a mix of bright neon colors in a swirl pattern with jeweled accents. The nail shape is almond, making the design look elegant and polished. The bright colors and added jewels make this design perfect for summer parties and events.
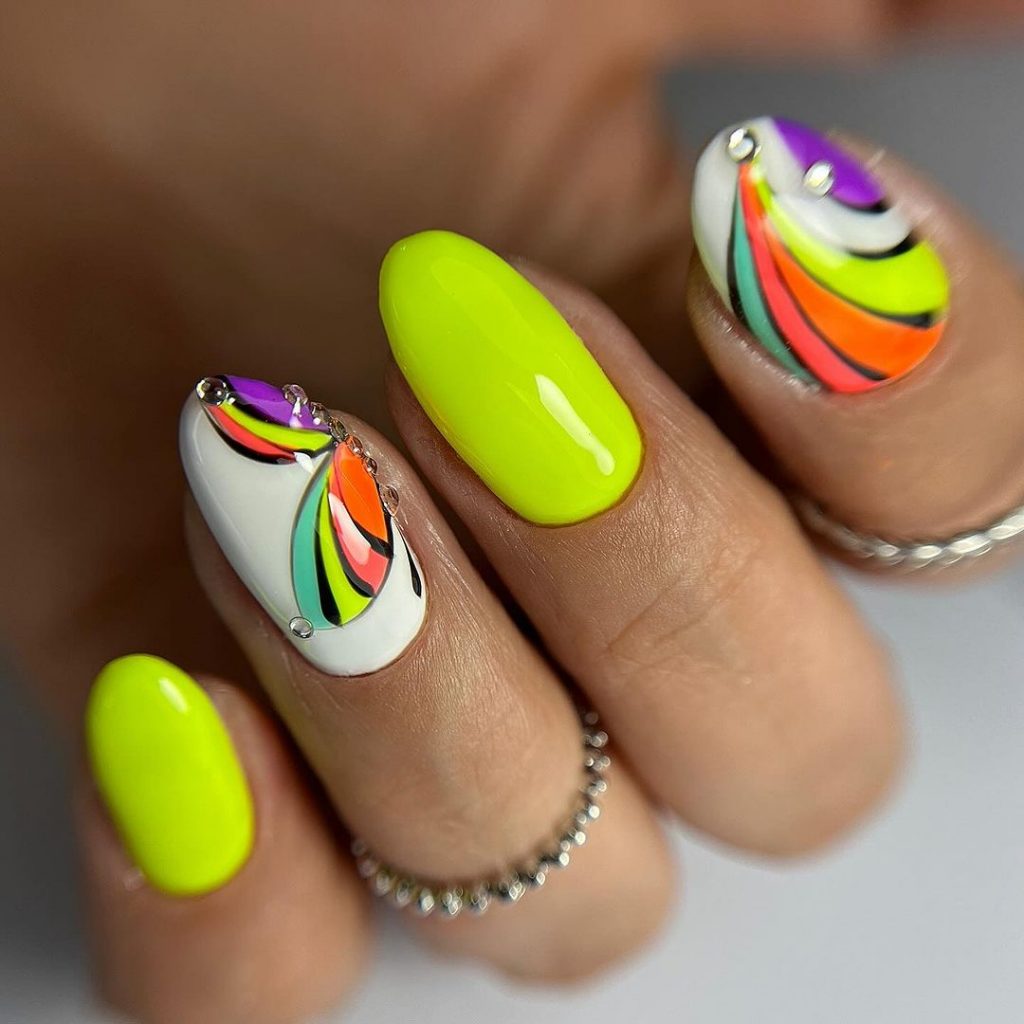
- Consumables:
- Neon yellow polish: Essie Neon Collection
- White polish: OPI Alpine Snow
- Neon pink, orange, green, and purple polishes for swirls: Various brands
- Nail jewels and adhesive
- Detail brush for swirls
- Top coat: Sally Hansen Insta-Dri
Home Instructions:
- Apply a base coat.
- Paint the base color (white) and allow it to dry.
- Use a detail brush to create neon swirls on the accent nails.
- Add small jewels to enhance the design.
- Finish with a top coat to secure the jewels and add shine.
Gradient Green
This simple yet stunning design features a gradient of green shades, creating an ombre effect that’s both elegant and eye-catching. The nail type is long and square, providing a large canvas for the gradient to shine. The subtle transition between light and dark green makes this design perfect for summer.
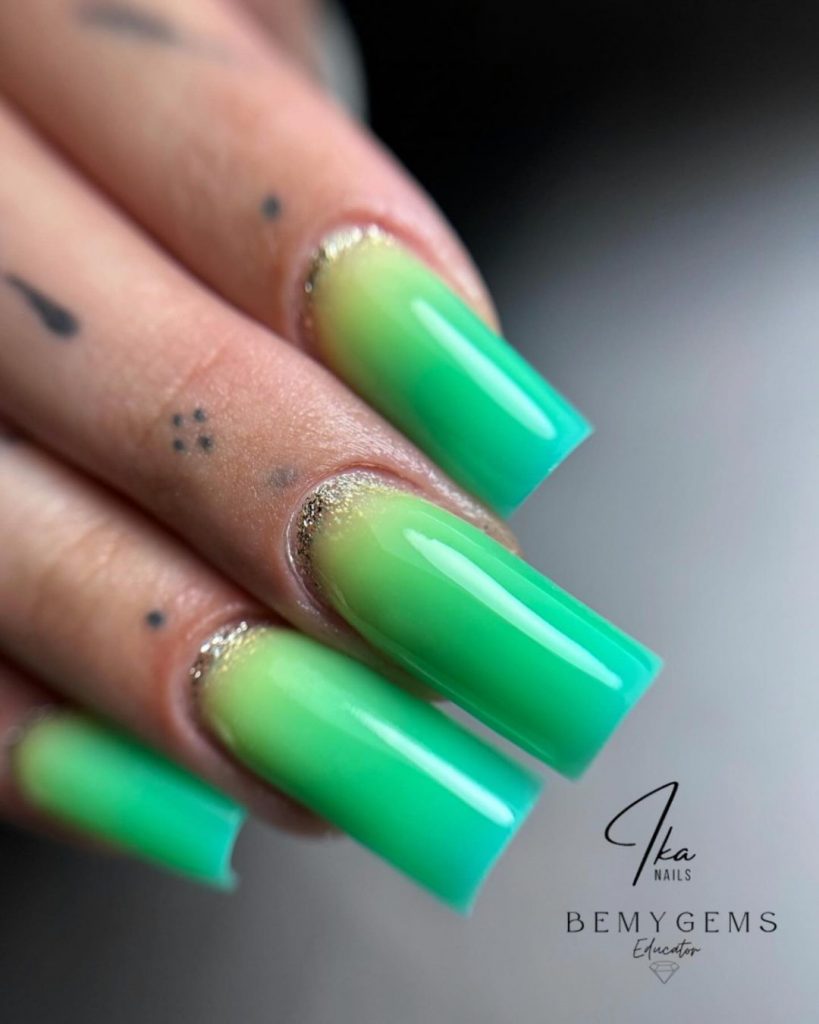
- Consumables:
- Light green polish: OPI My Gecko Does Tricks
- Dark green polish: Essie Going Incognito
- Makeup sponge for blending
- Top coat: Seche Vite Dry Fast
Home Instructions:
- Apply a base coat.
- Paint the light green polish on the upper half of the nails and the dark green on the lower half.
- Use a makeup sponge to blend the two colors in the middle for a seamless gradient.
- Finish with a top coat to smooth the gradient and add shine.
Orange and Gold Foil
For a trendy and luxurious look, this design features bright neon orange nails with black stripes and gold foil accents. The nail shape is almond, giving the design a sophisticated edge. The gold foil adds a touch of glamour, making this design perfect for special occasions.

- Consumables:
- Neon orange polish: China Glaze Orange Knockout
- Black polish for stripes: OPI Black Onyx
- Gold foil flakes
- Top coat: Essie Gel Couture
Home Instructions:
- Start with a base coat.
- Paint the nails with neon orange polish.
- Use a thin brush to create black stripes on the accent nails.
- Apply gold foil flakes to the stripes while the polish is still tacky.
- Finish with a top coat to secure the foil and add shine.
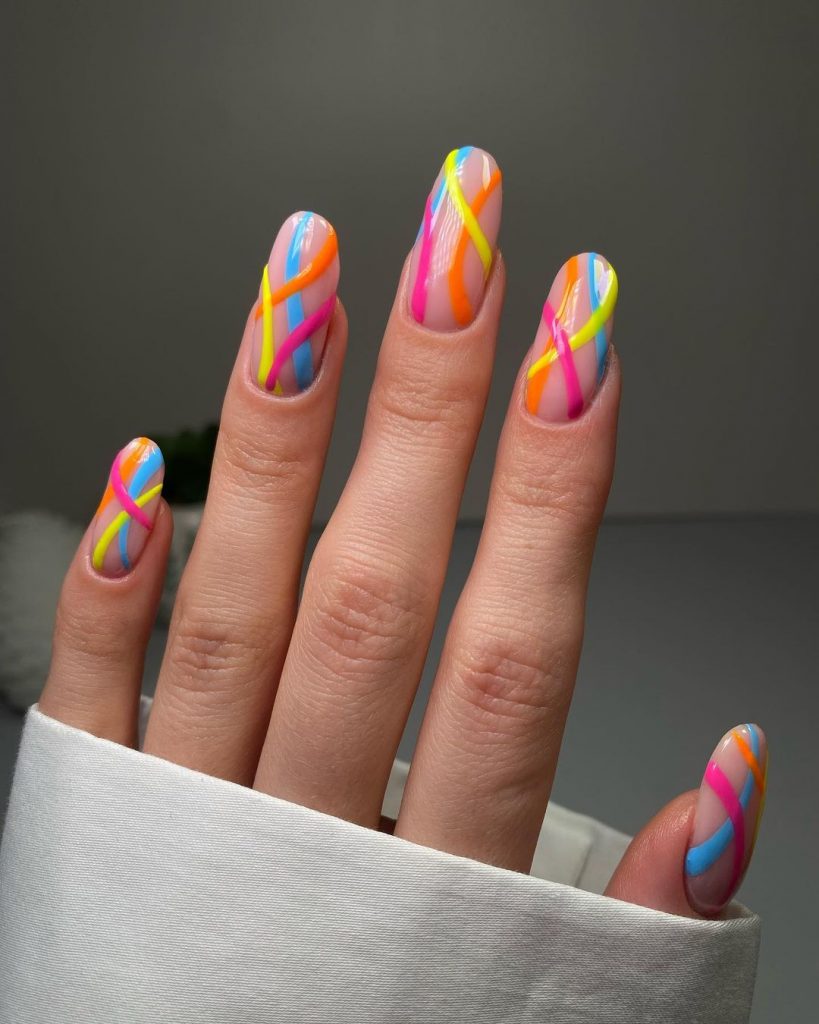
Wavy Neon Accents
This nail design combines a sleek white base with wavy neon accents in shades of purple, blue, and pink. The nail shape is long and square, providing a perfect canvas for the intricate wave pattern. This art design is both elegant and fun, making it a standout choice for summer.

- Consumables:
- White base polish: OPI Alpine Snow
- Neon purple polish: China Glaze Violet Vibes
- Neon blue polish: Essie Butler Please
- Neon pink polish: Orly Beach Cruiser
- Fine detail brush for wave patterns
- Top coat: Seche Vite Dry Fast
Home Instructions:
- Apply a base coat.
- Paint the nails with the white base polish and allow it to dry.
- Using a fine detail brush, create wavy lines with the neon colors on each nail.
- Finish with a top coat to seal and protect the design.
Matte Sunset Gradient
This beautiful design features a gradient from blue to yellow, reminiscent of a summer sunset. The nail type is long and oval, which is ideal for showing off the gradient effect. The matte finish adds a modern touch to the overall look.

- Consumables:
- Light blue polish: OPI It’s a Boy!
- Yellow polish: China Glaze Lemon Fizz
- Matte top coat: Sally Hansen Miracle Gel Matte
- Makeup sponge for blending
Home Instructions:
- Apply a base coat.
- Use a makeup sponge to blend the blue and yellow polishes, creating a gradient effect.
- Apply a matte top coat to finish the look.
Neon Jelly with Glitter
For a unique and trendy design, these neon jelly nails incorporate glitter and a translucent effect. The nail shape is long and square, which complements the layered look of the glitter within the jelly polish.
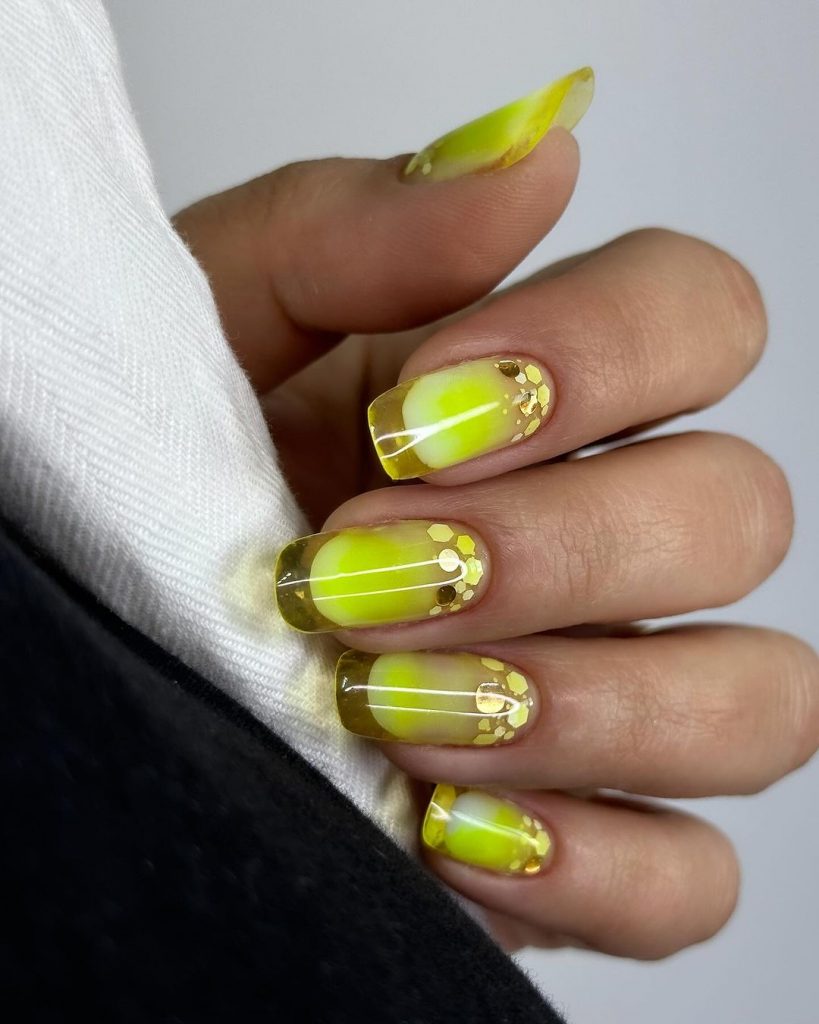
- Consumables:
- Neon yellow jelly polish: Sally Hansen Insta-Dri in Lemonade
- Clear polish: OPI Top Coat
- Gold glitter: Ciaté London Gold Digger
- Top coat: Essie Gel Couture
Home Instructions:
- Apply a base coat.
- Apply the neon yellow jelly polish in thin layers until the desired opacity is reached.
- Add gold glitter to the wet polish and let it set.
- Seal the design with a top coat.
Neon Coral and Scales
This design features bright neon coral nails with accent nails displaying a blue and pink scale pattern. The nail type is long and square, perfect for showcasing the intricate scale design. This look is vibrant and ideal for summer festivals or beach days.

- Consumables:
- Neon coral polish: Essie Neon Collection Coral
- Blue and pink polishes: Essie Bikini So Teeny and Orly Neon Heat
- Scale stencil or nail art brush
- Top coat: Sally Hansen Insta-Dri
Home Instructions:
- Apply a base coat.
- Paint the neon coral polish on all nails except the accent nails.
- Use a stencil or nail art brush to create the scale pattern on the accent nails with blue and pink polishes.
- Finish with a top coat.
Neon Yellow with Black Tips
This cute and simple design features bright neon yellow nails with black tips and striped accent nails. The nail shape is short and square, making it practical for everyday wear while still being stylish.
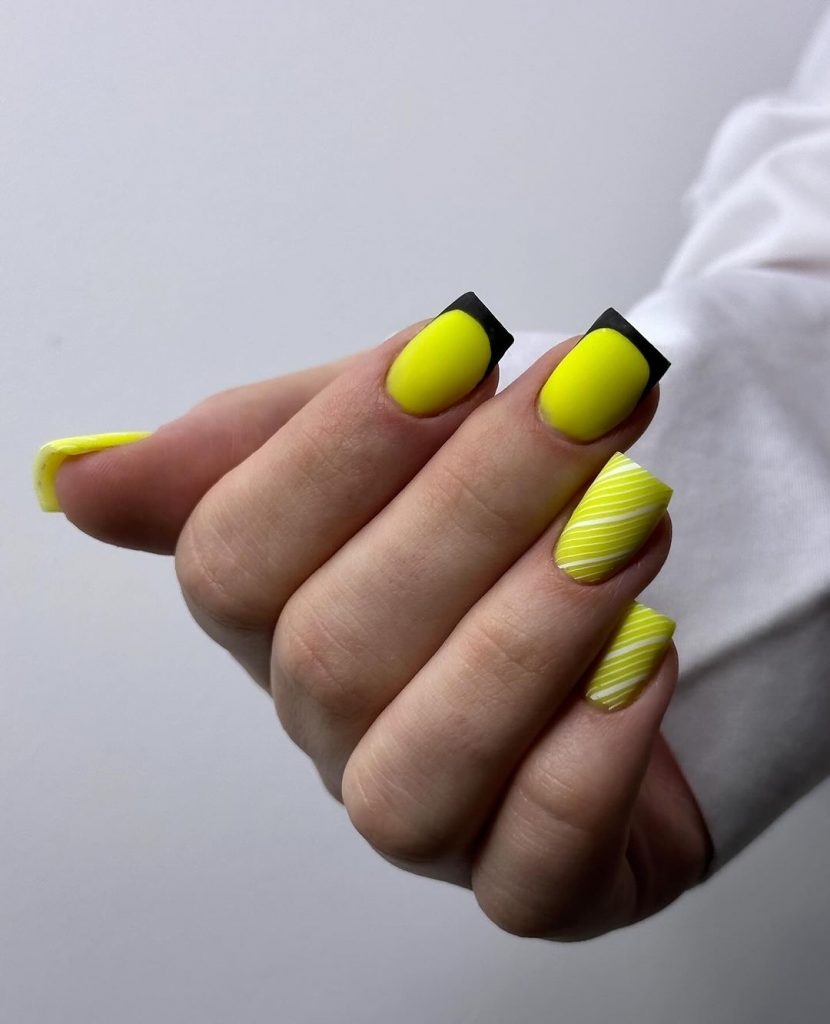
- Consumables:
- Neon yellow polish: China Glaze Celtic Sun
- Black polish: OPI Black Onyx
- Striping tape for accents
- Top coat: Seche Vite Dry Fast
Home Instructions:
- Apply a base coat.
- Paint all nails with neon yellow polish.
- Use black polish to create the tips and stripes with striping tape on the accent nails.
- Finish with a top coat.
Blue Bears
This adorable design features light blue nails with cute 3D bear accents, perfect for adding a playful touch to your neon summer nails. The nail shape is oval, providing a smooth and elegant silhouette that enhances the whimsical bear art.

- Consumables:
- Light blue polish: Essie Bikini So Teeny
- 3D bear nail art: AliExpress 3D Bear Charms
- Top coat: Seche Vite Dry Fast
Home Instructions:
- Apply a base coat to protect your natural nails.
- Paint all nails with light blue polish, applying two coats for full opacity.
- Attach the 3D bear charms to the nails using a small amount of nail glue.
- Finish with a top coat to seal the design and add shine.
Matte Pink
For a bold yet simple look, these matte neon pink nails are the way to go. The nail type is short and square, making this design both practical and stylish. The matte finish adds a modern twist to the bright pink color.

- Consumables:
- Neon pink polish: Orly Beach Cruiser
- Matte top coat: Sally Hansen Miracle Gel Matte
Home Instructions:
- Apply a base coat to protect your natural nails.
- Paint all nails with neon pink polish, applying two coats for full opacity.
- Finish with a matte top coat for a sleek, modern look.
Orange and Yellow Swirls
This vibrant design features a gradient of orange and yellow with a swirl pattern, creating a lively and eye-catching effect. The nail shape is long and square, perfect for showcasing the intricate swirls.
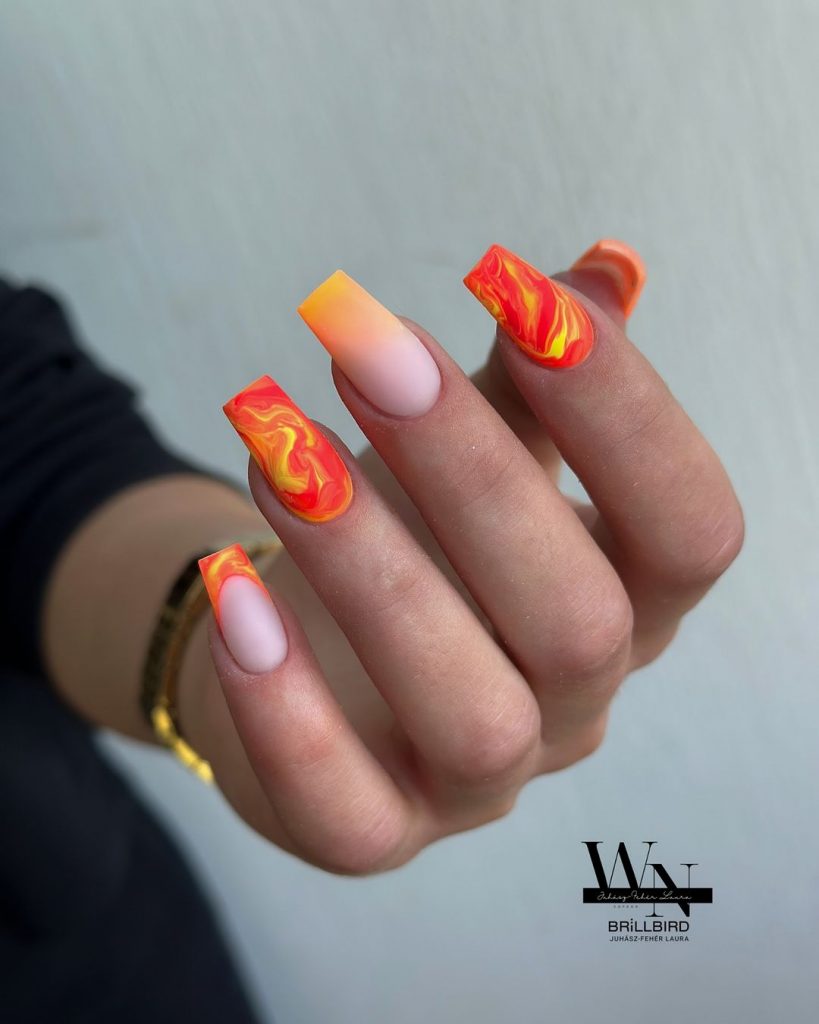
- Consumables:
- Orange polish: China Glaze Orange Knockout
- Yellow polish: Essie Neon Collection Yellow
- Detail brush for swirls
- Top coat: Seche Vite Dry Fast
Home Instructions:
- Apply a base coat.
- Create a gradient base by blending the orange and yellow polishes with a makeup sponge.
- Use a detail brush to create swirl patterns on the accent nails.
- Finish with a top coat to seal the design and add shine.
Purple and Green Leopard
For a bold and fun look, these purple nails with green leopard print accents are perfect. The nail shape is long and square, making this design stand out even more. The contrasting colors create a vibrant and trendy look.
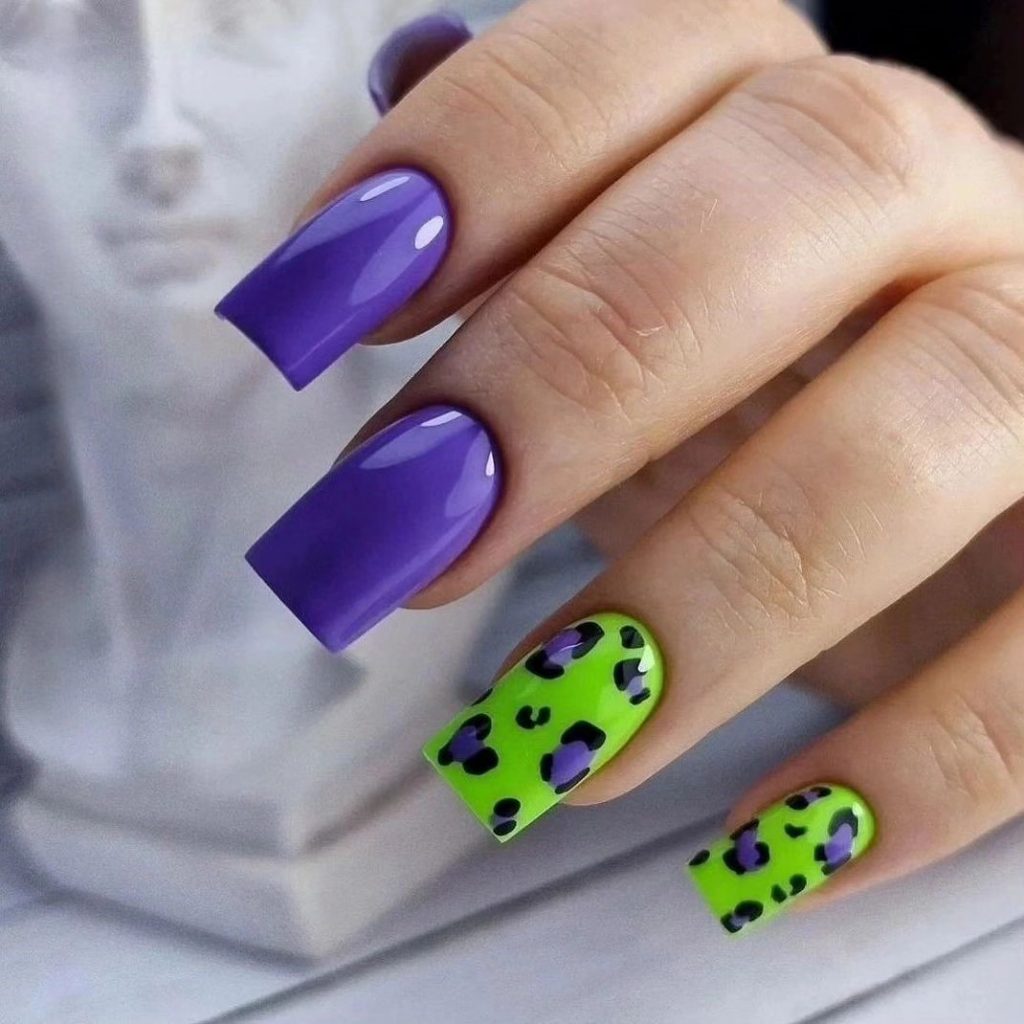
- Consumables:
- Purple polish: Essie Play Date
- Neon green polish: China Glaze I’m With the Lifeguard
- Black polish for leopard spots: OPI Black Onyx
- Dotting tool for creating spots
- Top coat: Sally Hansen Insta-Dri
Home Instructions:
- Apply a base coat.
- Paint the base color (purple) on all nails except the accent nails.
- Paint the accent nails with neon green polish.
- Use a dotting tool to create black leopard spots on the green nails.
- Finish with a top coat to protect the design.
Neon Yellow with Floral Accent
This cute and simple design features bright neon yellow nails with a floral accent and a glitter accent nail. The nail shape is almond, making the design elegant and chic. The floral design adds a playful touch, perfect for summer.
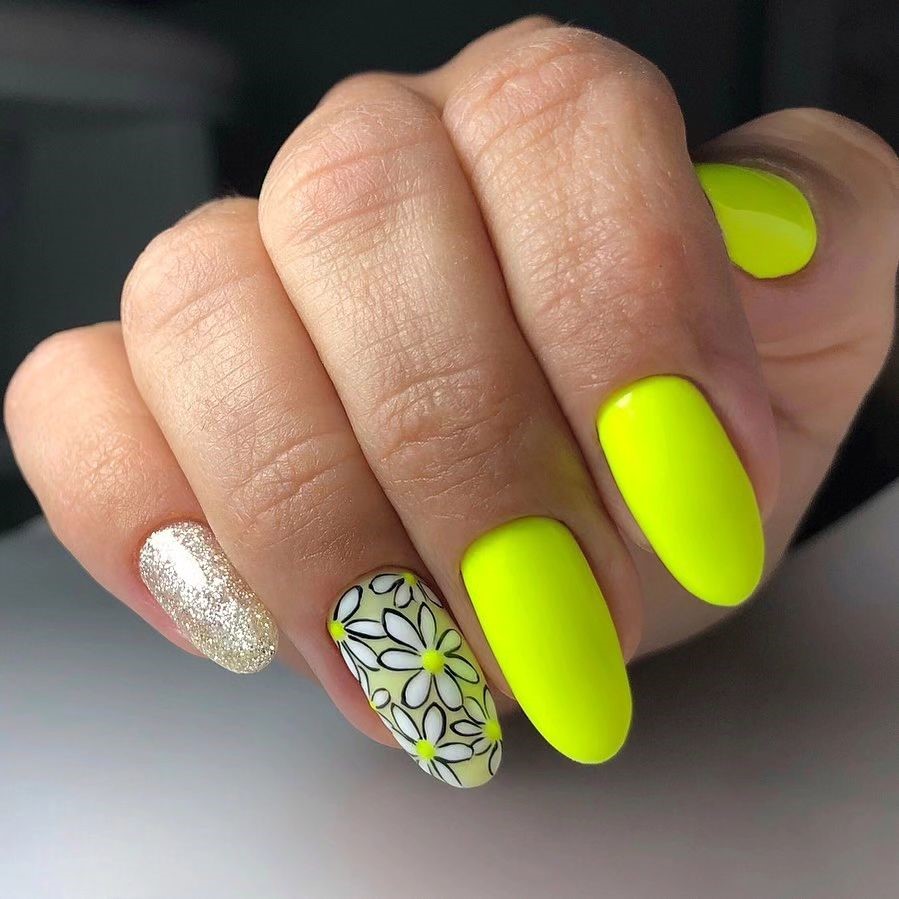
- Consumables:
- Neon yellow polish: Essie Neon Collection
- White polish for flowers: OPI Alpine Snow
- Glitter polish: Ciaté London Gold Digger
- Detail brush for flowers
- Top coat: Seche Vite Dry Fast
Home Instructions:
- Apply a base coat.
- Paint all nails with neon yellow polish, except the glitter accent nail.
- Paint the glitter accent nail with the glitter polish.
- Use a detail brush to paint white flowers on one accent nail.
- Finish with a top coat to seal the design and add shine.
Pastel Neon Gradients
This design features pastel neon gradients with shades of green, pink, orange, and yellow, creating a fresh and vibrant look. The nail shape is long and square, offering a perfect canvas for the smooth gradient transitions. The addition of black abstract lines and a tiny black rhinestone accentuates the design’s artistic flair.

- Consumables:
- Neon green polish: Essie Vibrant Vibes
- Neon pink polish: Orly Neon Heat
- Neon orange polish: China Glaze Orange Knockout
- Neon yellow polish: OPI Need Sunglasses?
- Black polish for abstract lines: Sally Hansen Black Out
- Small black rhinestones
- Makeup sponge for blending
- Top coat: Seche Vite Dry Fast
Home Instructions:
- Apply a base coat.
- Use a makeup sponge to blend the neon colors, creating smooth gradient transitions on each nail.
- Add abstract black lines using a thin brush and attach a small black rhinestone for an accent.
- Finish with a top coat to seal and protect the design.
Neon Stripes
This playful design features bright neon stripes in multiple colors over a clear base, creating a fun and dynamic look. The nail shape is almond, making it easy to create smooth and even stripes.
- Consumables:
- Neon pink polish: Essie Pink Parka
- Neon orange polish: China Glaze Sun Worshiper
- Neon yellow polish: Essie Neon Collection
- Neon blue polish: OPI No Room for the Blues
- Striping brush
- Top coat: Sally Hansen Insta-Dri
Home Instructions:
- Apply a base coat.
- Using a striping brush, paint diagonal stripes of each neon color across the nails.
- Allow each color to dry before applying the next stripe to prevent smudging.
- Finish with a top coat to seal the design.
Textured Neon Tips
This unique design features a combination of neon colors with textured tips and a matte finish. The nail shape is long and square, making the textured tips stand out prominently.
- Consumables:
- Neon orange polish: Essie Brights Collection
- Neon yellow polish: China Glaze Celtic Sun
- Matte top coat: Sally Hansen Miracle Gel Matte
- Texture powder for tips
- Top coat: Seche Vite Dry Fast
Home Instructions:
- Apply a base coat.
- Paint the nails with a gradient of neon orange and yellow polishes.
- Apply texture powder to the tips while the polish is still tacky.
- Finish with a matte top coat for a modern look.
Soft Blue Ombre
This elegant design features a soft blue ombre effect with a glossy finish, perfect for a subtle yet stylish look. The nail shape is almond, which suits the delicate gradient beautifully.
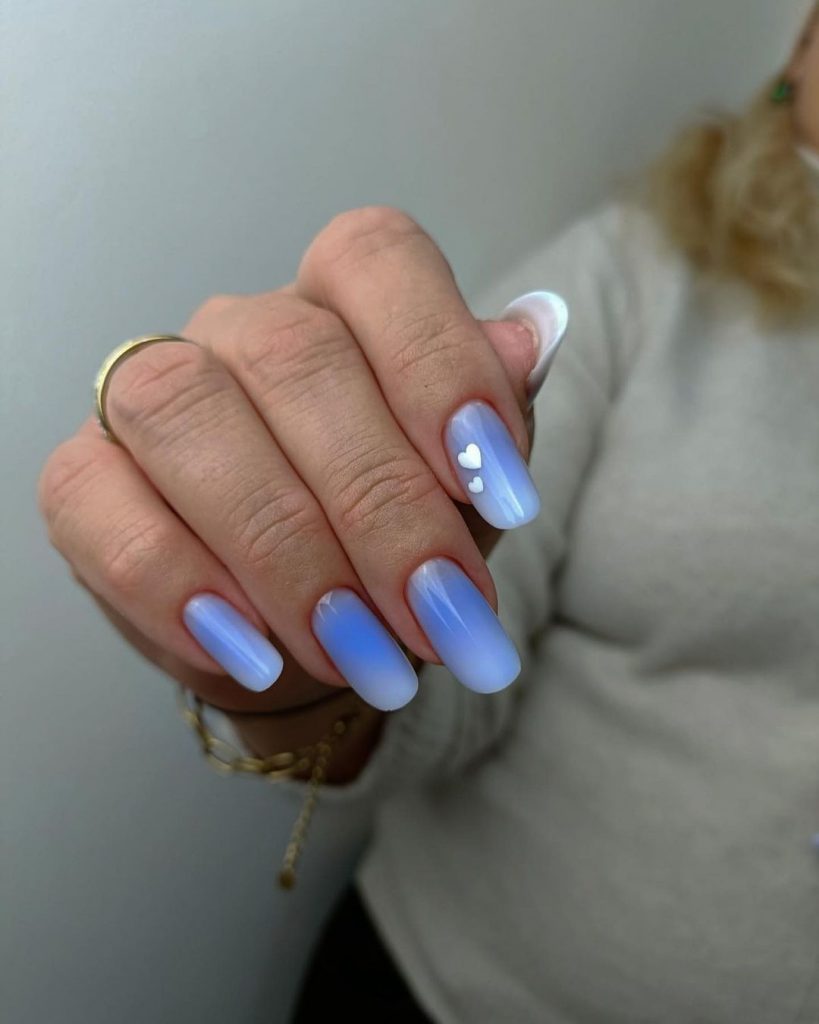
- Consumables:
- Light blue polish: OPI It’s a Boy!
- White polish: Essie Marshmallow
- Makeup sponge for blending
- Top coat: Sally Hansen Insta-Dri
Home Instructions:
- Apply a base coat.
- Create a gradient by blending light blue and white polishes with a makeup sponge.
- Add small white heart decals for an extra cute touch.
- Finish with a top coat to seal the design and add shine.
Green Marble Effect
For a bold and trendy look, these green marble nails are perfect. The nail shape is short and square, making this design practical while still being eye-catching. The marble effect is created by blending various shades of green.
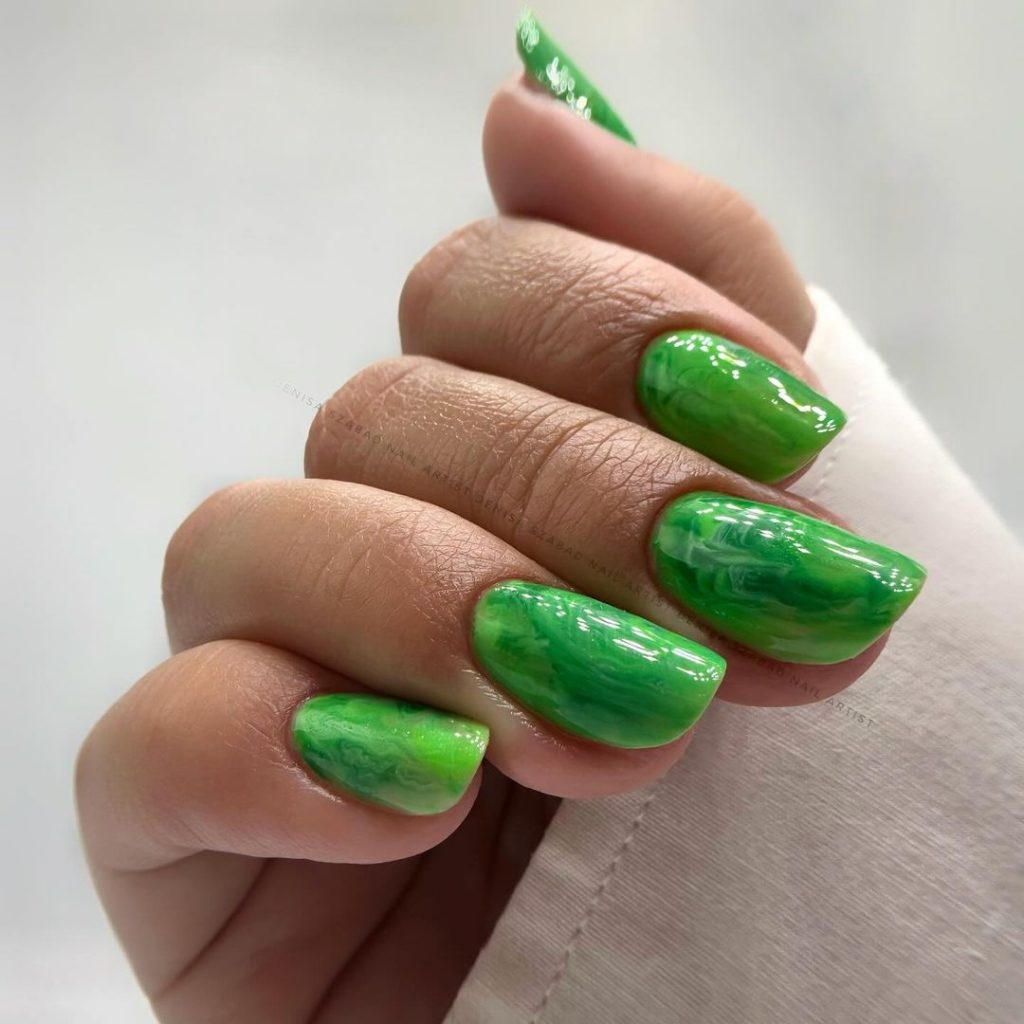
- Consumables:
- Light green polish: Essie Mojito Madness
- Dark green polish: OPI Jade is the New Black
- White polish: OPI Alpine Snow
- Detail brush for marbling
- Top coat: Seche Vite Dry Fast
Home Instructions:
- Apply a base coat.
- Paint the base color with light green polish.
- Using a detail brush, create marble patterns with dark green and white polishes.
- Finish with a top coat to seal the design and add shine.
Save Pin