Long Fall Nails 2024 25 Ideas: Your Guide to the Trendiest Looks
As the crisp air of fall approaches, our nails are ready for a seasonal update that reflects the rich, warm tones and sophisticated vibes of the season. Long nails offer the perfect canvas to experiment with intricate designs, bold colors, and luxe embellishments. But what makes a fall manicure stand out in 2024? Let’s dive into some of the most inspiring and on-trend long fall nails 2024 that will keep your nails looking fabulous all season long.
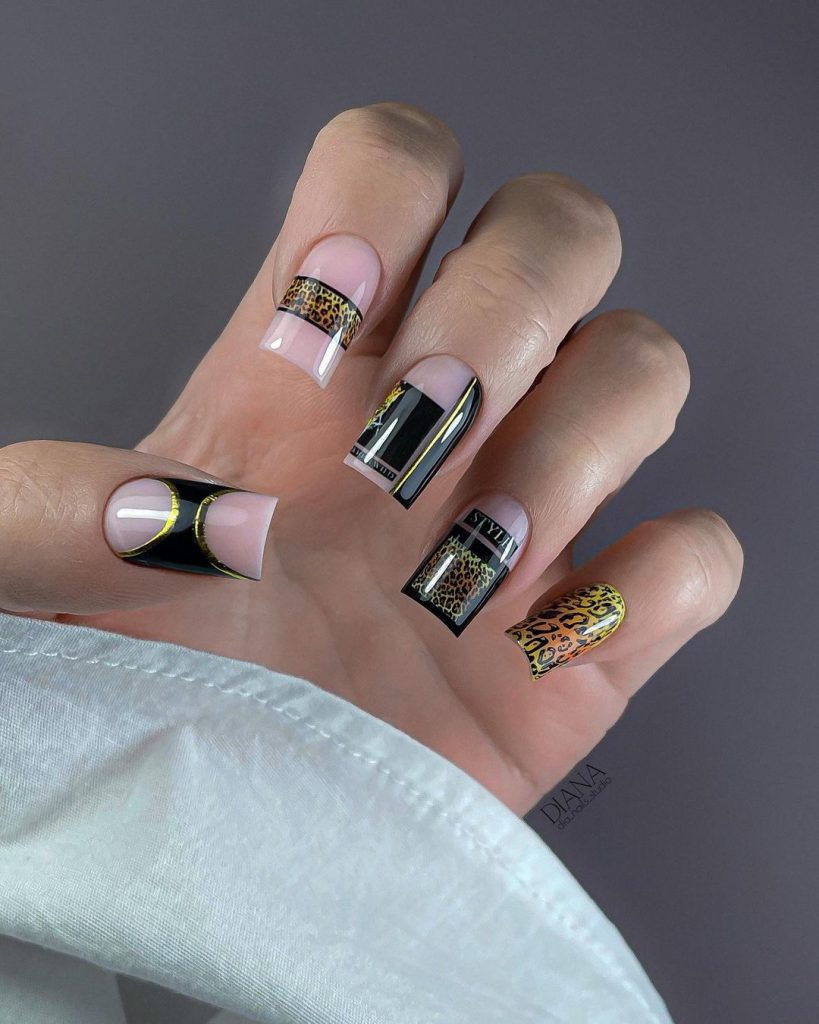
Leopard Luxe and Gold Accents
For those who love a combination of classy and bold, this nail design features sleek black and gold details with a hint of leopard print. The mix of glossy black and metallic gold gives the nails a luxurious feel, while the leopard print adds a wild touch. Each nail is meticulously designed with gold lines and small geometric patterns, making this set perfect for someone who loves a pretty and unique style.
To achieve this look, you’ll need:
- Base Coat: OPI Natural Nail Base Coat
- Black Polish: Essie Licorice
- Gold Foil: IN.HYPE Gold Transfer Foil
- Leopard Print Decals: Maniology Animal Instincts
- Top Coat: Seche Vite Dry Fast Top Coat
- Tools: Detail brush, Nail art stencil
Start by applying the base coat to protect your natural nails. Once dry, apply two coats of black polish. Use a detail brush to carefully apply gold foil accents and outline geometric shapes. Add the leopard print decals to a couple of accent nails for a striking contrast. Seal everything with a top coat to ensure long-lasting shine and durability.
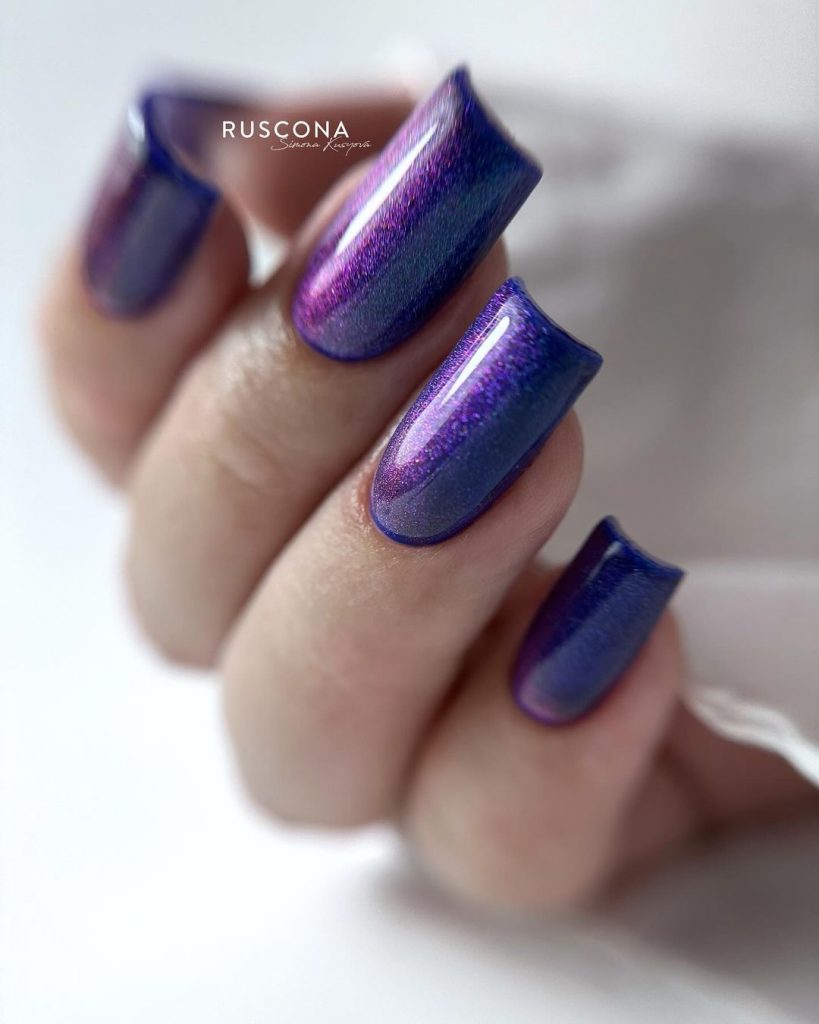
Cosmic Purple Ombre
This cosmic-inspired nail design brings a mystical touch to the season with deep purple and blue hues that blend seamlessly in an ombre effect. The subtle shimmer in the polish catches the light, adding a mesmerizing, almost magical quality to the nails. This look is perfect for anyone who loves a bit of extra glam but still wants something that feels simple and elegant.
For this design, gather the following:
- Base Coat: CND Stickey Base Coat
- Ombre Polish Set: RUSCONA Shimmer Ombre Collection
- Top Coat: Essie Good To Go Top Coat
- Sponge: For blending the ombre effect
- Clean-up Brush: For perfecting the edges
Apply the base coat to prep your nails. Using the sponge, dab the ombre polishes from the RUSCONA Shimmer Ombre Collection, blending from a deep blue at the tips to a rich purple at the base. Be sure to use a clean-up brush dipped in acetone to clean around the edges for a polished look. Finish with a top coat to protect the design and add shine.
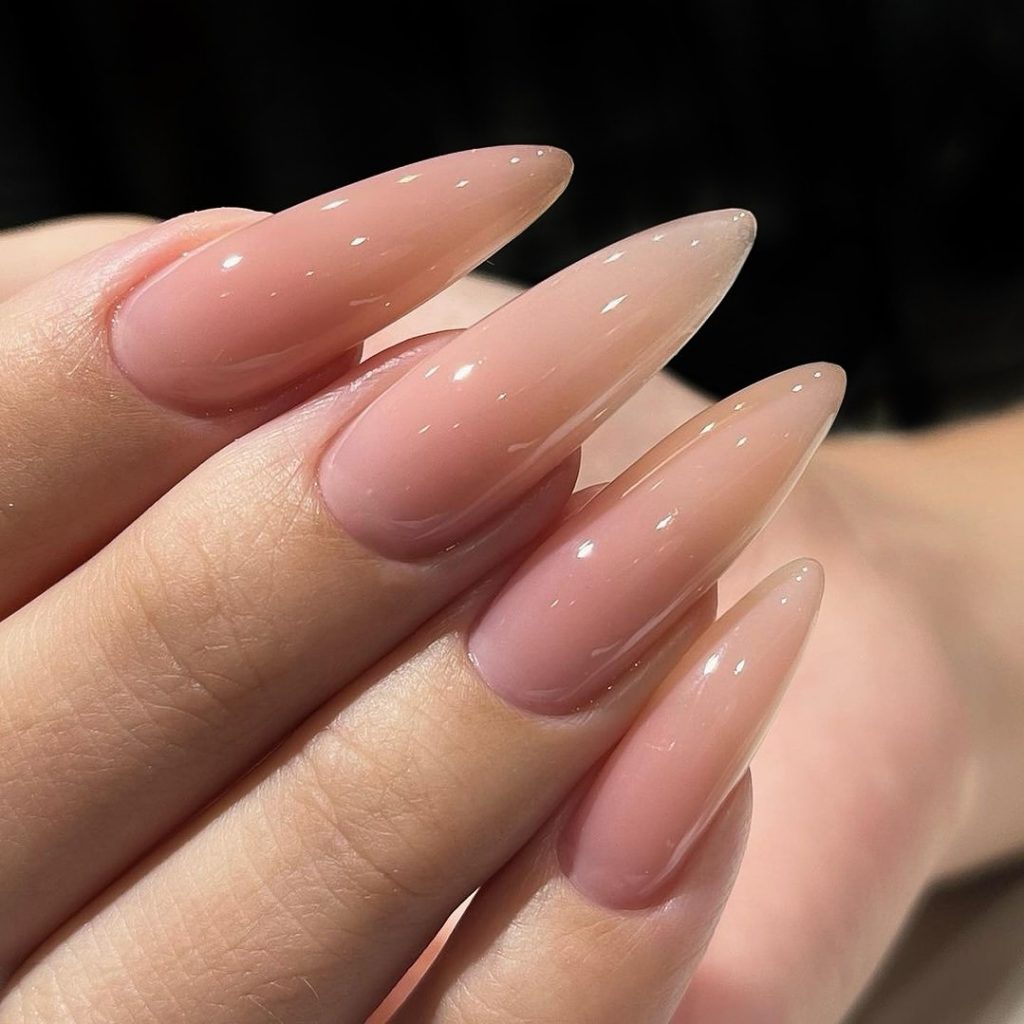
Nude Elegance with a Subtle Gloss
Nude nails are a timeless choice, but in 2024, the trend is all about a high-gloss finish that elevates this simple look. This design features a soft, peachy nude color that elongates the fingers and creates a sophisticated, classy look. Perfect for everyday wear or a more formal occasion, this manicure exudes understated elegance.
Here’s what you’ll need:
- Base Coat: Orly Bonder Base Coat
- Nude Polish: OPI Bubble Bath
- Top Coat: Seche Vite Gel Top Coat
- Buffer: For a smooth finish before applying polish
- Cuticle Oil: To nourish and finish the look
Begin by prepping your nails with the base coat. Apply two coats of OPI Bubble Bath, allowing each layer to dry completely. Buff the nails lightly to achieve a smooth surface, and finish with a gel top coat for that ultra-glossy effect. Finally, massage a nourishing cuticle oil around the edges for a clean, professional finish.
Black and White Abstract Swirls
This bold and artistic design features striking black and white swirls that give off a modern, avant-garde vibe. The sharp contrast between the two colors makes for an eye-catching manicure that is sure to stand out. The abstract swirls are carefully crafted, making this design perfect for those who want to showcase their nail art skills.
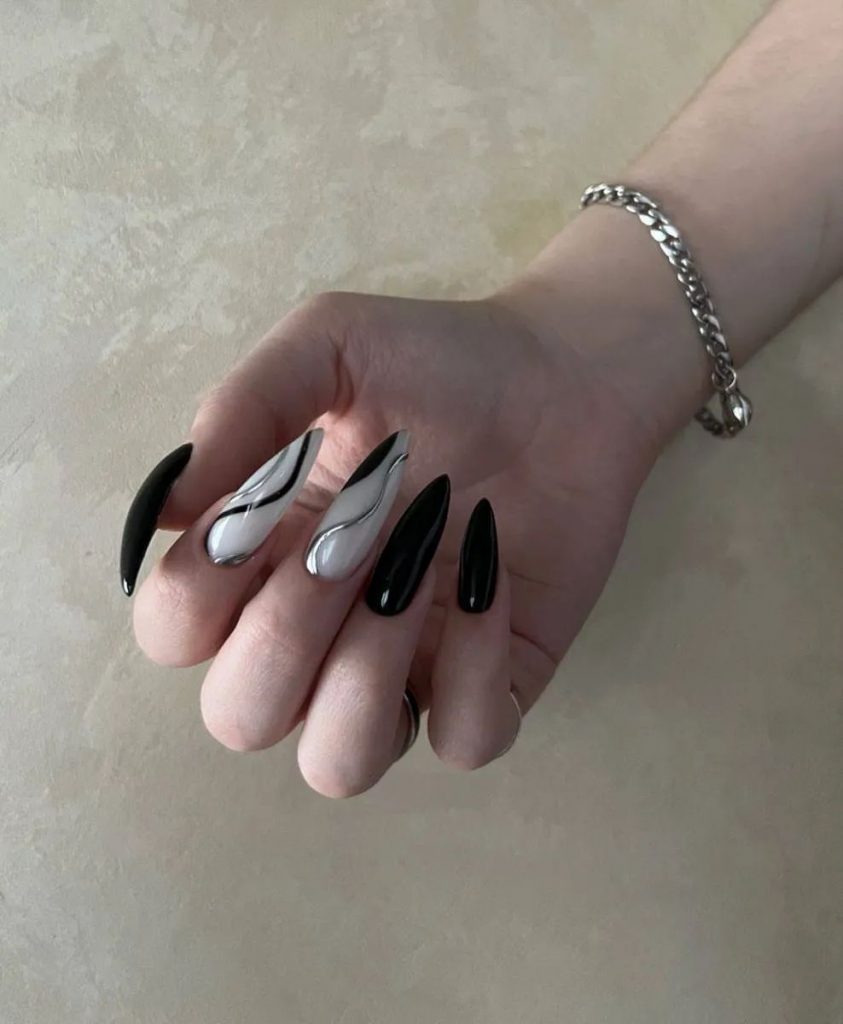
To recreate this design, you’ll need:
- Base Coat: Deborah Lippmann Hard Rock
- Black Polish: Chanel Le Vernis in Pure Black
- White Polish: Zoya Purity
- Detail Brush: For painting the swirls
- Top Coat: OPI Plumping Top Coat
After applying the base coat, paint the nails with two coats of white polish. Once dry, use a fine detail brush to create the black swirls, following the natural curve of your nail. Each swirl should be unique, adding to the abstract nature of the design. Finish with a plumping top coat to add volume and protect the intricate artwork.
Vibrant Pink with Rhinestone Accents
Pink nails are back in a big way this fall, and this design takes it up a notch with the addition of rhinestones. The vibrant pink color is both fun and cute, while the rhinestones add a touch of glam that makes this manicure ideal for a night out or special event. The glossy finish enhances the brightness of the pink, making it pop even more.
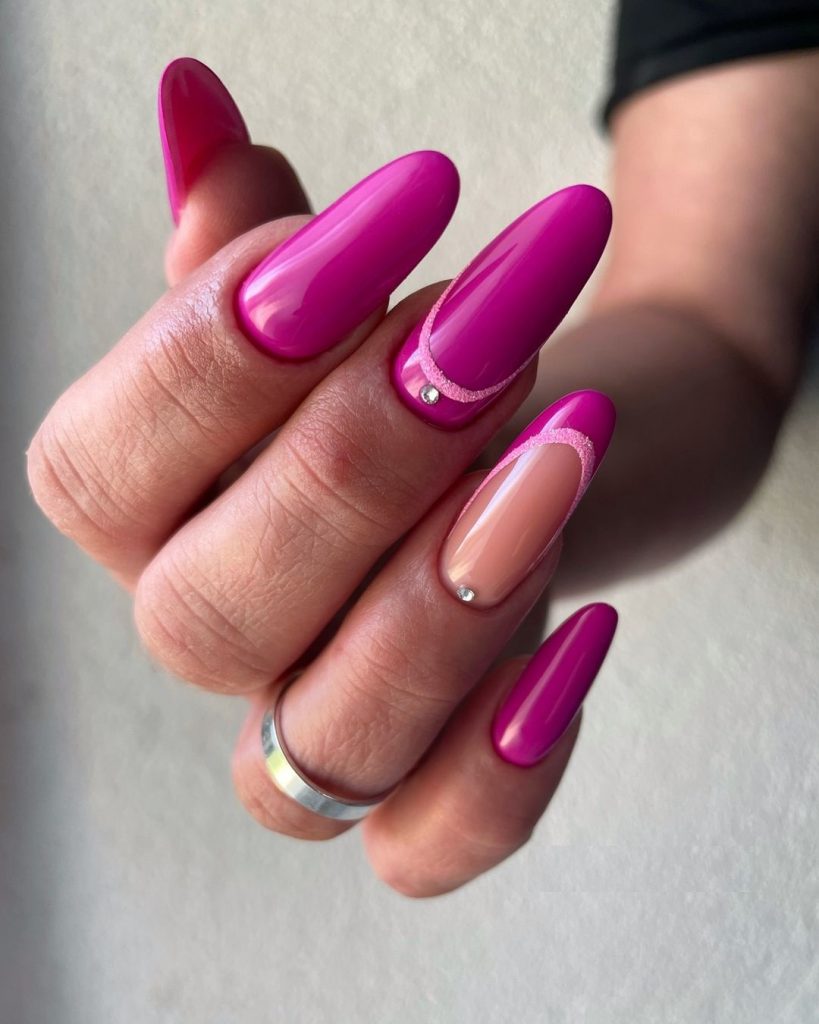
To achieve this look, gather the following supplies:
- Base Coat: Sally Hansen Miracle Cure
- Pink Polish: RUSCONA in Vivid Pink
- Rhinestones: Swarovski Flatback Crystals
- Top Coat: Essie Gel Couture Top Coat
- Rhinestone Applicator: For precise placement
Start by applying the base coat to protect your nails. Paint on two coats of the vivid pink polish, allowing each coat to dry thoroughly. Once the polish is dry, use a rhinestone applicator to carefully place the Swarovski crystals onto the nails, focusing on accent nails for a balanced look. Seal the design with a gel top coat to keep everything in place and add extra shine.
Animal Print Glamour
This striking animal print design is perfect for those who love a bold and edgy look. The pointed stiletto shape adds a fierce vibe to the already wild design. The leopard spots are meticulously placed over a nude base, blending seamlessly to create a natural yet dramatic effect. This style is ideal for anyone looking to make a statement with their long fall nails 2024 while keeping things classy and unique.
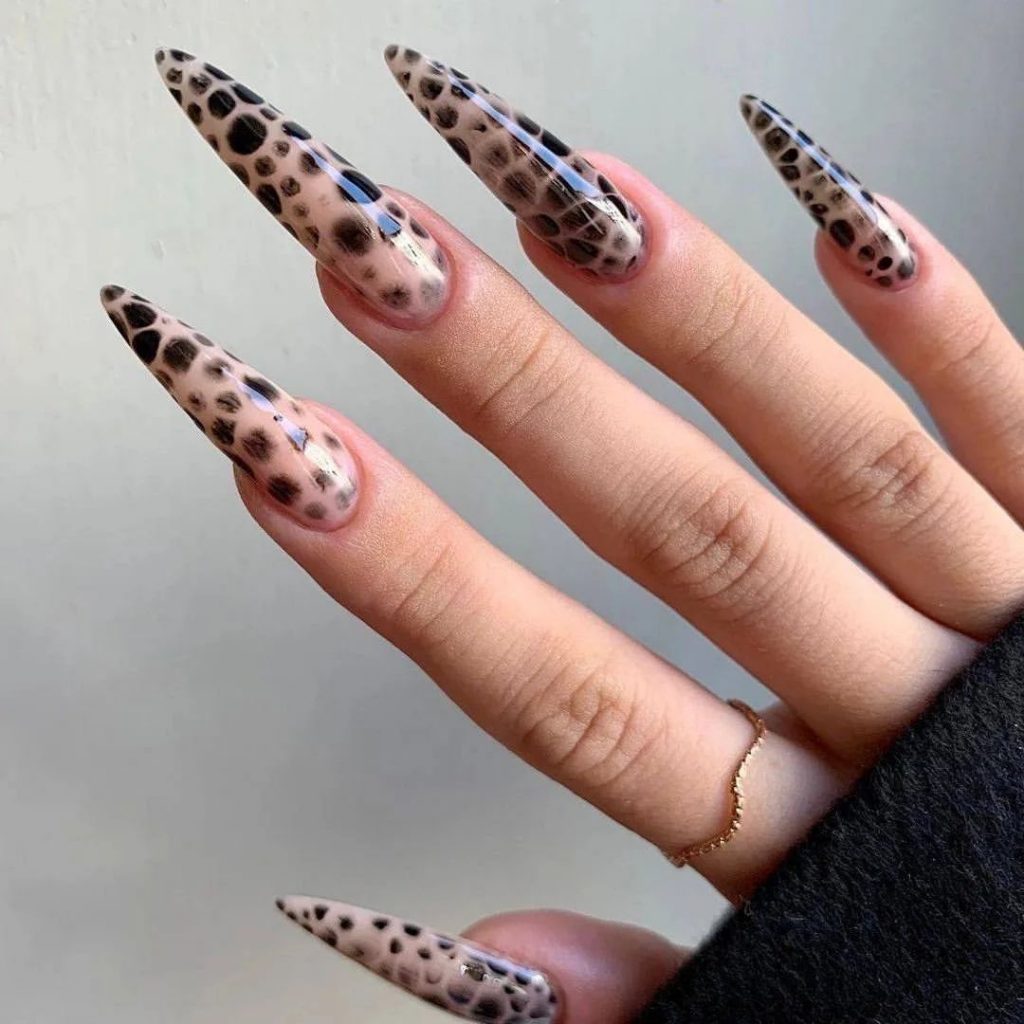
To recreate this look, you’ll need:
- Base Coat: Essie Here to Stay
- Nude Polish: OPI Tiramisu for Two
- Black Polish: Essie Licorice
- Detail Brush: For creating the leopard spots
- Top Coat: CND Vinylux Weekly Top Coat
Start by applying the base coat to prep your nails. Apply two coats of the nude polish and let it dry completely. Use a fine detail brush to create random leopard spots with the black polish. The key is to keep the spots irregular in shape and size for a more authentic look. Seal the design with a top coat for a glossy finish that lasts.
Neutral Tones with a Touch of Glitter
Neutral tones never go out of style, and this design is a perfect example of how to elevate them for the fall season. The combination of soft beige, warm brown, and a touch of glitter creates a classy and sophisticated look that’s perfect for any occasion. The subtle gold line adds a delicate accent that ties the whole design together.
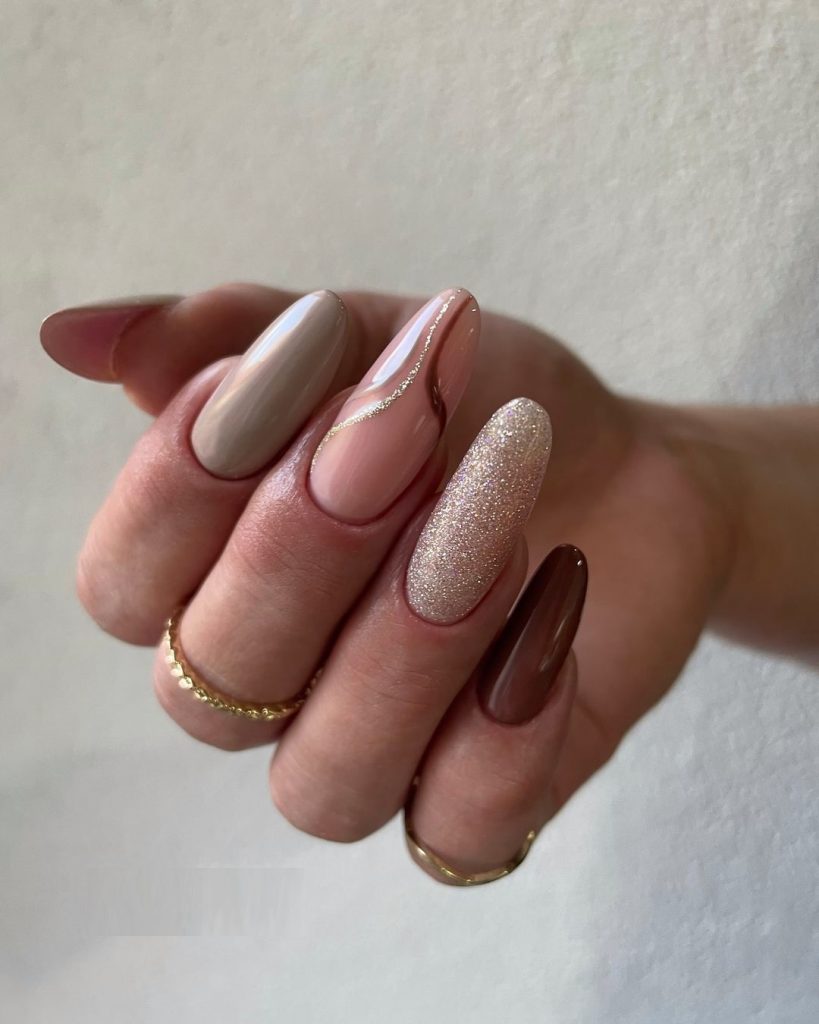
Here’s what you’ll need:
- Base Coat: Zoya Anchor Base Coat
- Beige Polish: Essie Topless & Barefoot
- Brown Polish: OPI Chocolate Moose
- Glitter Polish: RUSCONA Sparkling Sand
- Gold Striping Tape: For the fine gold line
- Top Coat: Essie Gel Couture Top Coat
Begin by applying the base coat. Paint each nail with a different shade of beige or brown, alternating for variety. Add the glitter polish to an accent nail for a bit of sparkle. Use gold striping tape to create a delicate line on one of the nails, and finish with a top coat to protect the design and add shine.
Bold Red and White Contrast
For those who love to stand out, this bold red and white design is sure to catch the eye. The long, squared nails are perfect for showcasing the contrast between the fiery red and the crisp white. The cow print-inspired accents add a playful twist, making this design both cute and edgy.
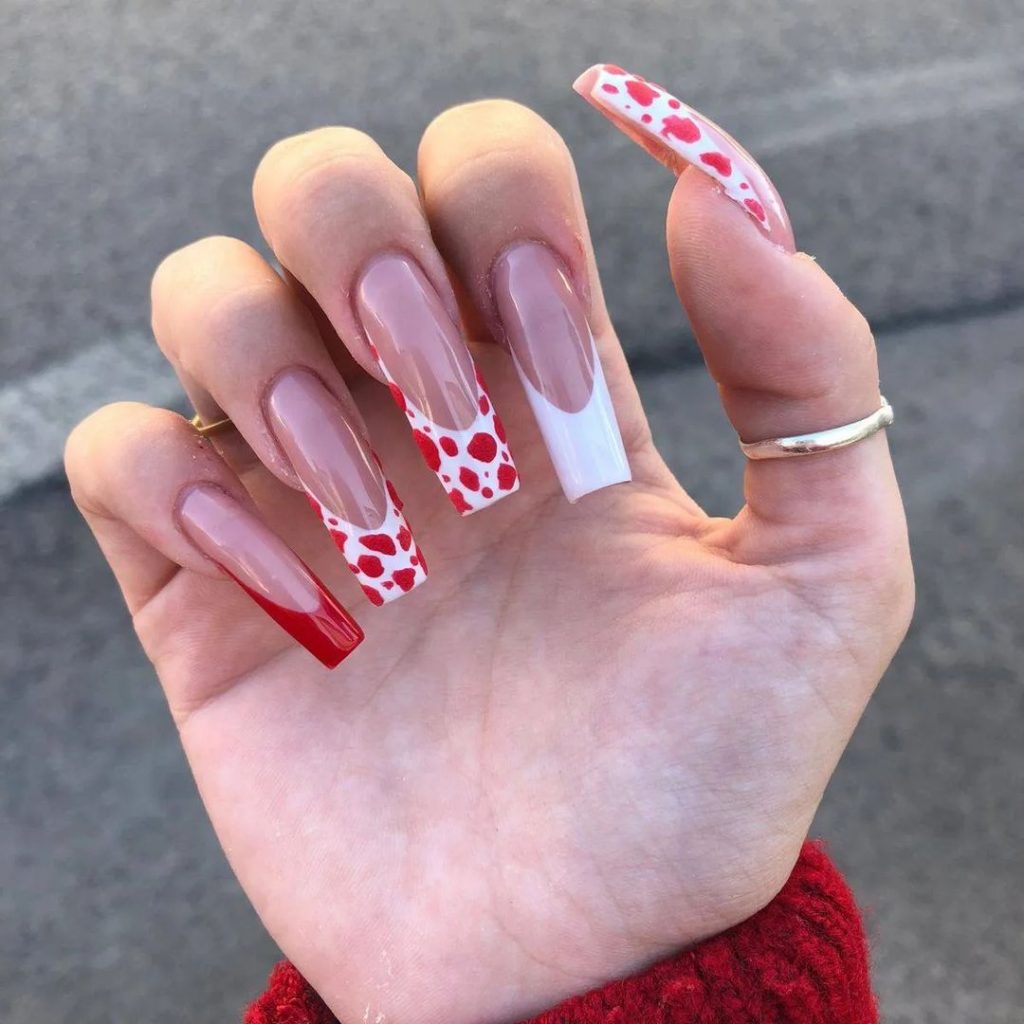
To create this look, gather the following:
- Base Coat: Deborah Lippmann Hard Rock Base Coat
- Red Polish: Chanel Rouge Essentiel
- White Polish: OPI Alpine Snow
- Dotting Tool: For creating the cow print spots
- Top Coat: Seche Vite Dry Fast Top Coat
Start by applying the base coat to protect your nails. Paint the nails with red and white polish, alternating the colors. Use a dotting tool to create irregular spots on the white nails, mimicking a cow print pattern. Seal with a top coat to ensure the design stays vibrant and chip-free.
Golden Ombre with Foil Accents
Ombre nails are a timeless trend, and this golden variation is perfect for the fall season. The smooth transition from warm yellow to golden tones evokes the feeling of autumn leaves, while the foil accents add a touch of luxury. This design is both elegant and eye-catching, ideal for those who love a bit of extra sparkle.
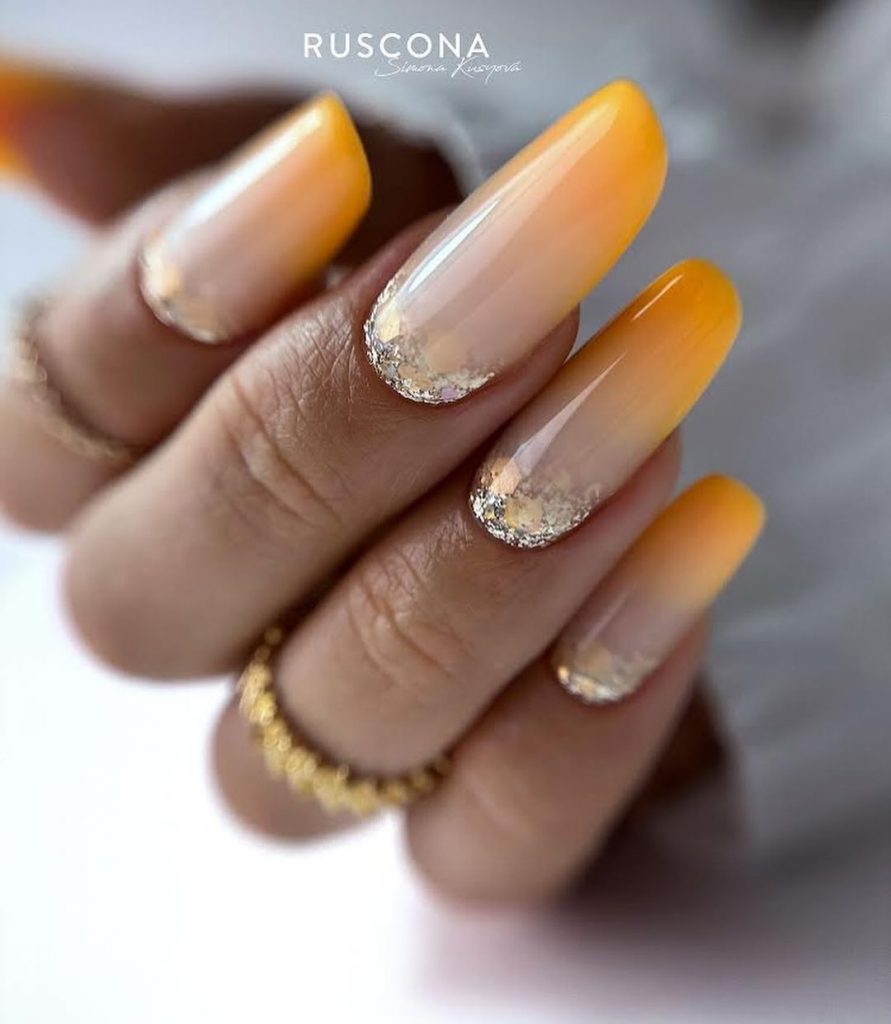
To achieve this look, you’ll need:
- Base Coat: OPI Natural Nail Base Coat
- Yellow Polish: Essie All Fun & Games
- Gold Foil: Born Pretty Gold Foil Sheets
- Top Coat: OPI Plumping Top Coat
- Sponge: For creating the ombre effect
Begin with the base coat. Using a sponge, apply the yellow polish at the tips, blending it towards the base to create the ombre effect. Once dry, carefully apply the gold foil to the tips of the nails for added dimension. Finish with a plumping top coat to enhance the look and give it a high-shine finish.
Minimalist Nude with Rhinestones
This minimalist nude design is perfect for those who prefer a simple and elegant look. The soft nude base is complemented by the addition of rhinestones, which add just the right amount of sparkle without overwhelming the design. This look is classy, understated, and perfect for any occasion.
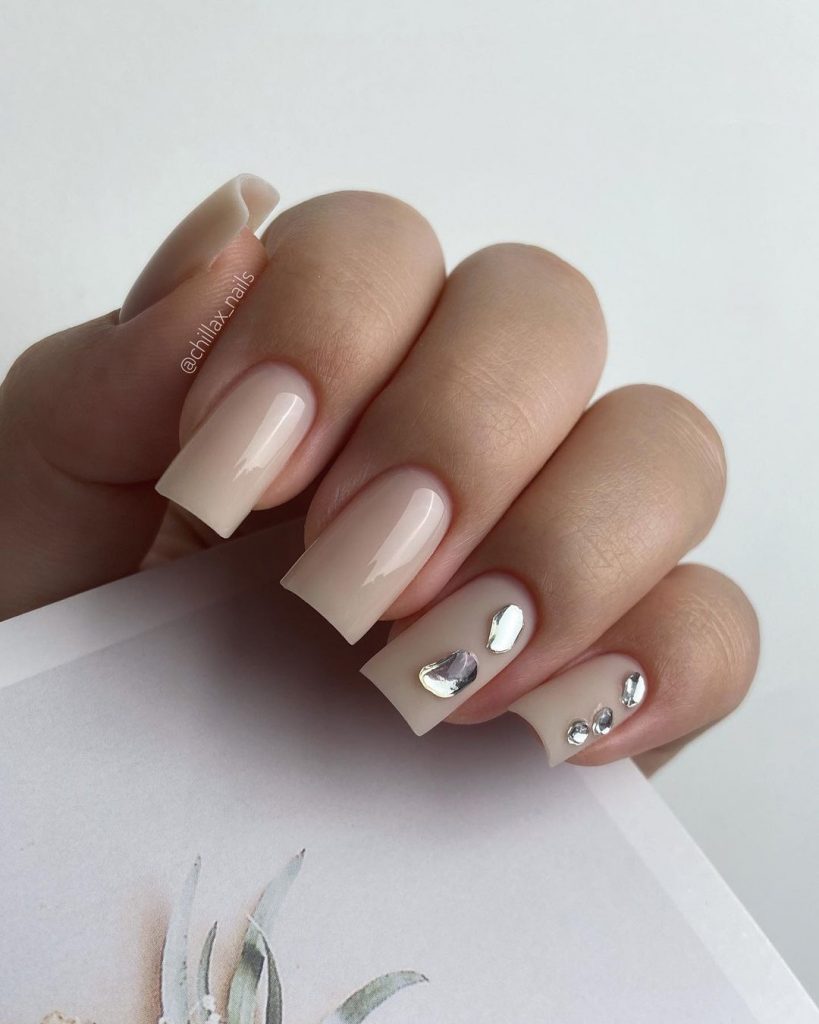
Here’s what you’ll need:
- Base Coat: Essie Strong Start
- Nude Polish: RUSCONA Nude Beige
- Rhinestones: Swarovski Flatback Crystals
- Top Coat: CND Vinylux Weekly Top Coat
- Rhinestone Applicator: For precise placement
Apply the base coat and follow with two coats of nude polish. Once the polish is dry, use a rhinestone applicator to place the crystals on one or two accent nails. Keep the design simple by limiting the number of rhinestones. Seal with a top coat to secure the stones and add a glossy finish.
Blue and Nude Contrast with Glitter
This design combines a bold matte blue with a soft pink glitter accent, creating a striking contrast that’s perfect for those who love both subtlety and boldness in their nail art. The matte finish on the blue nails gives them a modern edge, while the glittery pink adds a touch of cute and feminine charm. This look is great for a playful yet sophisticated fall manicure.
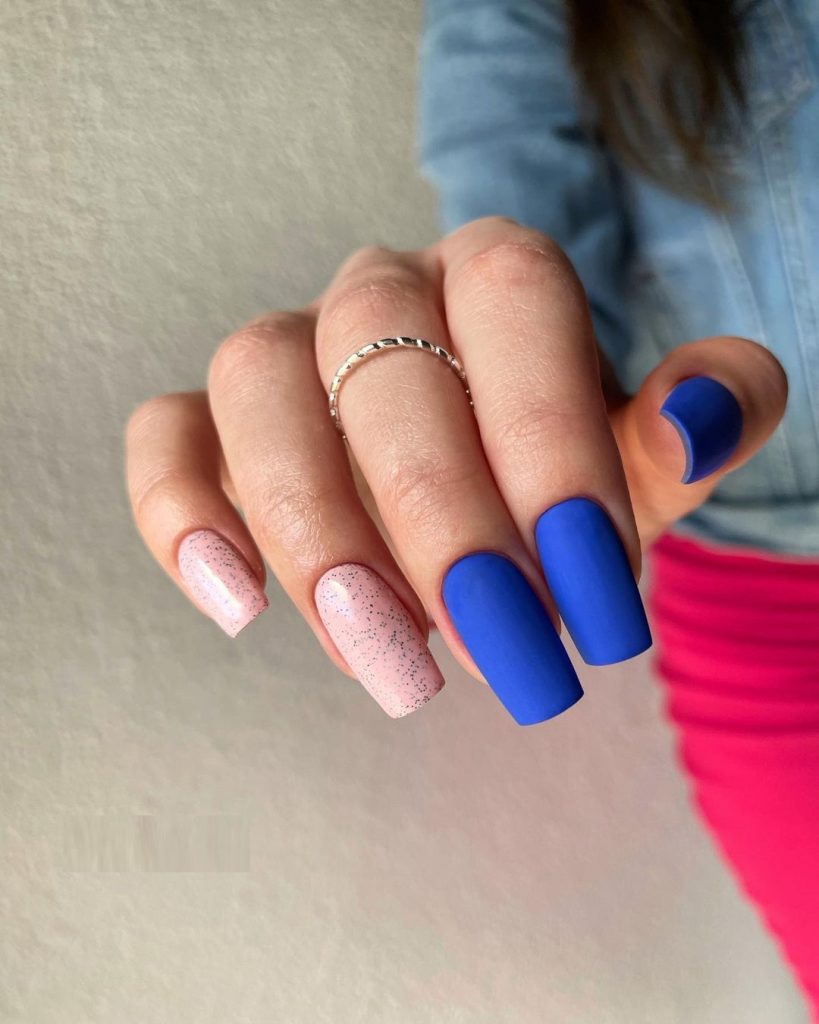
To achieve this look, you’ll need:
- Base Coat: Zoya Anchor Base Coat
- Blue Polish: RUSCONA Matte Royal Blue
- Pink Glitter Polish: RUSCONA Sparkling Rose
- Top Coat: Essie Matte About You for the matte finish
- Detail Brush: For clean edges around the cuticle
Start by applying the base coat. Paint the blue nails first, allowing each coat to dry completely before moving on to the next. For the pink glitter accent, apply two coats for a full, shimmering effect. Use the detail brush to ensure clean edges around the cuticle, and finish with a matte top coat to seal the blue polish.
Blood Red and Black Marble
This design is a bold and dramatic choice, perfect for those who love an edgy look. The long coffin-shaped nails feature a mix of matte black and blood-red marble designs, creating a striking contrast that’s both dark and alluring. The red marble effect adds depth and intensity, making this look ideal for a fall evening or a special event.
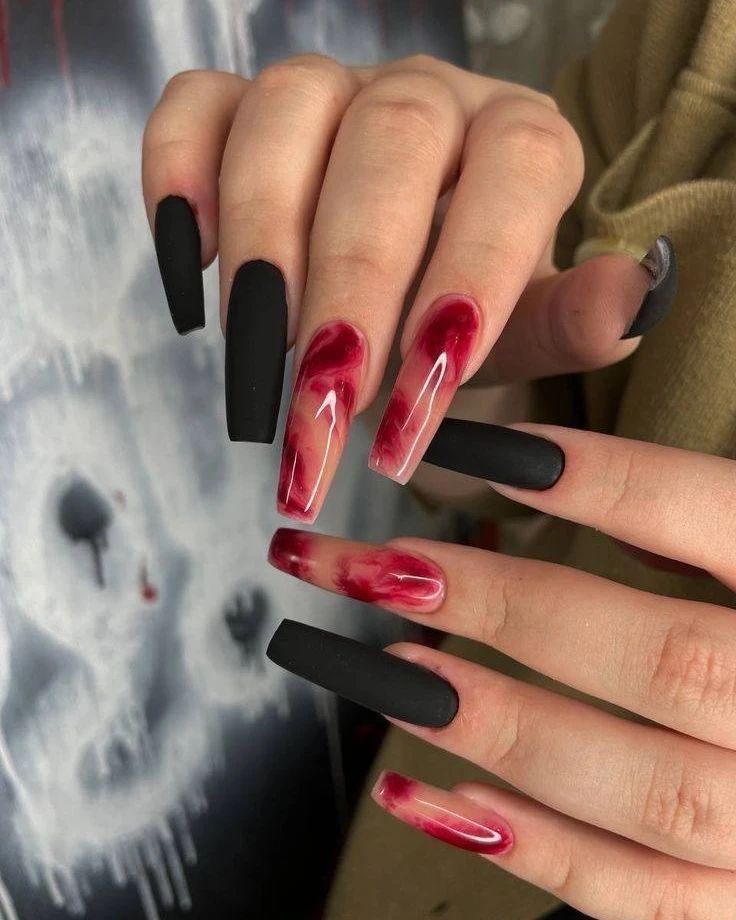
Here’s what you’ll need:
- Base Coat: OPI Natural Nail Base Coat
- Black Polish: RUSCONA Matte Black
- Red Polish: OPI Big Apple Red
- Detail Brush: For creating the marble effect
- Top Coat: Seche Vite Dry Fast Top Coat
Begin by applying the base coat. Paint some nails with the matte black polish and others with the red polish. While the red polish is still wet, use a detail brush to swirl in a bit of black polish, creating a marbled effect. Seal everything with a top coat for a smooth finish that will last.
Transparent Tips with Gold Leaf
This design is all about elegance and luxury. The nude base color is paired with transparent tips that feature delicate gold leaf accents, creating a sophisticated and refined look. The gold leaf adds just the right amount of extra sparkle, making this design perfect for both everyday wear and special occasions.
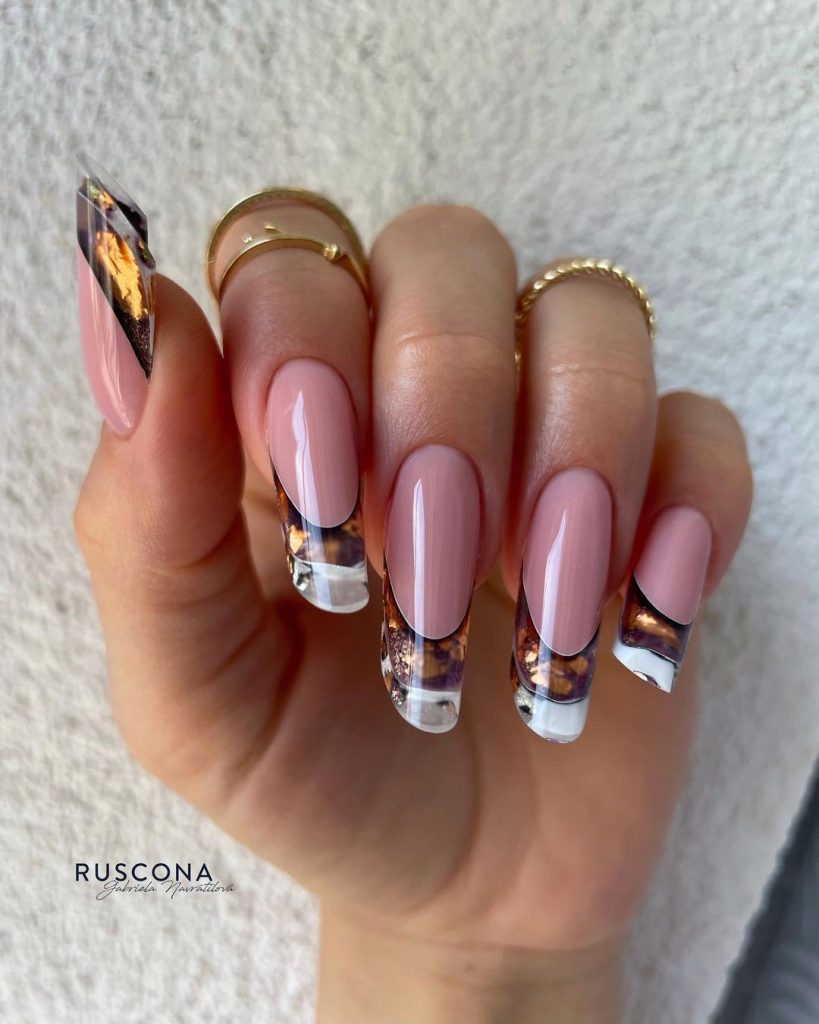
To create this look, gather the following supplies:
- Base Coat: Deborah Lippmann Hard Rock Base Coat
- Nude Polish: Essie Ballet Slippers
- Gold Leaf: Born Pretty Gold Leaf Sheets
- Top Coat: OPI Plumping Top Coat
- Sponge: For applying the gold leaf
Start with the base coat, then apply the nude polish, focusing on the base of the nails and leaving the tips transparent. Once dry, use a sponge to dab on the gold leaf at the tips. Finish with a plumping top coat to add volume and enhance the look.
White on Nude with Abstract Lines
This minimalist design features a nude base with white abstract lines, creating a modern and artistic look. The long, square-shaped nails provide a perfect canvas for the clean, crisp lines, making this design ideal for those who appreciate simplicity with a touch of creativity.
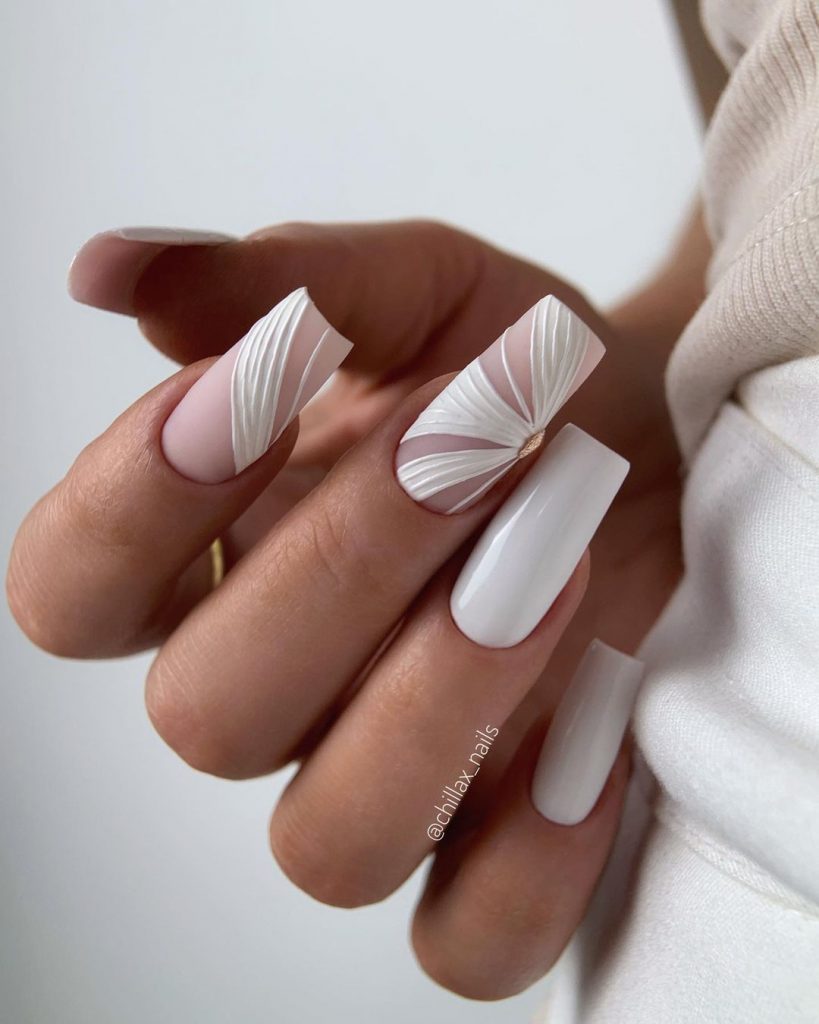
Here’s what you’ll need:
- Base Coat: Sally Hansen Double Duty Base & Top Coat
- Nude Polish: OPI Samoan Sand
- White Polish: RUSCONA Pure White
- Detail Brush: For creating the abstract lines
- Top Coat: Essie Gel Couture Top Coat
Apply the base coat, then paint the nails with two coats of nude polish. Once dry, use a fine detail brush to paint the white lines, creating abstract patterns on each nail. Finish with a top coat to protect the design and add a glossy finish.
Gradient Mocha Swirls
This gradient design features shades of mocha and brown, swirling together to create a rich, warm look that’s perfect for the fall season. The long coffin shape enhances the elegance of the design, making it a sophisticated choice for those who love neutral tones with a twist.
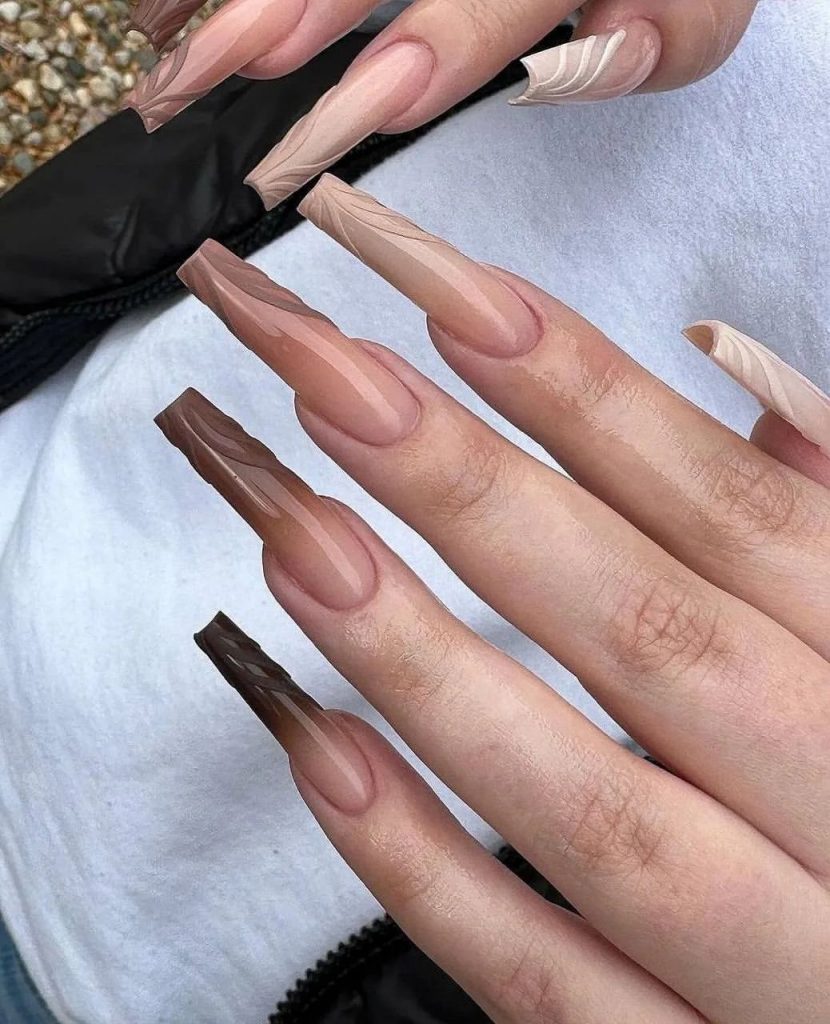
To achieve this look, you’ll need:
- Base Coat: Orly Bonder Base Coat
- Mocha Polish: OPI You Don’t Know Jacques!
- Brown Polish: Essie Mink Muffs
- Sponge: For blending the gradient
- Top Coat: CND Vinylux Weekly Top Coat
- Detail Brush: For refining the swirls
Begin with the base coat. Apply the mocha polish at the base of the nails, blending it with the brown polish towards the tips using a sponge. Use a detail brush to add swirling patterns, blending the colors together for a smooth gradient effect. Seal with a top coat for a glossy, long-lasting finish.
Soft Pink Perfection
This soft pink manicure is the epitome of elegance and simplicity. The long, almond-shaped nails are painted in a delicate pink shade that gives them a refined, feminine look. The high-gloss finish enhances the softness of the color, making these nails perfect for any occasion, whether casual or formal. This design is ideal for those who appreciate subtle beauty and timeless style.
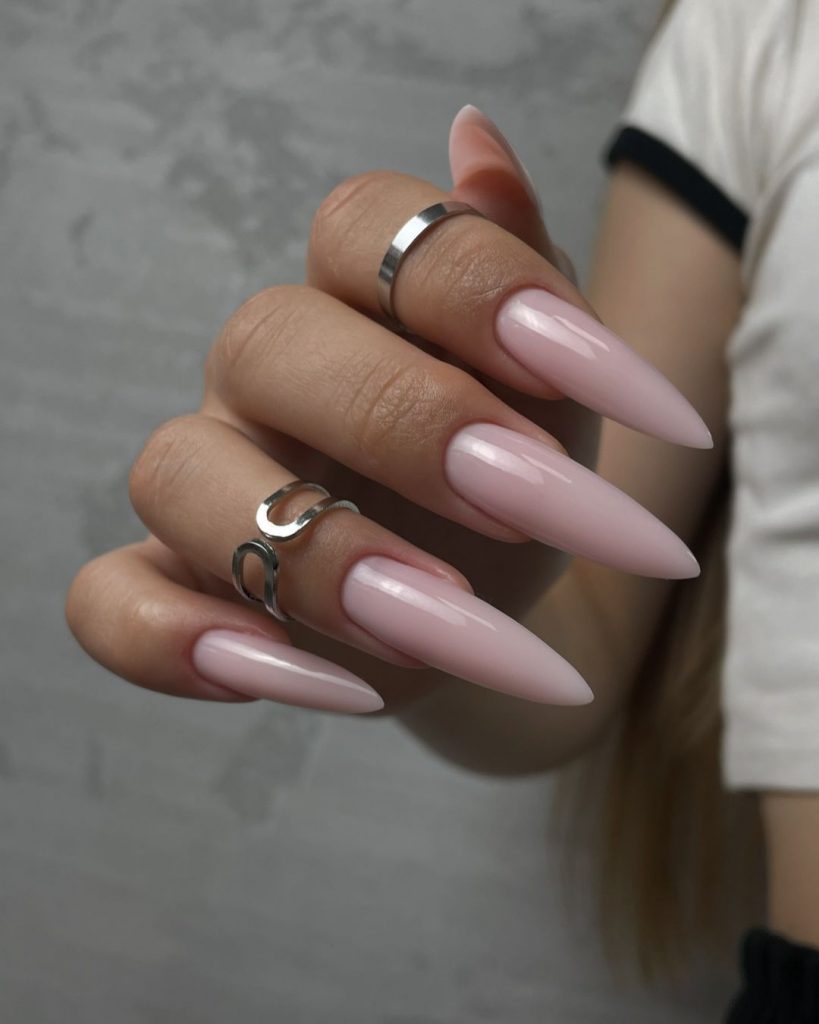
To achieve this look, you’ll need:
- Base Coat: Essie Here to Stay
- Pink Polish: OPI Bubble Bath
- Top Coat: Seche Vite Dry Fast Top Coat
- Buffer: For a smooth finish before applying polish
- Cuticle Oil: To nourish and finish the look
Begin by prepping your nails with a base coat. Apply two coats of the soft pink polish, allowing each layer to dry completely. Buff the nails lightly to achieve a smooth surface, and finish with a high-shine top coat. Finally, massage a nourishing cuticle oil around the edges for a clean, professional finish.
Bright Orange with Rhinestone Accent
This vibrant orange manicure is both playful and sophisticated, with a touch of sparkle to elevate the design. The long, square-shaped nails feature a mix of glossy and matte finishes, creating a dynamic contrast. The rhinestone accent on the matte nail adds just the right amount of extra glam, making this design perfect for a bold fall statement.
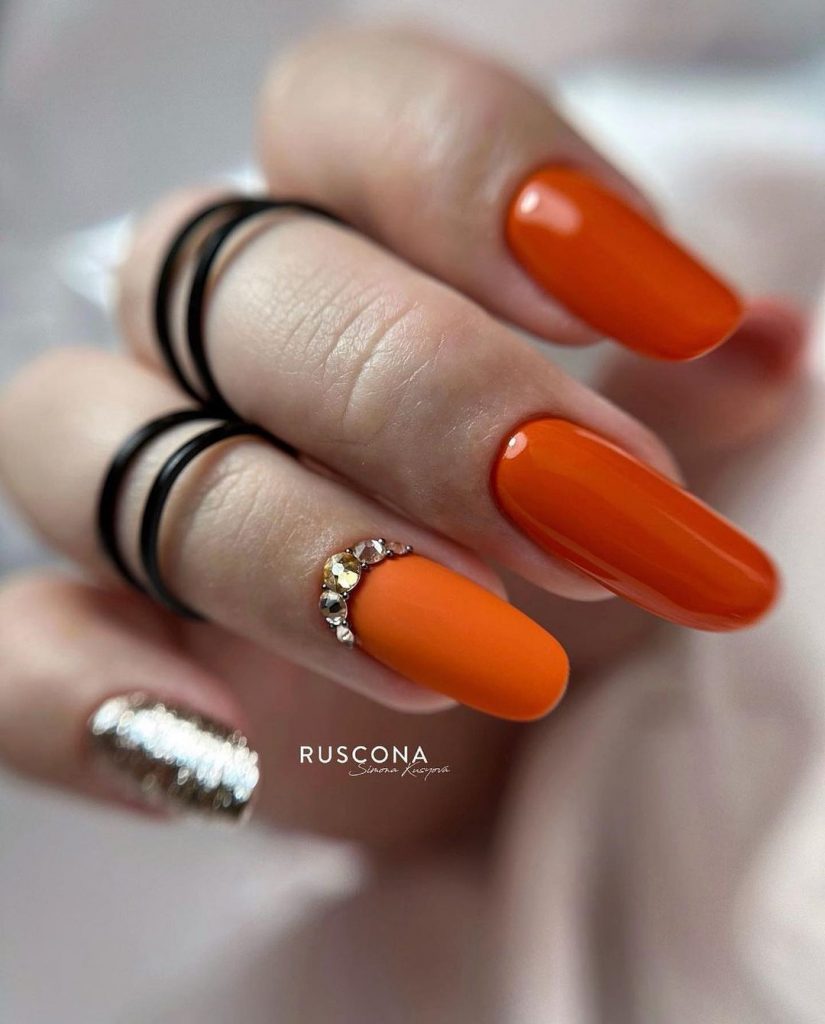
Here’s what you’ll need:
- Base Coat: RUSCONA Protective Base
- Orange Polish: RUSCONA in Vibrant Orange
- Matte Top Coat: Essie Matte About You
- Rhinestones: Swarovski Flatback Crystals
- Top Coat: OPI Top Coat for the glossy finish
Start by applying the base coat, then paint the nails with two coats of the vibrant orange polish. For the matte nail, apply the matte top coat after the orange polish has dried. Carefully place the rhinestones along the cuticle of the matte nail using a rhinestone applicator. Finish with a glossy top coat on the remaining nails to enhance the vibrancy of the color.
Classic Red Elegance
This classic red manicure is timeless and bold, perfect for those who love a striking look. The rich red shade is polished to perfection, with a high-gloss finish that adds depth and intensity to the color. The long, almond-shaped nails enhance the elegance of this design, making it ideal for both everyday wear and special occasions.
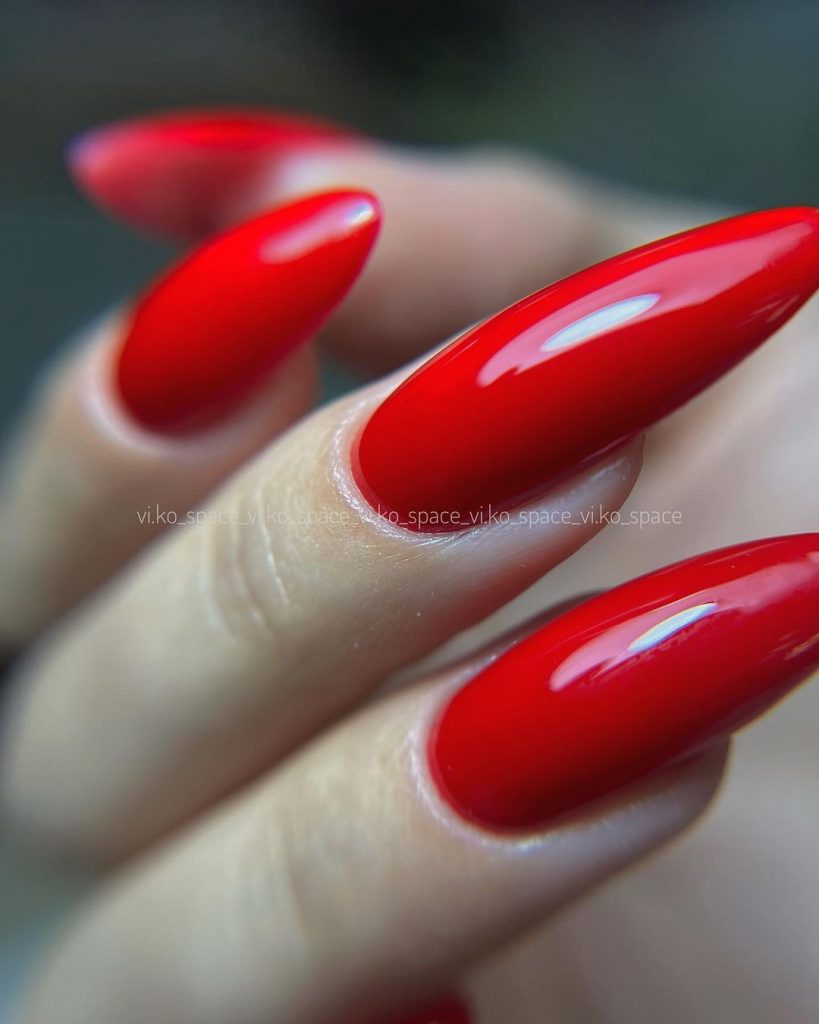
To create this look, you’ll need:
- Base Coat: Deborah Lippmann Hard Rock Base Coat
- Red Polish: Essie Really Red
- Top Coat: Seche Vite Dry Fast Top Coat
- Buffer: For a smooth finish before applying polish
- Cuticle Oil: To nourish and finish the look
Apply the base coat to protect your nails. Follow with two coats of the rich red polish, allowing each coat to dry completely. Buff the nails lightly to achieve a smooth surface, and finish with a top coat for a glossy, long-lasting shine. Add a touch of cuticle oil to keep your nails healthy and hydrated.
Pearl White with Gold Accents
This luxurious design features pearl white nails with gold accents, creating a regal and sophisticated look. The long, square-shaped nails are adorned with gold leaf and small pearl embellishments, adding a touch of elegance and opulence. This design is perfect for those who love to make a classy statement with their manicure.
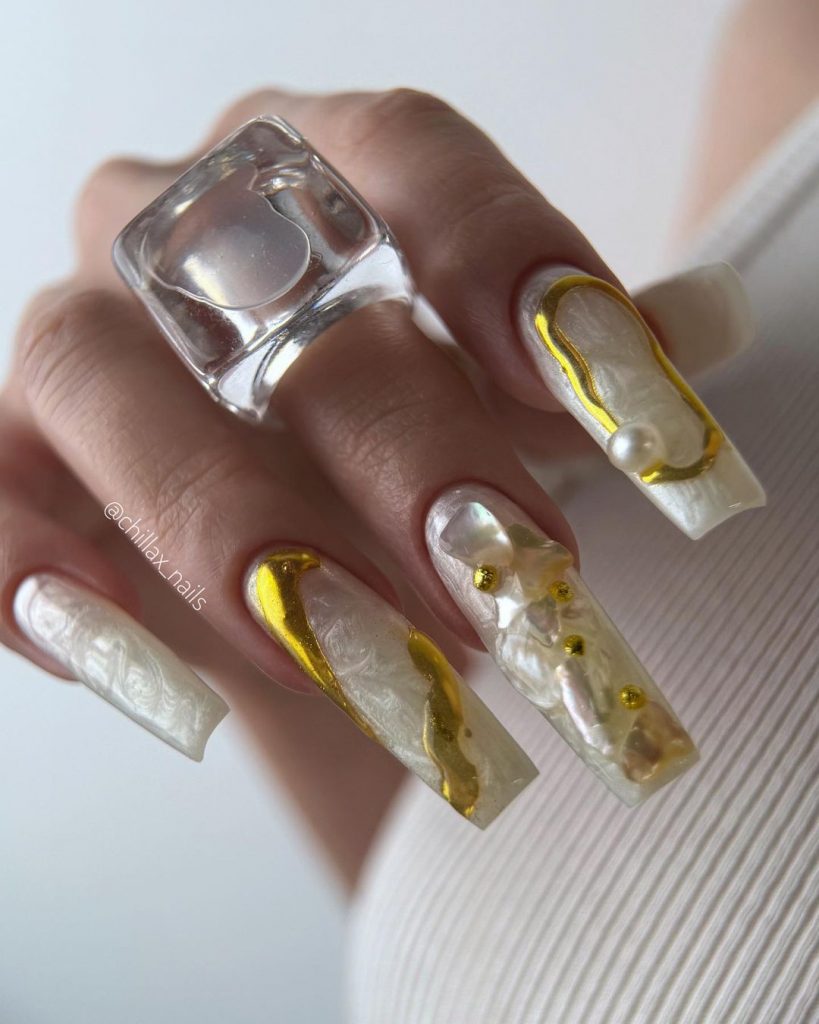
Here’s what you’ll need:
- Base Coat: Zoya Naked Base
- Pearl White Polish: RUSCONA in Pearl White
- Gold Leaf: Born Pretty Gold Leaf Sheets
- Pearl Embellishments: Small flatback pearls
- Top Coat: CND Vinylux Weekly Top Coat
Start with the base coat to prep your nails. Apply two coats of the pearl white polish, allowing each layer to dry completely. Use a detail brush to apply the gold leaf in abstract patterns on the nails, and add small pearl embellishments for an extra touch of luxury. Finish with a top coat to seal the design and add a glossy finish.
Cosmic Blue Holographic
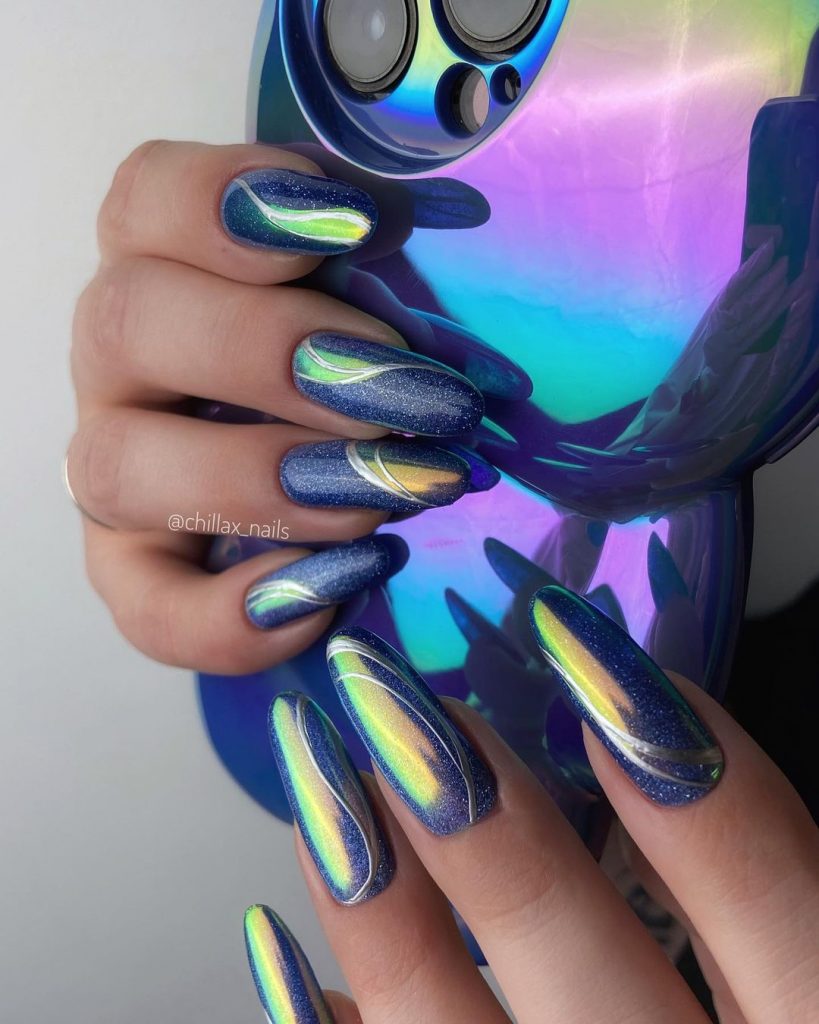
This cosmic-inspired design features a deep blue holographic polish that reflects light in stunning, multidimensional ways. The long, almond-shaped nails are perfect for showcasing the shifting colors, which range from blue to green to gold depending on the light. This design is both futuristic and glamorous, making it ideal for those who love to stand out.
To achieve this look, you’ll need:
- Base Coat: RUSCONA Protective Base
- Holographic Polish: RUSCONA Galaxy Blue
- Top Coat: Essie Gel Couture Top Coat
- Detail Brush: For clean edges and lines
Begin with the base coat to protect your nails. Apply two coats of the holographic polish, allowing each coat to dry fully to maximize the color-shifting effect. Use a detail brush to ensure clean edges around the cuticle. Finish with a top coat to enhance the holographic shine and protect the design.
Icy Blue and Glitter Combo
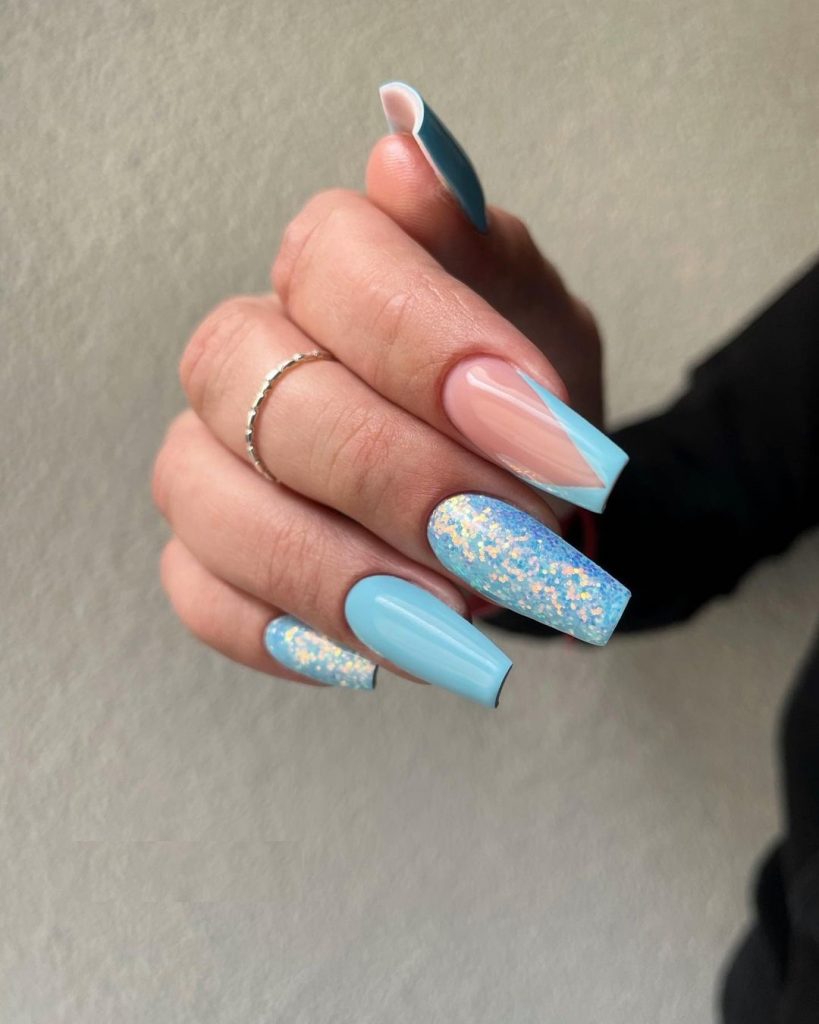
This design brings together the cool tones of icy blue with the sparkle of glitter, creating a look that is both refreshing and eye-catching. The combination of solid blue nails with glitter accents and a sleek nude base with a geometric blue tip offers a modern and playful style. Perfect for those who love a bit of extra shimmer with their long fall nails 2024.
To recreate this look, gather the following:
- Base Coat: Essie Strong Start
- Blue Polish: RUSCONA Icy Blue
- Glitter Polish: RUSCONA Blue Sparkle
- Nude Polish: Essie Mademoiselle
- Top Coat: CND Vinylux Weekly Top Coat
- Detail Brush: For clean lines and geometric designs
Start by applying the base coat to prep your nails. Paint the solid blue nails and add two coats of the glitter polish on the accent nails. For the geometric blue tip, use the detail brush to create a clean, angular line on the nude base. Finish with a top coat to seal the design and add extra shine.
Deep Green to Black Gradient
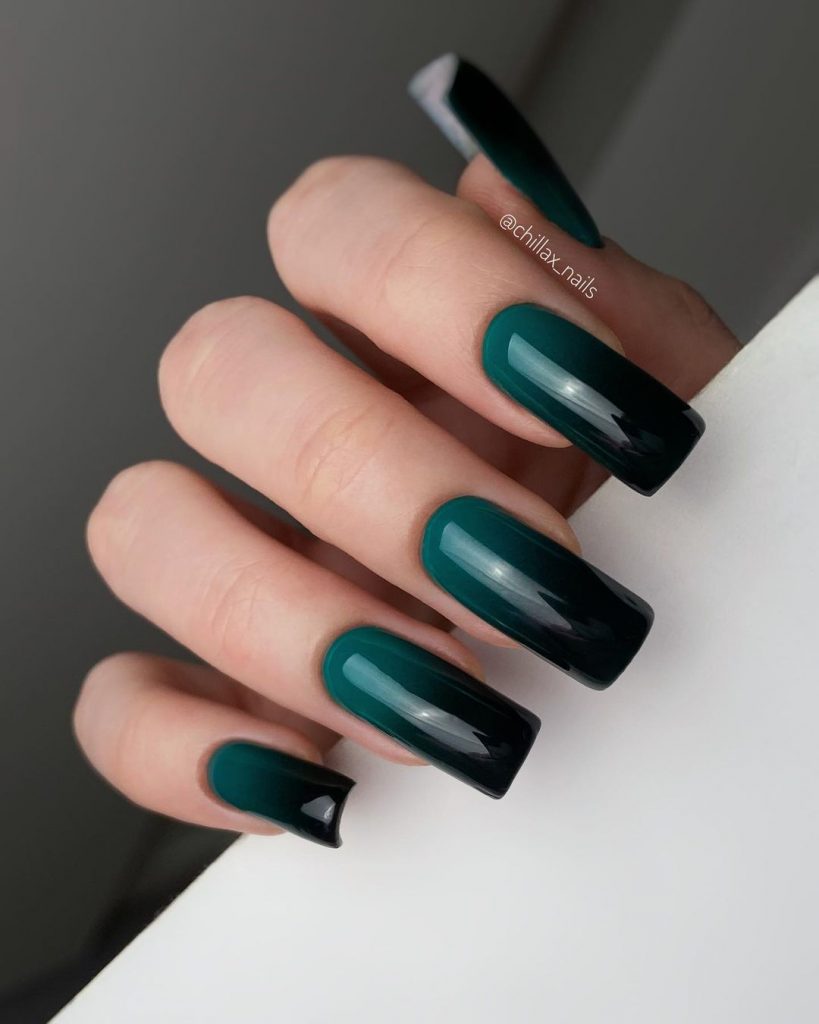
This deep green to black gradient design is both mysterious and elegant, perfect for the fall season. The seamless blend from dark green to black creates a moody, sophisticated look that’s ideal for evening events or for anyone who loves a dark, dramatic manicure. The glossy finish enhances the richness of the colors, making this design truly stand out.
Here’s what you’ll need:
- Base Coat: OPI Natural Nail Base Coat
- Green Polish: Essie Off Tropic
- Black Polish: RUSCONA Pure Black
- Top Coat: Seche Vite Dry Fast Top Coat
- Sponge: For blending the gradient
Begin with the base coat, then apply the green polish at the base of the nails. Use a sponge to blend the black polish from the tips toward the green, creating a smooth gradient effect. Finish with a top coat to protect the design and add a glossy finish.
White with Brown Dalmatian Spots
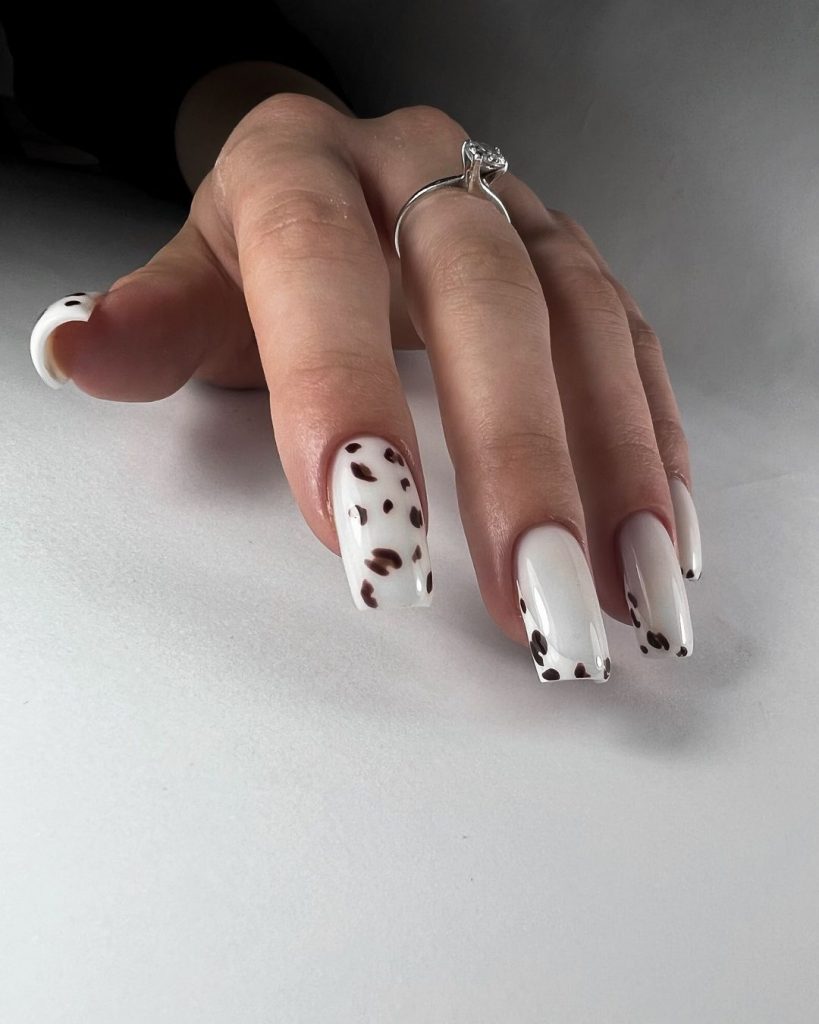
This quirky and cute design features a crisp white base with brown dalmatian spots, adding a playful twist to the classic animal print trend. The long, square-shaped nails provide the perfect canvas for this fun and stylish design, which is sure to turn heads.
To achieve this look, you’ll need:
- Base Coat: Sally Hansen Double Duty Base & Top Coat
- White Polish: OPI Alpine Snow
- Brown Polish: Essie Mink Muffs
- Dotting Tool: For creating the dalmatian spots
- Top Coat: CND Vinylux Weekly Top Coat
Start by applying the base coat. Paint the nails with two coats of white polish. Once dry, use a dotting tool to create irregular brown spots on each nail, mimicking the dalmatian pattern. Seal with a top coat for a long-lasting finish.
Rich Burgundy Elegance
Burgundy is a classic fall color, and this rich, glossy design showcases it beautifully. The deep, wine-red shade is both classy and bold, perfect for anyone who loves a timeless yet striking look. The long, square-shaped nails add to the elegance of this design, making it a versatile choice for any occasion.
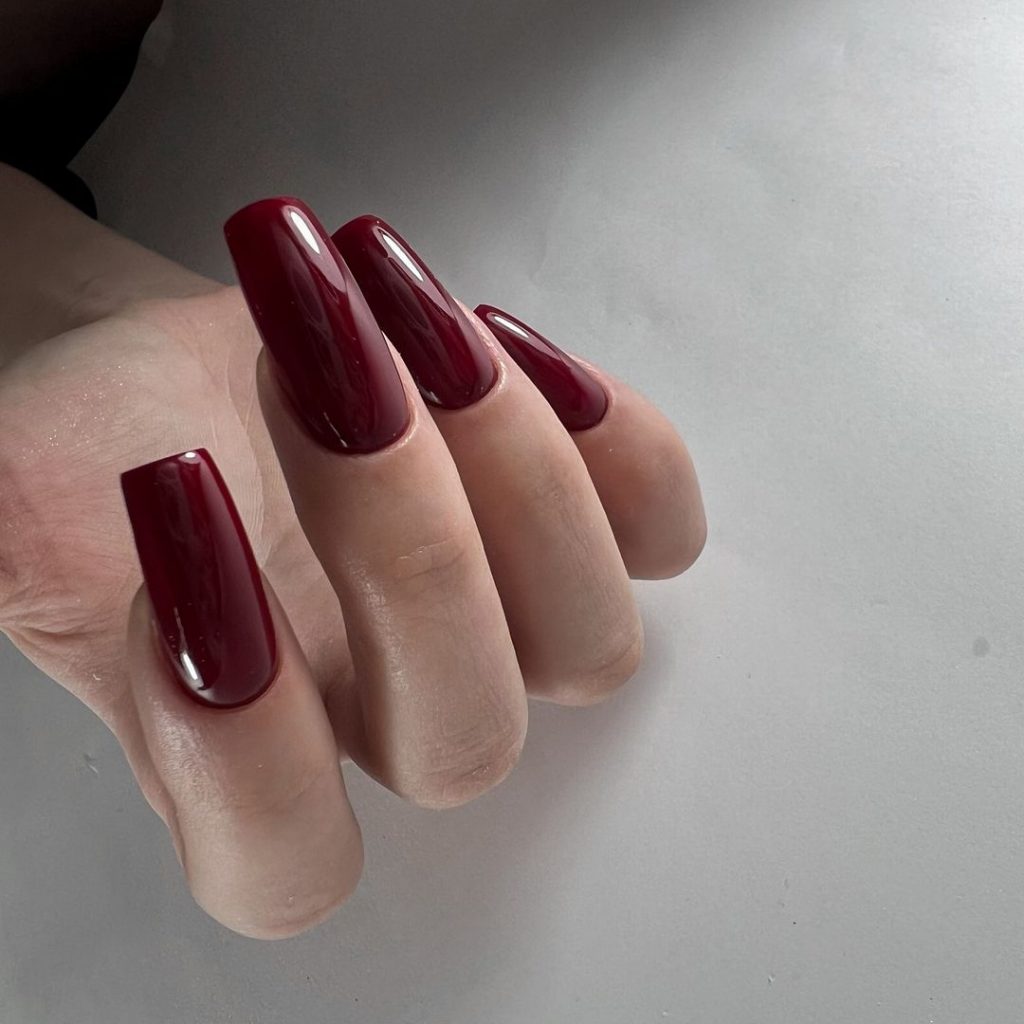
Here’s what you’ll need:
- Base Coat: Zoya Naked Base
- Burgundy Polish: OPI Malaga Wine
- Top Coat: Seche Vite Dry Fast Top Coat
- Buffer: For a smooth finish before applying polish
- Cuticle Oil: To nourish and finish the look
Apply the base coat to protect your nails, then paint on two coats of the burgundy polish, allowing each coat to dry fully. Buff the nails lightly to achieve a smooth surface, and finish with a top coat for a high-shine finish. Add a touch of cuticle oil to keep your nails looking healthy and hydrated.
Red and Blue Retro Vibes
This design brings a retro flair with its combination of bold red and cool blue, accented by a groovy, wavy pattern on the feature nail. The matte finish adds a modern twist to the vintage-inspired colors, making this design perfect for someone who loves to mix trendy and classic styles.
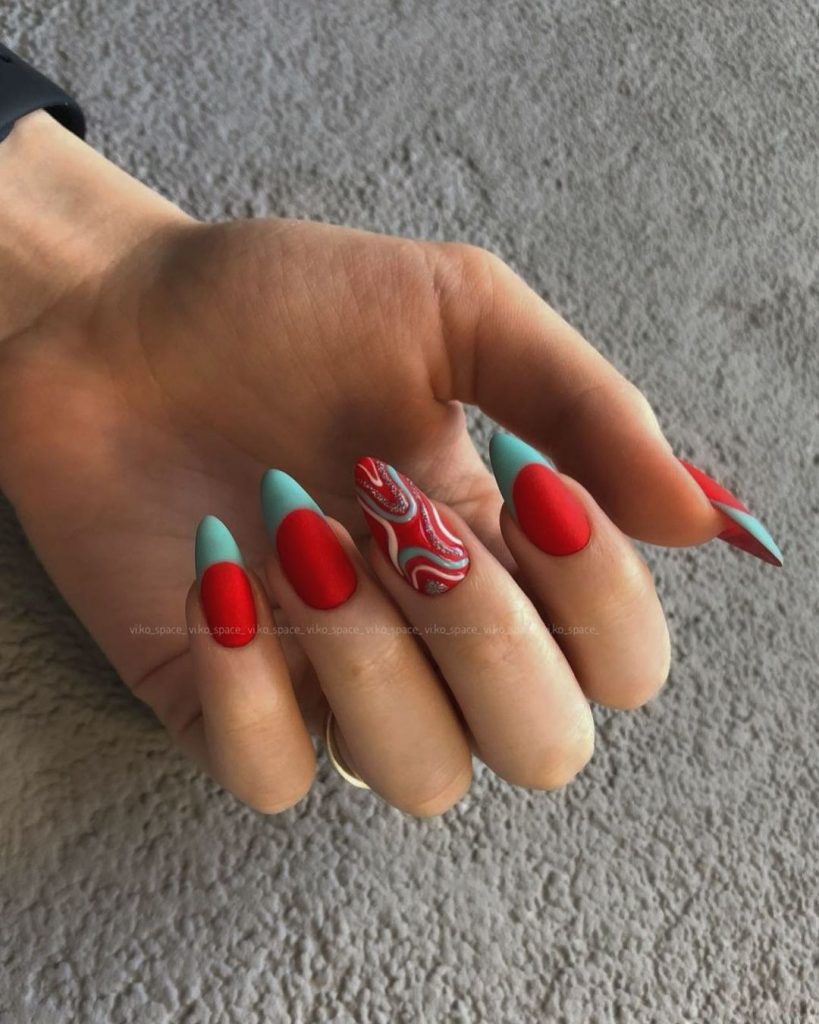
To recreate this look, gather the following supplies:
- Base Coat: RUSCONA Protective Base
- Red Polish: Essie Really Red
- Blue Polish: OPI It’s a Boy!
- White Polish: RUSCONA Pure White
- Detail Brush: For creating the wavy pattern
- Matte Top Coat: Essie Matte About You
Begin with the base coat to protect your nails. Paint the red and blue nails, allowing each coat to dry completely. Use a detail brush to create the white wavy pattern on the accent nail, adding a fun, retro touch. Finish with a matte top coat to give the design a modern, velvety finish.
Save Pin
