The arrival of autumn brings a spectrum of warm hues and a plethora of inspirations for nail art enthusiasts. Fall tree nail art 2024 is trending, capturing the essence of the season with intricate designs and stunning colors. In this article, we’ll delve into various manicure ideas, providing detailed descriptions, professional reviews, and practical DIY advice for each style. Let’s explore these beautiful designs and get inspired for your next nail project.
Olive and Gold Elegance
The first design combines a soft olive green with delicate gold accents, creating a chic and sophisticated look perfect for autumn. The primary color, a muted olive, is accented by gold flakes and intricate tree branch designs, bringing a touch of nature’s elegance to your nails.
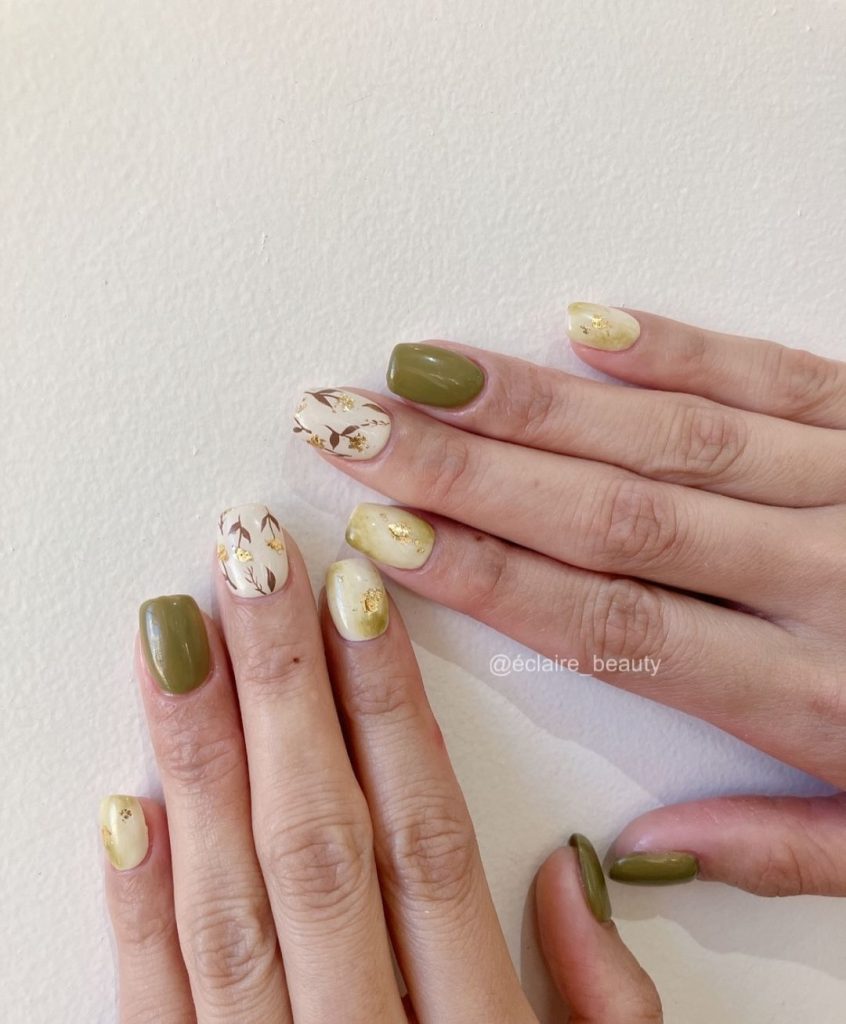
Consumables:
- Olive green nail polish (e.g., OPI’s “Olive for Green”)
- Gold leaf flakes
- Detail nail brush
- Clear top coat (e.g., Essie’s “Good to Go”)
Instructions:
- Start by applying a base coat to protect your nails.
- Apply two coats of olive green nail polish, allowing each coat to dry thoroughly.
- Using a detail nail brush, apply the gold leaf flakes strategically around the nail to mimic falling leaves.
- Finish with a clear top coat to seal the design and add shine.
Vibrant Autumn Hues
This vibrant design features a mix of red, orange, and yellow hues, capturing the fiery colors of autumn leaves. The nails are painted with a gradient effect, transitioning from dark to light shades, with black tree silhouettes adding a striking contrast.

Consumables:
- Red, orange, and yellow nail polishes (e.g., Essie’s “Playing Koi”, “Artsy Craftsy”, and “Yellow Flicker Beat”)
- Black nail art pen or fine brush
- Sponge for gradient effect
- Clear top coat
Instructions:
- Apply a base coat to your nails.
- Create a gradient effect by dabbing the red, orange, and yellow polishes onto a sponge and pressing it onto your nails.
- Use a black nail art pen or fine brush to draw tree silhouettes on each nail.
- Seal with a clear top coat to protect the design.
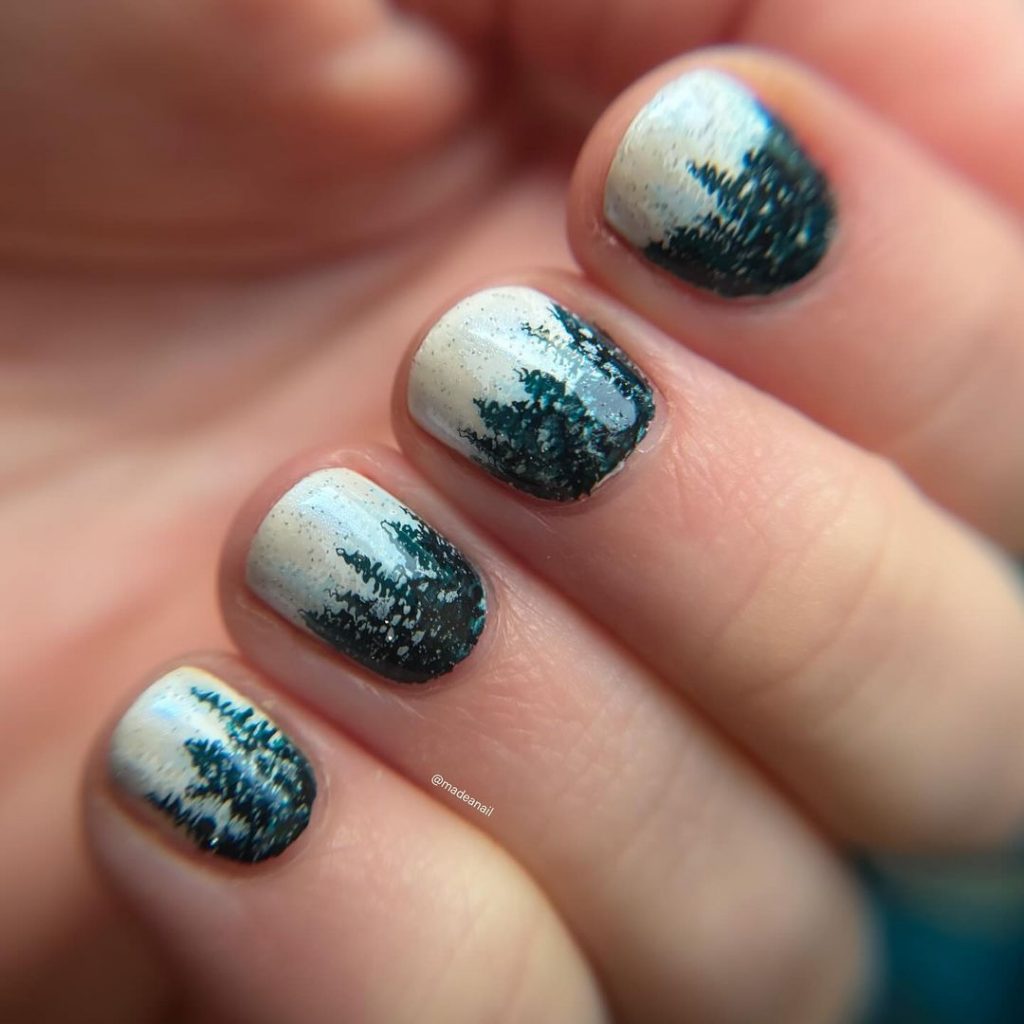
Subtle Pine Forest
For those who prefer a more understated look, this design features a subtle pine forest silhouette against a light grey background. The trees are delicately painted, giving a soft and serene appearance perfect for the season.
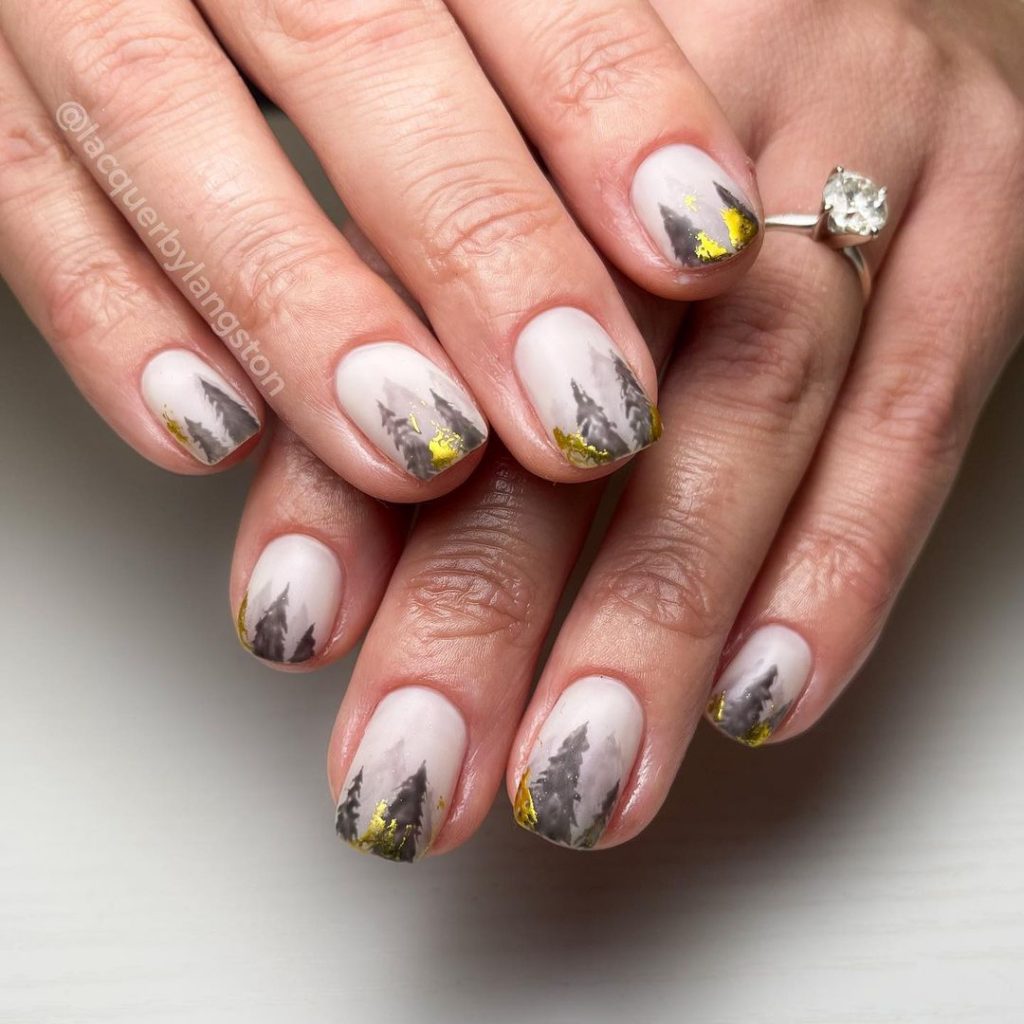
Consumables:
- Light grey nail polish (e.g., Zoya’s “Dove”)
- Dark green and black nail polishes
- Fine nail art brush
- Clear top coat
Instructions:
- Start with a base coat.
- Apply two coats of light grey nail polish.
- Using a fine brush, paint small pine trees with dark green and black polishes.
- Finish with a clear top coat to preserve the design.
Colorful Fall Trees
This playful design incorporates colorful trees painted in bright shades of blue, yellow, red, and orange. Each nail features a different tree, creating a fun and whimsical look that’s perfect for any age.
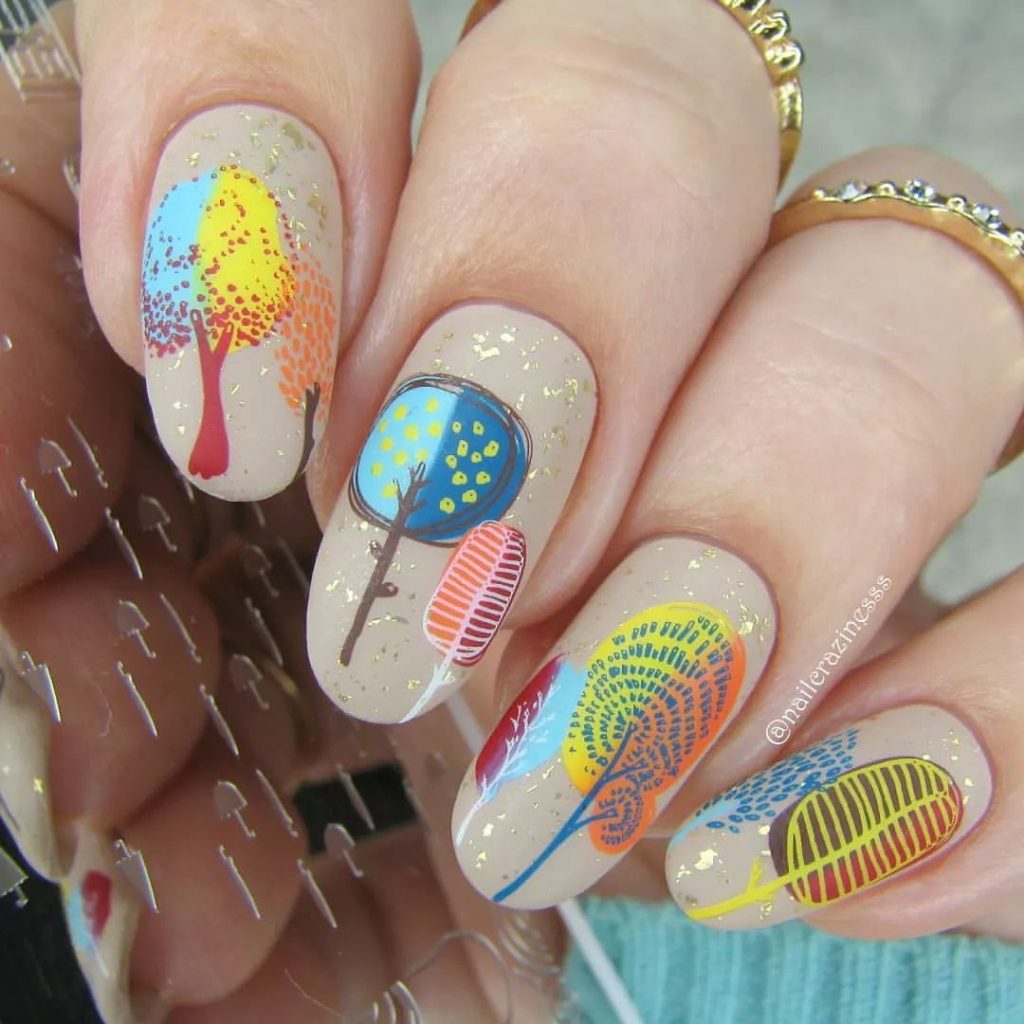
Consumables:
- Nude base nail polish (e.g., OPI’s “Dulce de Leche”)
- Various colorful nail polishes (blue, yellow, red, orange)
- Fine nail art brush
- Clear top coat
Instructions:
- Apply a base coat to protect your nails.
- Paint each nail with two coats of nude polish.
- Using a fine brush, paint different trees on each nail with the colorful polishes.
- Seal with a clear top coat for a lasting finish.
Golden Sunset
The final design in this series features a stunning golden sunset with a tree silhouette. The nails are painted in a glittery orange, with a black accent nail showcasing a tree against a sunset sky.

Consumables:
- Glittery orange nail polish (e.g., ILNP’s “Closure”)
- Black nail polish
- Detail nail brush
- Clear top coat
Instructions:
- Apply a base coat to your nails.
- Paint most of your nails with the glittery orange polish, and one accent nail with black polish.
- On the black accent nail, use a detail brush to paint a tree silhouette with the orange polish.
- Finish with a clear top coat to protect your manicure.
Minimalistic Pine Trees
This design offers a minimalistic approach with a nude base and delicate black pine tree silhouettes, adorned with subtle gold leaf accents. It’s perfect for those who love understated elegance with a touch of nature’s beauty.
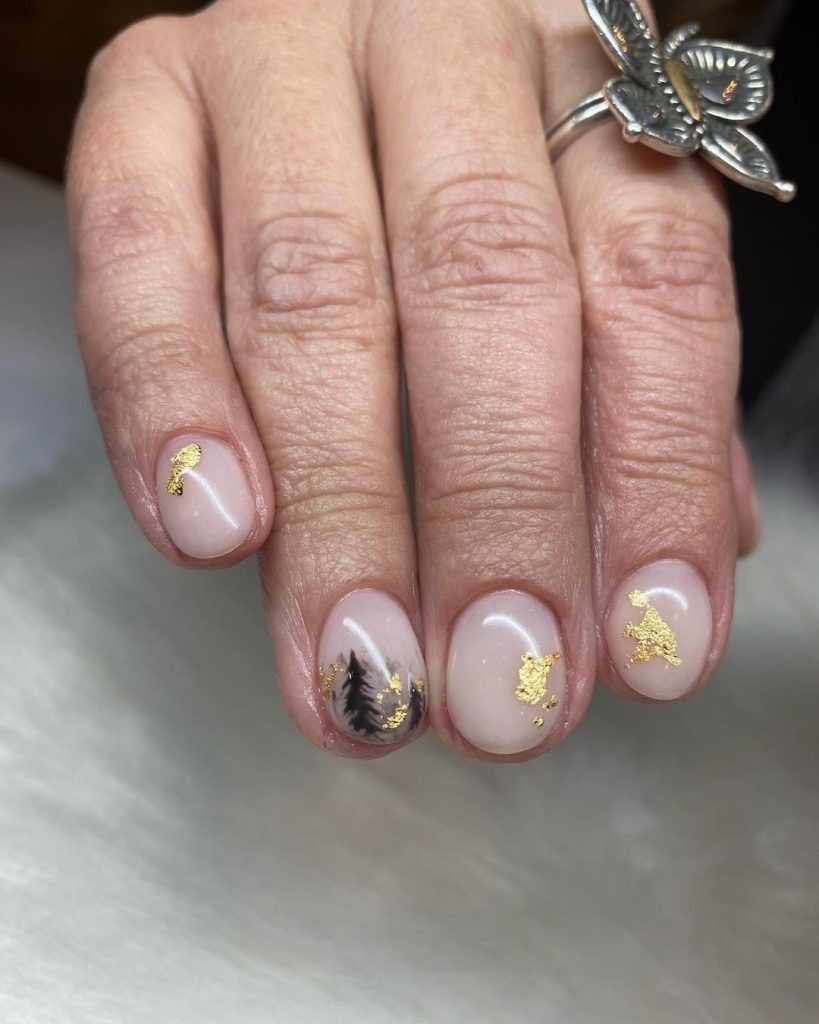
Consumables:
- Nude nail polish (e.g., OPI’s “Be There in a Prosecco”)
- Black nail art pen or fine brush
- Gold leaf flakes
- Clear top coat (e.g., Essie’s “Speed Setter”)
Instructions:
- Apply a base coat to protect your nails.
- Paint your nails with two coats of the nude polish, letting each coat dry completely.
- Using a black nail art pen or fine brush, draw small pine trees on your nails.
- Add gold leaf accents around the trees.
- Finish with a clear top coat to seal the design and add shine.
Vibrant Woodland Scene
This colorful design features a vibrant woodland scene with a silhouette of a deer against a sunset background. The vivid colors and intricate details make this design a standout.

Consumables:
- White nail polish (e.g., Cirque Colors’ “Carpe Diem”)
- Various colorful nail polishes (yellow, orange, green, red)
- Black nail art pen or fine brush
- Clear top coat
Instructions:
- Start with a base coat.
- Apply two coats of white nail polish.
- Create a gradient background using yellow, orange, and red polishes with a sponge.
- Use a fine brush or nail art pen to draw the deer and tree silhouettes.
- Finish with a clear top coat to protect your artwork.
Autumn Forest Gradient
This design showcases an autumn forest with a stunning gradient from deep red to bright orange, accented with gold flakes to mimic falling leaves. The vertical gradient creates a dynamic and eye-catching effect.
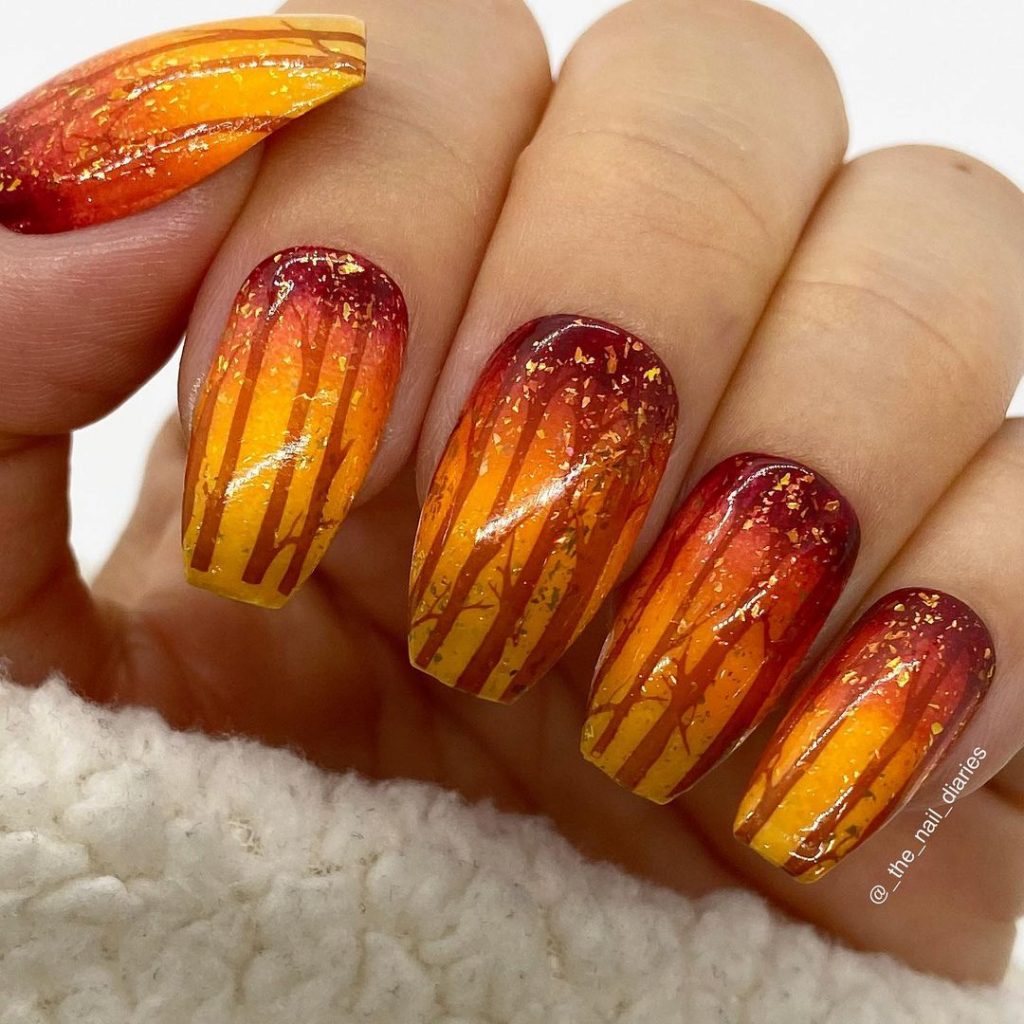
Consumables:
- Red and orange nail polishes (e.g., OPI’s “Big Apple Red” and “A Good Man-darin is Hard to Find”)
- Gold leaf flakes
- Sponge for gradient effect
- Clear top coat
Instructions:
- Apply a base coat to your nails.
- Create a gradient effect by applying red and orange polishes onto a sponge and pressing it onto your nails.
- Add gold leaf flakes to represent falling leaves.
- Seal with a clear top coat for durability.
Night Sky Forest
This design features a night sky forest scene, with dark silhouettes of trees against a blue and black gradient background. The subtle sparkle adds depth and a mystical feel to the nails.
Consumables:
- Blue and black nail polishes (e.g., Essie’s “Midnight Cami” and “Licorice”)
- Fine glitter polish
- Black nail art pen or fine brush
- Clear top coat
Instructions:
- Start with a base coat.
- Apply a gradient of blue and black polishes.
- Add a fine layer of glitter polish for a starry effect.
- Draw tree silhouettes with a black nail art pen or fine brush.
- Finish with a clear top coat to seal the design.
Geometric Fall Forest
This design combines geometric shapes with fall tree motifs, set against a matte grey background. The mix of patterns and subtle colors gives this manicure a modern and artistic look.

Consumables:
- Matte grey nail polish (e.g., OPI’s “Suzi Talks with Her Hands”)
- Various colorful nail polishes (purple, orange, black)
- Fine nail art brush
- Clear matte top coat
Instructions:
- Apply a base coat to your nails.
- Paint your nails with two coats of matte grey polish.
- Use a fine brush to create geometric shapes and tree designs with colorful polishes.
- Finish with a clear matte top coat to protect your design and maintain the matte effect.
Sunset Silhouettes
This mesmerizing design showcases a beautiful sunset backdrop with intricate black silhouettes of trees and birds. The soft pink and purple gradient provides a dreamy canvas for the detailed black art, making it a captivating choice for fall.
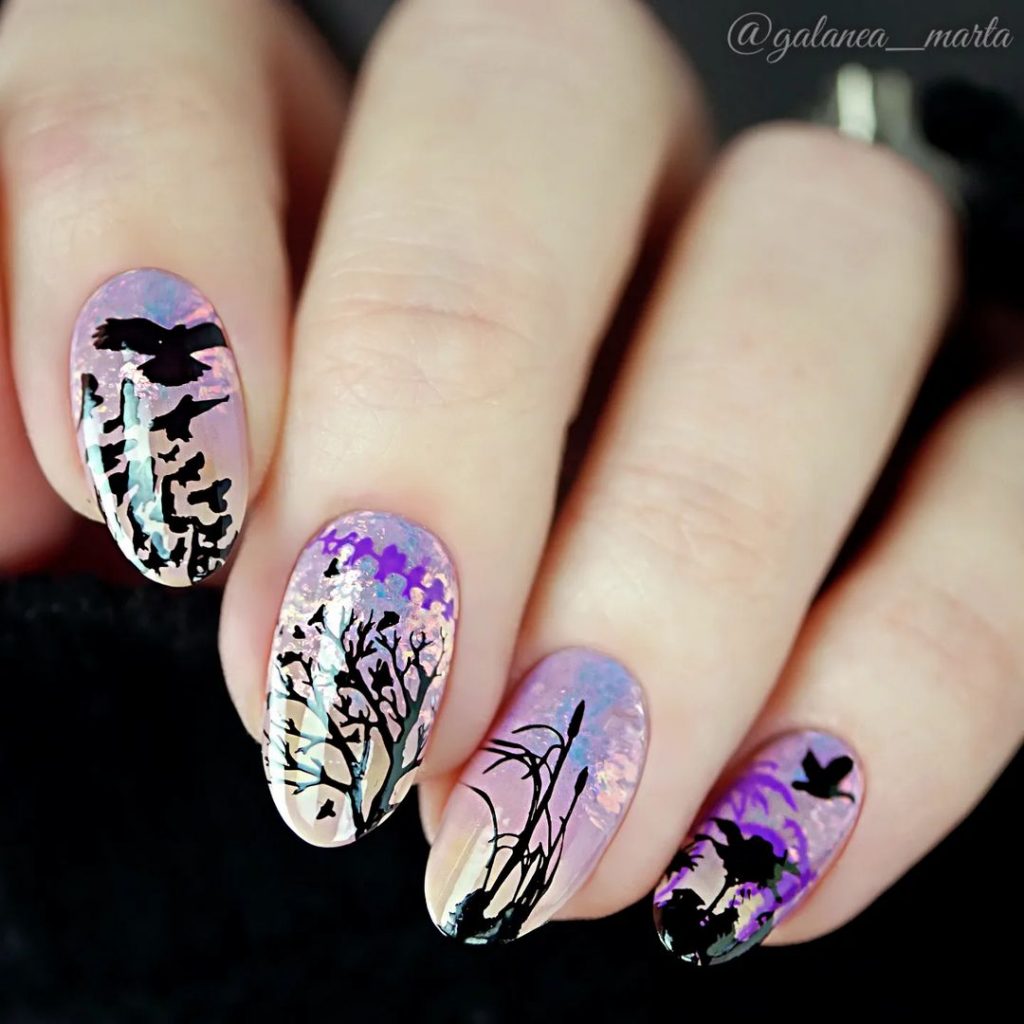
Consumables:
- Light pink and purple nail polishes (e.g., Essie’s “Ballet Slippers” and “Play Date”)
- Black nail art pen or fine brush
- Clear top coat (e.g., Sally Hansen’s “Insta-Dri”)
Instructions:
- Start with a base coat to protect your nails.
- Apply a gradient using the pink and purple polishes, blending with a sponge.
- Once dry, use a black nail art pen or fine brush to draw the silhouettes of trees and birds.
- Finish with a clear top coat to seal the design and add shine.
Golden Autumn Leaves
This design features vibrant yellow nails adorned with detailed tree branches and red autumn leaves. The warm colors and bold patterns capture the essence of fall, creating a striking and playful look.
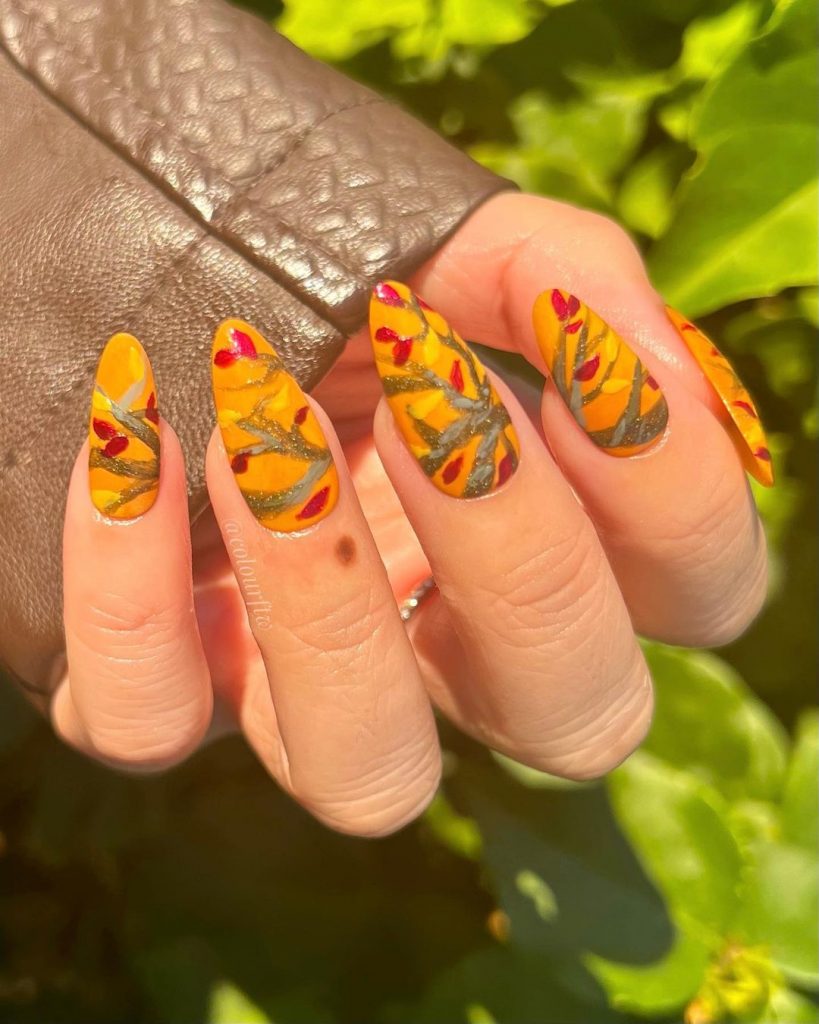
Consumables:
- Yellow nail polish (e.g., OPI’s “Sun, Sea, and Sand in My Pants”)
- Red and green nail polishes
- Fine nail art brush
- Clear top coat
Instructions:
- Apply a base coat to your nails.
- Paint your nails with two coats of yellow polish.
- Use a fine brush to paint tree branches with green polish and add red leaves.
- Finish with a clear top coat to protect the design.
Subtle Autumn Elegance
This design offers a subtle and elegant look with a matte nude base and intricate gold tree designs on an accent nail. The simplicity of the design makes it perfect for a sophisticated and understated autumn manicure.
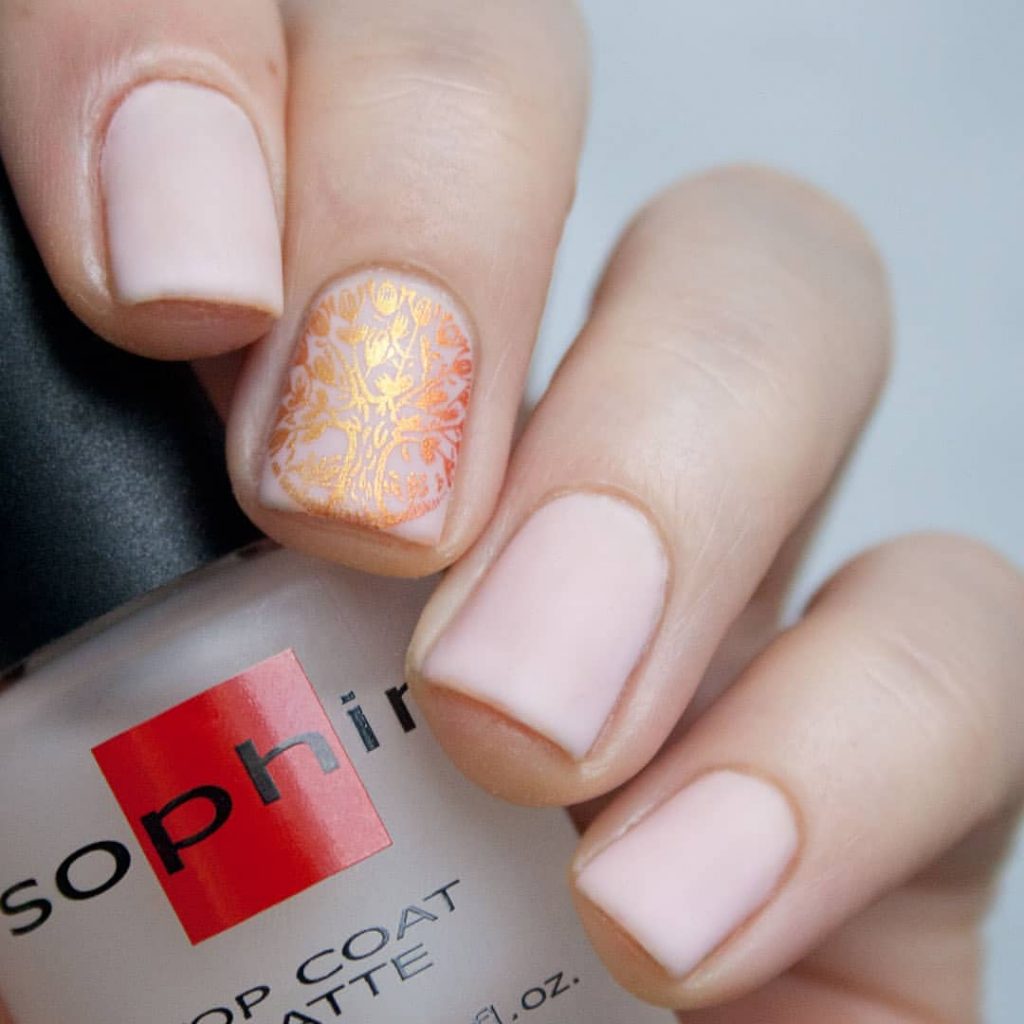
Consumables:
- Nude matte nail polish (e.g., Essie’s “Matte About You”)
- Gold nail art stickers or foil
- Clear matte top coat
Instructions:
- Start with a base coat.
- Apply two coats of nude matte polish.
- Use gold nail art stickers or foil to create the tree design on an accent nail.
- Seal with a clear matte top coat to protect the design and maintain the matte effect.
Autumn Sparkle
This design combines deep autumn colors with sparkling accents and tree silhouettes. The mix of burgundy, orange glitter, and tree designs makes this manicure a festive and eye-catching choice for the season.

Consumables:
- Burgundy nail polish (e.g., OPI’s “Malaga Wine”)
- Orange glitter polish
- Black nail art pen or fine brush
- Clear top coat
Instructions:
- Apply a base coat to your nails.
- Paint some nails with burgundy polish and others with orange glitter.
- Use a fine brush to draw tree silhouettes on the glitter nails.
- Finish with a clear top coat for durability and shine.
Pine Tree Ombre
This design features a gradient ombre effect with dark green pine trees. The gradient background transitions from light to dark, creating a serene and natural look that’s perfect for autumn.
Consumables:
- Light and dark green nail polishes (e.g., Essie’s “Mint Candy Apple” and “Off Tropic”)
- Sponge for gradient effect
- Fine nail art brush
- Clear top coat
Instructions:
- Start with a base coat to protect your nails.
- Create a gradient background using light and dark green polishes with a sponge.
- Use a fine brush to paint pine tree silhouettes on each nail.
- Seal with a clear top coat to protect your design.
Birch Tree Stripes
This unique design features striking white birch tree stripes against a deep maroon base, adding a rustic and natural feel to your nails. The contrast between the dark base and the white stripes makes for an eye-catching manicure.
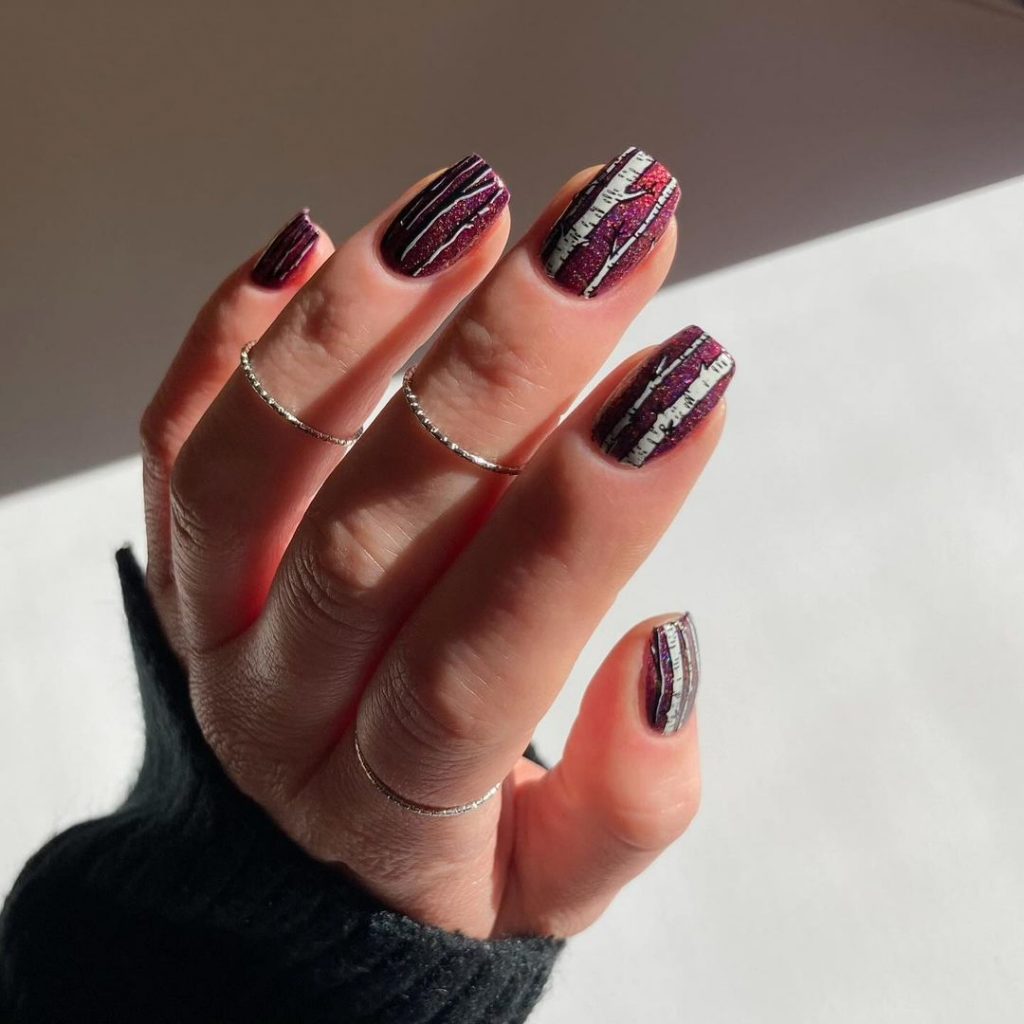
Consumables:
- Deep maroon nail polish (e.g., OPI’s “Malaga Wine”)
- White nail polish
- Thin nail art brush or striping tape
- Clear top coat (e.g., Seche Vite Dry Fast Top Coat)
Instructions:
- Start with a base coat.
- Apply two coats of deep maroon polish.
- Use a thin brush or striping tape to create vertical white stripes, mimicking birch trees.
- Finish with a clear top coat to seal and protect the design.
Matte Grey with Tree Silhouette
This design features a matte grey base with a black tree silhouette on an accent nail, providing a sophisticated and minimalistic look. The matte finish adds an elegant touch, perfect for the fall season.
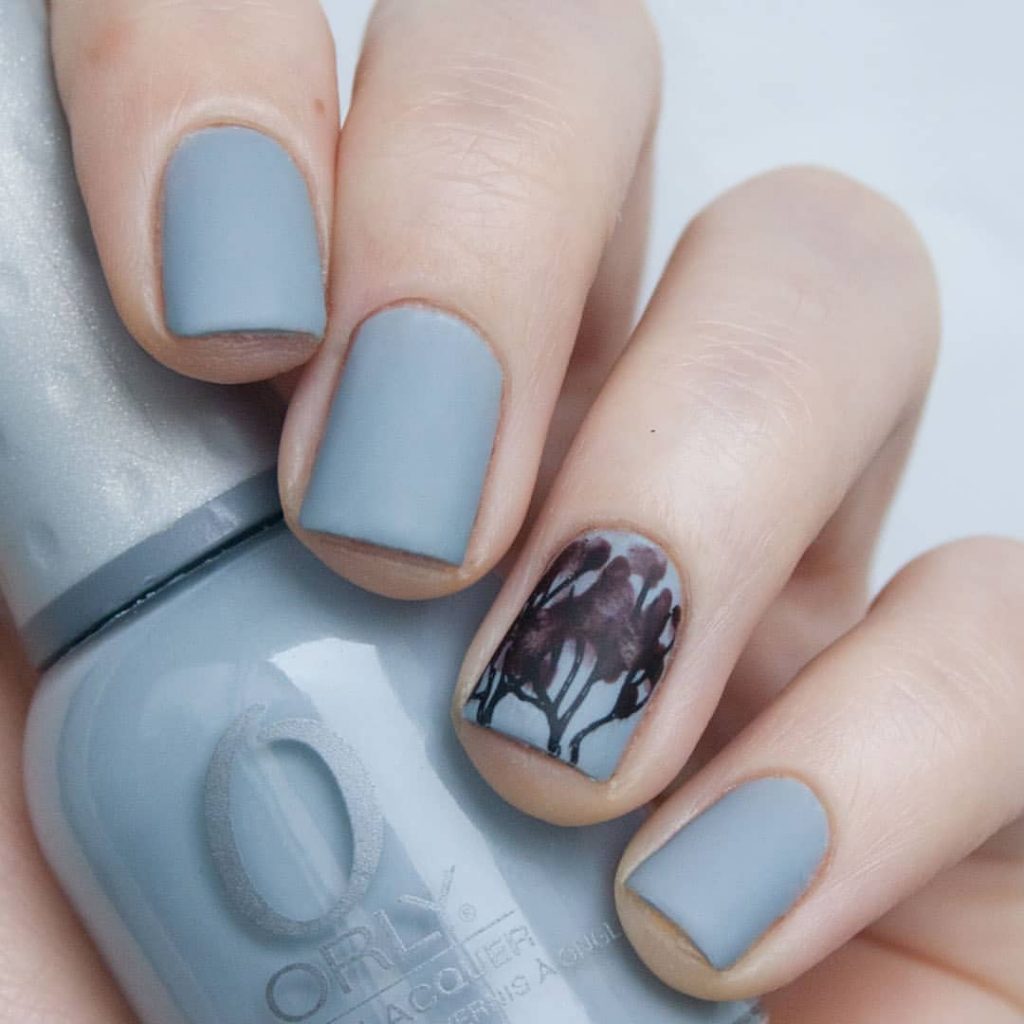
Consumables:
- Matte grey nail polish (e.g., Orly’s “Mirror Mirror”)
- Black nail polish
- Fine nail art brush
- Matte top coat
Instructions:
- Apply a base coat to your nails.
- Paint your nails with two coats of matte grey polish.
- On an accent nail, use a fine brush to draw a tree silhouette with black polish.
- Finish with a matte top coat to maintain the elegant matte effect.
Winter Forest Scene
This enchanting design depicts a winter forest scene with bare trees and a serene background. The gradient background and detailed tree silhouettes create a tranquil and picturesque look.
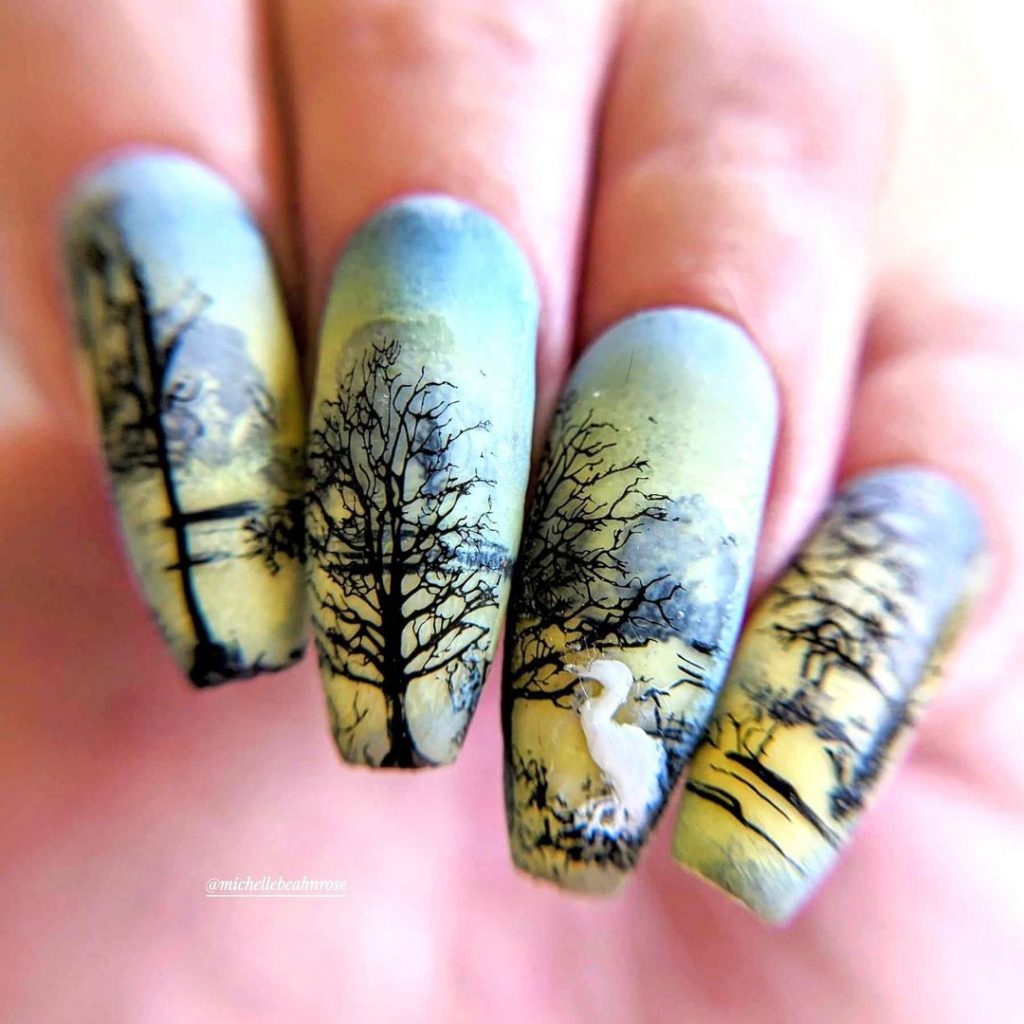
Consumables:
- Light blue and yellow nail polishes (e.g., Essie’s “Mint Candy Apple” and “Go Ginza”)
- Black nail art pen or fine brush
- Clear top coat
Instructions:
- Start with a base coat.
- Create a gradient background using the light blue and yellow polishes with a sponge.
- Use a fine brush to paint tree silhouettes with black polish.
- Seal with a clear top coat to protect your design.
Sunset Pine Trees
This design features a beautiful sunset sky with pine tree silhouettes, creating a serene and natural scene. The blue and pink hues of the sunset provide a stunning backdrop for the black tree details.
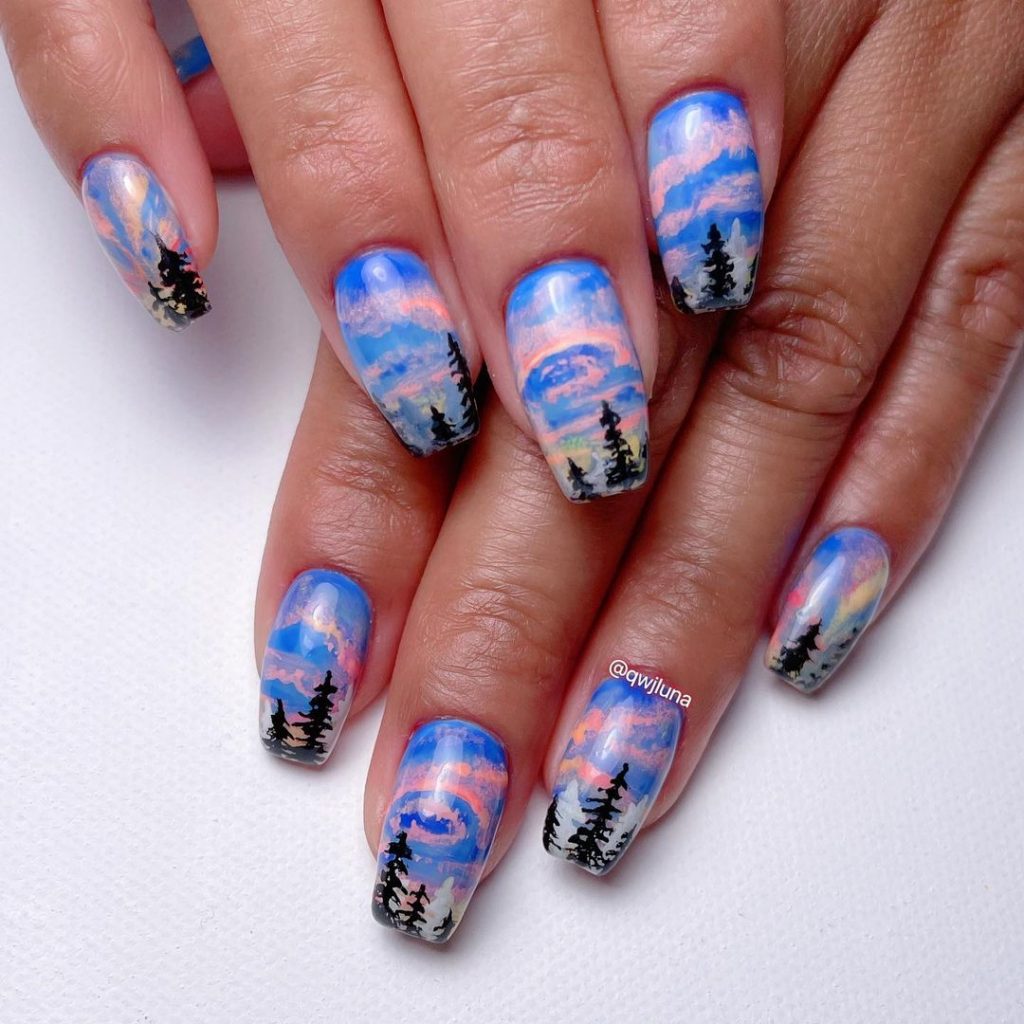
Consumables:
- Blue and pink nail polishes (e.g., Essie’s “Bikini So Teeny” and “Fiji”)
- Black nail art pen or fine brush
- Clear top coat
Instructions:
- Apply a base coat to your nails.
- Create a gradient background using blue and pink polishes with a sponge.
- Use a fine brush to draw pine tree silhouettes with black polish.
- Finish with a clear top coat to seal and protect the design.
Fiery Autumn Tree
This vibrant design showcases a fiery red autumn tree on a white accent nail, surrounded by rich red and orange nails. The bold colors and detailed tree design capture the essence of fall foliage.
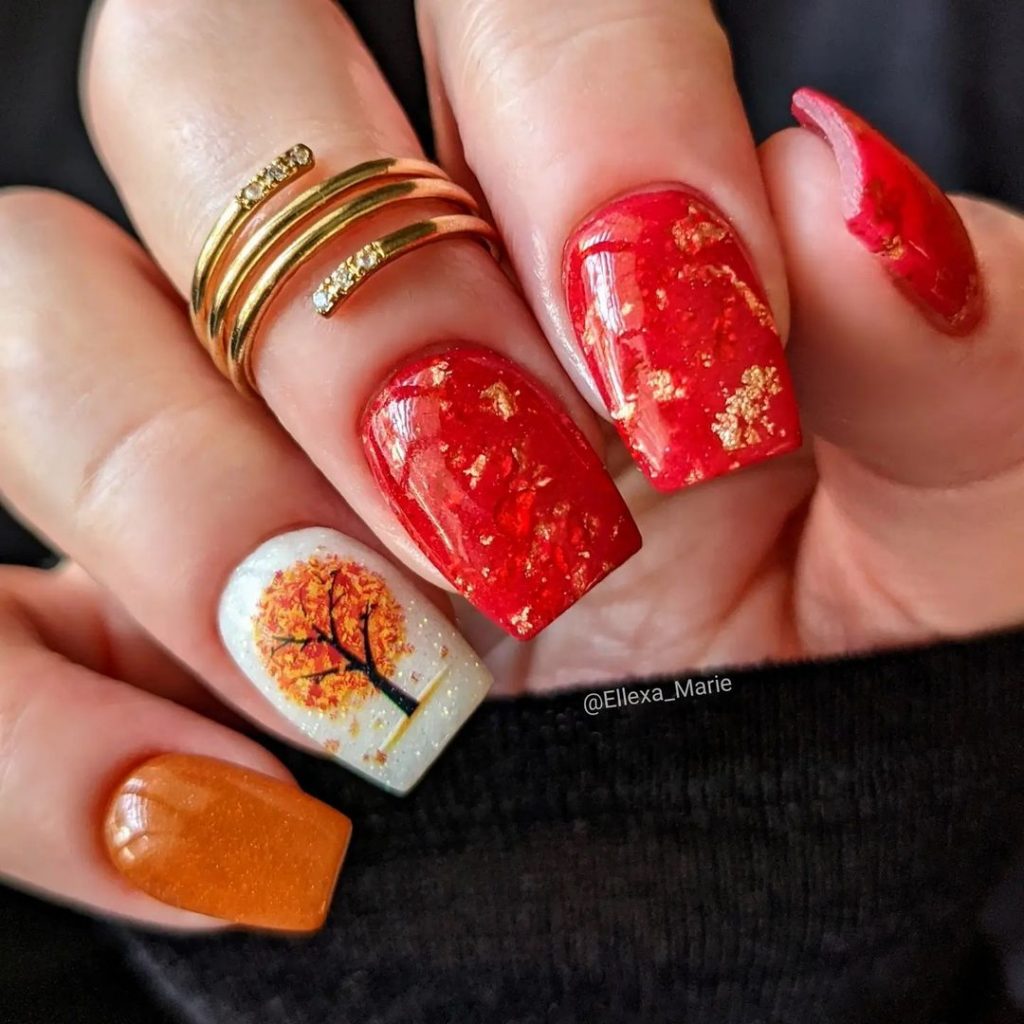
Consumables:
- Red and orange nail polishes (e.g., OPI’s “Big Apple Red” and “A Good Man-darin is Hard to Find”)
- White nail polish
- Black and orange nail art pens or fine brushes
- Clear top coat
Instructions:
- Start with a base coat.
- Paint most of your nails with red and orange polishes, and an accent nail with white polish.
- Use black and orange pens or brushes to draw the tree design on the white nail.
- Seal with a clear top coat for a glossy finish.
Evergreen Elegance
This design features a stunning evergreen tree motif on a nude base, complemented by solid dark green nails. The combination of natural and vibrant colors brings a sophisticated and fresh look to your fall manicure.
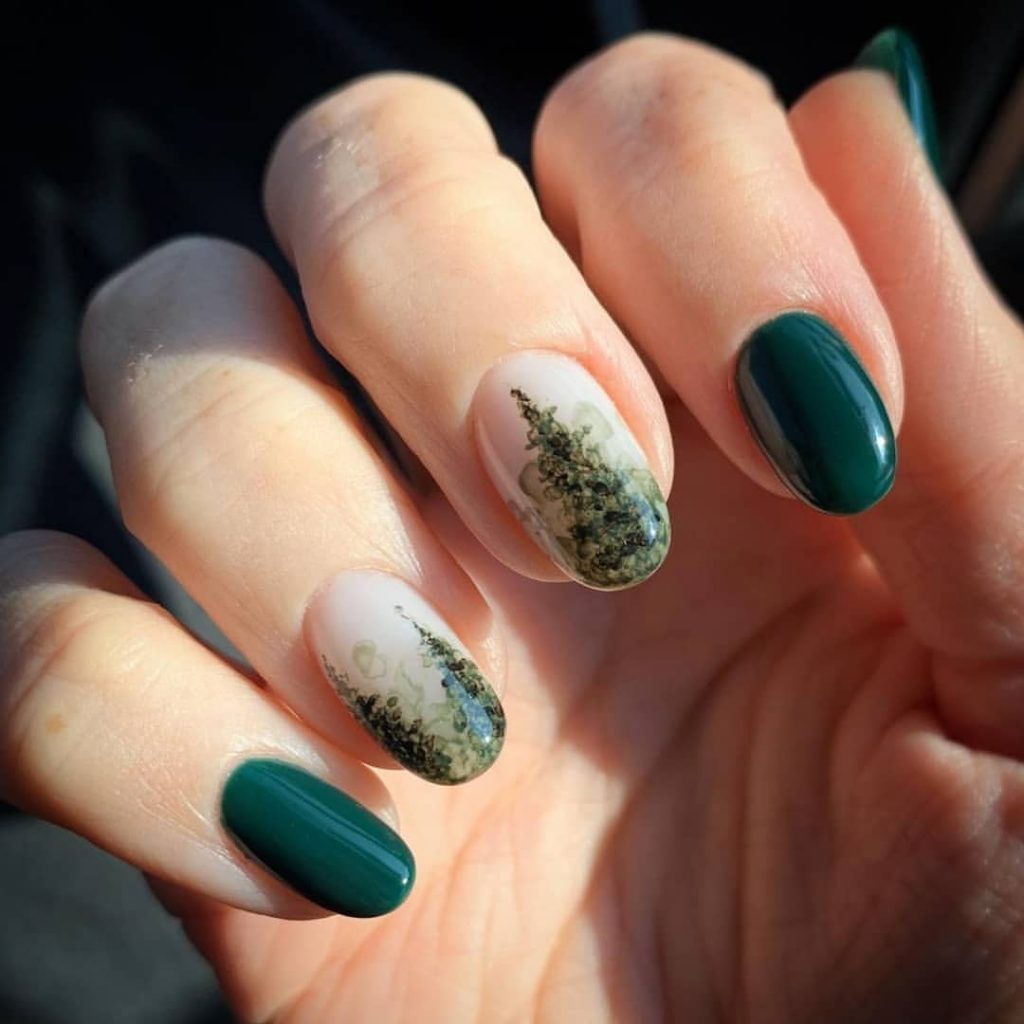
Consumables:
- Nude and dark green nail polishes (e.g., Essie’s “Ballet Slippers” and “Off Tropic”)
- Fine nail art brush
- Clear top coat (e.g., Seche Vite Dry Fast Top Coat)
Instructions:
- Apply a base coat to protect your nails.
- Paint your accent nails with two coats of nude polish and the remaining nails with dark green polish.
- Use a fine brush to draw the evergreen tree design on the nude nails with the dark green polish.
- Seal with a clear top coat to protect the design and add shine.
Rustic Autumn Mix
This design combines rich autumn colors with a delicate tree branch accent on a nude nail. The use of burgundy, green with gold flecks, and a subtle tree design creates a rustic and charming fall manicure.
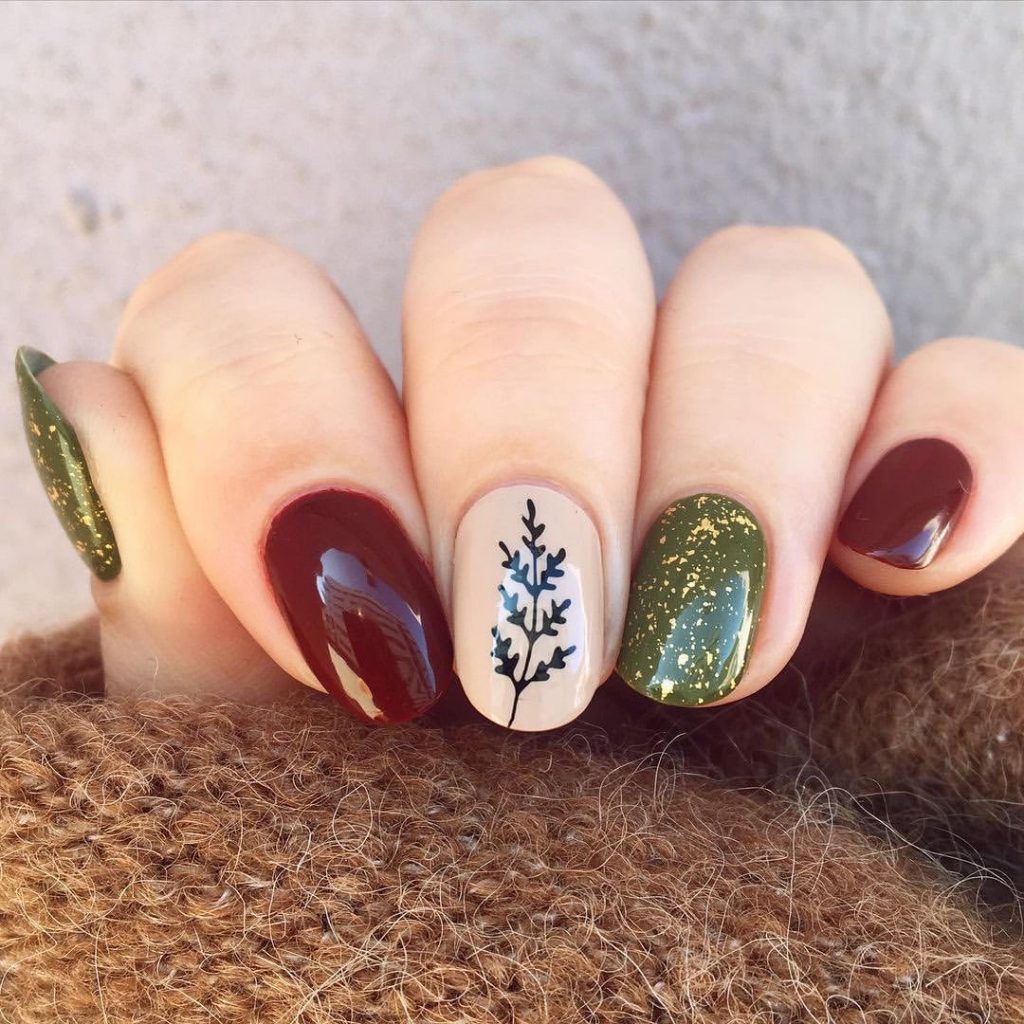
Consumables:
- Burgundy, nude, and green nail polishes (e.g., OPI’s “Malaga Wine,” Essie’s “Ballet Slippers,” and “Going Incognito”)
- Gold glitter polish
- Black nail art pen or fine brush
- Clear top coat
Instructions:
- Start with a base coat.
- Paint one nail with nude polish, one with burgundy, and one with green glitter polish.
- Use a fine brush or black nail art pen to draw the tree branch design on the nude nail.
- Finish with a clear top coat to seal and protect the design.
Save Pin