As the leaves change and the air grows crisp, it’s the perfect time to update your nail game with some fabulous fall-themed nails for 2024. Whether you’re a fan of Autumn pink, Pumpkin hues, or intricate Acrylic coffin designs, this season offers a plethora of ideas to keep your nails looking chic and stylish. Let’s dive into some captivating nail designs that will have you embracing the autumn vibes in no time.
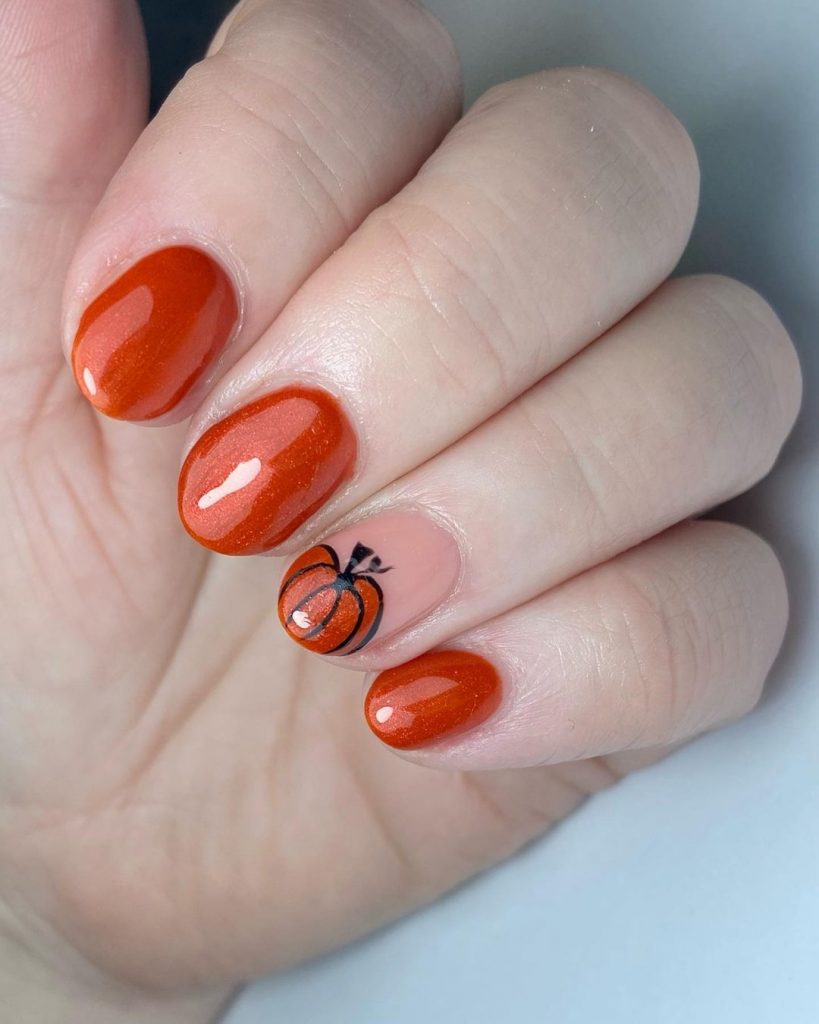
Cozy Pumpkin Delight
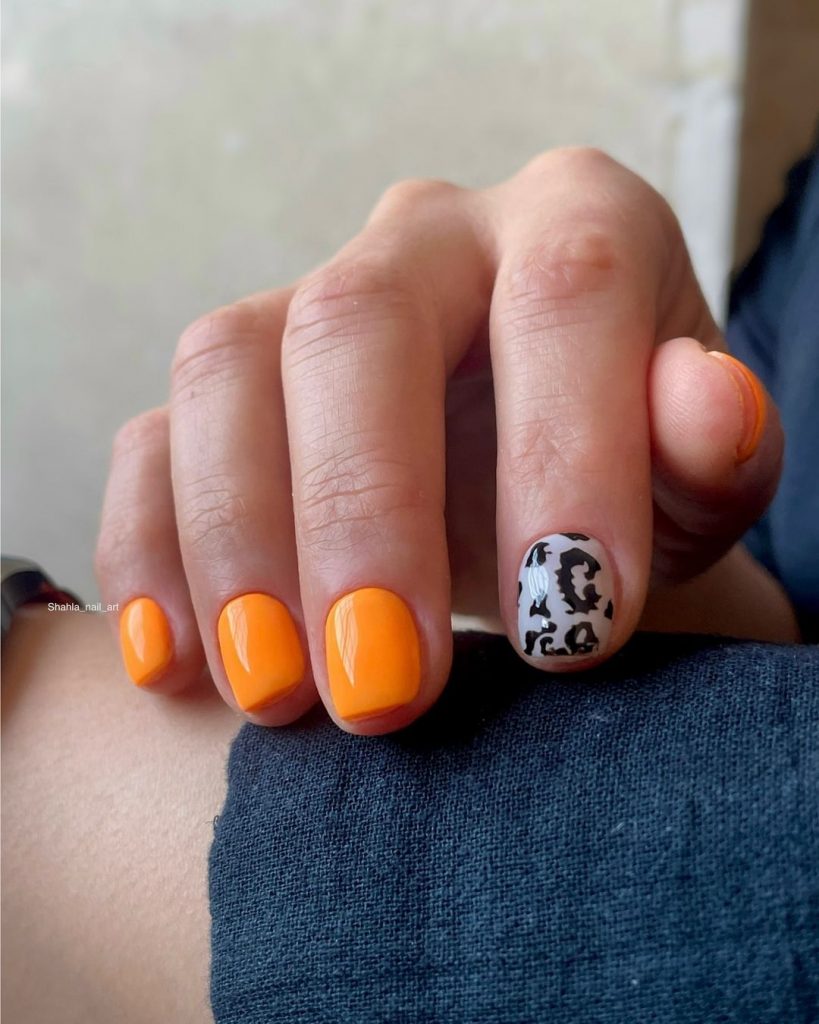
When it comes to fall, nothing says the season like pumpkins. This nail design captures the essence of autumn with a vibrant orange base and a charming pumpkin accent on the ring finger. The glossy finish adds a touch of elegance, making it perfect for any autumn gathering.
Consumables:
- Orange nail polish: OPI “It’s a Piazza Cake”
- Black nail art pen: Sally Hansen I Heart Nail Art Pen
- Clear top coat: Seche Vite Dry Fast Top Coat
Opt for a high-quality orange polish that provides a rich, even color. The Sally Hansen nail art pen is excellent for creating precise pumpkin details.
How to Create at Home:
- Apply a base coat to protect your nails.
- Paint all your nails with two coats of the orange polish.
- Use the black nail art pen to draw a pumpkin on the ring finger.
- Seal with a clear top coat to add shine and longevity.
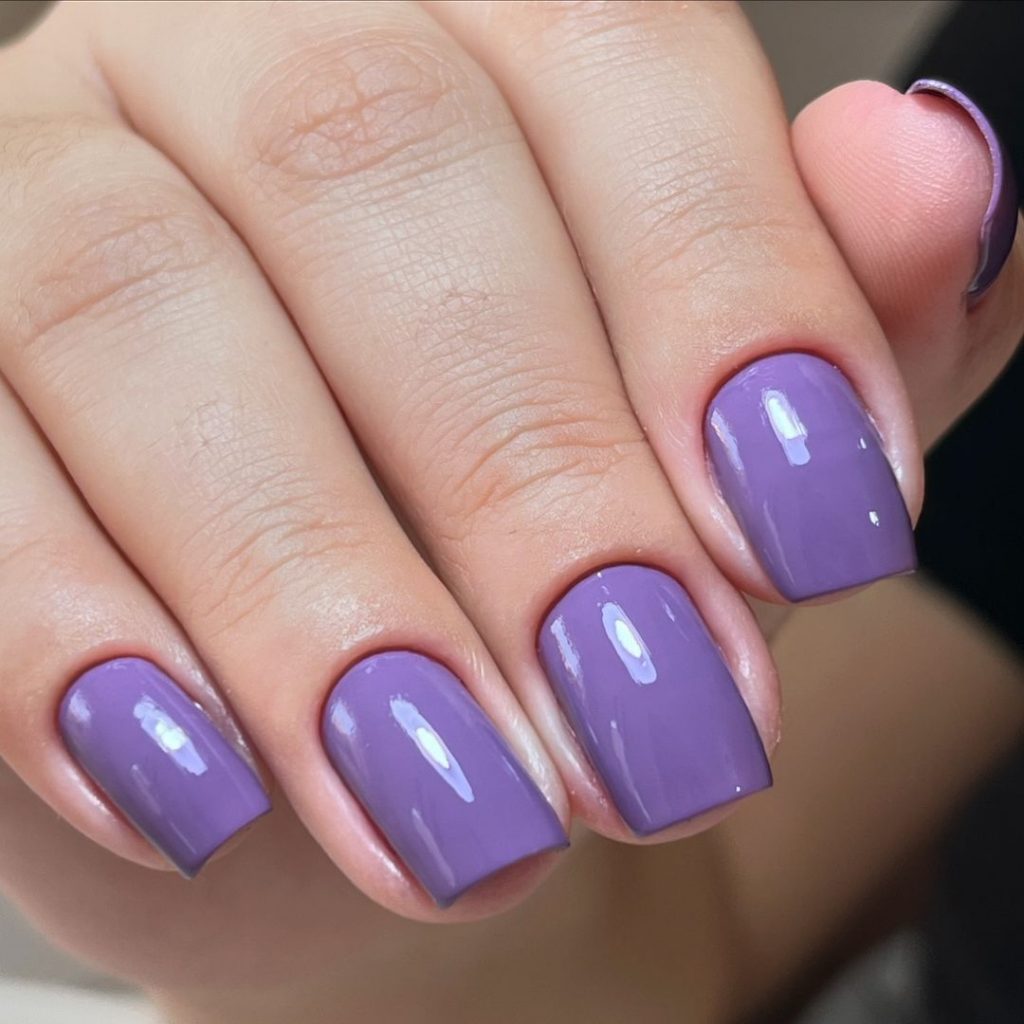
Lavender Dreams
For those who adore softer hues, this lavender nail design is both sophisticated and trendy. The short, square shape is practical yet stylish, making it an ideal choice for daily wear. The glossy lavender polish is perfect for adding a pop of color to your autumn look.
Consumables:
- Lavender nail polish: Essie “Lilacism”
- Clear base coat: Orly Bonder
- Clear top coat: Essie Gel-Setter Top Coat
Choosing a high-quality lavender polish will ensure a smooth application and a vibrant finish. The Essie Gel-Setter Top Coat will add a gel-like shine without the need for UV light.
How to Create at Home:
- Start with a clear base coat to prevent staining.
- Apply two coats of the lavender polish for an opaque finish.
- Finish with the clear top coat to seal the color and add a glossy shine.
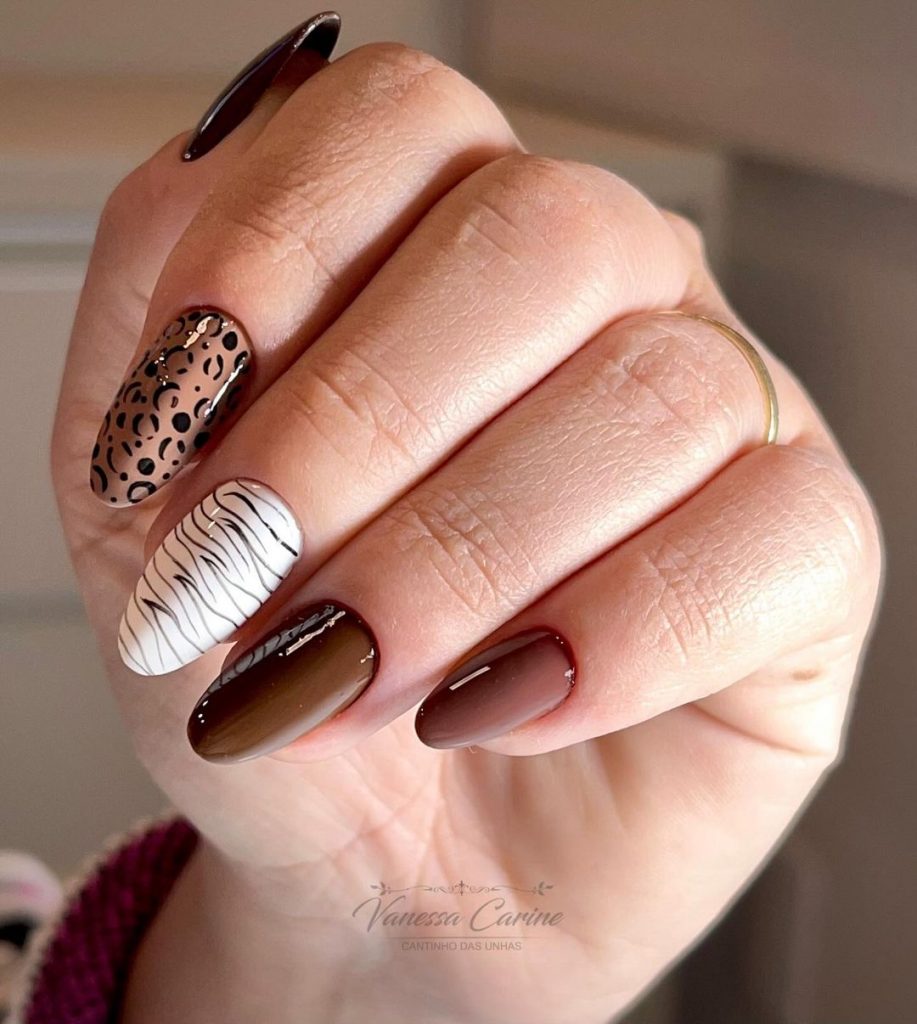
Wild Safari Nails
Embrace your wild side with this safari-themed nail design. Featuring a mix of animal prints and earthy tones, this look is perfect for those who love to experiment with their nail art. The combination of brown, white, and black creates a striking contrast that’s sure to turn heads.
Consumables:
- Brown nail polish: Zoya “Louise”
- White nail polish: OPI “Alpine Snow”
- Black nail art pen: Sally Hansen I Heart Nail Art Pen
- Clear top coat: Seche Vite Dry Fast Top Coat
Use a high-quality brown polish to achieve a rich, deep color. The black nail art pen is ideal for creating intricate animal prints with precision.
How to Create at Home:
- Apply a base coat to protect your nails.
- Paint each nail with two coats of the chosen colors, alternating between brown, white, and black.
- Use the black nail art pen to draw animal print patterns on the nails.
- Seal with a clear top coat for a long-lasting finish.
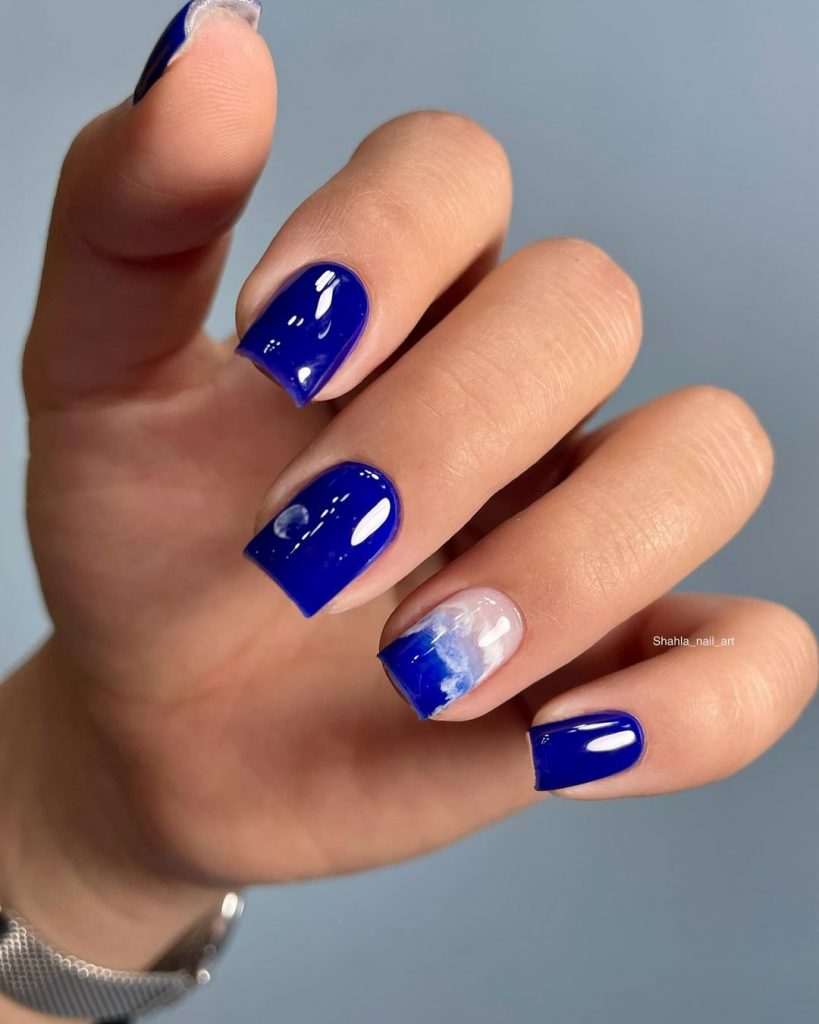
Deep Blue Sea Nails
Dive into the deep with this mesmerizing blue nail design. Perfect for those who love bold colors, this look features a stunning blue polish with a unique water effect on the accent nail. The square shape adds a modern touch to this vibrant design.
Consumables:
- Blue nail polish: Essie “Butler Please”
- White nail polish: OPI “Alpine Snow”
- Clear top coat: Seche Vite Dry Fast Top Coat
A high-quality blue polish like Essie’s “Butler Please” ensures a bold, even color. The white polish is used to create the water effect on the accent nail.
How to Create at Home:
- Start with a base coat to protect your nails.
- Apply two coats of the blue polish to all nails except the accent nail.
- On the accent nail, create a water effect using a sponge to dab white polish.
- Seal everything with a clear top coat.
Vibrant Autumn Hues
Capture the essence of fall with these vibrant autumn-themed nails. Featuring a bright orange base with a playful accent nail, this design is perfect for adding a pop of color to your autumn wardrobe. The short, square shape keeps the look practical and chic.
Consumables:
- Orange nail polish: OPI “My Chihuahua Bites”
- Black nail art pen: Sally Hansen I Heart Nail Art Pen
- Clear top coat: Seche Vite Dry Fast Top Coat
Opt for a bright orange polish to achieve a lively and vibrant look. The black nail art pen is perfect for adding playful details to the accent nail.
How to Create at Home:
- Apply a base coat to protect your nails.
- Paint all nails with two coats of the orange polish.
- Use the black nail art pen to add details to the accent nail.
- Finish with a clear top coat for added shine and protection.
Safari Adventure Nails
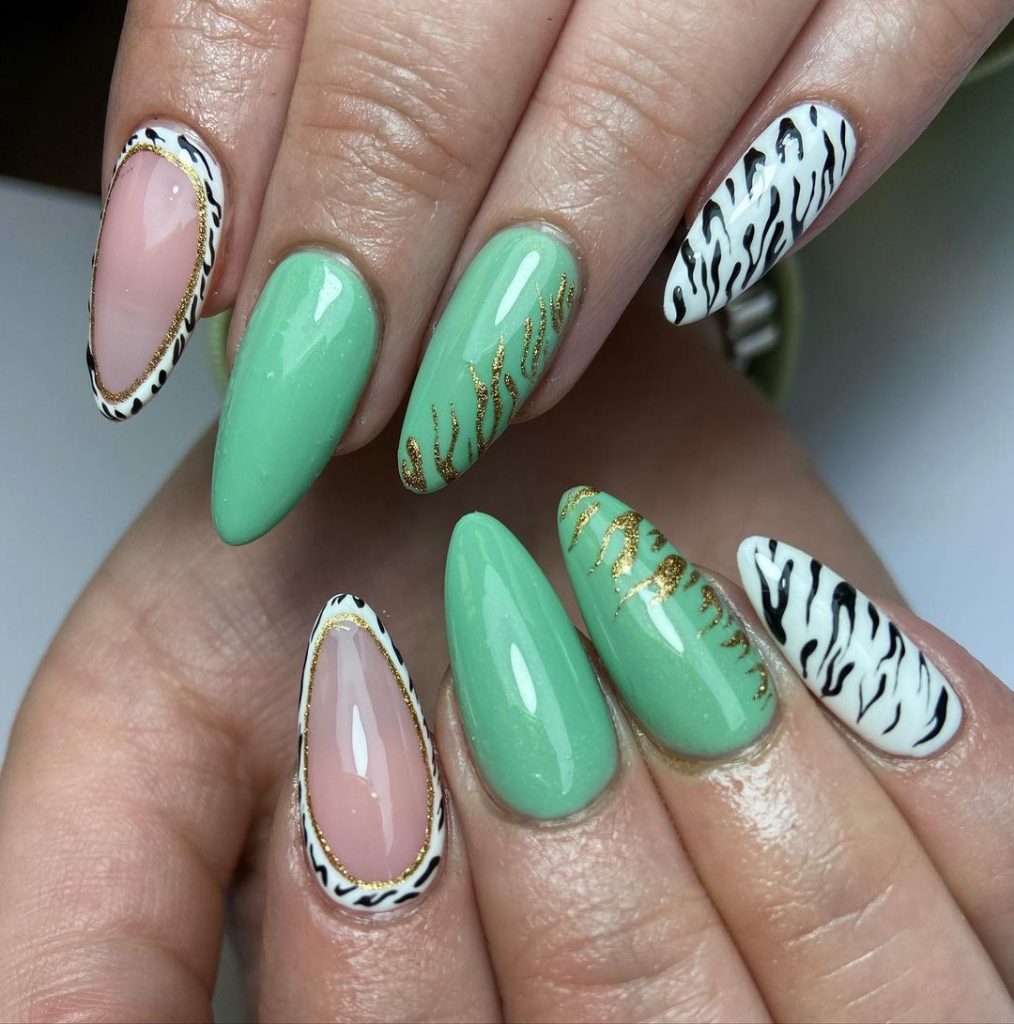
These safari-inspired nails are a bold choice for fall, combining zebra prints with a striking mint green. The almond shape adds a touch of elegance, while the gold accents provide a glamorous twist. This design is perfect for those who love a mix of wild and sophisticated styles.
Consumables:
- Mint green nail polish: Essie “Mint Candy Apple”
- White nail polish: OPI “Alpine Snow”
- Black nail art pen: Sally Hansen I Heart Nail Art Pen
- Gold glitter polish: Sally Hansen Insta-Dri in “Go For Gold”
- Clear top coat: Seche Vite Dry Fast Top Coat
High-quality polishes ensure vibrant colors and lasting wear. The black nail art pen is crucial for achieving precise zebra stripes.
How to Create at Home:
- Apply a base coat to protect your nails.
- Paint the majority of your nails with two coats of mint green polish.
- On accent nails, use the white polish as a base, then create zebra stripes with the black nail art pen.
- Add gold glitter accents where desired.
- Finish with a clear top coat to seal the design and add shine.
Serene Blue Nails
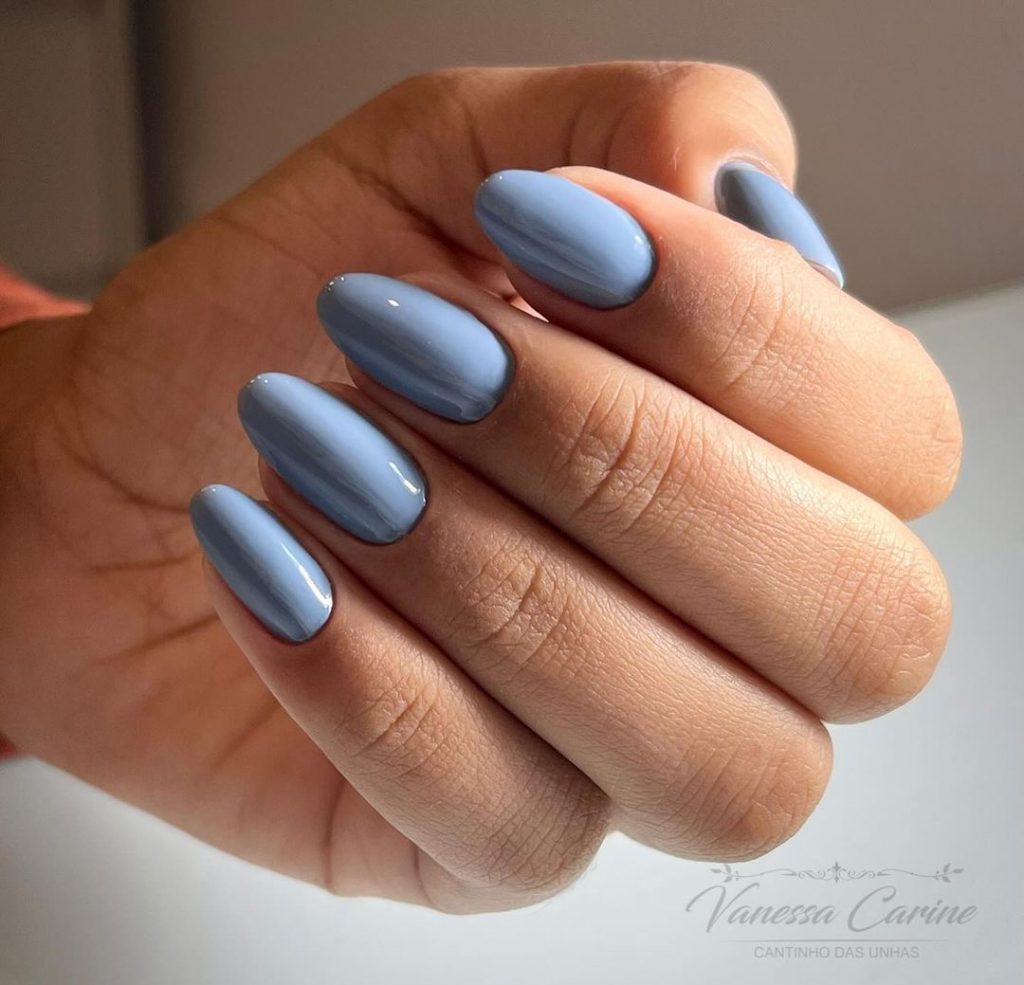
This serene blue manicure is both calming and stylish. The acrylic almond shape provides a sleek and modern look, perfect for any occasion. The soft blue hue is versatile and can be paired with various outfits.
Consumables:
- Blue nail polish: OPI “Gelato on My Mind”
- Clear base coat: Orly Bonder
- Clear top coat: Essie Gel-Setter Top Coat
Choosing a high-quality blue polish will ensure a smooth application and a vibrant finish. The Essie Gel-Setter Top Coat will add a gel-like shine without the need for UV light.
How to Create at Home:
- Start with a clear base coat to prevent staining.
- Apply two coats of the blue polish for an opaque finish.
- Finish with the clear top coat to seal the color and add a glossy shine.
Playful Floral Nails
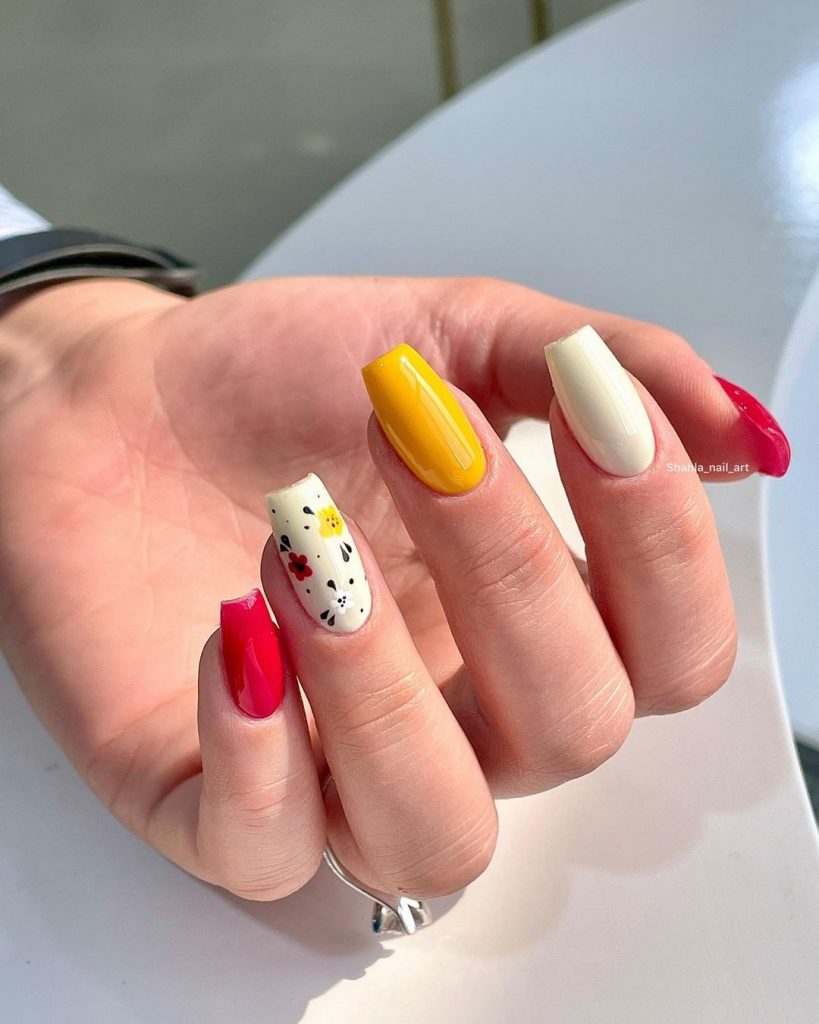
Add a touch of playfulness to your fall look with these vibrant floral nails. The combination of bright yellow, white, and pink, along with a floral accent nail, creates a cheerful and eye-catching design. The short square shape is practical yet stylish.
Consumables:
- Yellow nail polish: OPI “I Just Can’t Cope-acabana”
- White nail polish: Essie “Blanc”
- Pink nail polish: OPI “Strawberry Margarita”
- Floral nail stickers: Floral Nail Decals
- Clear top coat: Seche Vite Dry Fast Top Coat
Opt for vibrant polishes to achieve a lively and bright look. Floral nail stickers are perfect for adding detailed designs without the need for intricate painting.
How to Create at Home:
- Apply a base coat to protect your nails.
- Paint each nail with two coats of your chosen colors, alternating between yellow, white, and pink.
- Apply floral nail stickers to the accent nail.
- Seal with a clear top coat for added shine and protection.
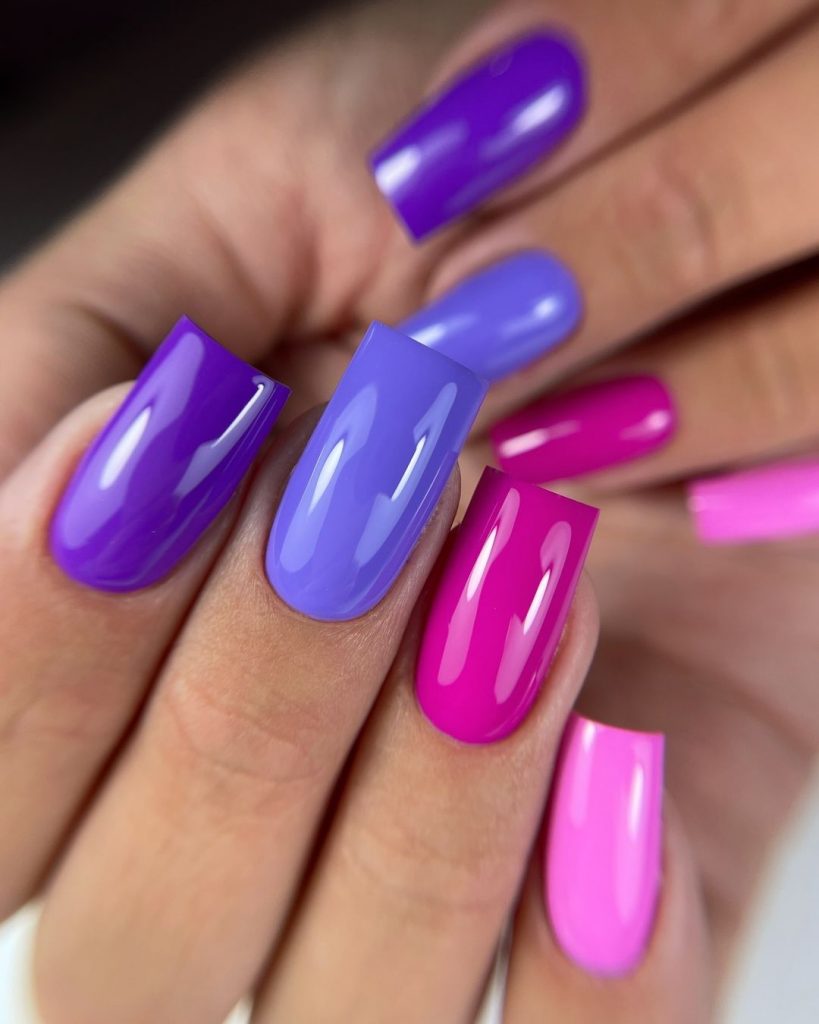
Bold Purple Nails
For a bold and vibrant look, these purple nails are a perfect choice. Featuring a range of purple hues, this acrylic coffin design is both eye-catching and stylish. The glossy finish enhances the rich colors, making your nails stand out.
Consumables:
- Light purple nail polish: Essie “Play Date”
- Dark purple nail polish: OPI “Do You Lilac It?”
- Clear top coat: Seche Vite Dry Fast Top Coat
Using high-quality purple polishes will ensure an even, vibrant finish. A glossy top coat will enhance the colors and provide long-lasting wear.
How to Create at Home:
- Start with a base coat to protect your nails.
- Paint each nail with two coats of your chosen purple shades.
- Finish with a clear top coat to seal the color and add a glossy shine.
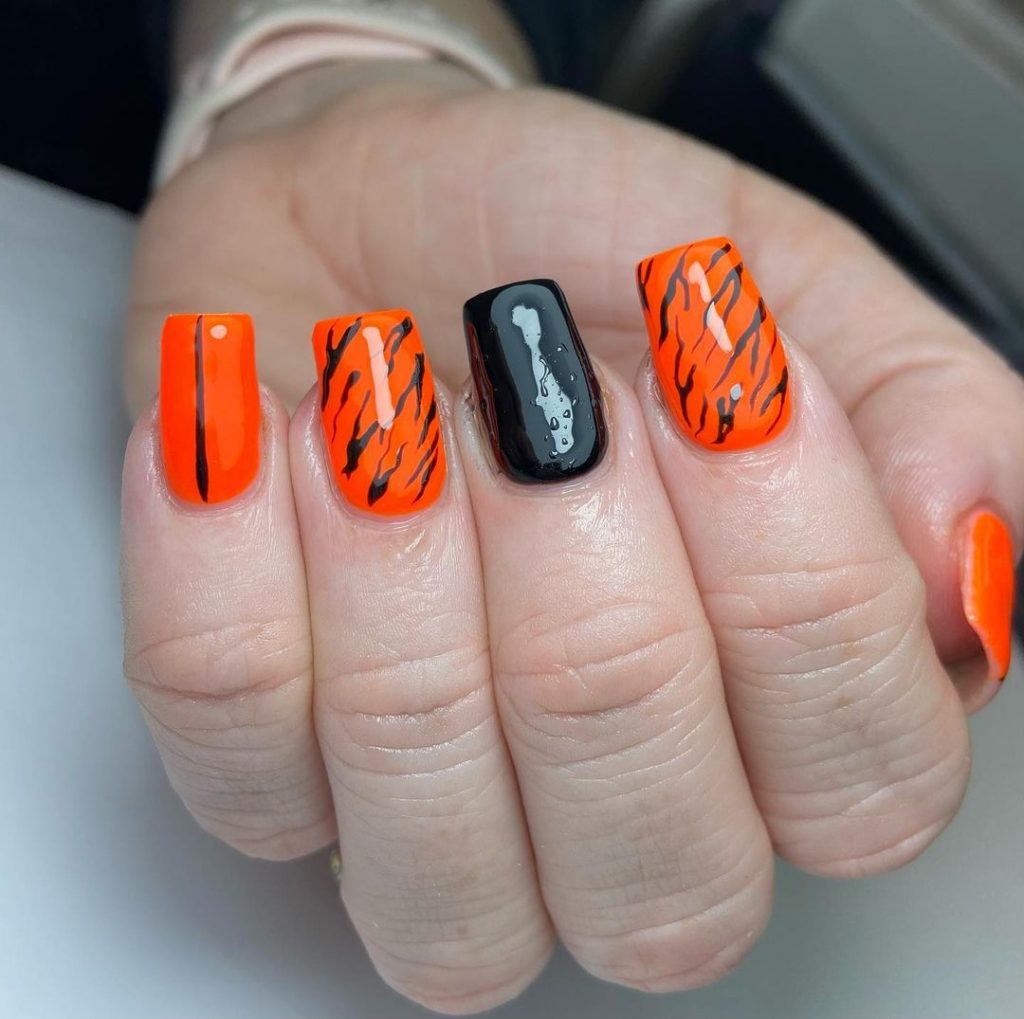
Halloween Vibes Nails
Get into the Halloween spirit with these bold orange and black nails. The short square shape keeps the look practical, while the tiger stripe accents add a playful twist. This design is perfect for adding a festive touch to your autumn look.
Consumables:
- Orange nail polish: OPI “A Good Man-darin is Hard to Find”
- Black nail polish: Essie “Licorice”
- Black nail art pen: Sally Hansen I Heart Nail Art Pen
- Clear top coat: Seche Vite Dry Fast Top Coat
High-quality orange and black polishes ensure vibrant and lasting colors. The black nail art pen is essential for creating detailed tiger stripes.
How to Create at Home:
- Apply a base coat to protect your nails.
- Paint all nails with two coats of orange polish.
- Use the black polish for accent nails and the black nail art pen to create tiger stripes.
- Finish with a clear top coat to seal the design and add shine.
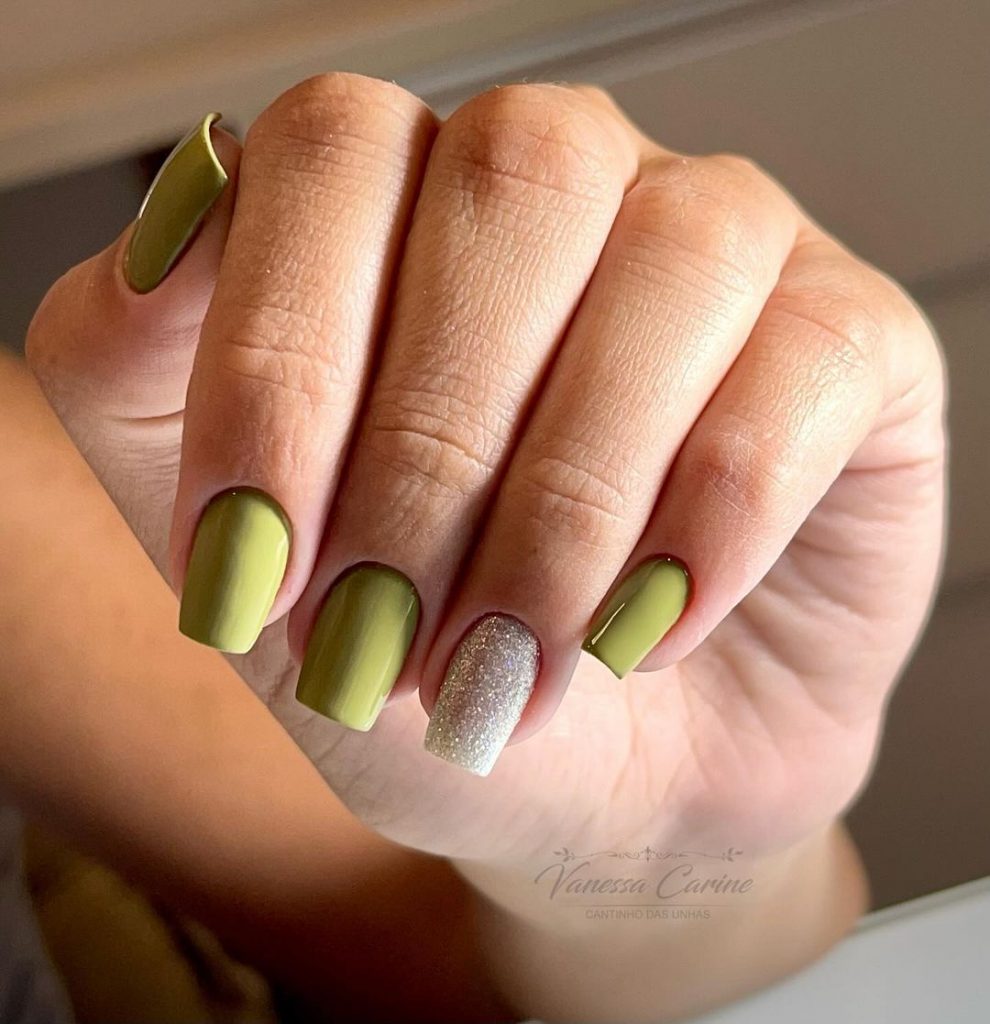
Minimalist Olive Green Nails
These olive green nails are perfect for a minimalist yet chic look this fall. The short square shape is both practical and stylish, while the glitter accent nail adds just the right amount of sparkle. This design seamlessly combines elegance with simplicity.
Consumables:
- Olive green nail polish: OPI “Suzi – The First Lady of Nails”
- Silver glitter polish: China Glaze “Fairy Dust”
- Clear top coat: Seche Vite Dry Fast Top Coat
Opt for a high-quality olive green polish to ensure a smooth, even application. The glitter polish on the accent nail adds a touch of glam without overwhelming the overall look.
How to Create at Home:
- Start with a base coat to protect your nails.
- Apply two coats of the olive green polish on all nails except the accent nail.
- On the accent nail, apply two coats of the silver glitter polish.
- Seal everything with a clear top coat to add shine and durability.
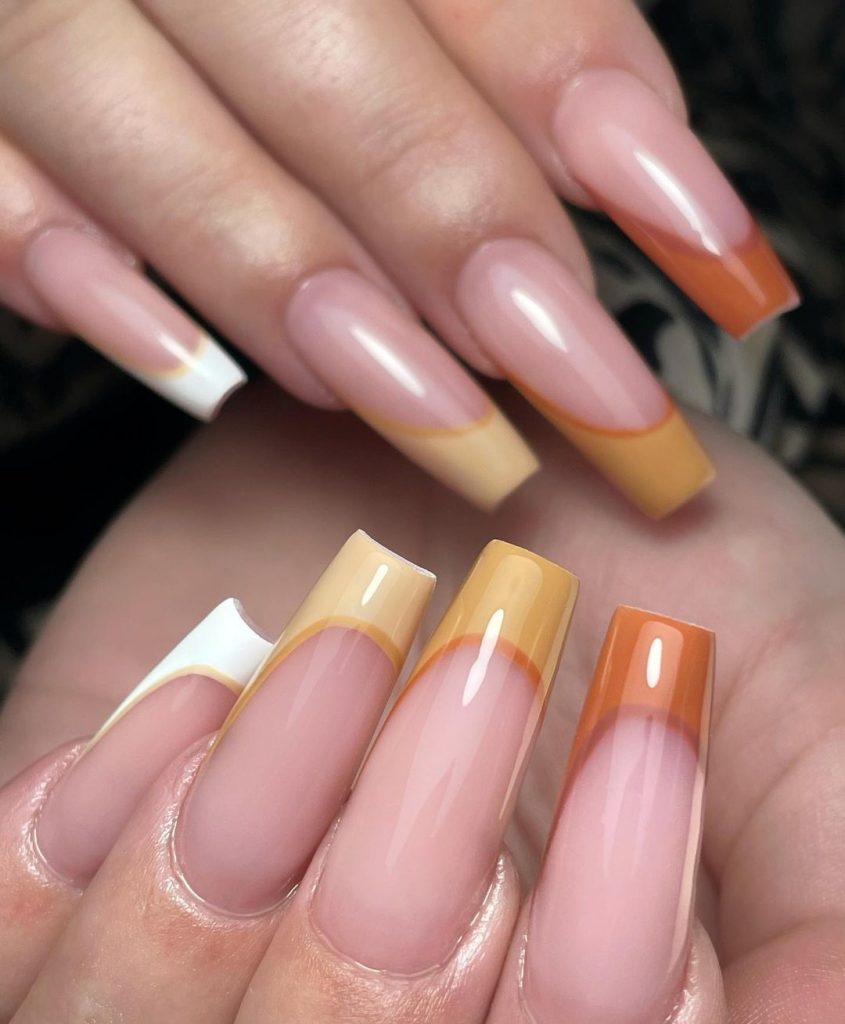
Autumn Ombre French Tips
These long coffin-shaped nails feature an elegant ombre French tip design. The gradient transitions from a soft nude base to warm autumn tones, creating a sophisticated look that is perfect for the season.
Consumables:
- Nude nail polish: Essie “Mademoiselle”
- Orange nail polish: OPI “It’s a Piazza Cake”
- Yellow nail polish: OPI “Sun, Sea, and Sand in My Pants”
- White nail polish: Essie “Blanc”
- Clear top coat: Seche Vite Dry Fast Top Coat
For a flawless gradient, use high-quality polishes. The long coffin shape adds length and elegance to this fall-inspired design.
How to Create at Home:
- Apply a base coat to protect your nails.
- Paint all nails with a nude base color.
- Using a makeup sponge, dab the autumn colors onto the tips to create the ombre effect.
- Clean up any excess polish around the nails with a brush dipped in nail polish remover.
- Finish with a clear top coat to blend the colors and add shine.
Cozy Sweater Nails
These cozy sweater nails are perfect for fall, featuring a matte finish and textured designs that mimic the look of knitwear. The earthy tones and intricate patterns add a warm, comforting vibe to your nails.
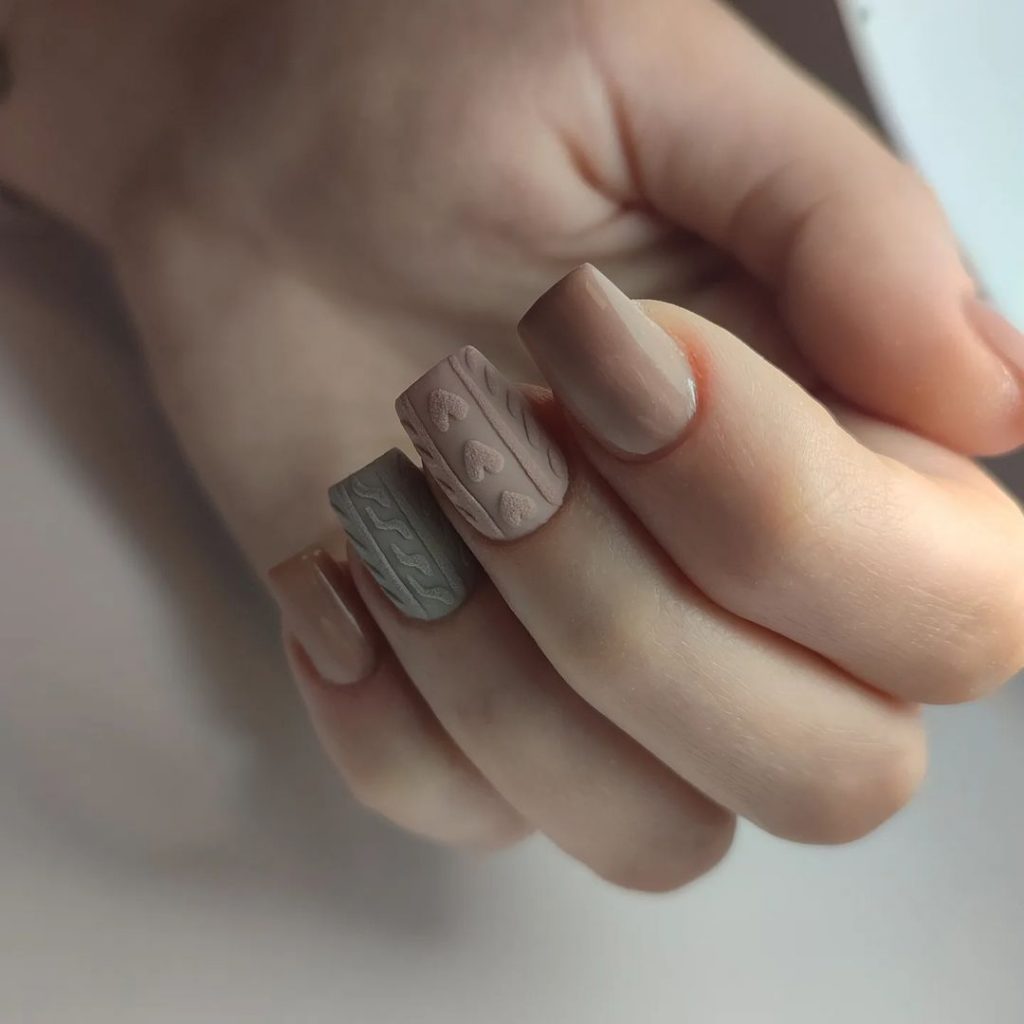
Consumables:
- Nude nail polish: Zoya “Chantal”
- Grey nail polish: OPI “I Can Never Hut Up”
- Matte top coat: OPI Matte Top Coat
Choosing matte polishes and textured patterns creates a unique, cozy look that’s ideal for autumn.
How to Create at Home:
- Apply a base coat to protect your nails.
- Paint your nails with the nude polish, alternating with grey on the accent nails.
- Use a thin brush to create textured patterns on the accent nails, resembling knitwear.
- Seal with a matte top coat for a soft, velvety finish.
Autumn Berry Nails
Capture the essence of fall with these beautiful autumn berry nails. The rich red color paired with delicate branch designs on the accent nails creates a look that’s both seasonal and sophisticated.
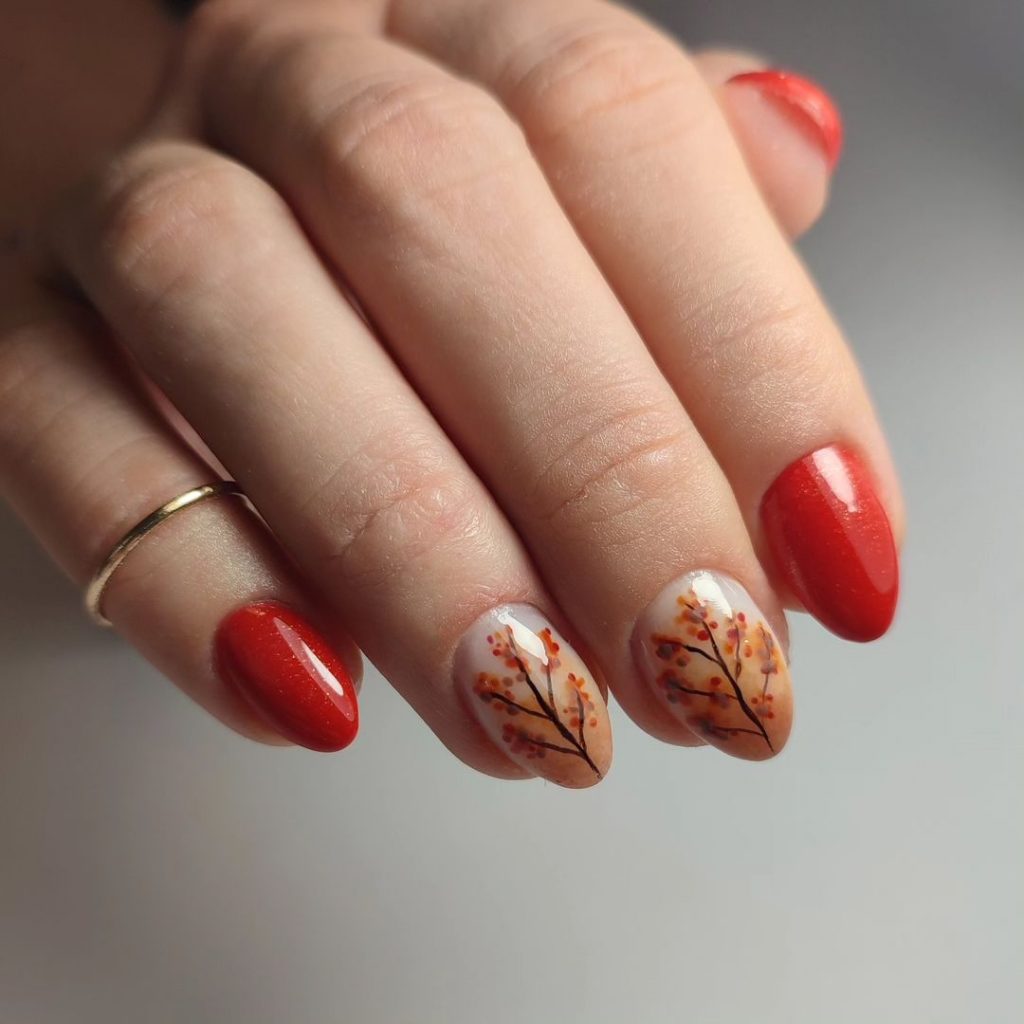
Consumables:
- Red nail polish: Essie “Forever Yummy”
- White nail polish: Essie “Blanc”
- Black nail art pen: Sally Hansen I Heart Nail Art Pen
- Clear top coat: Seche Vite Dry Fast Top Coat
A rich red polish ensures vibrant and even coverage. The black nail art pen is ideal for creating intricate branch designs.
How to Create at Home:
- Start with a base coat to protect your nails.
- Apply two coats of the red polish on all nails except the accent nails.
- On the accent nails, use the white polish as a base, then draw branches with the black nail art pen.
- Finish with a clear top coat to seal the design and add shine.
Minimalist Branch Nails
These minimalist branch nails are perfect for those who prefer a subtle and elegant look. The transparent base with delicate black branch designs creates a clean and sophisticated aesthetic.
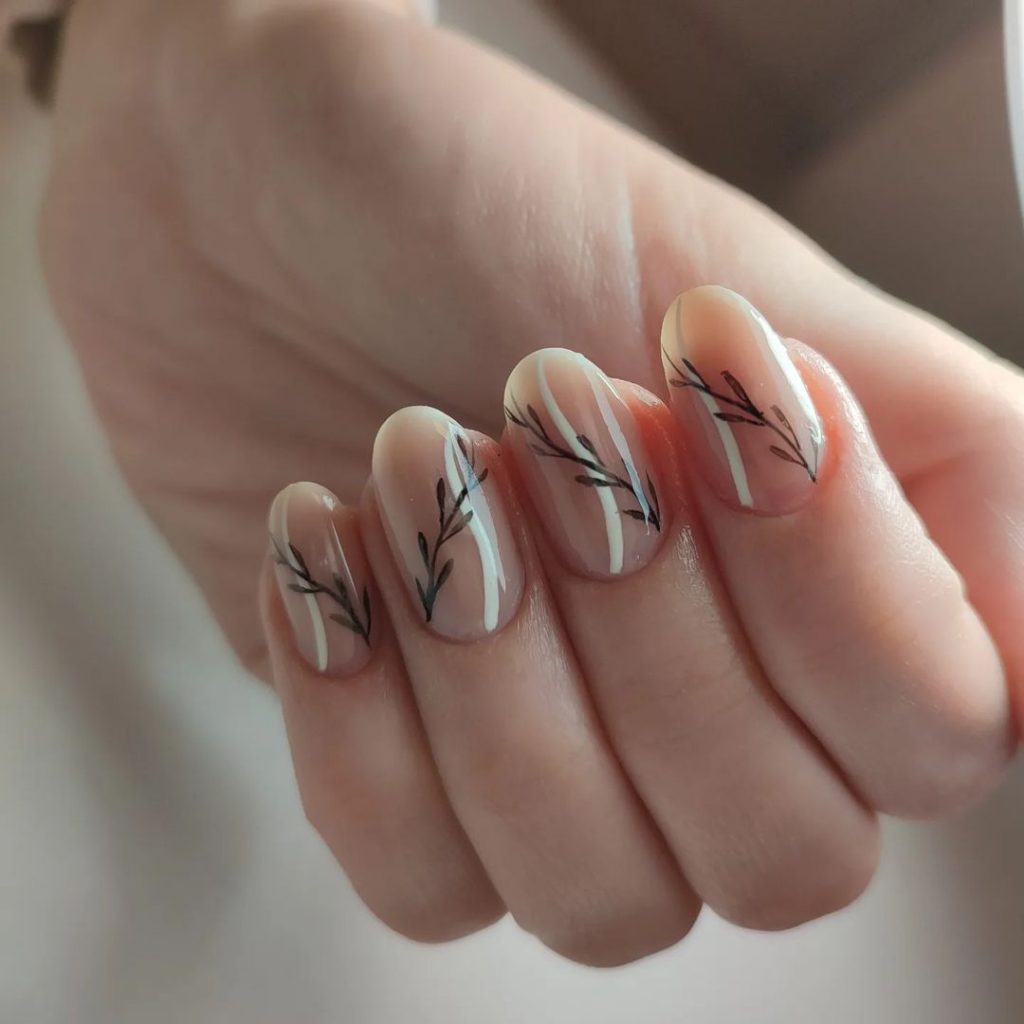
Consumables:
- Clear base coat: Orly Bonder
- Black nail art pen: Sally Hansen I Heart Nail Art Pen
- Clear top coat: Seche Vite Dry Fast Top Coat
Using a clear base coat and a precise black nail art pen ensures a clean and elegant design. The clear top coat adds shine and protects the artwork.
How to Create at Home:
- Apply a clear base coat to your nails.
- Use the black nail art pen to draw delicate branch designs on each nail.
- Finish with a clear top coat to seal the design and add a glossy finish.
Radiant Purple Nails
These radiant purple nails are bold and eye-catching. The almond shape adds a touch of elegance, while the glossy finish enhances the rich purple color, making it a standout choice for the fall season.
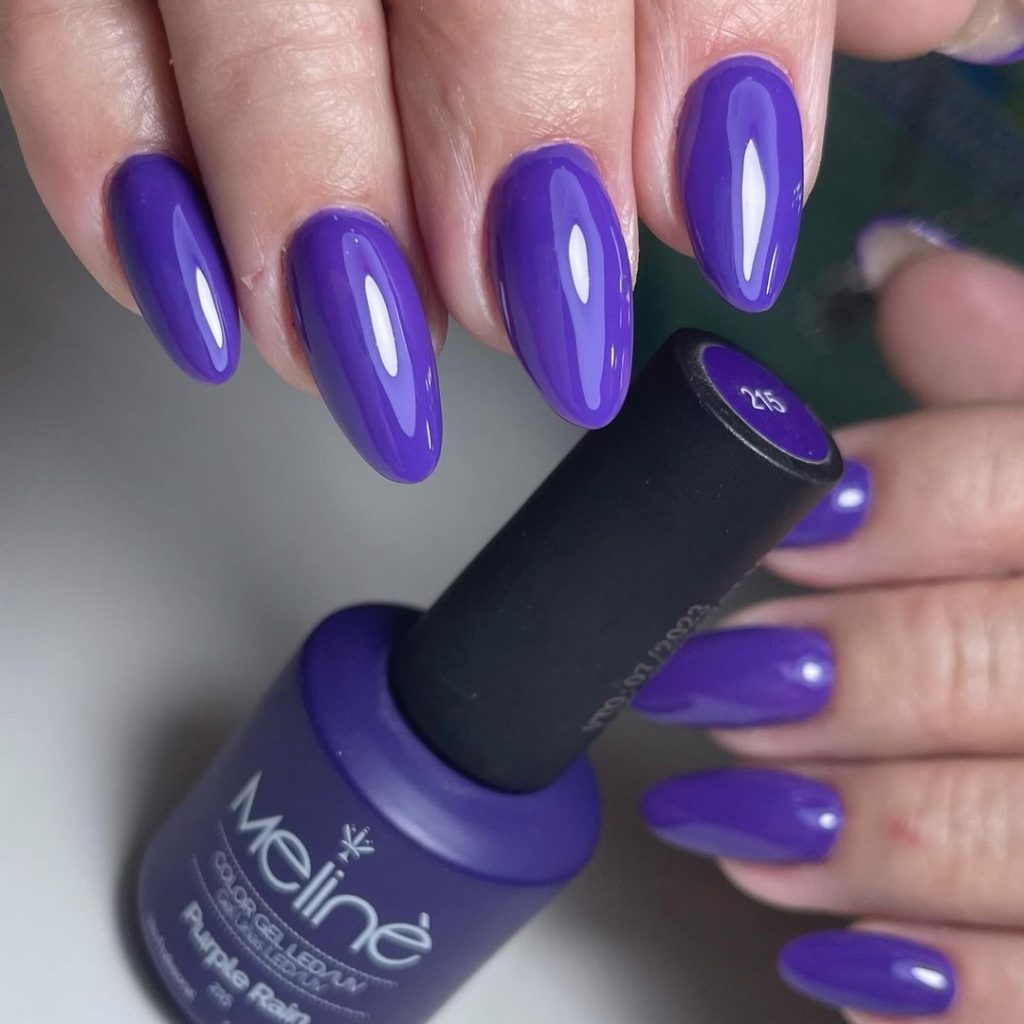
Consumables:
- Purple nail polish: Meline “Purple Rain”
- Clear top coat: Seche Vite Dry Fast Top Coat
Opt for a high-quality purple polish to ensure a smooth, even application. The glossy top coat adds shine and durability to the manicure.
How to Create at Home:
- Start with a base coat to protect your nails.
- Apply two coats of the purple nail polish for a vibrant finish.
- Seal with a clear top coat to enhance shine and protect the color.
Classic French Tips
These classic French tips are timeless and elegant. The long coffin shape adds sophistication, while the crisp white tips provide a clean and polished look. This design is perfect for any occasion, from casual to formal.
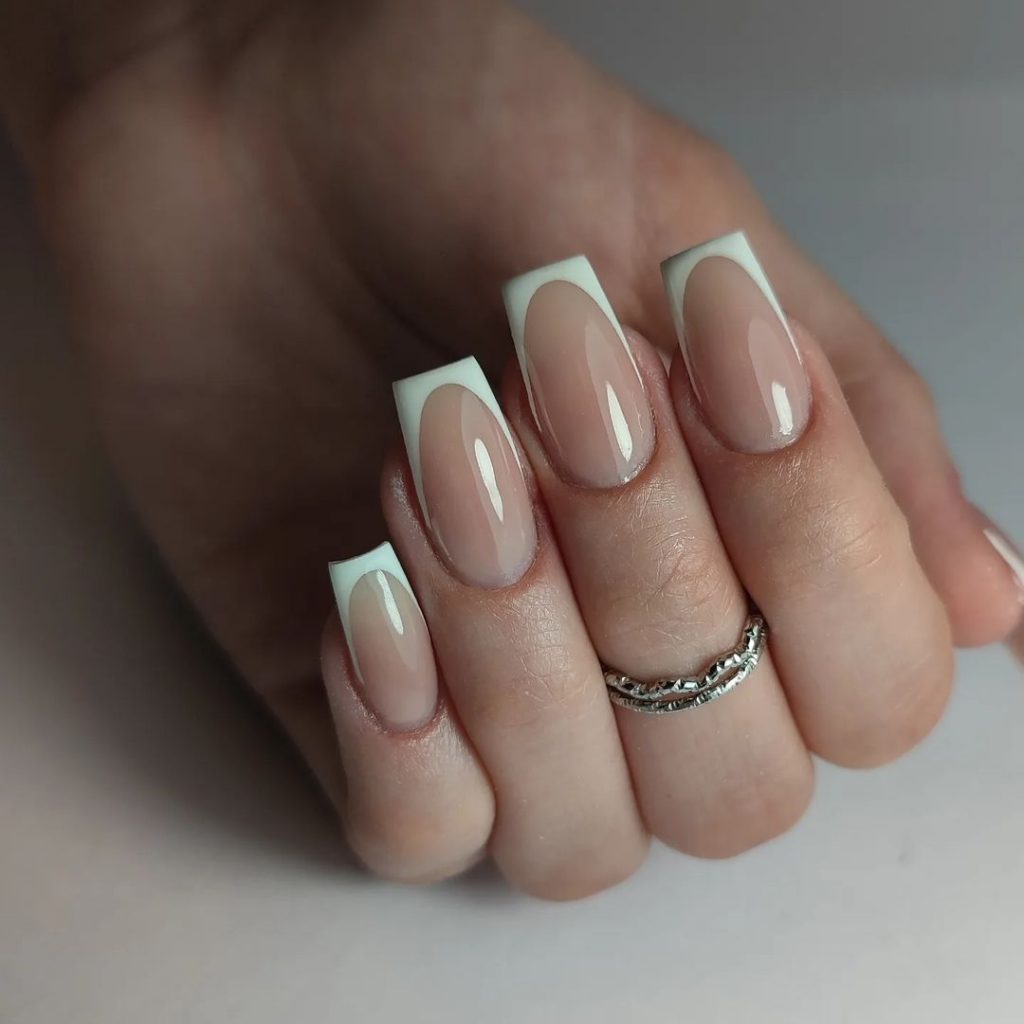
Consumables:
- Nude nail polish: Essie “Mademoiselle”
- White nail polish: Essie “Blanc”
- Clear top coat: Seche Vite Dry Fast Top Coat
Using high-quality polishes ensures a smooth application and a lasting finish. The clear top coat helps to protect the French tips and keep them looking fresh.
How to Create at Home:
- Apply a base coat to protect your nails.
- Paint all nails with a nude base color.
- Carefully paint the tips of your nails with white polish to create the French tip look.
- Finish with a clear top coat to seal the design and add shine.
Iridescent Magic Nails
These iridescent nails are mesmerizing and perfect for adding a touch of magic to your fall look. The almond shape complements the shimmering, multi-tonal polish, making your nails look like they belong in a fairytale.
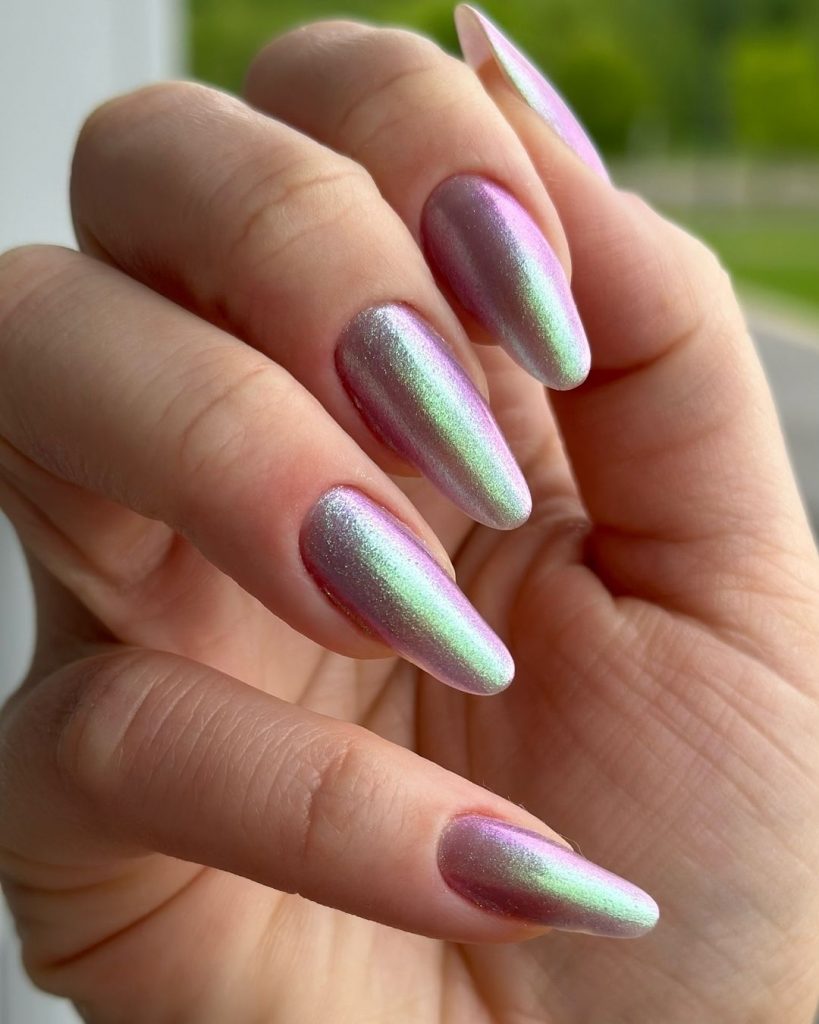
Consumables:
- Iridescent nail polish: ILNP “Reminisce”
- Clear top coat: Seche Vite Dry Fast Top Coat
Choose a high-quality iridescent polish to achieve a stunning, multi-dimensional effect. The clear top coat enhances the shine and extends the wear time of your manicure.
How to Create at Home:
- Apply a base coat to protect your nails.
- Apply two coats of the iridescent nail polish for a shimmering effect.
- Finish with a clear top coat to add shine and protection.
Bold Red Nails
These bold red nails are perfect for making a statement this fall. The short square shape keeps the look practical yet stylish, while the glossy red polish adds a touch of drama and sophistication.
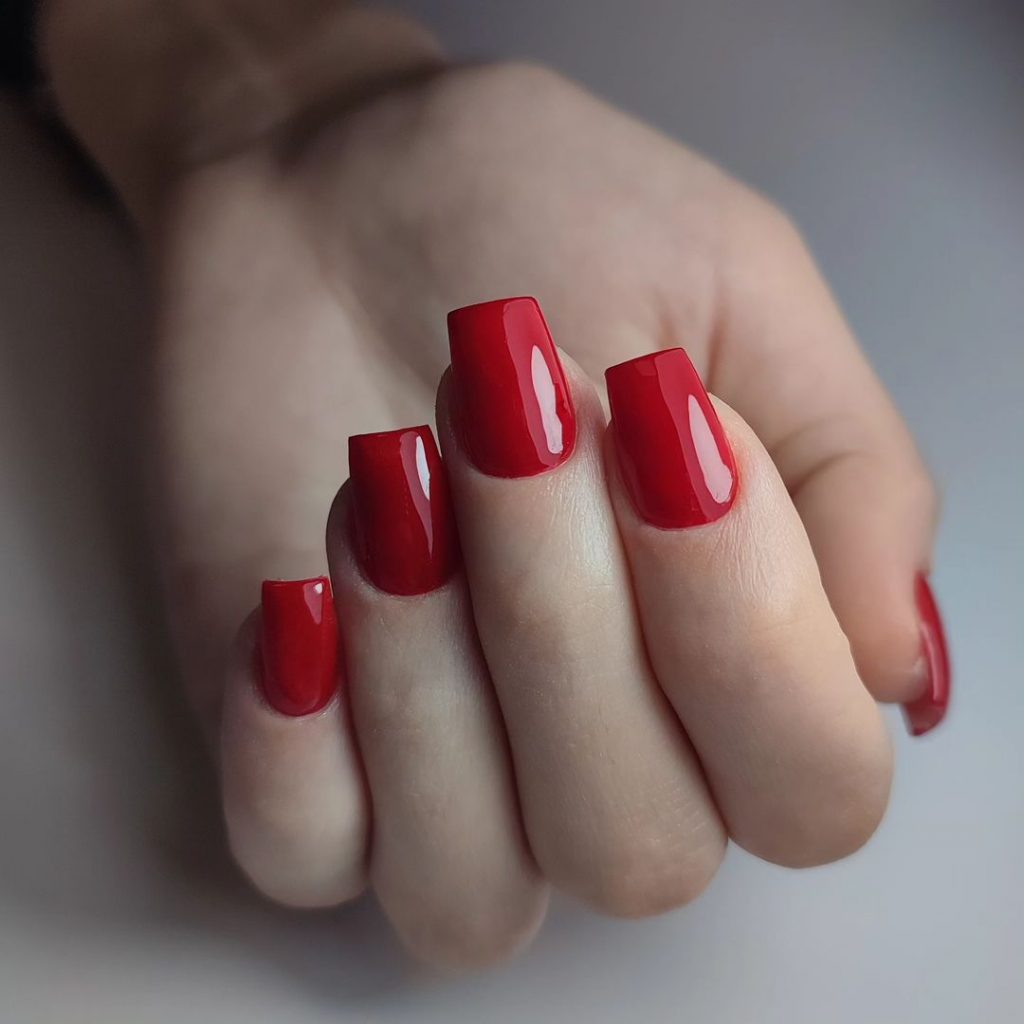
Consumables:
- Red nail polish: Essie “Forever Yummy”
- Clear top coat: Seche Vite Dry Fast Top Coat
Using a high-quality red polish ensures vibrant and even coverage. The clear top coat adds shine and helps to protect the color from chipping.
How to Create at Home:
- Start with a base coat to protect your nails.
- Apply two coats of the red nail polish for a bold, even finish.
- Seal with a clear top coat to enhance shine and durability.
Elegant Black and White Nails
These elegant black and white nails are chic and sophisticated. The short square shape is practical, while the black and white color scheme adds a modern touch. The accent nail with a wavy black design on a white base provides a unique twist.
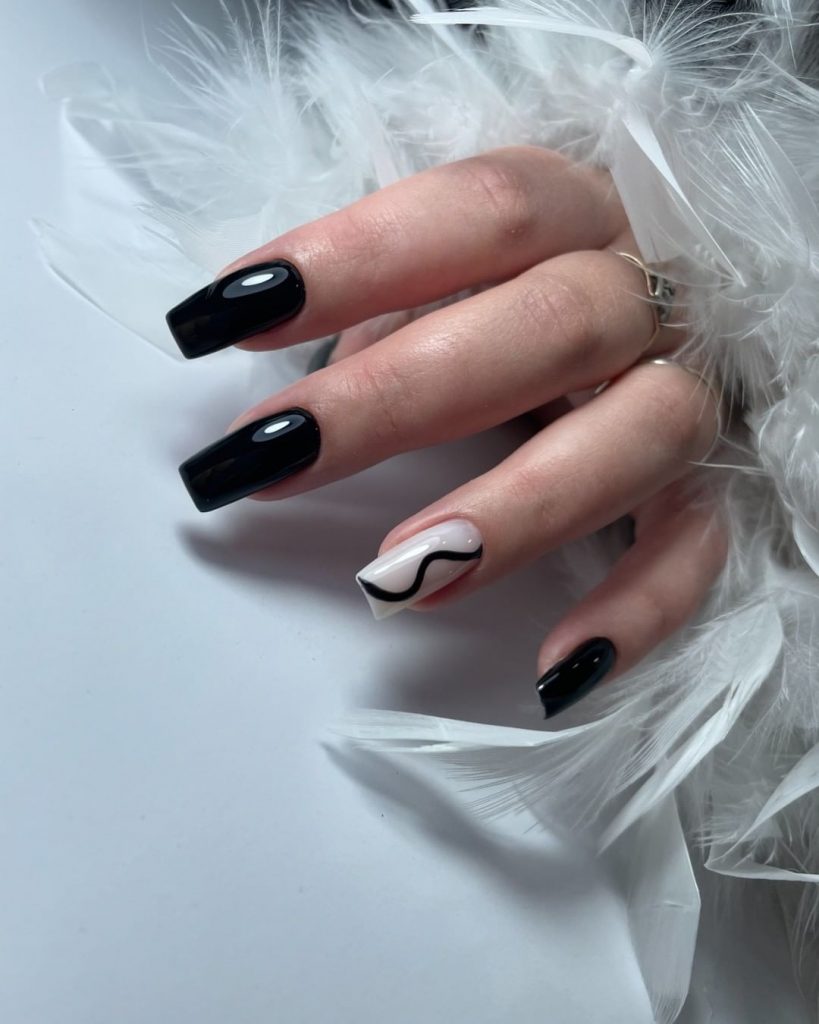
Consumables:
- Black nail polish: Essie “Licorice”
- White nail polish: OPI “Alpine Snow”
- Black nail art pen: Sally Hansen I Heart Nail Art Pen
- Clear top coat: Seche Vite Dry Fast Top Coat
High-quality black and white polishes ensure a smooth application and lasting wear. The black nail art pen is perfect for creating precise designs on the accent nail.
How to Create at Home:
- Apply a base coat to protect your nails.
- Paint your nails with two coats of the black polish, except for the accent nail.
- On the accent nail, apply two coats of the white polish and use the black nail art pen to draw a wavy design.
- Finish with a clear top coat to seal the design and add shine.
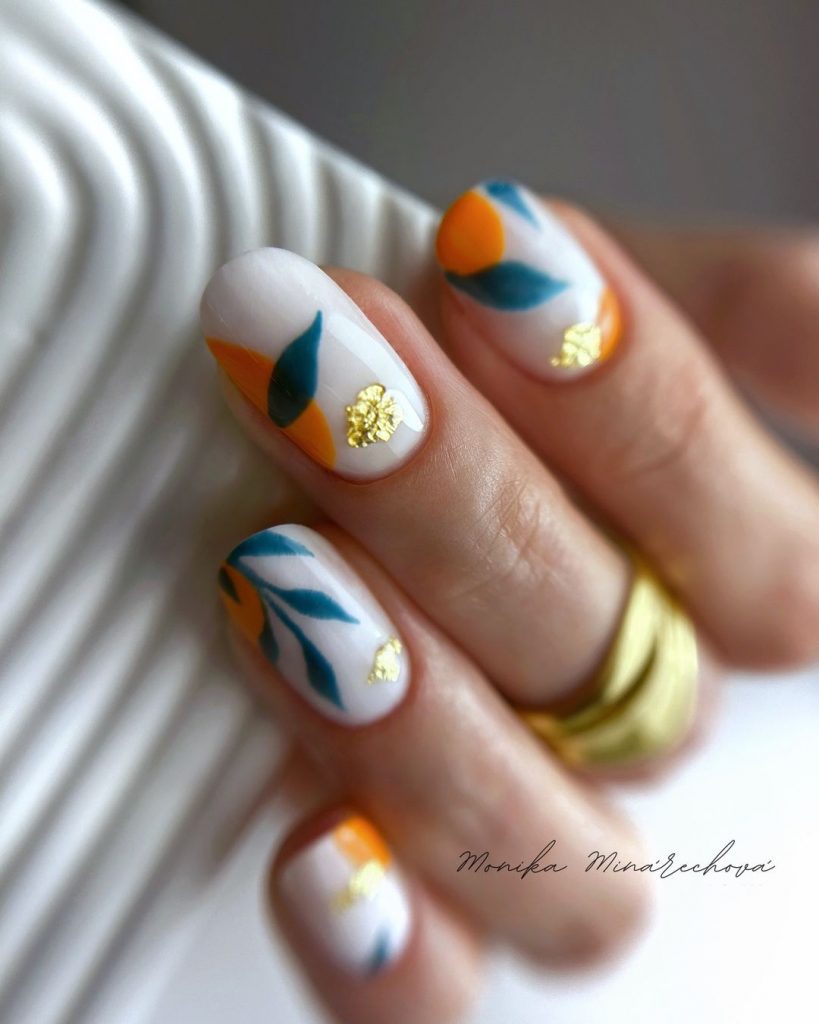
Colorful Leafy Nails
These colorful leafy nails are a vibrant and playful design that stands out beautifully. The almond shape is both elegant and practical, making it easy to maintain. The mix of orange, green, and gold accents on a white base creates a fresh, autumnal look perfect for the fall season.
Consumables:
- White nail polish: OPI “Alpine Snow”
- Orange nail polish: Essie “Tart Deco”
- Green nail polish: Zoya “Honor”
- Gold foil: Nail Art Gold Foil
- Clear top coat: Seche Vite Dry Fast Top Coat
Using high-quality polishes ensures smooth application and durability. The gold foil adds a touch of luxury, while the green and orange colors bring a playful, seasonal twist.
How to Create at Home:
- Apply a base coat to protect your nails.
- Paint your nails with two coats of the white polish.
- Use a thin brush to paint the orange and green leaf designs.
- Apply small pieces of gold foil to accent the design.
- Finish with a clear top coat to seal the design and add shine.
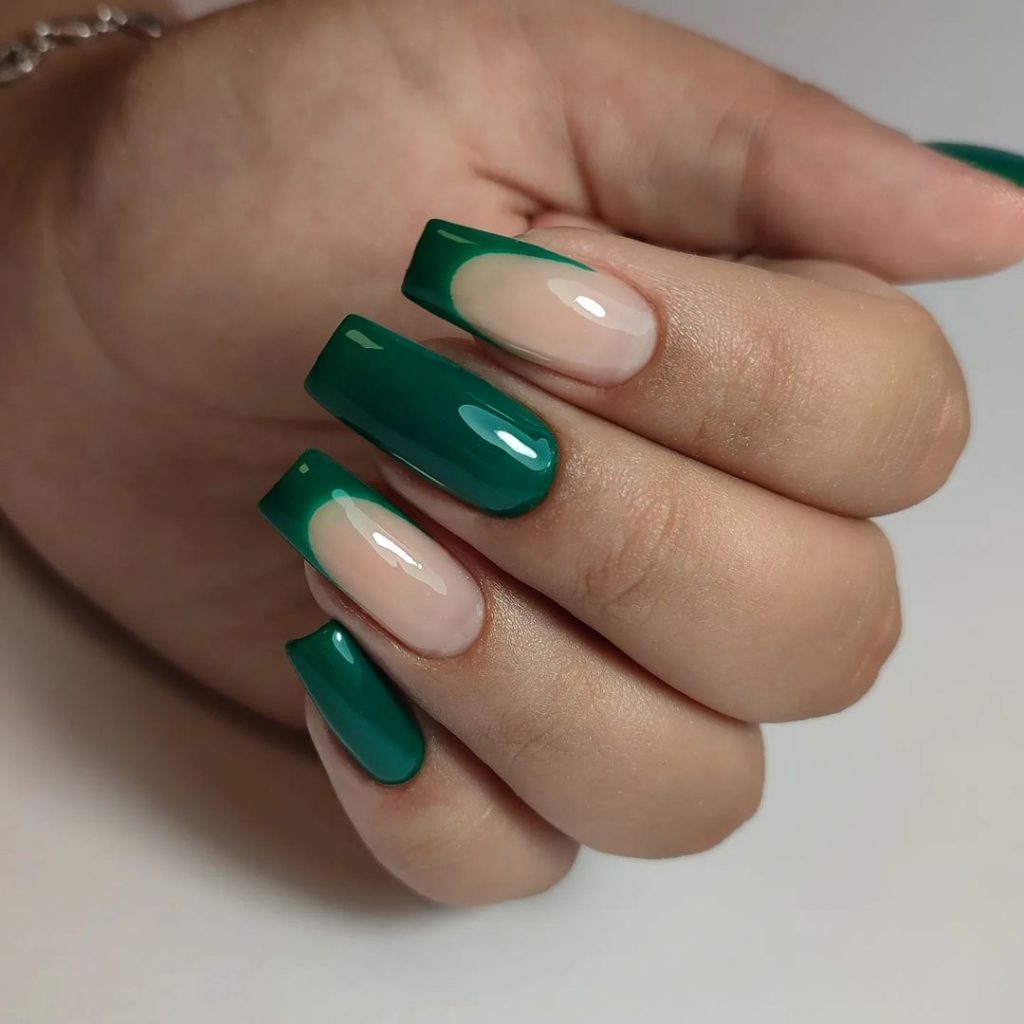
Deep Green French Tips
These deep green French tips are both bold and sophisticated. The long coffin shape is striking, and the deep green tips provide a modern twist on the classic French manicure. This design is perfect for making a statement while maintaining a touch of elegance.
Consumables:
- Nude base polish: Essie “Topless & Barefoot”
- Green nail polish: OPI “Stay Off the Lawn”
- Clear top coat: Seche Vite Dry Fast Top Coat
Using a nude base helps the green tips stand out, creating a striking contrast. The clear top coat ensures a glossy finish and long-lasting wear.
How to Create at Home:
- Apply a base coat to protect your nails.
- Paint your nails with two coats of the nude base polish.
- Use a fine brush to create the green French tips.
- Finish with a clear top coat to seal the design and add shine.
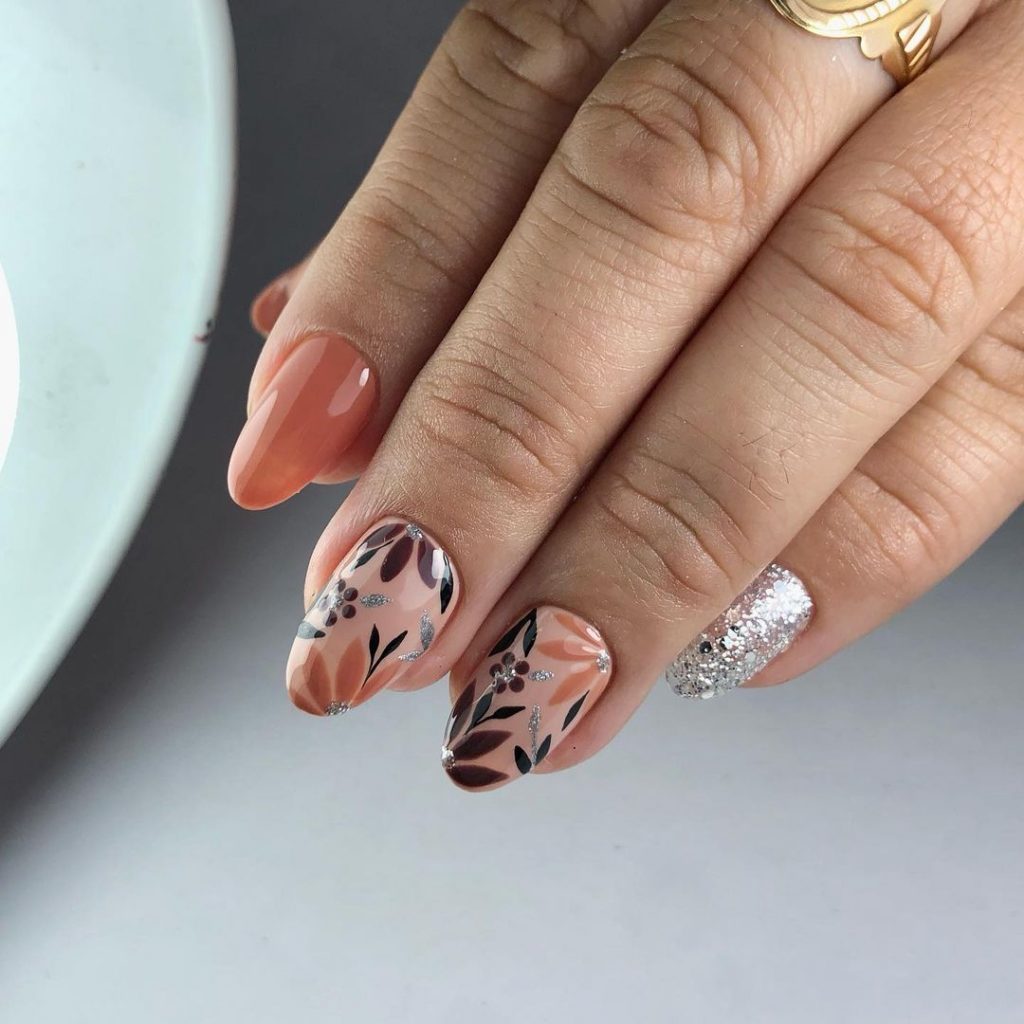
Autumn Floral Nails
These autumn floral nails combine warm, earthy tones with intricate floral designs. The oval shape is flattering and easy to manage, making this design both beautiful and practical. The mix of peach, brown, and silver accents creates a lovely, seasonal look.
Consumables:
- Peach nail polish: OPI “Crawfishin’ for a Compliment”
- Brown nail polish: Essie “Partner in Crime”
- Silver glitter polish: Zoya “Trixie”
- Clear top coat: Seche Vite Dry Fast Top Coat
The high-quality polishes ensure smooth application and durability. The floral designs add a delicate touch, while the silver glitter provides a hint of sparkle.
How to Create at Home:
- Apply a base coat to protect your nails.
- Paint your nails with two coats of the peach polish.
- Use a fine brush to paint the brown floral designs.
- Add silver glitter accents to the floral designs.
- Finish with a clear top coat to seal the design and add shine.
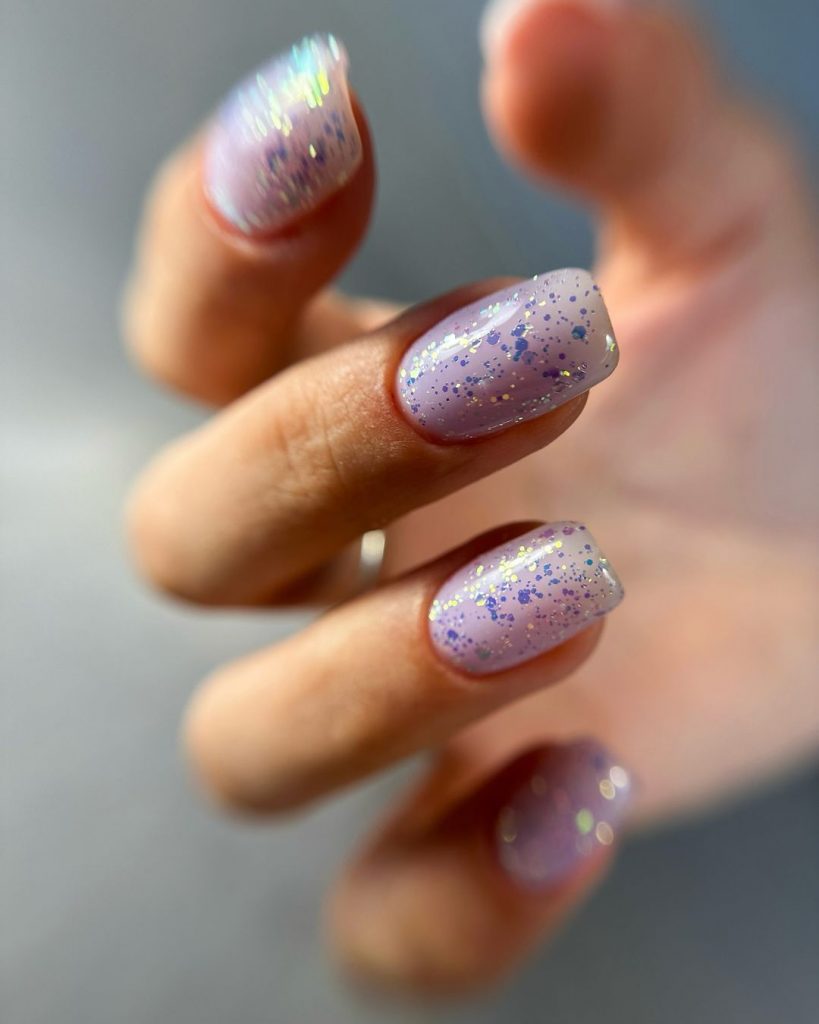
Sparkling Lavender Nails
These sparkling lavender nails are both whimsical and elegant. The short square shape is practical, while the lavender color with holographic glitter adds a magical touch. This design is perfect for those who want a subtle yet eye-catching look.
Consumables:
- Lavender nail polish: Essie “Lilacism”
- Holographic glitter polish: China Glaze “Fairy Dust”
- Clear top coat: Seche Vite Dry Fast Top Coat
Using high-quality polishes ensures smooth application and lasting wear. The holographic glitter adds a playful and enchanting effect.
How to Create at Home:
- Apply a base coat to protect your nails.
- Paint your nails with two coats of the lavender polish.
- Apply the holographic glitter polish over the lavender.
- Finish with a clear top coat to seal the design and add shine.
Black French Tips with Silver Accents
These black French tips with silver accents are a modern twist on a classic design. The almond shape is elegant and elongates the fingers, while the black tips with silver accents add a touch of sophistication. This design is perfect for those who love a chic and edgy look.
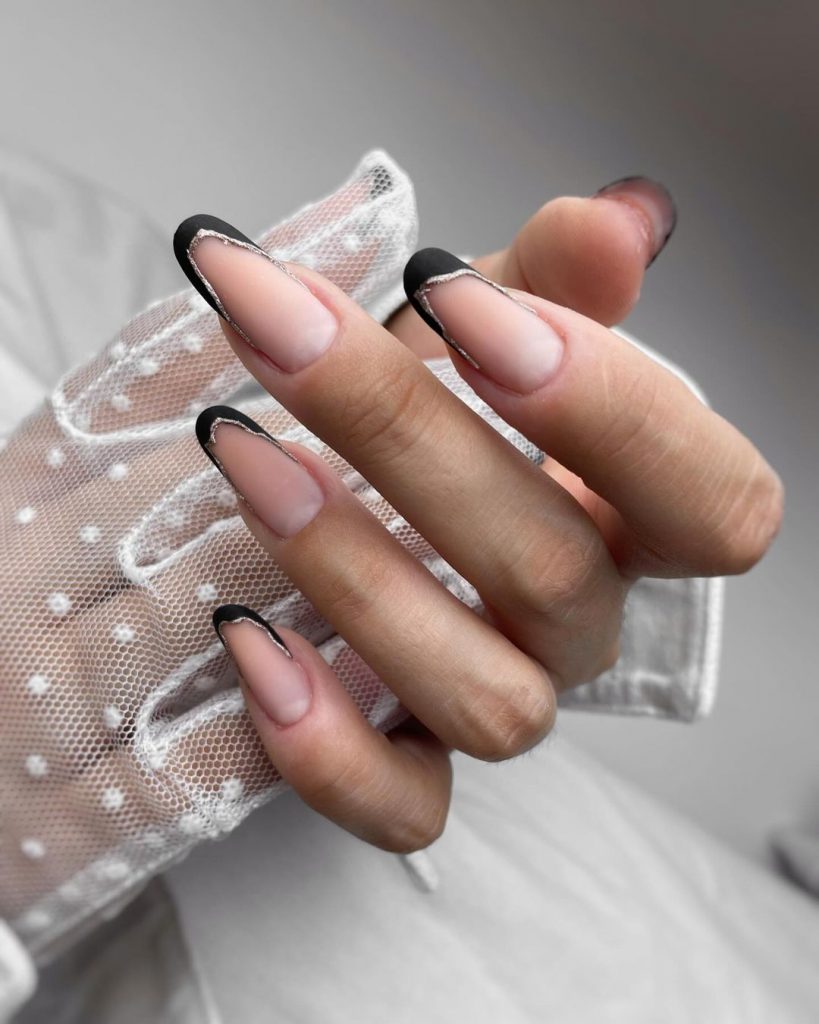
Consumables:
- Nude base polish: OPI “Bubble Bath”
- Black nail polish: Essie “Licorice”
- Silver nail art pen: Sally Hansen I Heart Nail Art Pen
- Clear top coat: Seche Vite Dry Fast Top Coat
The combination of nude and black polishes creates a striking contrast, while the silver accents add a touch of glamour. High-quality products ensure a smooth application and long-lasting wear.
How to Create at Home:
- Apply a base coat to protect your nails.
- Paint your nails with two coats of the nude base polish.
- Use a fine brush to create the black French tips.
- Add silver accents with the nail art pen.
- Finish with a clear top coat to seal the design and add shine.
Save Pin