As the leaves turn and the air gets crisp, it’s the perfect time to switch up your nail game with some fall pumpkin nails. Whether you’re looking for cute and simple designs or something more intricate for Halloween or Thanksgiving, we’ve got you covered. Let’s dive into some fabulous nail art ideas that are sure to make a statement this autumn.
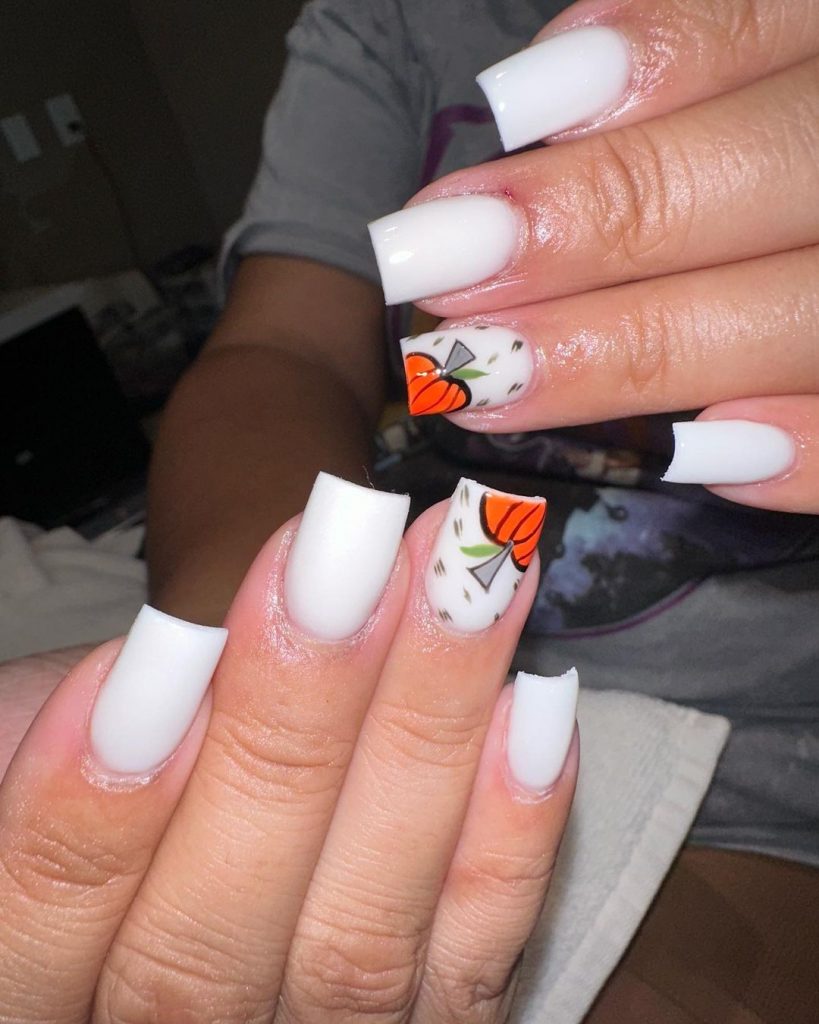
Pumpkin Patch Magic
These nails beautifully capture the essence of fall with a clean, white base and charming pumpkin accents. The matte finish gives them a neutral and classy look, perfect for any autumn occasion. The orange pumpkins add a pop of color, making this design both subtle and eye-catching. The square nail shape is ideal for showcasing this cute and simple art.
Consumables Needed
- White matte nail polish (e.g., OPI Alpine Snow)
- Orange nail polish (e.g., Essie Fall For NYC)
- Green nail polish for stem details (e.g., Sally Hansen Xtreme Wear in Green Thumb)
- Matte top coat (e.g., Revlon Matte Top Coat)
- Nail art brush for detailing
How to Create This Look at Home
- Start with a white matte base coat on all nails.
- Using an orange polish, paint small pumpkin shapes on accent nails.
- Add green stems using a fine nail art brush.
- Finish with a matte top coat to seal the design and give it a sophisticated finish.
Autumn Elegance
These fall pumpkin nails feature a delicate pink base with intricate pumpkin and vine designs. The almond shape adds elegance and length to the nails, while the gold foil accents bring a touch of glamour. This design is perfect for those who want a cute yet sophisticated look for the season.
Consumables Needed
- Light pink nail polish (e.g., Essie Ballet Slippers)
- Orange and grey nail polishes for pumpkins (e.g., Essie Fall For NYC and Zoya Dove)
- Gold foil flakes
- Clear top coat (e.g., Seche Vite Dry Fast Top Coat)
- Nail art brushes for detailing
How to Create This Look at Home
- Apply a light pink base coat to all nails.
- Paint pumpkins using orange and grey polishes, adding vine details with a fine brush.
- Apply gold foil flakes randomly on the nails for added shine.
- Seal the design with a clear top coat to keep everything in place.
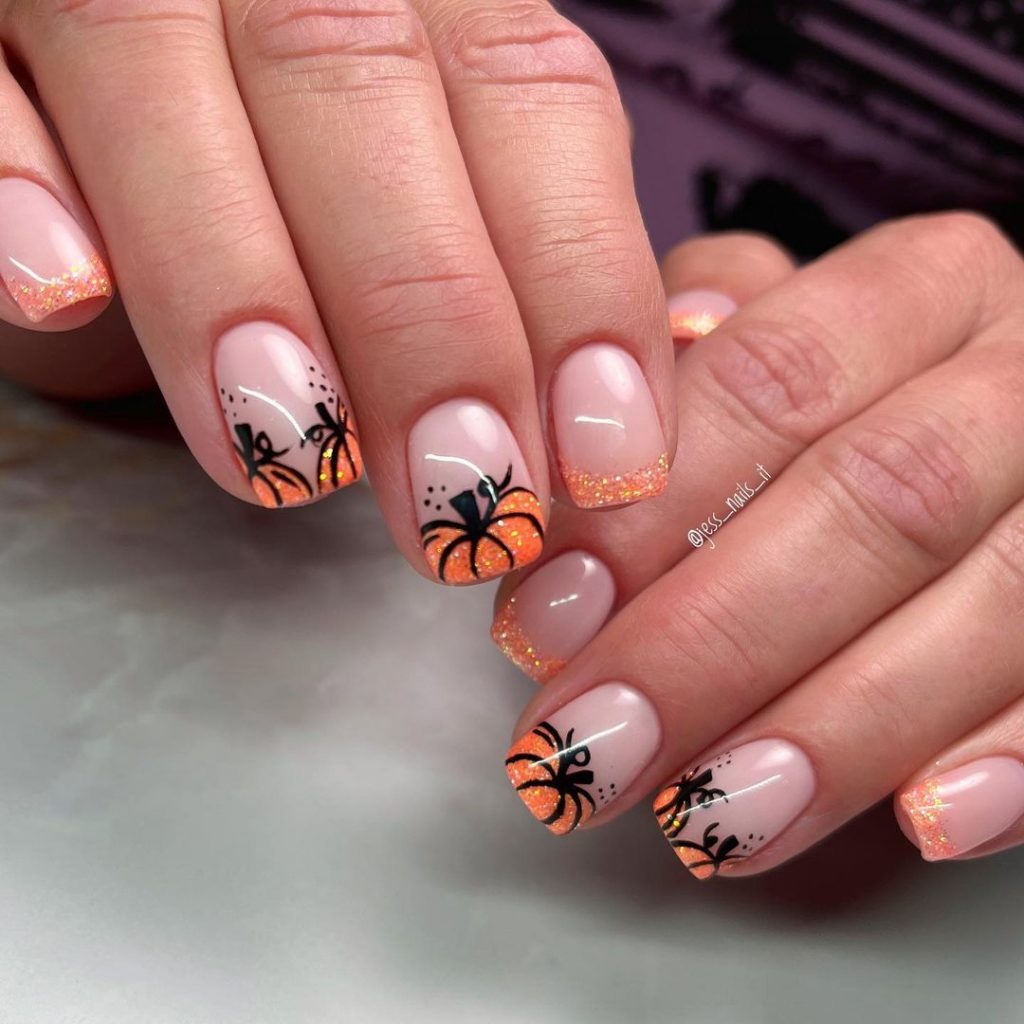
Glittery Pumpkin Fun
This nail design combines a subtle nude base with sparkling orange glitter tips and black pumpkin silhouettes. The short, square shape keeps the look cute and practical, while the glitter adds a festive touch perfect for Halloween or any fall celebration.
Consumables Needed
- Nude nail polish (e.g., Zoya Avery)
- Orange glitter polish (e.g., China Glaze Orange You Hot?)
- Black nail polish for pumpkin silhouettes (e.g., OPI Black Onyx)
- Clear top coat (e.g., Essie Gel Setter Top Coat)
- Nail art brushes for detailing
How to Create This Look at Home
- Start with a nude base coat on all nails.
- Apply orange glitter polish to the tips, creating a French manicure effect.
- Use black polish to paint small pumpkin silhouettes on accent nails.
- Finish with a clear top coat to protect the design and add shine.
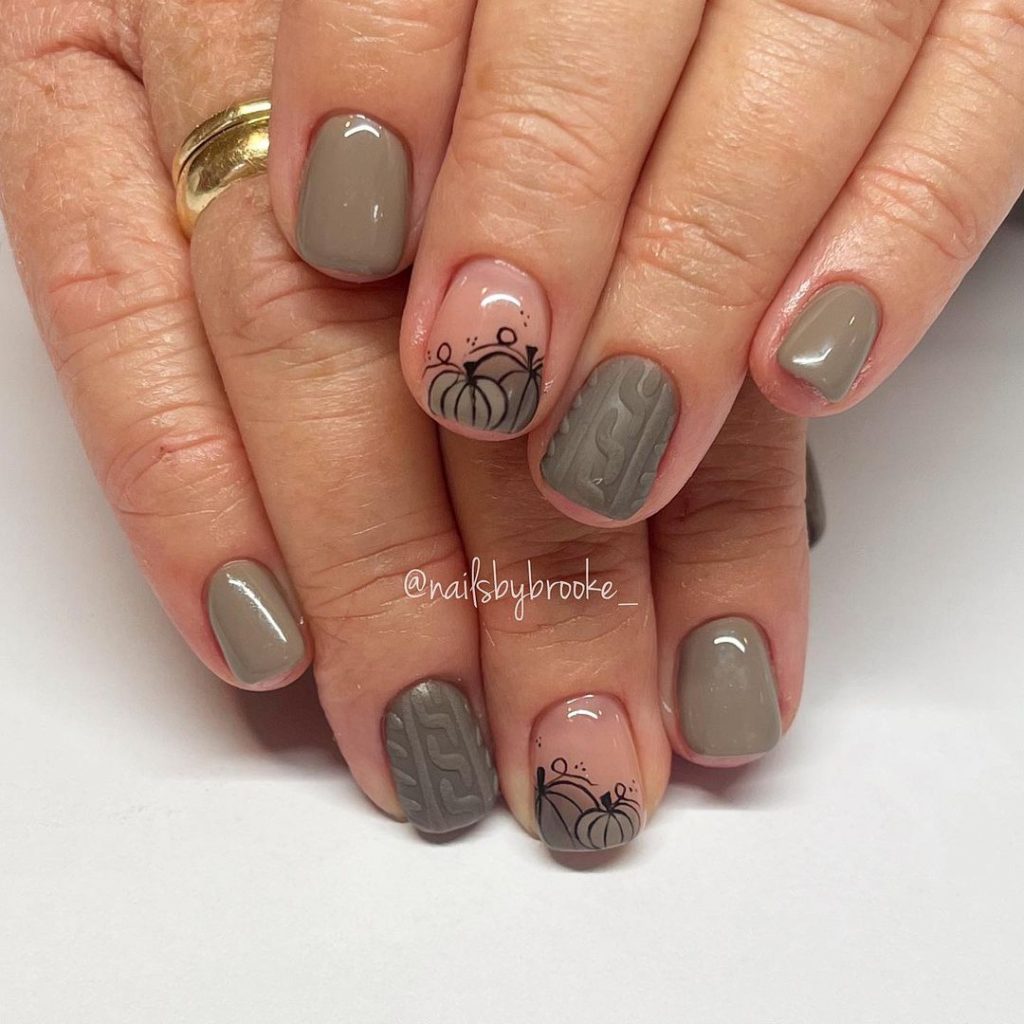
Cozy Autumn Vibes
These nails showcase a cozy and classy design with a taupe base and cute pumpkin art. The knitted sweater effect on some nails adds texture, while the short length makes this a practical and versatile choice for everyday wear.
Consumables Needed
- Taupe nail polish (e.g., OPI Taupe-less Beach)
- Black nail polish for pumpkin art (e.g., Essie Licorice)
- Matte top coat (e.g., Sally Hansen Big Matte Top Coat)
- Nail art brushes for detailing
- Stamping tools for the knitted effect
How to Create This Look at Home
- Apply a taupe base coat to all nails.
- Use black polish to create pumpkin designs on accent nails.
- Apply the knitted sweater effect using stamping tools on selected nails.
- Finish with a matte top coat to complete the cozy look.
Pumpkin Parade
This design features a playful array of small pumpkins on a nude base, perfect for those who love detailed and intricate nail art. The almond shape enhances the elegance and length of the nails, making this design ideal for both casual and festive occasions.

Consumables Needed
- Nude nail polish (e.g., Butter London Steady On)
- Orange nail polish for pumpkins (e.g., OPI A Good Man-darin is Hard to Find)
- Black and brown polishes for detailing (e.g., Essie Licorice and OPI Espresso Your Inner Self)
- Clear top coat (e.g., Seche Vite Dry Fast Top Coat)
- Nail art brushes for detailing
How to Create This Look at Home
- Start with a nude base coat on all nails.
- Use orange polish to paint small pumpkins on all nails.
- Add details with black and brown polishes using a fine nail art brush.
- Seal the design with a clear top coat to add durability and shine.
Pretty in Pink Pumpkins
This design brings a fresh twist to fall pumpkin nails by incorporating a playful pink base. The almond shape elongates the fingers while the pink pumpkins add a fun and unexpected element. This look is perfect for those who love to mix traditional fall themes with a modern twist.
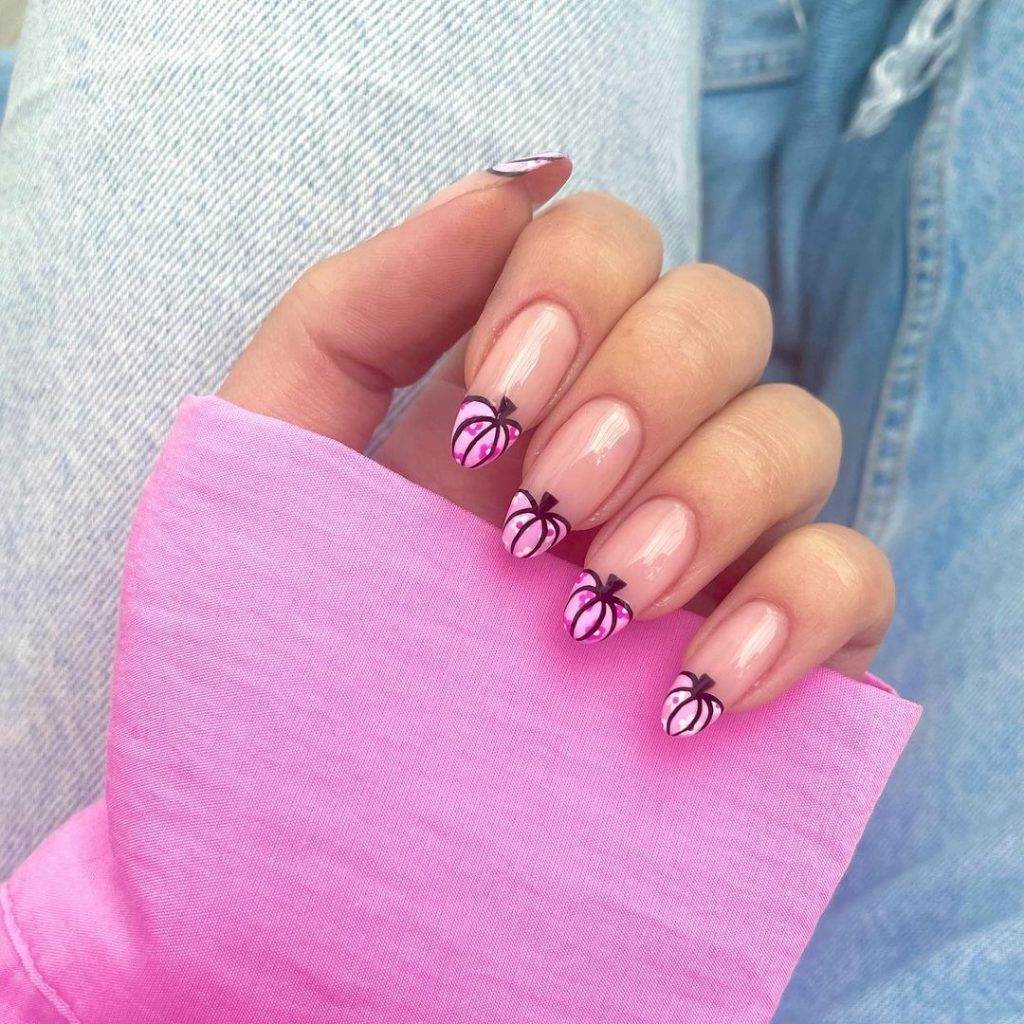
Consumables Needed
- Light pink nail polish (e.g., Essie Ballet Slippers)
- Dark pink nail polish for the pumpkins (e.g., OPI Strawberry Margarita)
- Black nail polish for detailing (e.g., Essie Licorice)
- Clear top coat (e.g., Sally Hansen Insta-Dri)
- Fine nail art brushes for detailing
How to Create This Look at Home
- Start with a light pink base coat on all nails.
- Using a dark pink polish, paint small pumpkin shapes near the tips.
- Add black detailing to the pumpkins using a fine nail art brush.
- Seal the design with a clear top coat to protect and add shine.
Checkerboard Pumpkins
This design combines a trendy checkerboard pattern with small pumpkin accents. The almond shape nails provide a chic canvas for the alternating patterns of the checkerboard and pumpkins, making this design both cute and sophisticated.
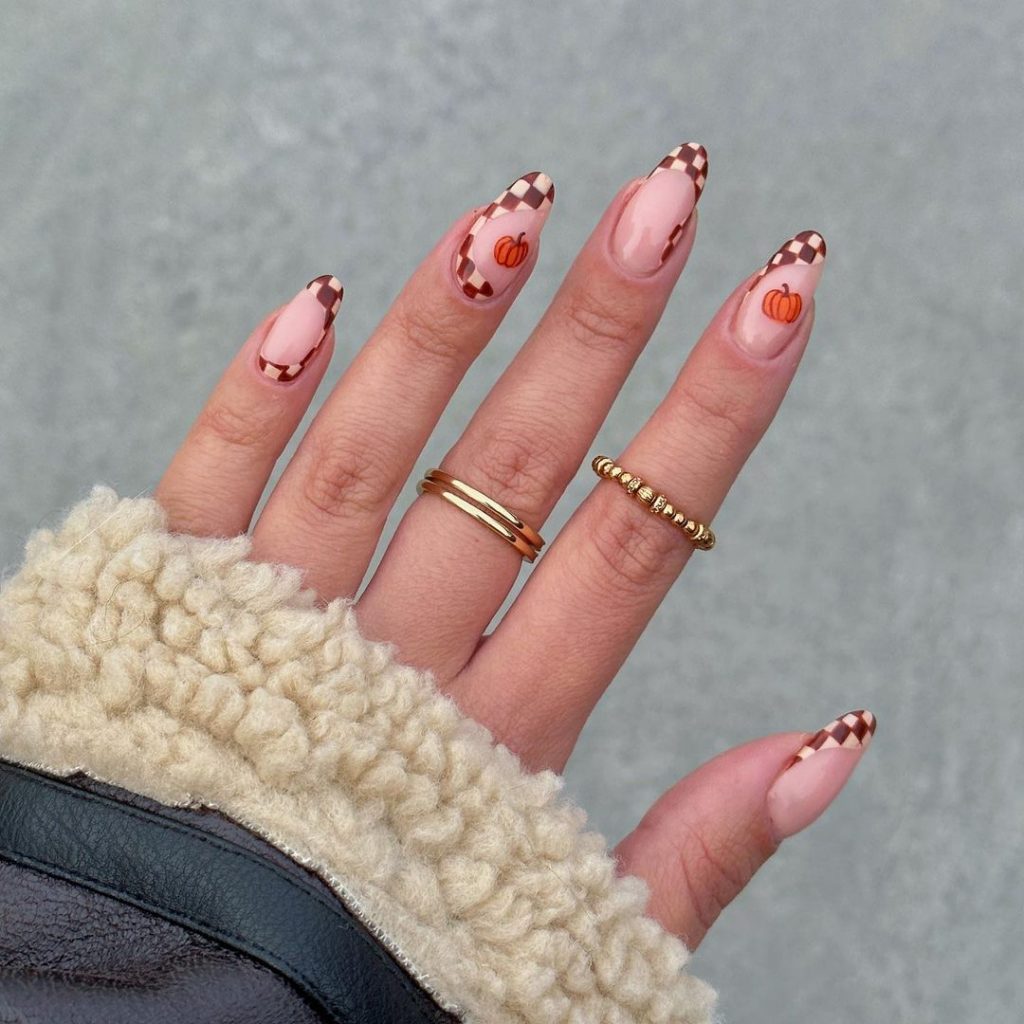
Consumables Needed
- Nude nail polish (e.g., Zoya Avery)
- Brown nail polish for the checkerboard (e.g., OPI You Don’t Know Jacques)
- Orange nail polish for the pumpkins (e.g., Essie Fall For NYC)
- Clear top coat (e.g., Seche Vite Dry Fast Top Coat)
- Nail art brushes for detailing
How to Create This Look at Home
- Apply a nude base coat on all nails.
- Paint alternating brown checkerboard patterns on the tips of the nails.
- Add small orange pumpkins on a few nails for accent.
- Finish with a clear top coat to ensure longevity and shine.
Glitter Pumpkins
These nails feature glittery pumpkin tips on a nude base, creating a striking and festive look. The short nail length keeps it practical, while the glitter adds a festive touch perfect for Halloween or any fall event.
Consumables Needed
- Nude nail polish (e.g., Essie Skinny Dip)
- Orange glitter polish (e.g., China Glaze Orange You Hot?)
- Black nail polish for detailing (e.g., OPI Black Onyx)
- Clear top coat (e.g., Essie Gel Setter Top Coat)
- Nail art brushes for detailing
How to Create This Look at Home
- Start with a nude base coat on all nails.
- Apply orange glitter polish to the tips, creating a French manicure effect.
- Use black polish to paint small pumpkin silhouettes on the glitter tips.
- Seal the design with a clear top coat to keep it shiny and durable.
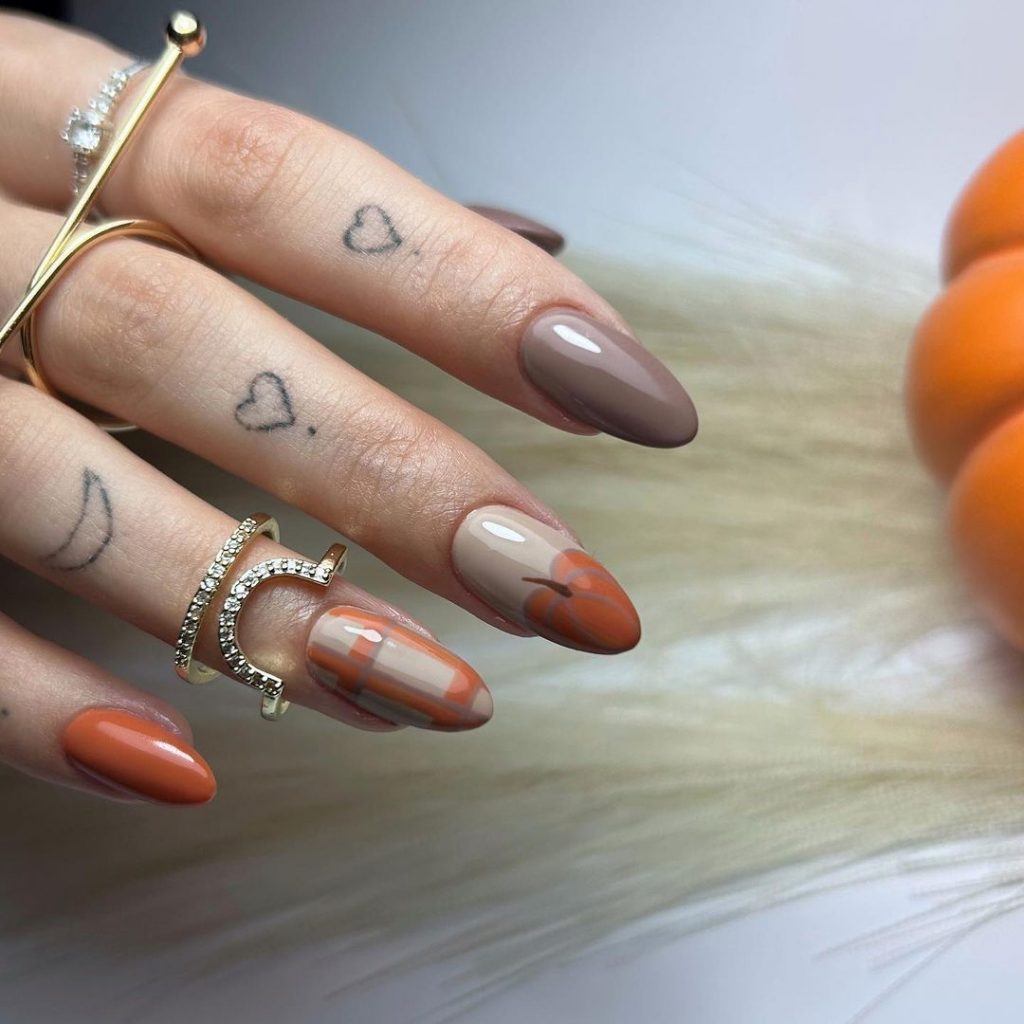
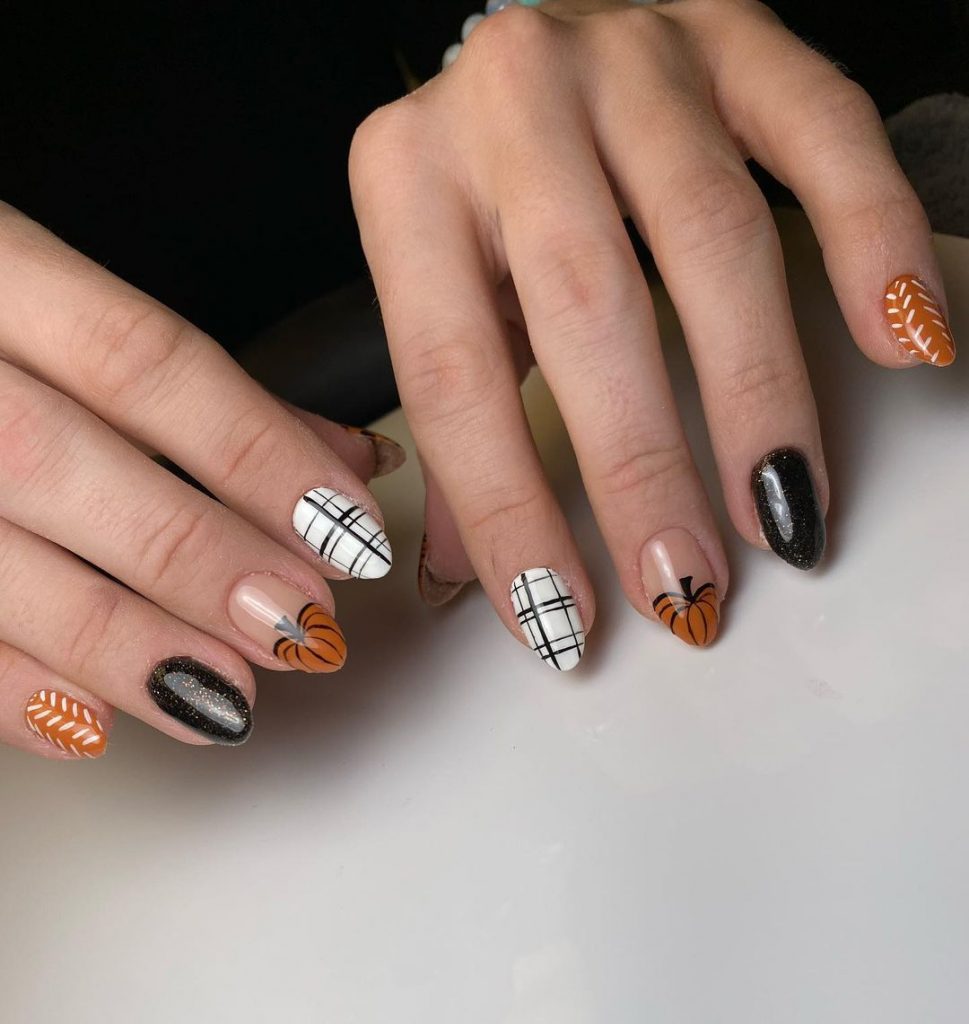
Pumpkin Spice Plaid
This design incorporates a cozy plaid pattern with pumpkin accents. The warm brown and white plaid complements the fall theme, while the pumpkin designs add a touch of festivity. The short, square nail shape is practical yet stylish.
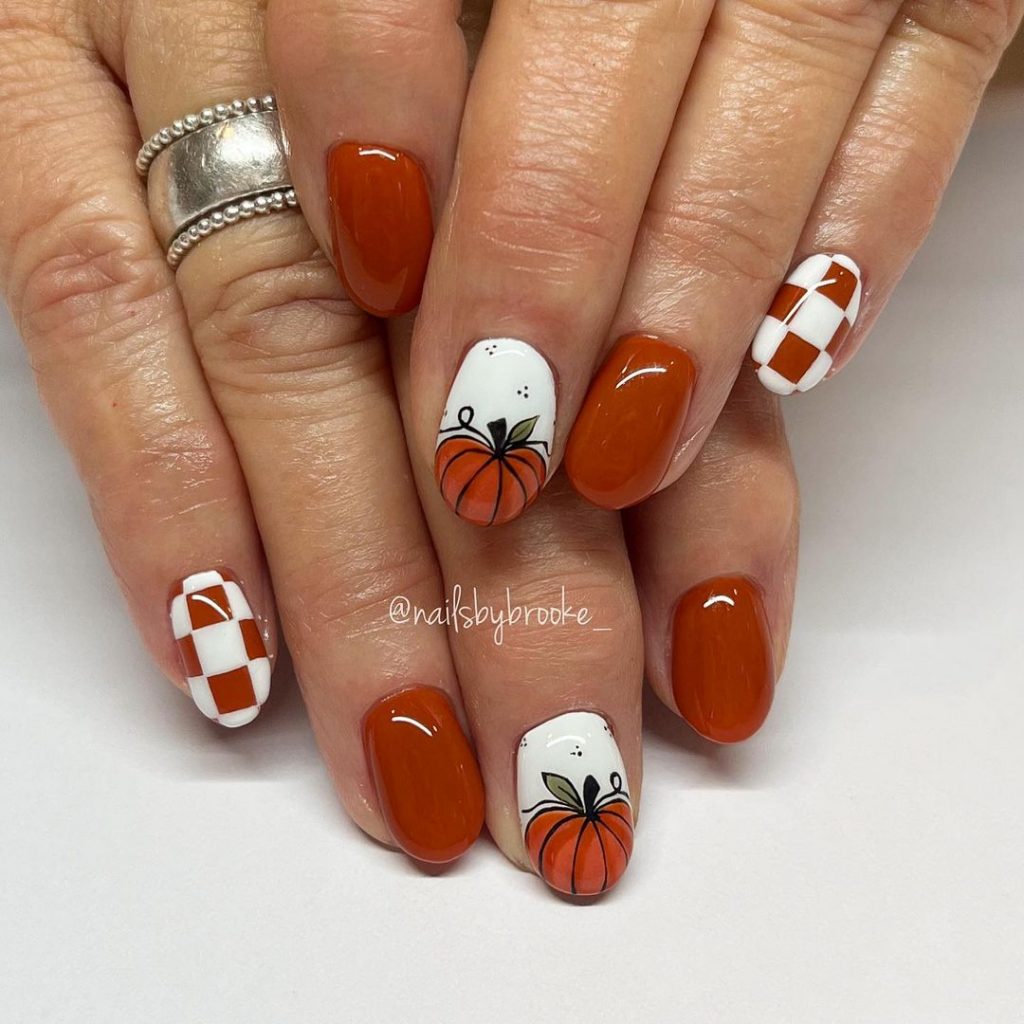
Consumables Needed
- Brown nail polish (e.g., OPI You Don’t Know Jacques)
- White nail polish (e.g., Essie Blanc)
- Orange nail polish for pumpkins (e.g., Essie Fall For NYC)
- Clear top coat (e.g., Sally Hansen Miracle Gel)
- Nail art brushes for detailing
How to Create This Look at Home
- Apply a brown base coat on all nails.
- Paint white plaid patterns on a few accent nails using a fine brush.
- Add small orange pumpkins on the plaid nails for a festive touch.
- Finish with a clear top coat to seal and protect the design.
Spooky and Chic
These nails are perfect for Halloween with their spooky yet chic design. Featuring spider webs, pumpkins, and rhinestones on a nude base, this look combines the eerie and the elegant. The long, coffin shape adds drama and flair.
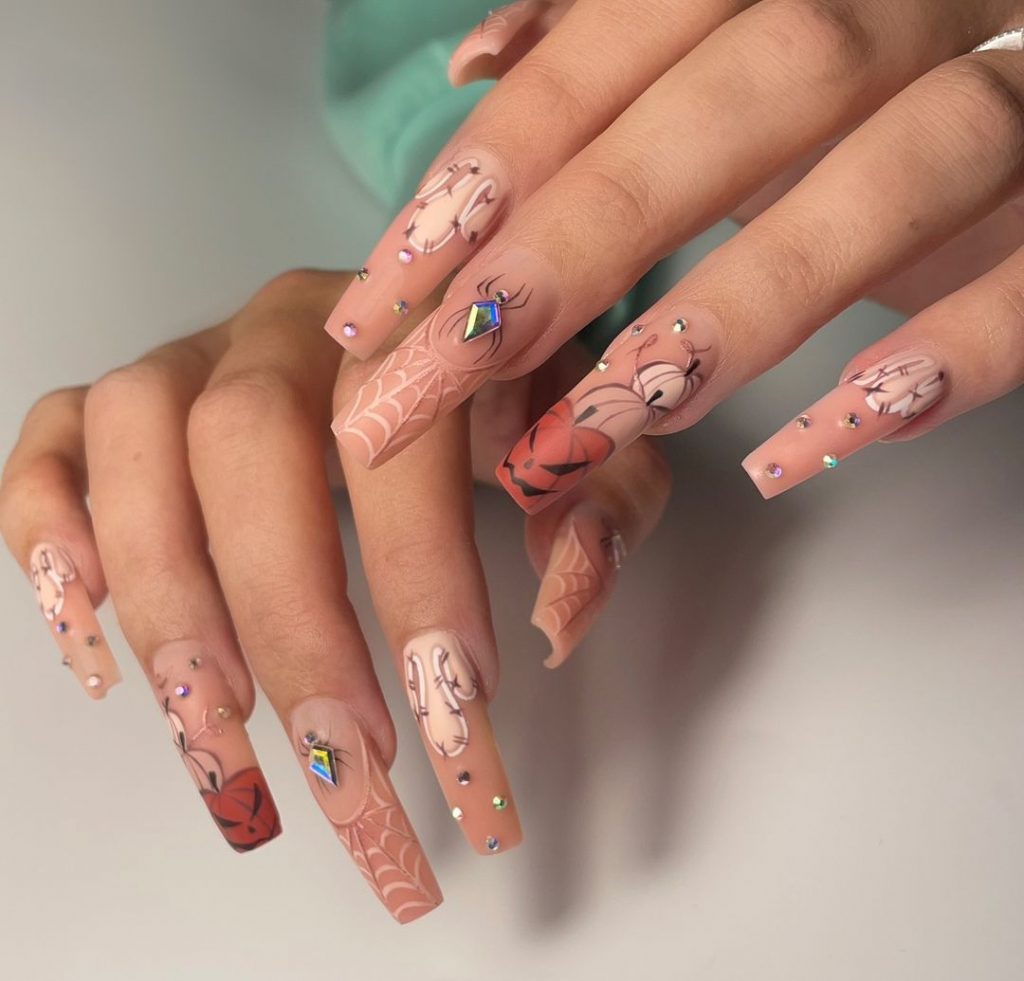
Consumables Needed
- Nude nail polish (e.g., OPI Bubble Bath)
- Black nail polish for detailing (e.g., Essie Licorice)
- Orange nail polish for pumpkins (e.g., Zoya Arizona)
- Rhinestones for added bling
- Clear top coat (e.g., Seche Vite Dry Fast Top Coat)
- Nail art brushes and dotting tools
How to Create This Look at Home
- Start with a nude base coat on all nails.
- Use black polish to create spider webs and pumpkin designs on selected nails.
- Add rhinestones for extra sparkle and bling.
- Finish with a clear top coat to secure the rhinestones and protect the design.
Jack-O’-Lantern Delight
These nails are perfect for Halloween, featuring classic jack-o’-lantern faces on a nude base. The almond shape enhances the length and elegance of the nails, while the detailed pumpkin art makes them stand out. This design is both playful and festive, ideal for the spooky season.
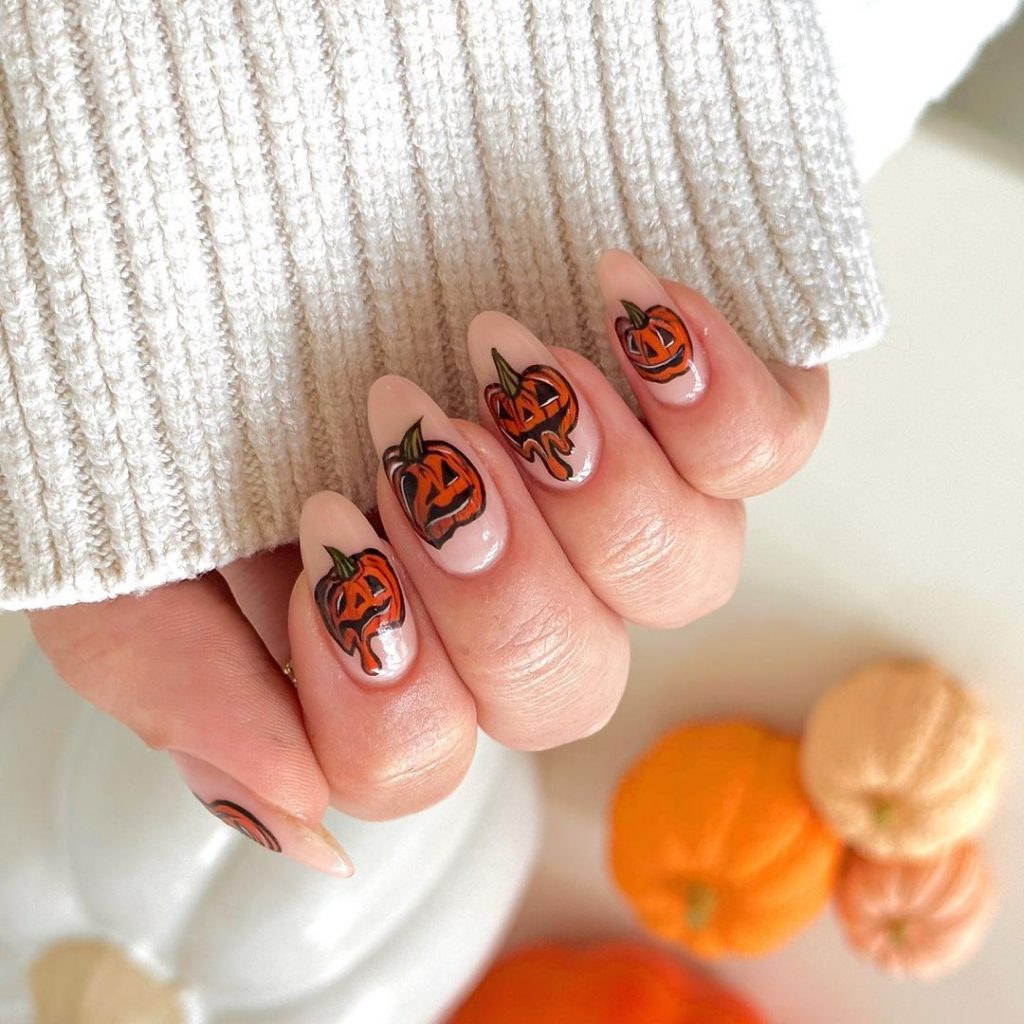
Consumables Needed
- Nude nail polish (e.g., OPI Bubble Bath)
- Orange nail polish for pumpkins (e.g., Essie Fall For NYC)
- Black nail polish for detailing (e.g., Sally Hansen Xtreme Wear in Black Out)
- Clear top coat (e.g., Seche Vite Dry Fast Top Coat)
- Nail art brushes for detailing
How to Create This Look at Home
- Apply a nude base coat on all nails.
- Paint orange pumpkins on each nail.
- Add black jack-o’-lantern faces using a fine nail art brush.
- Finish with a clear top coat to protect the design and add shine.
Autumn Chic
This sophisticated design features a mix of taupe, brown, and orange hues with subtle pumpkin accents. The almond shape adds a touch of elegance, making these nails perfect for both everyday wear and special occasions in the fall.
Consumables Needed
- Taupe nail polish (e.g., OPI Taupe-less Beach)
- Brown nail polish (e.g., Essie Mink Muffs)
- Orange nail polish for pumpkins (e.g., Zoya Arizona)
- Clear top coat (e.g., Sally Hansen Miracle Gel)
- Nail art brushes for detailing
How to Create This Look at Home
- Start with a taupe base coat on all nails.
- Alternate between brown and orange on different nails.
- Add subtle pumpkin designs using the orange polish and a fine brush.
- Seal with a clear top coat to ensure longevity and shine.
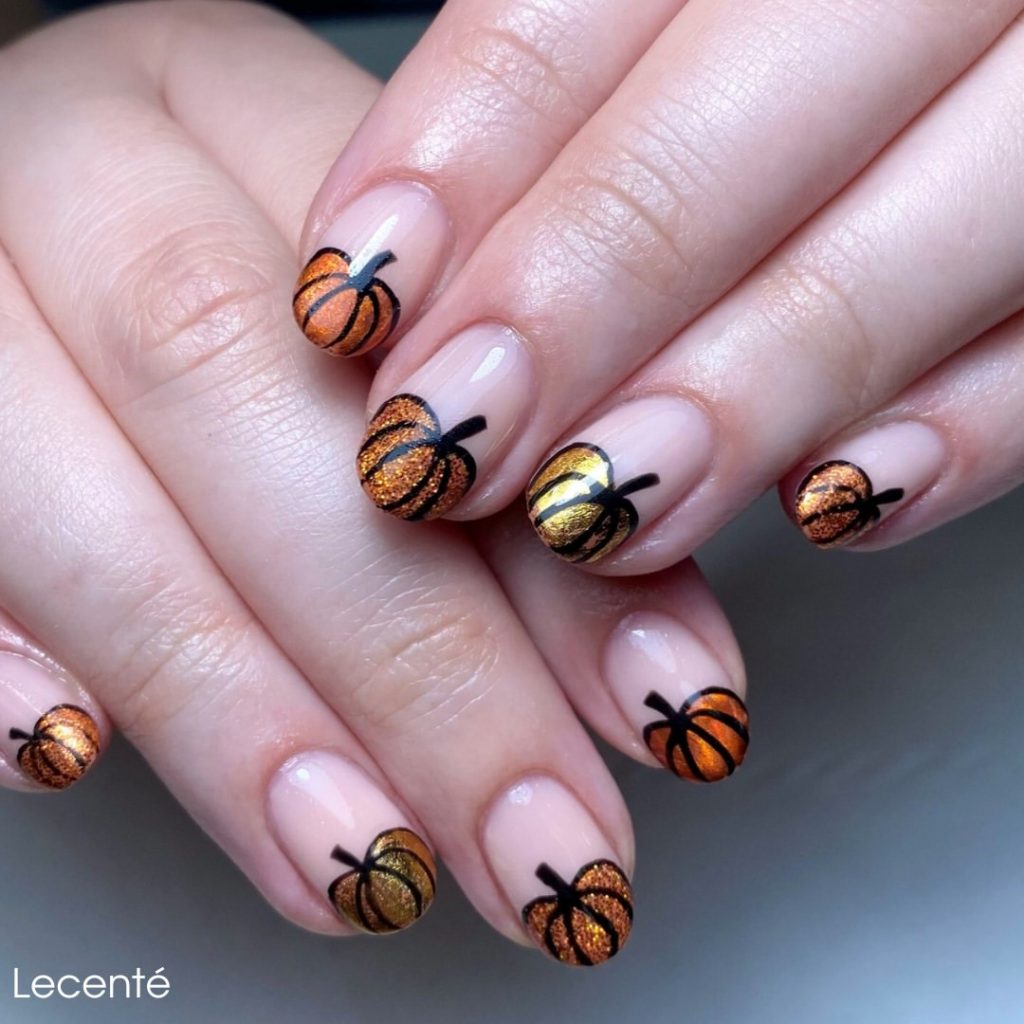
Glittery Gold Pumpkins
These nails are a glamorous take on fall pumpkin nails, featuring gold glitter polish and black pumpkin silhouettes. The short, square shape keeps the look practical, while the glitter adds a touch of luxury, perfect for any festive occasion.
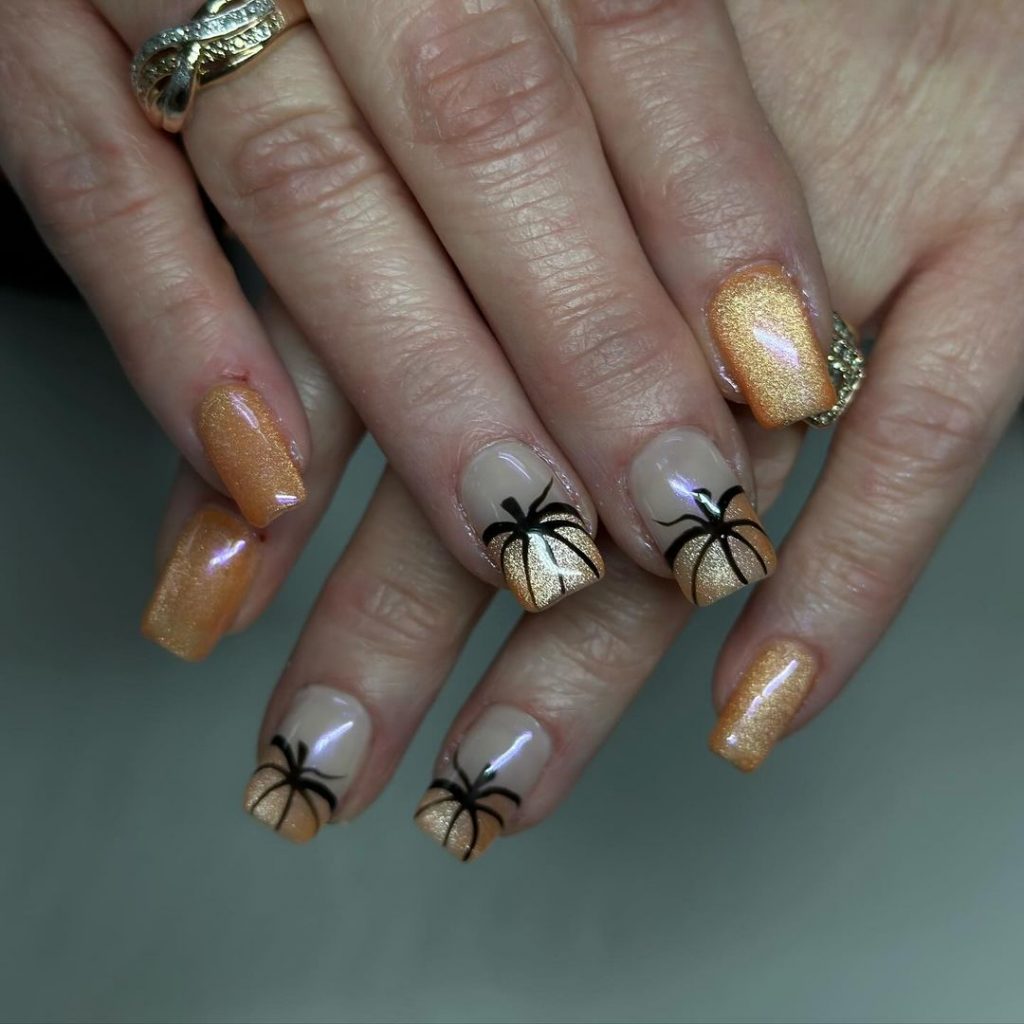
Consumables Needed
- Nude nail polish (e.g., Essie Skinny Dip)
- Gold glitter polish (e.g., China Glaze Golden Enchantment)
- Black nail polish for detailing (e.g., OPI Black Onyx)
- Clear top coat (e.g., Essie Gel Setter Top Coat)
- Nail art brushes for detailing
How to Create This Look at Home
- Start with a nude base coat on all nails.
- Apply gold glitter polish to the tips, creating a French manicure effect.
- Use black polish to paint small pumpkin silhouettes on the glitter tips.
- Seal the design with a clear top coat to keep it shiny and durable.
Plaid and Pumpkins
This design combines a trendy plaid pattern with pumpkin accents. The mix of black, white, and orange makes these nails perfect for fall. The short and square shape is practical yet stylish, suitable for daily wear.
Consumables Needed
- Nude nail polish (e.g., Zoya Avery)
- Black nail polish (e.g., OPI Black Onyx)
- White nail polish (e.g., Essie Blanc)
- Orange nail polish for pumpkins (e.g., Essie Fall For NYC)
- Clear top coat (e.g., Sally Hansen Miracle Gel)
- Nail art brushes for detailing
How to Create This Look at Home
- Apply a nude base coat on all nails.
- Paint plaid patterns on some nails using black and white polish.
- Add small orange pumpkins on a few nails for accent.
- Finish with a clear top coat to seal and protect the design.
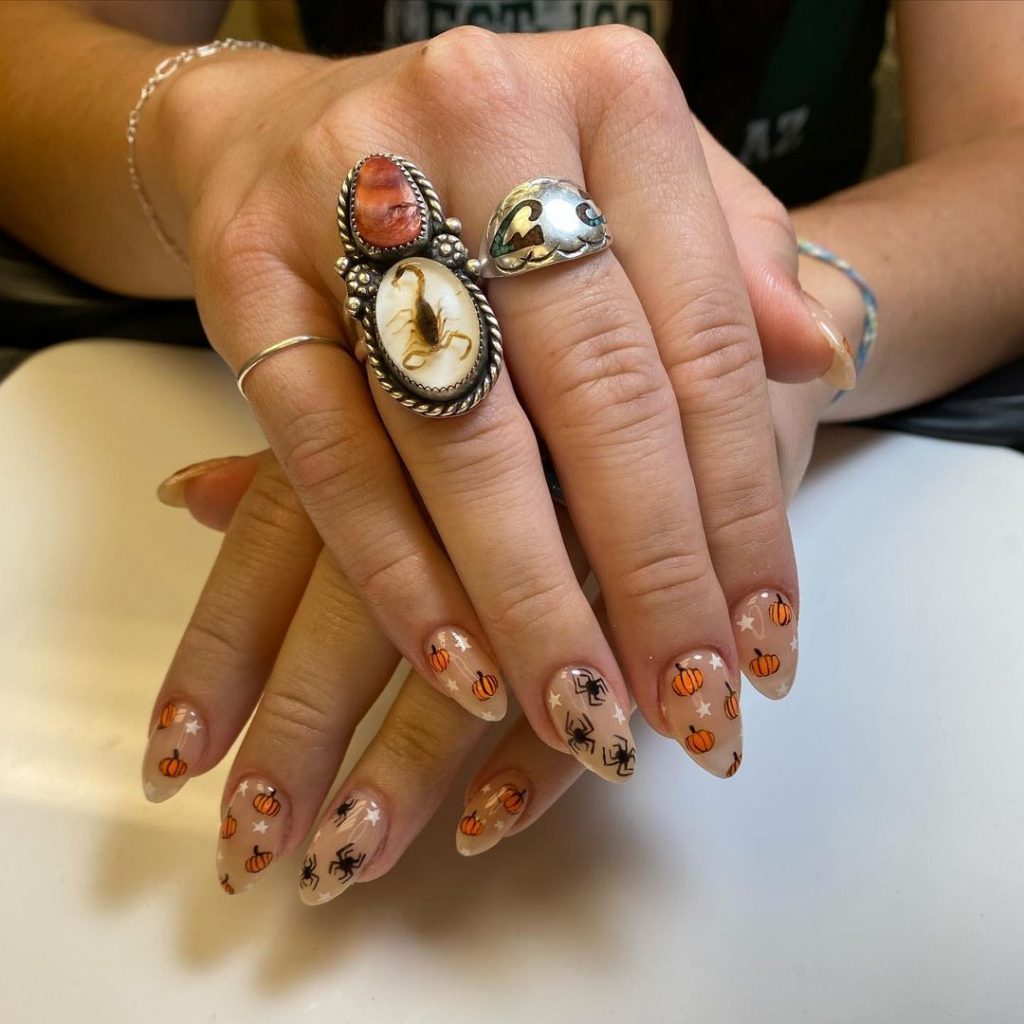
Spooky Fun
Perfect for Halloween, these nails feature a mix of pumpkins and spiders on a nude base. The detailed art is both playful and spooky, ideal for celebrating the season. The almond shape adds elegance to this fun design.
Consumables Needed
- Nude nail polish (e.g., OPI Bubble Bath)
- Orange nail polish for pumpkins (e.g., Essie Fall For NYC)
- Black nail polish for detailing (e.g., Sally Hansen Xtreme Wear in Black Out)
- Clear top coat (e.g., Seche Vite Dry Fast Top Coat)
- Nail art brushes for detailing
How to Create This Look at Home
- Start with a nude base coat on all nails.
- Paint orange pumpkins and black spiders on each nail.
- Use a fine nail art brush to add detailed faces and web designs.
- Finish with a clear top coat to protect the design and add shine.
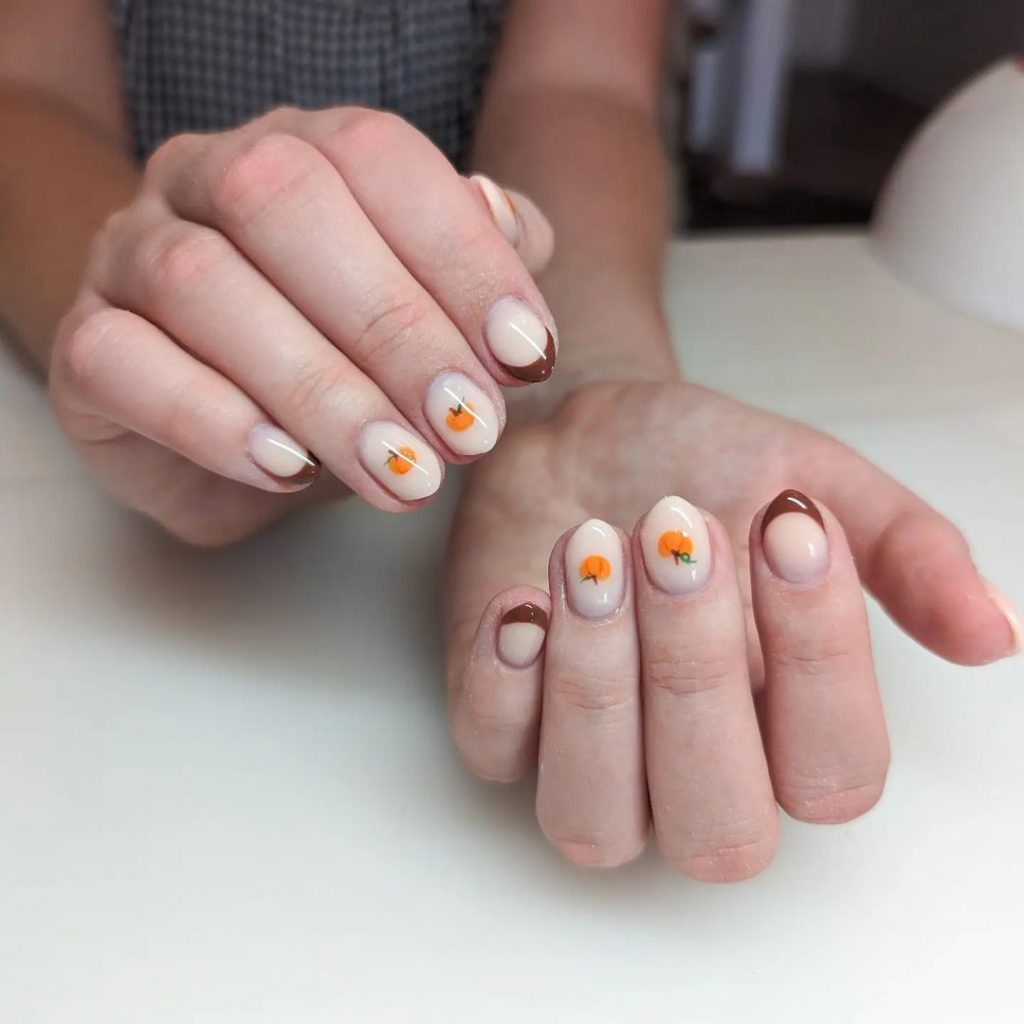
Minimalist Pumpkin French Tips
This minimalist design features tiny pumpkin accents on a nude base with brown French tips. The short nail length keeps the look practical and versatile for everyday wear. The tiny pumpkins add a cute and subtle nod to the fall season.
Consumables Needed
- Nude nail polish (e.g., OPI Bubble Bath)
- Brown nail polish for French tips (e.g., Essie Mink Muffs)
- Orange nail polish for pumpkins (e.g., Zoya Arizona)
- Green nail polish for stems (e.g., Sally Hansen Xtreme Wear in Green Thumb)
- Clear top coat (e.g., Seche Vite Dry Fast Top Coat)
- Fine nail art brushes for detailing
How to Create This Look at Home
- Start with a nude base coat on all nails.
- Apply brown polish to the tips to create a French manicure effect.
- Paint small orange pumpkins near the cuticles.
- Add green stems using a fine nail art brush.
- Seal the design with a clear top coat to protect and add shine.
Textured Pumpkin Glam
This nail design combines various textures and patterns, including gold foil, knit effect, and pumpkin art on a matte base. The vibrant orange and muted grey tones make this look perfect for fall festivities.

Consumables Needed
- Orange nail polish (e.g., OPI A Good Man-darin is Hard to Find)
- Grey nail polish (e.g., Essie Chinchilly)
- Gold foil flakes
- Matte top coat (e.g., Sally Hansen Big Matte Top Coat)
- Clear top coat (e.g., Essie Gel Setter Top Coat)
- Nail art brushes and dotting tools
How to Create This Look at Home
- Apply orange and grey polish alternately on the nails.
- Add gold foil flakes to the orange nails.
- Use a dotting tool to create a knit effect on the grey nails.
- Paint a pumpkin on one accent nail using orange and black polish.
- Seal the design with a clear top coat to protect and add durability.
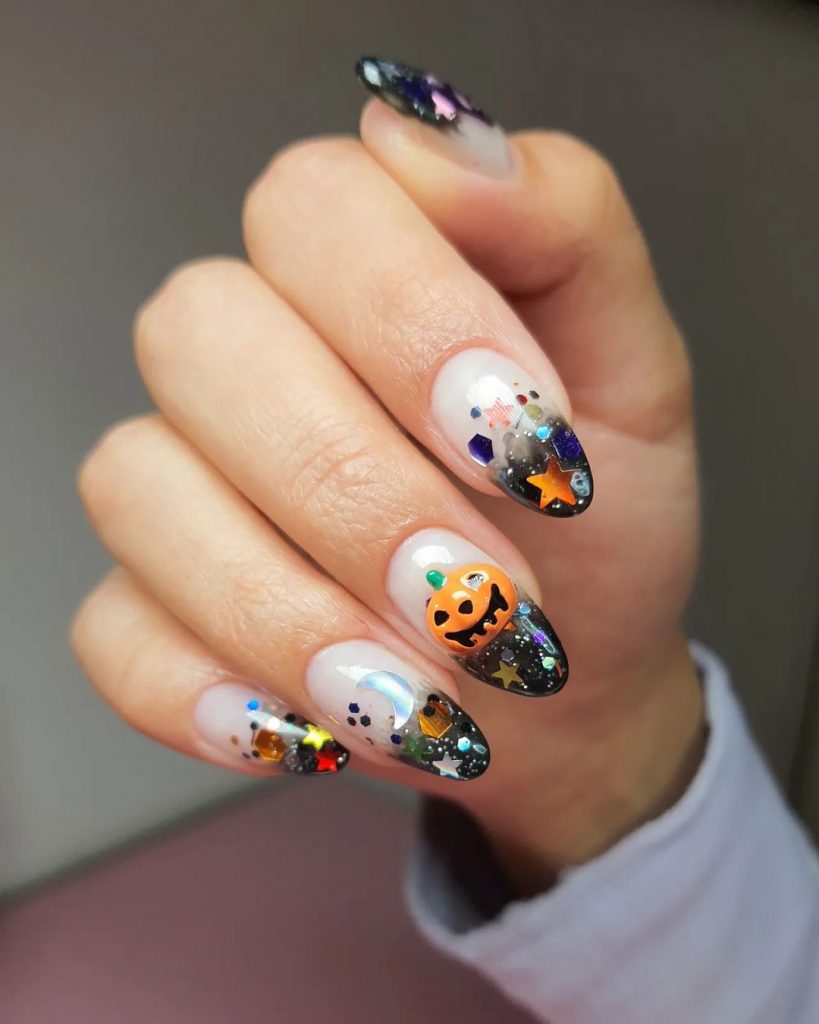
Halloween Glitter Pumpkins
These nails are perfect for Halloween with a mix of glitter, pumpkins, and spooky elements. The gradient black glitter base adds a dramatic effect, while the pumpkin art keeps it festive.
Consumables Needed
- Nude nail polish (e.g., Essie Skinny Dip)
- Black glitter polish (e.g., China Glaze Liquid Leather)
- Orange nail polish for pumpkins (e.g., Essie Fall For NYC)
- Clear top coat (e.g., Sally Hansen Miracle Gel)
- Nail art brushes for detailing
How to Create This Look at Home
- Start with a nude base coat on all nails.
- Apply black glitter polish to the tips, creating a gradient effect.
- Paint orange pumpkins and other spooky elements on the nails.
- Seal the design with a clear top coat to add shine and protect the art.
Plaid and Pumpkin Perfection
This design features a combination of plaid patterns and pumpkin accents. The mix of warm tones and gold glitter makes these nails perfect for autumn. The almond shape adds a touch of elegance.
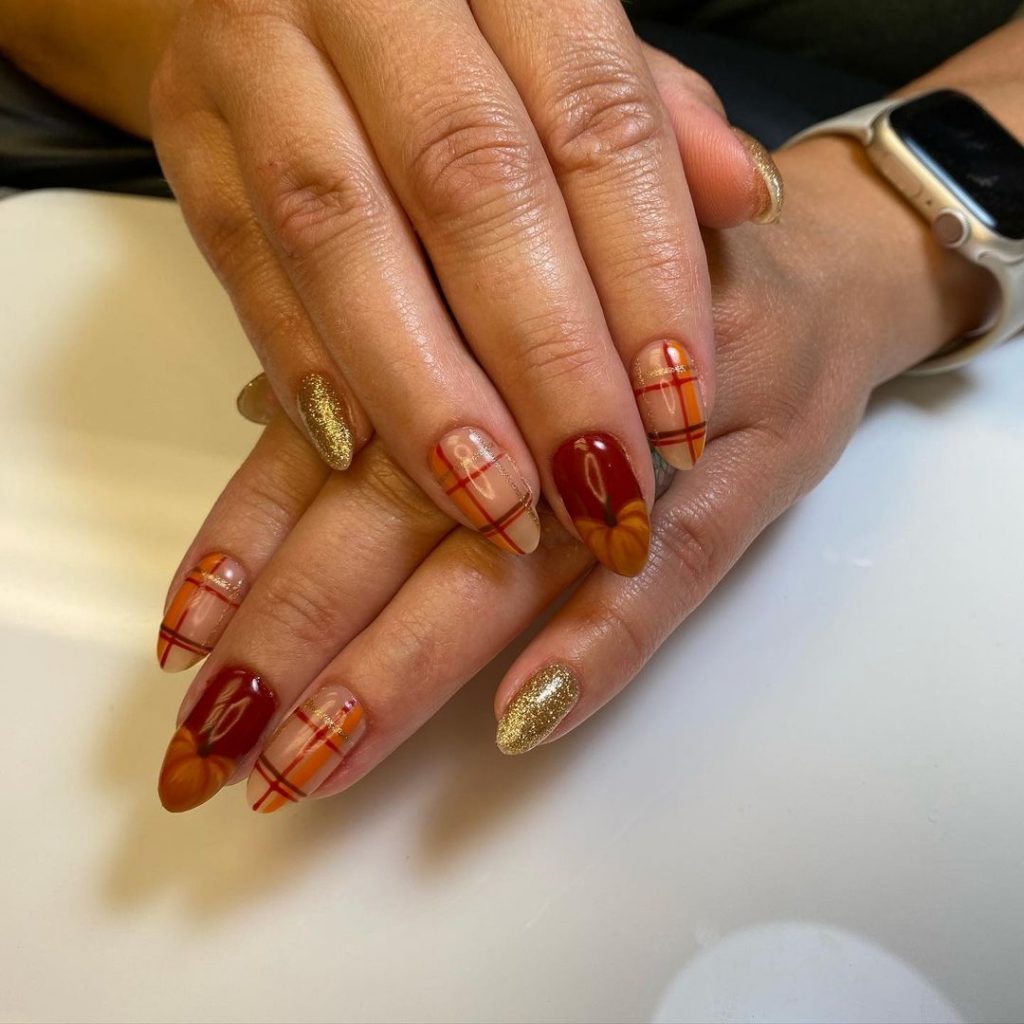
Consumables Needed
- Nude nail polish (e.g., OPI Bubble Bath)
- Red, orange, and gold nail polishes for plaid (e.g., Essie Forever Yummy, Zoya Arizona, China Glaze Golden Enchantment)
- Clear top coat (e.g., Seche Vite Dry Fast Top Coat)
- Nail art brushes for detailing
How to Create This Look at Home
- Apply a nude base coat on all nails.
- Paint plaid patterns on some nails using red, orange, and gold polish.
- Add small pumpkin designs on accent nails.
- Finish with a clear top coat to seal and protect the design.
Blue Pumpkin Elegance
This unique design features blue pumpkins on a light base, combined with solid blue nails. The square shape provides a modern look, while the blue tones offer a refreshing take on traditional fall colors.

Consumables Needed
- Light nude nail polish (e.g., Essie Ballet Slippers)
- Blue nail polish (e.g., OPI My Pal Joey)
- Clear top coat (e.g., Sally Hansen Miracle Gel)
- Nail art brushes for detailing
How to Create This Look at Home
- Apply a light nude base coat on all nails.
- Alternate between solid blue nails and light nude nails with blue pumpkin art.
- Use a fine nail art brush to paint detailed blue pumpkins on the accent nails.
- Seal the design with a clear top coat to protect and add shine.
Kawaii Pumpkin Fun
These nails feature adorable, cartoon-like pumpkin faces on a light beige base. The square nail shape is practical and offers a great canvas for detailed nail art. This design is perfect for those who love a cute and playful look for the fall season.
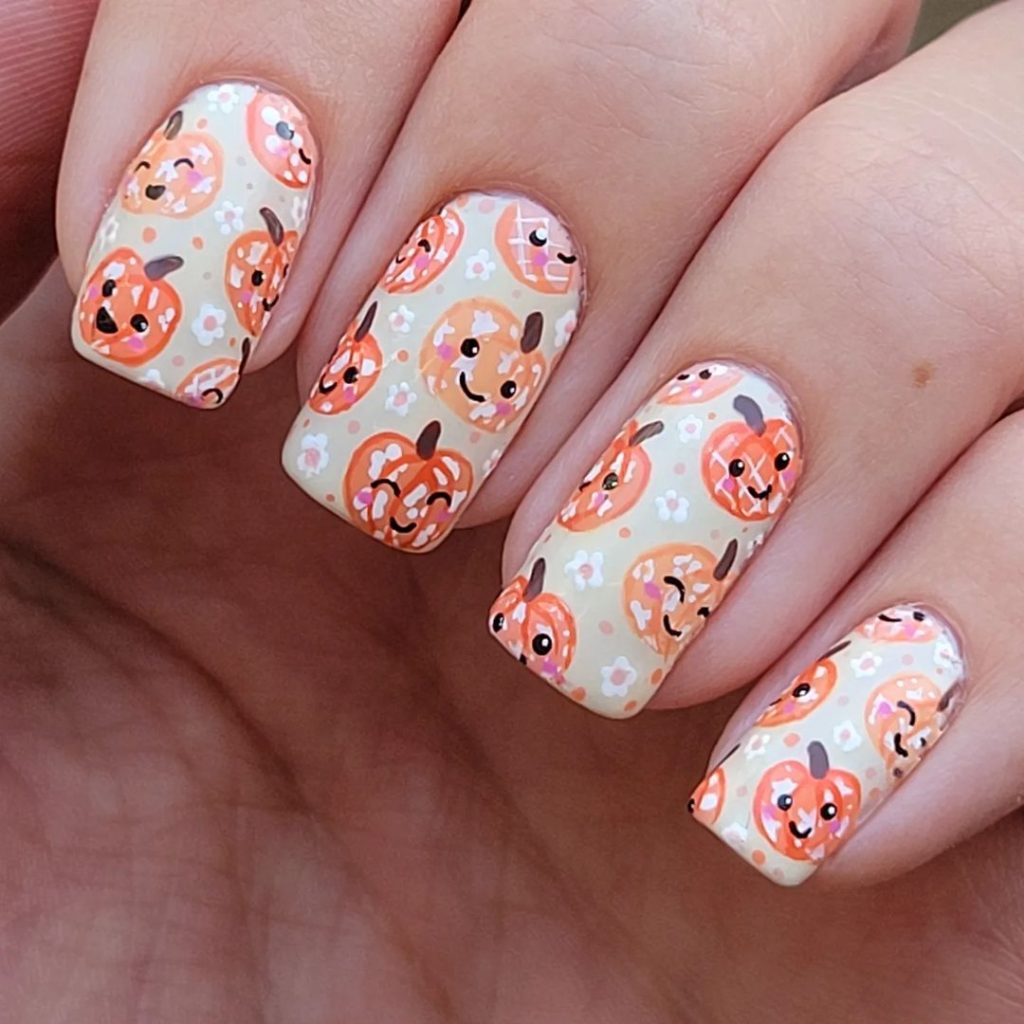
Consumables Needed
- Light beige nail polish (e.g., OPI Be There in a Prosecco)
- Orange nail polish for pumpkins (e.g., Essie Fall For NYC)
- Black nail polish for detailing (e.g., Sally Hansen Xtreme Wear in Black Out)
- Clear top coat (e.g., Seche Vite Dry Fast Top Coat)
- Nail art brushes for detailing
How to Create This Look at Home
- Apply a light beige base coat on all nails.
- Paint small, cute pumpkin faces using orange polish.
- Add black detailing for the faces and stems using a fine nail art brush.
- Seal the design with a clear top coat to protect the art and add shine.
Harvest Festival
This design is perfect for celebrating the fall harvest, featuring various gourds and autumn leaves on a nude base. The mix of colors and shapes makes this design vibrant and festive, perfect for Thanksgiving.
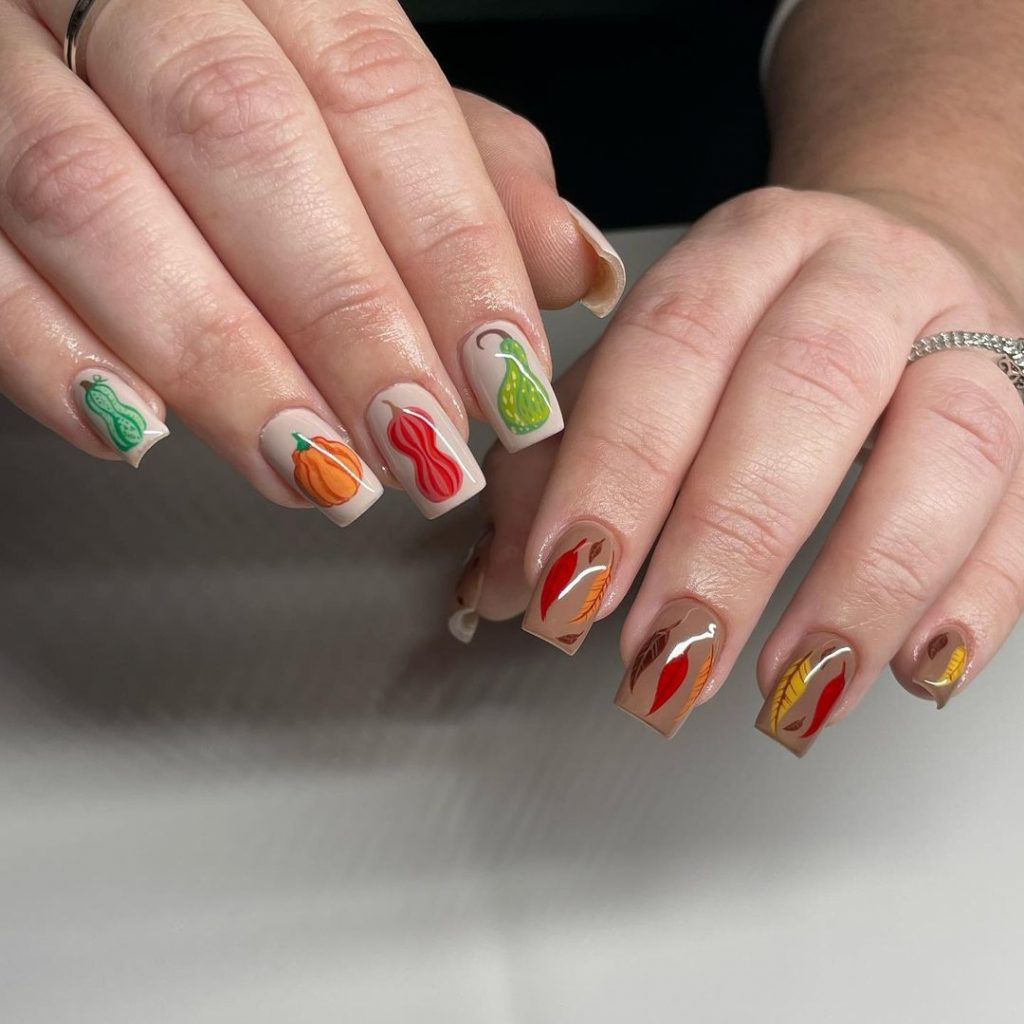
Consumables Needed
- Nude nail polish (e.g., Zoya Avery)
- Green, orange, red, and brown nail polishes for gourds and leaves (e.g., OPI My Chihuahua Doesn’t Bite Anymore, Essie Mojito Madness, Essie Fall For NYC, OPI Espresso Your Inner Self)
- Clear top coat (e.g., Sally Hansen Miracle Gel)
- Nail art brushes for detailing
How to Create This Look at Home
- Start with a nude base coat on all nails.
- Paint various gourds and autumn leaves using different colored polishes.
- Use a fine nail art brush for detailing and creating realistic shapes.
- Seal with a clear top coat to protect the design and add durability.
Smoky Pumpkin Tips
These nails feature a blend of glittery brown and nude bases with delicate pumpkin art on the tips. The almond shape and gradient glitter create a sophisticated look, perfect for any fall event.
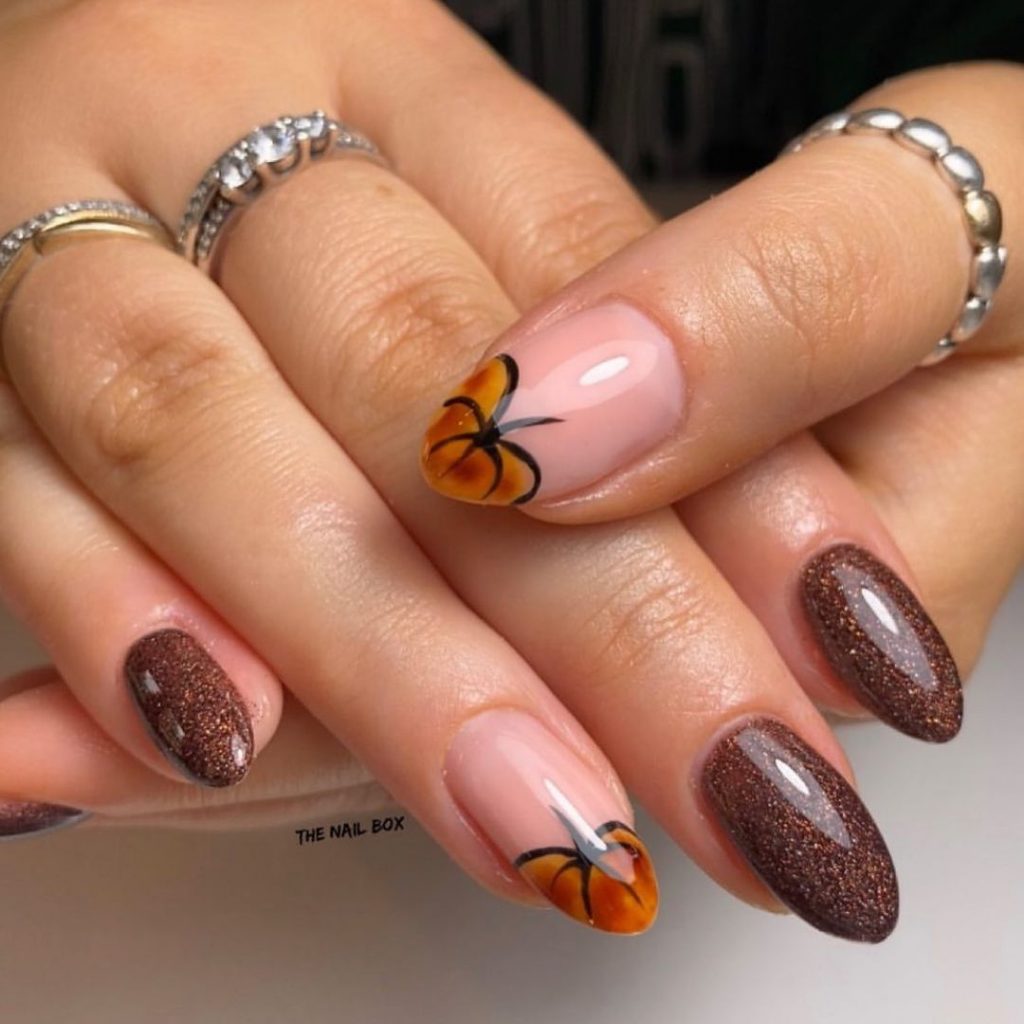
Consumables Needed
- Nude nail polish (e.g., Essie Skinny Dip)
- Brown glitter polish (e.g., China Glaze Liquid Leather)
- Orange nail polish for pumpkins (e.g., Essie Fall For NYC)
- Clear top coat (e.g., Seche Vite Dry Fast Top Coat)
- Nail art brushes for detailing
How to Create This Look at Home
- Apply a nude base coat on all nails.
- Create a gradient effect with brown glitter polish on some nails.
- Paint delicate pumpkin art on the tips using orange polish.
- Seal the design with a clear top coat to keep it shiny and durable.
Pop Art Pumpkins
This vibrant design features pink pumpkins on a black and purple base, giving it a pop art feel. The bold colors and playful design make this perfect for Halloween or any fun fall occasion.
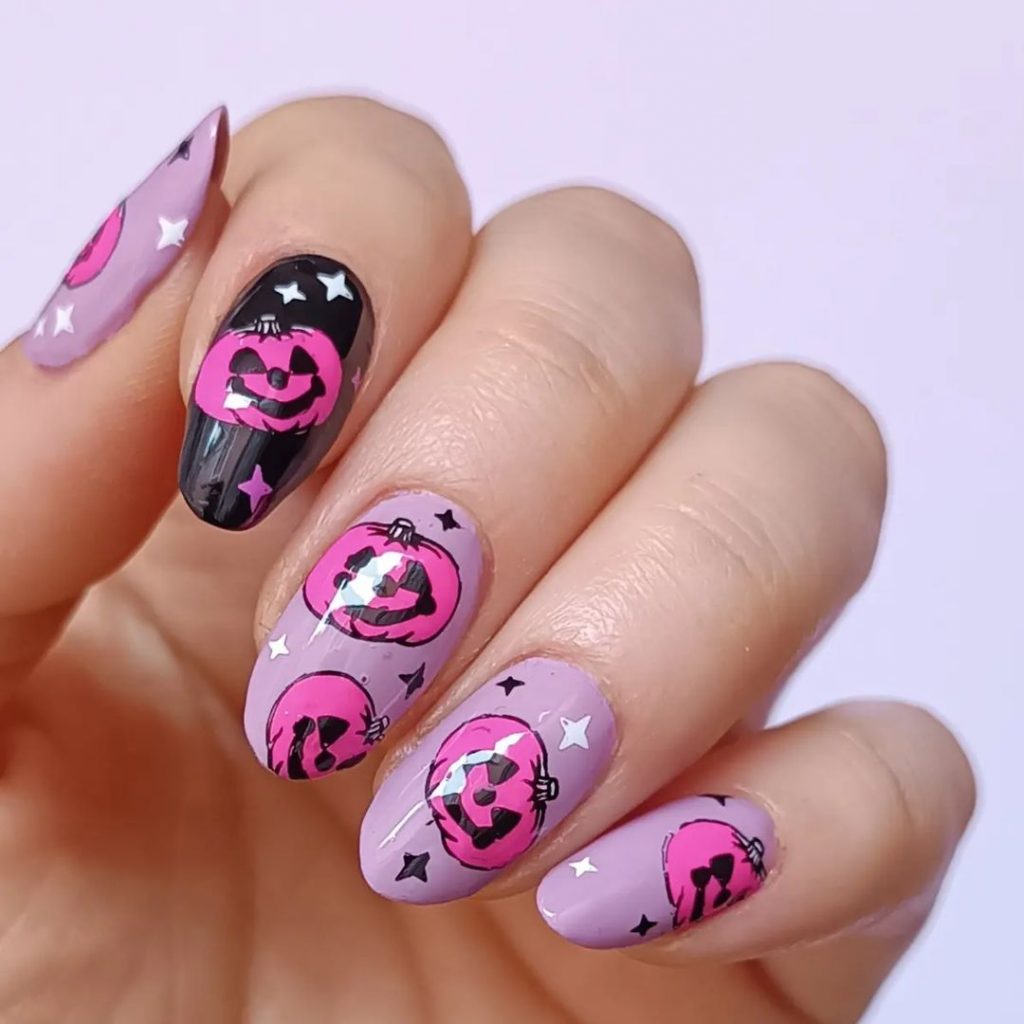
Consumables Needed
- Black nail polish (e.g., OPI Black Onyx)
- Purple nail polish (e.g., Essie Lilacism)
- Pink nail polish for pumpkins (e.g., OPI Mod About You)
- Clear top coat (e.g., Sally Hansen Miracle Gel)
- Nail art brushes for detailing
How to Create This Look at Home
- Alternate between black and purple base coats on different nails.
- Paint pink pumpkins on the nails, using black for detailing.
- Add some stars for extra flair.
- Finish with a clear top coat to protect the design and add shine.
Elegant Autumn Pumpkins
This design combines elegance and fun with detailed pumpkin art on a light pink base, accompanied by black and pink accent nails. The mix of colors and designs makes this look versatile and stylish for the fall season.
Consumables Needed
- Light pink nail polish (e.g., Essie Ballet Slippers)
- Black nail polish for detailing (e.g., OPI Black Onyx)
- Clear top coat (e.g., Sally Hansen Miracle Gel)
- Nail art brushes for detailing
How to Create This Look at Home
- Apply a light pink base coat on all nails.
- Alternate between black and pink on different nails.
- Paint detailed pumpkins and other autumn elements on the accent nails.
- Seal with a clear top coat to ensure durability and shine.
Save Pin