As we step into the fall season, it’s time to refresh our nail game with some fabulous new colors and designs. Are you ready to explore the latest trends in fall nail colors for 2024? Let’s dive into some mesmerizing nail designs that will keep you stylish all season long.
Burgundy Elegance
Burgundy is a timeless color that screams elegance and sophistication. This nail design features a rich, deep burgundy that looks stunning on long, almond-shaped nails. The glossy finish adds a luxurious touch, making it perfect for both casual and formal occasions. The subtle marbling effect within the burgundy polish gives it an added dimension, making the nails look like a work of art.
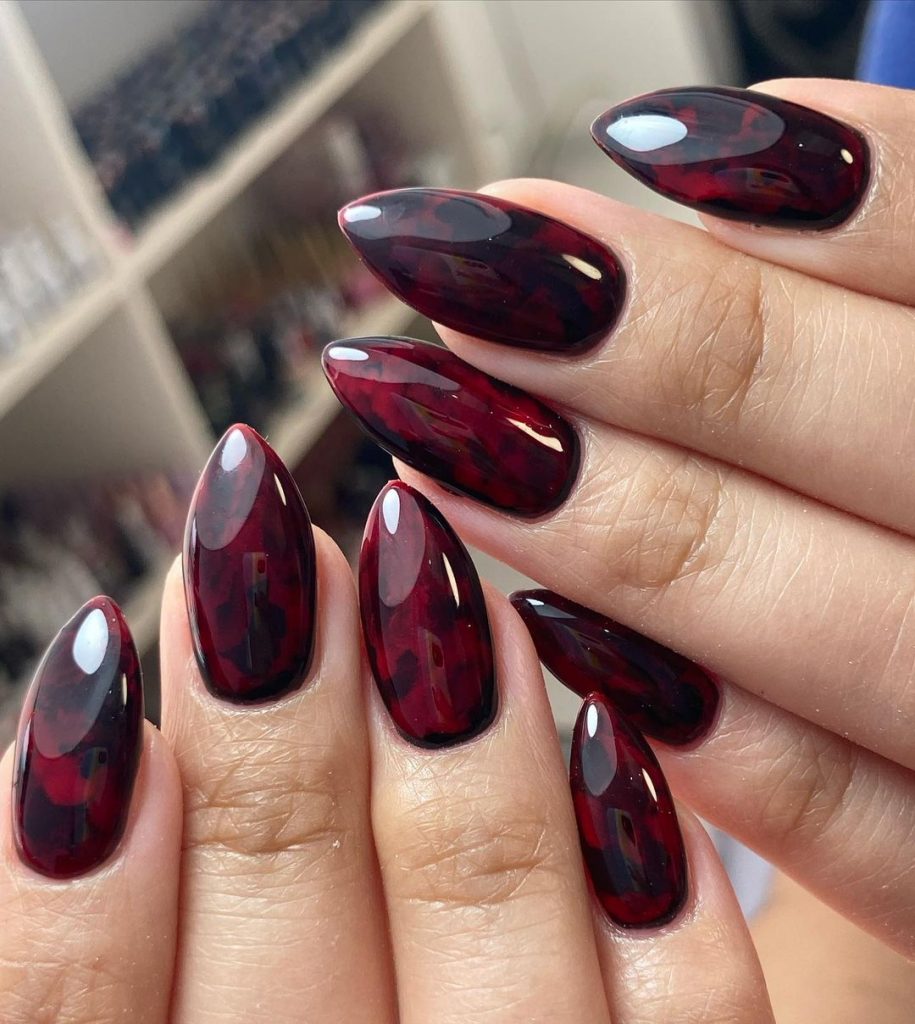
Consumables:
- Base coat: OPI Natural Nail Base Coat
- Nail polish: OPI “Got the Blues for Red”
- Top coat: Essie Gel Couture Top Coat
- Nail art tools: Thin brush for marbling
Creation Tips:
- Start with a base coat to protect your nails.
- Apply two coats of burgundy polish, letting each coat dry thoroughly.
- Use a thin brush to create a marbled effect with a darker shade of burgundy.
- Seal with a glossy top coat for a shiny finish.
Teal Perfection
Teal is a versatile color that brings a pop of freshness to your nails. This short nail design showcases a vibrant teal shade that is both bold and playful. The simplicity of the single color allows the beauty of the teal to stand out, making it a perfect choice for everyday wear. It’s a shade that works wonderfully with both warm and cool undertones, making it universally flattering.
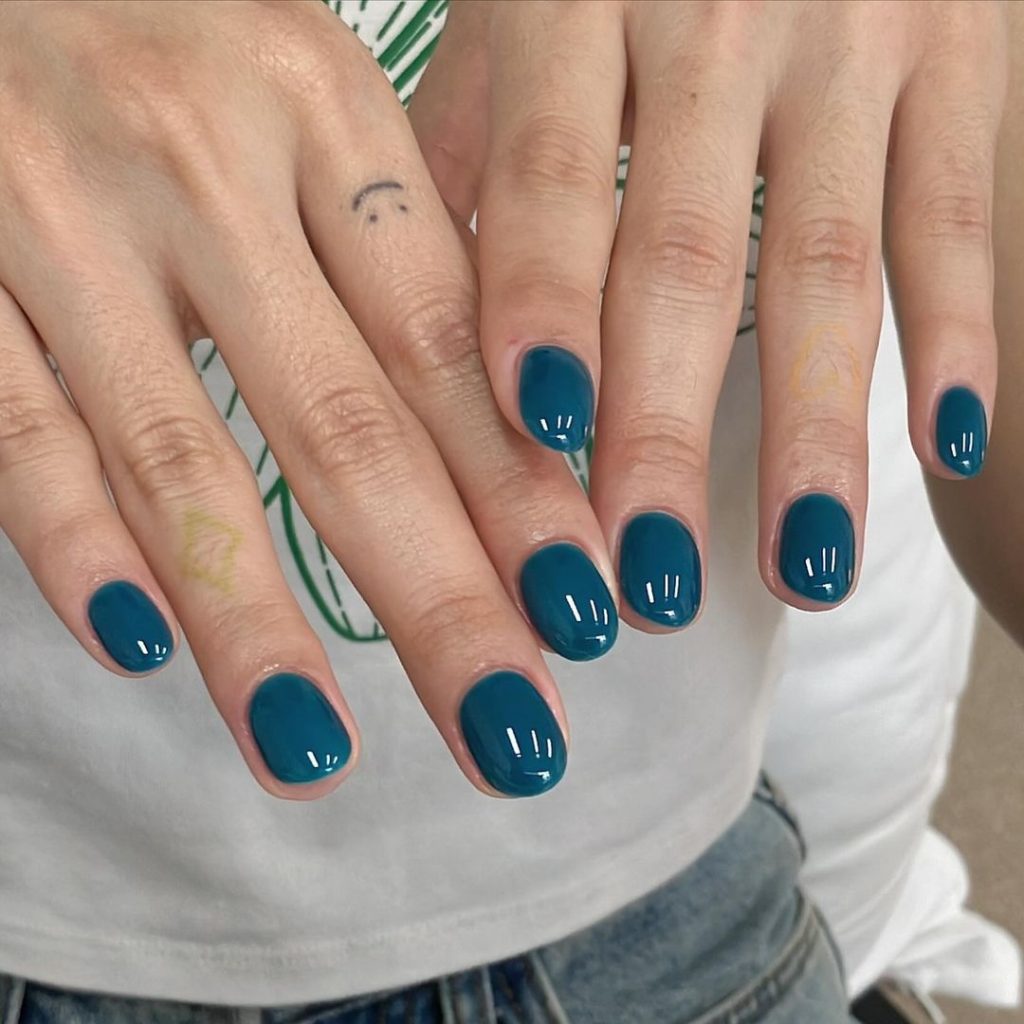
Consumables:
- Base coat: DND Gel Base Coat
- Nail polish: DND “Teal the Show”
- Top coat: Essie Speed Setter Top Coat
- Nail file and buffer: For shaping and smoothing
Creation Tips:
- Apply a base coat to protect your natural nails.
- Follow with two coats of teal polish, ensuring each layer dries completely.
- Finish with a top coat to add shine and longevity to your manicure.
Sunny Yellow Delight
Yellow nails are a cheerful and bold choice for fall, adding a splash of sunshine to your look. This vibrant yellow design is perfect for those who love to stand out. The bright, glossy finish makes your nails pop, and the almond shape adds a chic element. This shade is perfect for those who want to bring a bit of summer warmth into the cooler months.
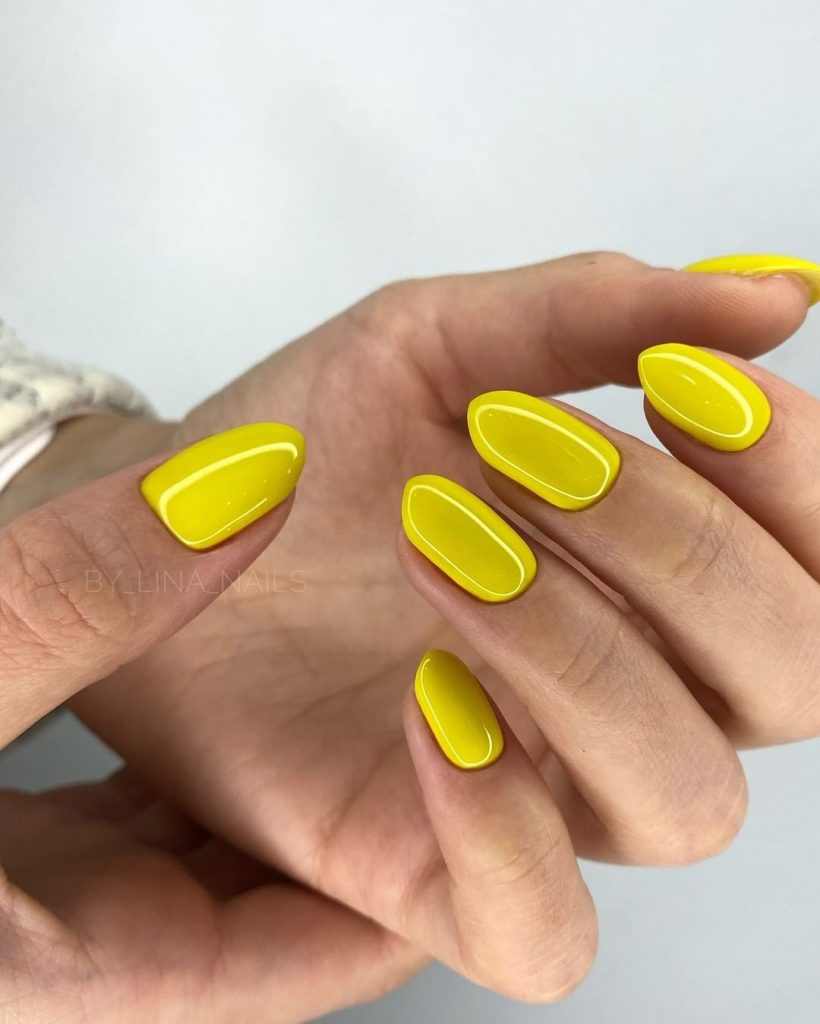
Consumables:
- Base coat: Essie First Base Coat
- Nail polish: OPI “Sun, Sea, and Sand in My Pants”
- Top coat: Seche Vite Dry Fast Top Coat
- Nail art tools: Cuticle pusher and nippers
Creation Tips:
- Begin with a base coat to ensure your nails are prepped and protected.
- Apply two coats of bright yellow polish, allowing ample drying time between coats.
- Use a top coat to lock in the color and add a brilliant shine.
Royal Blue Radiance
Royal blue nails exude a sense of luxury and sophistication. This deep blue manicure is perfect for the fall season, offering a bold yet classy look. The almond shape of the nails adds to the elegance, making it suitable for both everyday wear and special occasions. The high-gloss finish of the polish enhances the richness of the blue color.
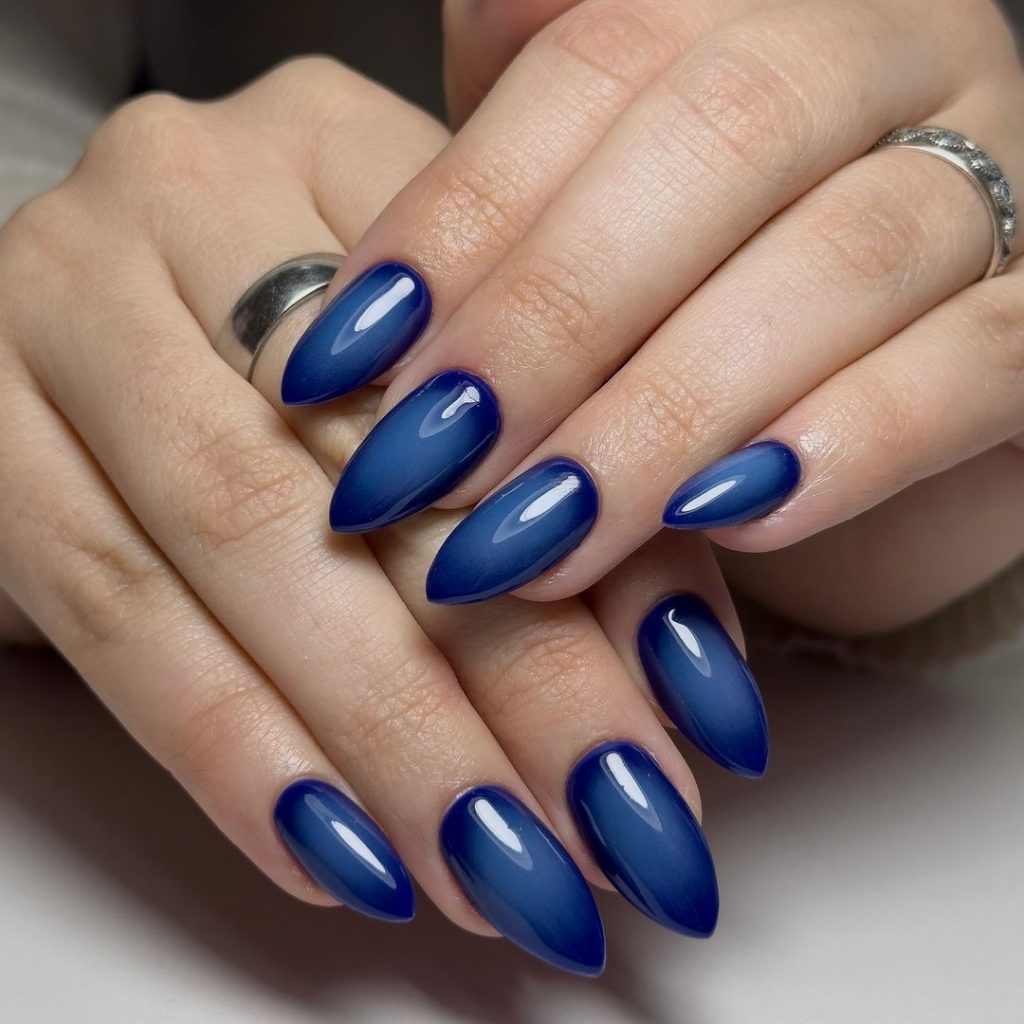
Consumables:
- Base coat: OPI Gel Base Coat
- Nail polish: Essie “Aruba Blue”
- Top coat: Sally Hansen Miracle Gel Top Coat
- Nail file and buffer: For shaping and smoothing
Creation Tips:
- Start with a protective base coat.
- Apply two coats of royal blue polish, letting each layer dry thoroughly.
- Finish with a top coat for added shine and durability.
Tortoiseshell Trend
The tortoiseshell trend is making waves this fall with its unique and stylish design. This look combines shades of brown and black to create a pattern reminiscent of tortoiseshell. The glossy finish adds a sleek touch, making it a standout choice for anyone looking to try something different. This design is perfect for both short and long nails.
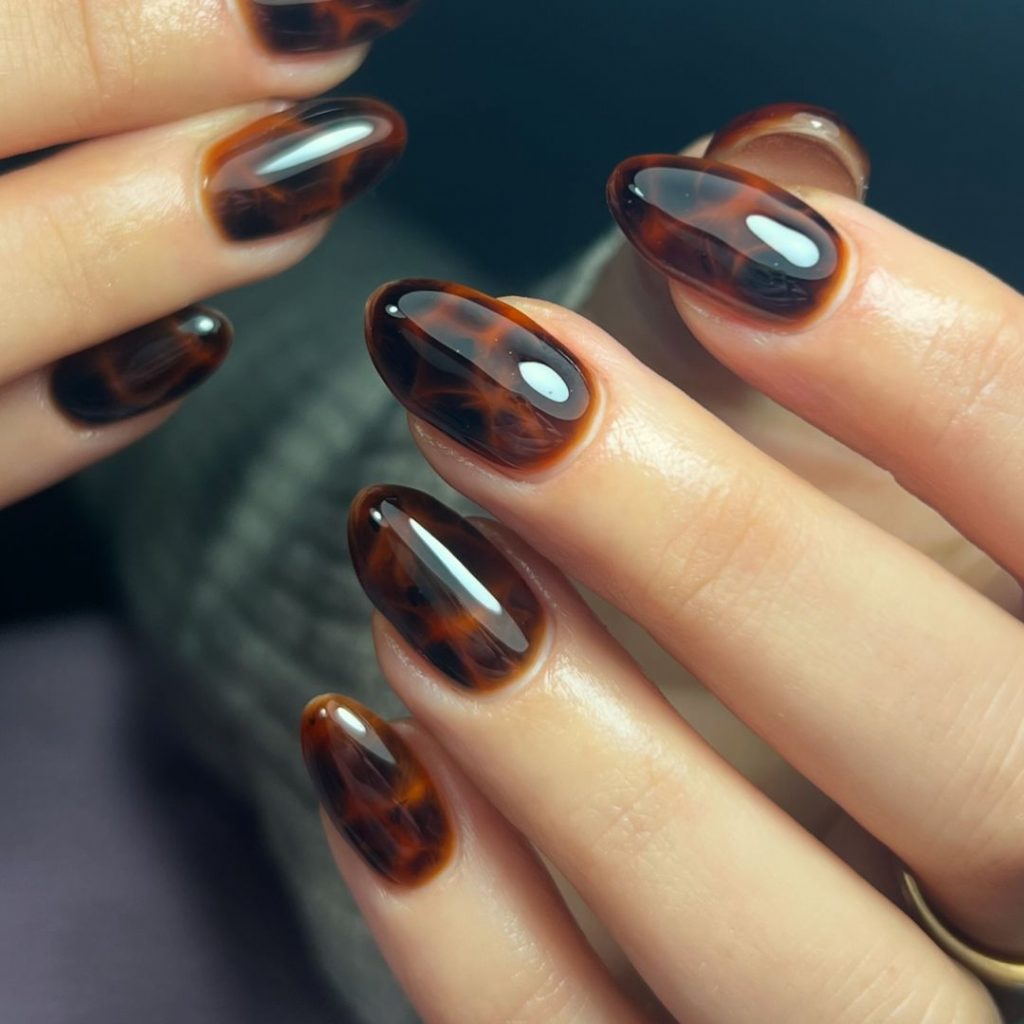
Consumables:
- Base coat: Essie Here to Stay Base Coat
- Nail polish: OPI “Black Onyx”, OPI “Suzi Needs a Loch-smith”
- Top coat: CND Super Shiny Top Coat
- Nail art tools: Nail art brush for detailing
Creation Tips:
- Apply a base coat to prep your nails.
- Use a combination of black and brown polishes to create the tortoiseshell effect. Apply in layers, using a nail art brush to blend.
- Seal with a top coat to give a polished, shiny finish.
Metallic Marvel
Metallic nails are back in a big way this fall. This stunning silver metallic design exudes a futuristic vibe while maintaining an air of sophistication. The smooth, reflective finish enhances the almond shape, making your nails look sleek and polished. This versatile shade pairs well with both casual and formal outfits, adding a touch of glamour to any look.
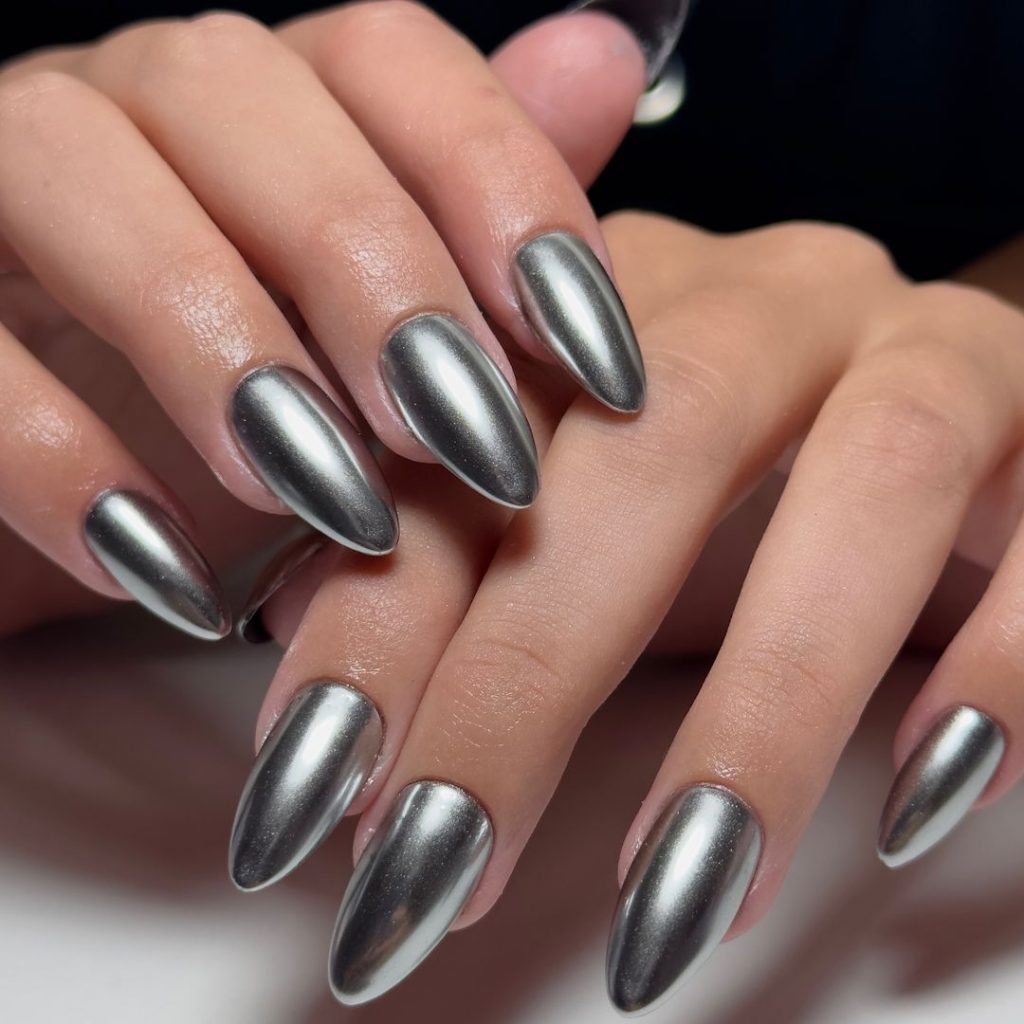
Consumables:
- Base coat: OPI Nail Envy
- Nail polish: Essie “No Place Like Chrome”
- Top coat: Seche Vite Dry Fast Top Coat
- Nail buffer: To create a smooth base for the metallic polish
Creation Tips:
- Start with a base coat to protect and strengthen your nails.
- Apply two coats of silver metallic polish, allowing each coat to dry thoroughly.
- Finish with a top coat to seal in the color and add extra shine.
Vibrant Zebra
This eye-catching design features a bold blue polish paired with a zebra print accent nail, creating a playful and trendy look. The combination of solid color and pattern adds depth and interest to your manicure. The short, rounded shape keeps it chic and easy to maintain, perfect for those who love a pop of color with a touch of whimsy.
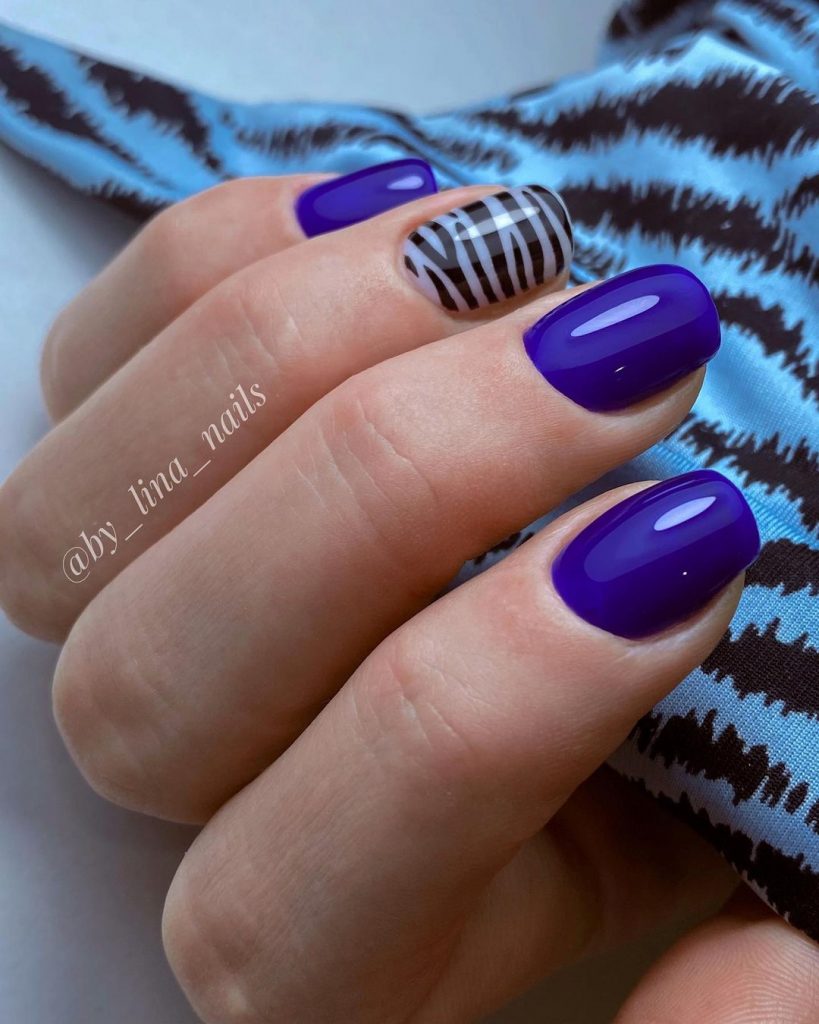
Consumables:
- Base coat: OPI Natural Nail Base Coat
- Nail polish: DND “Royal Blue”
- Top coat: Essie Gel Couture Top Coat
- Nail art tools: Nail striping brush and black polish for the zebra stripes
Creation Tips:
- Apply a base coat to protect your nails.
- Use two coats of blue polish on all nails except the accent nail.
- For the accent nail, create zebra stripes with a striping brush and black polish over a white base.
- Seal with a top coat for a long-lasting finish.
Pearlescent Shine
Pearlescent nails bring a touch of subtle elegance to your manicure. This delicate design features a soft, shimmering pearl finish that catches the light beautifully. The short, rounded nails enhance the natural look while adding a hint of sophistication. It’s an ideal choice for those who prefer understated yet stylish nails.
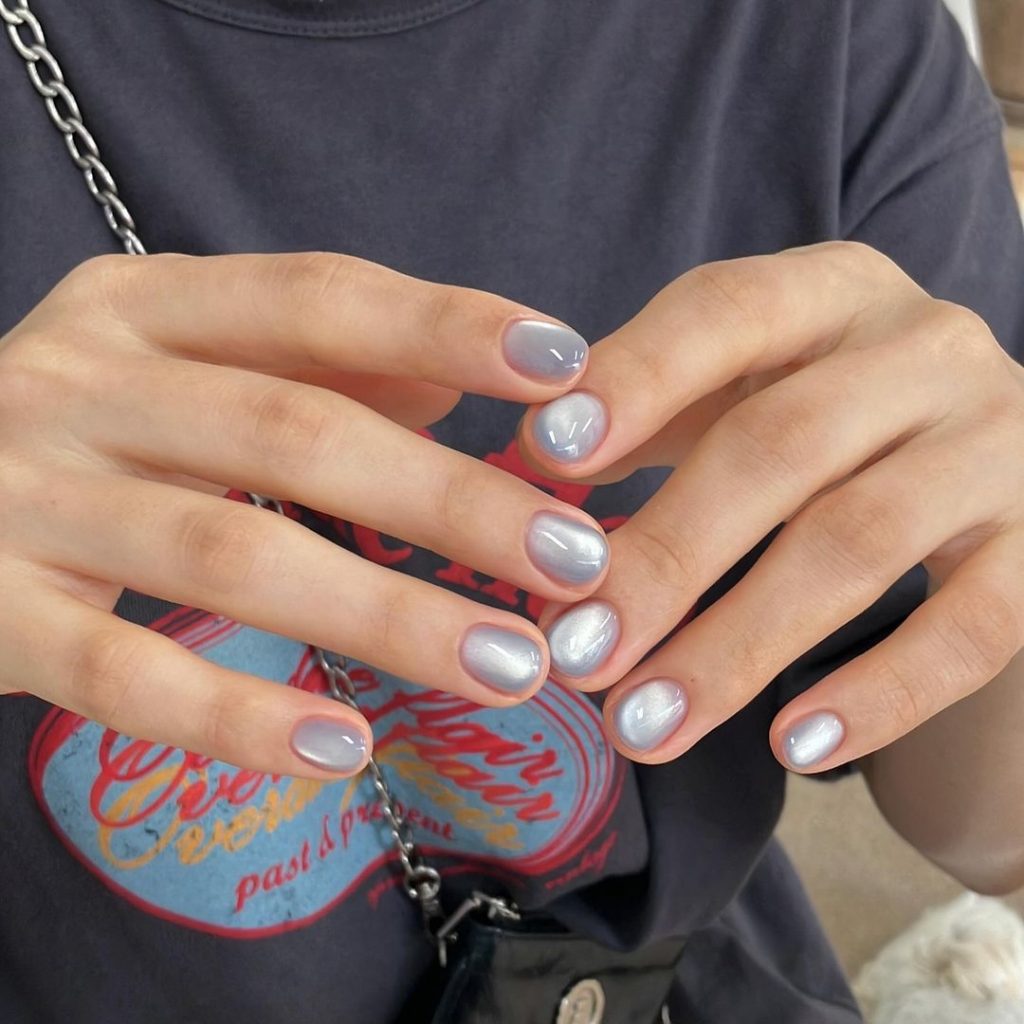
Consumables:
- Base coat: Essie Ridge Filling Base Coat
- Nail polish: OPI “Kyoto Pearl”
- Top coat: CND Super Shiny Top Coat
- Nail file: For shaping and smoothing the edges
Creation Tips:
- Start with a ridge-filling base coat to create a smooth surface.
- Apply two coats of pearlescent polish, allowing each to dry completely.
- Finish with a top coat to add shine and protect the polish.
Peachy Keen
Peach nails are a fresh and fun choice for the fall season. This design combines various shades of peach and a hint of glitter for a playful yet elegant look. The mix of matte and glossy finishes adds texture and depth to the manicure, making it perfect for any occasion. The almond shape enhances the overall aesthetic, giving your nails a chic and modern feel.
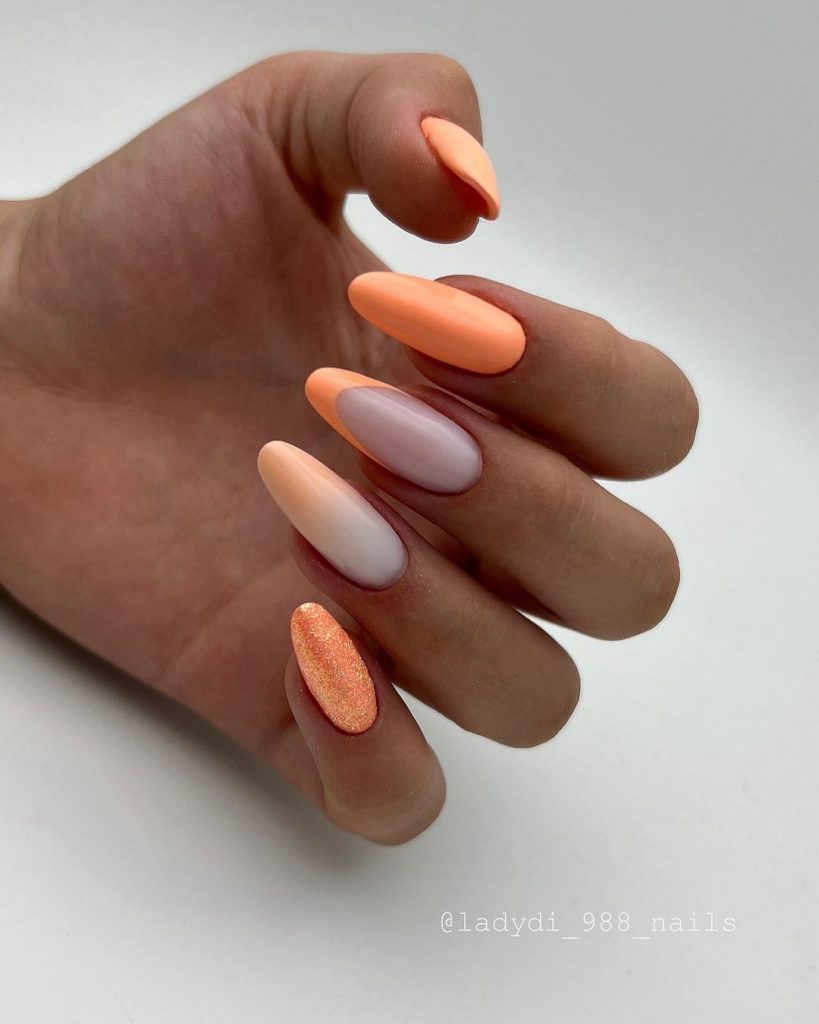
Consumables:
- Base coat: OPI Infinite Shine Primer
- Nail polish: Essie “Peach Side Babe”, OPI “Cosmo-Not Tonight Honey”
- Top coat: Sally Hansen Miracle Gel Top Coat
- Glitter polish: OPI “Kitty White”
Creation Tips:
- Apply a base coat to protect your natural nails.
- Use different shades of peach on each nail, applying two coats for full coverage.
- Add a touch of glitter polish on one or two accent nails.
- Seal with a top coat to ensure longevity and shine.
Green Envy
Green nails are making a bold statement this fall. This deep, rich green design features a striking combination of solid color and intricate patterns. The long, square shape adds a touch of drama, making it perfect for those who love to stand out. The glossy finish enhances the vibrancy of the green, making your nails look sophisticated and stylish.
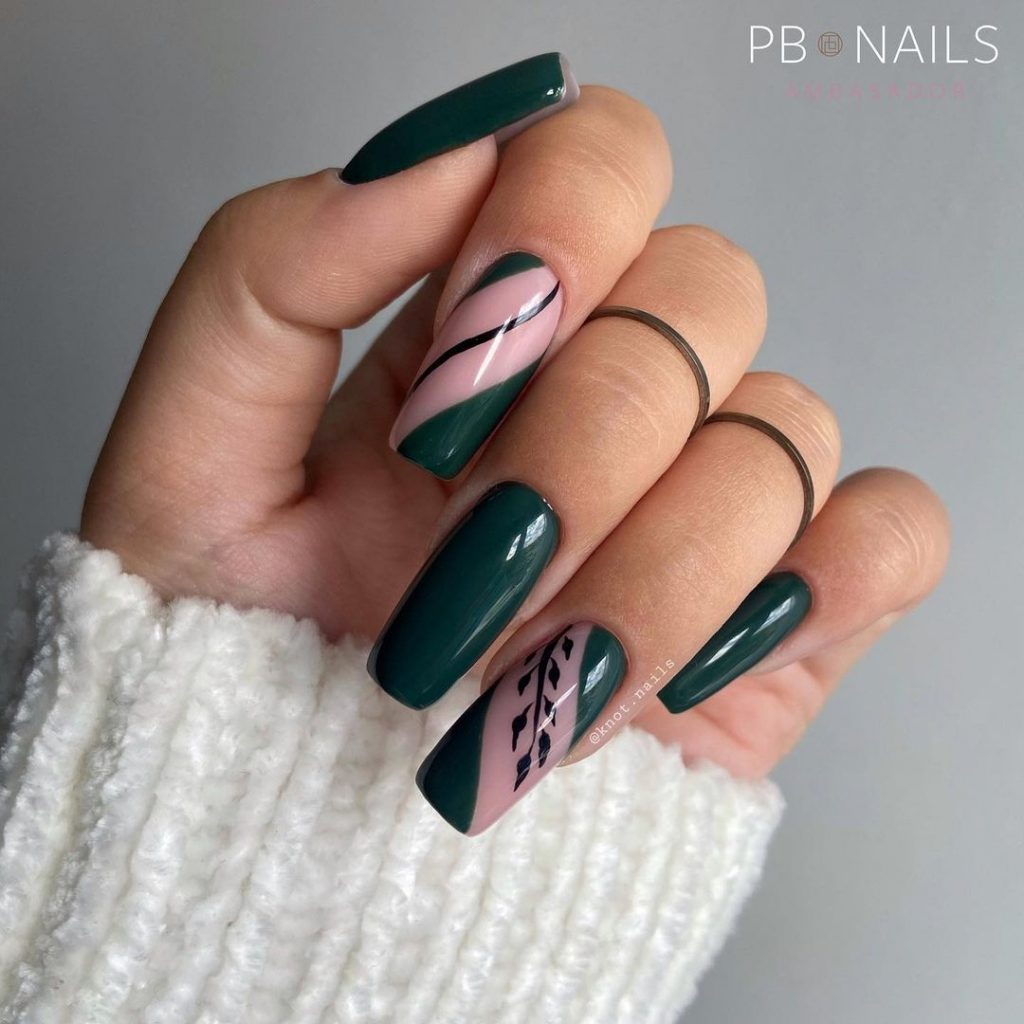
Consumables:
- Base coat: DND Gel Base Coat
- Nail polish: Essie “Off Tropic”
- Top coat: Seche Vite Dry Fast Top Coat
- Nail art tools: Striping tape and detail brush
Creation Tips:
- Apply a base coat to prep your nails.
- Paint all nails with two coats of deep green polish.
- Use striping tape and a detail brush to create patterns on one or two nails.
- Finish with a top coat to add shine and protect the design.
Neon Green Glow
Neon green nails are making a bold statement this fall. This vibrant, eye-catching color is perfect for those who love to stand out. The long, stiletto shape enhances the dramatic effect, making your nails look edgy and chic. The slight iridescent finish adds a futuristic touch to this bold look.
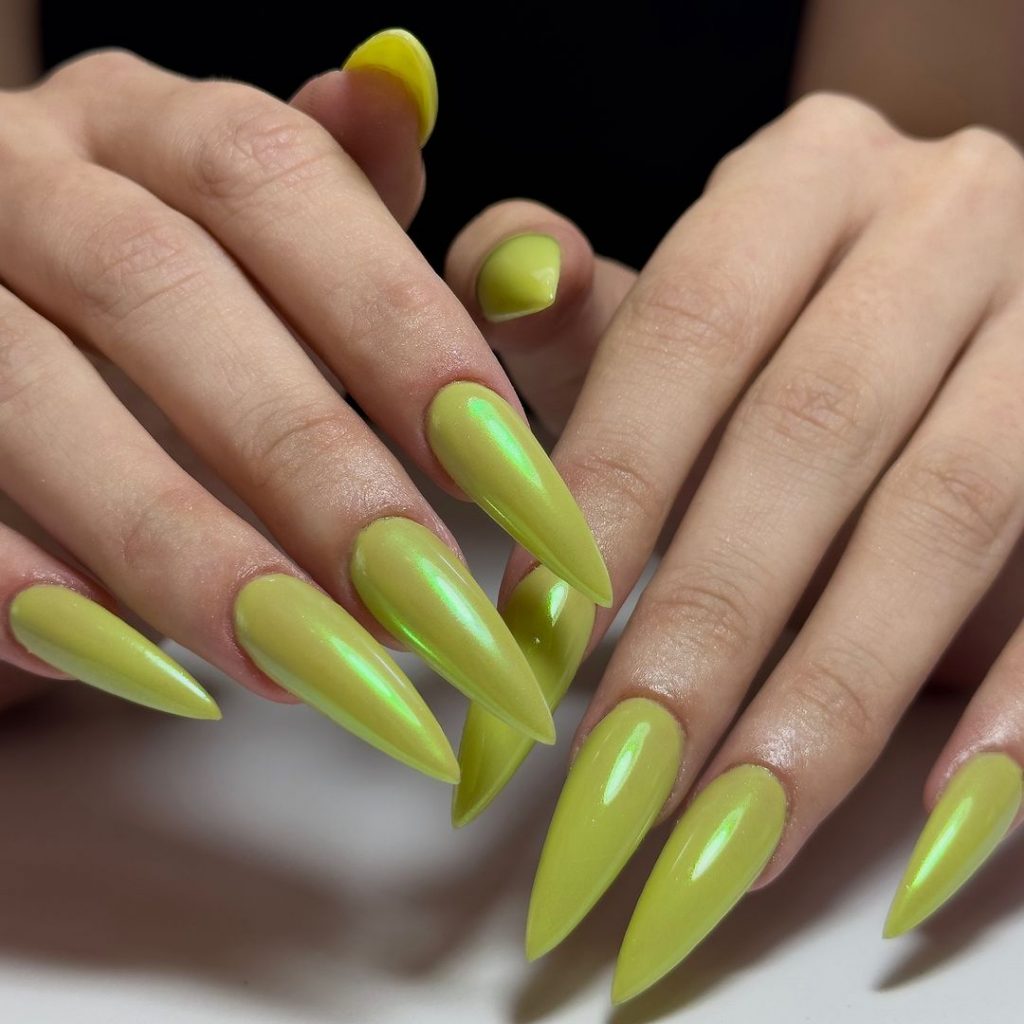
Consumables:
- Base coat: OPI Natural Nail Base Coat
- Nail polish: DND “Neon Green”
- Top coat: Essie Gel Couture Top Coat
- Nail art tools: Fine brush for precise application
Creation Tips:
- Apply a base coat to protect your nails.
- Use two coats of neon green polish, letting each coat dry thoroughly.
- Finish with a top coat to add shine and durability.
Golden Glitter Glam
Gold glitter nails are a timeless choice that adds a touch of glamour to any look. This design features a rich, golden glitter polish that sparkles in the light. The long, coffin shape enhances the luxurious feel, making your nails look elegant and festive. This style is perfect for special occasions or when you want to add some sparkle to your everyday look.
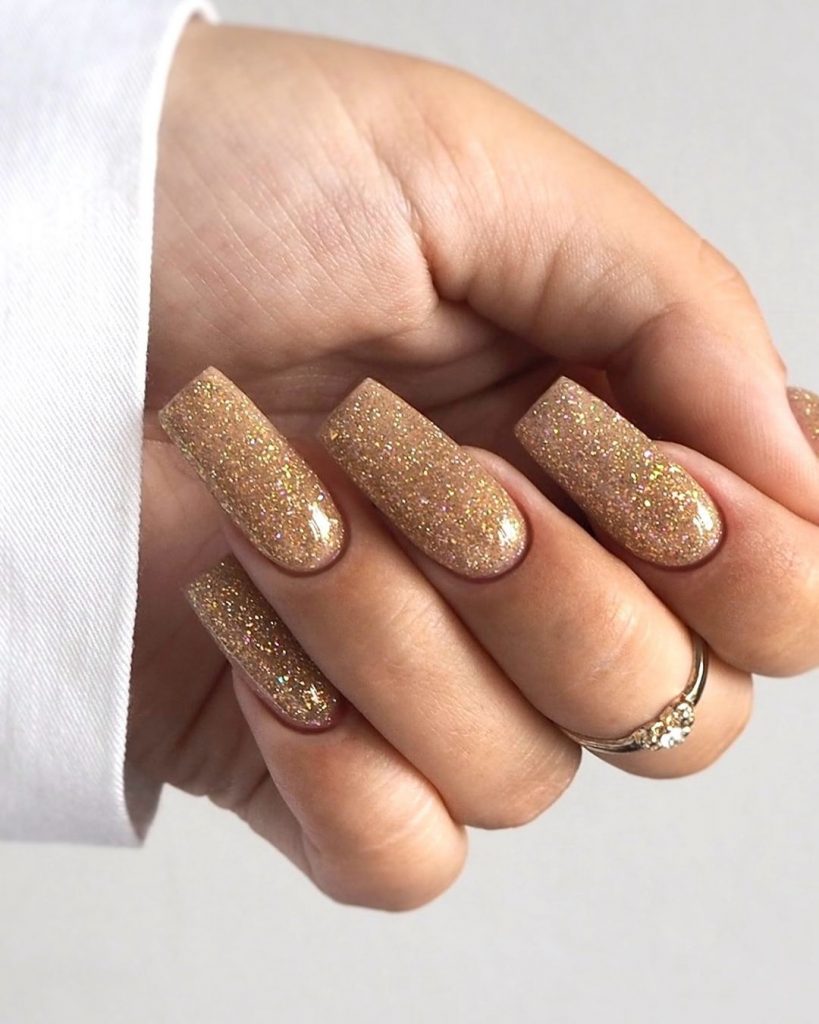
Consumables:
- Base coat: OPI Nail Envy
- Nail polish: Essie “Summit of Style”
- Top coat: Seche Vite Dry Fast Top Coat
- Nail art tools: Nail buffer for a smooth base
Creation Tips:
- Start with a base coat to protect and strengthen your nails.
- Apply two coats of gold glitter polish, allowing each to dry thoroughly.
- Seal with a top coat to lock in the glitter and add extra shine.
Autumn Artistry
This intricate design combines autumnal shades with elegant nail art. The mix of matte and glossy finishes, along with the use of gold foil accents, creates a sophisticated and artistic look. The long, almond shape provides a perfect canvas for the detailed design, making your nails look like miniature masterpieces.
Consumables:
- Base coat: DND Gel Base Coat
- Nail polish: OPI “Stay Off the Lawn”, Essie “Peach Side Babe”
- Top coat: Sally Hansen Miracle Gel Top Coat
- Nail art tools: Detail brush, gold foil flakes
Creation Tips:
- Apply a base coat to protect your nails.
- Use different shades of polish to create the base colors.
- Add gold foil accents with a detail brush for an artistic touch.
- Finish with a top coat to add shine and protect the design.
Sunset Ombre
This stunning ombre design transitions from a soft gold to a vibrant orange, mimicking the colors of a fall sunset. The gradient effect adds depth and dimension, making your nails look captivating and unique. The long, stiletto shape enhances the dramatic effect, perfect for those who love to make a statement.
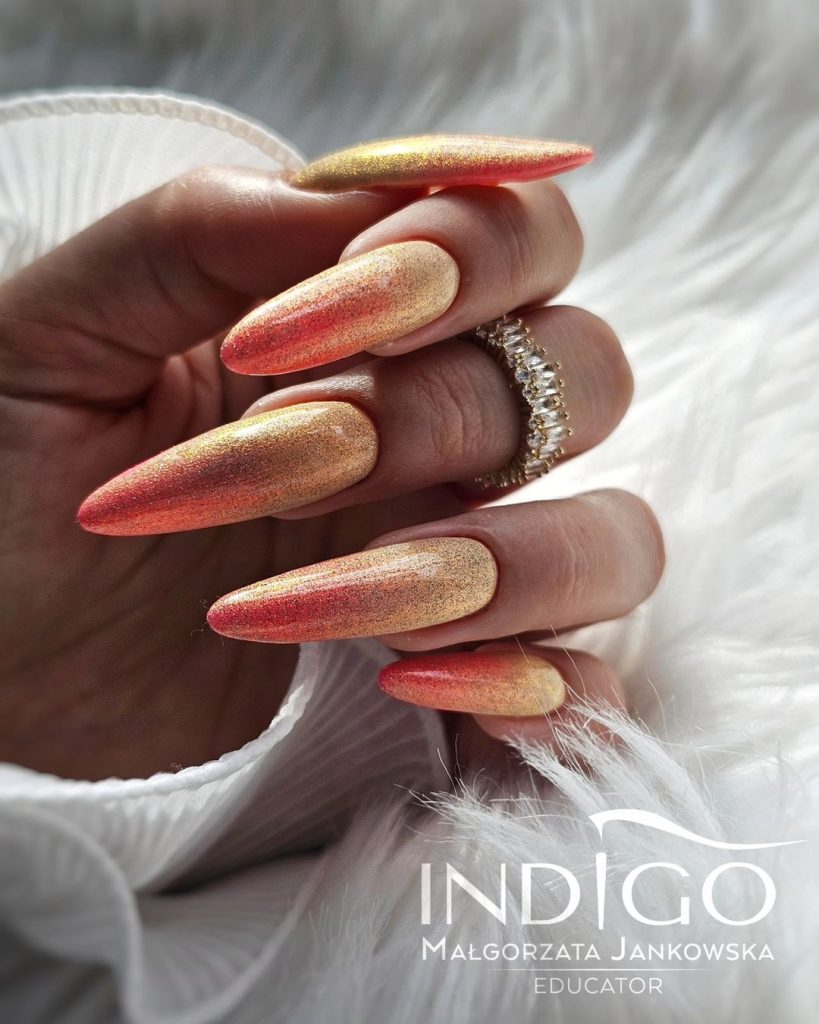
Consumables:
- Base coat: Essie First Base Coat
- Nail polish: OPI “Cosmo-Not Tonight Honey”, DND “Orange Flame”
- Top coat: CND Super Shiny Top Coat
- Nail art tools: Sponge for creating the gradient effect
Creation Tips:
- Start with a base coat to ensure your nails are prepped and protected.
- Apply the gradient effect using a sponge, blending the gold and orange shades seamlessly.
- Finish with a top coat to lock in the colors and add a glossy finish.
Forest Green French
This modern take on the classic French manicure features a deep green color with glitter accents. The mix of solid color and glitter tips adds a festive touch, making it perfect for the fall season. The long, square shape enhances the overall look, giving your nails a sleek and stylish appearance.
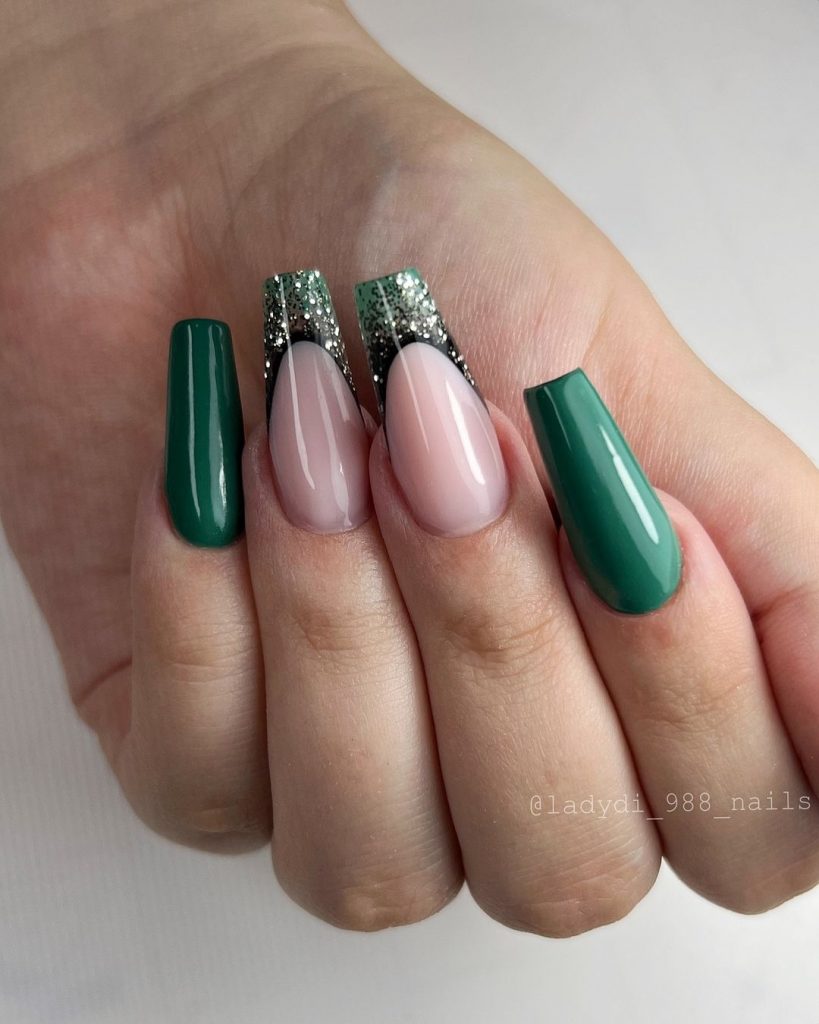
Consumables:
- Base coat: OPI Infinite Shine Primer
- Nail polish: Essie “Off Tropic”, OPI “Kitty White” for glitter
- Top coat: Seche Vite Dry Fast Top Coat
- Nail art tools: Striping tape for precise application
Creation Tips:
- Apply a base coat to protect your natural nails.
- Paint the nails with deep green polish, leaving the tips bare for the glitter.
- Use striping tape to create clean lines and apply the glitter polish on the tips.
- Seal with a top coat to ensure longevity and shine.
Blue and Coral Combo
This striking design combines a vibrant blue with a bold coral accent. The contrast between the deep blue and the bright coral creates a dynamic look that is both playful and stylish. The long, coffin shape adds a modern twist to the classic color combo, making your nails look trendy and chic.
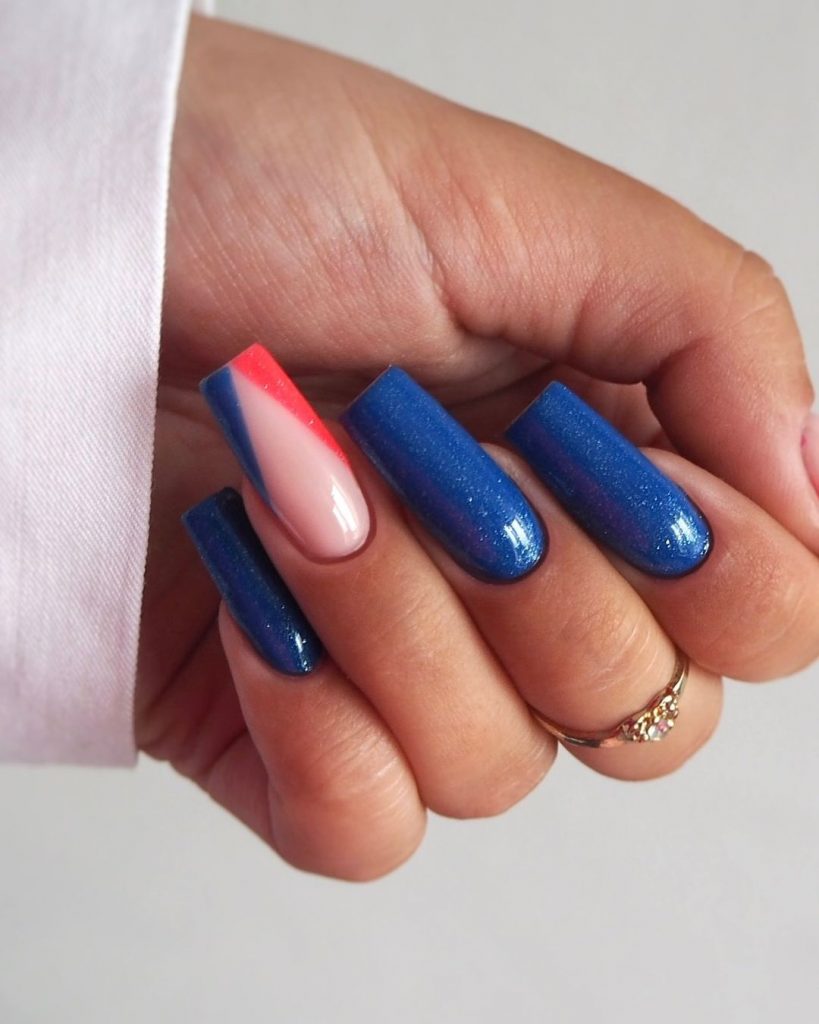
Consumables:
- Base coat: OPI Natural Nail Base Coat
- Nail polish: DND “Blue Steel”, Essie “Coral Reef”
- Top coat: Essie Gel Couture Top Coat
- Nail art tools: Striping tape for clean lines
Creation Tips:
- Apply a base coat to protect your nails.
- Use two coats of blue polish on all nails except the accent nail.
- On the accent nail, create a diagonal line using striping tape and fill in with coral polish.
- Finish with a top coat to add shine and protect the design.
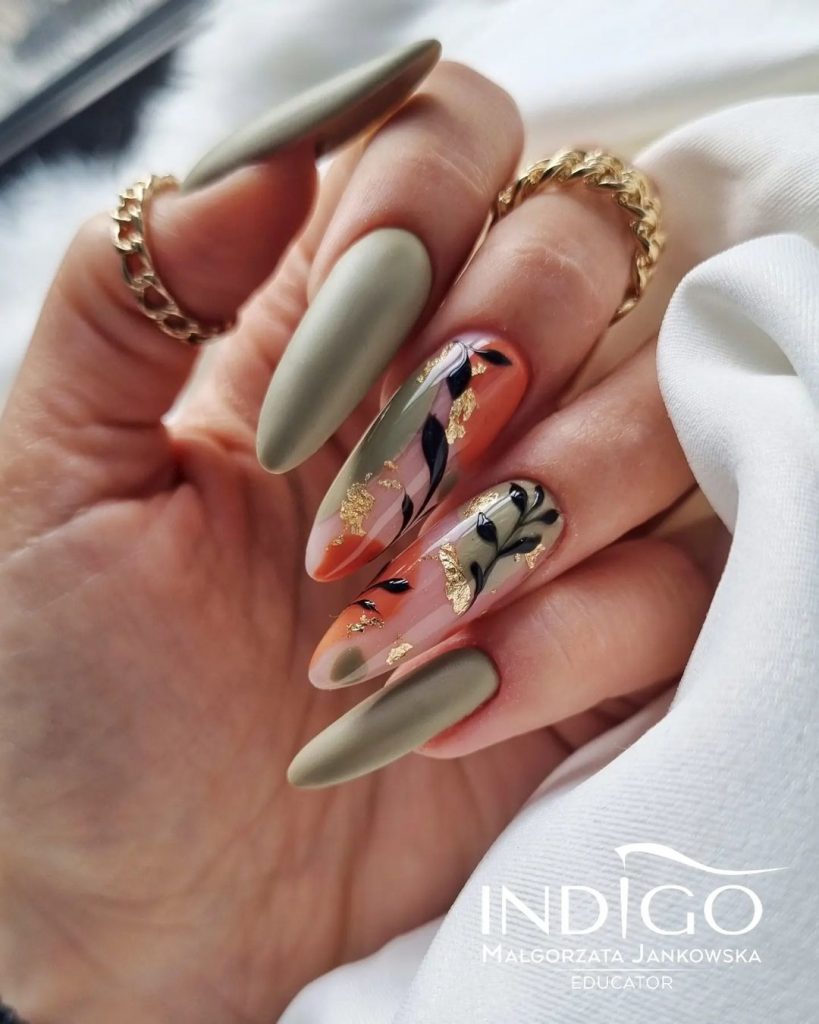
Olive Green Elegance
This sophisticated design features a combination of olive green and gold glitter. The elegant green color is perfect for the fall season, while the glitter adds a touch of sparkle. The mix of glossy and matte finishes creates a refined look that is both stylish and versatile.
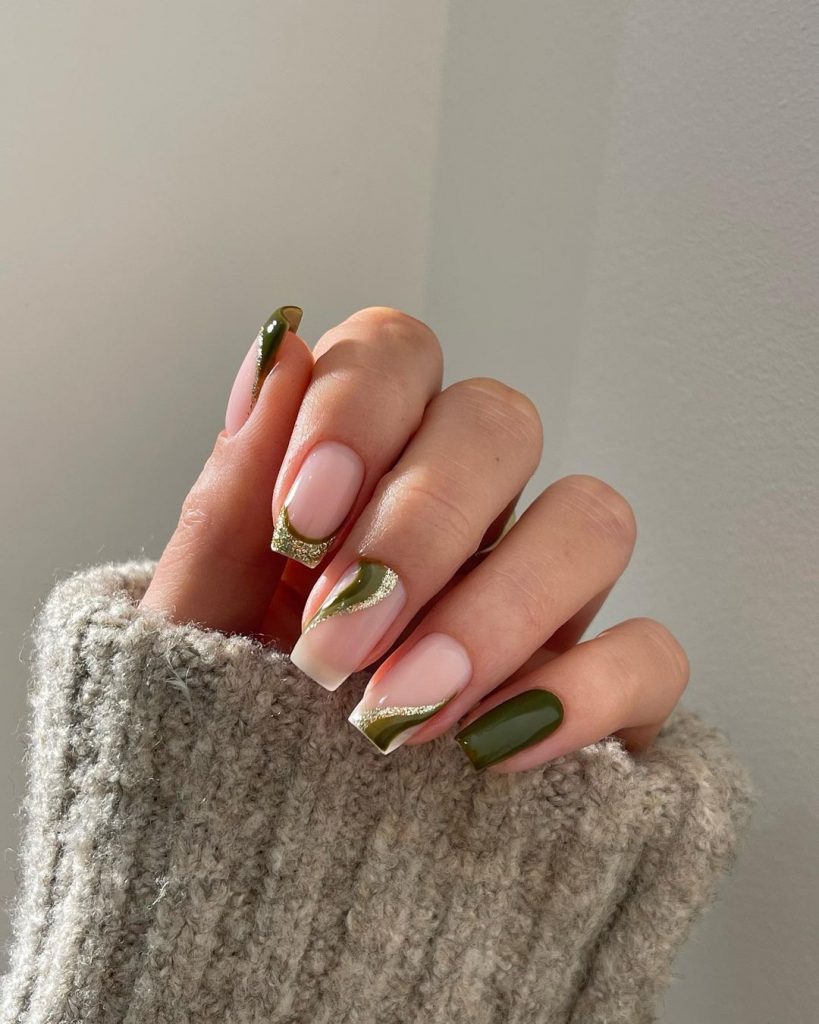
Consumables:
- Base coat: Essie Ridge Filling Base Coat
- Nail polish: OPI “Olive for Green”
- Top coat: Seche Vite Dry Fast Top Coat
- Nail art tools: Fine brush for glitter application
Creation Tips:
- Start with a ridge-filling base coat to create a smooth surface.
- Apply two coats of olive green polish, letting each coat dry completely.
- Add gold glitter accents with a fine brush for a touch of sparkle.
- Seal with a top coat to add shine and protect the polish.
Nude Glitter Glam
Nude nails with a touch of glitter are a classic and chic choice for any occasion. This design features a variety of nude shades, complemented by gold glitter accents. The short, oval shape keeps the look elegant and understated, perfect for those who prefer a minimalist yet stylish manicure.
Consumables:
- Base coat: OPI Nail Envy
- Nail polish: Essie “Ballet Slippers”, OPI “Samoan Sand”
- Top coat: CND Super Shiny Top Coat
- Nail art tools: Nail buffer for a smooth base
Creation Tips:
- Start with a base coat to protect and strengthen your nails.
- Apply two coats of various nude shades, allowing each to dry thoroughly.
- Add gold glitter accents for a touch of glam.
- Seal with a top coat to lock in the glitter and add extra shine.
Leafy Green Delight
This earthy design features a soft green shade with delicate leaf accents. The combination of solid color and subtle nail art creates a natural and elegant look. The short, rounded shape keeps it practical and easy to maintain, perfect for everyday wear.
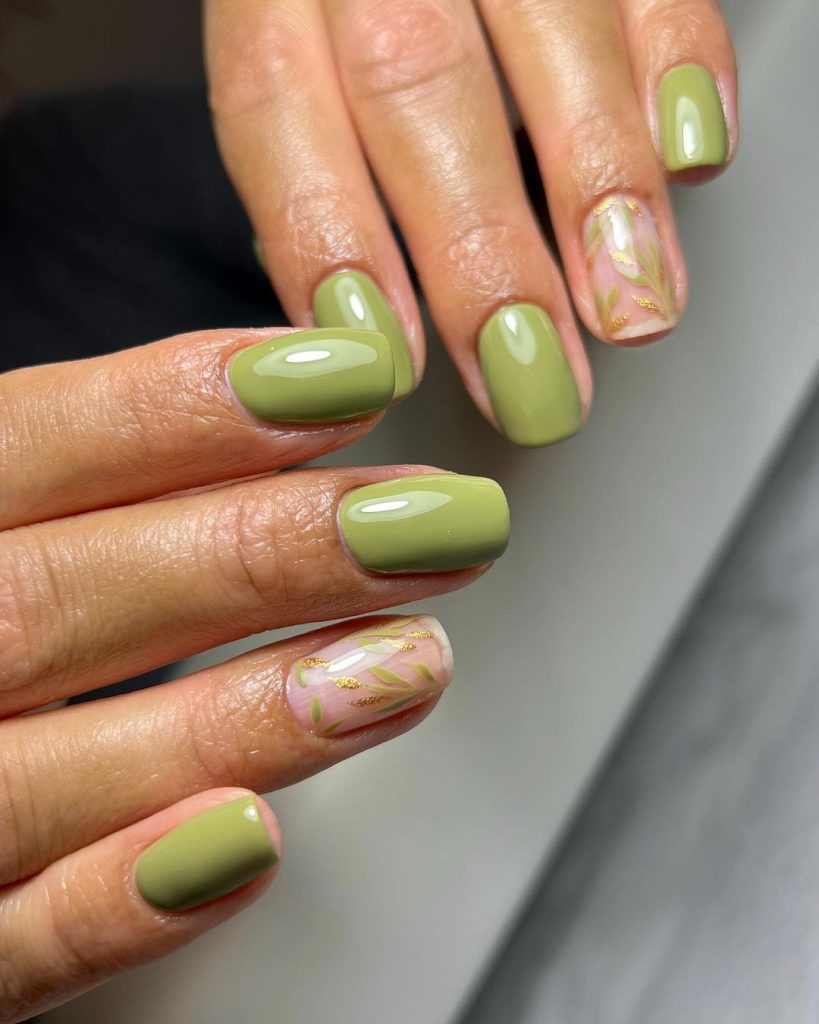
Consumables:
- Base coat: OPI Natural Nail Base Coat
- Nail polish: Essie “Mint Candy Apple”
- Top coat: Sally Hansen Miracle Gel Top Coat
- Nail art tools: Fine brush for leaf detailing
Creation Tips:
- Apply a base coat to protect your nails.
- Use two coats of soft green polish, letting each coat dry thoroughly.
- Create delicate leaf designs using a fine brush and a darker green polish.
- Finish with a top coat to add shine and durability.
Candy Corn Tips
This fun and festive design is perfect for the fall season. The long, almond-shaped nails feature a clear base with vibrant candy corn-colored tips. The gradient effect from yellow to orange to red mimics the look of candy corn, adding a playful touch to your manicure.

Consumables:
- Base coat: Essie First Base Coat
- Nail polish: OPI “Sun, Sea, and Sand in My Pants”, DND “Orange Flame”, OPI “Big Apple Red”
- Top coat: Seche Vite Dry Fast Top Coat
- Nail art tools: Sponge for creating the gradient effect
Creation Tips:
- Start with a base coat to ensure your nails are prepped and protected.
- Apply the gradient effect using a sponge, blending the yellow, orange, and red shades seamlessly.
- Finish with a top coat to lock in the colors and add a glossy finish.
Metallic Chocolate
This mesmerizing metallic chocolate design combines rich brown tones with a shimmering metallic finish. The short, rounded nails give this look a practical and elegant feel, making it perfect for everyday wear. The metallic effect catches the light beautifully, adding a touch of glamour to this otherwise understated color.
Consumables:
- Base coat: OPI Natural Nail Base Coat
- Nail polish: Essie “Leggy Legend”
- Top coat: Seche Vite Dry Fast Top Coat
- Nail buffer: For a smooth base
Creation Tips:
- Apply a base coat to protect your nails.
- Use two coats of metallic chocolate polish, letting each coat dry thoroughly.
- Finish with a top coat to add shine and longevity.
Teal Delight
This chic teal design is a perfect blend of bold and sophisticated. The rich teal color is striking and elegant, making it ideal for the fall season. The short, square shape enhances the modern look, making your nails appear sleek and stylish. This shade of teal works beautifully with various skin tones, adding a touch of elegance to any outfit.
Consumables:
- Base coat: OPI Infinite Shine Primer
- Nail polish: DND “Teal the Show”
- Top coat: Essie Gel Couture Top Coat
- Nail file and buffer: For shaping and smoothing
Creation Tips:
- Start with a base coat to protect and prep your nails.
- Apply two coats of teal polish, allowing each to dry completely.
- Finish with a top coat to add shine and ensure durability.
Autumn Leaves
This festive design captures the essence of fall with its vibrant orange and leaf accents. The combination of bright orange polish and delicate leaf art creates a playful and seasonal look. The short, rounded shape keeps it practical and easy to maintain, perfect for those who love to celebrate the fall season with their nails.
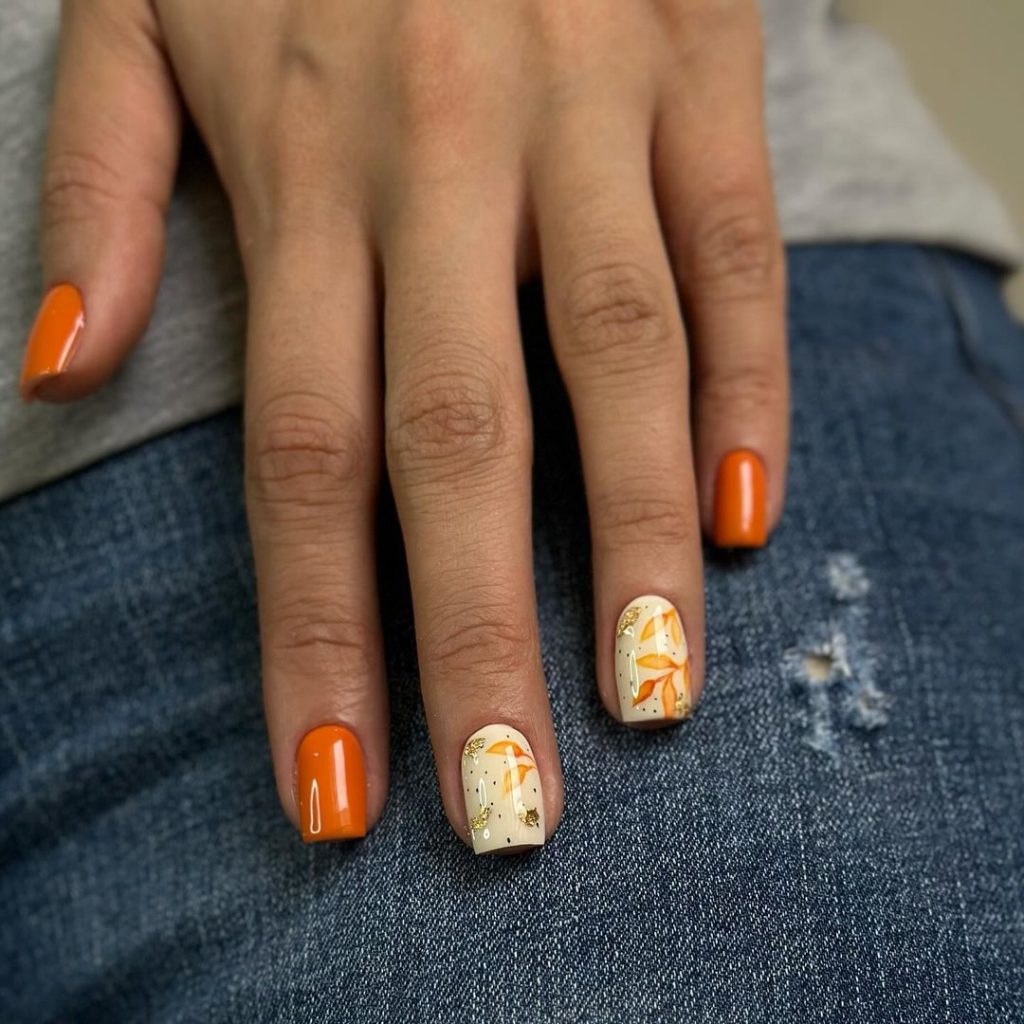
Consumables:
- Base coat: Essie Ridge Filling Base Coat
- Nail polish: OPI “A Good Man-darin is Hard to Find”
- Top coat: Sally Hansen Miracle Gel Top Coat
- Nail art tools: Fine brush for leaf detailing
Creation Tips:
- Apply a base coat to protect your nails.
- Use two coats of orange polish on all nails except the accent nail.
- On the accent nail, create leaf designs using a fine brush and a darker orange or brown polish.
- Finish with a top coat to add shine and protect the design.
Leopard Print Accent
Leopard print nails are a timeless trend that never goes out of style. This design features bold red nails with a leopard print accent, creating a striking and fashionable look. The almond shape adds a touch of elegance, making your nails appear sleek and sophisticated. This design is perfect for those who love to make a bold statement.
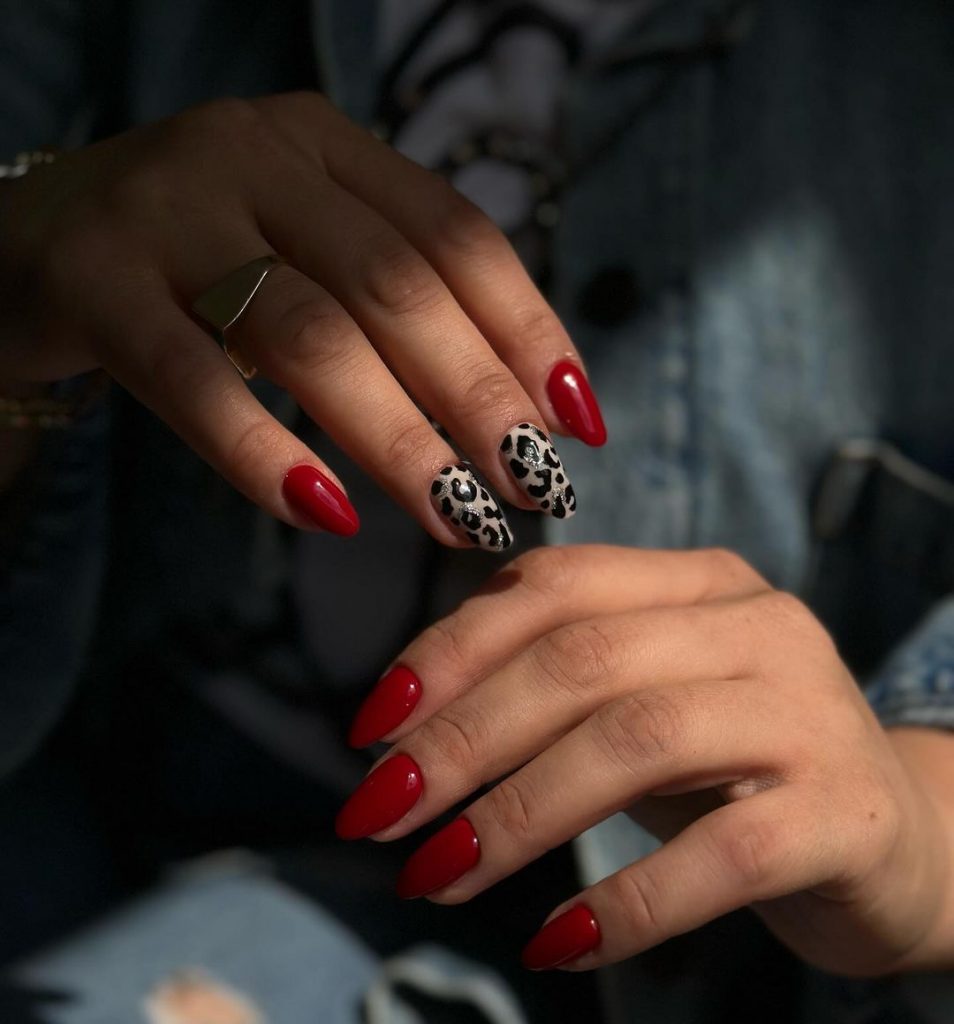
Consumables:
- Base coat: OPI Natural Nail Base Coat
- Nail polish: DND “Fire Red”, Essie “Licorice” for leopard spots
- Top coat: Seche Vite Dry Fast Top Coat
- Nail art tools: Dotting tool for leopard spots
Creation Tips:
- Apply a base coat to protect your nails.
- Use two coats of red polish on all nails except the accent nail.
- Create leopard spots on the accent nail using a dotting tool and black polish.
- Finish with a top coat to add shine and ensure durability.
Bright Orange Glow
This vibrant orange design is perfect for adding a pop of color to your fall look. The bright, glossy finish makes your nails stand out, while the short, rounded shape keeps it practical and stylish. This shade of orange is ideal for those who love bold, eye-catching nails.
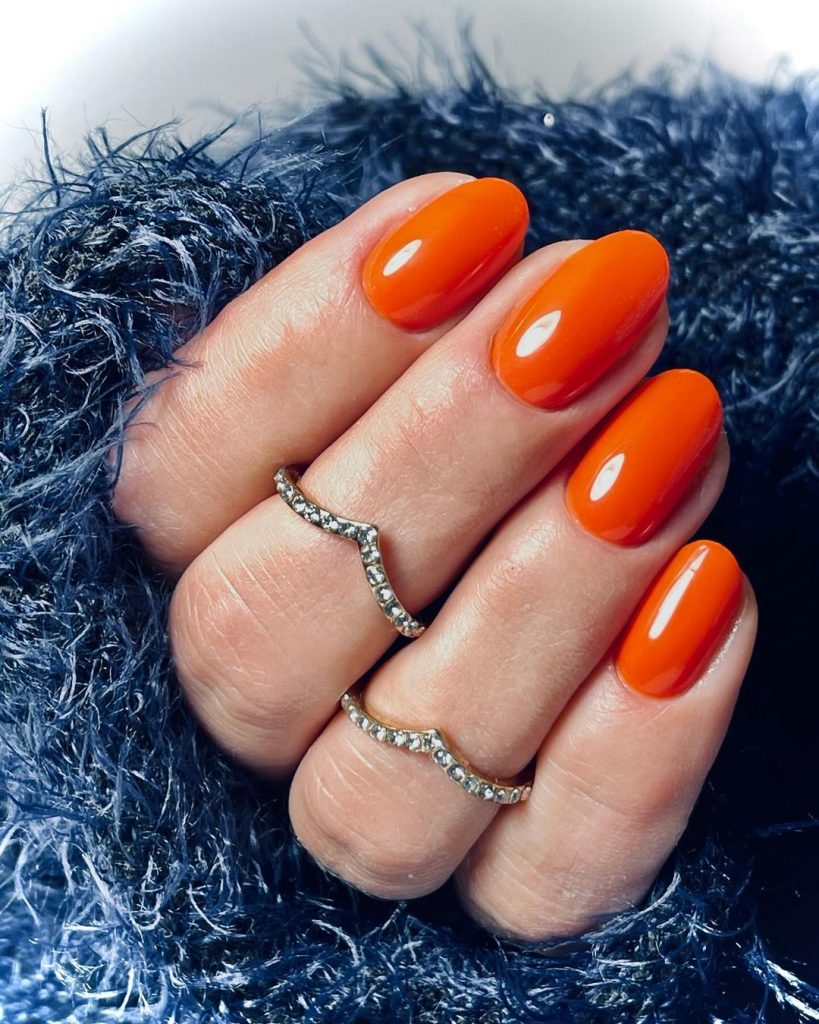
Consumables:
- Base coat: OPI Nail Envy
- Nail polish: Essie “Tangerine Tease”
- Top coat: CND Super Shiny Top Coat
- Nail file and buffer: For shaping and smoothing
Creation Tips:
- Apply a base coat to protect and strengthen your nails.
- Use two coats of bright orange polish, allowing each to dry thoroughly.
- Finish with a top coat to add shine and protect the color.
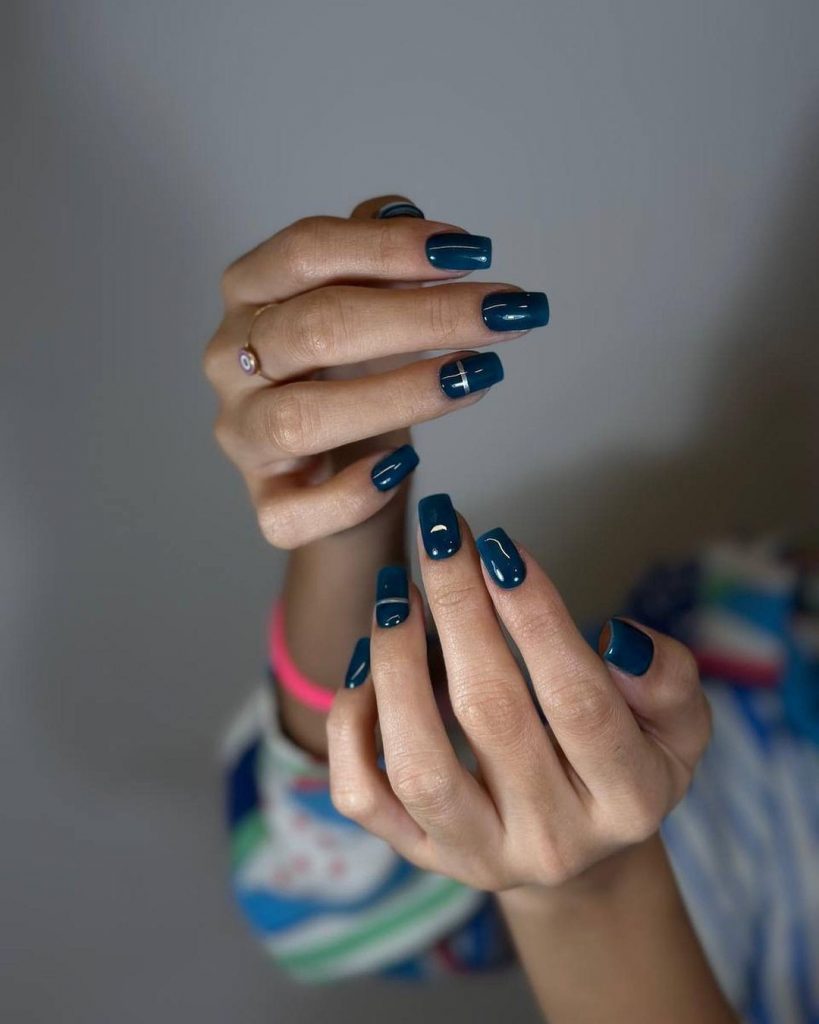
Sleek Navy Blue
Navy blue nails are a classic choice for fall. This sleek design features a deep navy polish with a high-gloss finish, creating a sophisticated and timeless look. The short, rounded shape makes it perfect for everyday wear, adding a touch of elegance to your style.

Consumables:
- Base coat: OPI Infinite Shine Primer
- Nail polish: DND “Blue Velvet”
- Top coat: Essie Gel Couture Top Coat
- Nail buffer: For a smooth base
Creation Tips:
- Start with a base coat to protect and prep your nails.
- Apply two coats of navy blue polish, letting each coat dry completely.
- Finish with a top coat to add shine and ensure durability.
Save Pin