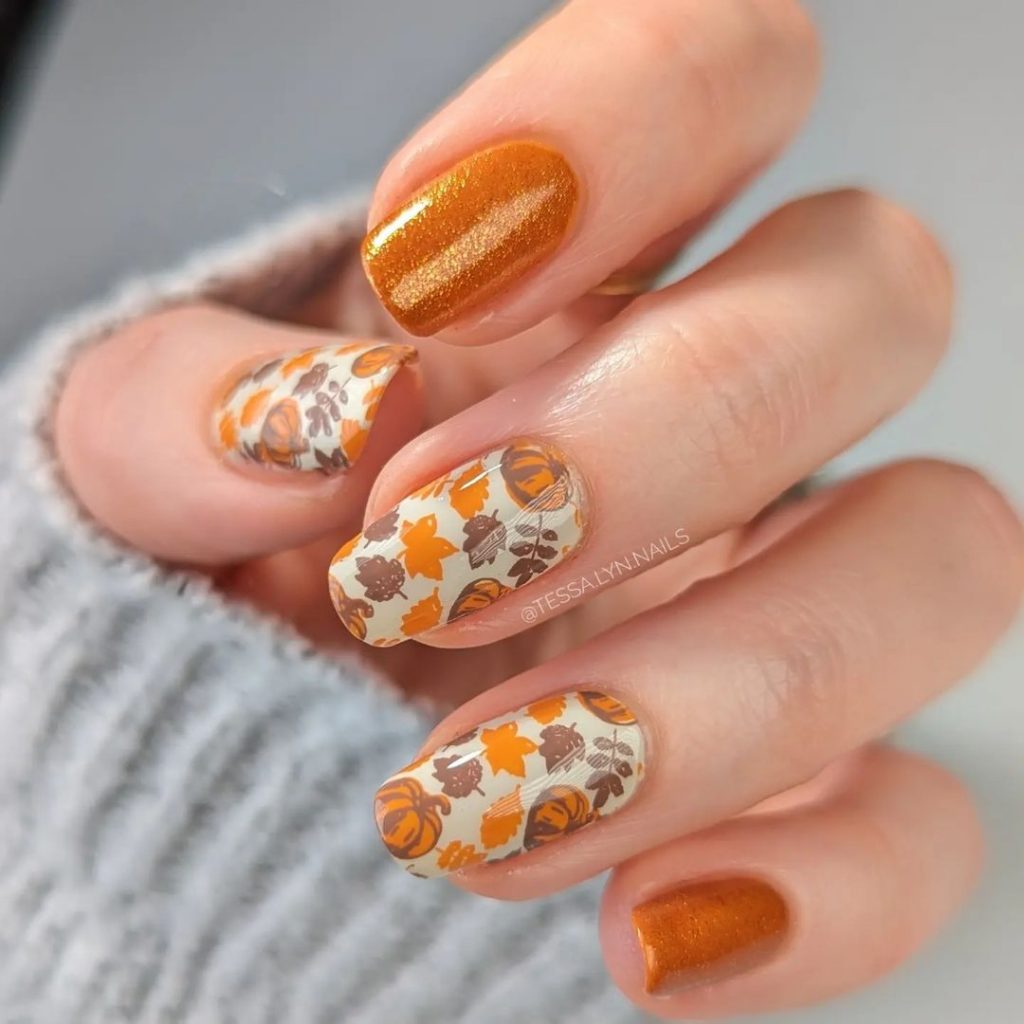
Fall is upon us, and there’s no better way to celebrate the season than by adorning your nails with stunning fall leaf nail art. But have you ever wondered how to achieve these intricate designs at home? How do you choose the best materials and tools to create the perfect autumn manicure? Let’s explore the world of fall leaf nail art and uncover the secrets to achieving these gorgeous looks!
Elegant Purple Ombre with White Leaves
This elegant nail design features a gradient purple base transitioning from deep violet to soft lavender, accented with delicate white leaf patterns. The combination of the ombre effect and the intricate leaf designs creates a sophisticated and dreamy look, perfect for adding a touch of elegance to any outfit. The glossy finish adds a refined touch to this chic manicure.
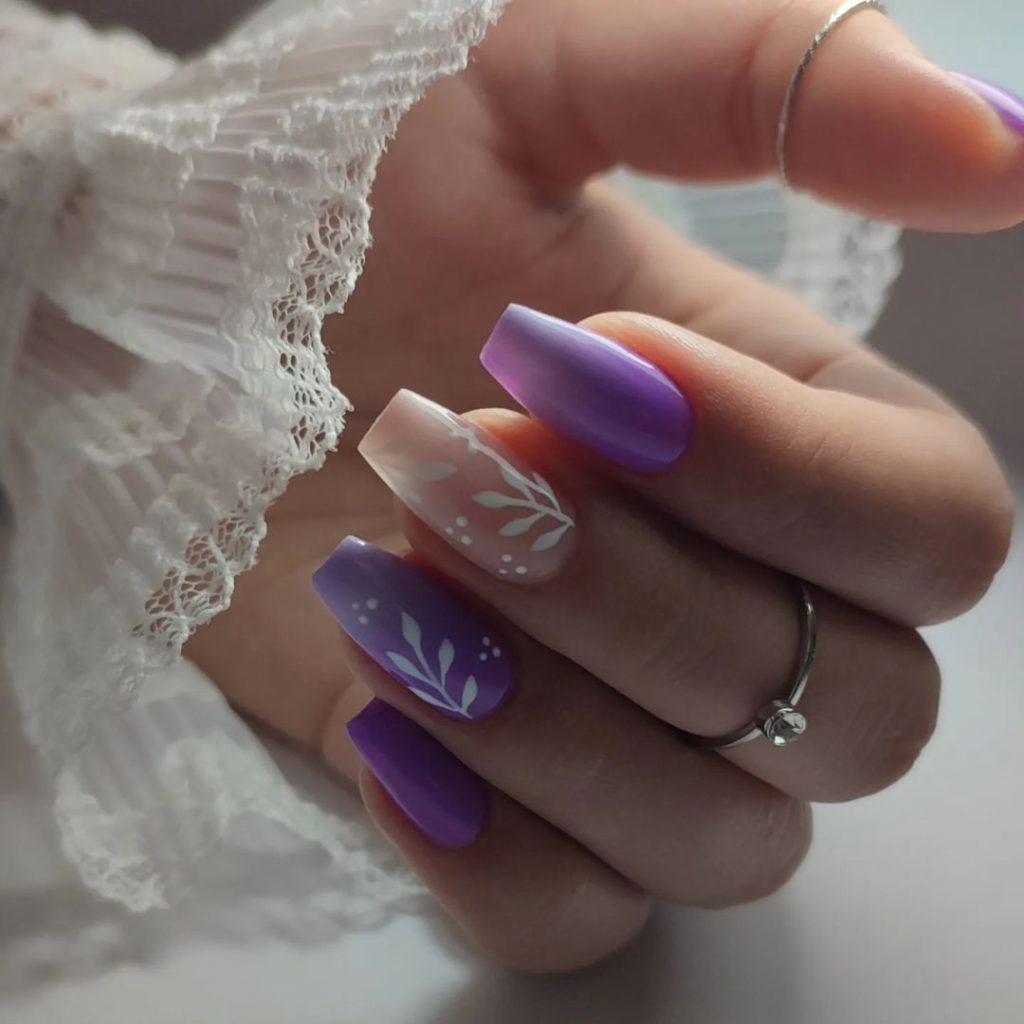
- Purple nail polish: OPI ‘Do You Lilac It?’
- White nail art pen: Sally Hansen Nail Art Pen in White
- Top coat: Seche Vite Dry Fast Top Coat
- Base coat: Orly Bonder Rubberized Basecoat
Recommendations:
- A gradient base will provide a soft and elegant background for the white leaf patterns.
- Use a white nail art pen to create detailed and precise leaf designs.
- A fast-drying top coat will ensure your manicure sets quickly and lasts longer.
- A rubberized base coat is ideal for preventing chipping and extending the life of your manicure.
Step-by-Step DIY Instructions:
- Apply a base coat to your nails and let it dry completely.
- Create a gradient effect using different shades of purple, blending them with a sponge.
- Use the white nail art pen to draw intricate leaf patterns on each nail.
- Apply a fast-drying top coat to seal the design and add a glossy finish.
- Allow the top coat to dry completely before using your hands.
Minimalist Nude with Black Leaves
This minimalist nail design features a nude base with delicate black leaf patterns. The combination of the neutral background and the subtle black leaves creates a clean and sophisticated look, perfect for any occasion. The glossy finish adds an extra touch of elegance to this understated yet chic manicure.
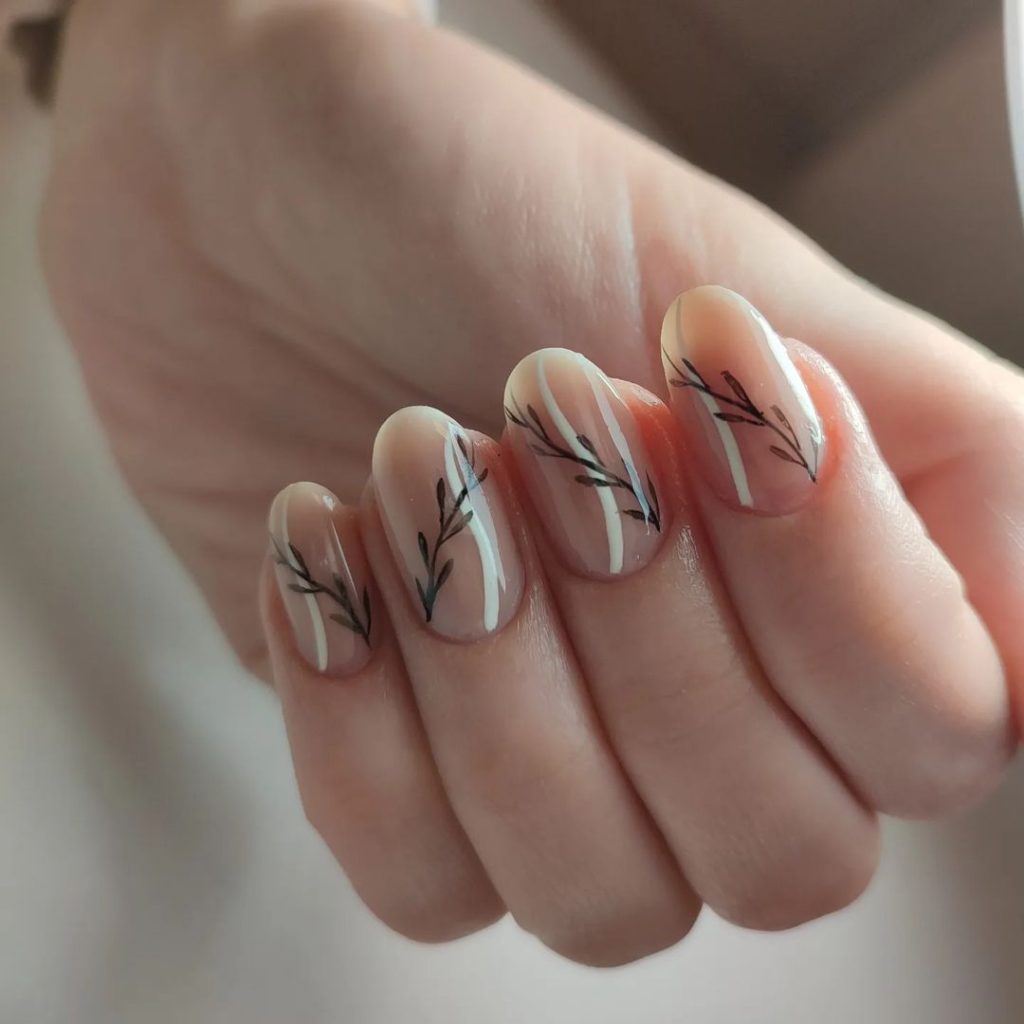
- Nude nail polish: Essie ‘Ballet Slippers’
- Black nail art pen: Sally Hansen Nail Art Pen in Black
- Top coat: Seche Vite Dry Fast Top Coat
- Base coat: Deborah Lippmann ‘Hard Rock’ Basecoat
Recommendations:
- A nude base will provide a clean and elegant backdrop for the black leaf patterns.
- Use a black nail art pen for detailed and precise leaf designs.
- A fast-drying top coat will ensure your manicure sets quickly and lasts longer.
- A strengthening base coat is crucial to protect your nails and prevent chipping.
Step-by-Step DIY Instructions:
- Apply a base coat to your nails and let it dry completely.
- Paint your nails with two coats of nude polish, ensuring each layer dries before applying the next.
- Use the black nail art pen to draw intricate leaf patterns on each nail.
- Apply a fast-drying top coat to seal the design and add a glossy finish.
- Allow the top coat to dry completely before using your hands.
Earthy Green and Gold Leaves
This earthy nail design features a mix of olive green and light green bases, accented with gold foil and black leaf patterns. The combination of the rich greens, the shimmering gold, and the striking black leaves creates a sophisticated and unique look, perfect for those who love natural tones with a touch of glamour. The glossy finish enhances the overall elegance of this chic manicure.
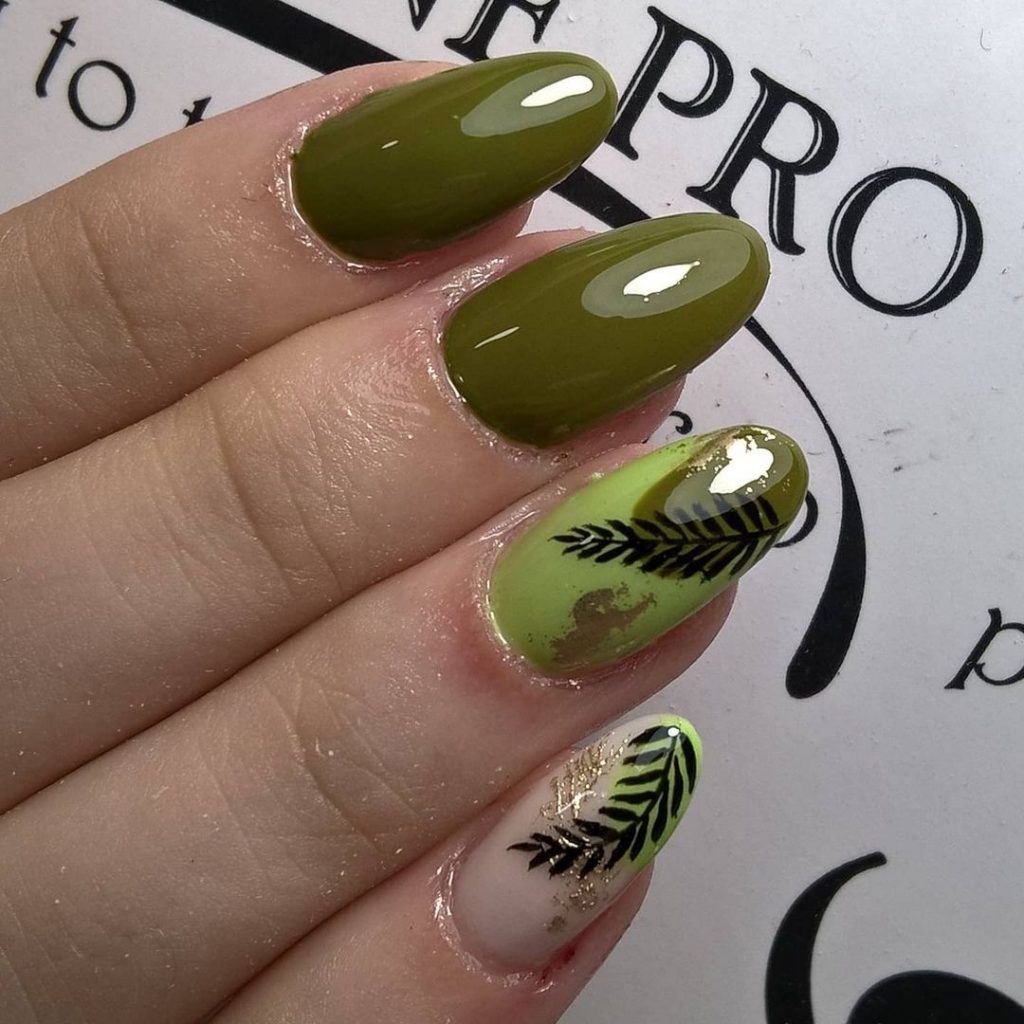
- Olive green nail polish: OPI ‘Olive for Green’
- Light green nail polish: Essie ‘Mojito Madness’
- Gold foil: Born Pretty Gold Nail Foil
- Black nail art pen: Sally Hansen Nail Art Pen in Black
- Top coat: Essie Gel Couture Top Coat
- Base coat: Orly Bonder Rubberized Basecoat
Recommendations:
- A mix of olive and light green bases will provide a natural and earthy background for the gold foil and black leaf accents.
- Use gold foil to add a touch of glamour and shimmer to the design.
- A black nail art pen will help you achieve detailed and precise leaf designs.
- A gel top coat will ensure your manicure lasts longer and maintains its shine.
- A rubberized base coat is ideal for preventing chipping and extending the life of your manicure.
Step-by-Step DIY Instructions:
- Apply a base coat to your nails and let it dry completely.
- Paint your nails with alternating coats of olive green and light green polish, ensuring each layer dries before applying the next.
- Apply gold foil to select areas on the accent nails.
- Use the black nail art pen to draw intricate leaf patterns on each nail.
- Apply a gel top coat to seal the design and add a glossy finish.
- Cure the top coat under a UV or LED lamp if necessary.
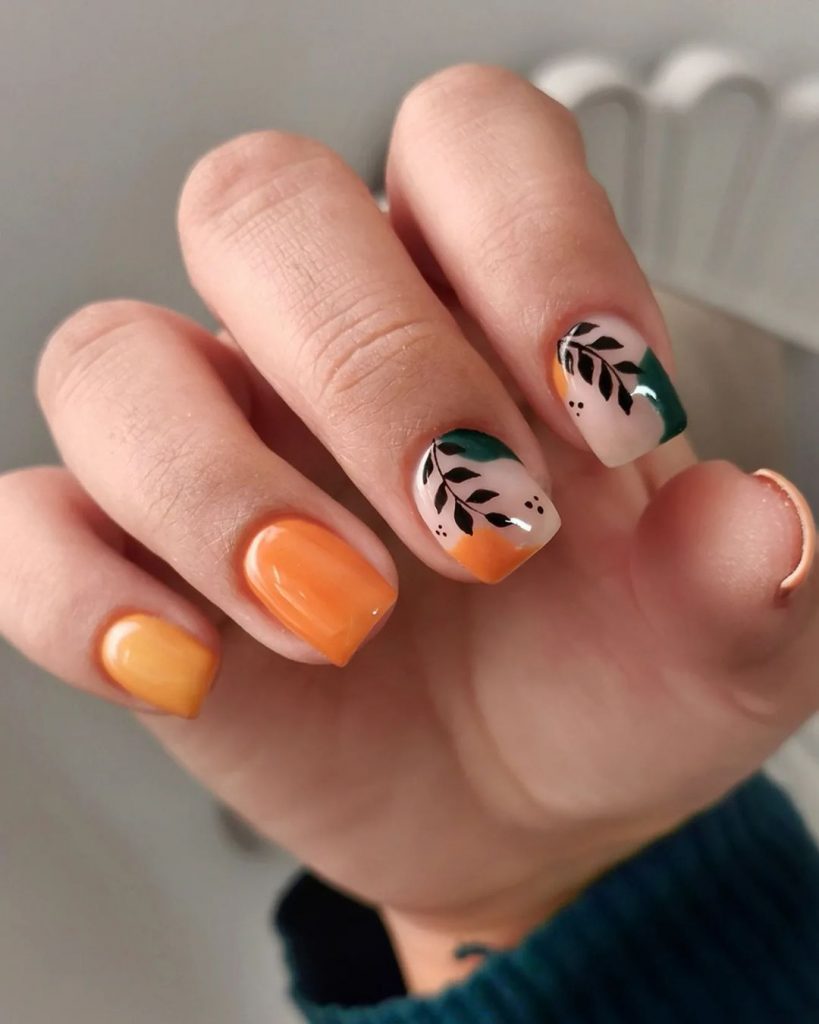
Playful Orange Leaf Design
This playful nail design features a nude base with vibrant orange tips and small green leaf patterns. The combination of the neutral base and the bright orange tips creates a fun and lively look, perfect for adding a pop of color to any outfit. The glossy finish adds an extra touch of sophistication to this whimsical manicure.
- Nude nail polish: Essie ‘Ballet Slippers’
- Orange nail polish: Essie ‘Playing Koi’
- Green nail art pen: Sally Hansen Nail Art Pen in Green
- Top coat: Seche Vite Dry Fast Top Coat
- Base coat: Deborah Lippmann ‘Hard Rock’ Basecoat
Recommendations:
- A nude base will provide a clean and elegant backdrop for the vibrant orange tips.
- Use a green nail art pen to add small leaf patterns for a playful touch.
- A fast-drying top coat will ensure your manicure sets quickly and lasts longer.
- A strengthening base coat is crucial to protect your nails and prevent chipping.
Step-by-Step DIY Instructions:
- Apply a base coat to your nails and let it dry completely.
- Paint your nails with two coats of nude polish, ensuring each layer dries before applying the next.
- Use the orange polish to create vibrant tips on each nail.
- Use the green nail art pen to draw small leaf patterns on each nail.
- Apply a fast-drying top coat to seal the design and add a glossy finish.
- Allow the top coat to dry completely before using your hands.
Delicate White Leaves on Nude Base
This delicate nail design features a nude base with intricate white leaf patterns. The combination of the neutral background and the detailed white leaves creates a refined and elegant look, perfect for any occasion. The glossy finish adds an extra touch of sophistication to this understated yet chic manicure.
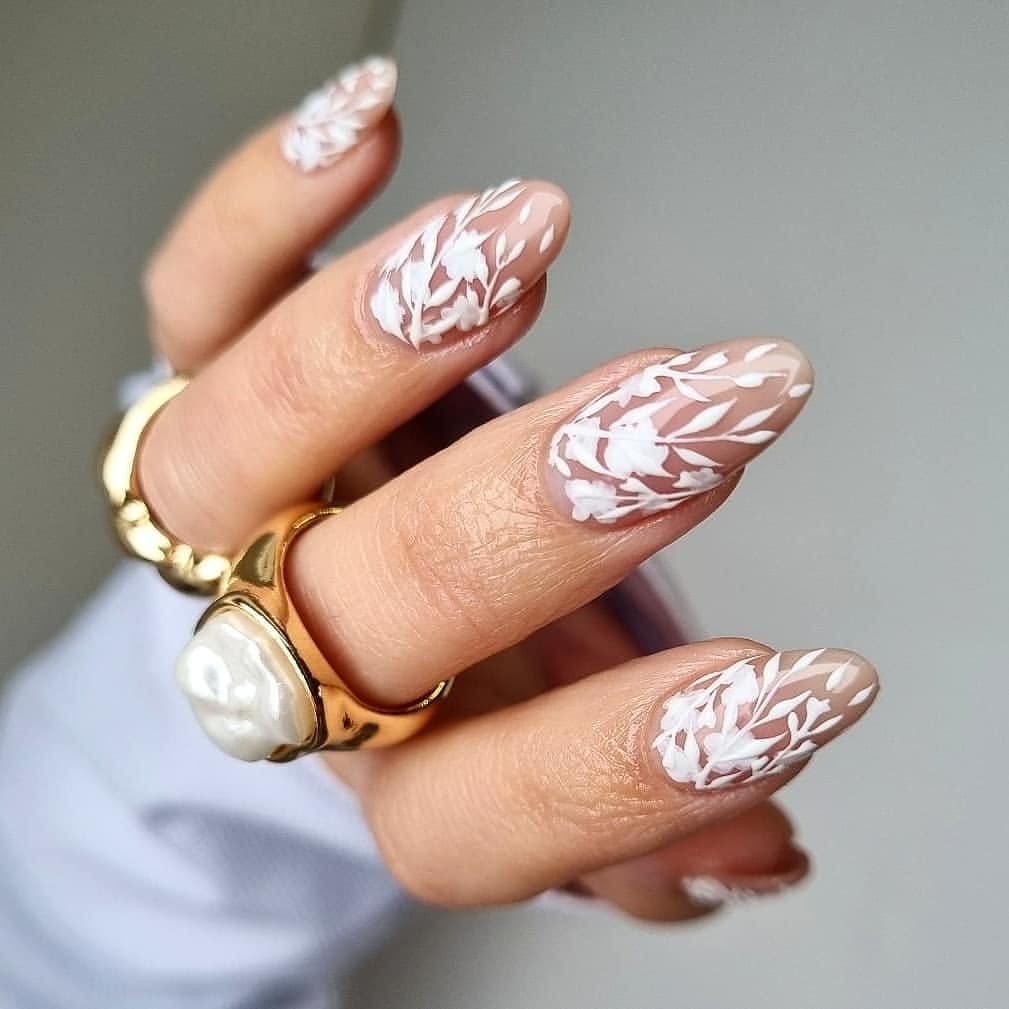
- Nude nail polish: Essie ‘Ballet Slippers’
- White nail art pen: Sally Hansen Nail Art Pen in White
- Top coat: Seche Vite Dry Fast Top Coat
- Base coat: Orly Bonder Rubberized Basecoat
Recommendations:
- A nude base will provide a clean and elegant backdrop for the white leaf patterns.
- Use a fine-tip white nail art pen for detailed and precise designs.
- A fast-drying top coat will ensure your manicure sets quickly and lasts longer.
- A rubberized base coat is ideal for preventing chipping and extending the life of your manicure.
Step-by-Step DIY Instructions:
- Apply a base coat to your nails and let it dry completely.
- Paint your nails with two coats of nude polish, ensuring each layer dries before applying the next.
- Use the white nail art pen to draw intricate leaf patterns on each nail.
- Apply a fast-drying top coat to seal the design and add a glossy finish.
- Allow the top coat to dry completely before using your hands.
Intricate Gold and Red Fall Leaves
This stunning nail design showcases a rich red base with intricate gold leaf patterns. The gold leaves create a luxurious and festive look, perfect for embracing the opulence of autumn. The combination of the deep red base and the metallic gold accents brings a touch of elegance and warmth, making this manicure ideal for both special occasions and everyday wear.
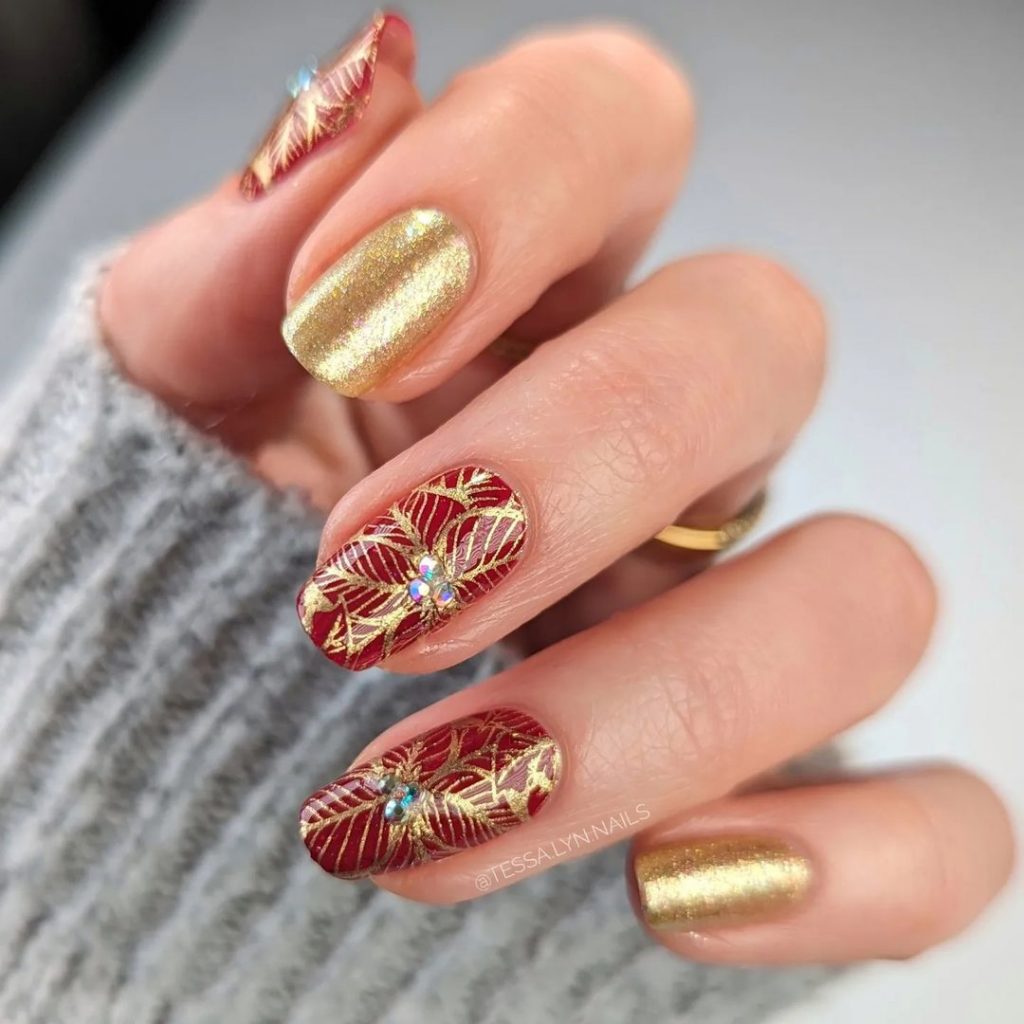
- Red nail polish: OPI ‘Big Apple Red’
- Gold nail art pen: Sally Hansen Nail Art Pen in Gold
- Top coat: Seche Vite Dry Fast Top Coat
- Base coat: Deborah Lippmann ‘Hard Rock’ Basecoat
Recommendations:
- Choose a vibrant red polish to provide a rich, festive background for the gold leaf patterns.
- A fine-tip gold nail art pen will help you achieve the detailed and intricate leaf designs.
- Using a fast-drying top coat will ensure your manicure sets quickly and lasts longer.
- A strengthening base coat is crucial to protect your nails and prevent chipping.
Step-by-Step DIY Instructions:
- Apply a base coat to your nails and let it dry completely.
- Paint your nails with two coats of red polish, ensuring each layer dries before applying the next.
- Use the gold nail art pen to draw delicate leaf patterns on each nail, allowing the design to dry between applications.
- Seal your design with a fast-drying top coat for a glossy finish and extended wear.
- For extra durability, consider curing the top coat under a UV or LED lamp.
Matte Autumn Leaves
This design features a matte brown base with a variety of leaf patterns, including black and white accents. The combination of matte and glossy finishes creates a unique and trendy look, perfect for those who love subtle yet stylish fall nail art. The different leaf patterns add an element of playfulness and creativity to the manicure.
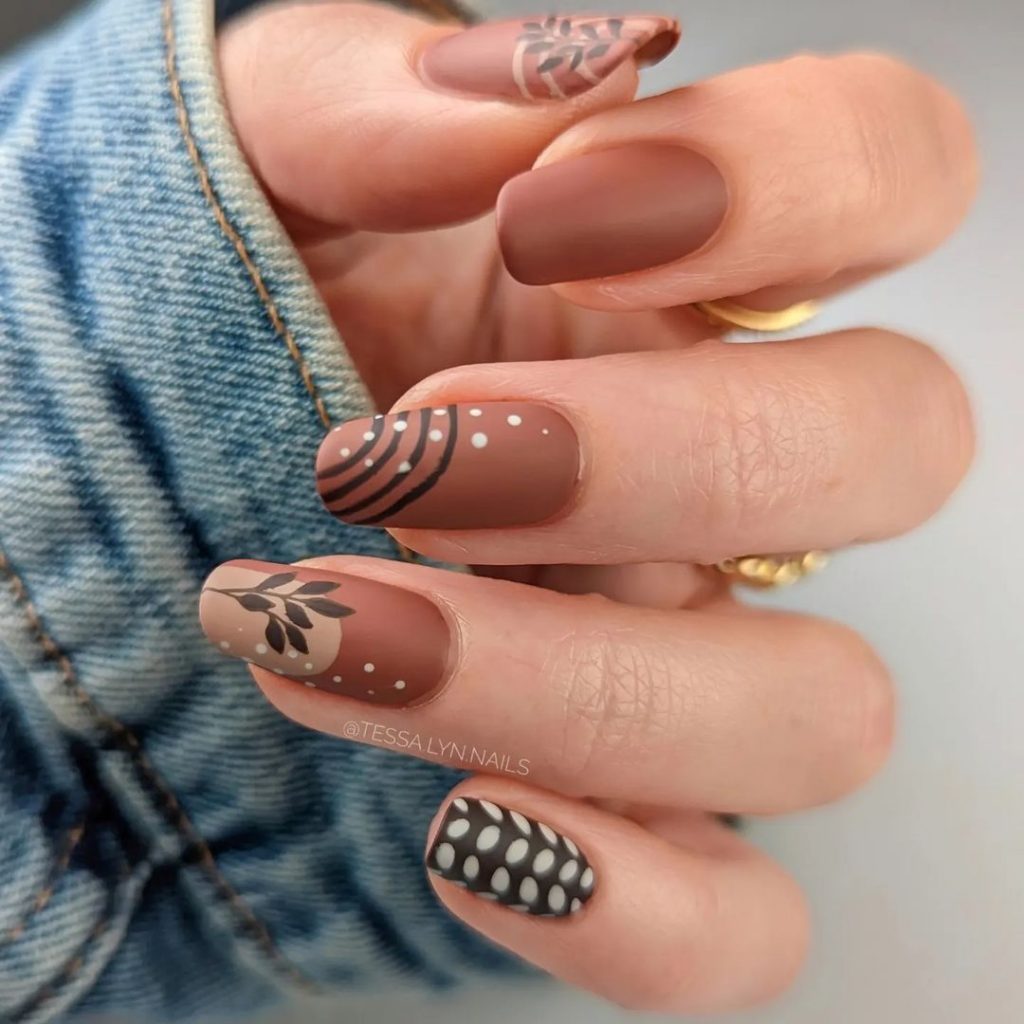
- Matte brown nail polish: Essie ‘Clothing Optional’
- Black nail art pen: Sally Hansen Nail Art Pen in Black
- White nail art pen: Sally Hansen Nail Art Pen in White
- Matte top coat: OPI Matte Top Coat
- Base coat: Orly Bonder Rubberized Basecoat
Recommendations:
- A matte brown base polish will give a sophisticated and understated background for the leaf patterns.
- Use both black and white nail art pens to create contrast and highlight the designs.
- A matte top coat will maintain the matte finish and provide extra protection.
- A rubberized base coat will help the polish adhere better and prevent chipping.
Step-by-Step DIY Instructions:
- Apply a base coat to your nails and let it dry completely.
- Paint your nails with two coats of matte brown polish, ensuring each layer dries before applying the next.
- Use the black and white nail art pens to draw various leaf patterns on each nail.
- Apply a matte top coat to seal the design and maintain the matte finish.
- Allow the top coat to dry completely before using your hands.
Delicate Pink and White Leaves
This design features a soft pink base with delicate white leaf patterns, creating a feminine and elegant look. The simplicity of the design makes it perfect for those who prefer a more understated approach to nail art. The combination of soft pink and white offers a fresh and clean appearance, suitable for any occasion.
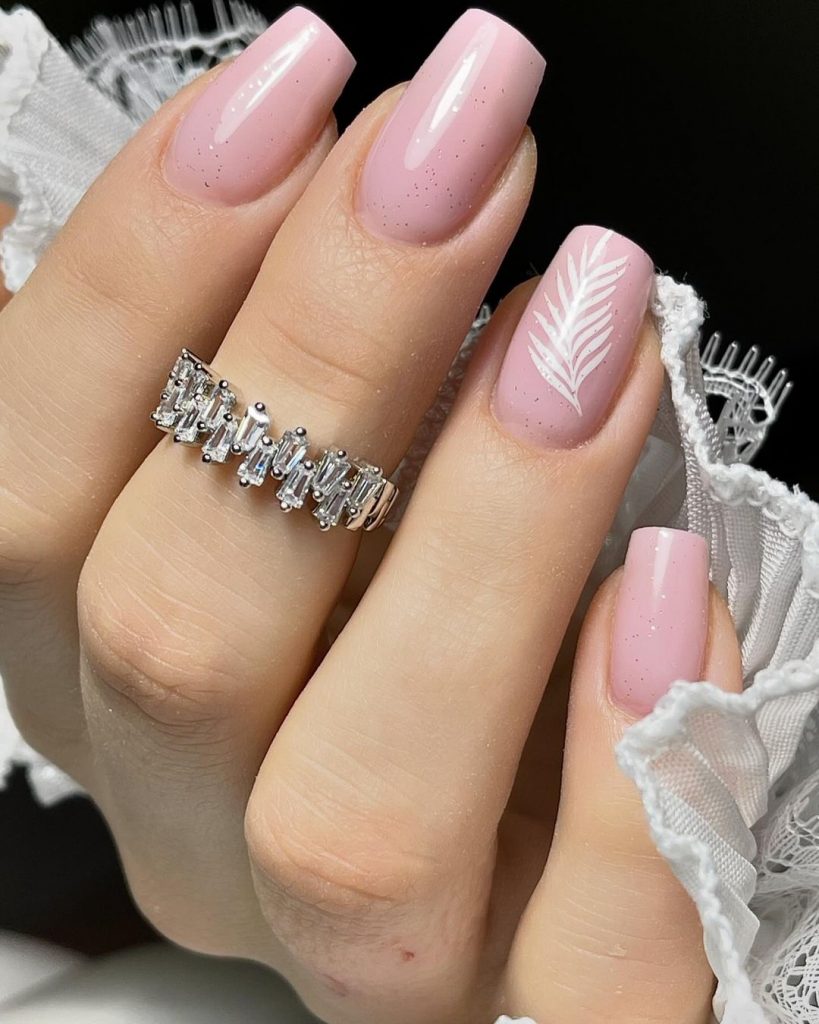
- Pink nail polish: Essie ‘Fiji’
- White nail art pen: Sally Hansen Nail Art Pen in White
- Top coat: Essie Gel Couture Top Coat
- Base coat: Deborah Lippmann ‘Hard Rock’ Basecoat
Recommendations:
- A soft pink base polish will provide a gentle and feminine background for the white leaf patterns.
- Use a fine-tip white nail art pen for detailed and precise designs.
- A gel top coat will ensure your manicure lasts longer and maintains its shine.
- A strengthening base coat will protect your nails and prevent chipping.
Step-by-Step DIY Instructions:
- Apply a base coat to your nails and let it dry completely.
- Paint your nails with two coats of soft pink polish, ensuring each layer dries before applying the next.
- Use the white nail art pen to draw delicate leaf patterns on each nail.
- Apply a gel top coat to seal the design and add a glossy finish.
- Cure the top coat under a UV or LED lamp if necessary.
Vibrant Autumn Leaf Pattern
This design showcases a vibrant autumn leaf pattern with orange, brown, and gold accents on a neutral base. The combination of warm fall colors and intricate leaf designs creates a lively and festive look. This manicure is perfect for those who want to embrace the full spectrum of autumn colors.
- Neutral base polish: OPI ‘Samoan Sand’
- Orange nail polish: Essie ‘Playing Koi’
- Brown nail polish: Essie ‘Mink Muffs’
- Gold nail polish: Sally Hansen ‘Golden-I’
- Top coat: Seche Vite Dry Fast Top Coat
- Base coat: Deborah Lippmann ‘Hard Rock’ Basecoat
Recommendations:
- A neutral base will provide a versatile backdrop for the vibrant autumn leaf patterns.
- Use orange, brown, and gold polishes to create a rich and dynamic design.
- A fast-drying top coat will ensure your manicure sets quickly and lasts longer.
- A strengthening base coat will help protect your nails and prevent chipping.
Step-by-Step DIY Instructions:
- Apply a base coat to your nails and let it dry completely.
- Paint your nails with two coats of neutral polish, ensuring each layer dries before applying the next.
- Use the orange, brown, and gold polishes to create intricate leaf patterns on each nail.
- Seal your design with a fast-drying top coat for a glossy finish and extended wear.
- For extra durability, consider curing the top coat under a UV or LED lamp.
Elegant Black and Silver Leaves
This elegant design features a nude base with black and silver leaf patterns. The combination of the neutral base and metallic accents creates a sophisticated and timeless look, perfect for formal events or everyday wear. The contrast between the black and silver leaves adds a modern and chic touch to the manicure.
- Nude base polish: Essie ‘Ballet Slippers’
- Black nail art pen: Sally Hansen Nail Art Pen in Black
- Silver nail art pen: Sally Hansen Nail Art Pen in Silver
- Top coat: Seche Vite Dry Fast Top Coat
- Base coat: Orly Bonder Rubberized Basecoat
Recommendations:
- A nude base will provide a clean and sophisticated backdrop for the black and silver leaf patterns.
- Use fine-tip black and silver nail art pens for detailed and precise designs.
- A fast-drying top coat will ensure your manicure lasts longer and maintains its shine.
- A rubberized base coat is ideal for preventing chipping and extending the life of your manicure.
Step-by-Step DIY Instructions:
- Apply a base coat to your nails and let it dry completely.
- Paint your nails with two coats of nude polish, ensuring each layer dries before applying the next.
- Use the black and silver nail art pens to draw intricate leaf patterns on each nail.
- Apply a fast-drying top coat to seal the design and add a glossy finish.
- Allow the top coat to dry completely before using your hands.
Soft Autumn French Tips
This elegant nail design features a soft pink base with subtle autumn-colored French tips and delicate floral accents. The combination of the gentle pink and the warm fall hues creates a sophisticated and feminine look, perfect for those who love a touch of seasonal charm without being too bold. The intricate floral details add a whimsical and graceful touch to the manicure.
- Pink nail polish: Essie ‘Mademoiselle’
- Orange and brown nail polish for tips: OPI ‘It’s a Piazza Cake’ and ‘Espresso Your Style’
- Floral nail stickers: Born Pretty Floral Nail Art Stickers
- Top coat: Seche Vite Dry Fast Top Coat
- Base coat: Deborah Lippmann ‘Hard Rock’ Basecoat
Recommendations:
- A soft pink base will provide a delicate and feminine background for the French tips.
- Use autumn-colored polishes for the tips to add a seasonal touch.
- Floral nail stickers are an easy way to add intricate details without requiring advanced nail art skills.
- A fast-drying top coat will ensure your manicure sets quickly and lasts longer.
- A strengthening base coat is crucial to protect your nails and prevent chipping.
Step-by-Step DIY Instructions:
- Apply a base coat to your nails and let it dry completely.
- Paint your nails with two coats of soft pink polish, ensuring each layer dries before applying the next.
- Use a fine brush to create French tips with the orange and brown polishes.
- Apply floral nail stickers on the accent nails.
- Seal your design with a fast-drying top coat for a glossy finish and extended wear.
- For extra durability, consider curing the top coat under a UV or LED lamp.
Bold Green and Orange Autumn Leaves
This striking nail design features a vibrant green and orange gradient base with detailed green leaf patterns. The combination of the bold colors and intricate leaf designs creates a dynamic and eye-catching look, perfect for those who love to make a statement with their nails. The gradient effect adds depth and dimension to the manicure, making it a trendy and fashionable choice for fall 2024.
- Green and orange nail polish: Essie ‘Mojito Madness’ and ‘Playing Koi’
- Green nail art pen: Sally Hansen Nail Art Pen in Green
- Top coat: Essie Gel Couture Top Coat
- Base coat: Orly Bonder Rubberized Basecoat
Recommendations:
- A gradient base will provide a vibrant and dynamic background for the leaf patterns.
- Use a green nail art pen to create detailed and precise leaf designs.
- A gel top coat will ensure your manicure lasts longer and maintains its shine.
- A rubberized base coat is ideal for preventing chipping and extending the life of your manicure.
Step-by-Step DIY Instructions:
- Apply a base coat to your nails and let it dry completely.
- Create a gradient effect using the green and orange polishes, blending them with a sponge.
- Use the green nail art pen to draw intricate leaf patterns on each nail.
- Apply a gel top coat to seal the design and add a glossy finish.
- Cure the top coat under a UV or LED lamp if necessary.
Playful Orange and Green Leaf Design
This playful nail design features a mix of orange and green hues with black leaf accents. The combination of bright colors and contrasting black leaves creates a fun and lively look, perfect for those who enjoy a bold and vibrant manicure. The simple yet striking design makes this manicure easy to achieve at home while still looking professionally done.
- Orange and green nail polish: OPI ‘It’s a Piazza Cake’ and ‘Green Come True’
- Black nail art pen: Sally Hansen Nail Art Pen in Black
- Top coat: Seche Vite Dry Fast Top Coat
- Base coat: Deborah Lippmann ‘Hard Rock’ Basecoat
Recommendations:
- A bright orange and green base will provide a playful and vibrant background for the black leaf accents.
- Use a black nail art pen to create bold and striking leaf designs.
- A fast-drying top coat will ensure your manicure sets quickly and lasts longer.
- A strengthening base coat is crucial to protect your nails and prevent chipping.
Step-by-Step DIY Instructions:
- Apply a base coat to your nails and let it dry completely.
- Paint your nails with alternating coats of orange and green polish, ensuring each layer dries before applying the next.
- Use the black nail art pen to draw bold leaf patterns on each nail.
- Apply a fast-drying top coat to seal the design and add a glossy finish.
- Allow the top coat to dry completely before using your hands.
Vibrant Purple and Black Leaves
This bold nail design features a vibrant purple base with striking black leaf accents. The combination of the rich purple and the contrasting black leaves creates a dramatic and eye-catching look, perfect for those who want to make a statement with their nails. The glossy finish adds an extra touch of sophistication to this trendy manicure.
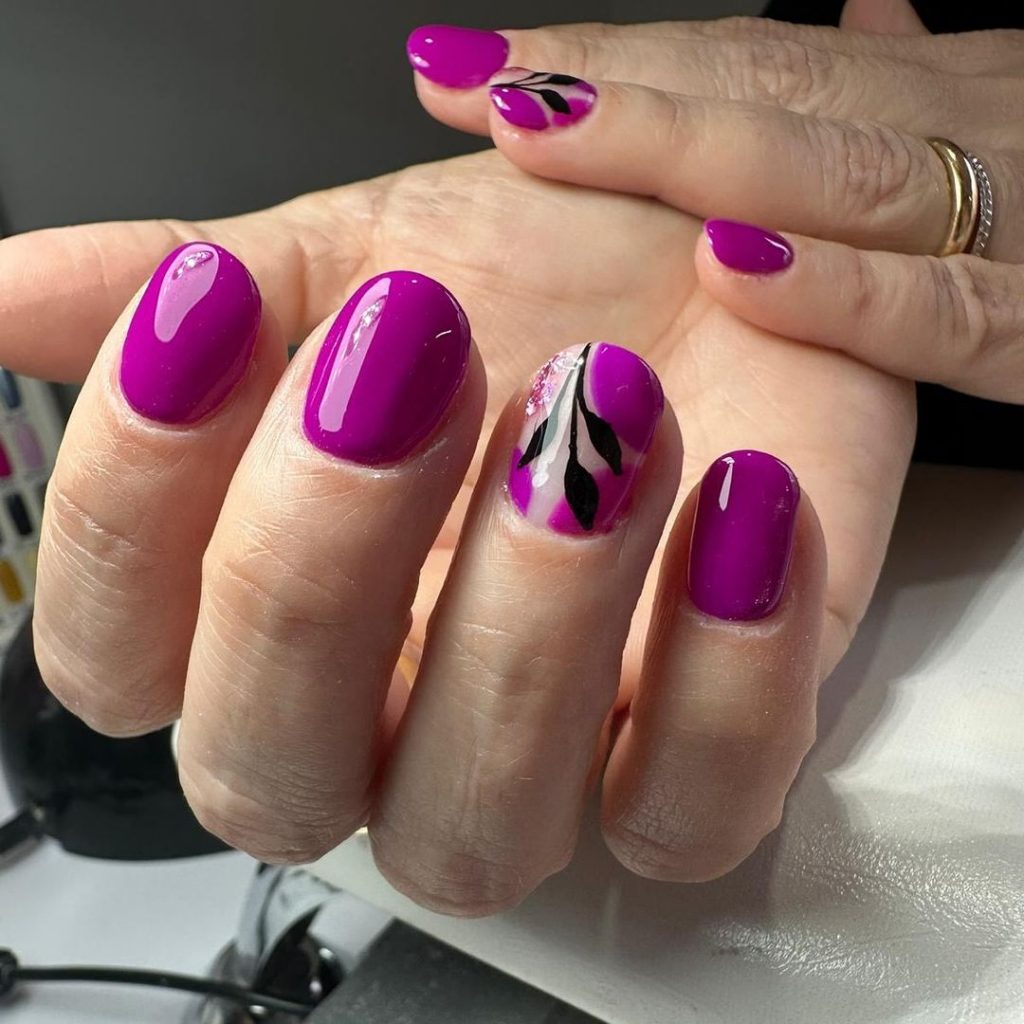
- Purple nail polish: Essie ‘Flowerista’
- Black nail art pen: Sally Hansen Nail Art Pen in Black
- Top coat: Seche Vite Dry Fast Top Coat
- Base coat: Deborah Lippmann ‘Hard Rock’ Basecoat
Recommendations:
- A vibrant purple base will provide a rich and bold background for the black leaf accents.
- Use a black nail art pen to create striking and detailed leaf designs.
- A fast-drying top coat will ensure your manicure sets quickly and lasts longer.
- A strengthening base coat is crucial to protect your nails and prevent chipping.
Step-by-Step DIY Instructions:
- Apply a base coat to your nails and let it dry completely.
- Paint your nails with two coats of purple polish, ensuring each layer dries before applying the next.
- Use the black nail art pen to draw intricate leaf patterns on each nail.
- Apply a fast-drying top coat to seal the design and add a glossy finish.
- Allow the top coat to dry completely before using your hands.
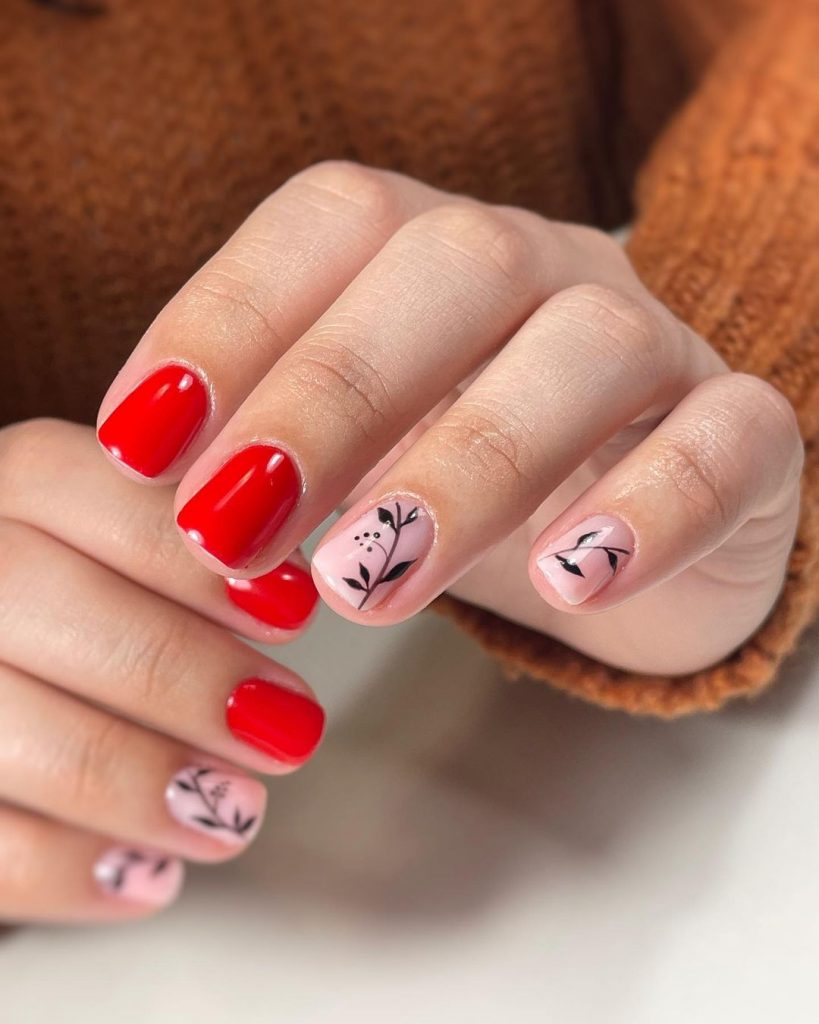
Classic Red and Black Leaf Design
This classic nail design features a crisp red base with elegant black leaf patterns. The combination of the bright red and the contrasting black leaves creates a timeless and sophisticated look, perfect for any occasion. The glossy finish enhances the overall elegance of this simple yet striking manicure.
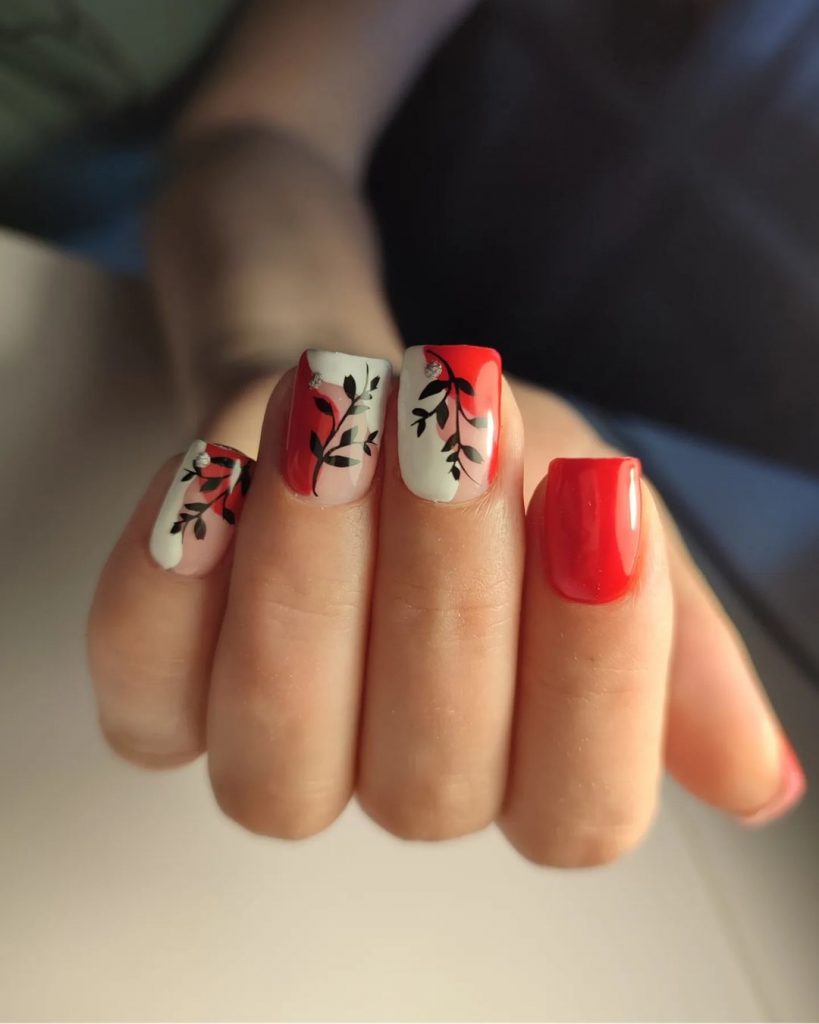
- Red nail polish: OPI ‘Big Apple Red’
- Black nail art pen: Sally Hansen Nail Art Pen in Black
- Top coat: Seche Vite Dry Fast Top Coat
- Base coat: Orly Bonder Rubberized Basecoat
Recommendations:
- A bright red base will provide a classic and timeless background for the black leaf patterns.
- Use a black nail art pen to create elegant and detailed leaf designs.
- A fast-drying top coat will ensure your manicure sets quickly and lasts longer.
- A rubberized base coat is ideal for preventing chipping and extending the life of your manicure.
Step-by-Step DIY Instructions:
- Apply a base coat to your nails and let it dry completely.
- Paint your nails with two coats of red polish, ensuring each layer dries before applying the next.
- Use the black nail art pen to draw intricate leaf patterns on each nail.
- Apply a fast-drying top coat to seal the design and add a glossy finish.
- Allow the top coat to dry completely before using your hands.
Festive Red and White Leaves
This vibrant nail design features a bold red base with delicate white leaf patterns. The striking contrast between the red and white creates a festive and eye-catching look, perfect for the holiday season or any special occasion. The glossy finish adds a touch of sophistication to this playful yet elegant manicure.
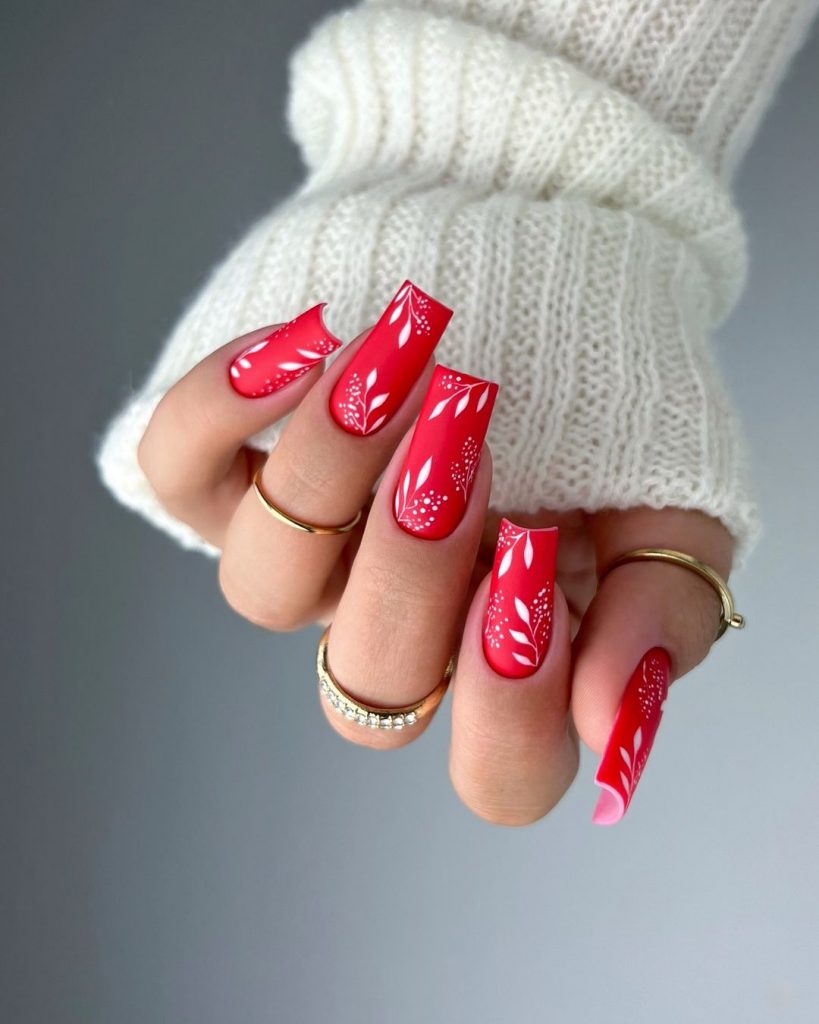
- Red nail polish: Essie ‘Really Red’
- White nail art pen: Sally Hansen Nail Art Pen in White
- Top coat: Seche Vite Dry Fast Top Coat
- Base coat: Orly Bonder Rubberized Basecoat
Recommendations:
- A bright red base will provide a festive and vibrant background for the white leaf patterns.
- Use a fine-tip white nail art pen for detailed and precise designs.
- A fast-drying top coat will ensure your manicure sets quickly and lasts longer.
- A rubberized base coat is ideal for preventing chipping and extending the life of your manicure.
Step-by-Step DIY Instructions:
- Apply a base coat to your nails and let it dry completely.
- Paint your nails with two coats of red polish, ensuring each layer dries before applying the next.
- Use the white nail art pen to draw intricate leaf patterns on each nail.
- Apply a fast-drying top coat to seal the design and add a glossy finish.
- Allow the top coat to dry completely before using your hands.
Cool Blue and Glitter Leaves
This stunning nail design features a cool blue base with glittery leaf accents. The combination of the soft blue and the shimmering glitter creates a fresh and modern look, perfect for any season. The glossy finish enhances the overall elegance and adds a touch of sparkle to this trendy manicure.
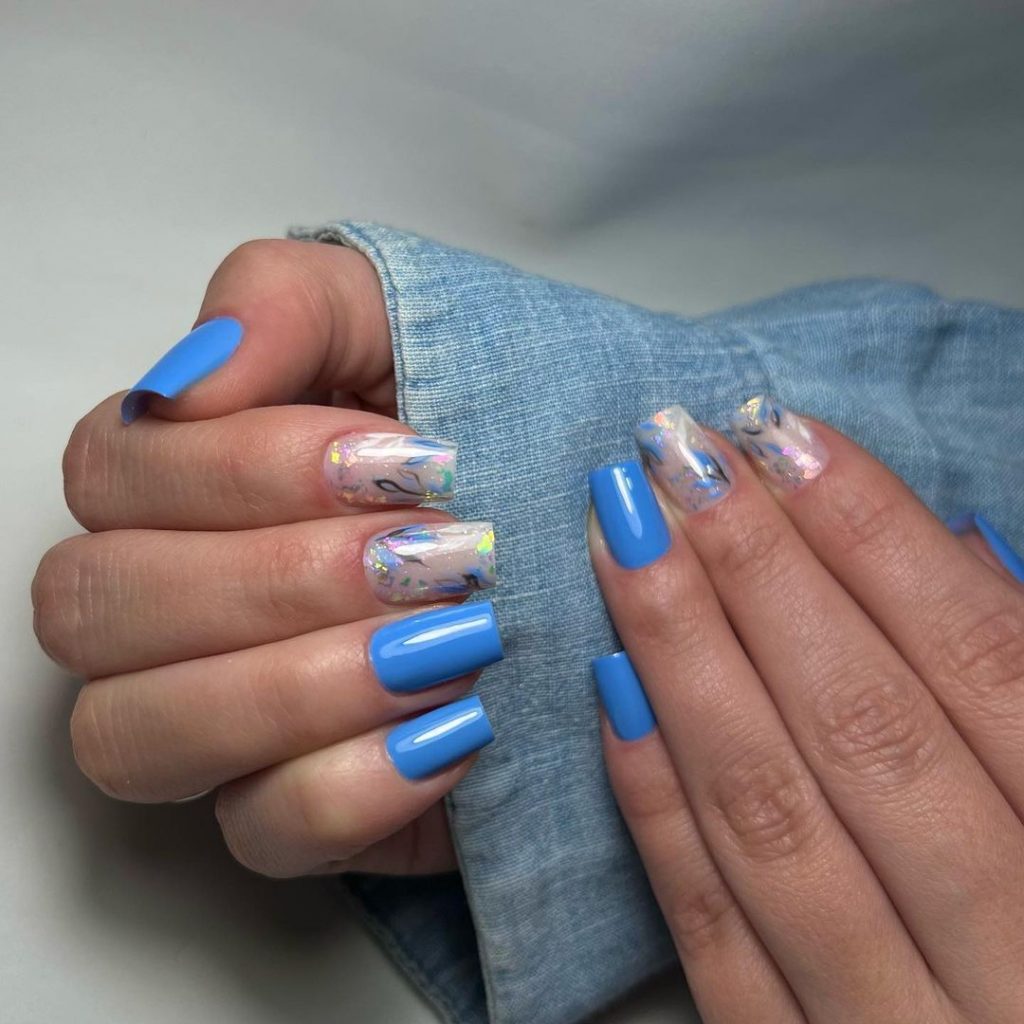
- Blue nail polish: OPI ‘Do You Lilac It?’
- Glitter nail polish: China Glaze ‘Fairy Dust’
- Top coat: Essie Gel Couture Top Coat
- Base coat: Deborah Lippmann ‘Hard Rock’ Basecoat
Recommendations:
- A soft blue base will provide a cool and refreshing background for the glittery leaf accents.
- Use a glitter nail polish to add sparkle and depth to the design.
- A gel top coat will ensure your manicure lasts longer and maintains its shine.
- A strengthening base coat is crucial to protect your nails and prevent chipping.
Step-by-Step DIY Instructions:
- Apply a base coat to your nails and let it dry completely.
- Paint your nails with two coats of blue polish, ensuring each layer dries before applying the next.
- Apply a coat of glitter polish to the accent nails, focusing on the leaf designs.
- Seal your design with a gel top coat for a glossy finish and extended wear.
- Cure the top coat under a UV or LED lamp if necessary.
Sunny Yellow and Black Leaves
This cheerful nail design features a sunny yellow base with black leaf patterns. The combination of the bright yellow and the contrasting black leaves creates a fun and playful look, perfect for those who love bold and vibrant colors. The glossy finish adds an extra touch of sophistication to this lively manicure.
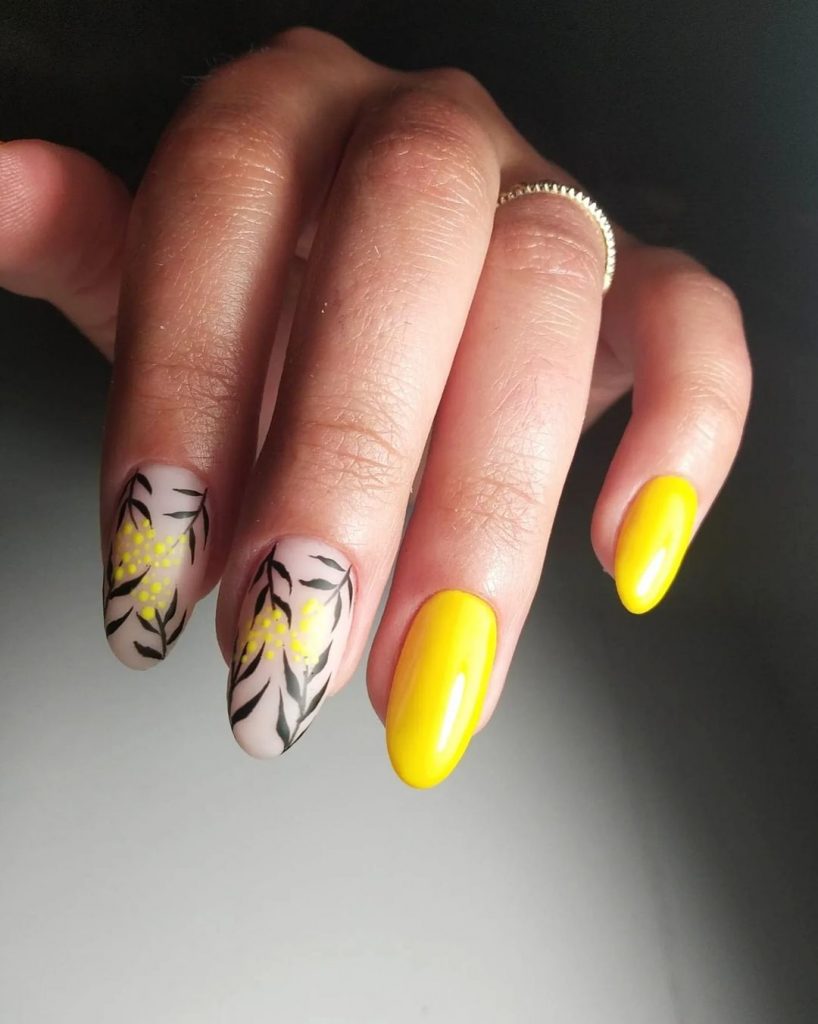
- Yellow nail polish: Essie ‘Sunny Business’
- Black nail art pen: Sally Hansen Nail Art Pen in Black
- Top coat: Seche Vite Dry Fast Top Coat
- Base coat: Orly Bonder Rubberized Basecoat
Recommendations:
- A bright yellow base will provide a cheerful and vibrant background for the black leaf patterns.
- Use a black nail art pen to create bold and striking leaf designs.
- A fast-drying top coat will ensure your manicure sets quickly and lasts longer.
- A rubberized base coat is ideal for preventing chipping and extending the life of your manicure.
Step-by-Step DIY Instructions:
- Apply a base coat to your nails and let it dry completely.
- Paint your nails with two coats of yellow polish, ensuring each layer dries before applying the next.
- Use the black nail art pen to draw intricate leaf patterns on each nail.
- Apply a fast-drying top coat to seal the design and add a glossy finish.
- Allow the top coat to dry completely before using your hands.
Autumn Ombre and Leaf Design
This beautiful nail design features an ombre effect with shades of orange and brown, accented by delicate black leaf patterns. The gradient of warm autumn colors creates a rich and cozy look, perfect for embracing the fall season. The intricate leaf designs add a touch of elegance and sophistication to this trendy manicure.
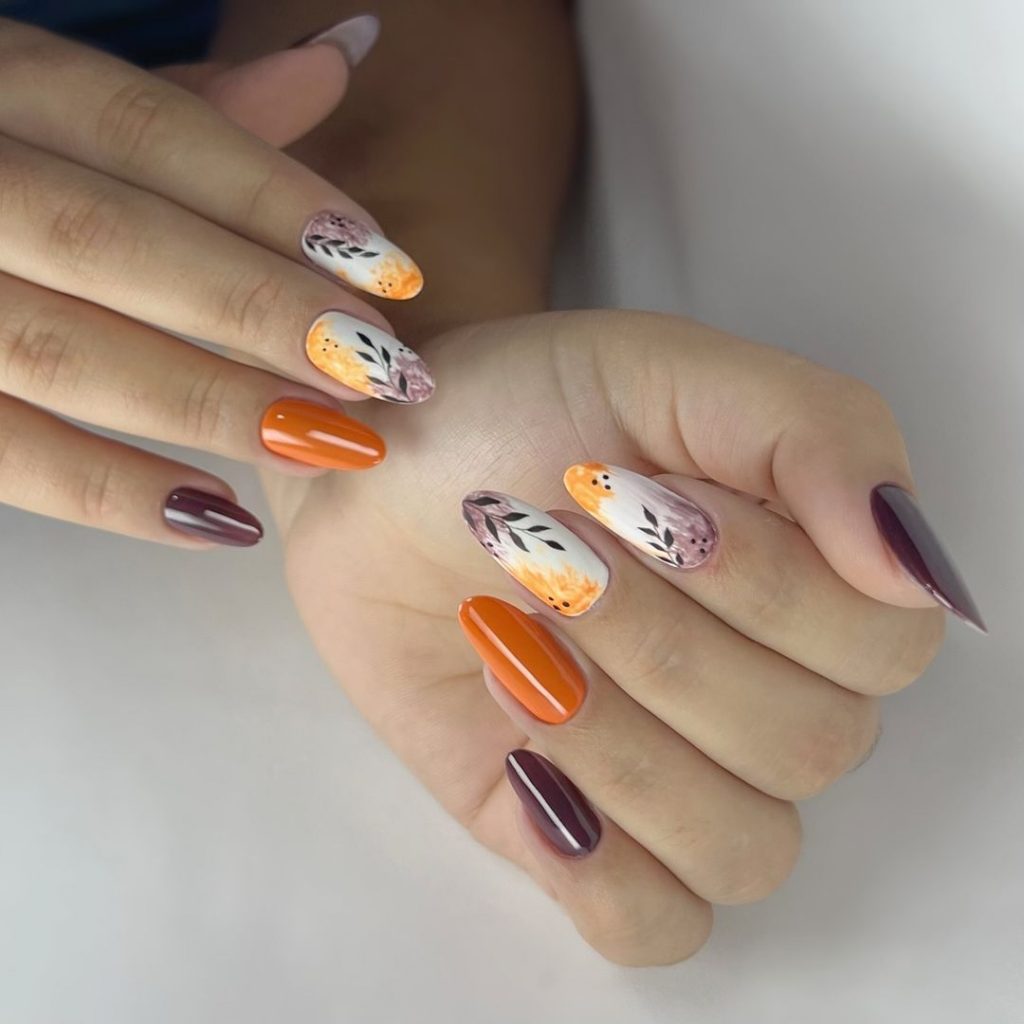
- Orange nail polish: Essie ‘Playing Koi’
- Brown nail polish: OPI ‘Espresso Your Style’
- Black nail art pen: Sally Hansen Nail Art Pen in Black
- Top coat: Seche Vite Dry Fast Top Coat
- Base coat: Deborah Lippmann ‘Hard Rock’ Basecoat
Recommendations:
- An ombre base with shades of orange and brown will provide a warm and rich background for the leaf patterns.
- Use a black nail art pen to create delicate and detailed leaf designs.
- A fast-drying top coat will ensure your manicure sets quickly and lasts longer.
- A strengthening base coat is crucial to protect your nails and prevent chipping.
Step-by-Step DIY Instructions:
- Apply a base coat to your nails and let it dry completely.
- Create an ombre effect using the orange and brown polishes, blending them with a sponge.
- Use the black nail art pen to draw intricate leaf patterns on each nail.
- Apply a fast-drying top coat to seal the design and add a glossy finish.
- Allow the top coat to dry completely before using your hands.
Coral and Black Leaf Design
This vibrant nail design features a bright coral base with black leaf accents. The combination of the vivid coral and the contrasting black leaves creates a bold and stylish look, perfect for summer or any lively occasion. The glossy finish adds a touch of sophistication to this playful yet elegant manicure.

- Coral nail polish: Essie ‘Tart Deco’
- Black nail art pen: Sally Hansen Nail Art Pen in Black
- Top coat: Seche Vite Dry Fast Top Coat
- Base coat: Orly Bonder Rubberized Basecoat
Recommendations:
- A bright coral base will provide a lively and vibrant background for the black leaf patterns.
- Use a black nail art pen to create bold and striking leaf designs.
- A fast-drying top coat will ensure your manicure sets quickly and lasts longer.
- A rubberized base coat is ideal for preventing chipping and extending the life of your manicure.
Step-by-Step DIY Instructions:
- Apply a base coat to your nails and let it dry completely.
- Paint your nails with two coats of coral polish, ensuring each layer dries before applying the next.
- Use the black nail art pen to draw intricate leaf patterns on each nail.
- Apply a fast-drying top coat to seal the design and add a glossy finish.
- Allow the top coat to dry completely before using your hands.
Red and Pink Leaf Accent
This charming nail design features a bright red base with delicate pink accent nails adorned with black leaf patterns. The combination of the vibrant red and the soft pink creates a playful and feminine look, perfect for adding a touch of elegance to any outfit. The glossy finish enhances the overall sophistication of this stylish manicure.
- Red nail polish: OPI ‘Big Apple Red’
- Pink nail polish: Essie ‘Fiji’
- Black nail art pen: Sally Hansen Nail Art Pen in Black
- Top coat: Seche Vite Dry Fast Top Coat
- Base coat: Orly Bonder Rubberized Basecoat
Recommendations:
- A bright red base will provide a bold and lively background for the black leaf patterns on the pink accent nails.
- Use a black nail art pen for detailed and precise leaf designs.
- A fast-drying top coat will ensure your manicure sets quickly and lasts longer.
- A rubberized base coat is ideal for preventing chipping and extending the life of your manicure.
Step-by-Step DIY Instructions:
- Apply a base coat to your nails and let it dry completely.
- Paint most of your nails with two coats of red polish, and the accent nails with two coats of pink polish, ensuring each layer dries before applying the next.
- Use the black nail art pen to draw intricate leaf patterns on the pink accent nails.
- Apply a fast-drying top coat to seal the design and add a glossy finish.
- Allow the top coat to dry completely before using your hands.
Bold Orange with Leaf Accent
This vibrant nail design features a bold orange base with black leaf accents on select nails. The combination of the striking orange and the contrasting black leaves creates a lively and energetic look, perfect for those who enjoy making a statement with their nails. The glossy finish adds an extra touch of sophistication to this bold manicure.
- Orange nail polish: Essie ‘Playing Koi’
- Black nail art pen: Sally Hansen Nail Art Pen in Black
- Top coat: Seche Vite Dry Fast Top Coat
- Base coat: Deborah Lippmann ‘Hard Rock’ Basecoat
Recommendations:
- A bold orange base will provide a vibrant and eye-catching background for the black leaf patterns.
- Use a black nail art pen for detailed and precise leaf designs.
- A fast-drying top coat will ensure your manicure sets quickly and lasts longer.
- A strengthening base coat is crucial to protect your nails and prevent chipping.
Step-by-Step DIY Instructions:
- Apply a base coat to your nails and let it dry completely.
- Paint your nails with two coats of orange polish, ensuring each layer dries before applying the next.
- Use the black nail art pen to draw intricate leaf patterns on select nails.
- Apply a fast-drying top coat to seal the design and add a glossy finish.
- Allow the top coat to dry completely before using your hands.
Earthy Green with Gold and Black Leaves
This earthy nail design features a soft green base with gold foil and black leaf accents. The combination of the muted green, the shimmering gold, and the striking black leaves creates a sophisticated and unique look, perfect for those who love natural tones with a touch of glamour. The glossy finish enhances the overall elegance of this chic manicure.
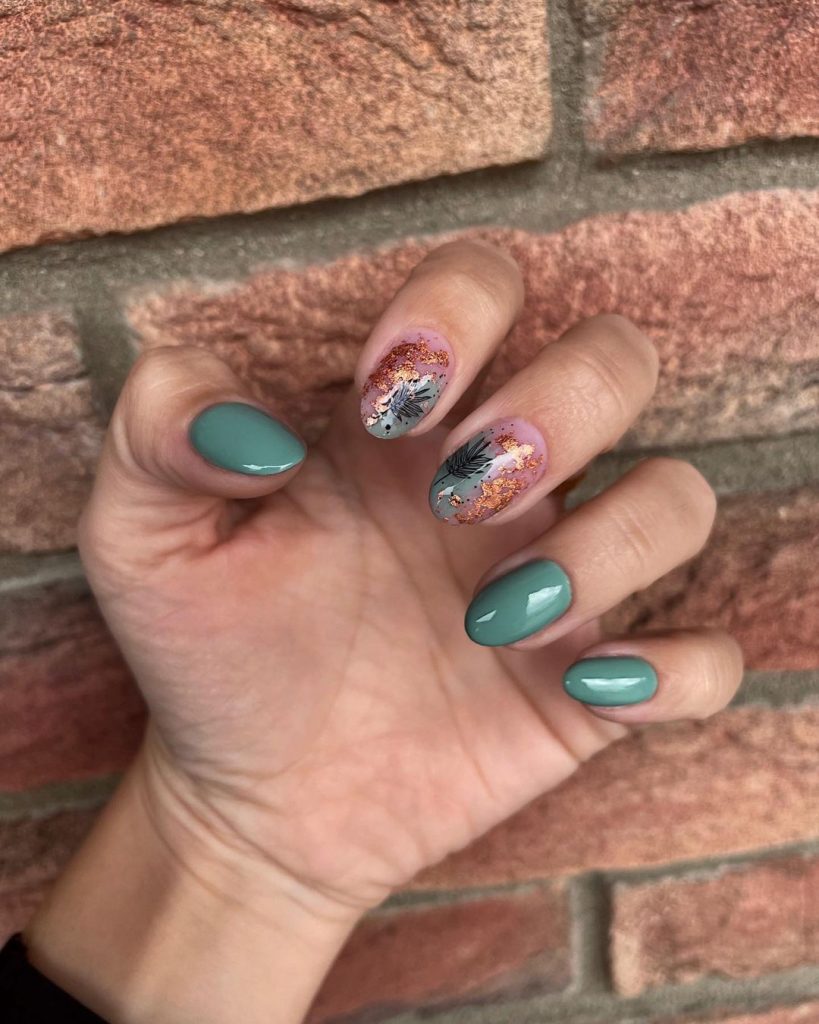
- Green nail polish: OPI ‘This Isn’t Greenland’
- Gold foil: Born Pretty Gold Nail Foil
- Black nail art pen: Sally Hansen Nail Art Pen in Black
- Top coat: Essie Gel Couture Top Coat
- Base coat: Orly Bonder Rubberized Basecoat
Recommendations:
- A soft green base will provide a natural and understated background for the gold foil and black leaf accents.
- Use gold foil to add a touch of glamour and shimmer to the design.
- A black nail art pen will help you achieve detailed and precise leaf designs.
- A gel top coat will ensure your manicure lasts longer and maintains its shine.
- A rubberized base coat is ideal for preventing chipping and extending the life of your manicure.
Step-by-Step DIY Instructions:
- Apply a base coat to your nails and let it dry completely.
- Paint your nails with two coats of green polish, ensuring each layer dries before applying the next.
- Apply gold foil to select areas on the accent nails.
- Use the black nail art pen to draw intricate leaf patterns on each nail.
- Apply a gel top coat to seal the design and add a glossy finish.
- Cure the top coat under a UV or LED lamp if necessary.
Delicate Gold and Black Palm Leaves
This delicate nail design features a nude base with black palm leaf patterns and touches of gold. The combination of the neutral background, the striking black leaves, and the subtle gold accents creates a refined and elegant look, perfect for any occasion. The glossy finish adds a touch of sophistication to this understated yet chic manicure.
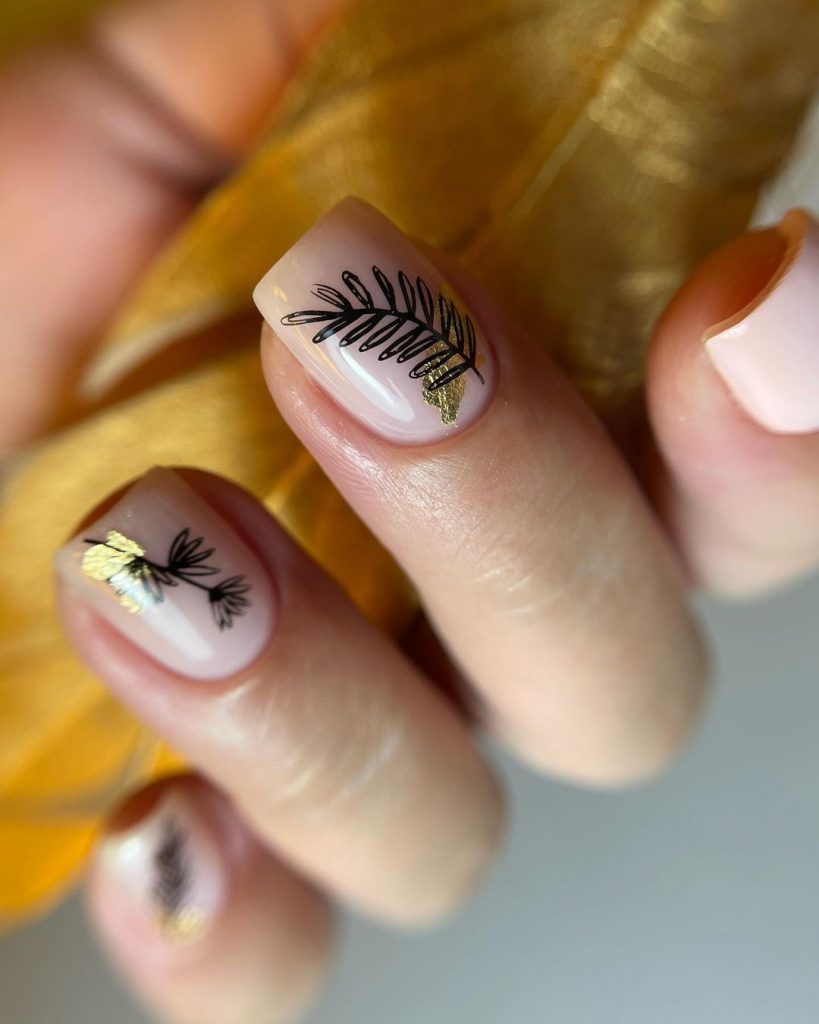
- Nude nail polish: Essie ‘Ballet Slippers’
- Black nail art pen: Sally Hansen Nail Art Pen in Black
- Gold nail art foil: Born Pretty Gold Nail Foil
- Top coat: Seche Vite Dry Fast Top Coat
- Base coat: Deborah Lippmann ‘Hard Rock’ Basecoat
Recommendations:
- A nude base will provide a clean and sophisticated backdrop for the black palm leaf patterns.
- Use gold nail art foil to add a subtle touch of elegance and glamour.
- A black nail art pen will help you achieve detailed and precise leaf designs.
- A fast-drying top coat will ensure your manicure sets quickly and lasts longer.
- A strengthening base coat is crucial to protect your nails and prevent chipping.
Step-by-Step DIY Instructions:
- Apply a base coat to your nails and let it dry completely.
- Paint your nails with two coats of nude polish, ensuring each layer dries before applying the next.
- Use the black nail art pen to draw intricate palm leaf patterns on each nail.
- Apply gold nail art foil to select areas on the accent nails.
- Apply a fast-drying top coat to seal the design and add a glossy finish.
- Allow the top coat to dry completely before using your hands.
Mint Green and Silver Leaves
This refreshing nail design features a mint green base with silver leaf accents. The combination of the cool green and the shimmering silver creates a fresh and modern look, perfect for spring or summer. The glossy finish adds an extra touch of sophistication to this trendy and chic manicure.
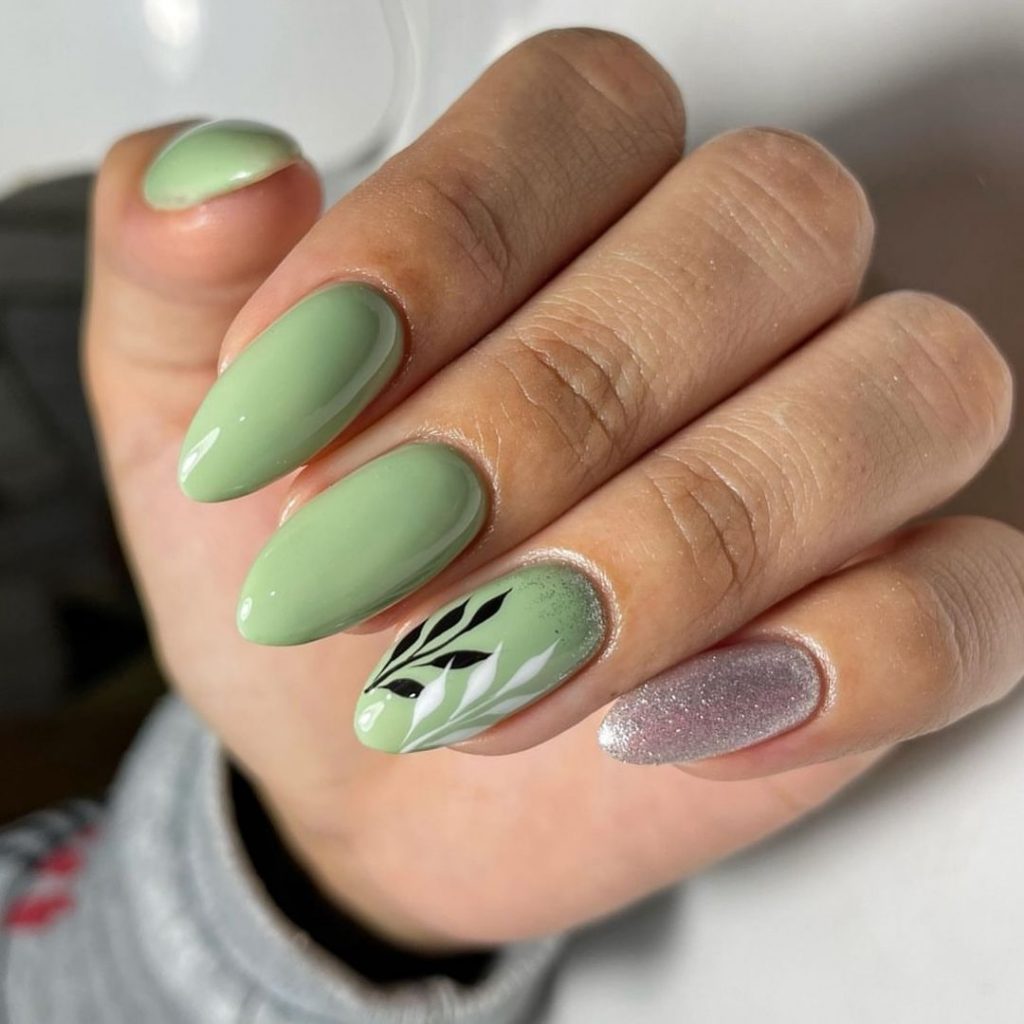
- Mint green nail polish: Essie ‘Mint Candy Apple’
- Silver nail art pen: Sally Hansen Nail Art Pen in Silver
- Top coat: Essie Gel Couture Top Coat
- Base coat: Orly Bonder Rubberized Basecoat
Recommendations:
- A mint green base will provide a cool and refreshing background for the silver leaf accents.
- Use a silver nail art pen to add shimmering and detailed leaf designs.
- A gel top coat will ensure your manicure lasts longer and maintains its shine.
- A rubberized base coat is ideal for preventing chipping and extending the life of your manicure.
Step-by-Step DIY Instructions:
- Apply a base coat to your nails and let it dry completely.
- Paint your nails with two coats of mint green polish, ensuring each layer dries before applying the next.
- Use the silver nail art pen to draw intricate leaf patterns on each nail.
- Apply a gel top coat to seal the design and add a glossy finish.
- Cure the top coat under a UV or LED lamp if necessary.
Elegant Lavender and Black Leaves
This elegant nail design features a soft lavender base with black leaf accents and silver details. The combination of the muted lavender, the striking black leaves, and the shimmering silver creates a sophisticated and graceful look, perfect for any special occasion. The glossy finish enhances the overall elegance of this refined manicure.
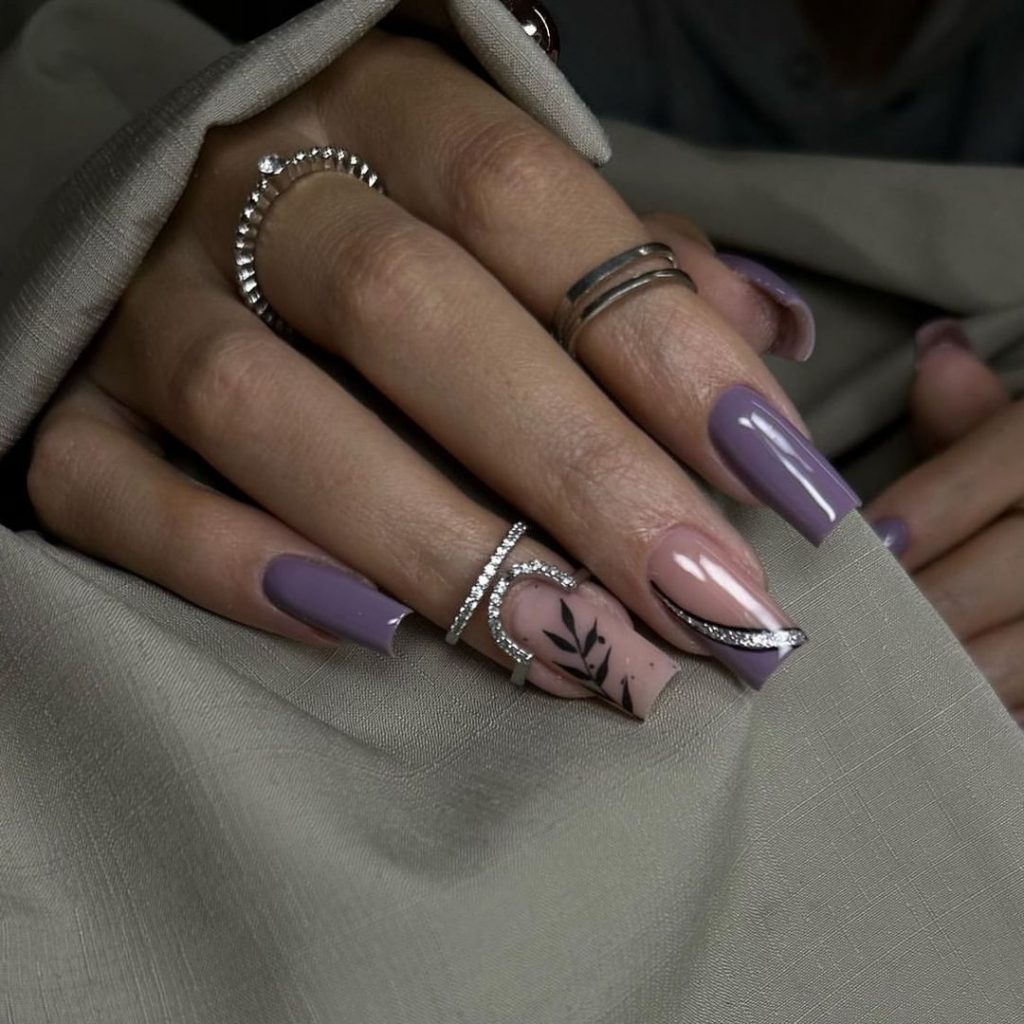
- Lavender nail polish: OPI ‘Do You Lilac It?’
- Black nail art pen: Sally Hansen Nail Art Pen in Black
- Silver nail art foil: Born Pretty Silver Nail Foil
- Top coat: Seche Vite Dry Fast Top Coat
- Base coat: Deborah Lippmann ‘Hard Rock’ Basecoat
Recommendations:
- A soft lavender base will provide a delicate and elegant background for the black leaf patterns.
- Use silver nail art foil to add a touch of shimmer and sophistication.
- A black nail art pen will help you achieve detailed and precise leaf designs.
- A fast-drying top coat will ensure your manicure sets quickly and lasts longer.
- A strengthening base coat is crucial to protect your nails and prevent chipping.
Step-by-Step DIY Instructions:
- Apply a base coat to your nails and let it dry completely.
- Paint your nails with two coats of lavender polish, ensuring each layer dries before applying the next.
- Use the black nail art pen to draw intricate leaf patterns on each nail.
- Apply silver nail art foil to select areas on the accent nails.
- Apply a fast-drying top coat to seal the design and add a glossy finish.
- Allow the top coat to dry completely before using your hands.
Save Pin