Fall Halloween Nails 2024 27 Ideas: Get Inspired with Spooky and Stylish Manicures
Fall is here, and with it comes the spooky season! Halloween is the perfect time to experiment with nail art that’s both fun and festive. Whether you’re into ghoulish designs or prefer something more subtle, I’ve got you covered with the latest trends for fall halloween nails 2024. Let’s dive into some Cute and Simple Ideas that will make your nails the highlight of your Halloween ensemble.
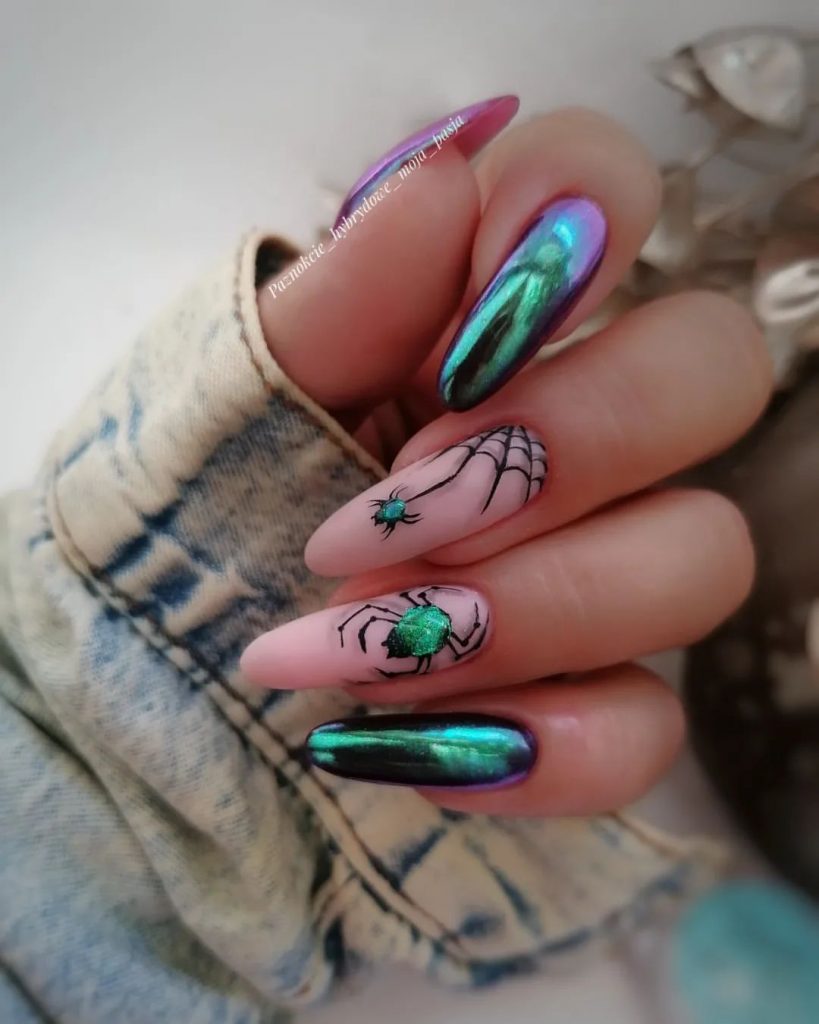
Spider Web Glam
When it comes to Halloween nail art, nothing says spooky quite like a detailed spider web design. This look features a mix of black spider web patterns on a nude base, accented with metallic green spiders that give it an extra eerie touch. The metallic sheen on some nails adds a glam factor, making this design perfect for anyone looking to mix classy and creepy.
Consumables:
- Nude base polish: OPI “Samoan Sand”
- Black nail polish: Essie “Licorice”
- Metallic green polish: Sally Hansen “Electric Emerald”
- Fine nail art brush
- Top coat: Seche Vite
Recommendations:
- Use a fine nail art brush for precision when drawing the webs.
- Choose a high-shine top coat to make the metallic elements pop.
How to Create:
- Start with a nude base coat.
- Use a fine brush to draw spider webs on a couple of nails with black polish.
- Add metallic green polish dots and draw tiny legs for the spiders.
- Finish with a top coat to seal the design and add shine.
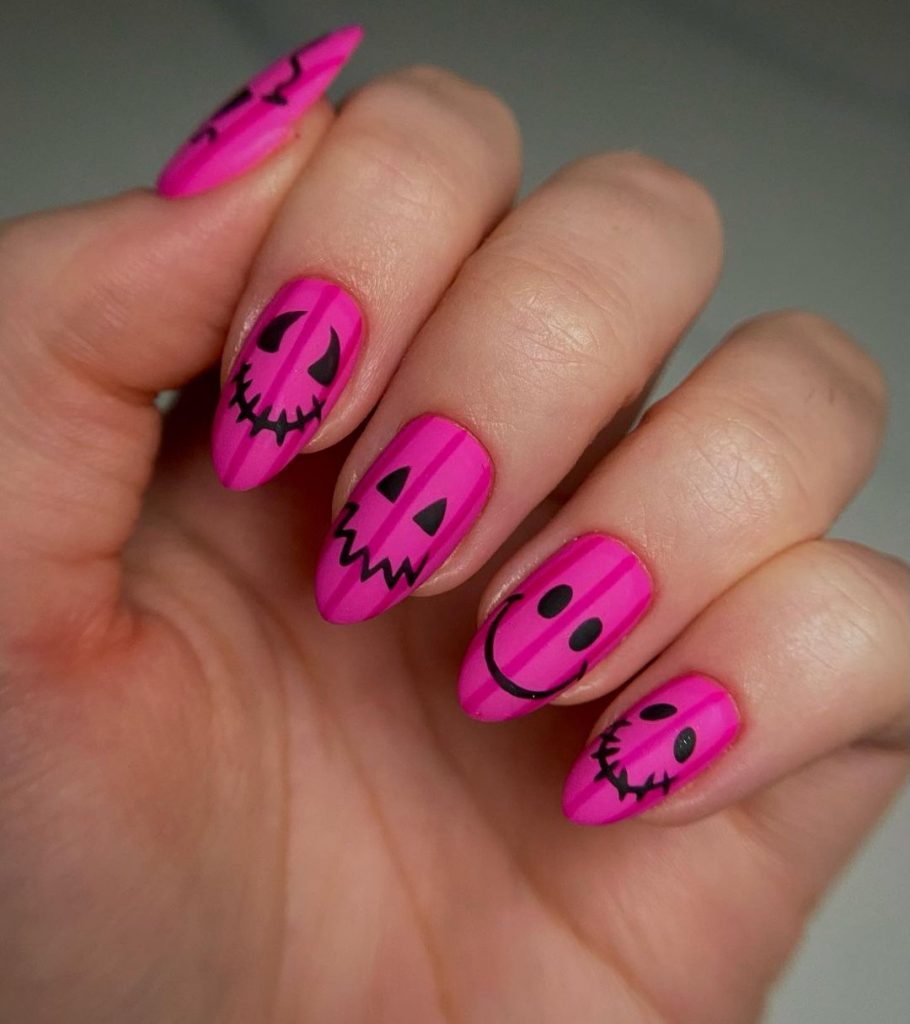
Pink Pumpkin Smiles
For a fun and whimsical take on Halloween nails, these pink pumpkin faces are just the ticket. The bright pink base is unexpected for Halloween but adds a playful twist to the traditional spooky theme. Black jack-o’-lantern faces are painted on each nail, giving them a cute and animated look.
Consumables:
- Pink base polish: Essie “Bachelorette Bash”
- Black nail polish: Sally Hansen “Black Heart”
- Nail art brush
- Matte top coat: OPI Matte Top Coat
Recommendations:
- Ensure the pink polish is fully dry before applying the black designs to avoid smudging.
- Use a matte top coat to give the nails a unique finish that contrasts with the glossy black.
How to Create:
- Apply the pink base polish and let it dry completely.
- Use a nail art brush to paint different jack-o’-lantern faces on each nail with black polish.
- Once dry, finish with a matte top coat to seal the design.
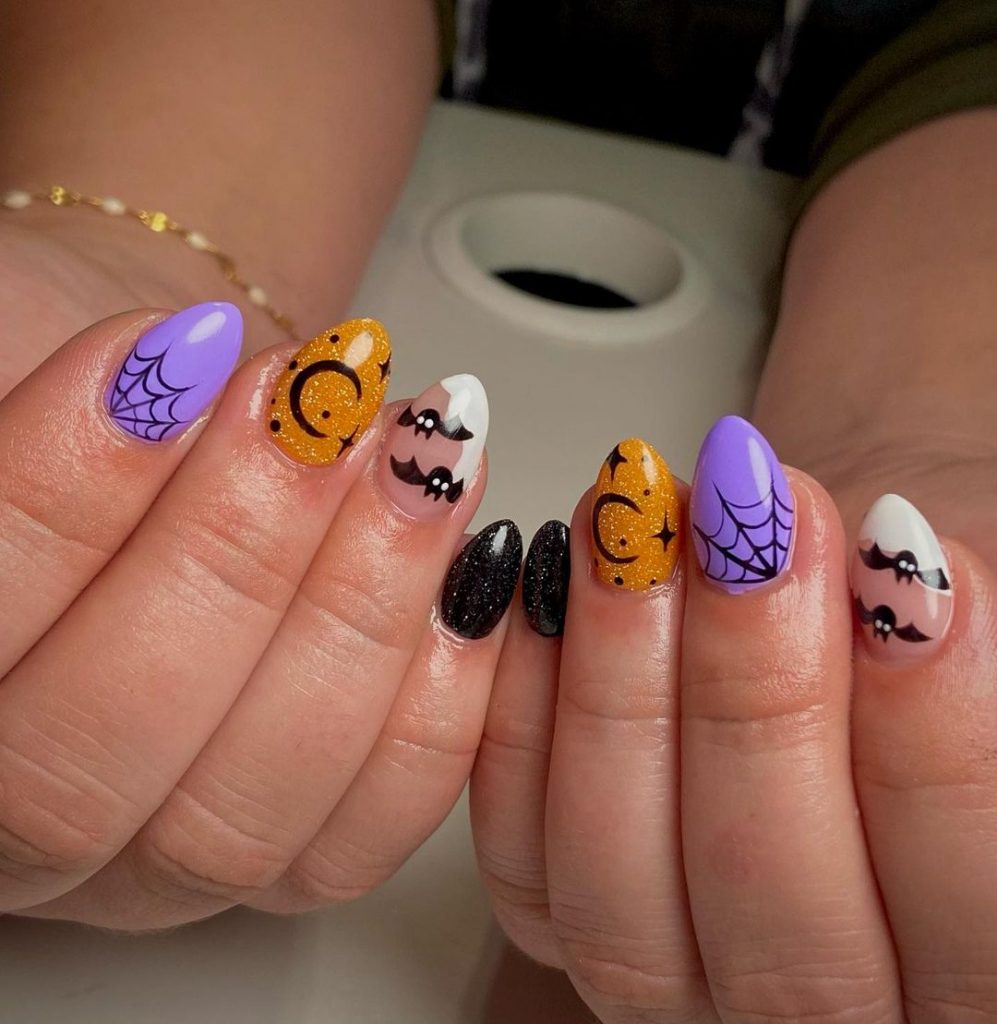
Halloween Mix and Match
This design is perfect for those who can’t decide on just one Halloween theme. It features a variety of motifs like spider webs, ghosts, and bats, all in festive colors like orange, purple, and black. The glitter accents add a touch of fun to the overall look.
Consumables:
- Orange glitter polish: China Glaze “Ick-A-Bod-Y”
- Purple polish: OPI “Do You Lilac It?”
- Black polish: Essie “Licorice”
- White polish: Zoya “Purity”
- Fine nail art brushes
- Top coat: Seche Vite
Recommendations:
- Experiment with different motifs on each nail to create a unique design.
- Use glitter polishes for a festive sparkle that catches the light.
How to Create:
- Paint each nail with a different base color (orange, purple, black, white).
- Use fine nail art brushes to draw different Halloween motifs on each nail.
- Add glitter accents as desired.
- Finish with a top coat to protect the designs and add shine.
Ghostly Orange Tips
Add a spooky twist to a classic French manicure with ghostly designs on orange tips. This look features bright orange tips with tiny ghosts and spider webs, combining the simple elegance of a French manicure with Halloween charm.
Consumables:
- Nude base polish: OPI “Bubble Bath”
- Orange polish: Essie “Tangerine Tease”
- Black and white nail art pens
- Top coat: Seche Vite
Recommendations:
- Use nail art pens for more control when drawing small details like ghosts and webs.
- Choose a quick-dry top coat to avoid smudging the designs.
How to Create:
- Apply a nude base coat and let it dry.
- Paint the tips of your nails orange.
- Use black and white nail art pens to draw ghosts and spider webs on the tips.
- Finish with a top coat to seal the design.
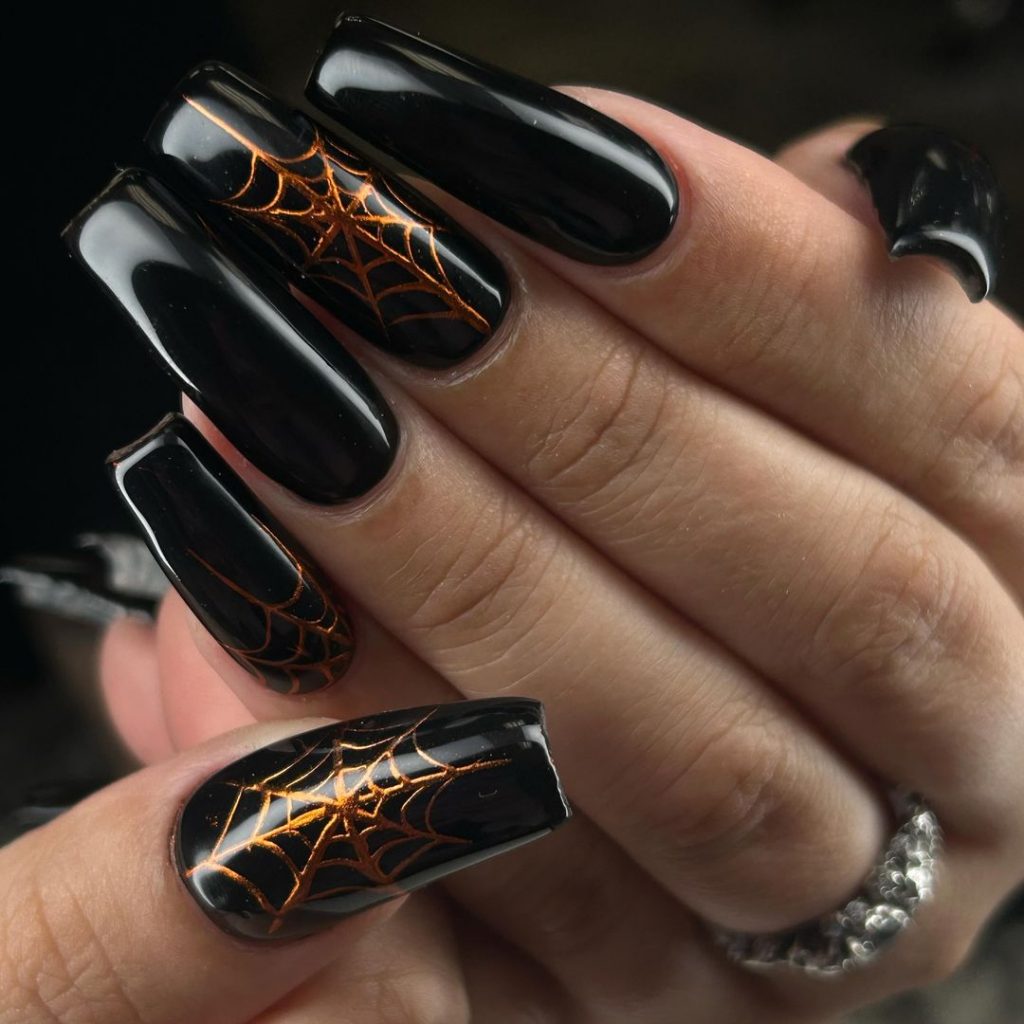
Black Web Elegance
For those who love a dark and elegant look, these black nails with copper spider webs are perfect. The deep black base is both dramatic and stylish, while the intricate copper web designs add a touch of Halloween spirit without being over-the-top.
Consumables:
- Black polish: Sally Hansen “Black Out”
- Copper nail art polish: Orly “Rage”
- Fine nail art brush
- Top coat: Essie “Good To Go”
Recommendations:
- Use a steady hand and a fine brush for the spider web designs to ensure clean lines.
- A glossy top coat will enhance the metallic effect of the copper polish.
How to Create:
- Apply the black base polish and let it dry completely.
- Use a fine nail art brush to draw copper spider webs on each nail.
- Finish with a glossy top coat to seal the design and add shine.
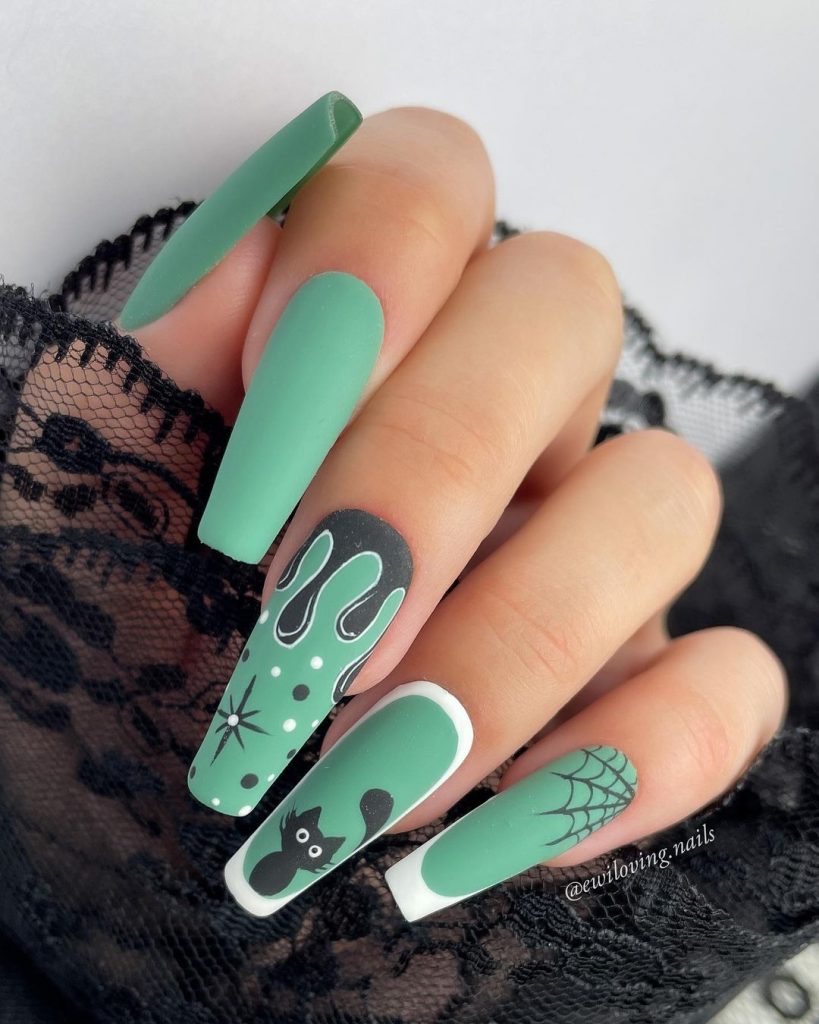
Minty Halloween Chic
This nail design is a fresh take on Halloween with a mint green base and contrasting black and white accents. The nails feature dripping slime, a cute black cat, and spider web motifs, all brought together in a matte finish. The combination of green and black with white accents creates a cute and modern look for the spooky season.
Consumables:
- Mint green polish: Essie “Mint Candy Apple”
- Black polish: OPI “Black Onyx”
- White polish: Sally Hansen “White On”
- Matte top coat: OPI Matte Top Coat
- Fine nail art brush
Recommendations:
- Use a high-quality matte top coat to ensure the design stays chic and non-glossy.
- Opt for a thin brush to achieve precise lines for the spider webs and cat details.
How to Create:
- Apply the mint green polish as the base coat and let it dry.
- Use the fine brush to draw black slime drips on one nail, a black cat on another, and spider webs on a third.
- Add white accents to the designs to highlight the details.
- Finish with a matte top coat to seal the design.
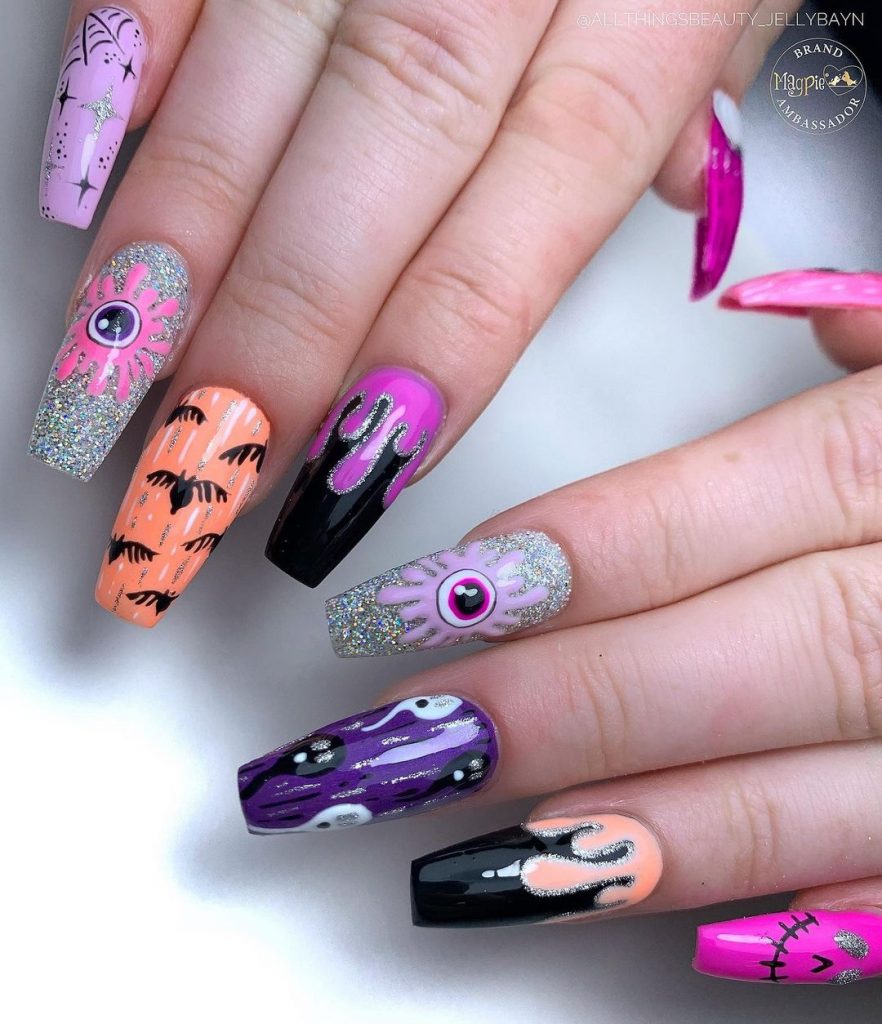
Halloween Extravaganza
This vibrant nail set features a mix of Halloween motifs including spooky eyes, bats, dripping slime, and stitched details. The color palette includes neon pinks, oranges, and purples, making it a fun and eye-catching option for those who love bold colors and intricate designs.
Consumables:
- Neon pink polish: China Glaze “Shocking Pink”
- Orange polish: Essie “Tangerine Tease”
- Purple polish: OPI “Do You Lilac It?”
- Black polish: Sally Hansen “Black Heart”
- Silver glitter polish: Zoya “Trixie”
- Fine nail art brushes
Recommendations:
- Combine different neon colors for a playful and striking effect.
- Use glitter polish to add a sparkle to some nails, making the design stand out even more.
How to Create:
- Paint each nail with a different base color (pink, orange, purple).
- Use fine brushes to draw various Halloween motifs such as eyes, bats, and stitches.
- Apply glitter polish on selected nails for added sparkle.
- Seal the design with a glossy top coat.
Classic Halloween Fun
This nail design embraces classic Halloween symbols with pumpkins, ghosts, and checkerboard patterns. The mix of black, white, orange, and silver creates a classy yet festive look. The detailed artwork on each nail makes this design perfect for those who love traditional Halloween vibes.
Consumables:
- Orange polish: Essie “Tangerine Tease”
- Black polish: OPI “Black Onyx”
- White polish: Sally Hansen “White On”
- Silver glitter polish: Zoya “Trixie”
- Fine nail art brushes
Recommendations:
- Use a dotting tool for creating the eyes and mouth of the pumpkins and ghosts.
- Ensure the checkerboard pattern is precise for a polished look.
How to Create:
- Apply the base colors (orange, black, white, silver) to different nails.
- Draw pumpkins, ghosts, and checkerboard patterns with fine brushes.
- Use a dotting tool for small details.
- Finish with a top coat to protect the designs.
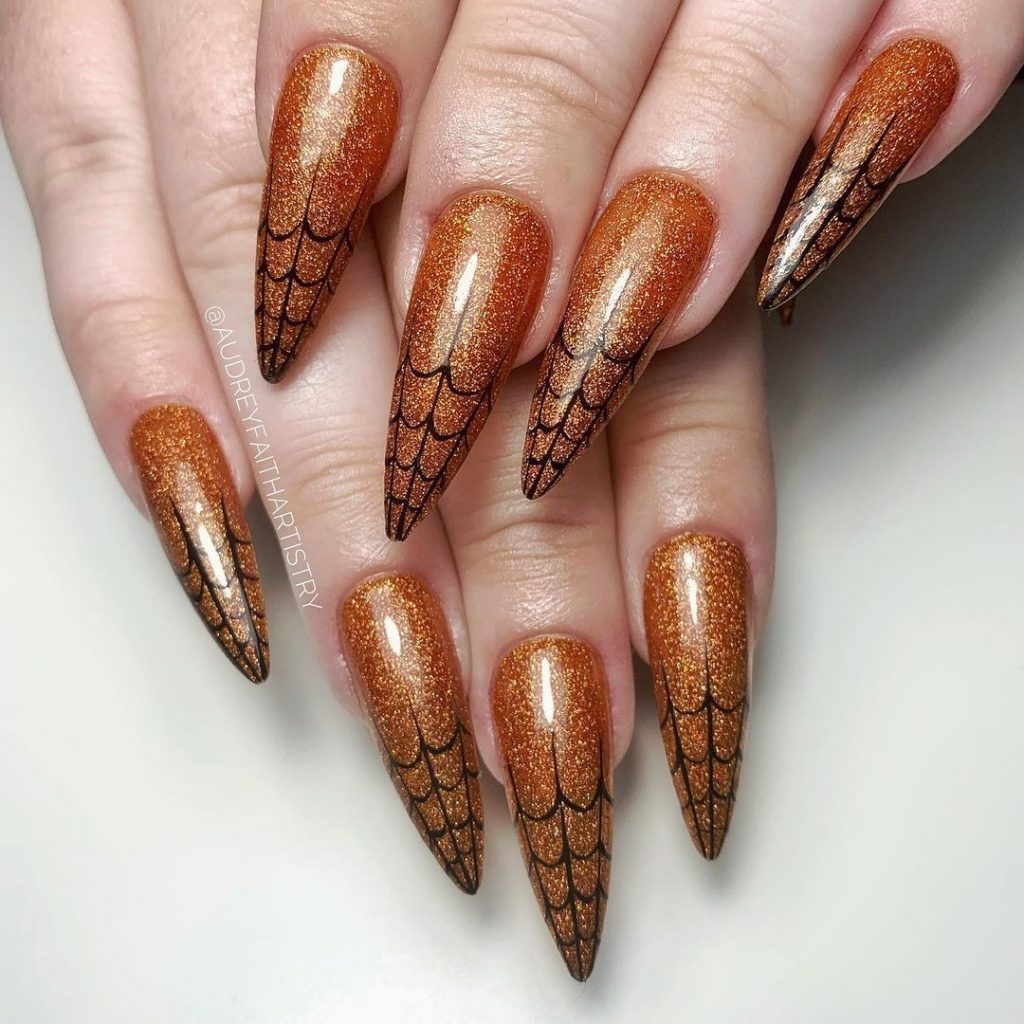
Golden Webs
For a glamorous Halloween look, these golden glitter nails with black spider web accents are perfect. The rich gold polish provides a luxurious base, while the black spider web designs add a spooky yet elegant touch.
Consumables:
- Gold glitter polish: China Glaze “Gold Digger”
- Black polish: Essie “Licorice”
- Fine nail art brush
- Top coat: Seche Vite
Recommendations:
- Use a high-quality gold glitter polish for a rich, sparkling finish.
- Ensure the black web designs are crisp by using a fine brush.
How to Create:
- Apply the gold glitter polish as the base and let it dry.
- Use a fine brush to draw black spider webs on each nail.
- Seal with a top coat to add shine and protect the design.
Pumpkin Patch Delight
This nail design features pumpkins, spider webs, and spiders on a nude base, creating a cohesive and festive look. The intricate artwork is balanced with the simplicity of the nude background, making it suitable for both casual and more formal Halloween events.
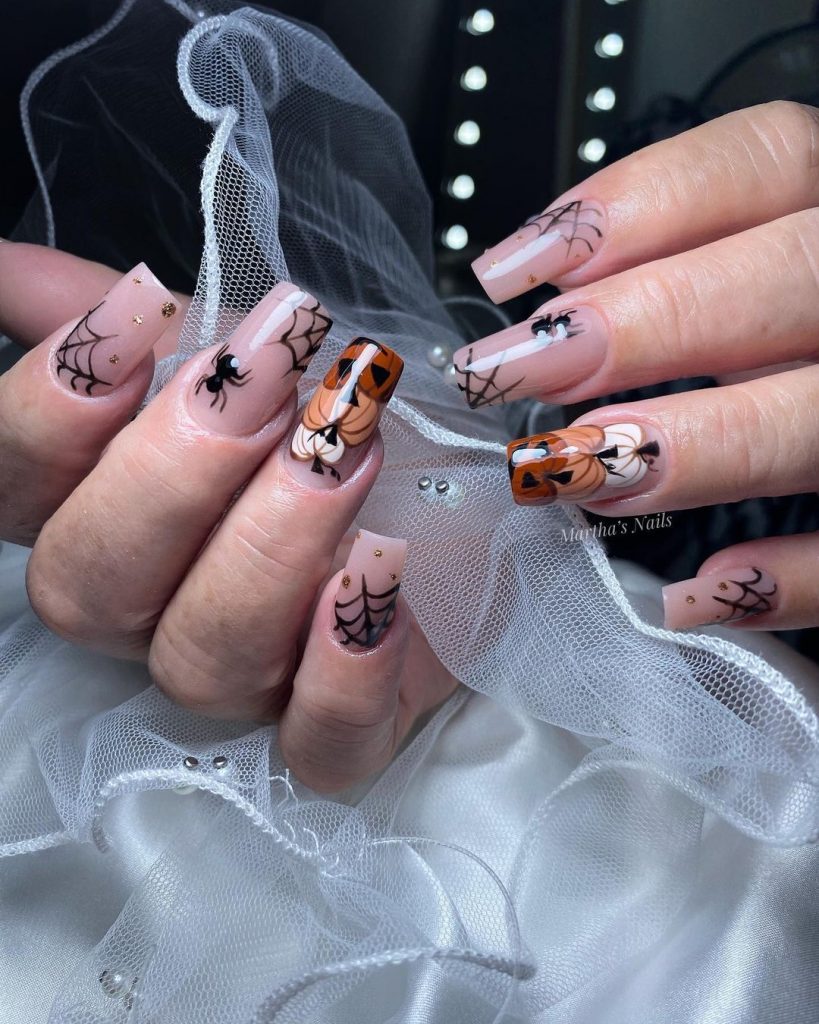
Consumables:
- Nude base polish: OPI “Bubble Bath”
- Black polish: Sally Hansen “Black Heart”
- Orange polish: Essie “Tangerine Tease”
- Fine nail art brushes
Recommendations:
- Keep the nude base simple to make the detailed artwork stand out.
- Use a thin brush for precise lines when drawing the spider webs and pumpkins.
How to Create:
- Apply the nude base polish and let it dry completely.
- Draw spider webs, spiders, and pumpkins with fine brushes.
- Add small details like pumpkin stems and spider legs for more depth.
- Finish with a glossy top coat to protect the design.
Purple and Orange Stiletto Spiders
This striking stiletto nail design combines deep purple with vibrant orange, featuring intricate black spider webs. The high-gloss finish on the purple nails contrasts beautifully with the glittery orange, creating a bold and eye-catching look perfect for Halloween.
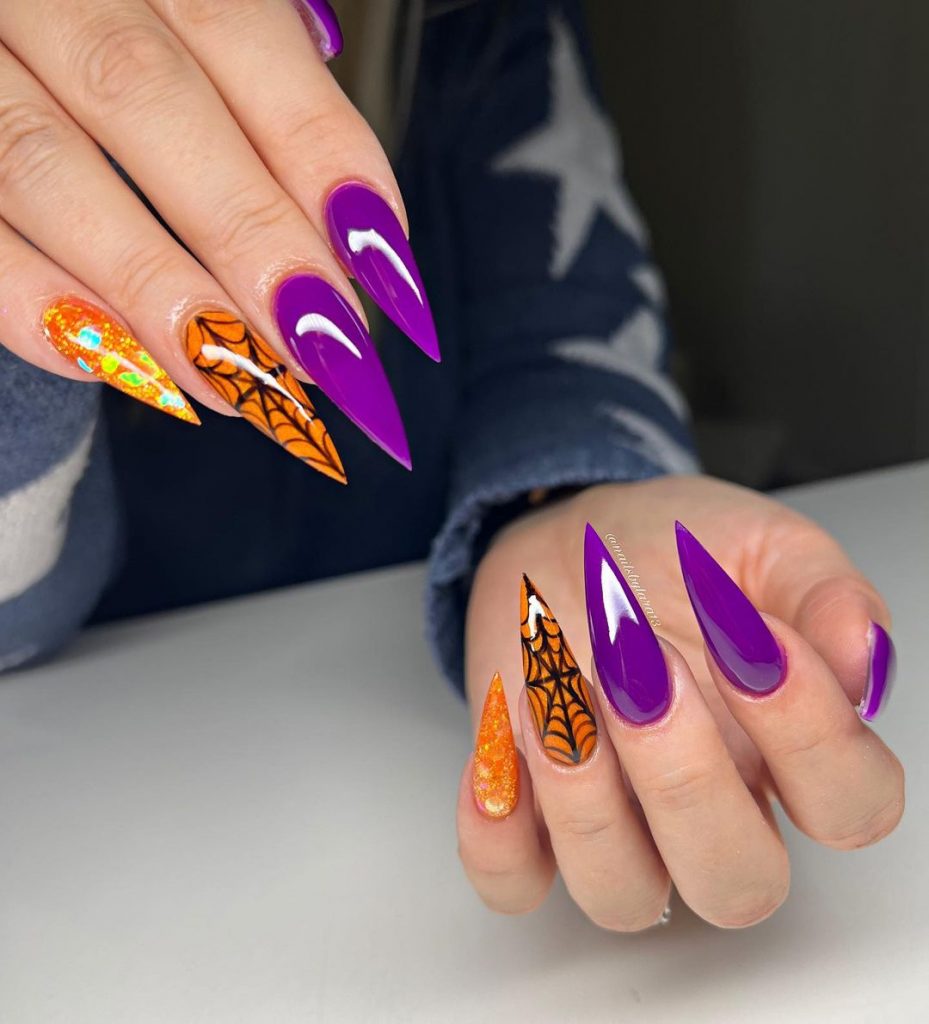
Consumables:
- Purple polish: OPI “Do You Lilac It?”
- Orange glitter polish: China Glaze “Ick-A-Bod-Y”
- Black polish: Essie “Licorice”
- Fine nail art brush
- Top coat: Seche Vite
Recommendations:
- Use a high-quality glitter polish for a rich sparkle.
- Ensure your top coat is extra glossy to enhance the shine of the purple nails.
How to Create:
- Apply the purple polish on selected nails and the orange glitter polish on others.
- Use a fine brush to draw spider webs on the orange nails with black polish.
- Finish with a top coat to seal and protect the design.
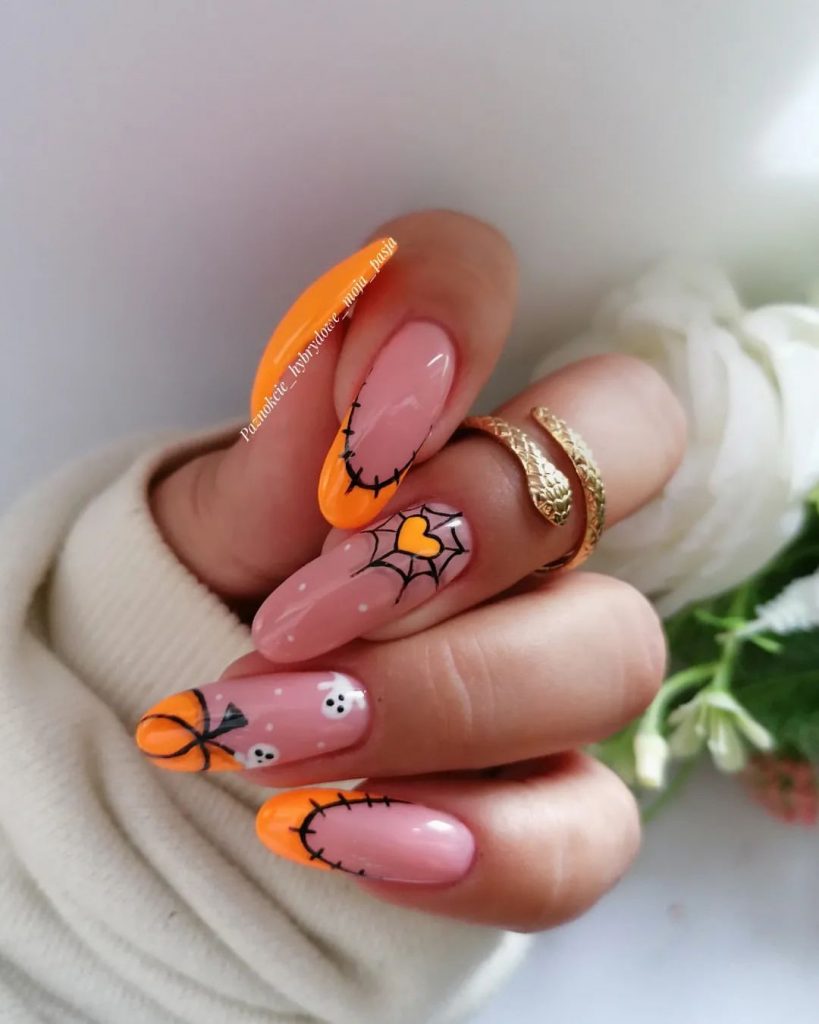
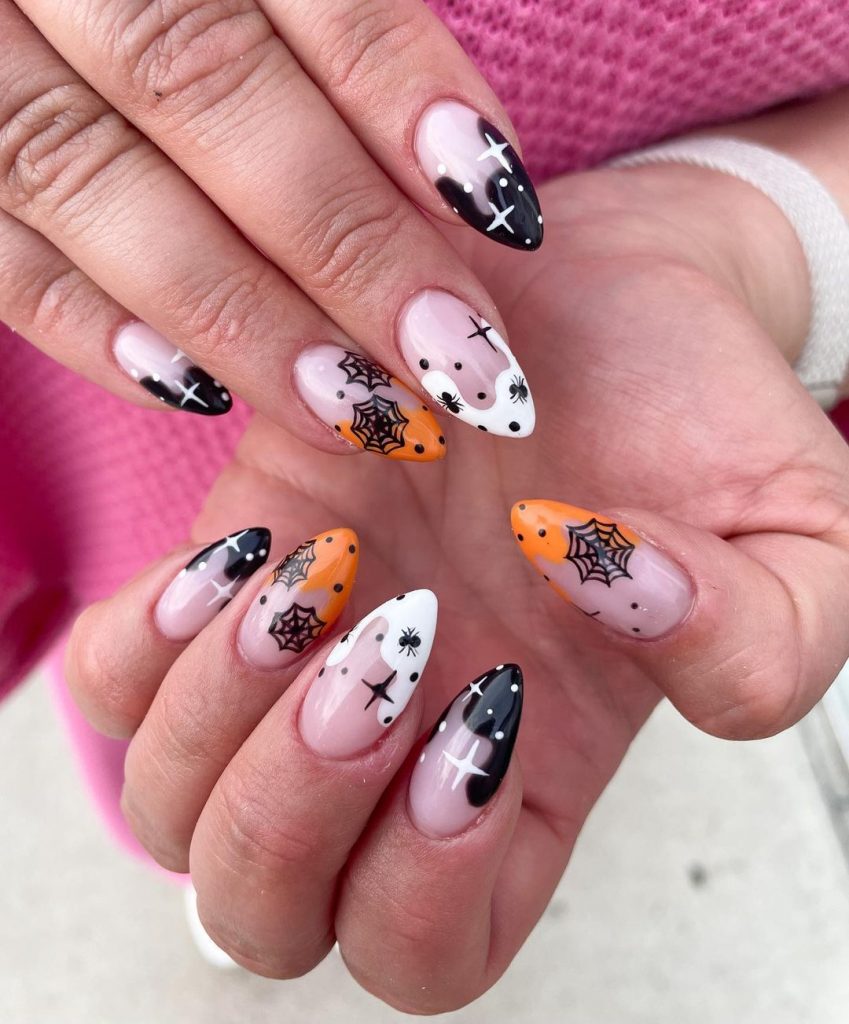
Heart and Web Halloween Mix
This cute and fun nail design features a mix of hearts, spider webs, and dripping white polish. The neutral base makes the bright orange and black accents stand out, while the little ghost adds a playful touch.
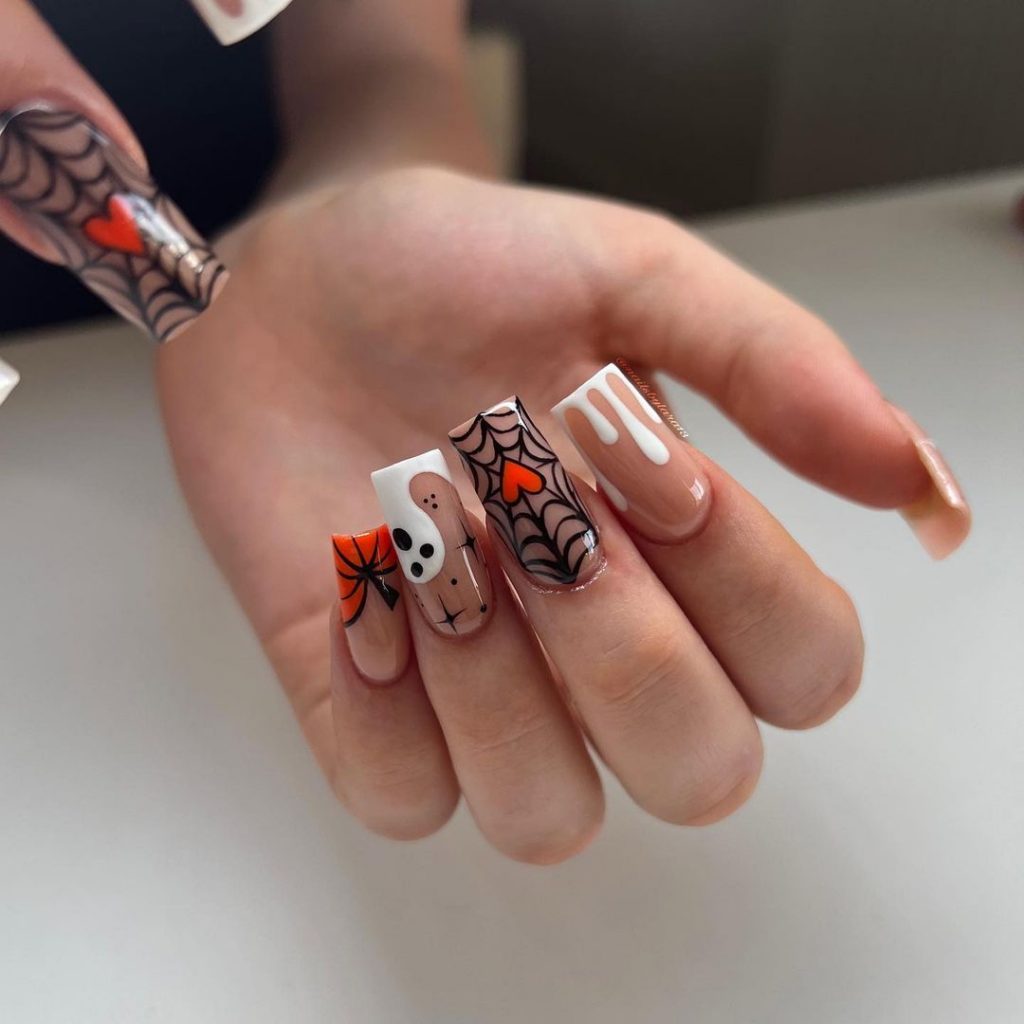
Consumables:
- Nude base polish: OPI “Bubble Bath”
- Black polish: Sally Hansen “Black Heart”
- Orange polish: Essie “Tangerine Tease”
- White polish: Sally Hansen “White On”
- Fine nail art brushes
Recommendations:
- Use a dotting tool for creating the small hearts and ghost eyes.
- Ensure each layer of polish is fully dry before adding details to avoid smudging.
How to Create:
- Apply the nude base polish and let it dry.
- Draw spider webs, hearts, and a small ghost using fine brushes and dotting tools.
- Add white drips on one nail for a spooky effect.
- Seal with a top coat.
Matte Ghost and Web
For a sleek and sophisticated Halloween look, these matte black and grey nails feature ghost and spider web designs. The matte finish adds a modern twist to the traditional Halloween motifs, making them look classy and simple.
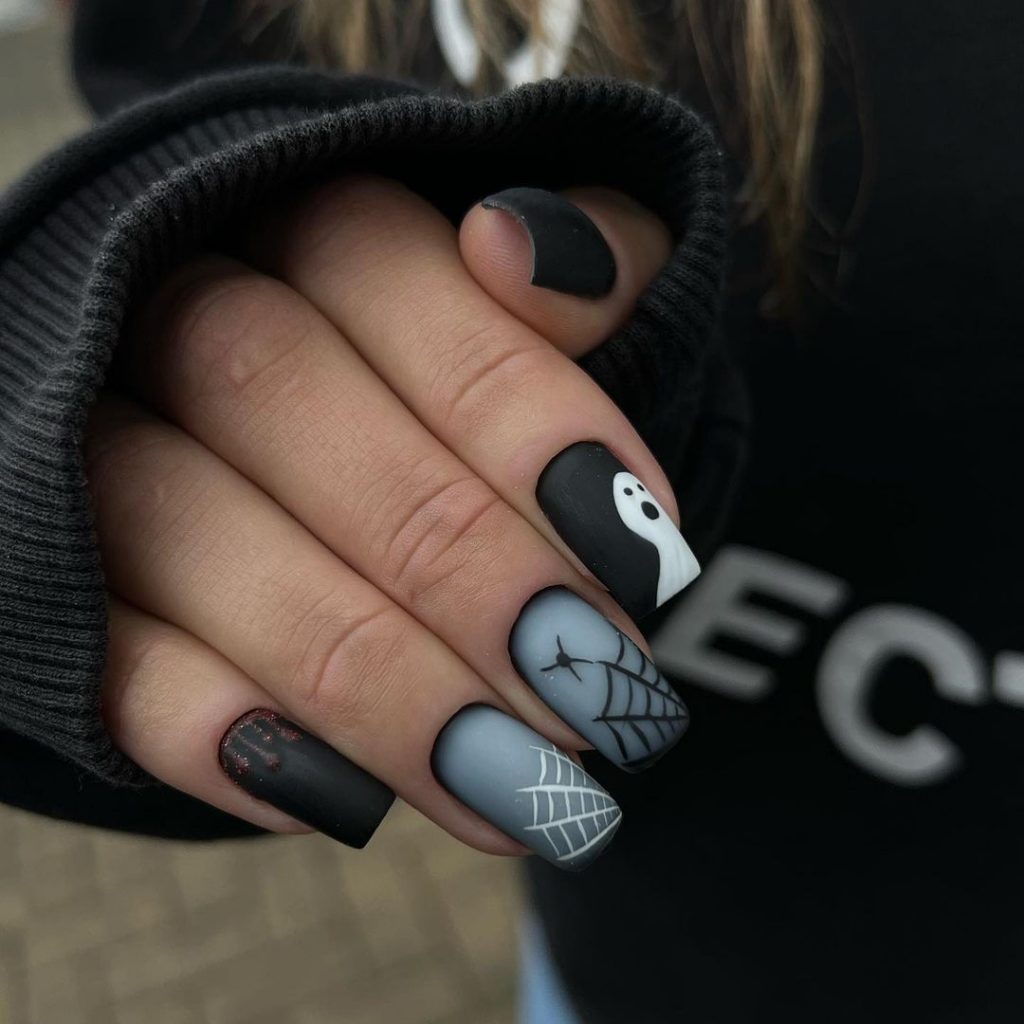
Consumables:
- Black matte polish: OPI “Matte Black Onyx”
- Grey polish: Essie “Chinchilly”
- White polish: Zoya “Purity”
- Fine nail art brush
- Matte top coat: OPI Matte Top Coat
Recommendations:
- Use a matte top coat to ensure the design remains non-glossy.
- Opt for a thin brush to achieve precise lines for the spider webs and ghost details.
How to Create:
- Apply the matte black and grey polishes as base colors.
- Use a fine brush to draw spider webs and ghost details with white polish.
- Finish with a matte top coat to seal the design.
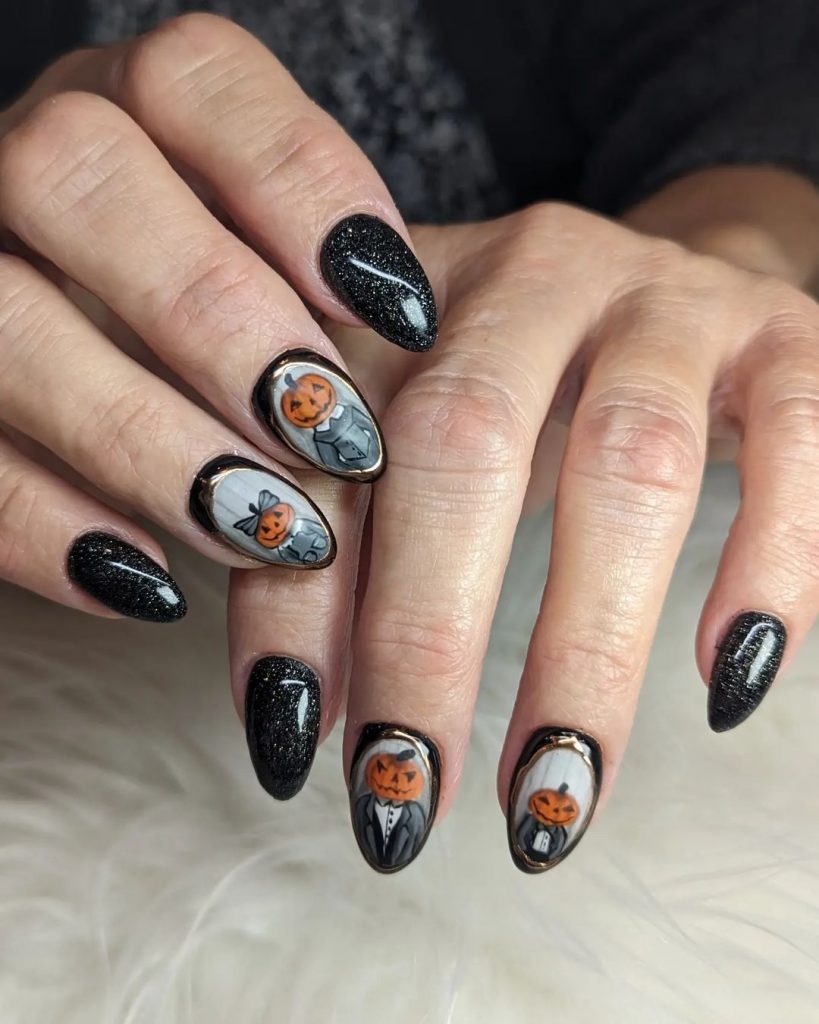
Pumpkin Family Portrait
This quirky nail design showcases a pumpkin family portrait, set against a background of black glitter polish. The detailed artwork features pumpkins dressed up in suits, adding a fun and unique element to your Halloween nails.
Consumables:
- Black glitter polish: OPI “Black Onyx Glitter”
- Nude polish: OPI “Bubble Bath”
- Orange polish: Essie “Tangerine Tease”
- Fine nail art brushes
Recommendations:
- Use a fine brush for the detailed pumpkin family portraits.
- Ensure the black glitter polish is fully dry before adding the pumpkin details.
How to Create:
- Apply the black glitter polish on selected nails and nude polish on others.
- Draw the pumpkin family portraits using fine brushes and orange polish.
- Add details like suits and faces with black and white polish.
- Seal with a top coat.
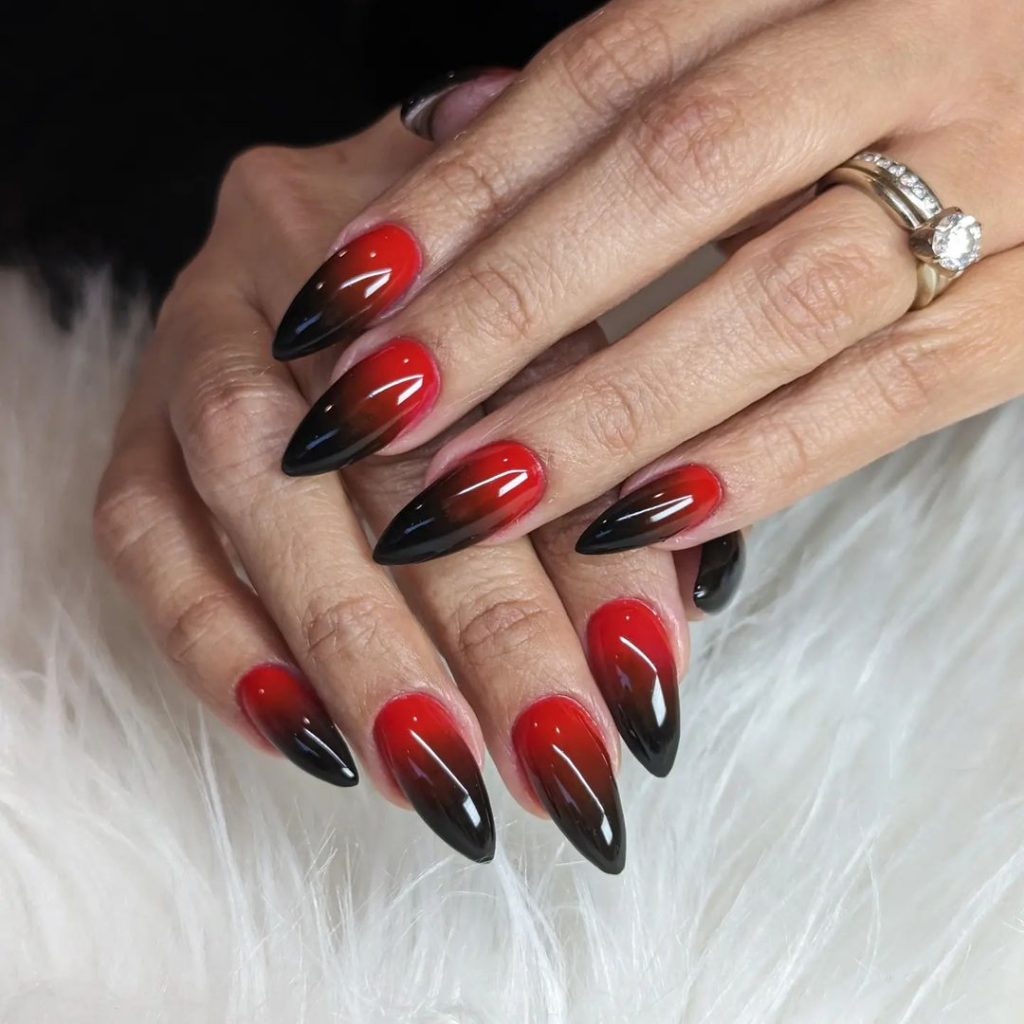
Red and Black Gradient
This dramatic gradient nail design features a bold transition from red to black, creating a striking ombre effect. The high-gloss finish makes this design look classy and elegant, perfect for a sophisticated Halloween look.
Consumables:
- Red polish: Essie “Really Red”
- Black polish: OPI “Black Onyx”
- Sponge for gradient effect
- Top coat: Seche Vite
Recommendations:
- Use a sponge to blend the red and black polishes smoothly for a seamless gradient.
- Apply a high-gloss top coat to enhance the shine and smooth out the gradient.
How to Create:
- Apply the red polish as the base coat and let it dry.
- Use a sponge to dab black polish at the tips, blending it into the red for a gradient effect.
- Repeat until you achieve the desired intensity.
- Finish with a top coat to seal and add shine.
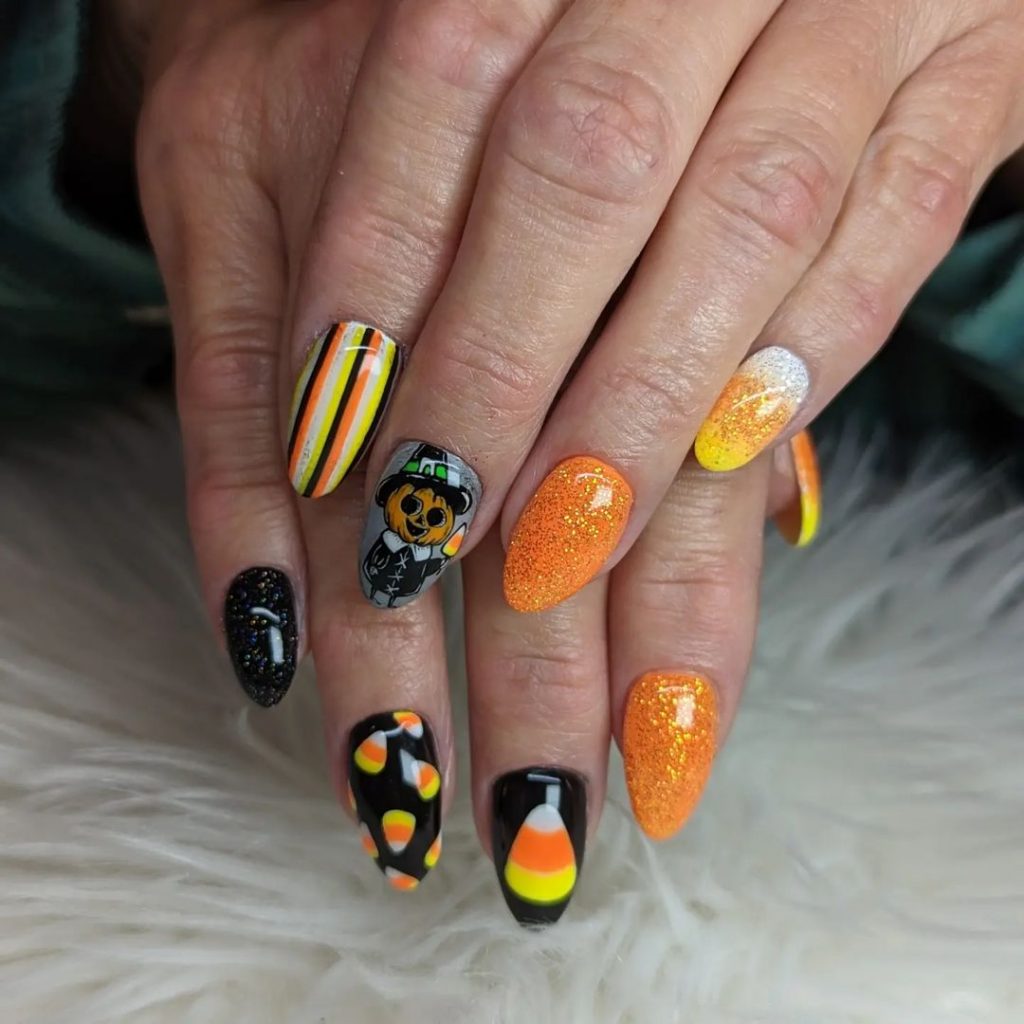
Candy Corn Delight
This vibrant nail design is all about Halloween’s favorite treat—candy corn! The nails feature a mix of candy corn patterns, stripes, and glittery orange, with an adorable pumpkin scarecrow making a guest appearance. The bold color combination of orange, yellow, and black captures the essence of Halloween fun.
Consumables:
- Orange glitter polish: China Glaze “Orange Knockout”
- Yellow polish: Essie “Sunshine State of Mind”
- Black polish: OPI “Black Onyx”
- White polish: Sally Hansen “White On”
- Fine nail art brushes
Recommendations:
- Use a fine brush to ensure precise candy corn shapes and scarecrow details.
- Opt for a high-quality glitter polish for maximum sparkle.
How to Create:
- Apply the orange glitter polish on some nails and the black polish on others.
- Use fine brushes to draw candy corn patterns, stripes, and the pumpkin scarecrow.
- Add white and yellow details to create the candy corn effect.
- Seal with a top coat to protect the design.
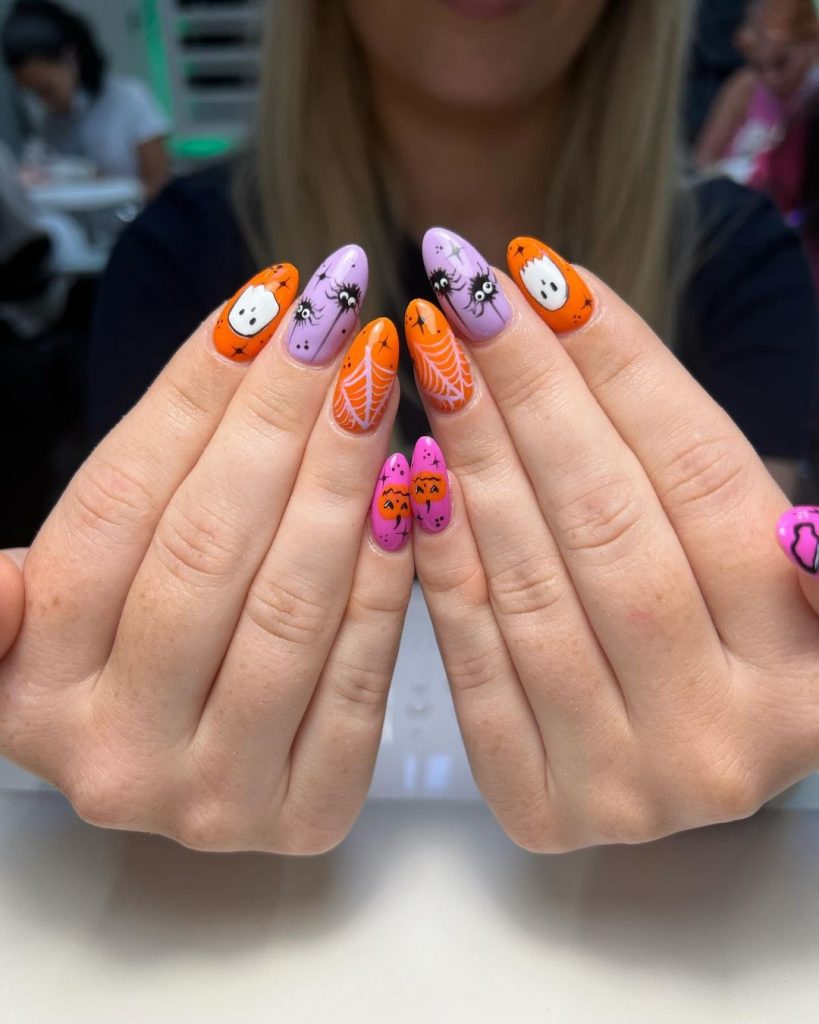
Spooky Spider Webs and Ghosts
This cute nail design combines Halloween favorites like ghosts and spider webs with a playful color palette of purple, orange, and pink. The animated spiders and smiling ghosts add a fun twist to the traditionally spooky motifs.
Consumables:
- Purple polish: OPI “Do You Lilac It?”
- Orange polish: Essie “Tangerine Tease”
- Pink polish: China Glaze “Pink Voltage”
- Black polish: Sally Hansen “Black Heart”
- White polish: Zoya “Purity”
- Fine nail art brushes
Recommendations:
- Use a thin brush for the detailed spider webs and ghost faces.
- Ensure each layer of polish is fully dry before adding the next color to avoid smudging.
How to Create:
- Apply the purple, orange, and pink polishes as base colors on different nails.
- Draw spider webs, ghosts, and spiders using fine brushes and black and white polishes.
- Add tiny details like eyes and smiles to the ghosts and spiders.
- Seal with a top coat.
Classic Halloween Mix
This elegant design features a mix of classic Halloween elements like spider webs, ghosts, and stars on a neutral base. The combination of black, white, and orange with glittery accents makes it perfect for a classy Halloween look.
Consumables:
- Nude base polish: OPI “Bubble Bath”
- Black polish: Essie “Licorice”
- White polish: Sally Hansen “White On”
- Orange polish: Essie “Tangerine Tease”
- Fine nail art brushes
Recommendations:
- Use a fine brush for detailed designs like spider webs and ghosts.
- Opt for a glossy top coat to enhance the glittery accents.
How to Create:
- Apply the nude base polish and let it dry.
- Draw spider webs, ghosts, and stars using fine brushes and black, white, and orange polishes.
- Add glittery accents for a touch of sparkle.
- Seal with a top coat.
Neon Ghosts and Candy Corn
This vibrant and fun nail design features neon green, purple, and black bases with a mix of ghosts, skulls, and candy corn patterns. The bold colors and detailed designs make this a standout look for any Halloween celebration.
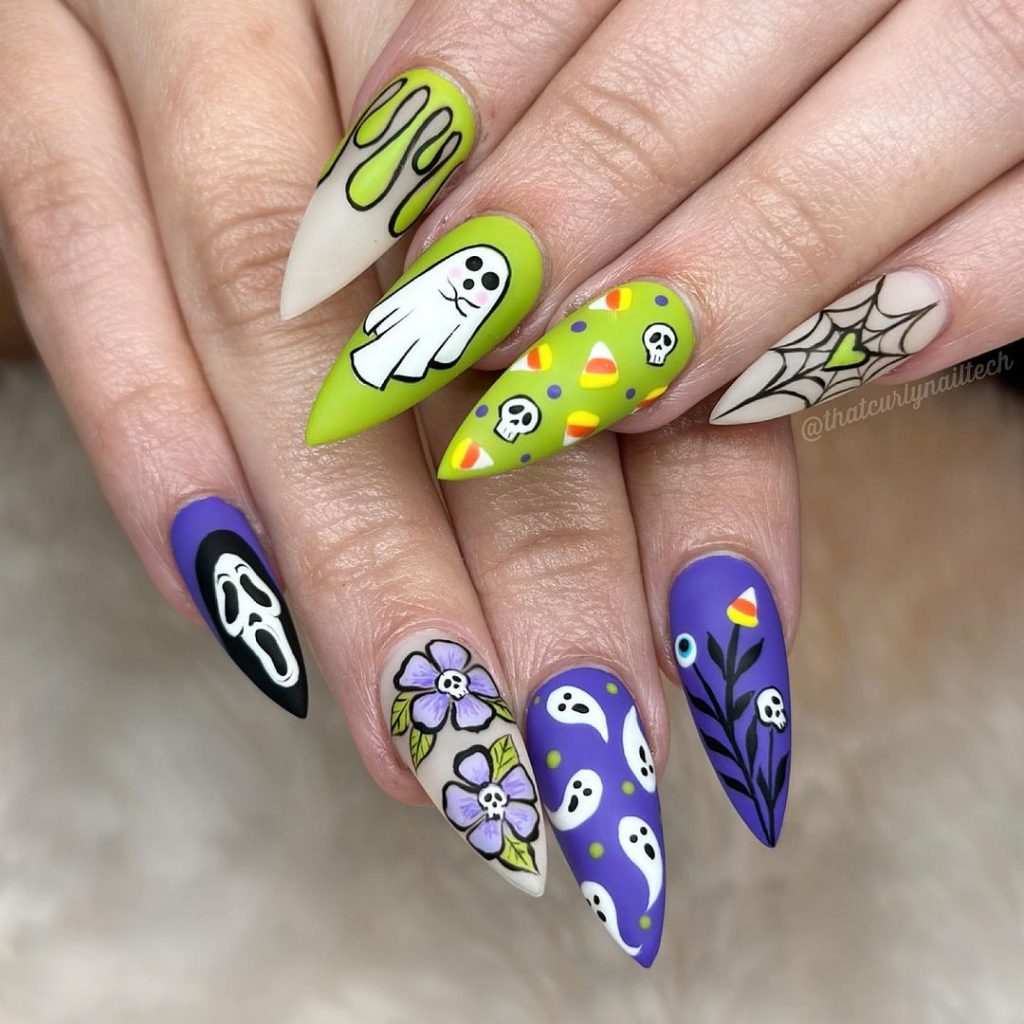
Consumables:
- Neon green polish: China Glaze “I’m With The Lifeguard”
- Purple polish: OPI “Do You Lilac It?”
- Black polish: Sally Hansen “Black Heart”
- White polish: Zoya “Purity”
- Fine nail art brushes
Recommendations:
- Use a dotting tool for the tiny ghost and skull faces.
- Ensure each layer of polish is completely dry before adding details to avoid smudging.
How to Create:
- Apply the neon green, purple, and black polishes as base colors on different nails.
- Draw ghosts, skulls, and candy corn patterns using fine brushes and white polish.
- Add tiny details like eyes and smiles to the ghosts and skulls.
- Seal with a matte top coat for a unique finish.
Autumnal Halloween
This nail design embraces the autumn season with rich tones of brown, yellow, and green, accented with cute ghost and pumpkin motifs. The mix of fall colors and Halloween designs makes it perfect for transitioning from fall to Halloween.
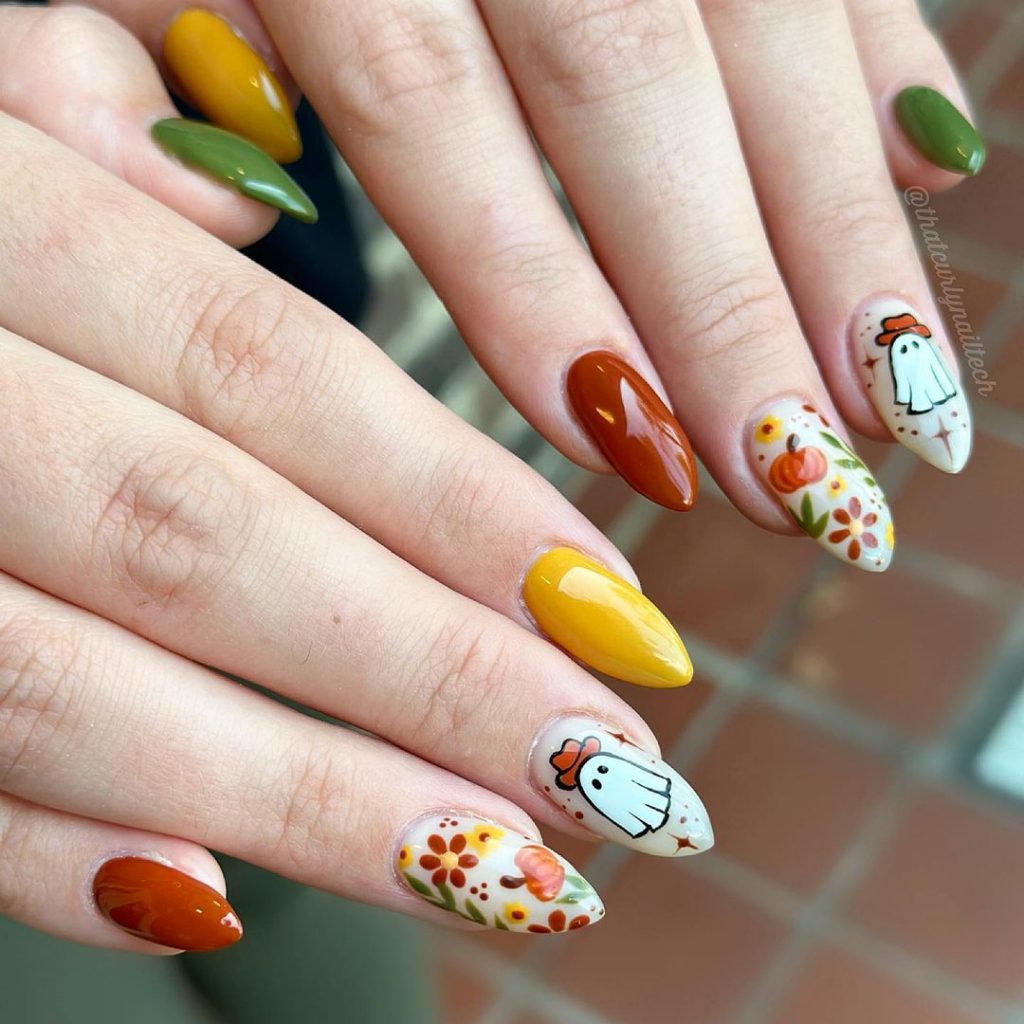
Consumables:
- Brown polish: OPI “Chocolate Moose”
- Yellow polish: Essie “Sunshine State of Mind”
- Green polish: Sally Hansen “Green Thumb”
- White polish: Zoya “Purity”
- Fine nail art brushes
Recommendations:
- Use a fine brush for the detailed ghost and pumpkin designs.
- Opt for a glossy top coat to enhance the rich autumn colors.
How to Create:
- Apply the brown, yellow, and green polishes as base colors on different nails.
- Draw ghosts and pumpkins using fine brushes and white polish.
- Add details like eyes and stems to the pumpkins.
- Seal with a top coat.
Matte Web Elegance
This sophisticated matte nail design features a dark, smoky blue base with intricate black spider web patterns. The matte finish adds a unique twist to the spooky motif, making it a perfect choice for a classy and understated Halloween look.
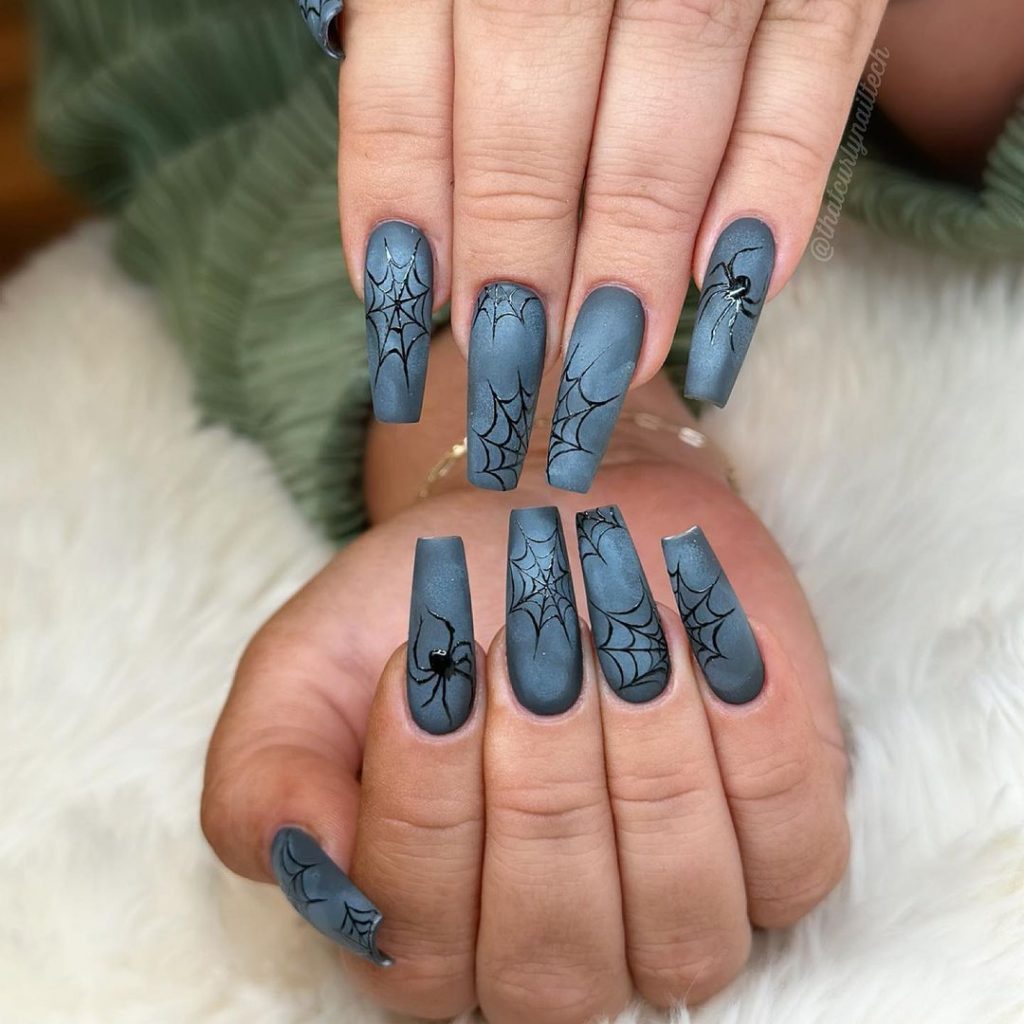
Consumables:
- Smoky blue matte polish: Essie “Twilight”
- Black polish: Sally Hansen “Black Heart”
- Fine nail art brush
- Matte top coat: OPI Matte Top Coat
Recommendations:
- Use a fine brush for detailed spider web designs.
- Apply a matte top coat to keep the finish smooth and non-glossy.
How to Create:
- Apply the smoky blue matte polish as the base coat.
- Use a fine brush to draw black spider webs on each nail.
- Finish with a matte top coat to seal the design.
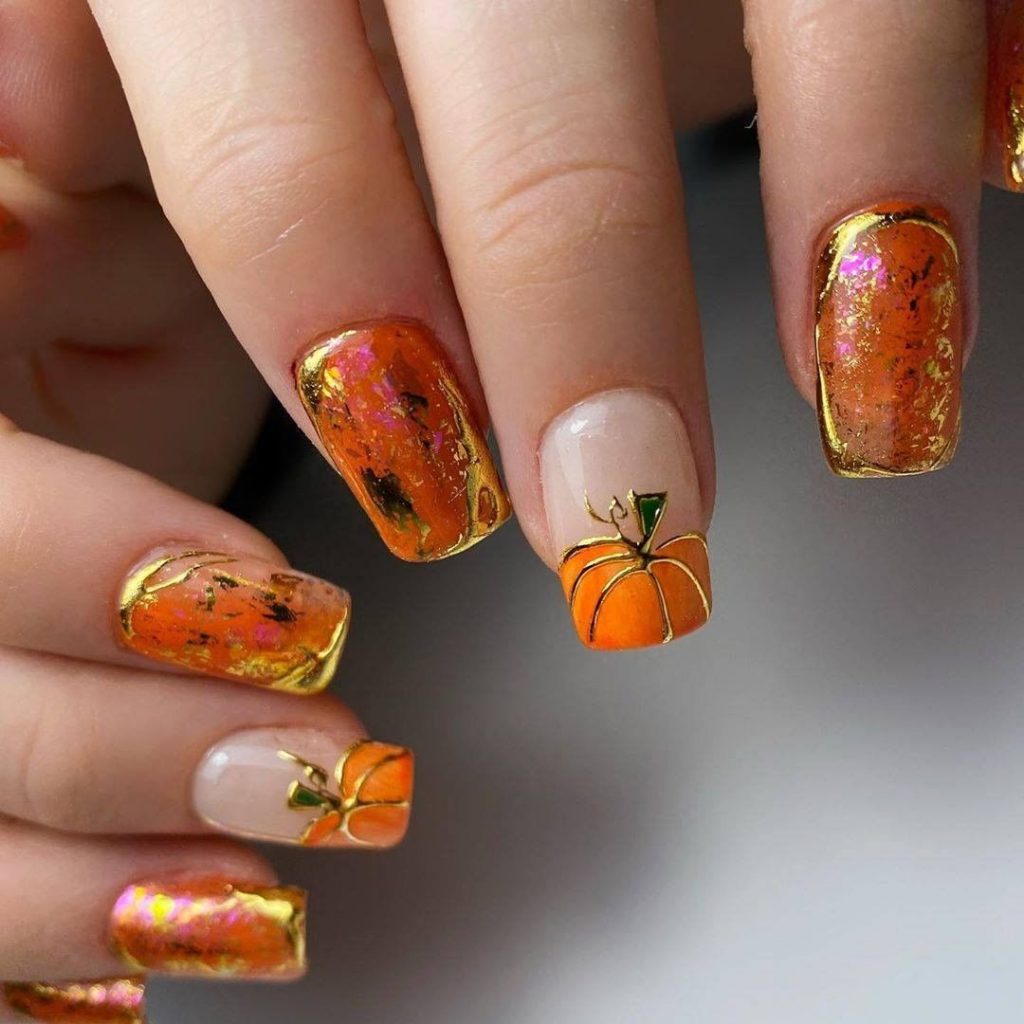
Golden Pumpkin Delight
This vibrant and festive nail design showcases shimmering orange and gold foil with cute pumpkin accents. The golden highlights add a touch of luxury, making these nails perfect for a fun and easy Halloween look.
Consumables:
- Orange foil polish: China Glaze “Harvest Moon”
- Gold foil flakes
- Nude polish: OPI “Bubble Bath”
- Fine nail art brushes
Recommendations:
- Use gold foil flakes to add a luxurious touch to the design.
- Ensure each layer is fully dry before applying the next to avoid smudging.
How to Create:
- Apply the orange foil polish on selected nails.
- Use fine brushes to draw pumpkin accents with gold foil flakes.
- Apply a nude polish on one nail and add a small pumpkin detail.
- Seal with a top coat.
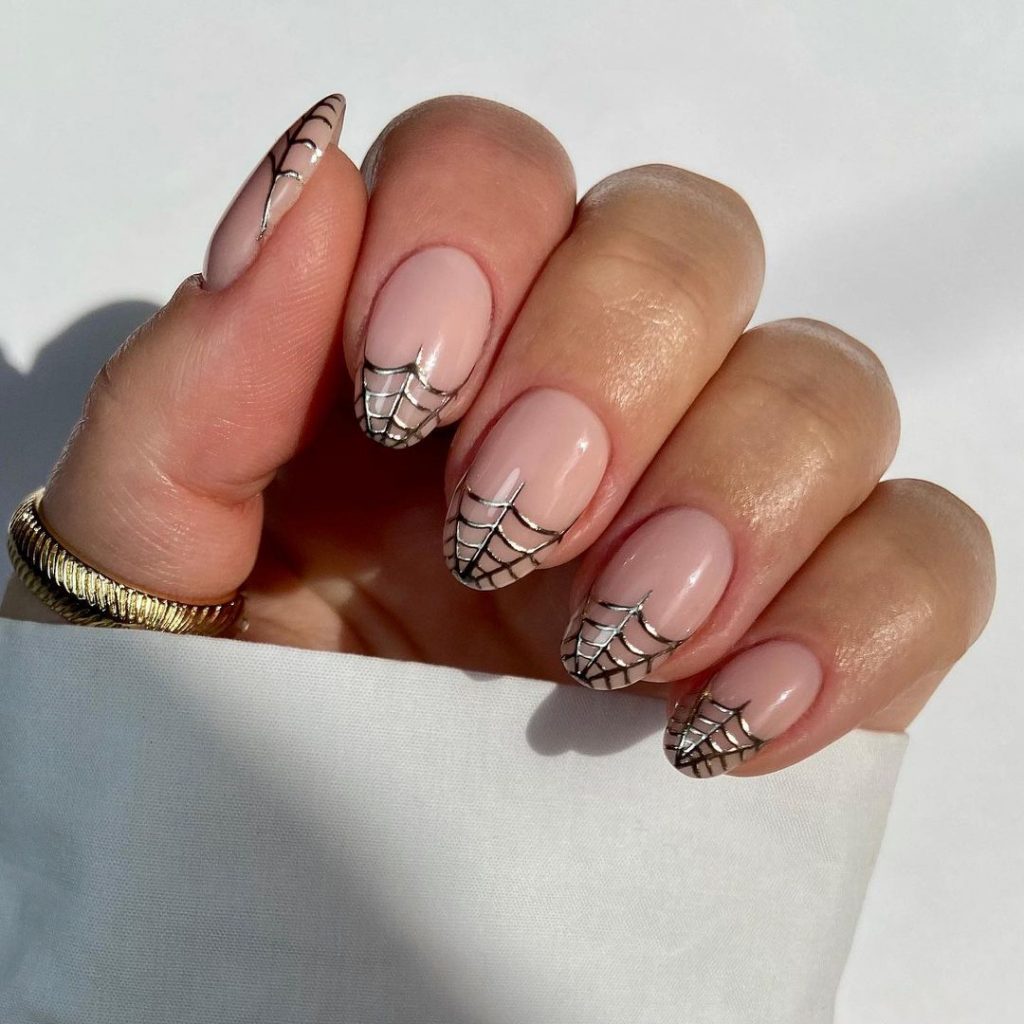
Silver Web French Tips
For a modern twist on the classic French manicure, this design features silver spider web tips on a nude base. The delicate webs add a subtle Halloween touch, making it perfect for a classy and minimalistic look.
Consumables:
- Nude polish: OPI “Bubble Bath”
- Silver polish: Essie “No Place Like Chrome”
- Fine nail art brush
Recommendations:
- Use a fine brush to achieve precise silver web designs.
- Opt for a high-quality silver polish to ensure a metallic finish.
How to Create:
- Apply the nude polish as the base coat.
- Use a fine brush to draw silver spider webs on the tips of each nail.
- Seal with a top coat to protect the design.
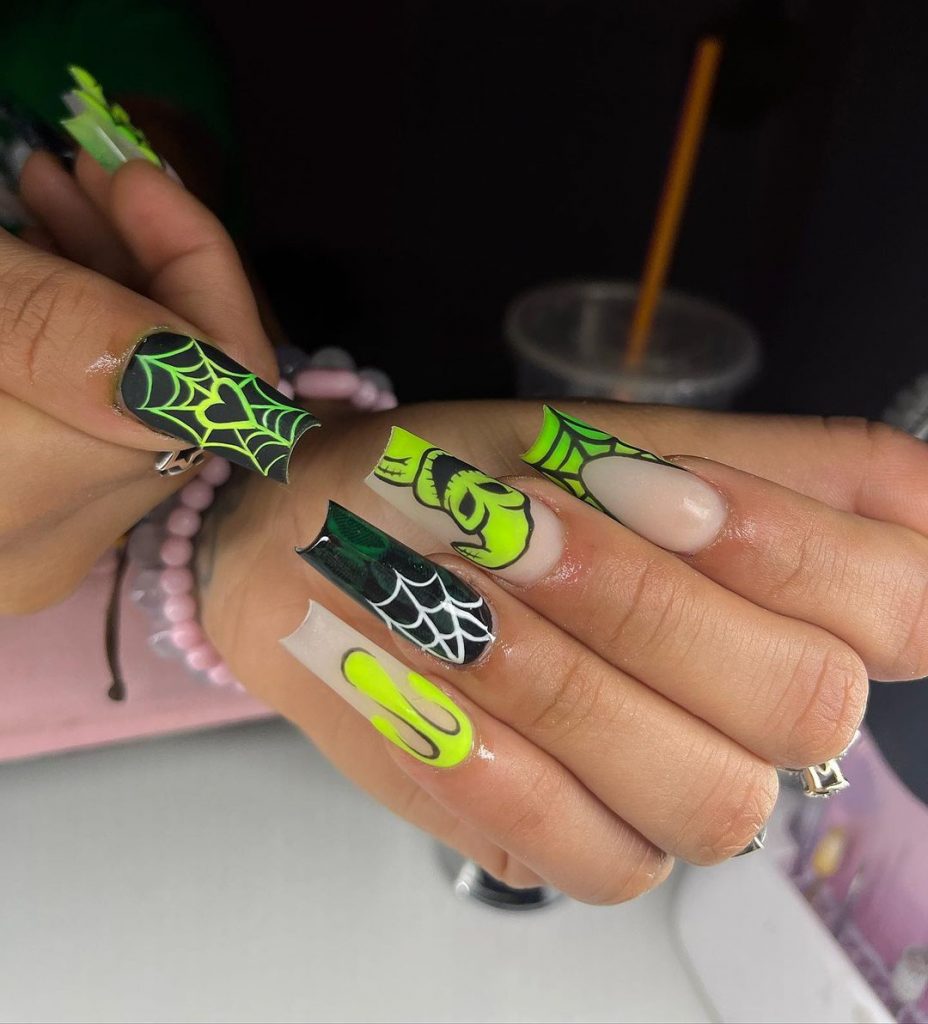
Neon Green Spooky Nails
This bold nail design features a mix of neon green, black, and white with spider webs and a Frankenstein motif. The vibrant colors and detailed artwork make this design perfect for those who love to stand out during Halloween.
Consumables:
- Neon green polish: China Glaze “I’m With The Lifeguard”
- Black polish: OPI “Black Onyx”
- White polish: Zoya “Purity”
- Fine nail art brushes
Recommendations:
- Use neon green for a bold and eye-catching effect.
- Ensure each layer is dry before adding details to prevent smudging.
How to Create:
- Apply the neon green, black, and white polishes as base colors.
- Use fine brushes to draw spider webs and the Frankenstein motif.
- Seal with a glossy top coat.
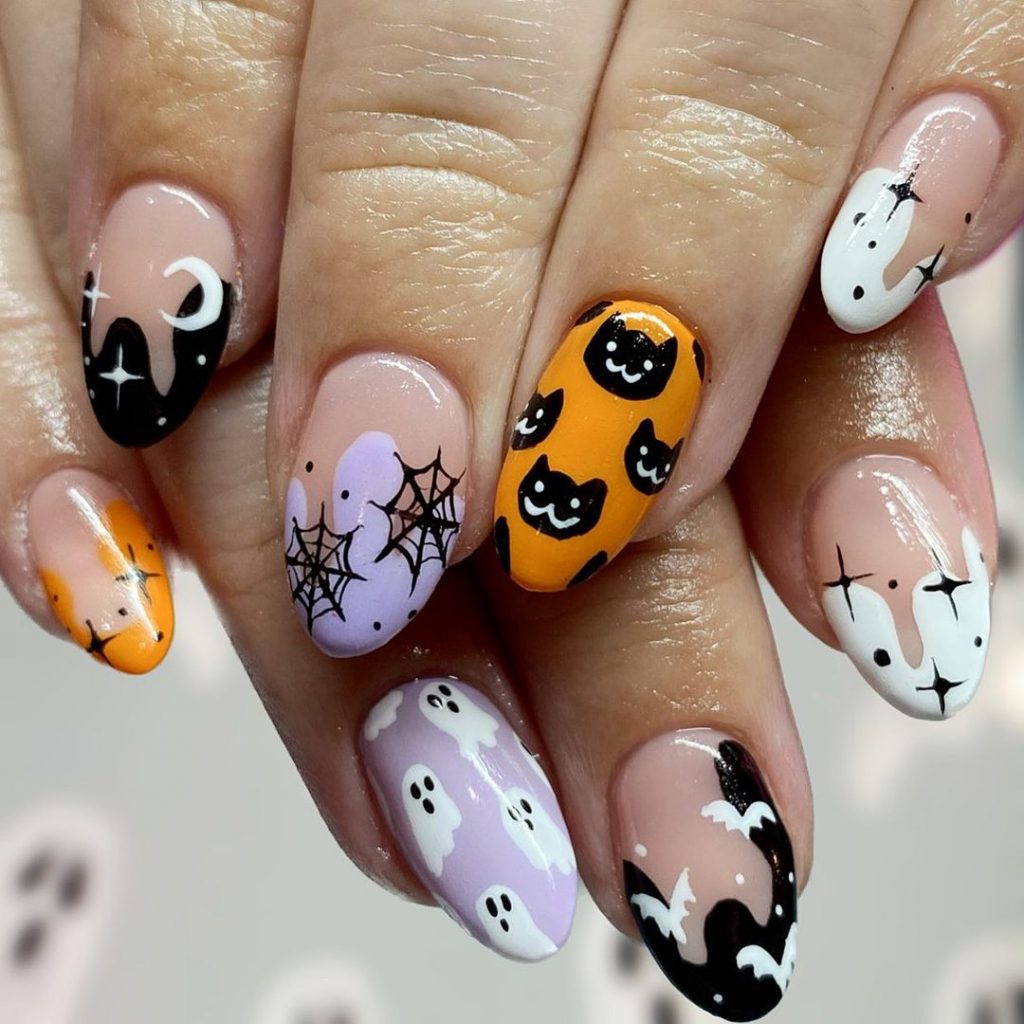
Spooky Cats and Ghosts
This adorable nail design features a mix of cats, ghosts, and spider webs in a playful color palette of orange, black, white, and lavender. The cute designs make this look perfect for a fun and whimsical Halloween.
Consumables:
- Orange polish: Essie “Tangerine Tease”
- Black polish: Sally Hansen “Black Heart”
- White polish: Zoya “Purity”
- Lavender polish: OPI “Do You Lilac It?”
- Fine nail art brushes
Recommendations:
- Use a dotting tool for small details like eyes and ghost faces.
- Opt for a glossy top coat to make the designs pop.
How to Create:
- Apply the orange, black, white, and lavender polishes as base colors.
- Use fine brushes to draw cats, ghosts, and spider webs.
- Add small details with a dotting tool.
- Seal with a top coat.
Ghostly Floral Nails
This unique nail design combines ghostly figures with delicate floral patterns on a matte black background. The contrast between the spooky ghosts and the pretty flowers makes this design stand out for Halloween.
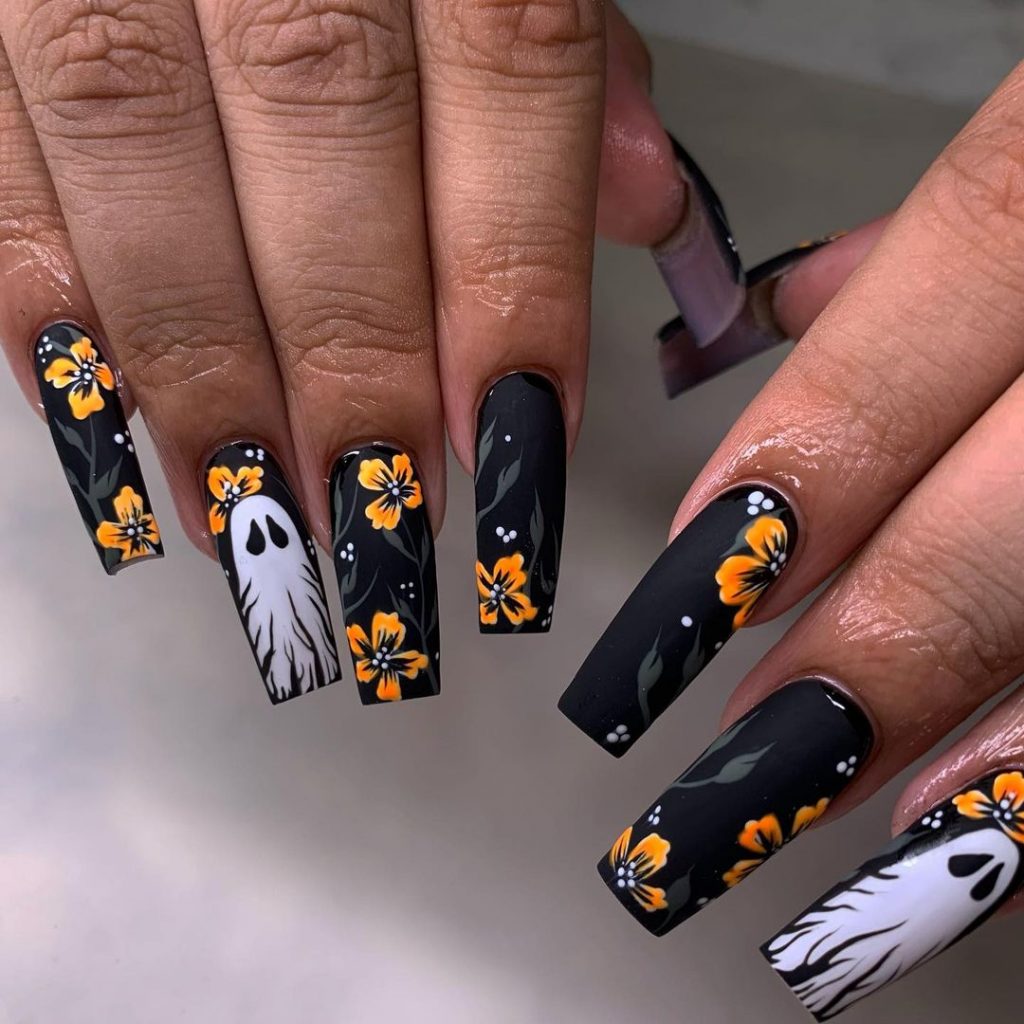
Consumables:
- Black matte polish: OPI “Matte Black Onyx”
- Orange polish: Essie “Tangerine Tease”
- White polish: Zoya “Purity”
- Fine nail art brushes
Recommendations:
- Use a fine brush for intricate floral and ghost details.
- Apply a matte top coat for a smooth, non-glossy finish.
How to Create:
- Apply the black matte polish as the base coat.
- Use fine brushes to draw ghosts and floral patterns with white and orange polishes.
- Seal with a matte top coat.
Pink Halloween Delight
This pastel pink nail design features cute Halloween elements like pumpkins, spiders, and stars. The light pink base adds a soft and playful touch to the spooky motifs, making it perfect for a cute and simple Halloween look.
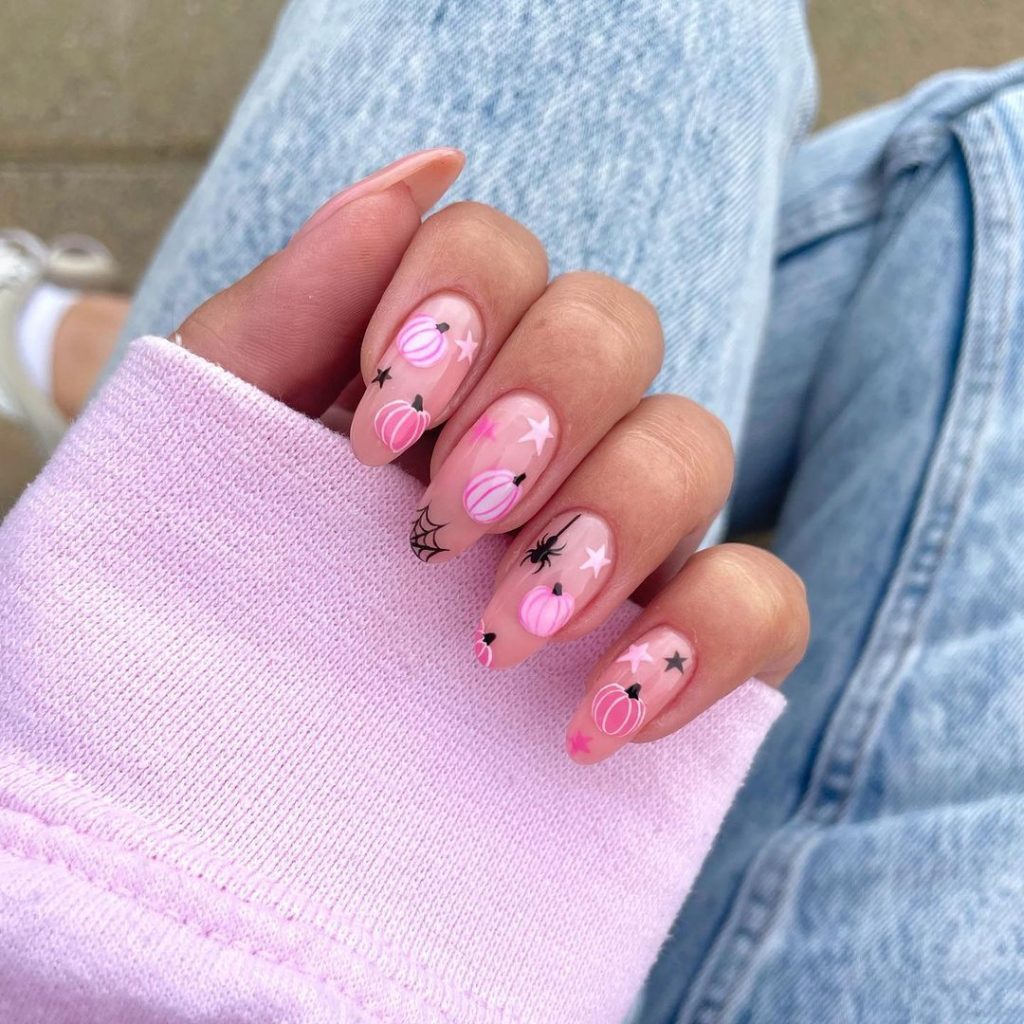
Consumables:
- Pink polish: Essie “Ballet Slippers”
- Black polish: OPI “Black Onyx”
- White polish: Zoya “Purity”
- Fine nail art brushes
Recommendations:
- Use a fine brush for small details like pumpkins and spiders.
- Opt for a glossy top coat to enhance the pastel pink base.
How to Create:
- Apply the pink polish as the base coat.
- Use fine brushes to draw pumpkins, spiders, and stars.
- Add small details with black and white polishes.
- Seal with a top coat.
Save Pin