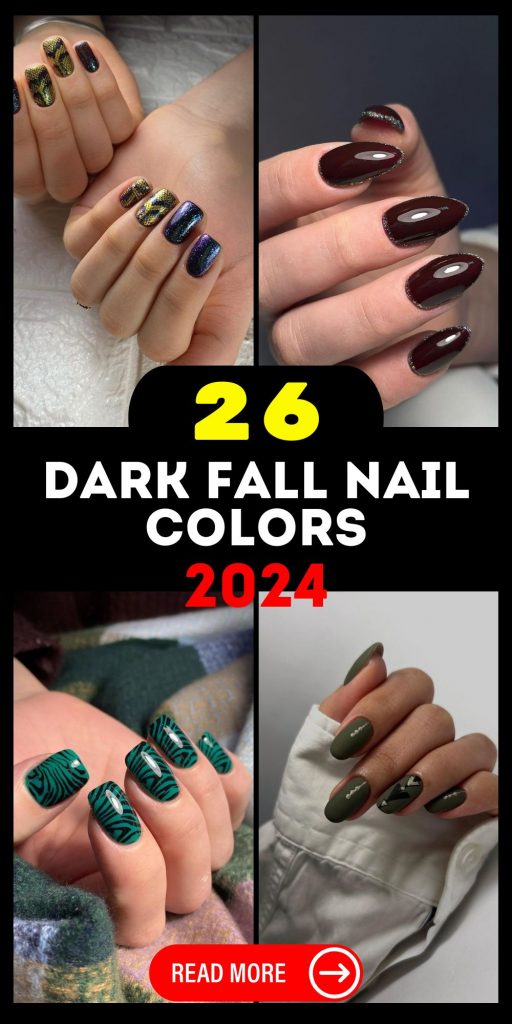
Are you ready to embrace the changing seasons with the most captivating nail colors and designs for fall? As the leaves turn and the air cools, it’s the perfect time to refresh your manicure with deep, rich hues that capture the essence of autumn. But with so many options available, which dark fall nail colors should you choose? In this guide, we’re diving into 26 stunning ideas that range from classic burgundy to edgy matte black, sophisticated navy blue, and everything in between. Whether you prefer the long-lasting finish of gel, the durability of acrylic, or the trendy dip powder method, we’ve got you covered. Keep reading to discover the best dark fall nail colors, their price points, and how to achieve these looks at home. Let’s make your autumn manicure unforgettable!
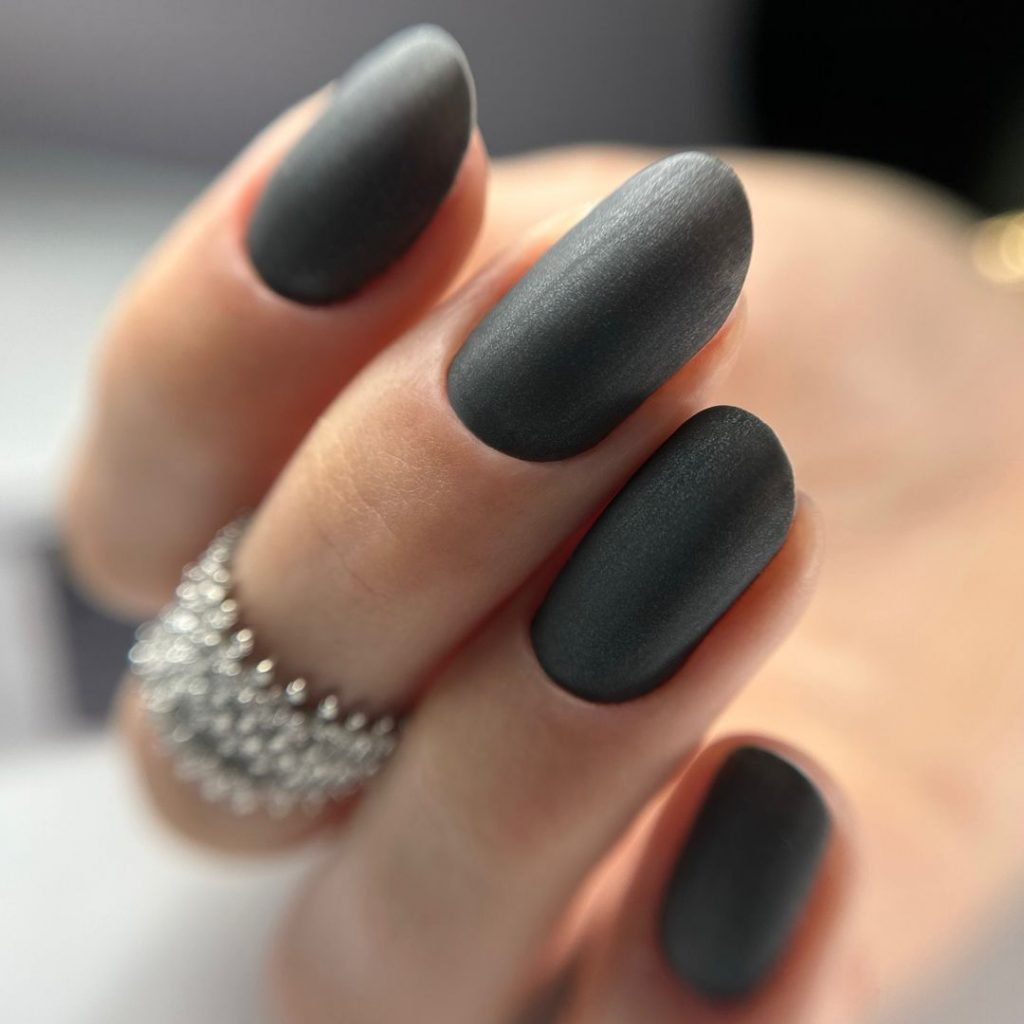
Sleek Matte Black Look
Matte nails are all the rage for fall 2024, and this sleek black manicure is a perfect example of why. The matte finish adds a sophisticated twist to the classic black nail, making it ideal for any autumn occasion. The nails are shaped in an elegant almond style, which elongates the fingers and gives a refined appearance. This design is all about understated elegance and minimalism, yet it stands out due to the depth and intensity of the matte black color.
Consumables Needed:
- Matte black nail polish (e.g., OPI Matte Top Coat)
- Almond-shaped nail tips (optional)
- Base coat and top coat (DND)
- Nail file and buffer
Professional Tips:
- For the best results, use a high-quality matte top coat like OPI.
- Ensure your nails are properly shaped and filed to enhance the elegance of the almond shape.
- Use a good base coat to protect your natural nails from staining.
DIY Instructions:
- Start by shaping your nails into an almond shape using a nail file.
- Apply a base coat to protect your natural nails.
- Apply two coats of black nail polish, allowing each coat to dry completely.
- Finish with a matte top coat to achieve that sleek, sophisticated look.
- Allow the nails to dry thoroughly and avoid any oil-based products that could ruin the matte effect.
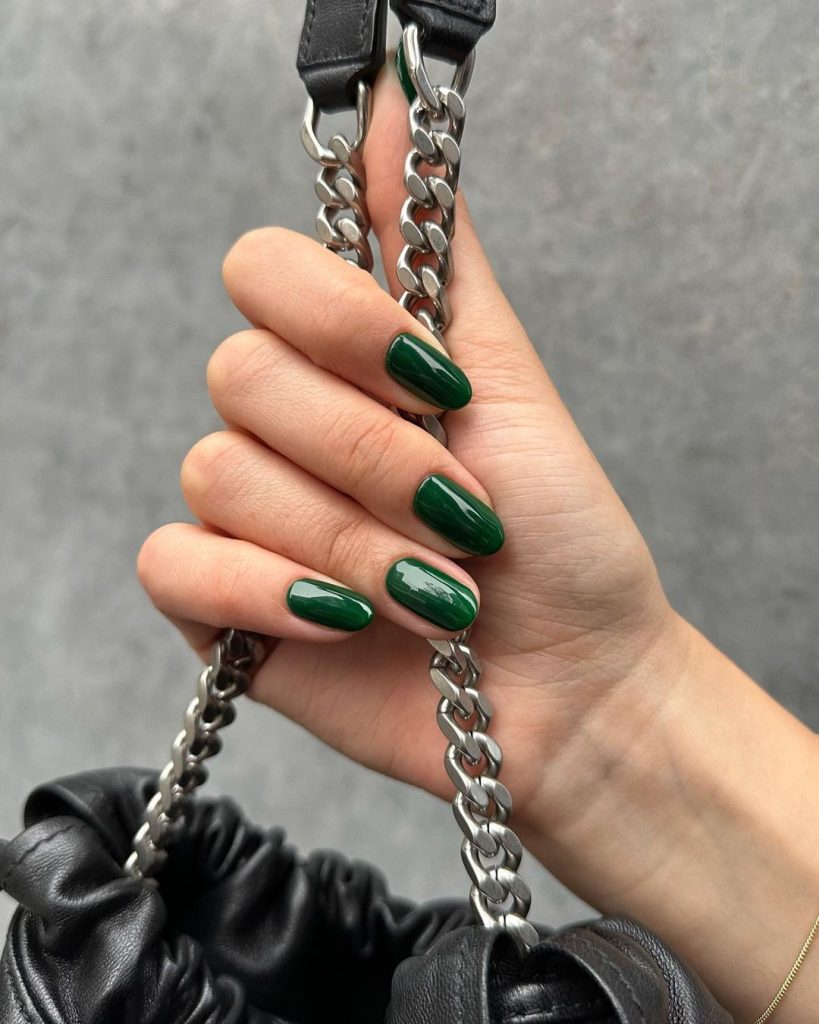
Glossy Green Glamour
Green is a standout color for fall, and this glossy green manicure is both vibrant and chic. The glossy finish highlights the depth of the green shade, making it pop against any outfit. This nail design is perfect for those who love a bold yet sophisticated look. The oval shape of the nails adds a soft and feminine touch, making it suitable for both everyday wear and special occasions.
Consumables Needed:
- Glossy green nail polish (e.g., OPI Gel Color in “Stay Off the Lawn!”)
- Oval-shaped nail tips (optional)
- Base coat and top coat (DND)
- Nail file and buffer
Professional Tips:
- Opt for a high-gloss top coat to enhance the shine and longevity of the manicure.
- Make sure to apply thin coats of nail polish to avoid streaking and bubbling.
- Consider using OPI Gel polish for a more durable and longer-lasting finish.
DIY Instructions:
- File your nails into an oval shape for a soft and feminine look.
- Apply a base coat to protect your natural nails.
- Apply two coats of glossy green nail polish, allowing each coat to dry completely.
- Finish with a high-gloss top coat to seal in the color and add shine.
- Ensure your nails are completely dry before using your hands to avoid smudging.
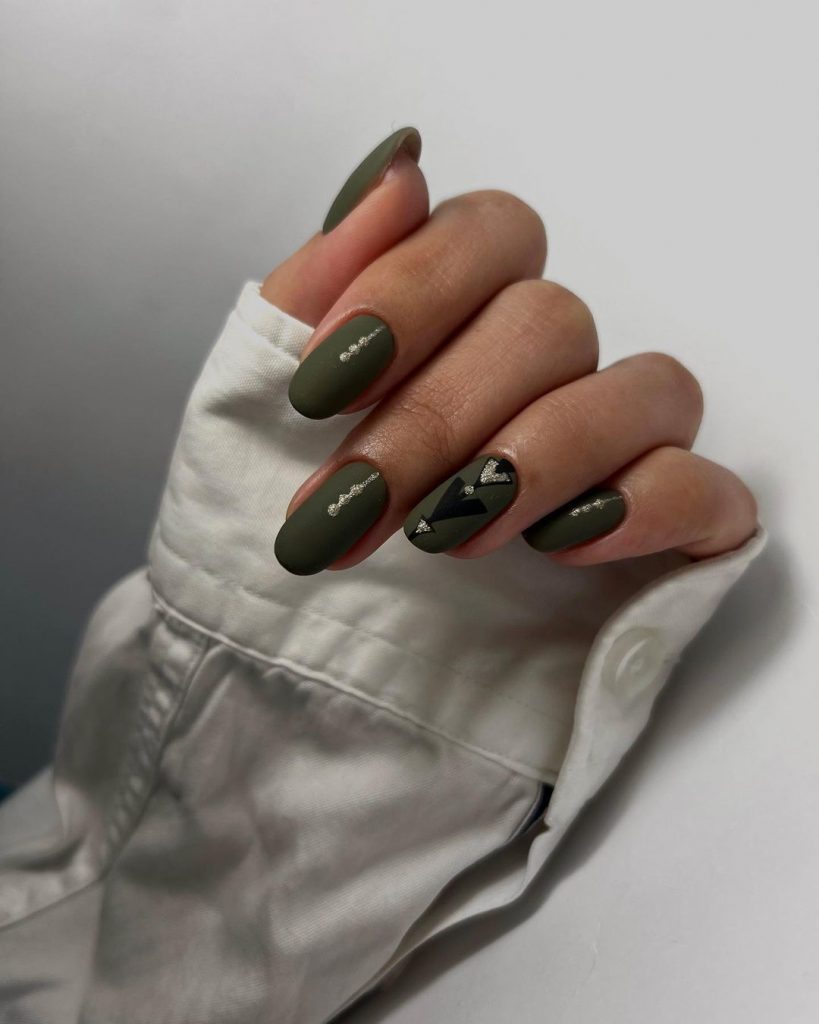
Matte Olive with Geometric Accents
This matte olive manicure with geometric accents is a unique and trendy choice for fall 2024. The matte olive color is subtle yet stylish, and the addition of geometric designs adds a modern twist. This nail design is perfect for those who love to experiment with different looks and stand out from the crowd. The mix of matte finish and geometric patterns creates a balance between understated elegance and artistic flair.
Consumables Needed:
- Matte olive nail polish (e.g., DND in “Forest Night”)
- Geometric nail art stickers or a fine nail art brush
- Base coat and top coat (OPI)
- Nail file and buffer
Professional Tips:
- Use nail art stickers for precise geometric designs, or if you’re confident, a fine brush can also work.
- Ensure the matte polish is fully dry before applying any top coat or stickers to avoid smudging.
- Choose a long-lasting matte polish to maintain the look for longer.
DIY Instructions:
- Shape your nails into your preferred style using a nail file.
- Apply a base coat to protect your nails and ensure a smooth application.
- Apply two coats of matte olive nail polish, allowing each coat to dry completely.
- Use geometric stickers or a fine brush to add the geometric designs.
- Seal the design with a matte top coat to maintain the matte finish.
- Let your nails dry completely before using your hands to prevent any smudging or smearing.
Metallic Burgundy Shimmer
Metallic shades are always a hit for fall, and this metallic burgundy manicure is no exception. The rich, deep burgundy color combined with a metallic finish creates a glamorous and luxurious look. This nail design is perfect for evening events and special occasions. The metallic sheen catches the light beautifully, making your nails the star of the show.
Consumables Needed:
- Metallic burgundy nail polish (e.g., OPI in “I’m Not Really a Waitress”)
- Base coat and top coat (DND)
- Nail file and buffer
Professional Tips:
- Apply thin coats of the metallic polish to ensure an even finish.
- Use a top-quality base coat to prevent staining from the rich burgundy color.
- Consider using a gel polish for extra durability and shine.
DIY Instructions:
- Start by filing your nails into your desired shape.
- Apply a base coat to protect your natural nails.
- Apply two thin coats of metallic burgundy nail polish, allowing each coat to dry fully.
- Finish with a high-shine top coat to enhance the metallic finish.
- Allow your nails to dry completely before using your hands to ensure the polish sets properly.
Midnight Blue Elegance
Midnight blue is a perfect color for fall, exuding elegance and sophistication. This deep, rich shade of blue is both mysterious and captivating. The glossy finish adds a touch of luxury, making this nail design ideal for any formal occasion. The stiletto shape of the nails adds an extra level of drama and style, making a bold statement.
Consumables Needed:
- Midnight blue nail polish (e.g., OPI Gel in “Russian Navy”)
- Stiletto-shaped nail tips (optional)
- Base coat and top coat (DND)
- Nail file and buffer
Professional Tips:
- Use a gel polish to achieve a high-gloss, long-lasting finish.
- Ensure your nails are properly prepped and filed into the stiletto shape for the best effect.
- Apply thin layers of polish to prevent bubbling and ensure an even finish.
DIY Instructions:
- File your nails into a stiletto shape using a nail file.
- Apply a base coat to protect your natural nails.
- Apply two coats of midnight blue nail polish, letting each coat dry thoroughly.
- Finish with a high-gloss top coat to seal in the color and add shine.
- Allow your nails to dry completely before using your hands to avoid smudging.
Purple Heart and Glitter
This manicure combines deep purple with creative accents, making it a perfect choice for those who want a unique and eye-catching design for fall 2024. The primary color is a rich purple with a glossy finish, paired with an accent nail featuring a black heart and another with multicolored glitter. The mix of gloss and glitter adds depth and interest, making your nails a true statement piece.
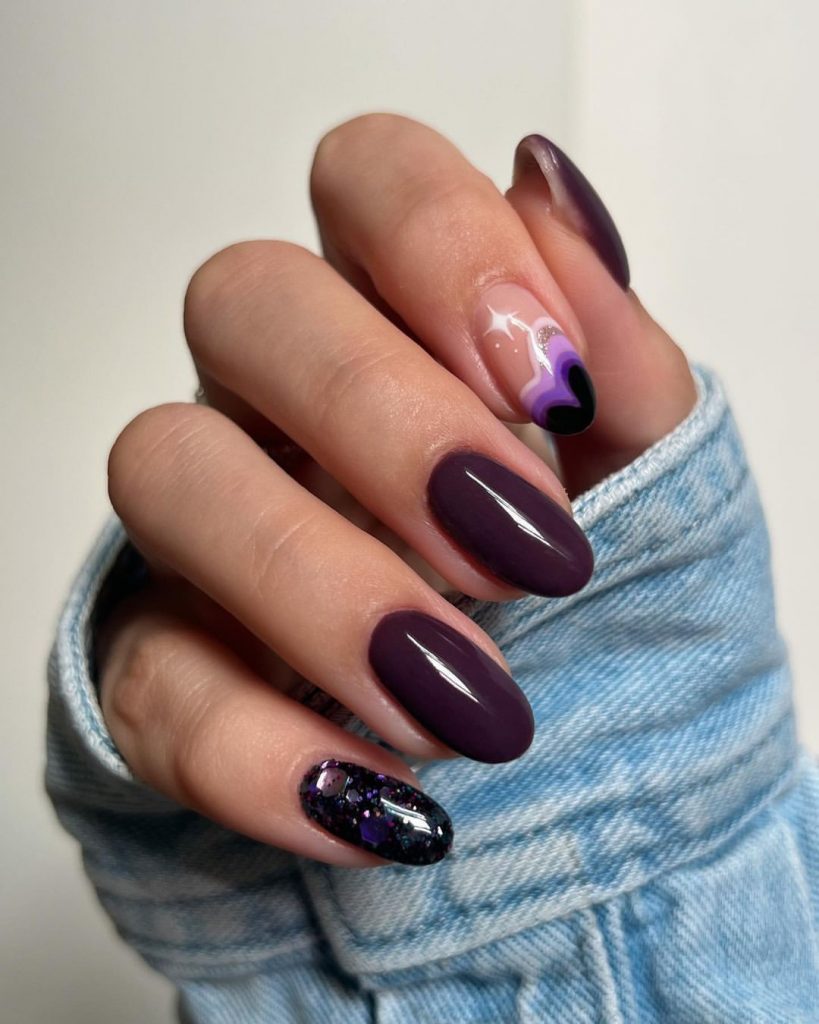
Consumables Needed:
- Glossy purple nail polish (e.g., OPI Gel in “Lincoln Park After Dark”)
- Black nail polish for the heart design
- Multicolored glitter nail polish
- Base coat and top coat (DND)
- Nail file and buffer
Professional Tips:
- Use a fine nail art brush to create the heart design for precision.
- Apply the glitter polish in layers to achieve the desired level of sparkle.
- Seal the look with a high-gloss top coat to protect the design and add shine.
DIY Instructions:
- Start by filing your nails into your preferred shape.
- Apply a base coat to protect your natural nails.
- Apply two coats of the glossy purple nail polish, allowing each coat to dry completely.
- Use a fine brush to paint a black heart on the accent nail.
- Apply the multicolored glitter polish on another accent nail.
- Finish with a high-gloss top coat to seal and protect your design.
- Let your nails dry thoroughly before using your hands to avoid smudging.
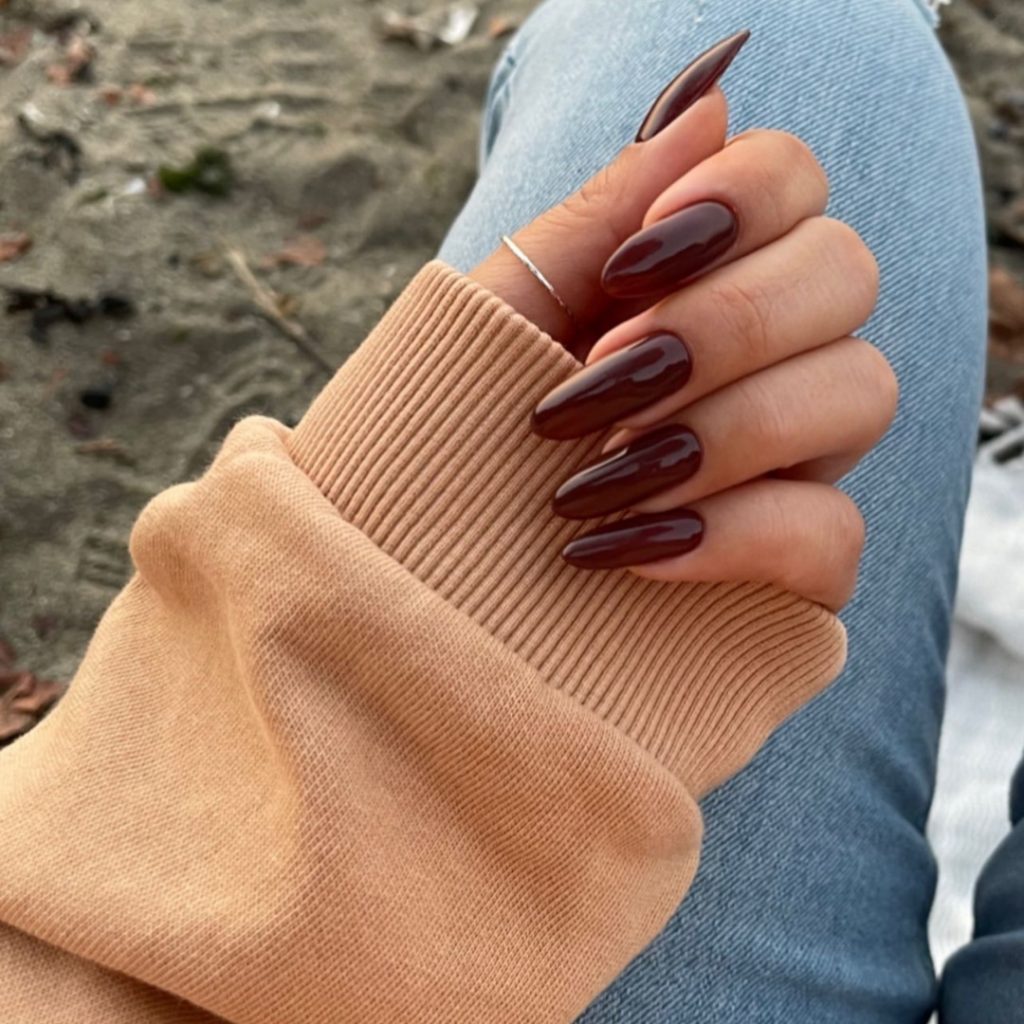
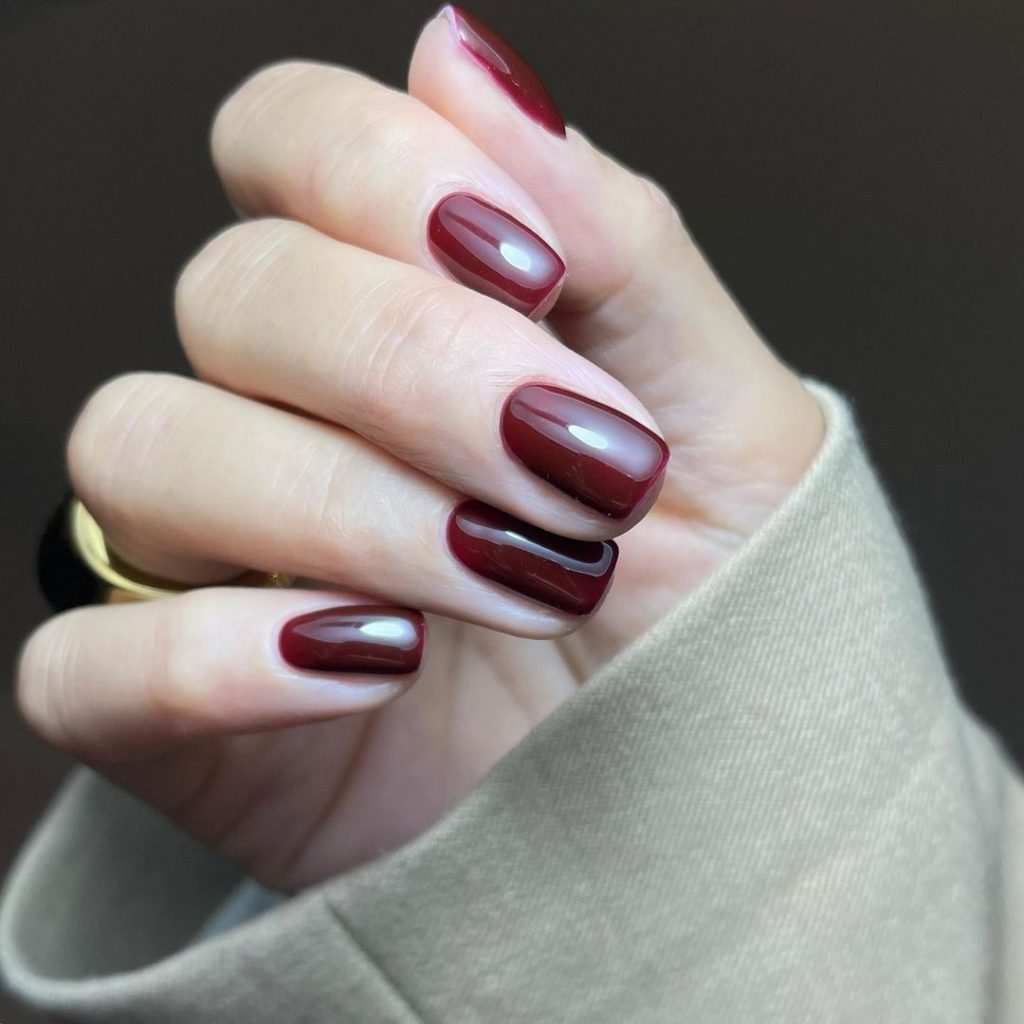
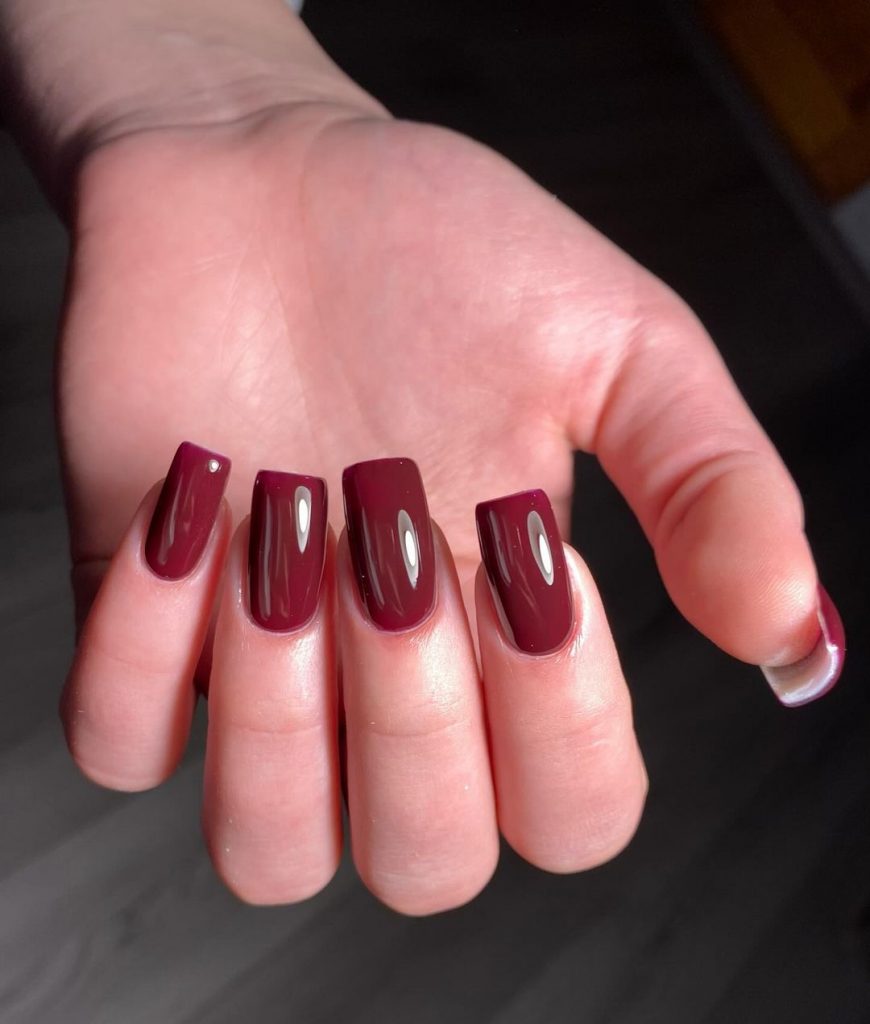
Burgundy Elegance
Burgundy is a timeless color for fall, and this manicure showcases its beauty perfectly. The nails are polished to a high gloss, which enhances the richness of the burgundy shade. This design is simple yet incredibly elegant, making it suitable for both casual and formal settings.
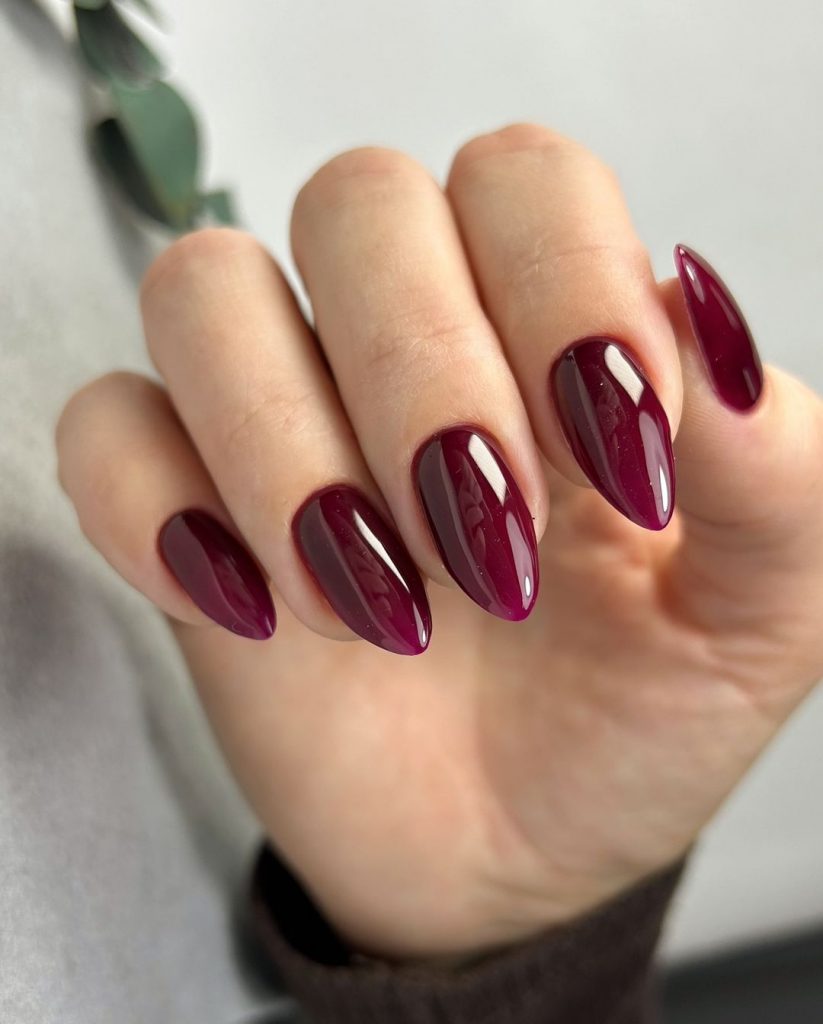
Consumables Needed:
- Glossy burgundy nail polish (e.g., OPI Gel in “Malaga Wine”)
- Base coat and top coat (DND)
- Nail file and buffer
Professional Tips:
- Apply thin coats of polish to avoid streaking and bubbling.
- Use a gel polish for a longer-lasting and more durable finish.
- Ensure your nails are properly prepped with a base coat to prevent staining.
DIY Instructions:
- File your nails into an almond shape for a soft, elegant look.
- Apply a base coat to protect your natural nails.
- Apply two thin coats of burgundy nail polish, letting each coat dry completely.
- Finish with a high-gloss top coat to enhance the color and protect the polish.
- Allow your nails to dry completely before using your hands to ensure the polish sets properly.
Black and White Heart Accent
This chic manicure combines the classic black and white color scheme with a cute heart accent. The majority of the nails are painted a glossy black, while one nail is painted white with a small black heart. This design is perfect for those who love a minimalist yet stylish look.
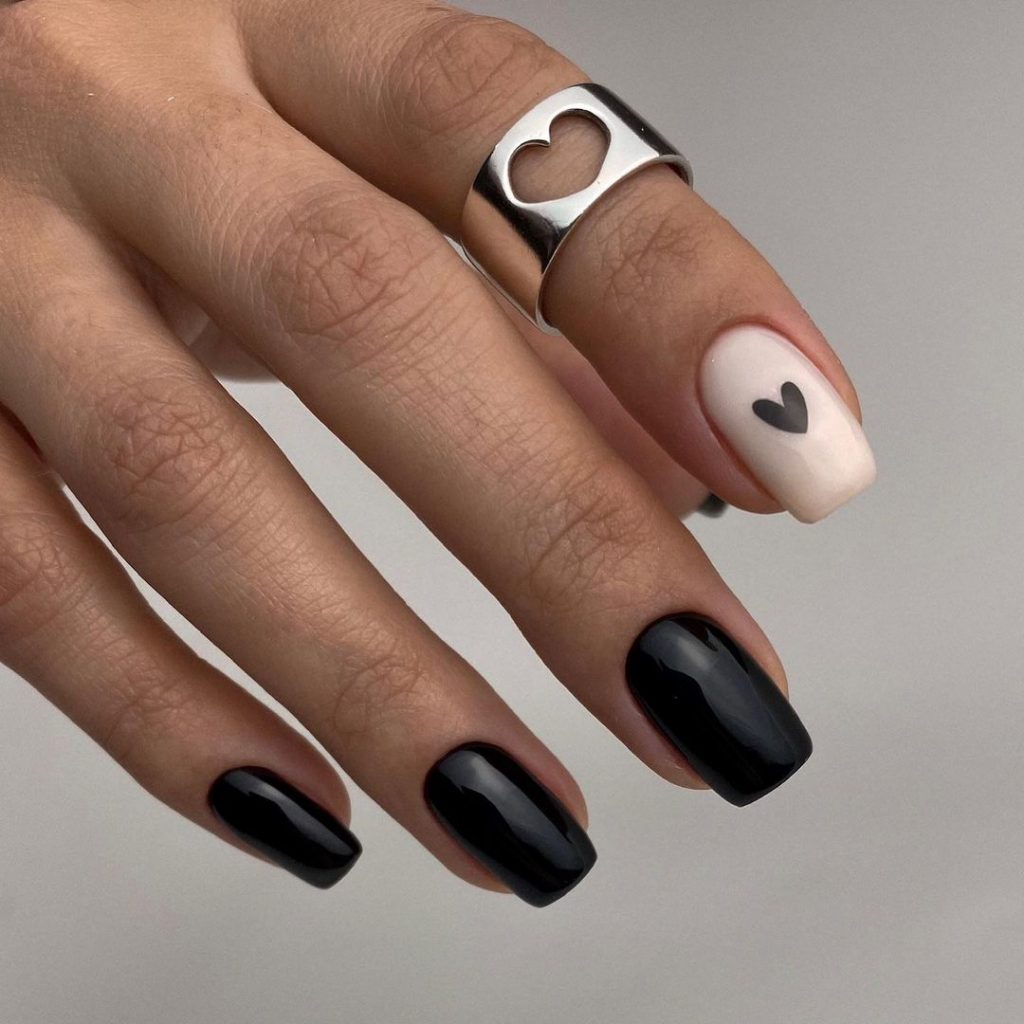
Consumables Needed:
- Glossy black nail polish (e.g., OPI in “Black Onyx”)
- White nail polish for the accent nail
- Black nail polish for the heart design
- Base coat and top coat (DND)
- Nail file and buffer
Professional Tips:
- Use a fine nail art brush for the heart design to ensure precision.
- Apply a high-gloss top coat to both protect and enhance the design.
- Keep the white accent nail crisp by using a high-quality white polish.
DIY Instructions:
- File your nails into your preferred shape.
- Apply a base coat to protect your natural nails.
- Paint most of your nails with two coats of glossy black polish.
- Paint one nail with white polish and let it dry completely.
- Use a fine brush to paint a small black heart on the white nail.
- Finish with a high-gloss top coat to seal and protect the design.
- Allow your nails to dry thoroughly before using your hands.
Glossy Chocolate Brown
This glossy chocolate brown manicure is perfect for fall, offering a warm and inviting color that complements the season’s aesthetic. The nails are shaped in a sleek almond style, which adds a touch of sophistication to the overall look.
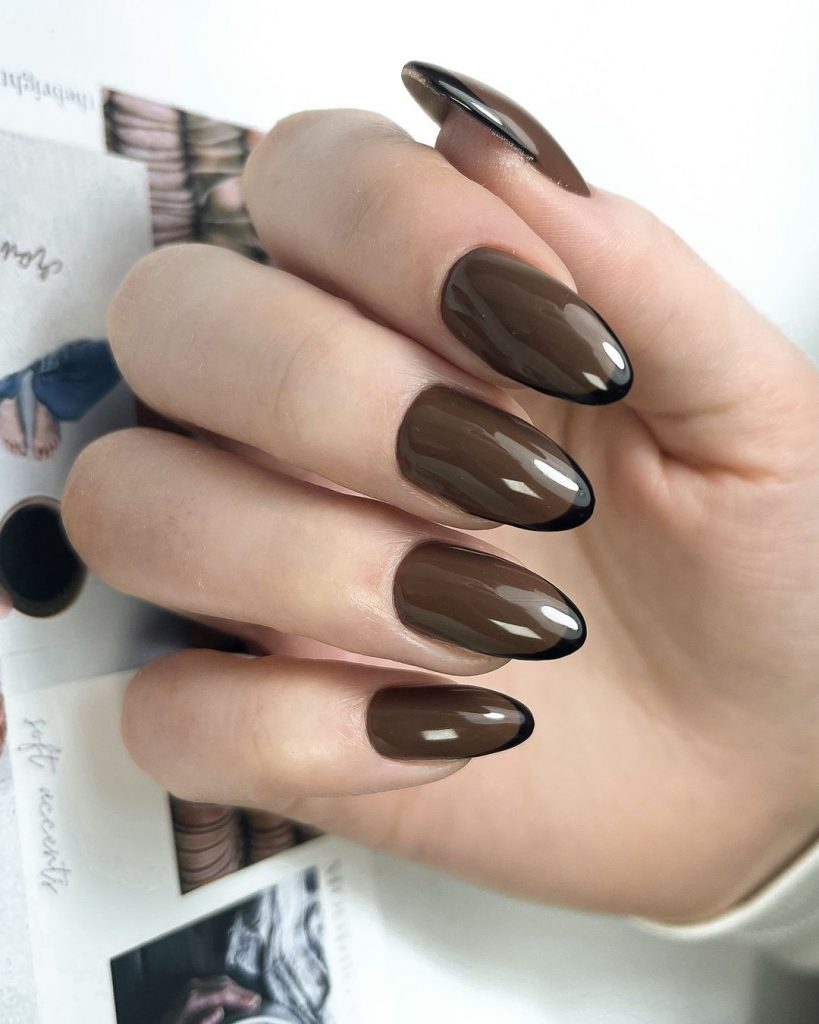
Consumables Needed:
- Glossy chocolate brown nail polish (e.g., OPI Gel in “You Don’t Know Jacques!”)
- Base coat and top coat (DND)
- Nail file and buffer
Professional Tips:
- Apply thin coats of polish to ensure an even and smooth finish.
- Use a high-quality top coat to enhance the shine and durability of the manicure.
- Consider using gel polish for a longer-lasting effect.
DIY Instructions:
- File your nails into an almond shape.
- Apply a base coat to protect your natural nails.
- Apply two coats of chocolate brown nail polish, allowing each coat to dry fully.
- Finish with a high-gloss top coat to seal in the color and add shine.
- Allow your nails to dry completely before using your hands to avoid smudging.
Rich Red Almond Nails
These rich red almond nails are a classic choice for fall. The deep red color exudes warmth and elegance, making it perfect for both day and night. The almond shape further enhances the chic and sophisticated look of this manicure.
Consumables Needed:
- Deep red nail polish (e.g., OPI in “Big Apple Red”)
- Base coat and top coat (DND)
- Nail file and buffer
Professional Tips:
- Apply thin coats of the red polish to prevent streaking.
- Use a high-shine top coat to enhance the color and protect the manicure.
- Ensure your nails are well-prepped and shaped before applying the polish.
DIY Instructions:
- Shape your nails into an almond style using a nail file.
- Apply a base coat to protect your natural nails.
- Apply two thin coats of deep red nail polish, letting each coat dry completely.
- Finish with a high-shine top coat to seal in the color and add a glossy finish.
- Allow your nails to dry thoroughly before using your hands.
Teal Glitter Magic
This mesmerizing teal glitter manicure is perfect for those who want to add a touch of sparkle to their fall look. The deep teal color, combined with fine glitter, creates a stunning effect that catches the light beautifully. The short, rounded nail shape makes it practical for everyday wear while still being incredibly stylish.
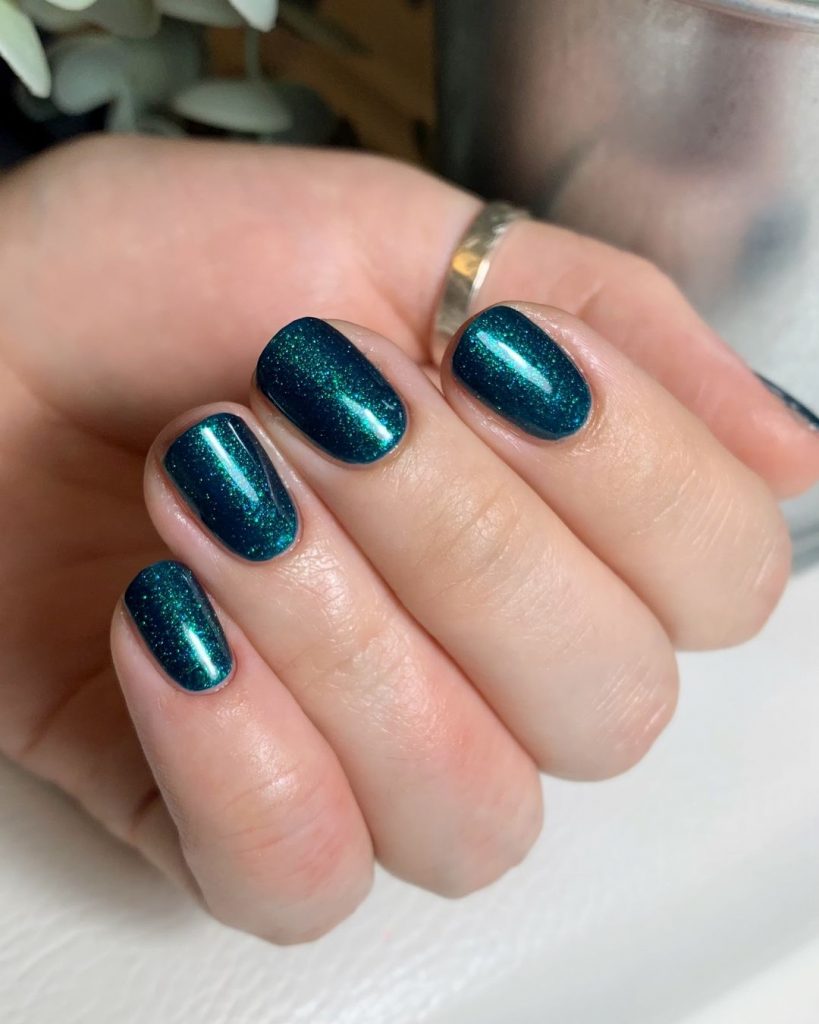
Consumables Needed:
- Teal glitter nail polish (e.g., OPI in “Teal the Cows Come Home”)
- Base coat and top coat (DND)
- Nail file and buffer
Professional Tips:
- Apply a base coat to ensure smooth application and protect your nails from staining.
- Use thin layers of the glitter polish to build up the intensity without clumping.
- Finish with a high-gloss top coat to enhance the sparkle and ensure longevity.
DIY Instructions:
- Shape your nails using a nail file and buffer.
- Apply a base coat to protect your natural nails.
- Apply two coats of teal glitter nail polish, allowing each coat to dry completely.
- Finish with a high-gloss top coat to seal in the glitter and add shine.
- Let your nails dry thoroughly before using your hands to avoid smudging.
Glossy Deep Purple
This deep purple manicure is both bold and sophisticated, perfect for making a statement this fall. The glossy finish enhances the richness of the purple hue, making your nails look luxurious and elegant. The square shape adds a modern twist, making this design ideal for both casual and formal occasions.
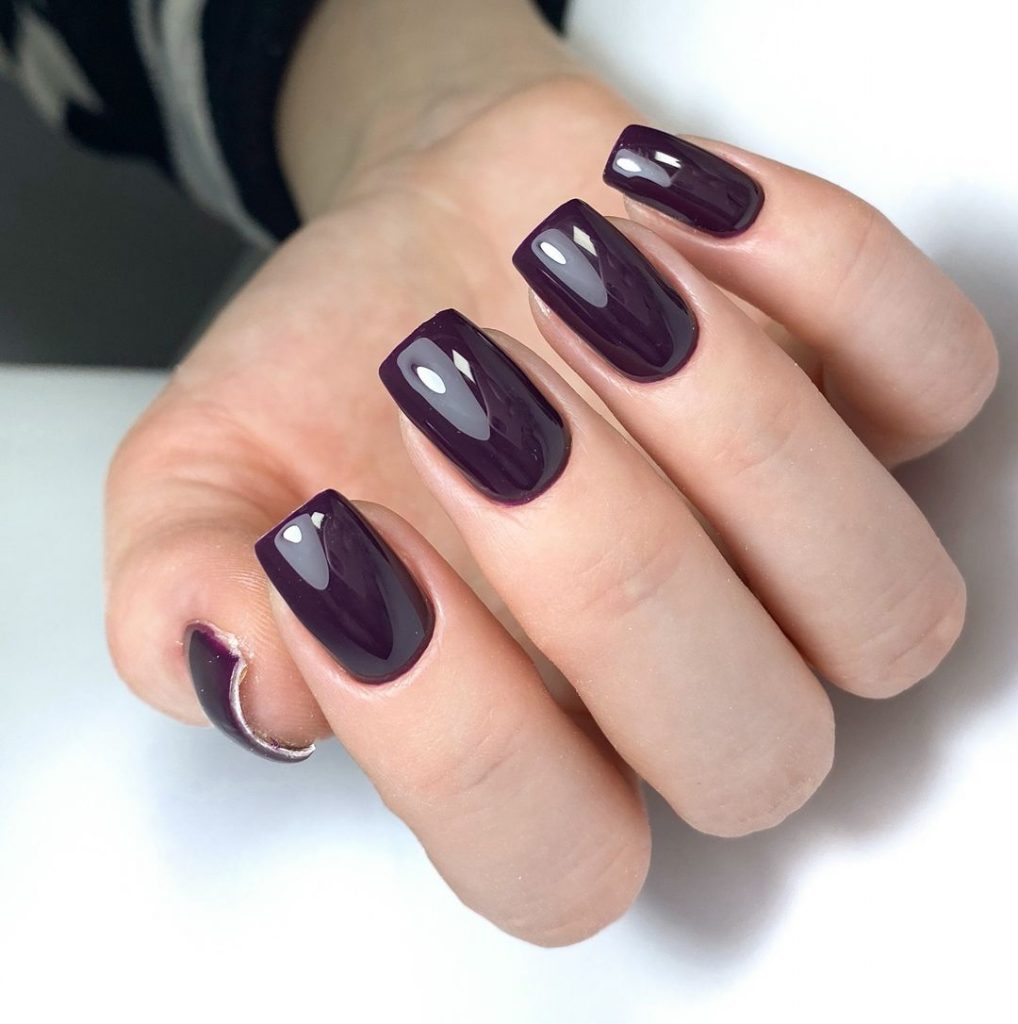
Consumables Needed:
- Glossy deep purple nail polish (e.g., OPI Gel in “Lincoln Park After Dark”)
- Base coat and top coat (DND)
- Nail file and buffer
Professional Tips:
- Ensure your nails are properly prepped with a base coat to prevent staining and prolong the wear.
- Apply thin layers of the purple polish to avoid streaking and achieve an even finish.
- Use a high-gloss top coat to enhance the shine and durability of the manicure.
DIY Instructions:
- File your nails into a square shape using a nail file.
- Apply a base coat to protect your natural nails.
- Apply two thin coats of deep purple nail polish, letting each coat dry completely.
- Finish with a high-gloss top coat to seal in the color and add a glossy finish.
- Allow your nails to dry thoroughly before using your hands.
Classic Burgundy Short Nails
These short burgundy nails are a timeless choice for fall. The rich, deep red color exudes elegance and warmth, making it suitable for any occasion. The short length and rounded shape are both practical and stylish, perfect for everyday wear.
Consumables Needed:
- Burgundy nail polish (e.g., OPI in “Got the Blues for Red”)
- Base coat and top coat (DND)
- Nail file and buffer
Professional Tips:
- Use a high-quality base coat to protect your nails and prevent staining.
- Apply the polish in thin layers to avoid streaks and bubbles.
- Finish with a glossy top coat to enhance the color and protect your manicure.
DIY Instructions:
- Shape your nails into a short, rounded style using a nail file.
- Apply a base coat to protect your natural nails.
- Apply two thin coats of burgundy nail polish, allowing each coat to dry fully.
- Finish with a high-gloss top coat to seal in the color and add shine.
- Let your nails dry thoroughly before using your hands to prevent smudging.
Colorful Snake Print
This vibrant snake print design is perfect for those who love bold and creative nail art. The combination of green, gold, and purple shades creates a stunning, eye-catching effect. The short, square shape adds a modern twist to this intricate design.
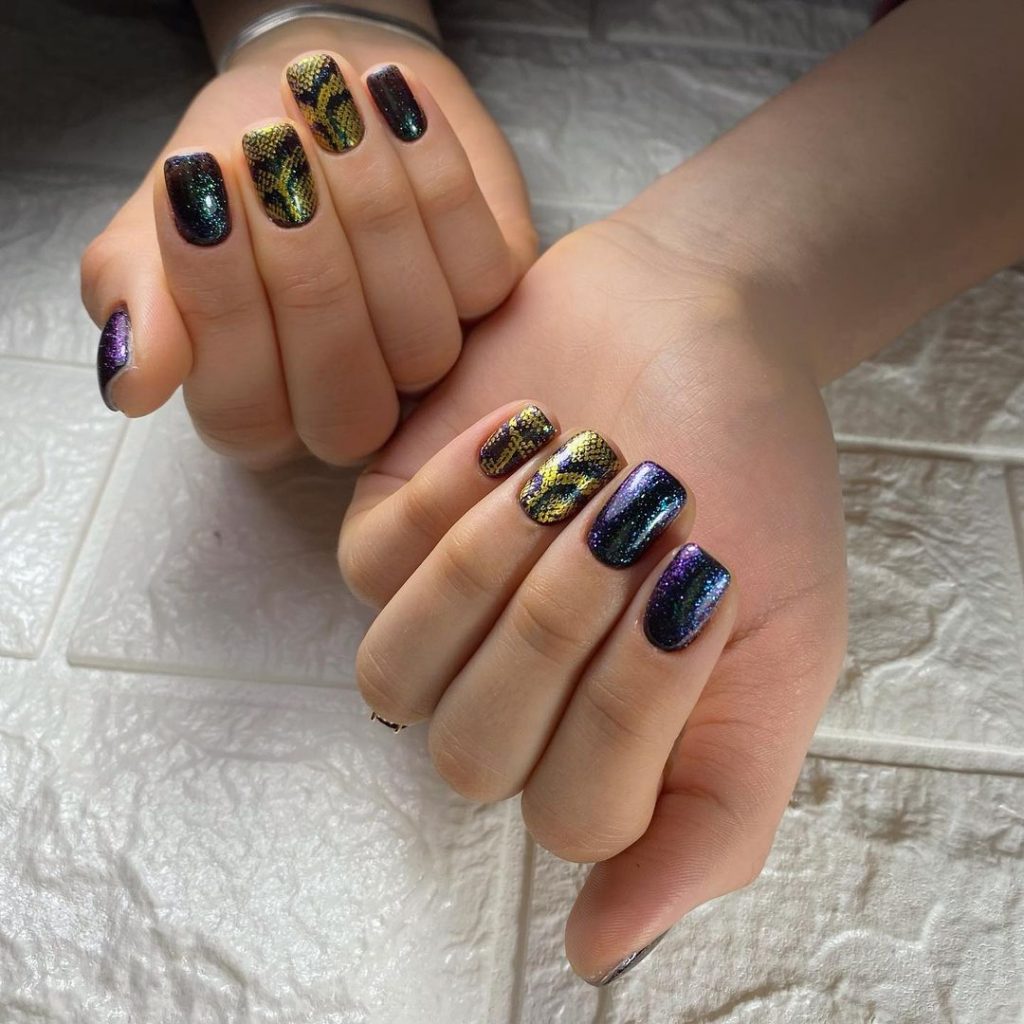
Consumables Needed:
- Green, gold, and purple nail polishes (e.g., OPI Gel in “Stay Off the Lawn!”, “Glitzerland”, and “Do You Lilac It?”)
- Snake print nail stickers or stamping plates
- Base coat and top coat (DND)
- Nail file and buffer
Professional Tips:
- Use high-quality nail stickers or stamping plates to achieve precise and detailed designs.
- Apply the base color first and let it dry completely before adding the snake print.
- Seal the design with a top coat to protect the nail art and ensure it lasts longer.
DIY Instructions:
- File your nails into a short, square shape using a nail file.
- Apply a base coat to protect your natural nails.
- Paint your nails with the base color and let it dry completely.
- Apply the snake print stickers or use stamping plates to create the design.
- Finish with a high-gloss top coat to seal in the design and add shine.
- Allow your nails to dry thoroughly before using your hands to avoid smudging.
Bold Black and Red
This striking black and red manicure is perfect for making a bold statement this fall. The glossy black nails are paired with a single red accent nail, creating a dramatic contrast. The almond shape adds elegance and sophistication to this daring design.
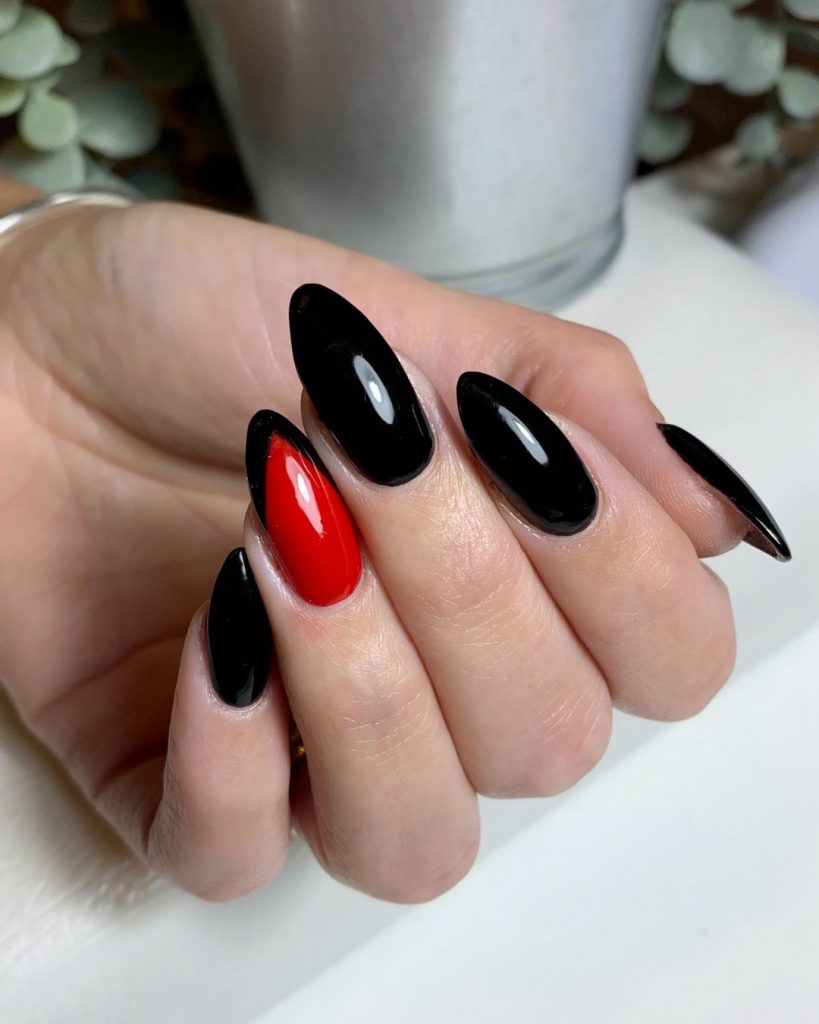
Consumables Needed:
- Glossy black nail polish (e.g., OPI in “Black Onyx”)
- Red nail polish (e.g., OPI in “Big Apple Red”)
- Base coat and top coat (DND)
- Nail file and buffer
Professional Tips:
- Use a high-quality red polish for the accent nail to ensure a vivid and rich color.
- Apply thin layers of polish to avoid streaks and ensure an even finish.
- Seal the manicure with a high-gloss top coat to enhance the color and durability.
DIY Instructions:
- Shape your nails into an almond style using a nail file.
- Apply a base coat to protect your natural nails.
- Paint most of your nails with glossy black polish, leaving one nail for the red accent.
- Paint the accent nail with red polish and let it dry completely.
- Finish with a high-gloss top coat to seal in the colors and add shine.
- Allow your nails to dry thoroughly before using your hands.
Green Zebra Print
This striking green zebra print manicure is a bold and trendy choice for fall. The vibrant green base color is complemented by black zebra stripes, creating a unique and eye-catching design. The short, square shape is practical for everyday wear while still making a fashion statement.
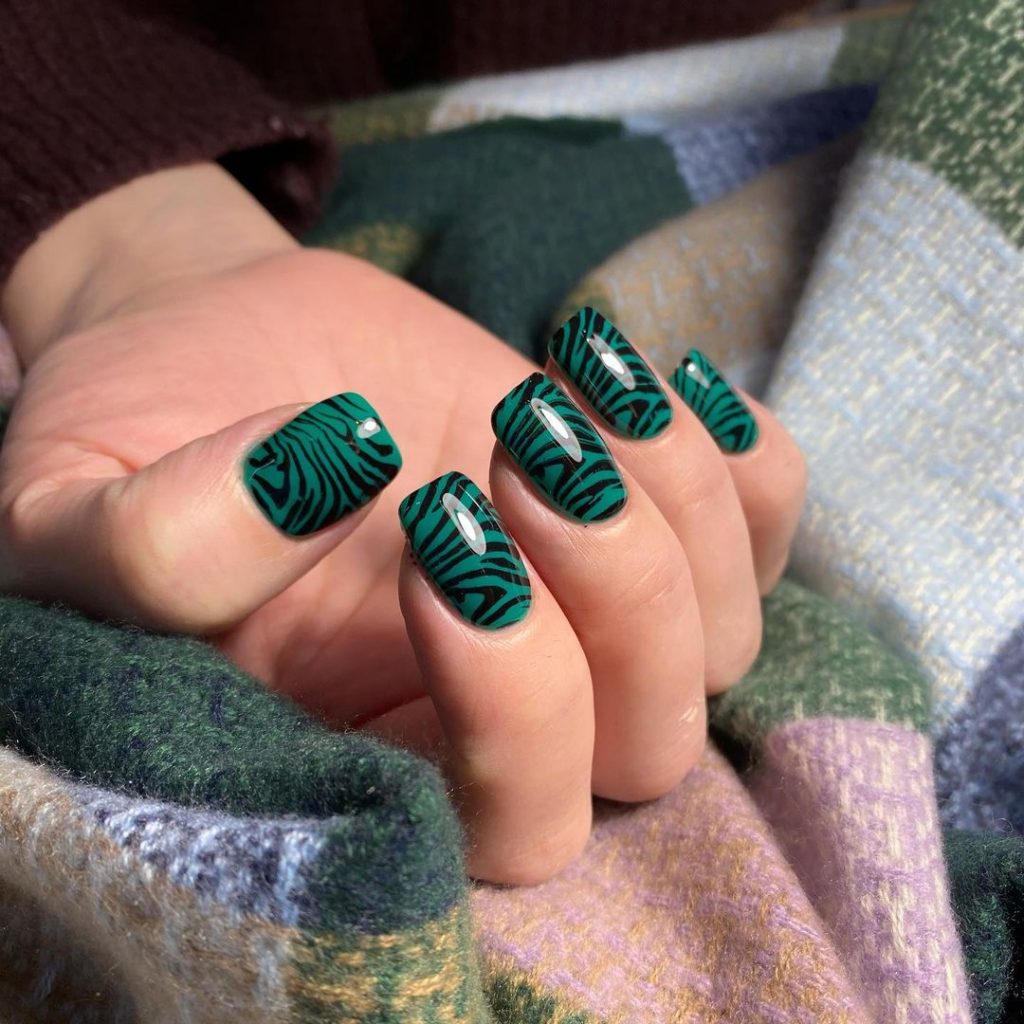
Consumables Needed:
- Green nail polish (e.g., OPI Gel in “Stay Off the Lawn!”)
- Black nail polish for the zebra stripes
- Base coat and top coat (DND)
- Nail file and buffer
- Zebra print nail stickers or a fine nail art brush
Professional Tips:
- Use nail stickers for a precise zebra pattern or a fine brush if you prefer to paint it freehand.
- Apply thin layers of the base color to ensure an even finish.
- Seal the design with a high-gloss top coat to protect the pattern and add shine.
DIY Instructions:
- File your nails into a square shape using a nail file.
- Apply a base coat to protect your natural nails.
- Paint your nails with two coats of green nail polish, allowing each coat to dry completely.
- Apply zebra print stickers or use a fine brush to paint the zebra stripes.
- Finish with a high-gloss top coat to seal in the design and add shine.
- Allow your nails to dry thoroughly before using your hands.
Deep Navy Blue
This deep navy blue manicure is a sophisticated and elegant choice for fall. The rich blue color is both bold and versatile, making it suitable for both casual and formal occasions. The short, rounded shape is practical for everyday wear while still being stylish.

Consumables Needed:
- Deep navy blue nail polish (e.g., OPI in “Russian Navy”)
- Base coat and top coat (DND)
- Nail file and buffer
Professional Tips:
- Use a high-quality base coat to prevent staining and ensure an even application.
- Apply thin layers of the navy polish to avoid streaks and bubbles.
- Seal the look with a high-gloss top coat for extra shine and durability.
DIY Instructions:
- Shape your nails using a nail file and buffer.
- Apply a base coat to protect your natural nails.
- Apply two thin coats of deep navy blue nail polish, allowing each coat to dry completely.
- Finish with a high-gloss top coat to seal in the color and add a glossy finish.
- Allow your nails to dry thoroughly before using your hands.
Burgundy with Glitter Edges
This burgundy manicure with glitter edges is perfect for adding a touch of sparkle to your fall look. The deep burgundy color is complemented by subtle glitter along the edges, creating a sophisticated and glamorous effect. The almond shape adds elegance and style to this unique design.
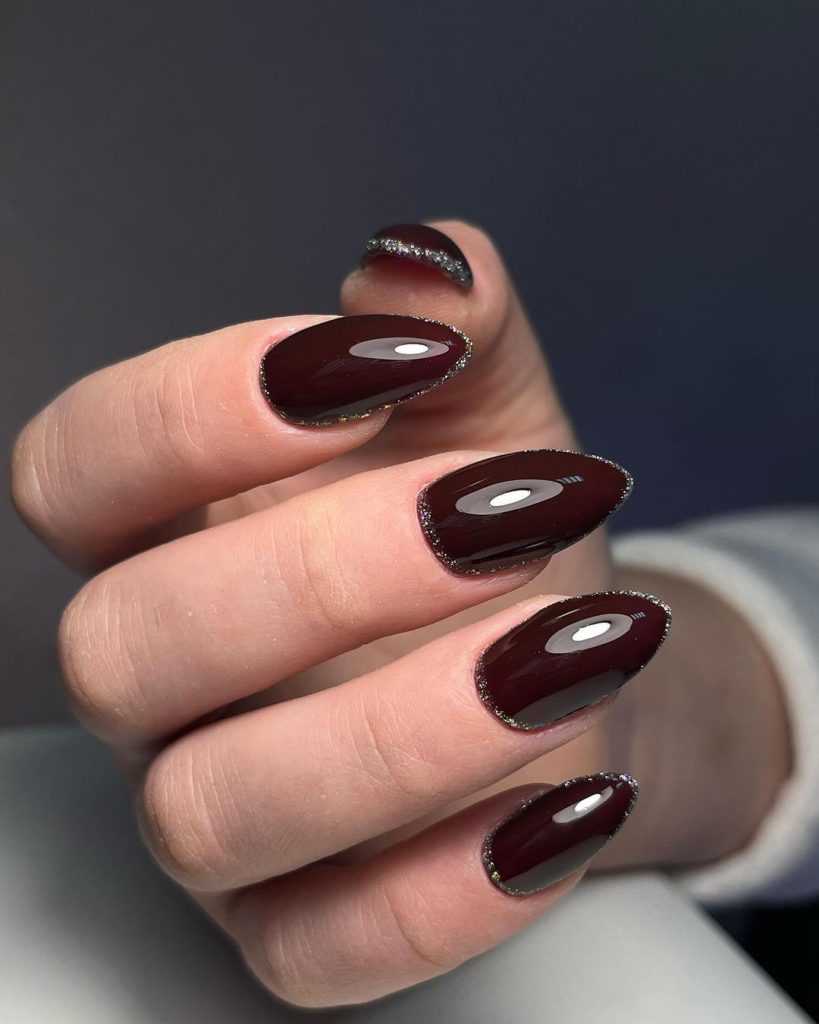
Consumables Needed:
- Burgundy nail polish (e.g., OPI in “Malaga Wine”)
- Fine glitter nail polish for the edges
- Base coat and top coat (DND)
- Nail file and buffer
Professional Tips:
- Use a fine brush to apply the glitter polish precisely along the edges of your nails.
- Apply thin layers of the burgundy polish to ensure an even finish.
- Seal the design with a high-gloss top coat to protect the glitter and add shine.
DIY Instructions:
- Shape your nails into an almond style using a nail file.
- Apply a base coat to protect your natural nails.
- Paint your nails with two coats of burgundy nail polish, allowing each coat to dry completely.
- Use a fine brush to apply glitter polish along the edges of your nails.
- Finish with a high-gloss top coat to seal in the design and add shine.
- Allow your nails to dry thoroughly before using your hands.
Black with Net Accent
This chic black manicure with a net accent nail is a modern and stylish choice for fall. The glossy black nails are paired with a single net design accent nail, creating a unique and sophisticated look. The square shape adds a contemporary touch to this elegant design.
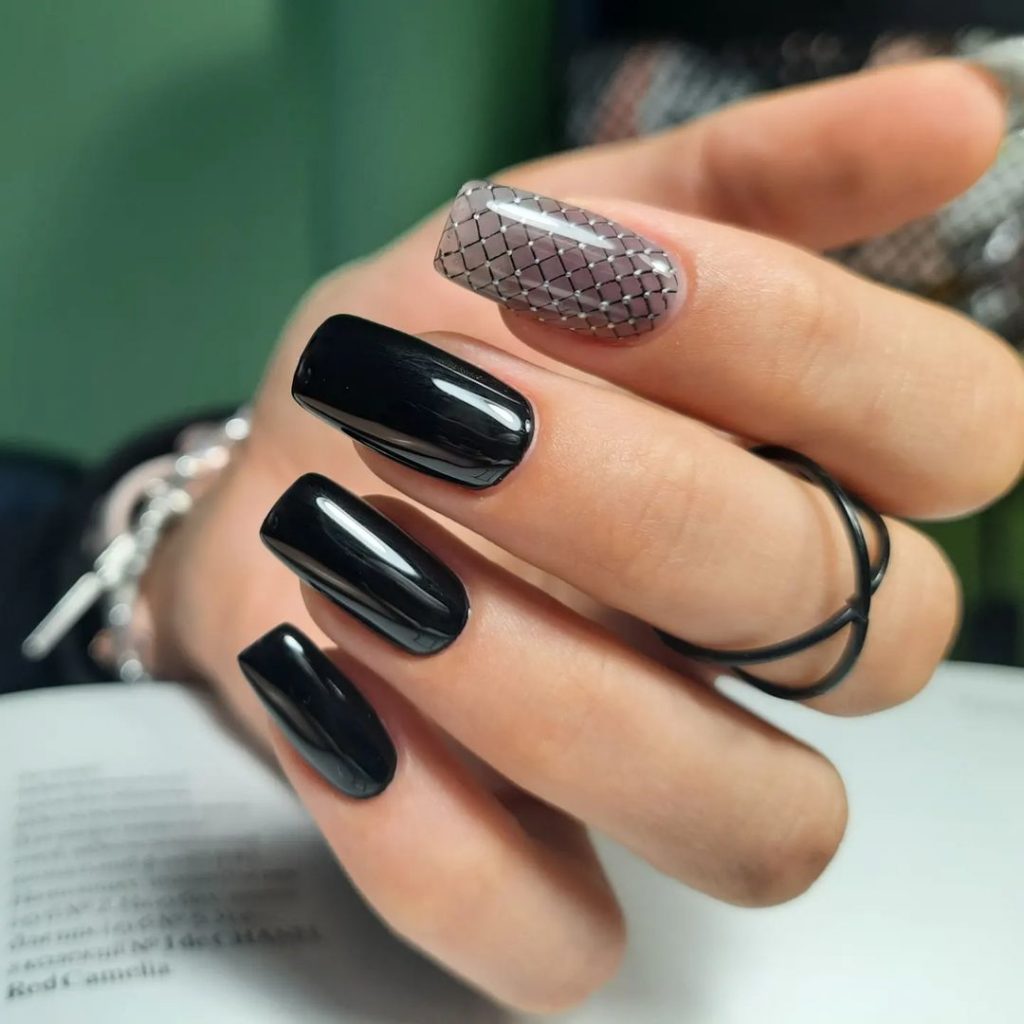
Consumables Needed:
- Glossy black nail polish (e.g., OPI in “Black Onyx”)
- Net design nail stickers or stamping plates
- Base coat and top coat (DND)
- Nail file and buffer
Professional Tips:
- Use high-quality nail stickers or stamping plates to achieve a precise net design.
- Apply thin layers of the black polish to avoid streaks and bubbles.
- Seal the manicure with a high-gloss top coat to enhance the color and protect the design.
DIY Instructions:
- File your nails into a square shape using a nail file.
- Apply a base coat to protect your natural nails.
- Paint most of your nails with two coats of glossy black polish, allowing each coat to dry completely.
- Apply the net design sticker or use a stamping plate on one accent nail.
- Finish with a high-gloss top coat to seal in the colors and add shine.
- Allow your nails to dry thoroughly before using your hands.
Classic Maroon Long Nails
These classic maroon long nails are perfect for fall, offering a deep, rich color that exudes elegance and warmth. The long, square shape adds a touch of sophistication, making this design ideal for both day and night.
Consumables Needed:
- Maroon nail polish (e.g., OPI in “Malaga Wine”)
- Base coat and top coat (DND)
- Nail file and buffer
Professional Tips:
- Apply thin layers of polish to avoid streaks and bubbles.
- Use a high-quality base coat to protect your nails and prevent staining.
- Finish with a glossy top coat to enhance the color and protect the manicure.
DIY Instructions:
- Shape your nails into a long, square style using a nail file.
- Apply a base coat to protect your natural nails.
- Apply two thin coats of maroon nail polish, allowing each coat to dry fully.
- Finish with a high-gloss top coat to seal in the color and add shine.
- Allow your nails to dry thoroughly before using your hands.
Elegant Navy Blue Almond Nails
These navy blue almond nails are the epitome of elegance and sophistication. The rich navy color is perfect for fall, adding depth and a touch of mystery to your look. The glossy finish enhances the color, making your nails look sleek and polished. The almond shape elongates the fingers, creating a chic and feminine silhouette.
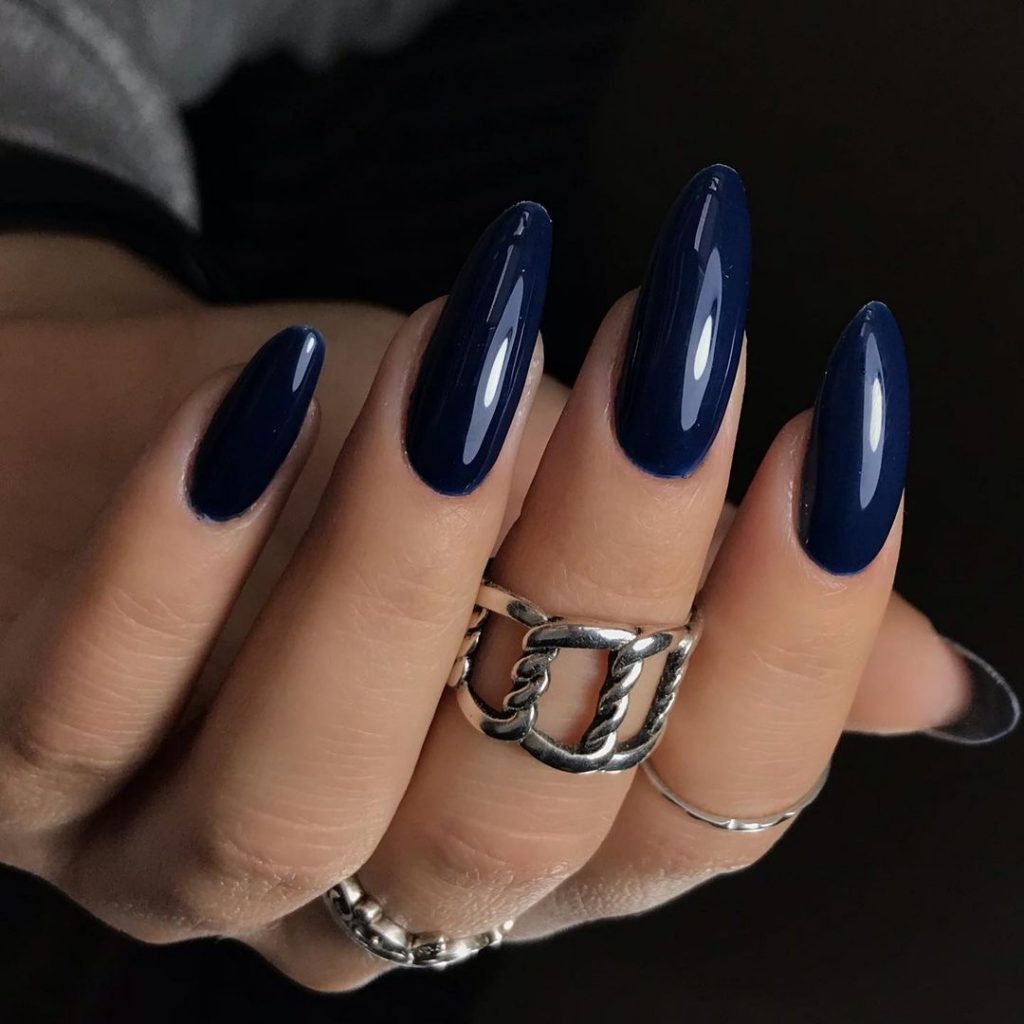
Consumables Needed:
- Navy blue nail polish (e.g., OPI in “Russian Navy”)
- Base coat and top coat (DND)
- Nail file and buffer
Professional Tips:
- Apply a base coat to prevent staining and ensure smooth application.
- Use thin layers of the navy polish to avoid streaks and bubbles.
- Seal with a high-gloss top coat for extra shine and durability.
DIY Instructions:
- Shape your nails into an almond style using a nail file.
- Apply a base coat to protect your natural nails.
- Paint your nails with two thin coats of navy blue nail polish, allowing each coat to dry completely.
- Finish with a high-gloss top coat to seal in the color and add shine.
- Allow your nails to dry thoroughly before using your hands.
Matte Crackle Effect
This matte crackle effect manicure is a unique and artistic choice for fall. The combination of green and black crackle polish creates an edgy, textured look that stands out. The short, rounded nails are practical and stylish, making this design perfect for everyday wear.
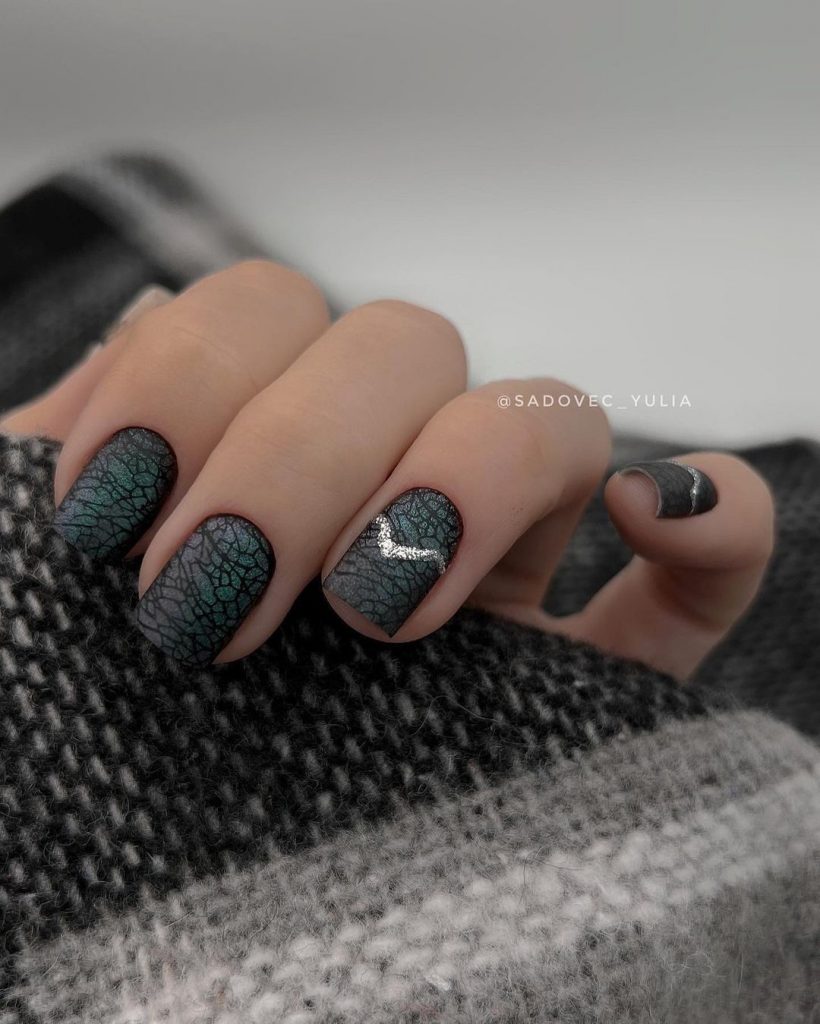
Consumables Needed:
- Green base coat (e.g., OPI Gel in “Stay Off the Lawn!”)
- Black crackle polish
- Matte top coat
- Base coat (DND)
- Nail file and buffer
Professional Tips:
- Ensure the base coat is completely dry before applying the crackle polish.
- Apply the crackle polish in thin layers for the best effect.
- Finish with a matte top coat to enhance the crackle texture.
DIY Instructions:
- File your nails into a short, rounded shape using a nail file.
- Apply a base coat to protect your natural nails.
- Paint your nails with the green base coat and let it dry completely.
- Apply a thin layer of black crackle polish and watch the crackle effect appear.
- Finish with a matte top coat to seal in the design and add a unique texture.
- Allow your nails to dry thoroughly before using your hands.
Glossy Burgundy with Gold Leaf
This glossy burgundy manicure with gold leaf accents is luxurious and perfect for the fall season. The deep burgundy color is rich and elegant, while the gold leaf adds a touch of opulence. The long, square shape makes this design ideal for special occasions and adds a dramatic flair.
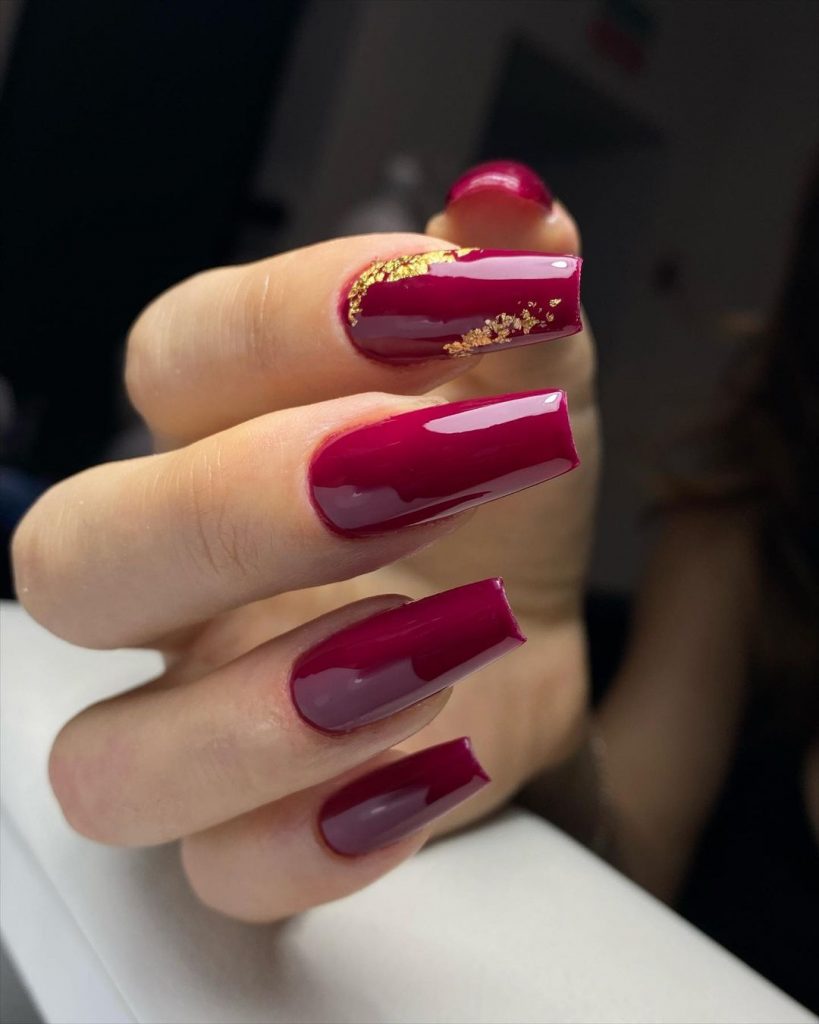
Consumables Needed:
- Burgundy nail polish (e.g., OPI in “Malaga Wine”)
- Gold leaf flakes
- Base coat and top coat (DND)
- Nail file and buffer
- Tweezers for applying gold leaf
Professional Tips:
- Use tweezers to apply the gold leaf precisely.
- Apply thin layers of the burgundy polish to avoid streaks.
- Seal the design with a high-gloss top coat for durability and shine.
DIY Instructions:
- Shape your nails into a long, square style using a nail file.
- Apply a base coat to protect your natural nails.
- Paint your nails with two coats of burgundy nail polish, allowing each coat to dry completely.
- Use tweezers to apply gold leaf accents to one or two nails.
- Finish with a high-gloss top coat to seal in the gold leaf and add shine.
- Allow your nails to dry thoroughly before using your hands.
Black and Silver Leopard Print
This black and silver leopard print manicure is bold and trendy, perfect for making a statement this fall. The combination of glossy black and sparkling silver creates a striking contrast. The almond shape adds a touch of elegance, making this design suitable for both casual and formal occasions.
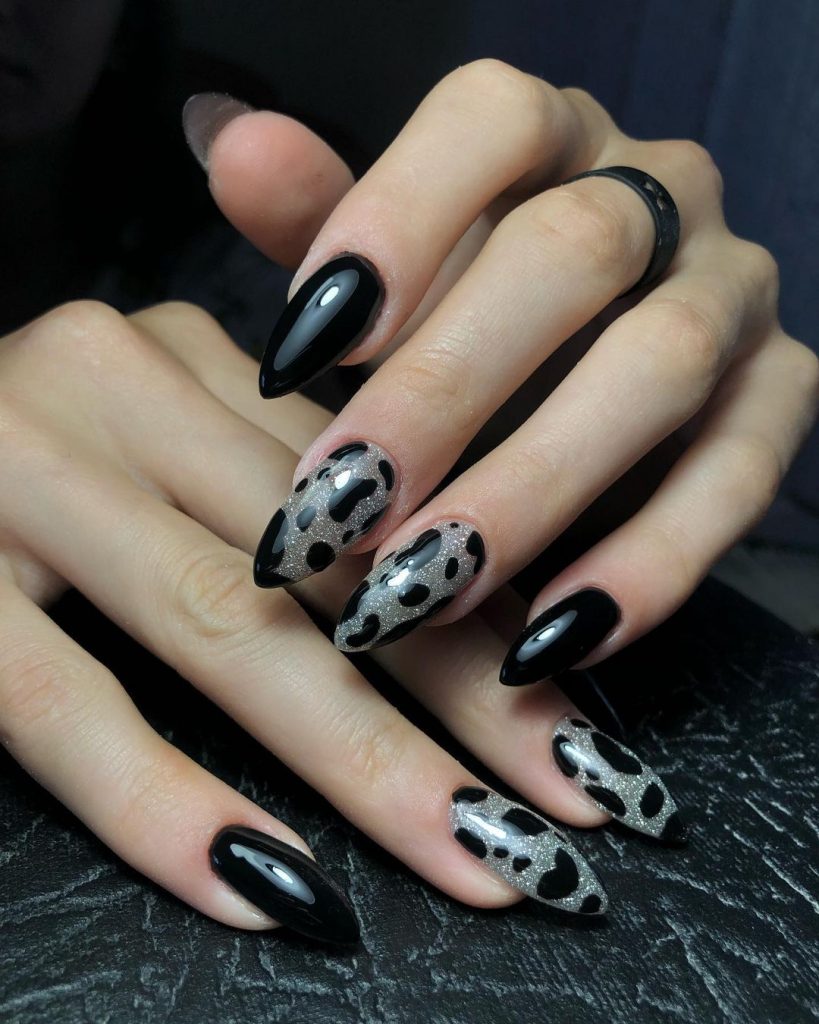
Consumables Needed:
- Glossy black nail polish (e.g., OPI in “Black Onyx”)
- Silver glitter polish
- Base coat and top coat (DND)
- Nail file and buffer
- Leopard print nail stickers or a fine nail art brush
Professional Tips:
- Use high-quality leopard print stickers for a precise pattern.
- Apply thin layers of the black polish to avoid streaks.
- Seal with a high-gloss top coat for added shine and protection.
DIY Instructions:
- Shape your nails into an almond style using a nail file.
- Apply a base coat to protect your natural nails.
- Paint your nails with two coats of black nail polish, allowing each coat to dry completely.
- Apply silver glitter polish on accent nails or use it to create leopard spots with a fine brush.
- Finish with a high-gloss top coat to seal in the design and add shine.
- Allow your nails to dry thoroughly before using your hands.
Matte Brown Nails
These matte brown nails are a subtle and sophisticated choice for fall. The rich brown color is warm and earthy, making it perfect for the autumn season. The matte finish adds a modern twist to this classic color, and the short, rounded shape is both practical and stylish.
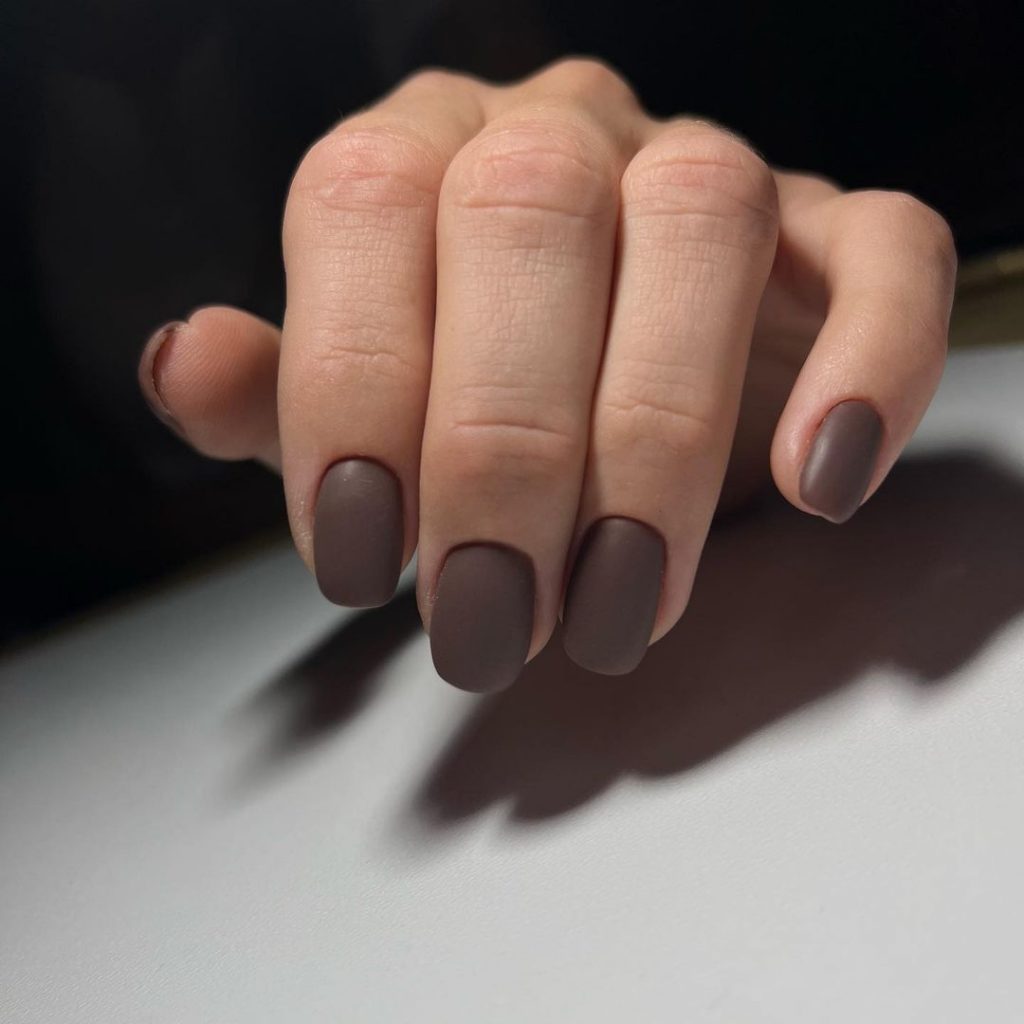
Consumables Needed:
- Matte brown nail polish (e.g., OPI Gel in “Squeaker of the House”)
- Base coat and top coat (DND)
- Nail file and buffer
Professional Tips:
- Apply a matte top coat to achieve a smooth, non-shiny finish.
- Use thin layers of the polish to avoid streaks and bubbles.
- Ensure the base coat is completely dry before applying the matte polish.
DIY Instructions:
- File your nails into a short, rounded shape using a nail file.
- Apply a base coat to protect your natural nails.
- Paint your nails with two coats of matte brown nail polish, allowing each coat to dry completely.
- Finish with a matte top coat to seal in the color and add a smooth finish.
- Allow your nails to dry thoroughly before using your hands.
Glittery Grey Ombre
This glittery grey ombre manicure is perfect for adding a touch of sparkle to your fall look. The gradient from matte grey to glittery tips creates a stunning ombre effect. The almond shape elongates the fingers, making this design both elegant and eye-catching.
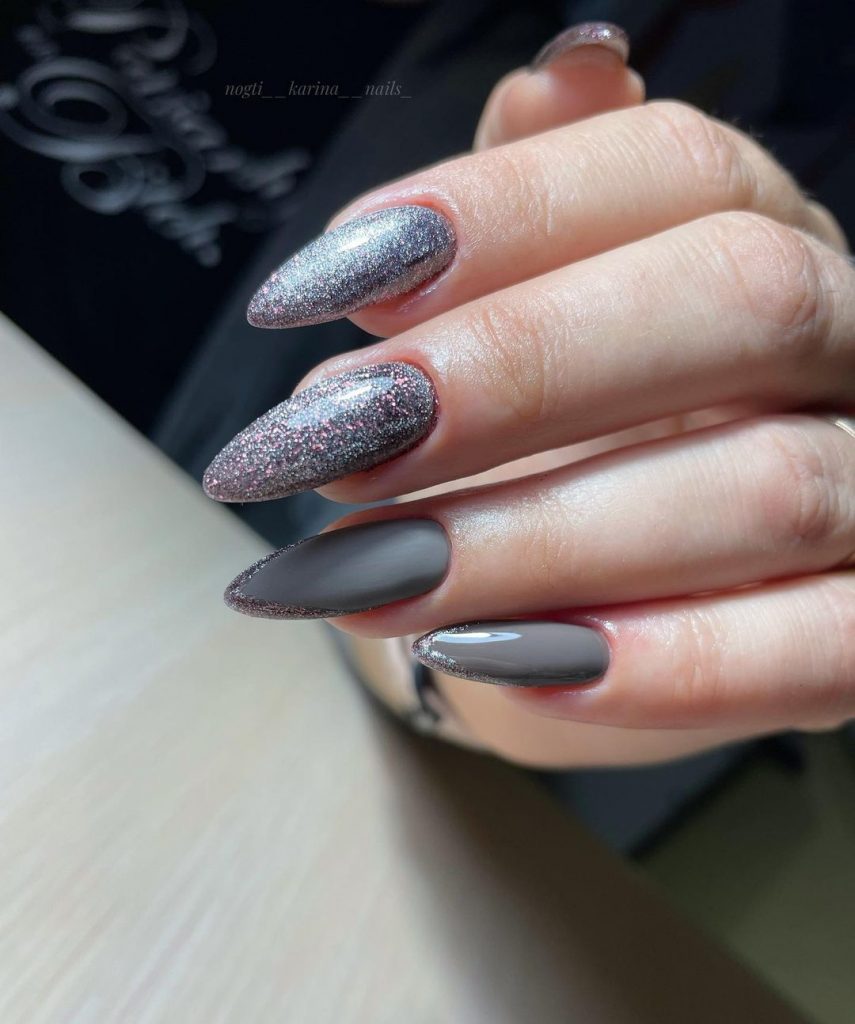
Consumables Needed:
- Matte grey nail polish (e.g., OPI in “I Cannoli Wear OPI”)
- Silver glitter polish
- Base coat and top coat (DND)
- Nail file and buffer
- Makeup sponge for ombre effect
Professional Tips:
- Use a makeup sponge to apply the glitter polish for a smooth gradient effect.
- Apply thin layers of the matte grey polish to ensure even coverage.
- Seal with a high-gloss top coat on the glitter tips for added sparkle.
DIY Instructions:
- Shape your nails into an almond style using a nail file.
- Apply a base coat to protect your natural nails.
- Paint your nails with two coats of matte grey nail polish, allowing each coat to dry completely.
- Use a makeup sponge to apply silver glitter polish to the tips, creating an ombre effect.
- Finish with a high-gloss top coat on the glitter tips to seal in the design and add shine.
- Allow your nails to dry thoroughly before using your hands.
Save Pin