Fall is the perfect season to experiment with new nail designs and colors. The vibrant hues of autumn inspire a range of nail art ideas that can complement any outfit. But what are the beautiful fall nails 2024 trends you need to know? How can you achieve these looks at home? In this article, we’ll explore stunning nail designs that will make your fall manicure stand out. From elegant to cute, and simple to intricate, there’s something for everyone. Let’s dive into the art of fall nails and get inspired by the trends of 2024.
Green and Gold Elegance
This design is a breathtaking blend of deep green and delicate gold accents, perfect for an elegant and classy look. The matte green nails are complemented by intricate gold leaf designs, adding a touch of luxury. This art design is both sophisticated and subtle, making it ideal for various occasions.

The unique color combination and the use of a matte finish make this design stand out, which is a trendy choice for 2024. The gold leaf adds a touch of glamour without being overwhelming, making it perfect for those who want to keep their nails elegant yet noticeable.
Consumables:
- Matte green polish (e.g., OPI Matte Nail Polish in “Green on the Runway”)
- Gold leaf stickers (e.g., Born Pretty Gold Foil Nail Stickers)
- Top coat (e.g., Essie Gel Couture Top Coat)
- Nail art brush (e.g., Winstonia Fine Detail Brush)
DIY Instructions:
- Apply a base coat to protect your natural nails.
- Paint your nails with two coats of matte green polish.
- Once dry, use a nail art brush to apply gold leaf stickers to your desired pattern.
- Seal the design with a top coat to ensure longevity.
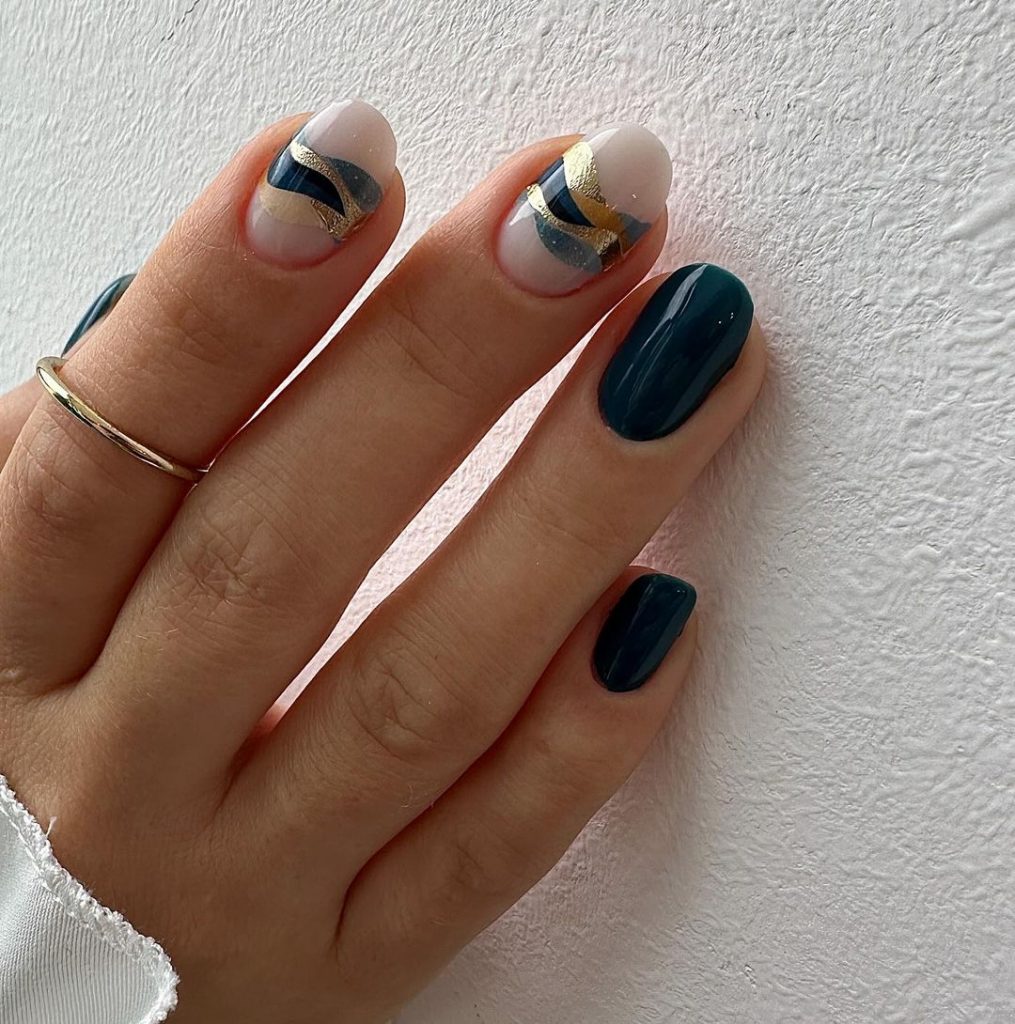
Mesmerizing Blue and Brown
This design features a captivating blend of blue and brown, creating a striking contrast that’s perfect for fall. The mix of these two colors on an almond-shaped nail is both bold and stylish, adding a unique twist to your fall look.
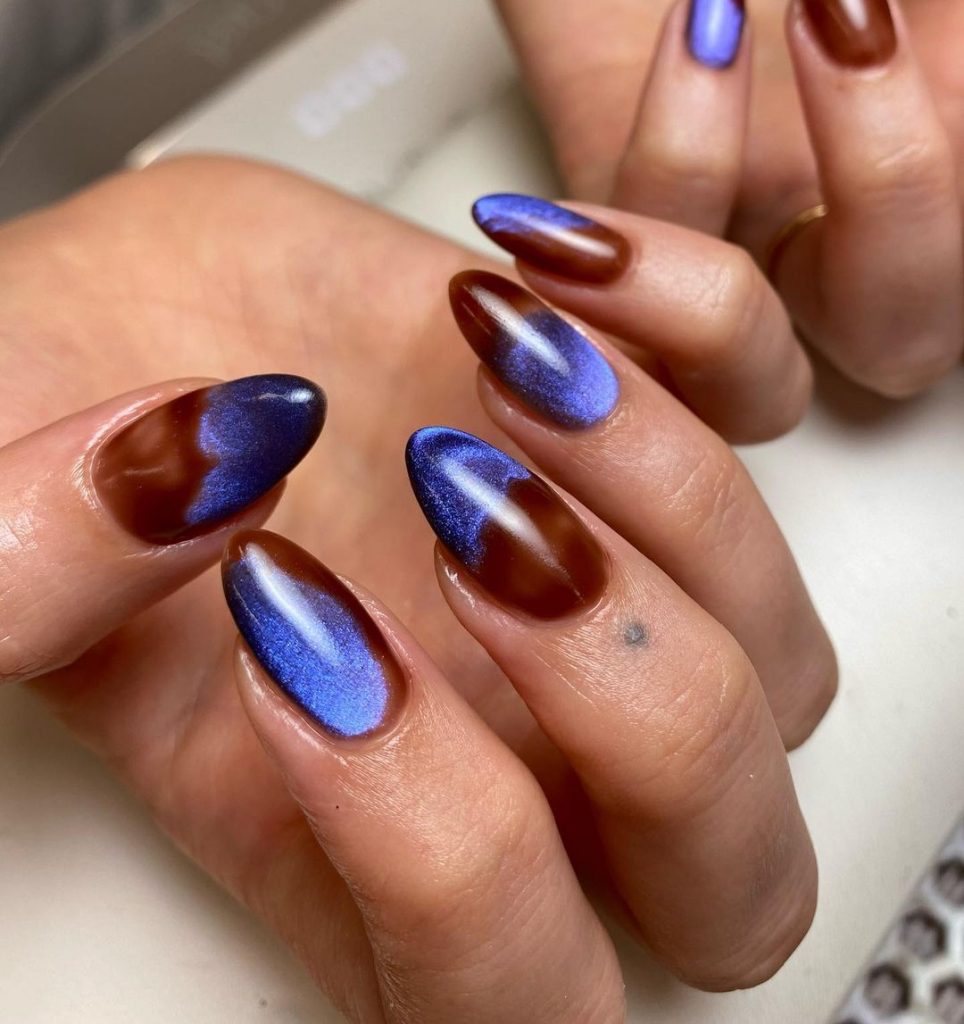
The combination of shimmering blue and rich brown offers a modern take on fall colors. This look is especially great for those who love to experiment with new trends and aren’t afraid to stand out. It’s a perfect example of art designs classy and elegant.
Consumables:
- Blue metallic polish (e.g., Sally Hansen Miracle Gel in “Shimmer Me Timbers”)
- Brown polish (e.g., Essie Nail Polish in “Wicked”)
- Top coat (e.g., Seche Vite Dry Fast Top Coat)
- Nail art sponge (e.g., Makeup sponge or nail art sponge)
DIY Instructions:
- Apply a base coat to protect your natural nails.
- Paint your nails with a base color of brown polish.
- Use a sponge to dab the blue metallic polish onto the nails, creating a gradient effect.
- Seal the design with a top coat to ensure longevity.
Classic Burgundy Shine
Burgundy is a classic fall color, and this design takes it to the next level with a glossy finish that shines brilliantly. The deep red tones are perfect for autumn, providing a rich and luxurious look that’s both elegant and trendy.
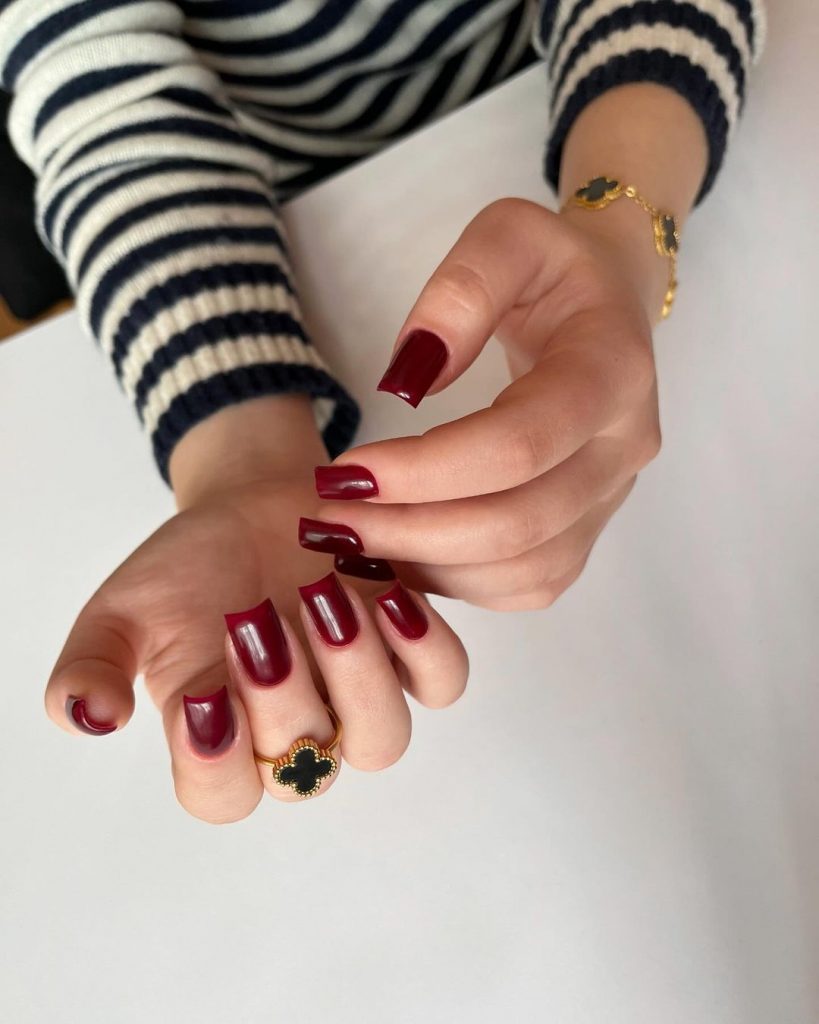
Burgundy nails are a timeless choice that never goes out of style. The glossy finish adds depth and dimension, making your nails look polished and sophisticated. This design is perfect for both everyday wear and special occasions.
Consumables:
- Burgundy polish (e.g., OPI Nail Lacquer in “Malaga Wine”)
- Top coat (e.g., Sally Hansen Miracle Gel Top Coat)
- Nail file (e.g., Revlon Nail File)
DIY Instructions:
- Apply a base coat to protect your natural nails.
- Paint your nails with two coats of burgundy polish.
- Apply a top coat for a glossy finish and added durability.
Warm Autumn Leaves
This nail design captures the essence of autumn with warm, earthy tones and intricate leaf patterns. The combination of orange and brown shades, along with detailed leaf art, makes this design perfect for fall.
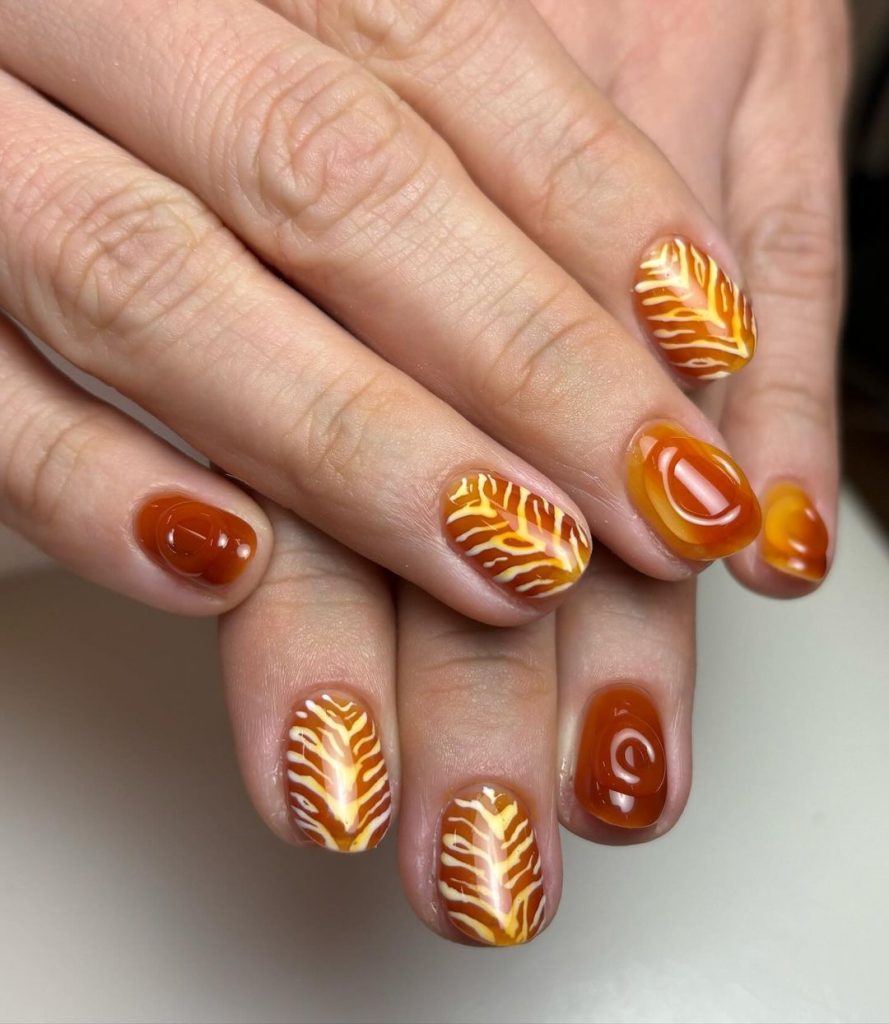
The warm colors and leaf patterns evoke the feeling of falling leaves, making it a perfect choice for the season. This design is both playful and sophisticated, suitable for those who love to embrace the autumn spirit in their nail art.
Consumables:
- Orange polish (e.g., Essie Nail Polish in “Playing Koi”)
- Brown polish (e.g., OPI Nail Lacquer in “Espresso Your Inner Self”)
- Nail art brush (e.g., Beetles Gel Polish Nail Art Brush Set)
- Top coat (e.g., Gellen Top Coat)
DIY Instructions:
- Apply a base coat to protect your natural nails.
- Paint your nails with alternating orange and brown polishes.
- Use a nail art brush to create detailed leaf patterns with the contrasting color.
- Seal the design with a top coat to ensure longevity.
Simple Lavender Charm
This design is all about simplicity and charm with a beautiful lavender hue. The soft purple color is both calming and trendy, making it a great choice for those who prefer a more minimalist look.
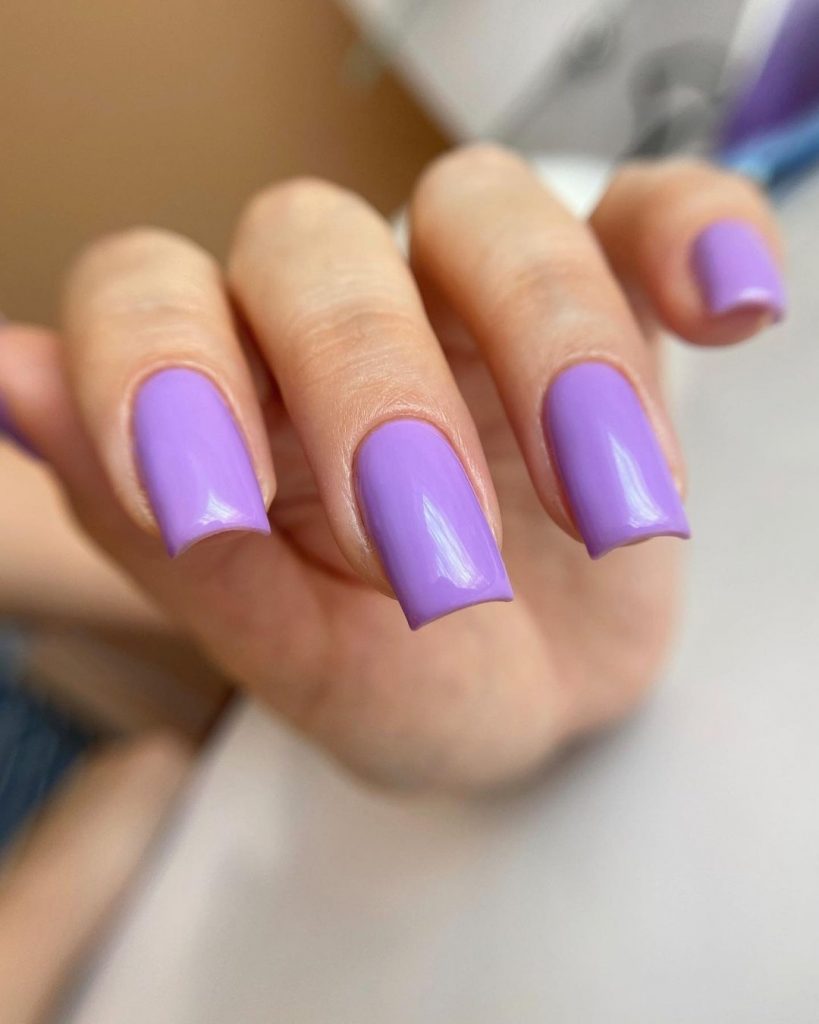
Lavender is a versatile color that can be worn year-round, but it especially shines in the fall. Its soft, muted tone is perfect for a simple yet elegant manicure that can easily complement any outfit.
Consumables:
- Lavender polish (e.g., Essie Nail Polish in “Lilacism”)
- Top coat (e.g., Orly Glosser Top Coat)
- Nail buffer (e.g., Onyx Professional Nail Buffer)
DIY Instructions:
- Apply a base coat to protect your natural nails.
- Paint your nails with two coats of lavender polish.
- Apply a top coat for a glossy finish and added durability.
Monochrome Abstract
This design showcases a stunning mix of black and white abstract patterns, giving a modern and sophisticated look. The combination of glossy and matte finishes adds depth and dimension, making it perfect for those who love minimalistic yet elegant nail art.
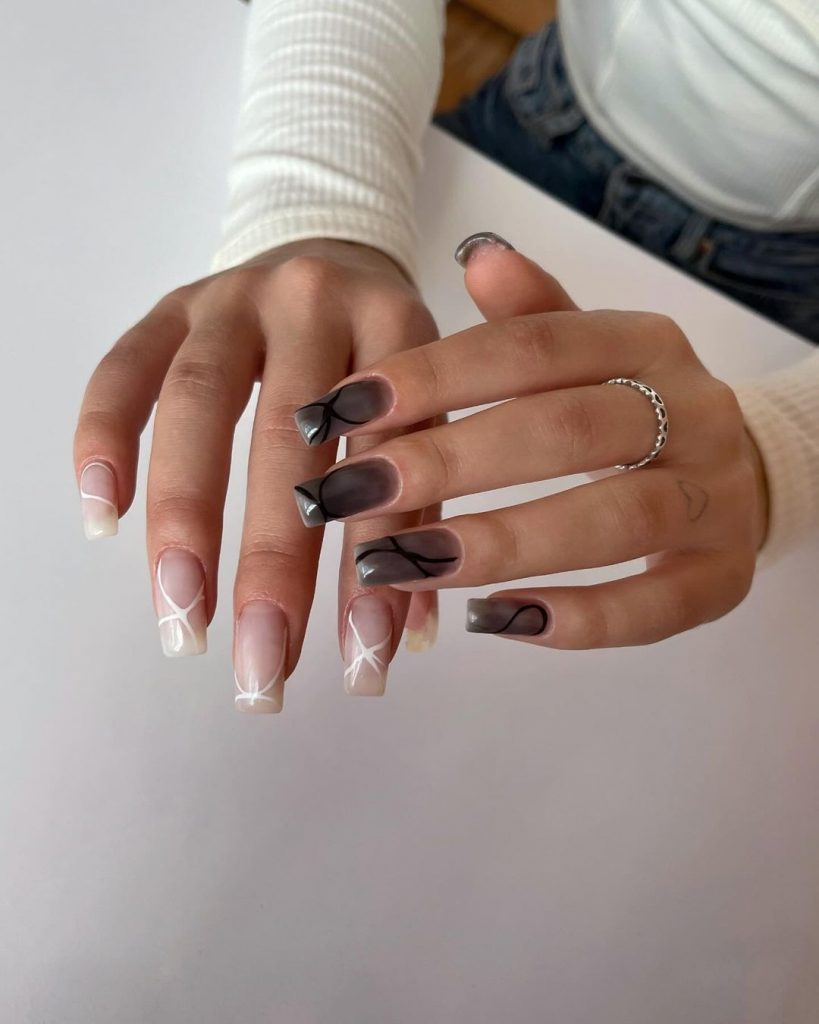
The monochrome palette is timeless and versatile, making it suitable for any occasion. The abstract lines add a touch of artistry, making your nails look like tiny canvases.
Consumables:
- White polish (e.g., OPI Nail Lacquer in “Alpine Snow”)
- Black polish (e.g., Essie Nail Polish in “Licorice”)
- Matte top coat (e.g., Sally Hansen Big Matte Top Coat)
- Nail art brush (e.g., Beetles Gel Polish Nail Art Brush Set)
DIY Instructions:
- Apply a base coat to protect your natural nails.
- Paint your nails with alternating white and black polishes.
- Use a nail art brush to create abstract lines and patterns with the contrasting color.
- Seal the design with a matte top coat for a sophisticated finish.
Green and Gold Extravaganza
This eye-catching design features a luxurious combination of matte green and gold accents, including a unique chain detail. The almond-shaped nails are both bold and elegant, making them perfect for special occasions.
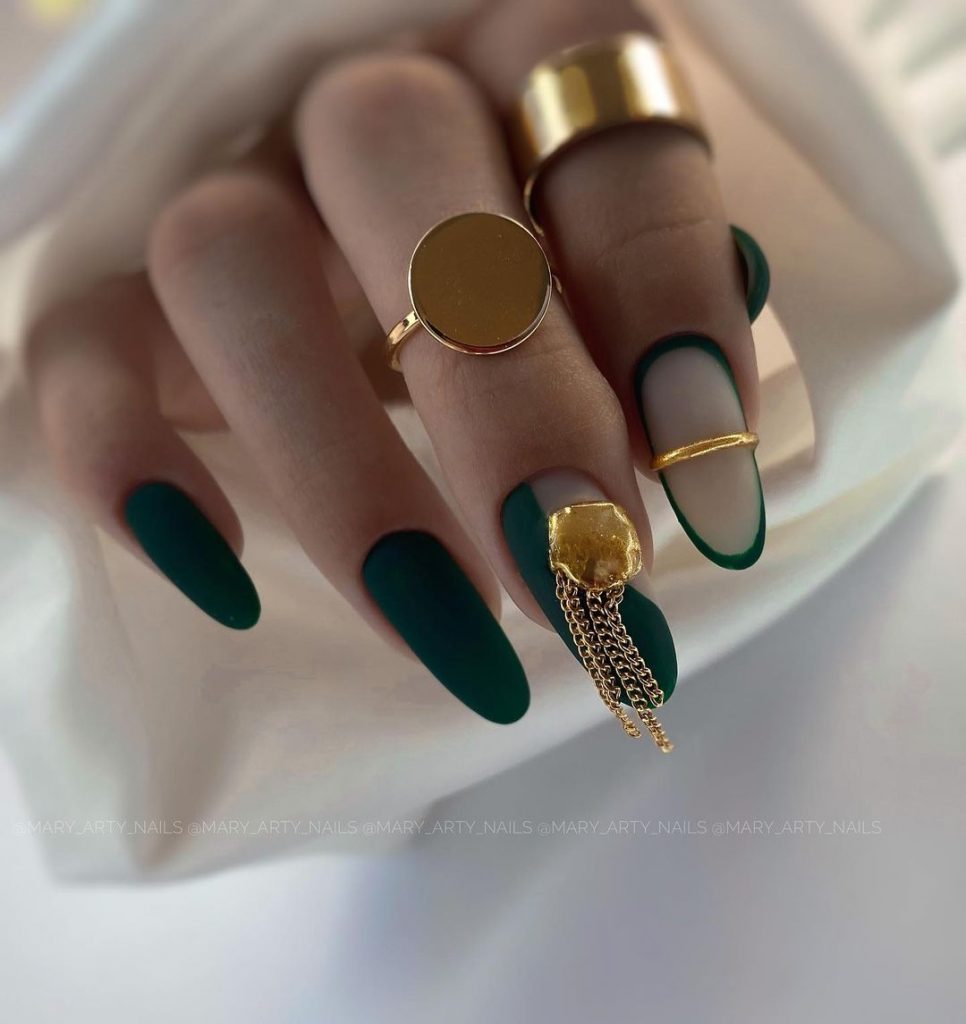
The deep green color is both trendy and sophisticated, while the gold chains add a touch of opulence. This design is sure to turn heads and make a statement.
Consumables:
- Matte green polish (e.g., OPI Matte Nail Polish in “Amazon…Amazoff”)
- Gold foil (e.g., Born Pretty Gold Foil)
- Chain nail decorations (e.g., Makartt Nail Art Chains)
- Nail glue (e.g., KDS Nail Tip Glue)
DIY Instructions:
- Apply a base coat to protect your natural nails.
- Paint your nails with two coats of matte green polish.
- Apply gold foil to accent nails using nail glue.
- Attach chain decorations to the desired nails and secure them with nail glue.
- Seal the design with a top coat for added durability.
Red and Black Tortoiseshell
This design brings a unique twist to the classic tortoiseshell pattern with a rich red and black color scheme. The almond-shaped nails add a touch of elegance, making this design perfect for those who love bold and sophisticated nail art.
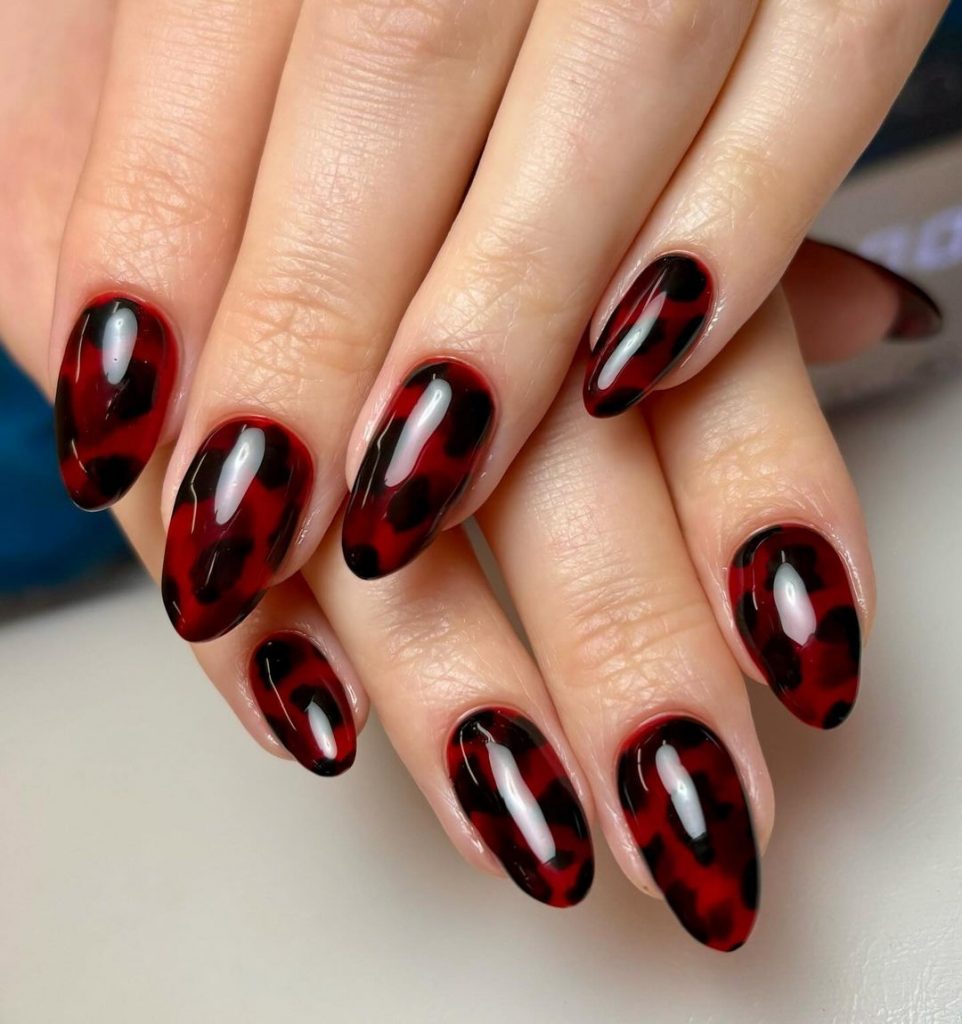
The deep red and black colors create a striking contrast, while the tortoiseshell pattern adds an element of nature-inspired beauty. This look is both trendy and timeless.
Consumables:
- Red polish (e.g., OPI Nail Lacquer in “Big Apple Red”)
- Black polish (e.g., Essie Nail Polish in “Licorice”)
- Nail art sponge (e.g., Makeup sponge or nail art sponge)
- Top coat (e.g., Seche Vite Dry Fast Top Coat)
DIY Instructions:
- Apply a base coat to protect your natural nails.
- Paint your nails with a base color of red polish.
- Use a sponge to dab black polish onto the nails, creating a tortoiseshell pattern.
- Seal the design with a top coat to ensure longevity.
Royal Blue Coffin Nails
This design features bold royal blue coffin-shaped nails with a high-gloss finish. The vibrant color is perfect for making a statement and adds a pop of color to any fall outfit.
Royal blue is a striking and versatile color that works well for both casual and formal occasions. The coffin shape adds a touch of drama, making your nails look both modern and sophisticated.
Consumables:
- Royal blue polish (e.g., Sally Hansen Miracle Gel in “Tidal Wave”)
- Top coat (e.g., Orly Glosser Top Coat)
- Nail file (e.g., Revlon Nail File)
DIY Instructions:
- Apply a base coat to protect your natural nails.
- Paint your nails with two coats of royal blue polish.
- Apply a top coat for a glossy finish and added durability.
Geometric Glamour
This design showcases a chic combination of pink, black, and glitter in geometric patterns. The long, coffin-shaped nails add a touch of elegance, making this design perfect for special occasions or a night out.
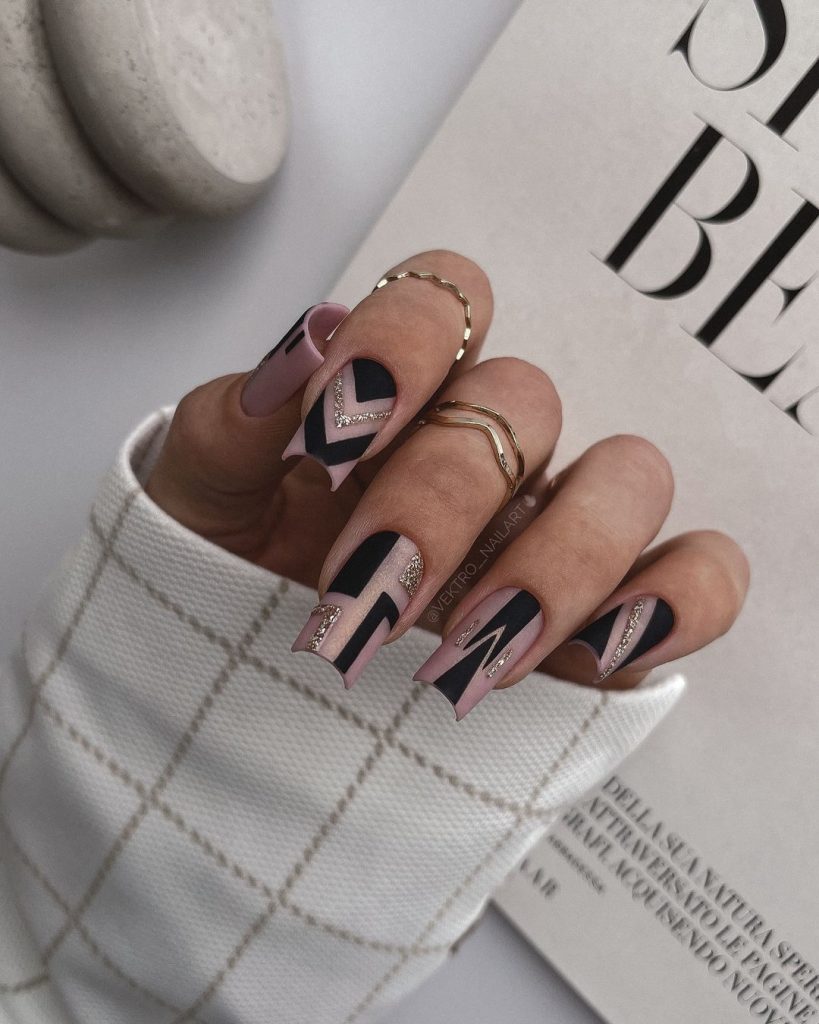
The mix of matte and glossy finishes, along with glitter accents, creates a sophisticated and eye-catching look. This design is perfect for those who love to stand out and make a statement with their nails.
Consumables:
- Pink polish (e.g., Essie Nail Polish in “Fiji”)
- Black polish (e.g., OPI Nail Lacquer in “Black Onyx”)
- Glitter polish (e.g., China Glaze Nail Lacquer in “Fairy Dust”)
- Nail art tape (e.g., Striping Tape)
- Top coat (e.g., Seche Vite Dry Fast Top Coat)
DIY Instructions:
- Apply a base coat to protect your natural nails.
- Paint your nails with a base color of pink polish.
- Use nail art tape to create geometric patterns and fill in with black and glitter polishes.
- Seal the design with a top coat to ensure longevity.
Peachy Perfection
This design features a soft peach color with a subtle shimmer, giving the nails a delicate and feminine look. The short, square shape is perfect for those who prefer a more natural and understated manicure.
The peach color is versatile and can complement any skin tone, making it a perfect choice for a simple yet elegant look. The subtle shimmer adds a touch of glamour without being too bold.
Consumables:
- Peach nail polish (e.g., Essie Nail Polish in “Ballet Slippers”)
- Shimmer top coat (e.g., Zoya Naked Manicure Glossy Seal)
- Nail buffer (e.g., Onyx Professional Nail Buffer)
DIY Instructions:
- Apply a base coat to protect your natural nails.
- Paint your nails with two coats of peach nail polish.
- Apply a shimmer top coat for added sparkle and durability.
- Finish with a top coat to seal and protect the design.
Forest Foliage
This design combines dark green nails with intricate botanical accents, creating a nature-inspired look that’s perfect for fall. The almond shape adds a touch of elegance, while the leaf designs bring a whimsical element to the manicure.
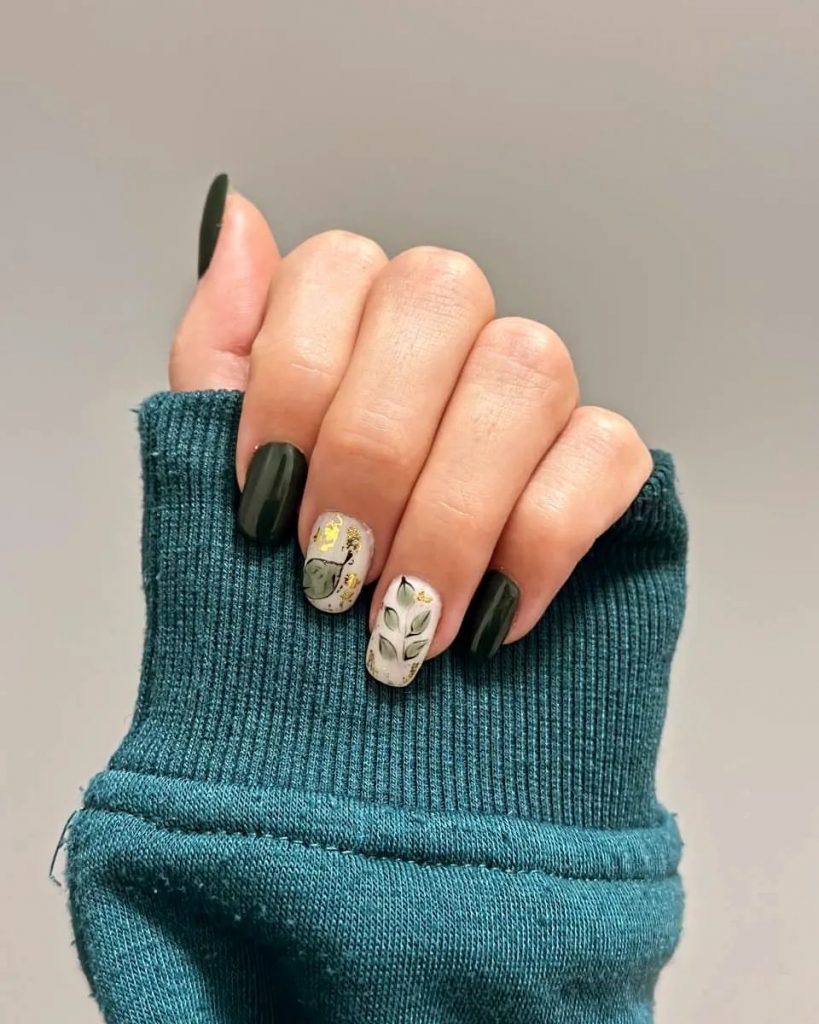
The combination of dark green and delicate botanical accents is both trendy and sophisticated, making it ideal for those who love nature-inspired nail art.
Consumables:
- Dark green polish (e.g., OPI Nail Lacquer in “Stay Off the Lawn”)
- White polish for accents (e.g., Sally Hansen Xtreme Wear in “White On”)
- Nail art brush (e.g., Beetles Gel Polish Nail Art Brush Set)
- Top coat (e.g., Seche Vite Dry Fast Top Coat)
DIY Instructions:
- Apply a base coat to protect your natural nails.
- Paint your nails with two coats of dark green polish.
- Use a nail art brush to paint delicate botanical designs with white polish.
- Seal the design with a top coat to ensure longevity.
Berry Glitter Glam
This design features a chic combination of berry, nude, and glitter accents, creating a sophisticated and stylish look. The mix of colors and textures adds depth and dimension, making it perfect for any fall occasion.
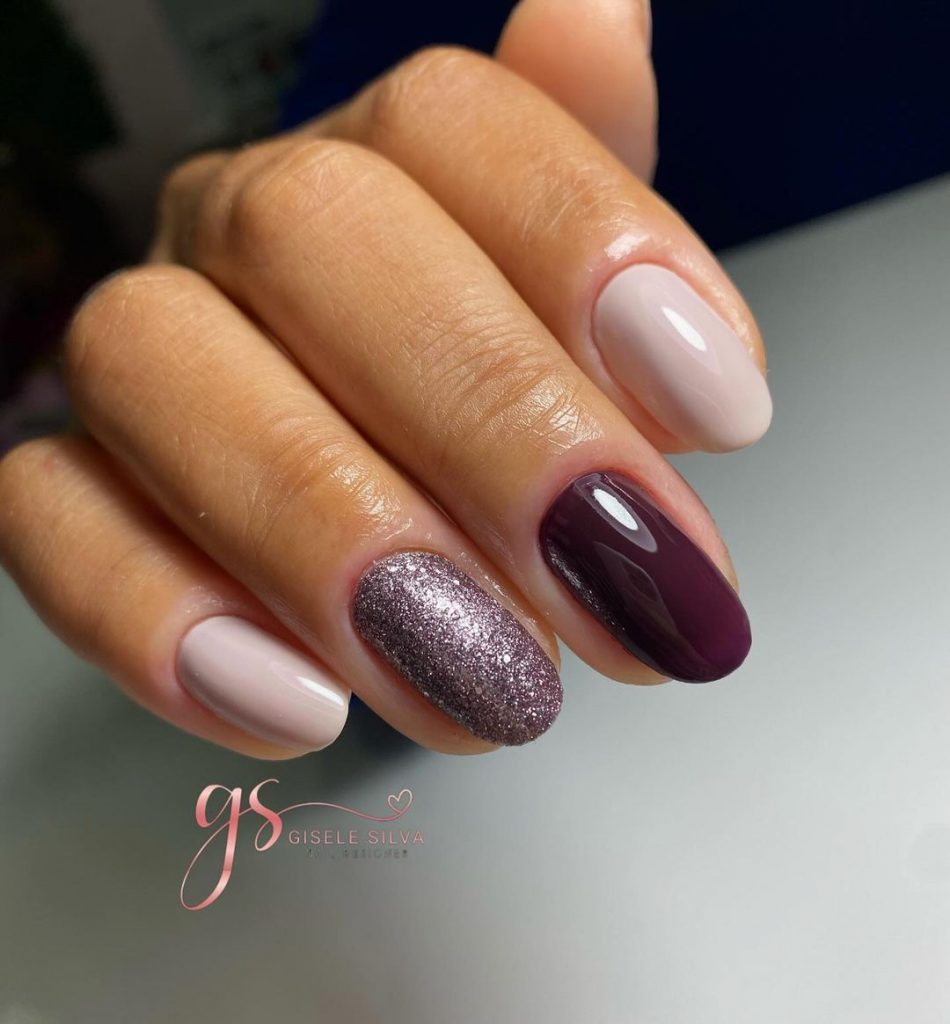
The berry and nude colors are both classic and versatile, while the glitter accent adds a touch of glamour. This design is perfect for those who want to add a bit of sparkle to their fall manicure.
Consumables:
- Berry polish (e.g., OPI Nail Lacquer in “Bogota Blackberry”)
- Nude polish (e.g., Essie Nail Polish in “Topless & Barefoot”)
- Glitter polish (e.g., China Glaze Nail Lacquer in “Fairy Dust”)
- Top coat (e.g., Orly Glosser Top Coat)
DIY Instructions:
- Apply a base coat to protect your natural nails.
- Paint your nails with alternating berry and nude polishes.
- Apply glitter polish to an accent nail for added sparkle.
- Seal the design with a top coat to ensure longevity.
Green Ombre Delight
This design showcases a beautiful green ombre effect, transitioning from a deep forest green to a soft, natural hue. The rounded shape adds to the elegant and subtle look, making it perfect for the fall season.
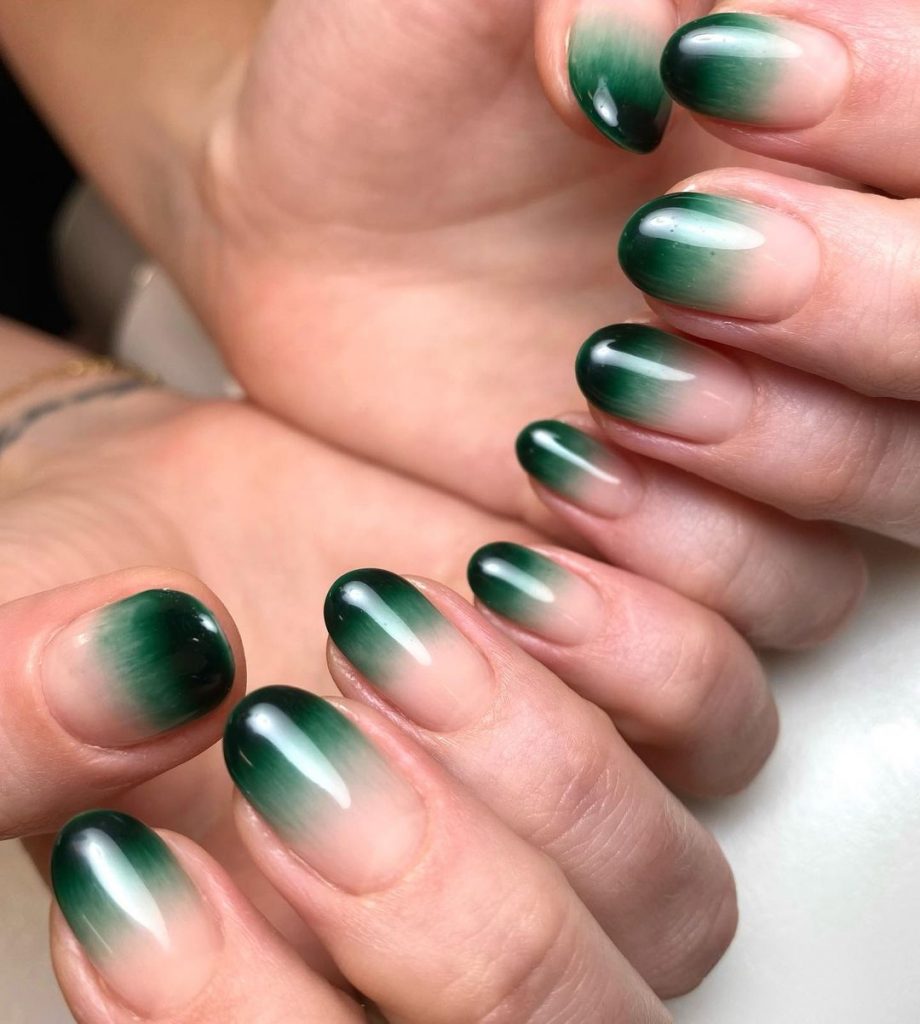
The ombre effect is both trendy and sophisticated, offering a unique twist on traditional green nails. This design is ideal for those who love gradient styles and want to incorporate fall colors into their manicure.
Consumables:
- Dark green polish (e.g., OPI Nail Lacquer in “Jade is the New Black”)
- Nude polish (e.g., Essie Nail Polish in “Mademoiselle”)
- Makeup sponge (for ombre effect)
- Top coat (e.g., Seche Vite Dry Fast Top Coat)
DIY Instructions:
- Apply a base coat to protect your natural nails.
- Paint a stripe of dark green polish and nude polish side by side on a makeup sponge.
- Dab the sponge onto your nails to create the ombre effect, blending the colors together.
- Seal the design with a top coat to ensure longevity.
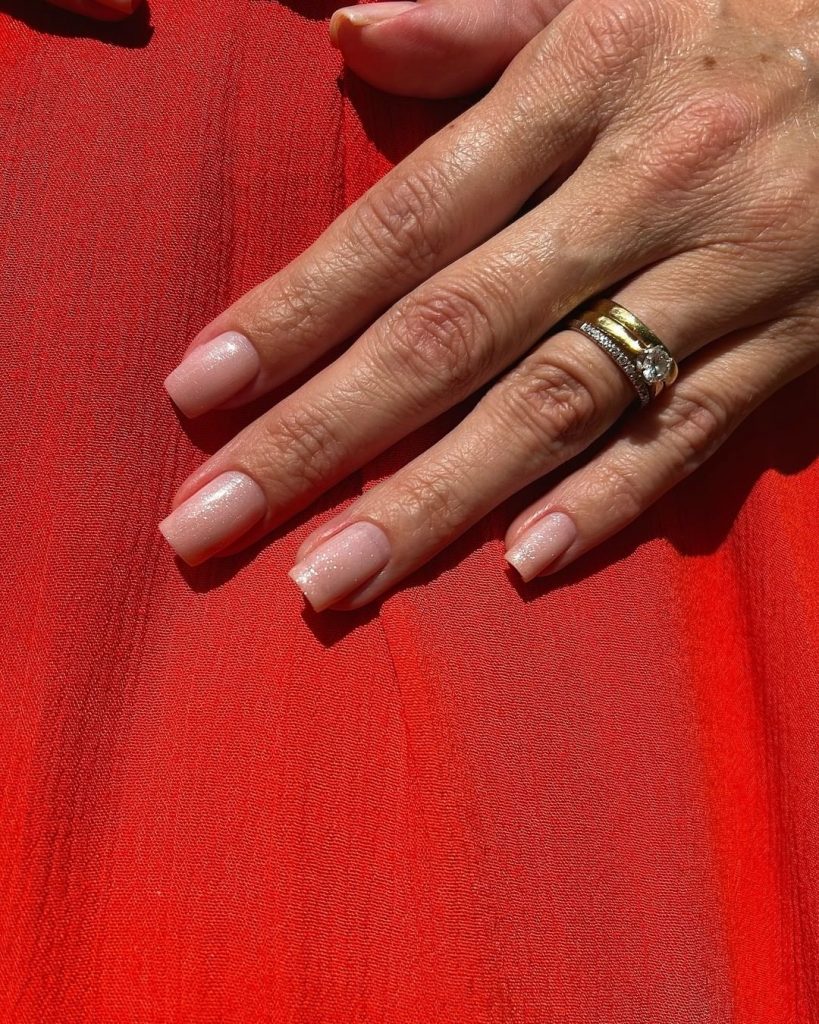
Nude Elegance
This design features a sophisticated nude color, perfect for an elegant and understated look. The almond shape adds a touch of class, making it suitable for both everyday wear and special occasions.
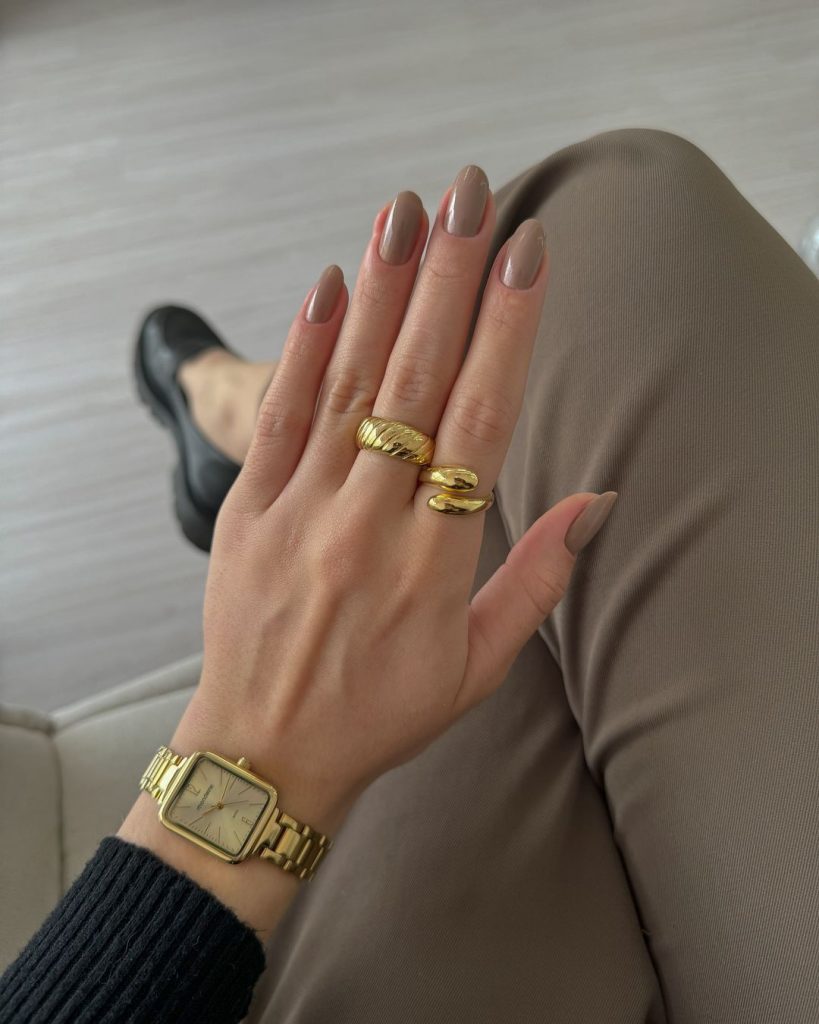
The nude color is timeless and versatile, complementing any outfit and occasion. This design is perfect for those who prefer a minimalist and chic look.
Consumables:
- Nude polish (e.g., Essie Nail Polish in “Sand Tropez”)
- Top coat (e.g., Orly Glosser Top Coat)
- Nail file (e.g., Revlon Nail File)
DIY Instructions:
- Apply a base coat to protect your natural nails.
- Paint your nails with two coats of nude polish.
- Apply a top coat for a glossy finish and added durability.
- File your nails to the desired almond shape for a polished look.
Wild and Chic
This design combines black nails with pink zebra stripes and gold flakes, creating a wild and chic look. The mix of textures and patterns adds a fun and edgy element to the manicure, perfect for those who love to make a statement with their nails.
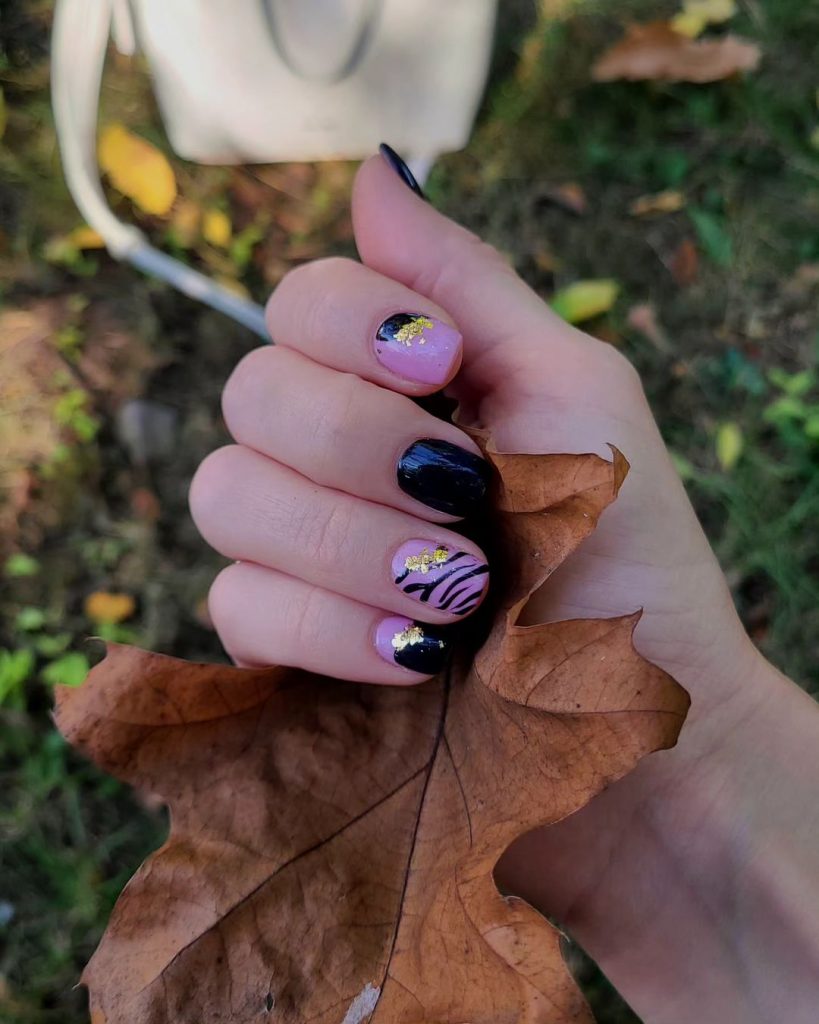
The combination of black, pink, and gold is both bold and stylish. The zebra stripes add a playful touch, while the gold flakes bring a hint of luxury.
Consumables:
- Black polish (e.g., Essie Nail Polish in “Licorice”)
- Pink polish (e.g., OPI Nail Lacquer in “Pink Flamenco”)
- Gold flakes (e.g., Born Pretty Gold Foil)
- Nail art brush (e.g., Beetles Gel Polish Nail Art Brush Set)
- Top coat (e.g., Seche Vite Dry Fast Top Coat)
DIY Instructions:
- Apply a base coat to protect your natural nails.
- Paint your nails with black polish.
- Use a nail art brush to paint pink zebra stripes on accent nails.
- Apply gold flakes to the accent nails using a top coat as adhesive.
- Seal the design with a top coat to ensure longevity.
Classic Red
This design features a classic red polish on short, rounded nails. The bold color is timeless and elegant, making it perfect for any occasion. The glossy finish adds a touch of sophistication and makes the nails look polished and refined.
Red nails are a classic choice that never goes out of style. The bright color is both bold and elegant, perfect for adding a pop of color to any fall outfit.
Consumables:
- Red polish (e.g., OPI Nail Lacquer in “Big Apple Red”)
- Top coat (e.g., Orly Glosser Top Coat)
- Nail buffer (e.g., Onyx Professional Nail Buffer)
DIY Instructions:
- Apply a base coat to protect your natural nails.
- Paint your nails with two coats of red polish.
- Apply a top coat for a glossy finish and added durability.
- Buff your nails to ensure a smooth and even surface.
Mustard Yellow Delight
This design features a vibrant mustard yellow polish on short, square nails. The bold color is perfect for fall and adds a pop of warmth to any look. The glossy finish enhances the brightness of the color, making it stand out even more.
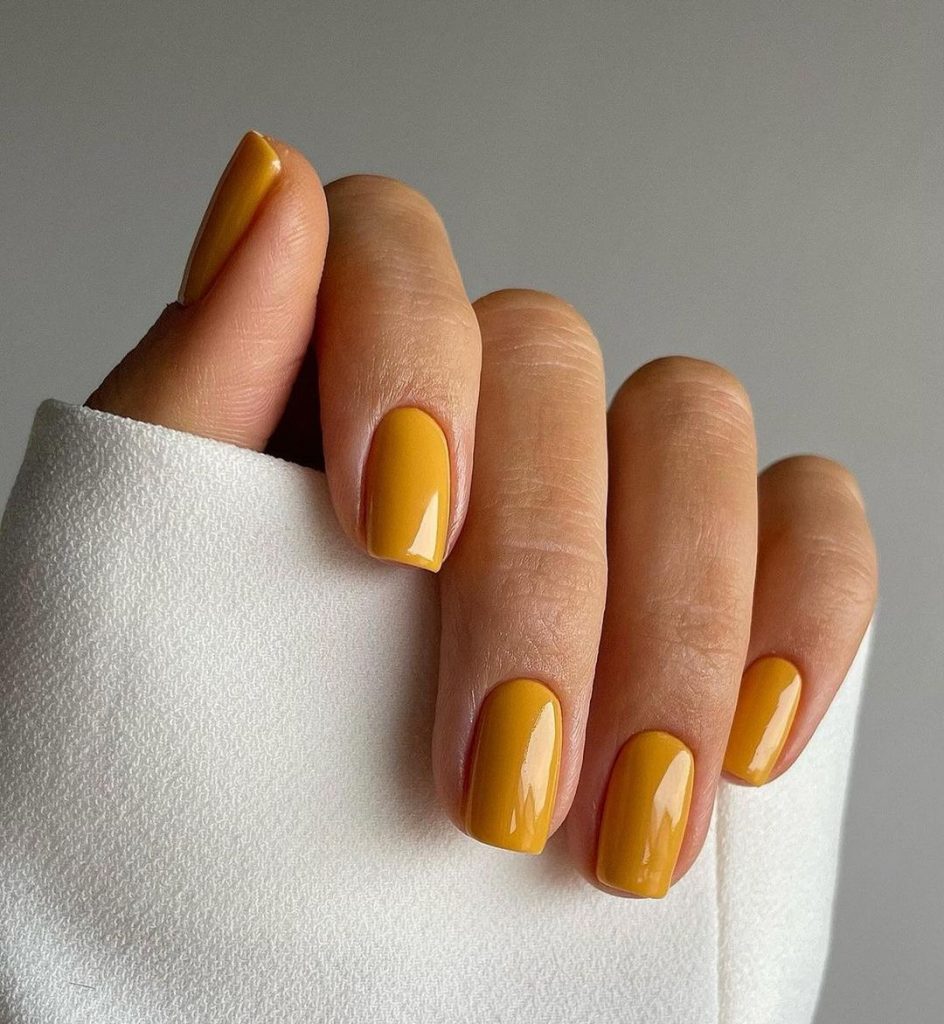
Mustard yellow is a trendy and unique color for fall. It’s bold, warm, and perfect for making a statement. This color is ideal for those who want to try something different and eye-catching.
Consumables:
- Mustard yellow polish (e.g., Essie Nail Polish in “Hay There”)
- Top coat (e.g., Sally Hansen Miracle Gel Top Coat)
- Nail file (e.g., Revlon Nail File)
DIY Instructions:
- Apply a base coat to protect your natural nails.
- Paint your nails with two coats of mustard yellow polish.
- Apply a top coat for a glossy finish and added durability.
- File your nails to the desired square shape for a polished look.
Bright Orange Burst
This design features a bright orange polish on short, rounded nails. The vibrant color is perfect for fall and adds a fun and playful touch to any look. The glossy finish enhances the brightness of the color, making it pop.
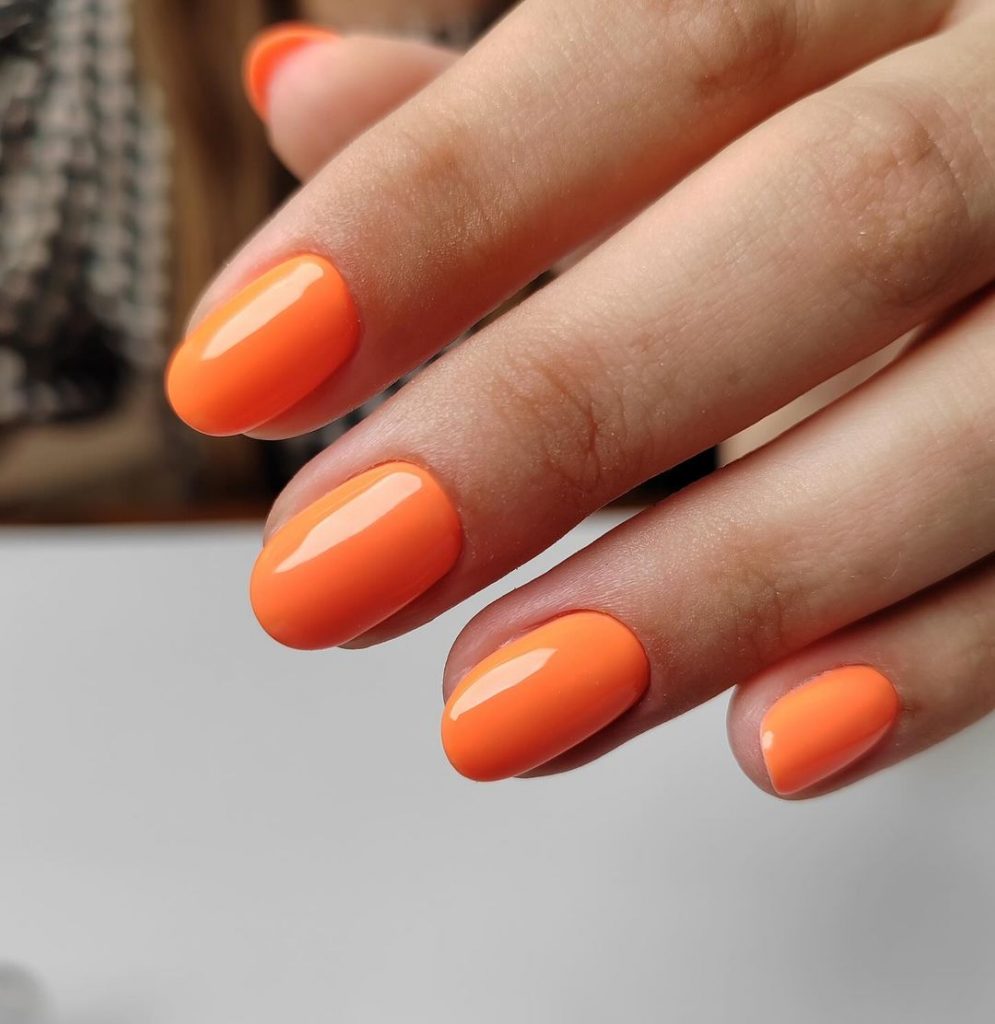
Bright orange is a fun and lively color for fall. It’s bold and eye-catching, perfect for those who want to add some fun to their nail art.
Consumables:
- Orange polish (e.g., OPI Nail Lacquer in “A Good Man-darin is Hard to Find”)
- Top coat (e.g., Seche Vite Dry Fast Top Coat)
- Nail buffer (e.g., Onyx Professional Nail Buffer)
DIY Instructions:
- Apply a base coat to protect your natural nails.
- Paint your nails with two coats of orange polish.
- Apply a top coat for a glossy finish and added durability.
- Buff your nails to ensure a smooth and even surface.
Emerald and Gold Glam
This design features a rich emerald green polish with a gold glitter accent nail, creating a luxurious and glamorous look. The short, square nails add a touch of sophistication, making this design perfect for any special occasion.
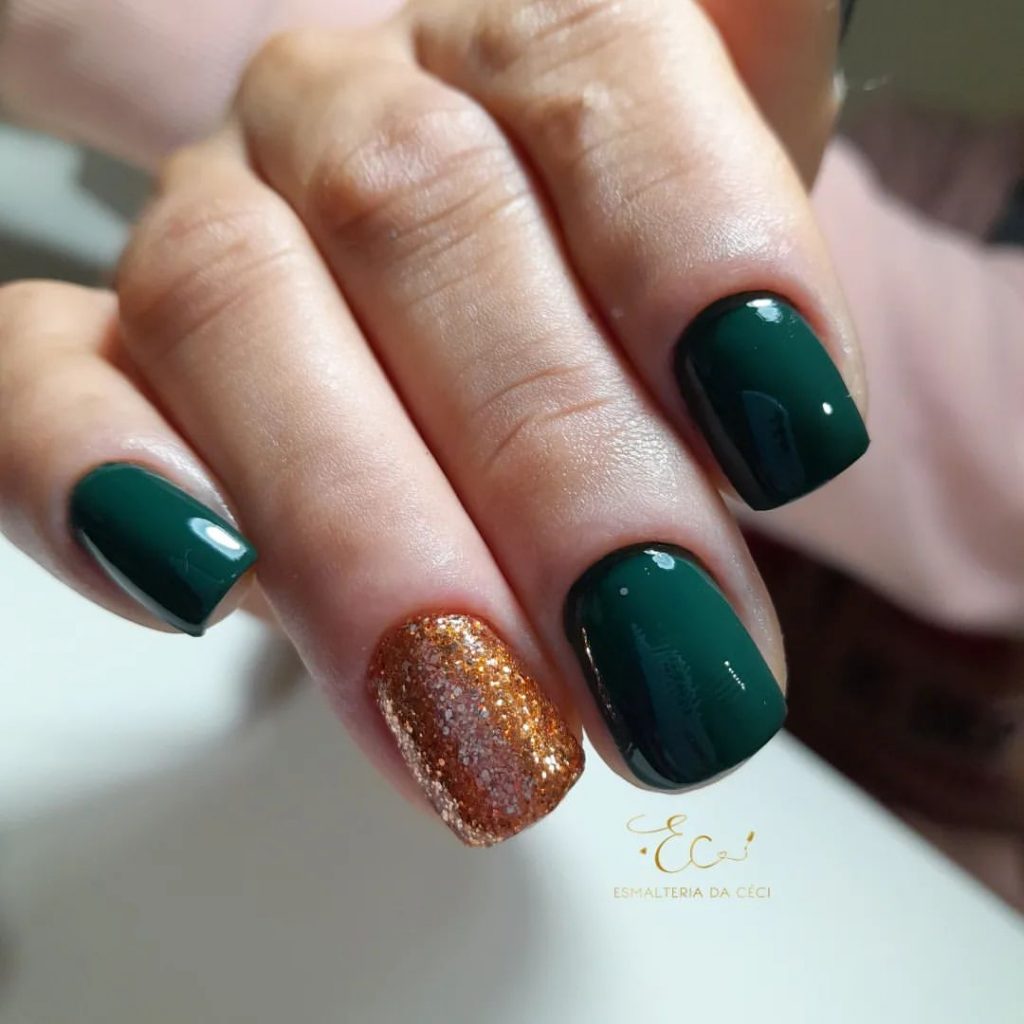
The combination of emerald green and gold glitter is both elegant and festive. This look is perfect for those who want to add some sparkle to their fall manicure.
Consumables:
- Emerald green polish (e.g., OPI Nail Lacquer in “Jade is the New Black”)
- Gold glitter polish (e.g., China Glaze Nail Lacquer in “Fairy Dust”)
- Top coat (e.g., Orly Glosser Top Coat)
- Nail file (e.g., Revlon Nail File)
DIY Instructions:
- Apply a base coat to protect your natural nails.
- Paint your nails with emerald green polish, leaving one nail for the gold glitter accent.
- Apply gold glitter polish to the accent nail.
- Apply a top coat for a glossy finish and added durability.
- File your nails to the desired square shape for a polished look.
Nude and Glitter
This design features a sophisticated nude color with a glitter accent nail. The combination of matte nude and sparkling glitter creates a chic and elegant look, perfect for any occasion. The almond shape adds a touch of class, making the nails appear elongated and refined.
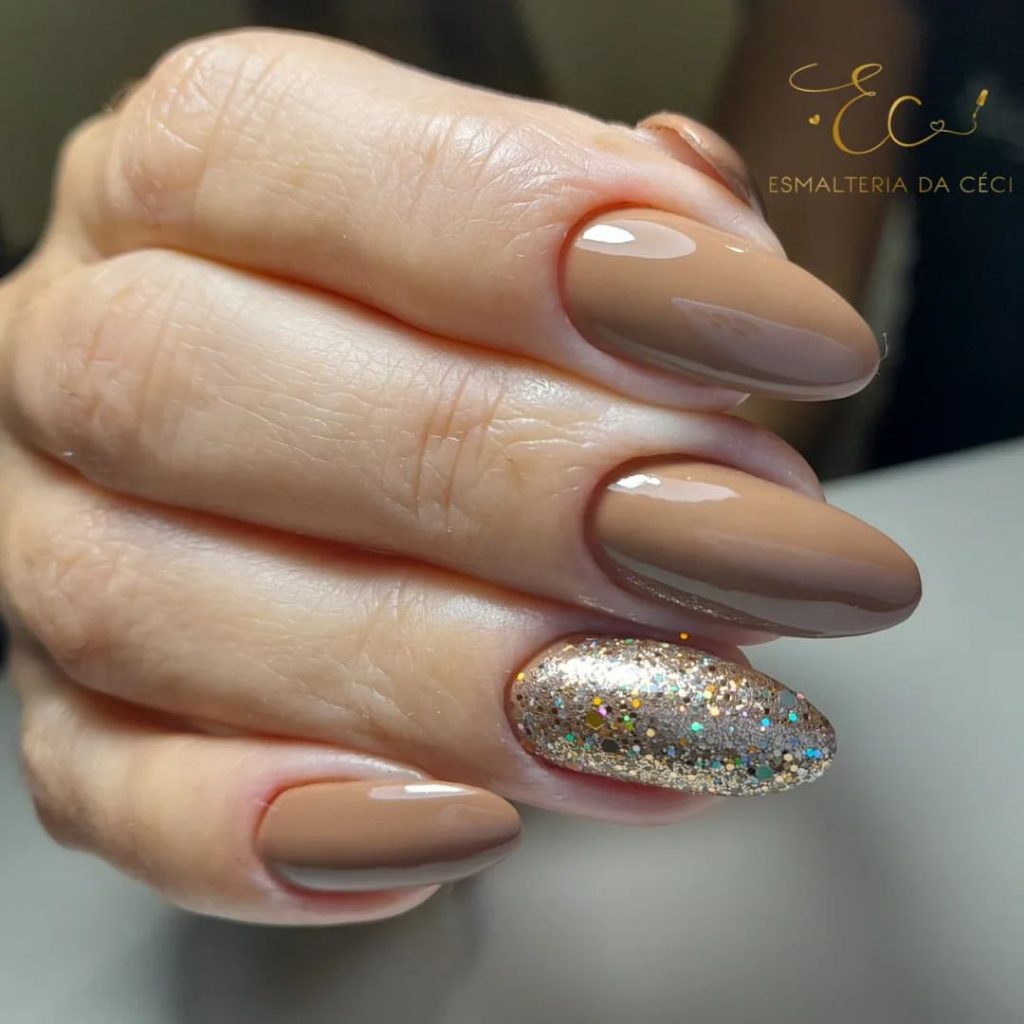
The contrast between the subtle nude and the dazzling glitter accent is both eye-catching and tasteful. This design is ideal for those who want a glamorous yet understated look.
Consumables:
- Nude polish (e.g., Essie Nail Polish in “Sand Tropez”)
- Gold glitter polish (e.g., China Glaze Nail Lacquer in “Fairy Dust”)
- Top coat (e.g., Seche Vite Dry Fast Top Coat)
- Nail buffer (e.g., Onyx Professional Nail Buffer)
DIY Instructions:
- Apply a base coat to protect your natural nails.
- Paint your nails with two coats of nude polish.
- Apply gold glitter polish to the accent nail.
- Seal the design with a top coat for a glossy finish and added durability.
- Buff your nails to ensure a smooth and even surface.
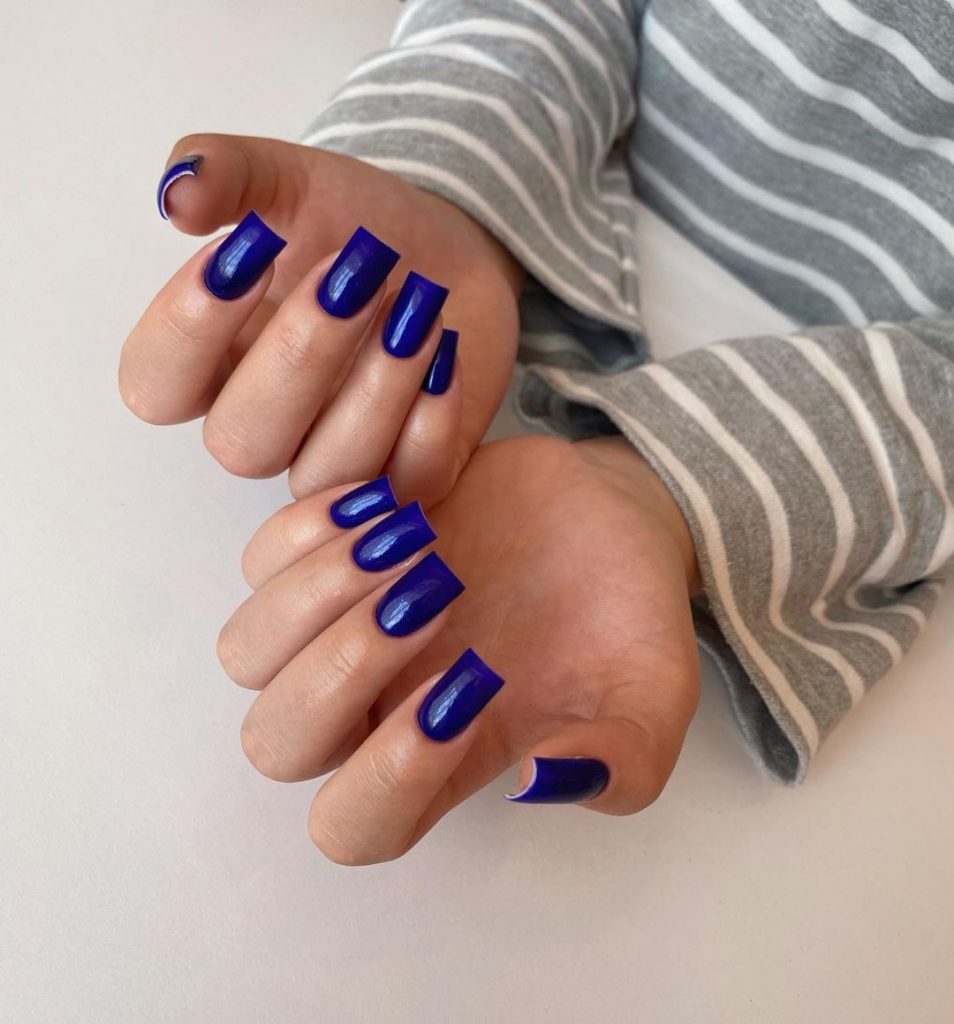
Bold Blue
This design features a bold blue polish on coffin-shaped nails. The vibrant blue color is perfect for making a statement and adds a pop of color to any fall outfit. The glossy finish enhances the brightness of the color, making it stand out even more.
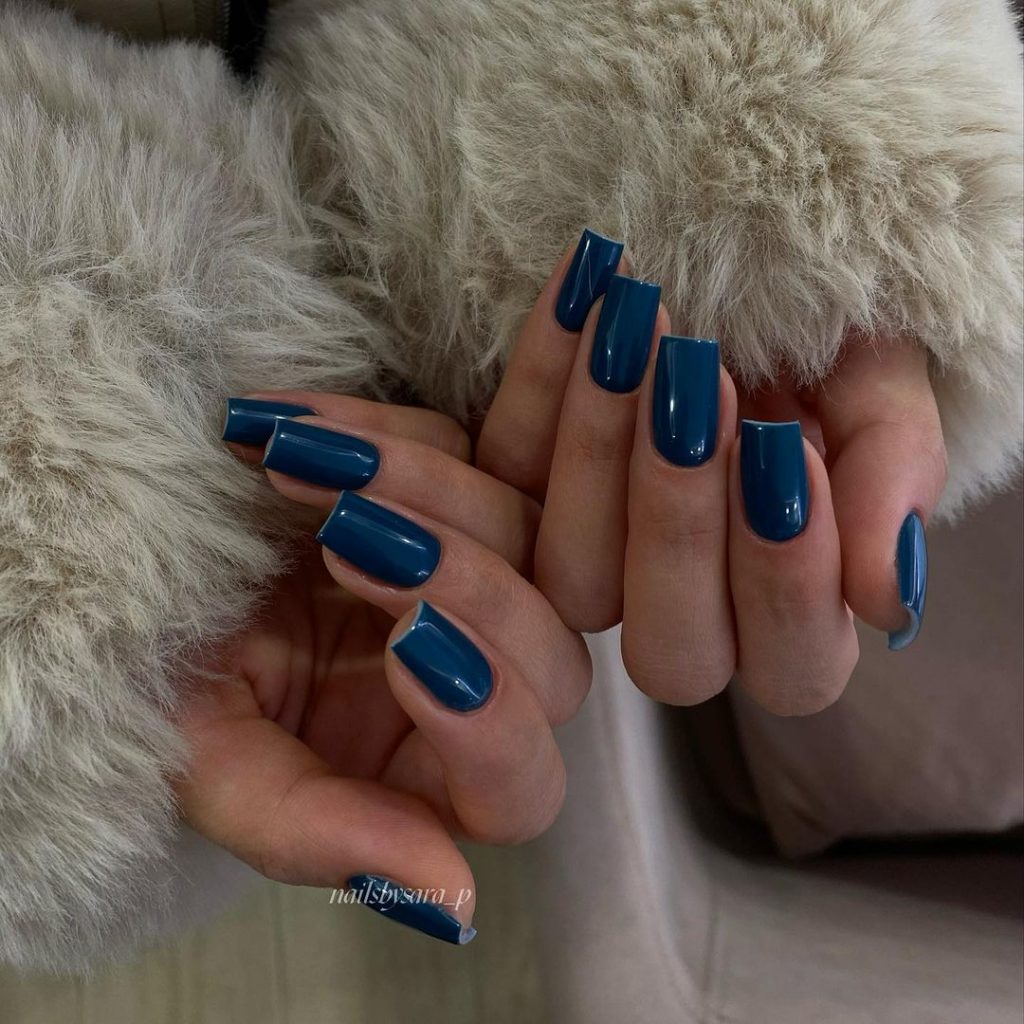
Blue nails are a bold choice that is both modern and stylish. The coffin shape adds a touch of drama, making your nails look both sophisticated and trendy.
Consumables:
- Blue polish (e.g., OPI Nail Lacquer in “My Car Has Navy-gation”)
- Top coat (e.g., Sally Hansen Miracle Gel Top Coat)
- Nail file (e.g., Revlon Nail File)
DIY Instructions:
- Apply a base coat to protect your natural nails.
- Paint your nails with two coats of blue polish.
- Apply a top coat for a glossy finish and added durability.
- File your nails to the desired coffin shape for a polished look.
Abstract Elegance
This design features a chic combination of matte nude and black abstract patterns. The long, square nails add a touch of elegance, making this design perfect for special occasions or a night out. The mix of matte and glossy finishes creates a sophisticated and eye-catching look.
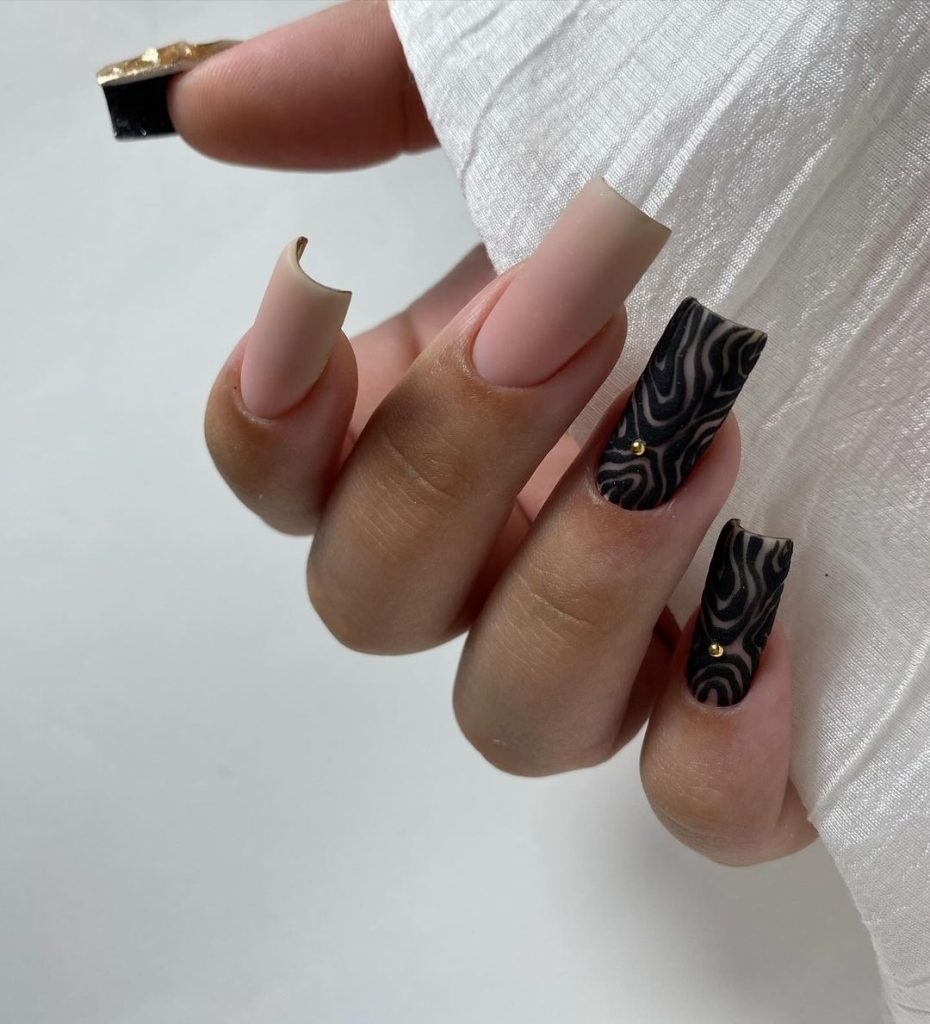
The abstract patterns add a modern and artistic element to the nails, making them look like tiny pieces of art. This design is perfect for those who love to stand out and make a statement with their nails.
Consumables:
- Matte nude polish (e.g., OPI Matte Nail Polish in “Tiramisu for Two”)
- Black polish (e.g., Essie Nail Polish in “Licorice”)
- Nail art brush (e.g., Beetles Gel Polish Nail Art Brush Set)
- Top coat (e.g., Seche Vite Dry Fast Top Coat)
DIY Instructions:
- Apply a base coat to protect your natural nails.
- Paint your nails with matte nude polish.
- Use a nail art brush to create black abstract patterns on accent nails.
- Seal the design with a top coat to ensure longevity.
Floral Fantasy
This design features a beautiful combination of soft green, nude, and floral accents. The floral design on one nail adds a whimsical touch to the manicure, making it perfect for those who love nature-inspired nail art. The glossy finish enhances the brightness of the colors, making them stand out.
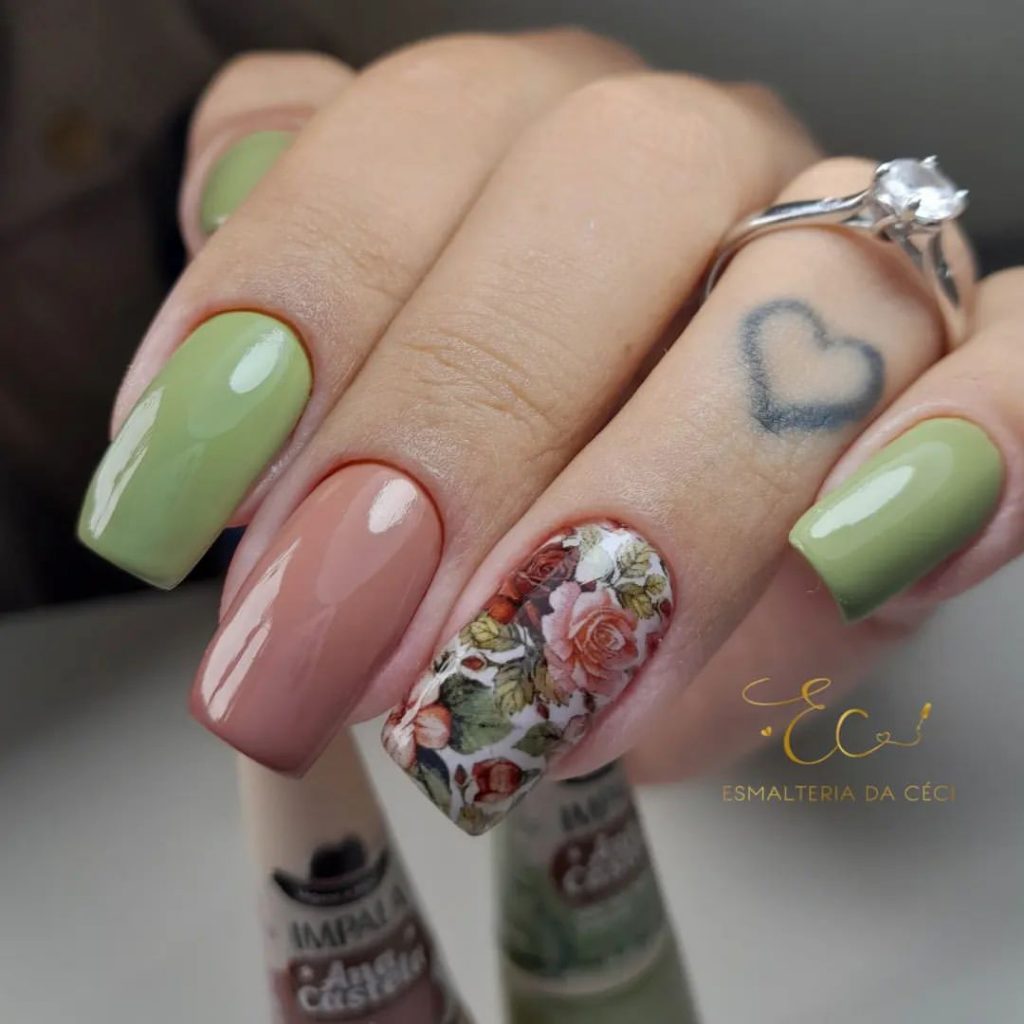
The combination of green and nude is both soothing and stylish, perfect for the fall season. The floral accent adds a unique and personalized touch to the manicure.
Consumables:
- Green polish (e.g., Essie Nail Polish in “Mint Candy Apple”)
- Nude polish (e.g., OPI Nail Lacquer in “Dulce de Leche”)
- Floral nail stickers (e.g., Born Pretty Floral Nail Stickers)
- Top coat (e.g., Seche Vite Dry Fast Top Coat)
DIY Instructions:
- Apply a base coat to protect your natural nails.
- Paint your nails with alternating green and nude polishes.
- Apply floral nail stickers to the accent nail.
- Seal the design with a top coat to ensure longevity.
Geometric Chic
This design showcases a chic combination of dark green and gold geometric patterns. The short, oval-shaped nails add a touch of elegance, making this design perfect for any occasion. The mix of glossy and metallic finishes creates a sophisticated and eye-catching look.
The geometric patterns add a modern and stylish element to the nails, making them look both trendy and refined. This design is perfect for those who love bold and unique nail art.
Consumables:
- Dark green polish (e.g., OPI Nail Lacquer in “Stay Off the Lawn”)
- Gold polish (e.g., Essie Nail Polish in “Good as Gold”)
- Nail art tape (e.g., Striping Tape)
- Top coat (e.g., Seche Vite Dry Fast Top Coat)
DIY Instructions:
- Apply a base coat to protect your natural nails.
- Paint your nails with dark green polish.
- Use nail art tape to create geometric patterns and fill in with gold polish.
- Seal the design with a top coat to ensure longevity.
Peach Perfection
This design features a soft peach color with delicate black leaf accents. The almond shape adds a touch of elegance, making the nails appear elongated and refined. The combination of matte and glossy finishes creates a chic and sophisticated look.
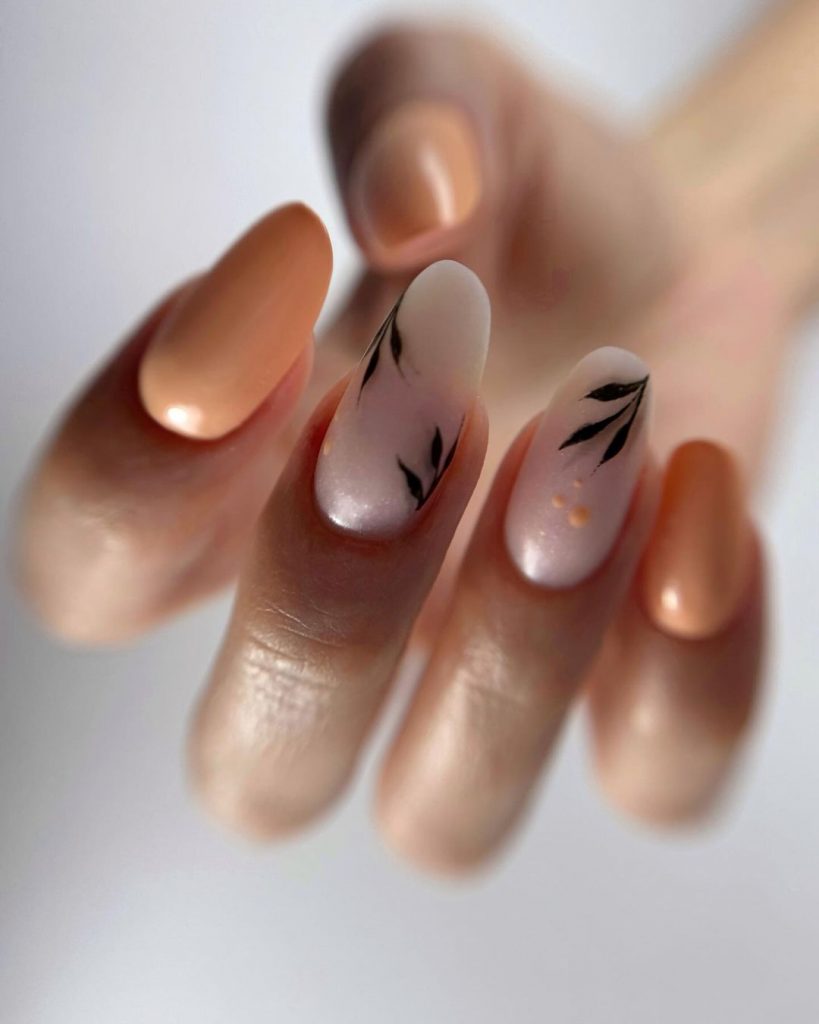
The soft peach color is perfect for fall, adding a touch of warmth to your manicure. The black leaf accents add a unique and artistic element, making the nails look like tiny pieces of art.
Consumables:
- Peach polish (e.g., Essie Nail Polish in “Peach Side Babe”)
- Black polish for accents (e.g., Sally Hansen Xtreme Wear in “Black Out”)
- Nail art brush (e.g., Beetles Gel Polish Nail Art Brush Set)
- Top coat (e.g., Seche Vite Dry Fast Top Coat)
DIY Instructions:
- Apply a base coat to protect your natural nails.
- Paint your nails with two coats of peach polish.
- Use a nail art brush to paint delicate black leaf accents on the nails.
- Seal the design with a top coat to ensure longevity.
Floral and Orange
This design features a vibrant orange polish with a floral accent nail. The combination of bright orange and delicate floral designs creates a fun and playful look, perfect for fall. The glossy finish enhances the brightness of the colors, making them pop.
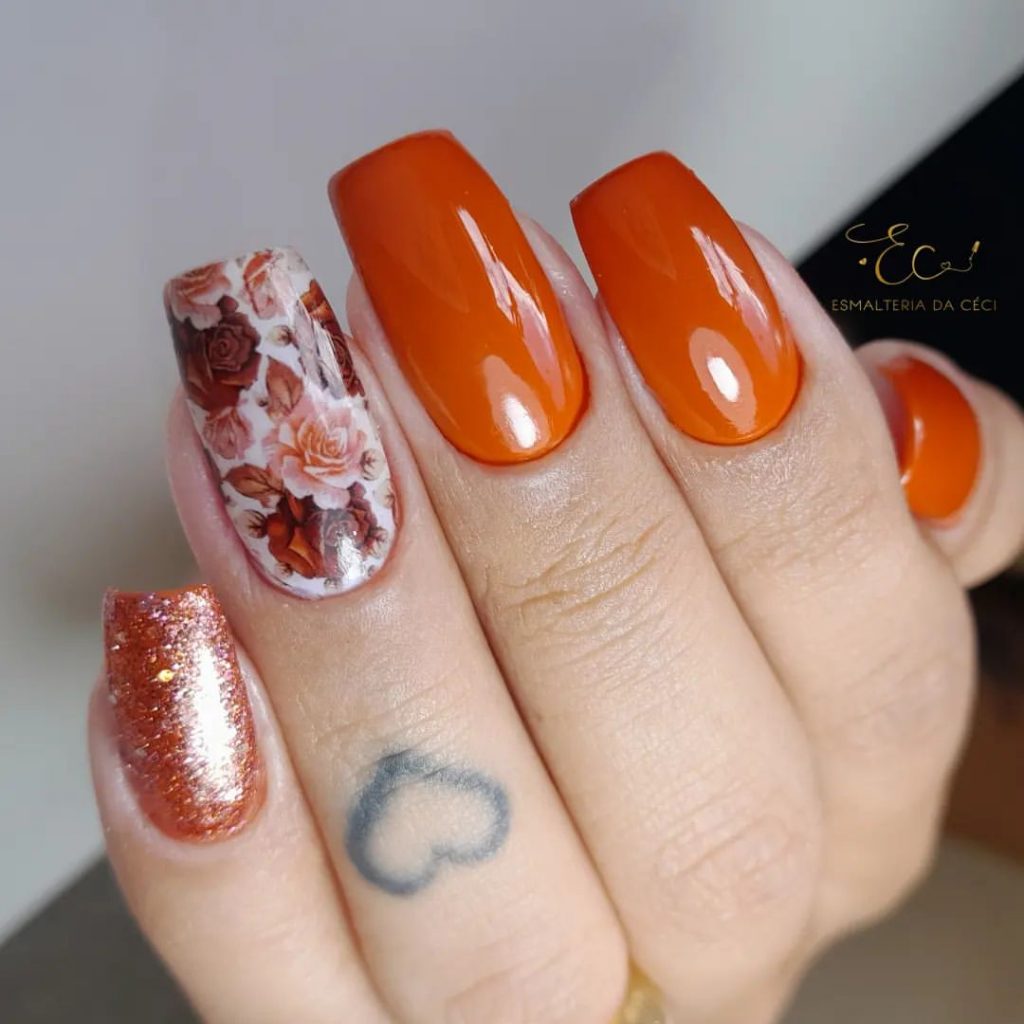
The mix of orange and floral patterns is both bold and stylish, perfect for those who love to experiment with their nail art. This design is ideal for adding a touch of fun to your fall manicure.
Consumables:
- Orange polish (e.g., OPI Nail Lacquer in “A Good Man-darin is Hard to Find”)
- Floral nail stickers (e.g., Born Pretty Floral Nail Stickers)
- Glitter polish (e.g., China Glaze Nail Lacquer in “Fairy Dust”)
- Top coat (e.g., Seche Vite Dry Fast Top Coat)
DIY Instructions:
- Apply a base coat to protect your natural nails.
- Paint your nails with orange polish, leaving one nail for the floral accent.
- Apply floral nail stickers to the accent nail and add glitter polish to another nail for added sparkle.
- Seal the design with a top coat to ensure longevity.
Save Pin