
When it comes to basic fall nails 2024, simplicity doesn’t mean sacrificing style. In fact, the most understated designs often have the biggest impact, combining classic shapes with modern twists. Whether you’re into Acrylic, Short, or Square nails, this guide will walk you through some of the must-have nail designs for the upcoming fall season. Let’s dive into the colors, shapes, and ideas that will keep your nails looking fresh and on-trend.
Subtle Elegance with a Touch of Sparkle
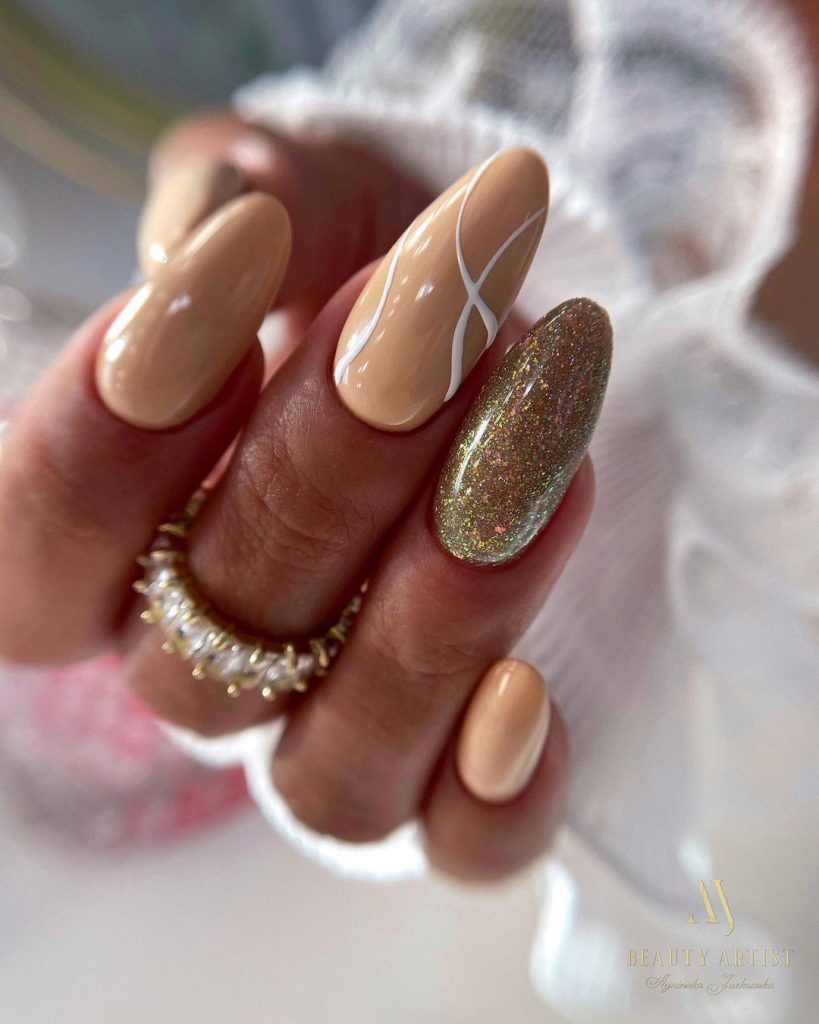
The first nail design features a beautifully understated almond shape in a soft beige tone, accented with a shimmering gold nail that adds just the right amount of sparkle. The sleek lines of the white design give these Acrylic nails a refined and sophisticated look, perfect for both day-to-day wear and special occasions. This Simple design is both timeless and trendy, making it an excellent choice for anyone looking to keep things classy yet current.
Consumables:
- Beige polish: OPI in “Dulce de Leche”
- Gold glitter polish: Essie in “Summit of Style”
- White nail art striping tape or CND Vinylux in “Cream Puff” for the lines
- Almond-shaped Acrylic tips
DIY Tips:
- Start by shaping your nails into an almond shape using a fine-grit nail file.
- Apply a base coat to protect your nails.
- Paint all nails with two coats of the beige polish, allowing each coat to dry thoroughly.
- Use the striping tape to create the clean white lines, then apply the gold glitter polish to the accent nail.
- Seal everything with a high-shine top coat to ensure longevity and brilliance.
Bold and Bright Fall Inspiration
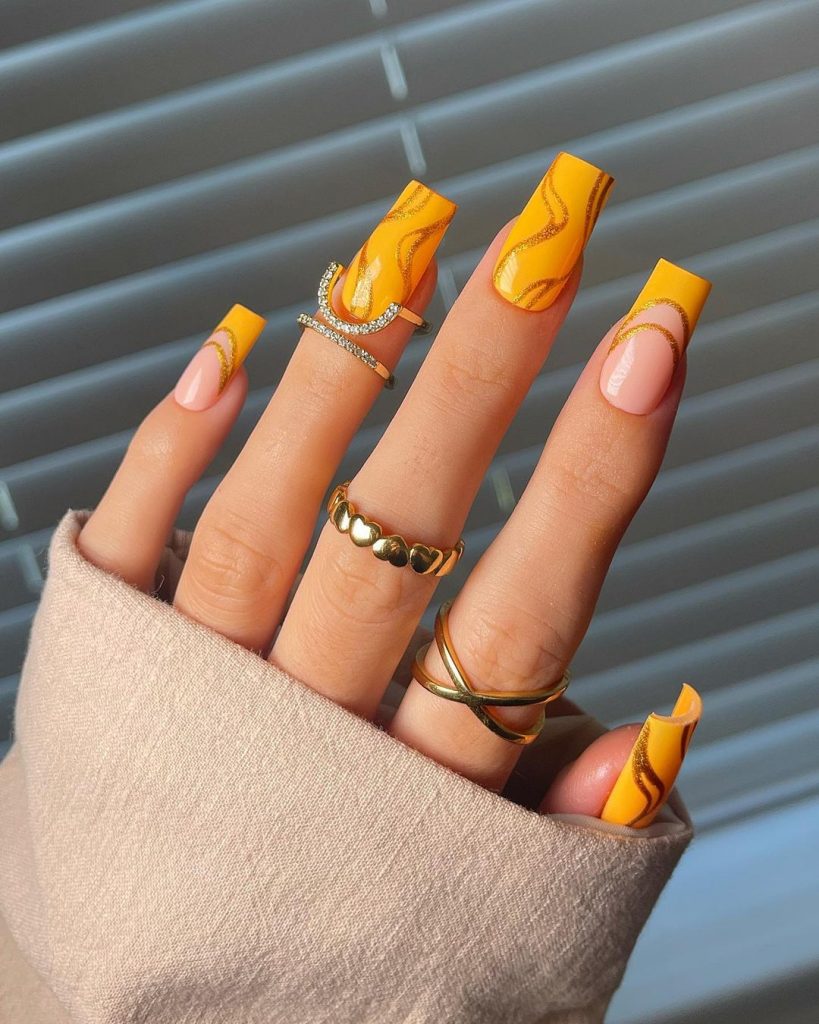
For those who aren’t afraid to make a statement, this bright orange set is everything you need. The square shape adds a modern edge, while the swirling design keeps it playful and fun. Perfect for anyone who loves Inspo ballerina looks but with a bit more flair, this design screams confidence. Orange is a bold Color choice for fall, and pairing it with gold accents elevates the look to a whole new level of chic. This Simple yet Cute design is ideal for anyone who wants their nails to stand out this season.
Consumables:
- Orange polish: China Glaze in “Sunset Sail”
- Gold glitter polish: OPI in “GoldenEye”
- Square Acrylic tips
- Nail art brush for swirling design
DIY Tips:
- Shape your nails into a sharp square using a straight-edge nail file.
- Apply a base coat to protect your nails from staining.
- Use two coats of the orange polish on all nails, allowing each layer to dry completely.
- Create the swirl design with a nail art brush dipped in the gold glitter polish, being as creative as you like.
- Finish with a top coat to lock in the design and add shine.
Earthy Tones with a Twist
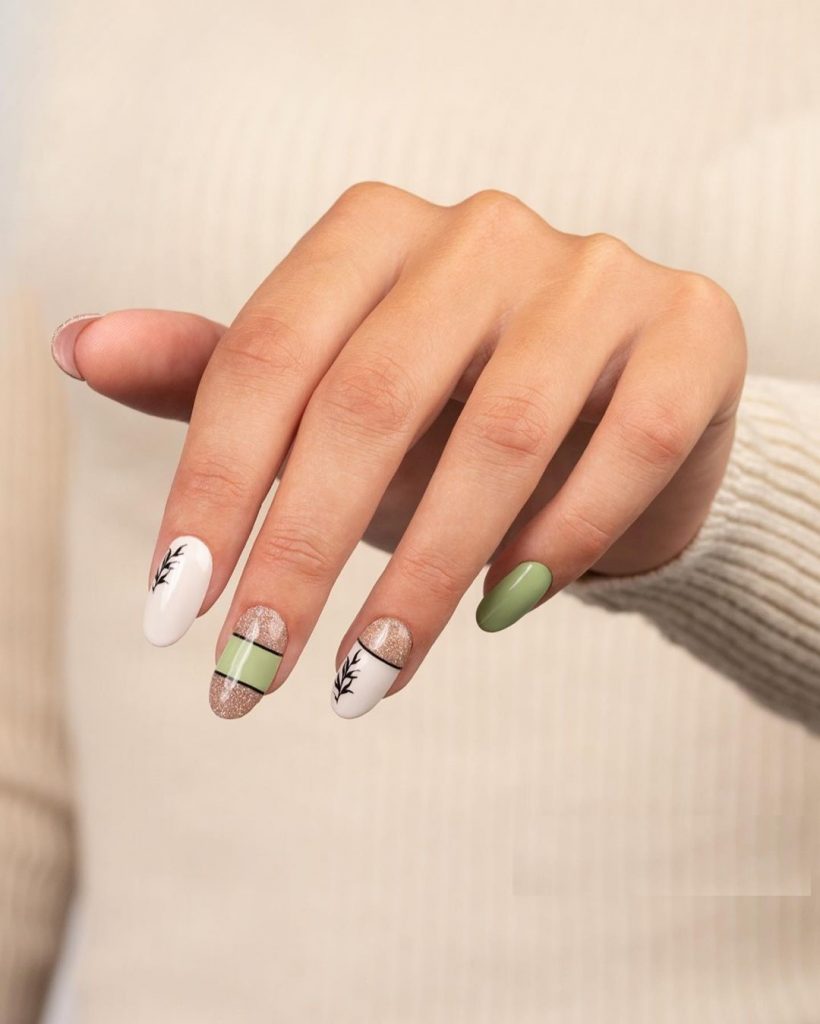
This nail design combines soft, earthy tones with a touch of artistic flair. The mix of matte green, white, and nude shades paired with minimalistic black leaf designs makes for a perfect Inspiration for those who prefer Simple yet elegant nails. The almond shape elongates the fingers, and the understated Art adds just the right amount of detail to keep things interesting. This is an excellent choice for anyone looking for Ideas that are both subtle and stylish.
Consumables:
- Matte green polish: Essie in “Can Dew Attitude”
- White polish: Zoya in “Purity”
- Nude polish: OPI in “Samoan Sand”
- Black nail art pen for leaf design
- Almond-shaped Acrylic tips
DIY Tips:
- File your nails into a rounded almond shape.
- Apply a base coat to protect your natural nails.
- Paint your nails with the green, white, and nude polishes, alternating the colors as shown.
- Use the black nail art pen to draw simple leaf designs on the nude and white nails.
- Seal the design with a matte top coat for a sophisticated finish.
Dark and Daring
If you’re a fan of darker, more mysterious nail looks, this deep plum manicure with artistic accents is a must-try. The combination of glossy plum with a touch of metallic gold and black dots creates a captivating contrast that’s perfect for fall. This design is ideal for short nails and is both Pretty and Elegant. The simple Art on the accent nail adds a playful touch without overpowering the overall look, making it a great choice for anyone looking to embrace the darker side of the season.

Consumables:
- Plum polish: OPI in “Lincoln Park After Dark”
- Gold glitter polish: Sally Hansen in “Golden-I”
- Black dotting tool
- Clear top coat for a glossy finish
DIY Tips:
- Begin by filing your nails into a neat, short square shape.
- Apply a base coat to keep your nails healthy and prevent chipping.
- Paint your nails with two coats of the plum polish, allowing each coat to dry.
- Use the gold glitter polish on one or two accent nails.
- Add black dots to the accent nails using a dotting tool, then apply a clear top coat to seal the design.
Classic Chocolate with a Modern Twist
Nothing says fall like rich chocolate brown nails, and this design adds a modern twist with its mix of matte and glossy finishes. The square shape keeps the look contemporary, while the swirling nude accents on the feature nails add a touch of elegance. This design is perfect for those who love Acrylic Square nails but want to keep things Simple and stylish. The deep brown shade is versatile, making it a staple for any fall nail collection.

Consumables:
- Chocolate brown polish: Essie in “Wicked”
- Nude polish: OPI in “Be There in a Prosecco”
- Matte top coat
- Glossy top coat for accent nails
DIY Tips:
- Shape your nails into a crisp square using a high-quality nail file.
- Apply a base coat to ensure your nails stay strong and healthy.
- Use the chocolate brown polish on all nails, applying two coats for full coverage.
- Add nude swirl accents on two nails, then apply a matte top coat to the remaining nails.
- Finish the accent nails with a glossy top coat to create contrast.
Cool Tones with a Botanical Touch
This design brings a fresh, cool vibe to fall with its combination of soft blue and nude tones accented by delicate black leaf designs. The almond shape adds to the elegance, making these nails a versatile option for both casual and formal occasions. The contrast between the solid blue nails and the leafy art on the nude background creates a harmonious yet striking look that embodies the transition from summer to fall. This design is perfect for those looking for Ideas that are Simple yet sophisticated.

Consumables:
- Soft blue polish: Essie in “Saltwater Happy”
- Nude polish: OPI in “Samoan Sand”
- Black nail art pen for leaf design
- Almond-shaped Acrylic tips
DIY Tips:
- Start by shaping your nails into an almond shape.
- Apply a base coat to ensure longevity.
- Paint the blue nails with two coats of the soft blue polish, and use the nude polish for the remaining nails.
- Create the leaf designs using the black nail art pen, taking care to keep the lines delicate and detailed.
- Seal the design with a glossy top coat to protect the art and add shine.
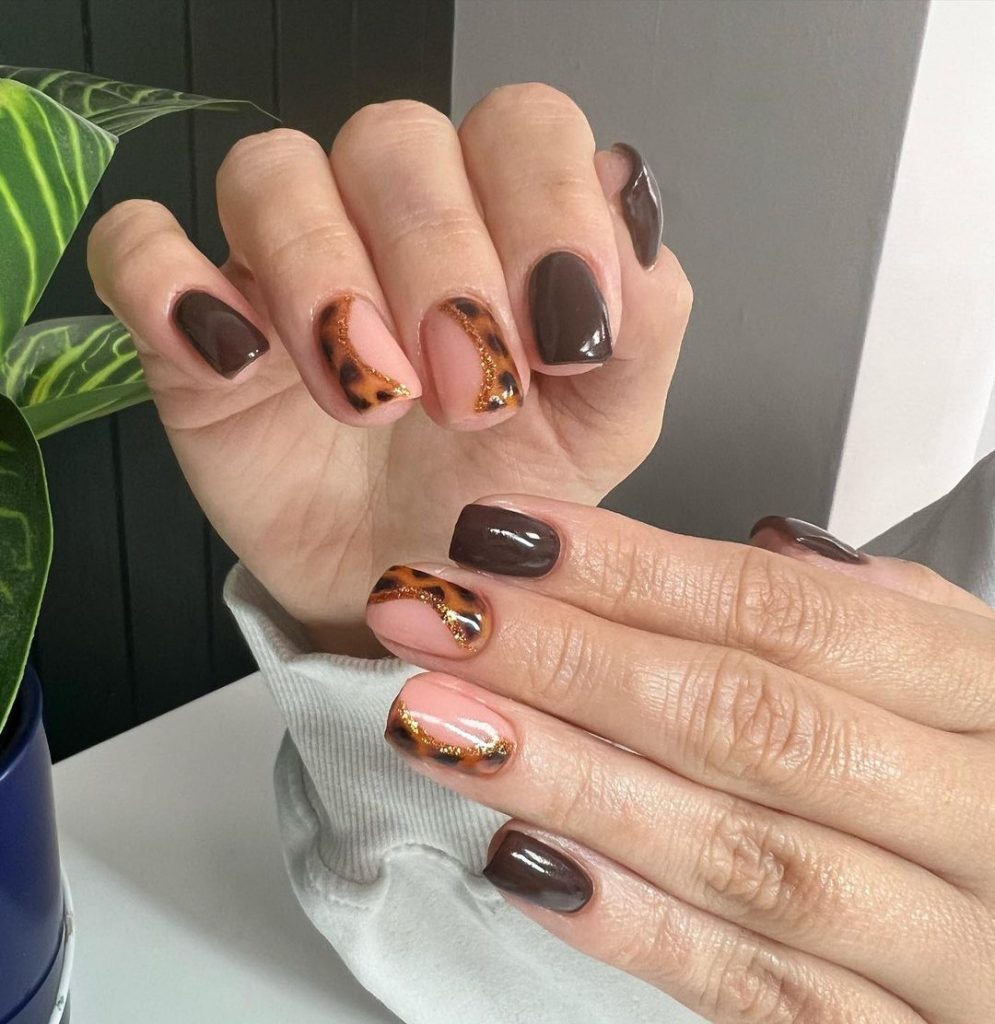
Rich Chocolate with Tortoiseshell Accents
This design is the epitome of fall elegance with its deep chocolate brown base and luxurious tortoiseshell accents. The combination of the warm, earthy tones with the intricate pattern on the accent nails creates a sophisticated and polished look. The short square shape keeps it practical and easy to maintain, while the tortoiseshell detail adds a fashionable twist. Perfect for those who want Ideas that are both Simple and on-trend for the fall season.
Consumables:
- Chocolate brown polish: Essie in “Wicked”
- Nude polish: Zoya in “Rue”
- Black and gold polish for tortoiseshell effect: Sally Hansen in “Blacky-O” and OPI in “GoldenEye”
- Square Acrylic tips
DIY Tips:
- File your nails into a short square shape.
- Apply a base coat to protect your nails and prevent chipping.
- Paint all nails with the chocolate brown polish, leaving a few accent nails bare.
- For the tortoiseshell effect, layer the black and gold polishes in irregular patterns on the nude accent nails.
- Finish with a glossy top coat to enhance the depth of the tortoiseshell design and add shine.
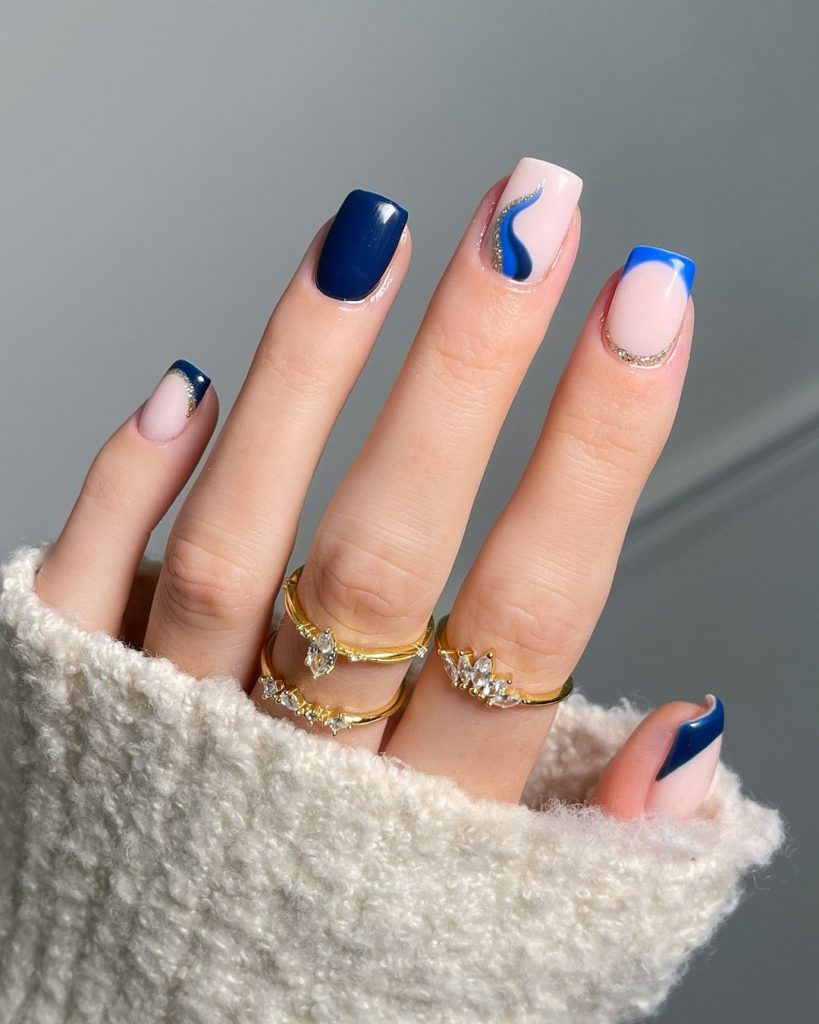
Navy and Nude with a Twist
Navy blue and nude make a perfect pairing for a chic fall manicure. This design features a mix of classic French Tips and modern swirls, accented with subtle glitter for an added touch of glam. The square shape gives it a contemporary feel, while the contrasting colors ensure that these nails stand out. This Pretty design is great for anyone looking to combine traditional elements with a fresh, modern twist.
Consumables:
- Navy blue polish: Essie in “After School Boy Blazer”
- Nude polish: OPI in “Be There in a Prosecco”
- Fine glitter polish for accents: CND Vinylux in “Sparkling Water”
- Square Acrylic tips
DIY Tips:
- Shape your nails into a square using a straight-edge nail file.
- Apply a base coat to protect your nails.
- Create the French Tips using the navy blue polish, then add the swirl designs on a few nails using a nail art brush.
- Apply a thin layer of glitter polish along the swirls for added dimension.
- Seal the design with a top coat to ensure it lasts and retains its shine.
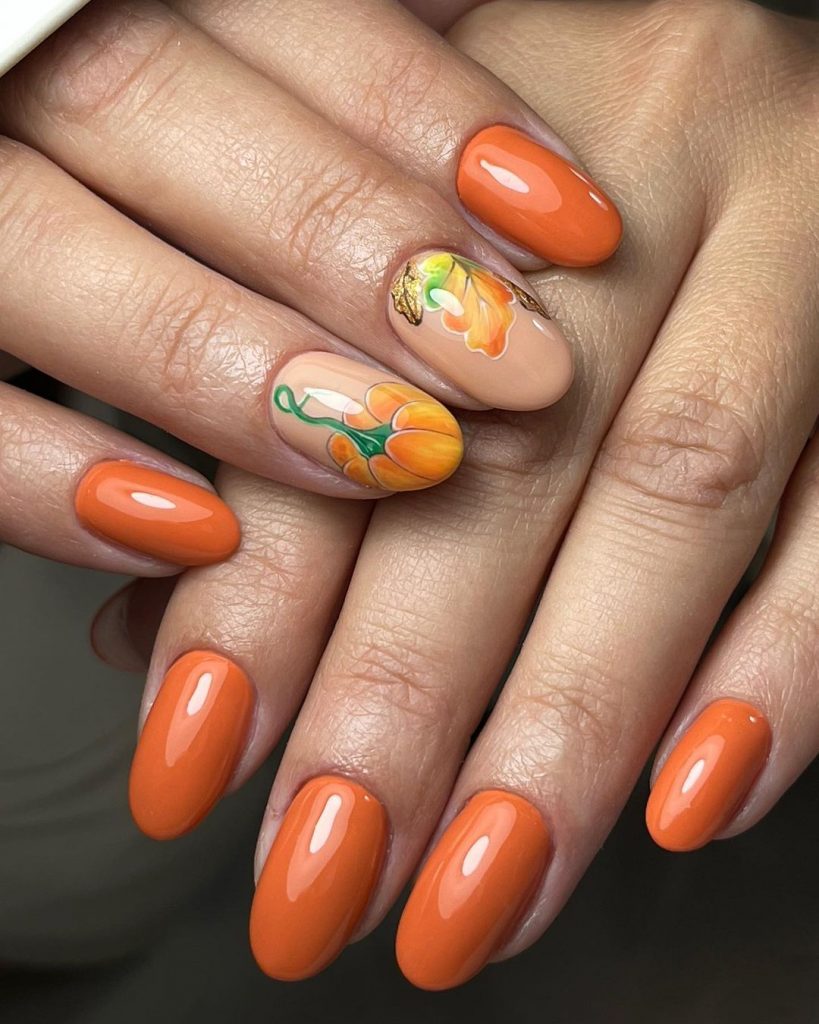
Harvest Pumpkin Nail Art
Nothing embodies fall like the warm, inviting hue of pumpkin orange. This design takes the autumn theme to the next level with a detailed pumpkin art accent. The almond shape gives these nails a sophisticated silhouette, while the glossy finish keeps them looking fresh and vibrant. This is a Cute and fun design that is perfect for embracing the festive spirit of the season.
Consumables:
- Pumpkin orange polish: Essie in “Playing Koi”
- Nude polish: OPI in “Samoan Sand”
- Green and brown polish for pumpkin art: OPI in “My Chihuahua Bites” and Essie in “Mink Muffs”
- Almond-shaped Acrylic tips
DIY Tips:
- Start by shaping your nails into an almond shape using a fine-grit nail file.
- Apply a base coat to protect your nails and prevent staining.
- Paint the majority of your nails with the pumpkin orange polish, leaving one or two accent nails nude.
- Use a fine nail art brush to create the pumpkin design, starting with the outline and filling it in with orange. Add green for the stem and brown for shading.
- Finish with a glossy top coat to protect the design and enhance the shine.
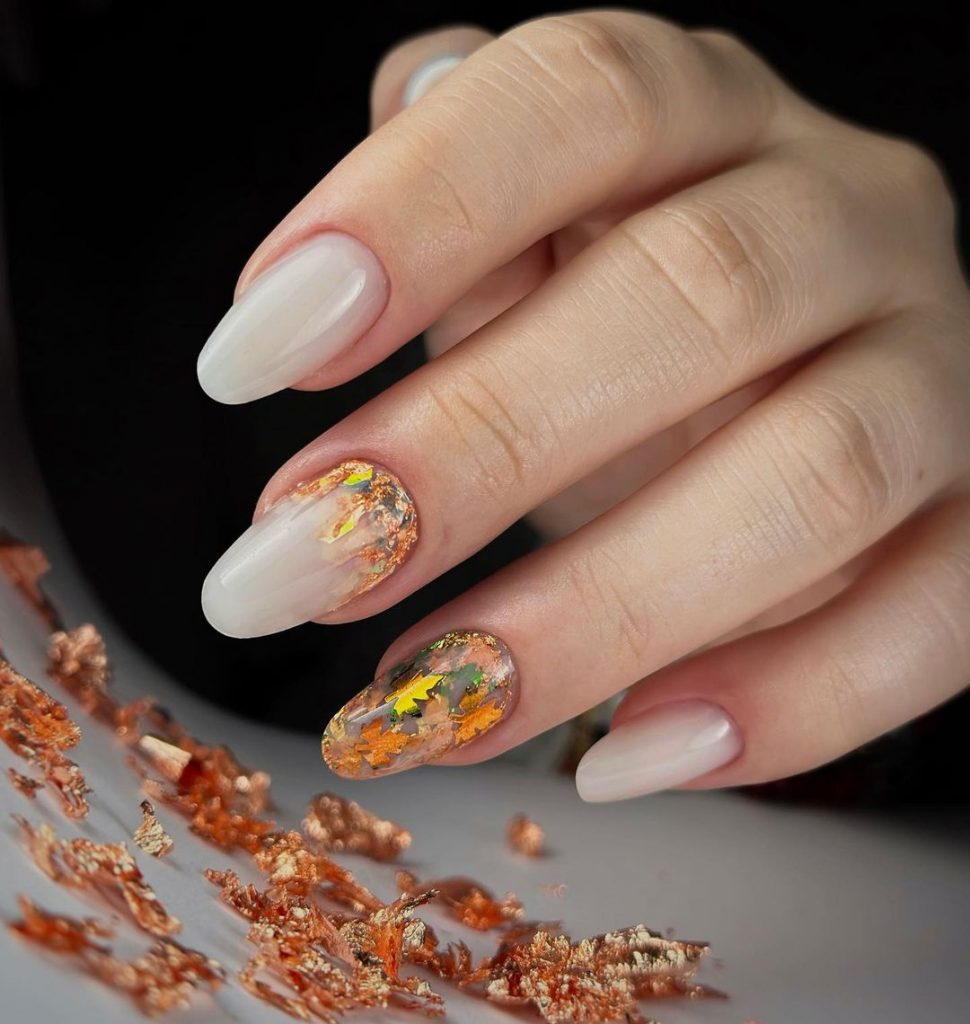
Elegant Autumn Leaves
This design captures the essence of fall with its delicate leaf art embedded in a clear, glossy base. The almond shape elongates the fingers, and the clear polish allows the metallic leaf details to shine through. This is a Simple yet elegant design that works well for any fall occasion, offering a touch of nature-inspired beauty without being overpowering. The subtlety of the design makes it versatile, perfect for those who prefer understated yet stylish nails.
Consumables:
- Clear polish: Essie in “Ballet Slippers”
- Metallic foil leaf accents: Born Pretty Metallic Leaf Nail Art Foil
- Almond-shaped Acrylic tips
DIY Tips:
- Begin by shaping your nails into an almond shape.
- Apply a base coat to create a smooth surface.
- Place the metallic leaf accents onto the nails while the base coat is still tacky, arranging them in a way that mimics falling leaves.
- Seal the design with a clear top coat to lock in the foil and ensure a long-lasting finish.
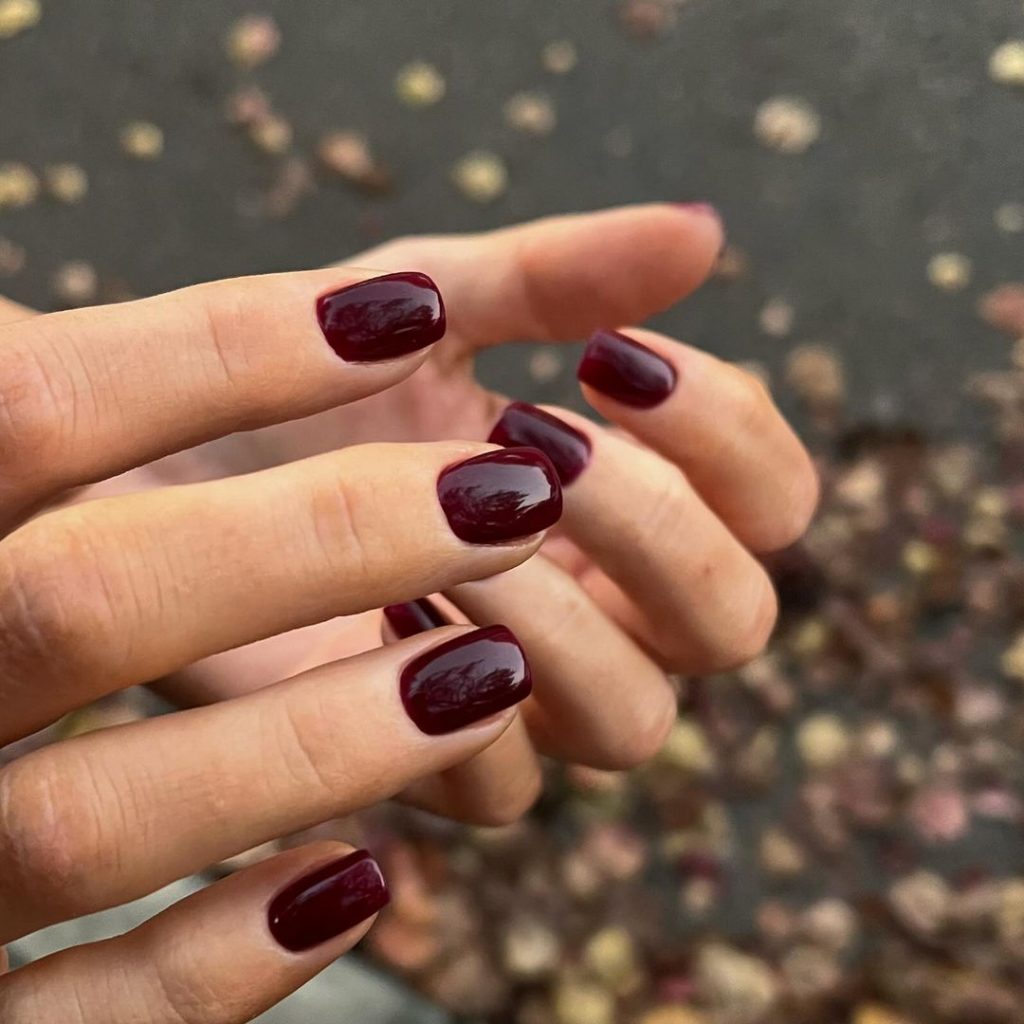
Deep Burgundy Perfection
This nail design features a deep burgundy shade that’s perfect for fall. The short square shape keeps it modern and practical, while the rich, glossy finish adds an element of luxury. This Simple yet striking look is ideal for those who prefer understated elegance in their fall nail designs. The color is versatile, complementing any fall outfit with ease, making it a must-have for the season.
Consumables:
- Burgundy polish: Essie in “Bordeaux”
- Square Acrylic tips
- Clear top coat for added shine
DIY Tips:
- Start by filing your nails into a short square shape.
- Apply a base coat to protect your natural nails.
- Use two coats of the burgundy polish, allowing each layer to dry completely before applying the next.
- Finish with a high-shine top coat to ensure your nails look glossy and chic for days.
Red Elegance with Floral Art
This design combines the timeless appeal of red nails with the delicate touch of floral nail art. The almond shape adds sophistication, while the floral design on the accent nail gives it a personalized, artistic feel. This is a Pretty and Cute option for those looking to add a bit of flair to their fall manicure. The red shade is bold and vibrant, making it perfect for both casual and formal occasions.
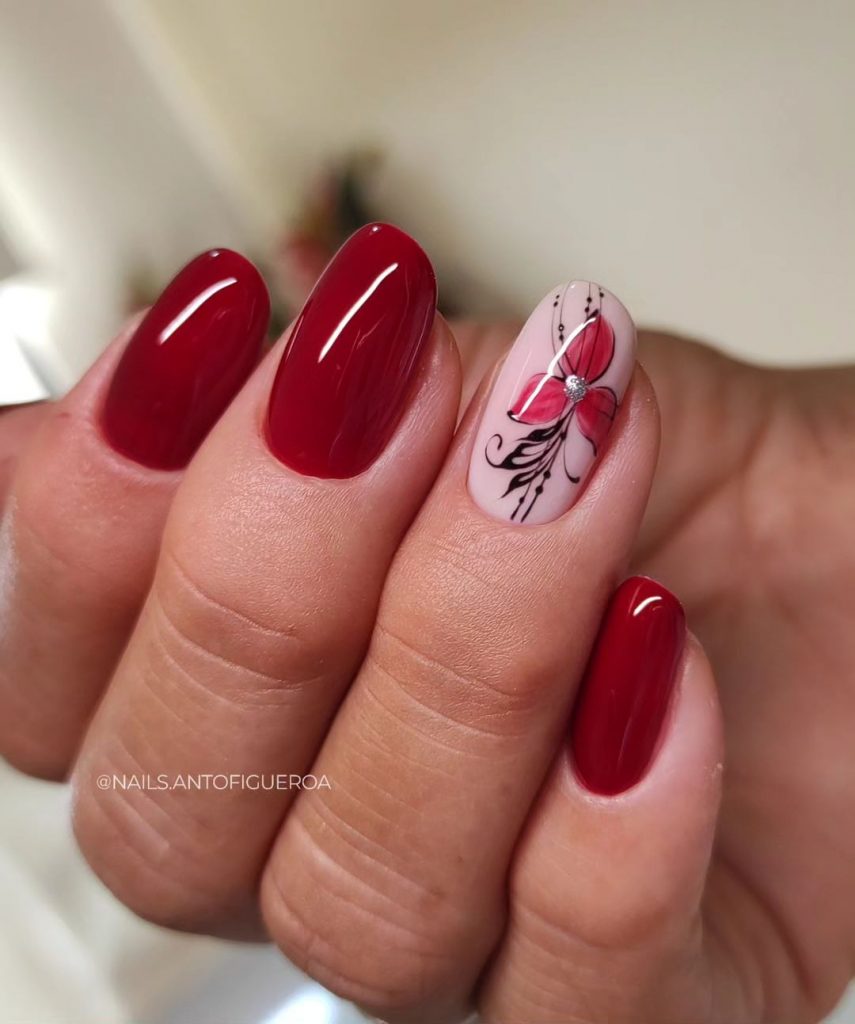
Consumables:
- Red polish: OPI in “Big Apple Red”
- Nude polish: OPI in “Samoan Sand” for the accent nail
- Black and pink polish for floral art: Essie in “Licorice” and Essie in “Mod Square”
- Rhinestone for the center of the flower
- Almond-shaped Acrylic tips
DIY Tips:
- File your nails into an almond shape for a sleek look.
- Apply a base coat to protect your nails.
- Paint most of your nails with the red polish, and use the nude polish on the accent nail.
- Use a fine nail art brush to create the floral design, starting with the black outline and filling in with pink. Add a rhinestone to the center for a touch of sparkle.
- Seal everything with a glossy top coat to lock in the design and add durability.
Soft Green with Subtle Zebra Stripes
This unique nail design combines a soft, muted green with subtle zebra stripes for an unexpected yet stylish look. The short square shape adds to the practicality of this design, while the green color brings a touch of nature to your nails. This is a Simple and Easy option for those who want something different without being too bold. The zebra stripes add just enough interest to keep the design fresh and modern.
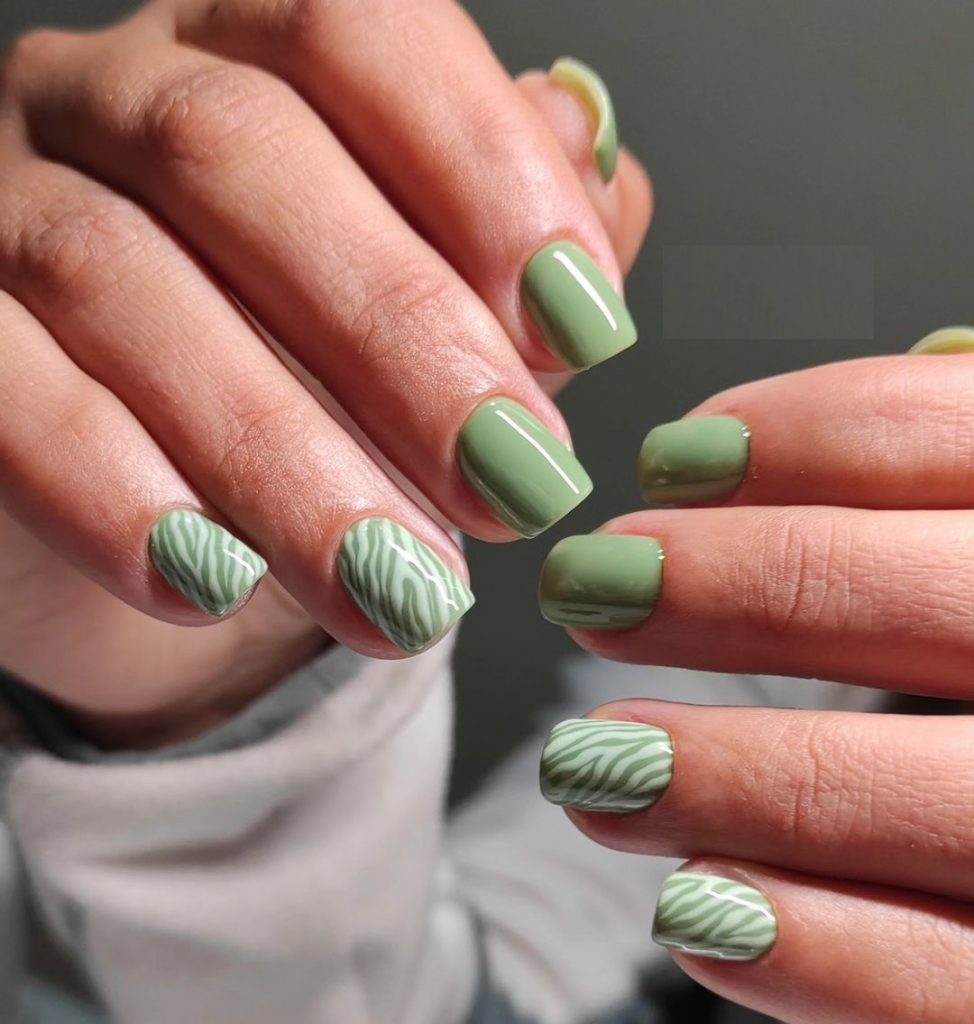
Consumables:
- Soft green polish: Essie in “Can Dew Attitude”
- White polish for zebra stripes: OPI in “Alpine Snow”
- Square Acrylic tips
- Nail art brush for the stripes
DIY Tips:
- Shape your nails into a square using a fine-grit nail file.
- Apply a base coat to protect your nails.
- Paint your nails with the soft green polish, applying two coats for full coverage.
- Use a nail art brush to create the zebra stripes on one or two accent nails.
- Finish with a clear top coat to ensure your design lasts and remains glossy.
Autumn Waves of Color
This design is all about embracing the warm hues of fall. With a combination of rich burgundy and vibrant orange, accented by silver glitter waves, this nail art is both bold and seasonal. The square shape keeps it contemporary, while the swirling design adds a dynamic element that’s perfect for autumn. This look is great for those who love Colors that reflect the changing leaves and the cozy feel of fall.
Consumables:
- Burgundy polish: Essie in “Bordeaux”
- Orange polish: OPI in “It’s a Piazza Cake”
- Silver glitter polish: Sally Hansen in “Disco Ball”
- Square Acrylic tips
DIY Tips:
- File your nails into a square shape.
- Apply a base coat to prevent staining and prolong your manicure.
- Paint your nails with alternating burgundy and orange polishes, applying two coats of each.
- Use a thin nail art brush to create the silver glitter waves on the accent nails.
- Seal with a top coat to ensure your design stays in place and shines bright.
Nude Elegance with Gold and Leaves
This design captures the essence of fall in a subtle and elegant way. The nude base is soft and sophisticated, while the gold leaf accents and delicate black leaf art add a touch of nature’s beauty. The square shape and muted tones make this design versatile and perfect for any occasion, whether you’re heading to a formal event or just enjoying a cozy day at home. This is a Simple yet Elegant design that embodies the serenity of the fall season.
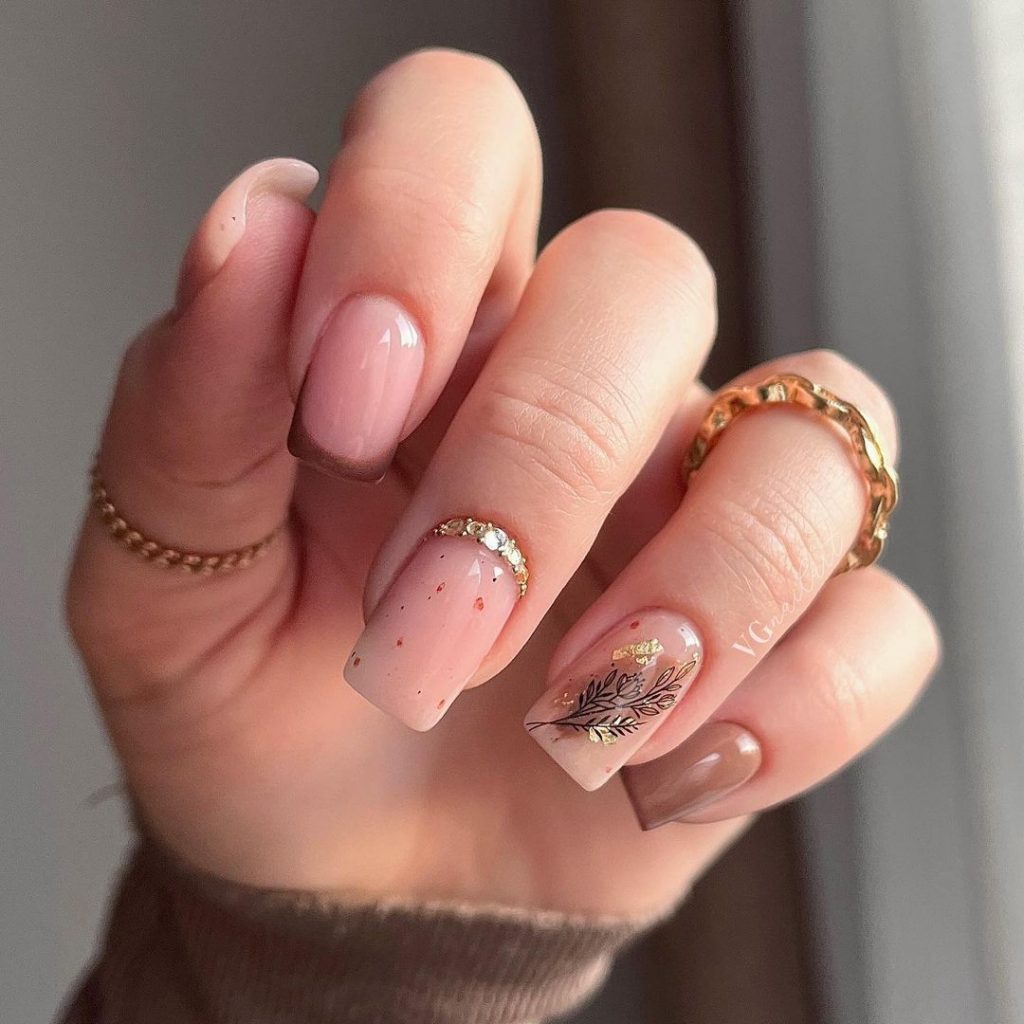
Consumables:
- Nude polish: OPI in “Be There in a Prosecco”
- Gold foil leaf accents: Born Pretty Metallic Leaf Nail Art Foil
- Black nail art pen for leaf design
- Square Acrylic tips
DIY Tips:
- Start by shaping your nails into a square.
- Apply a base coat to create a smooth surface for your polish.
- Paint your nails with the nude polish, allowing it to dry completely.
- Carefully place the gold foil leaf accents on one or two nails, and use the black nail art pen to draw delicate leaf designs.
- Seal the look with a top coat to protect the design and give it a beautiful shine.
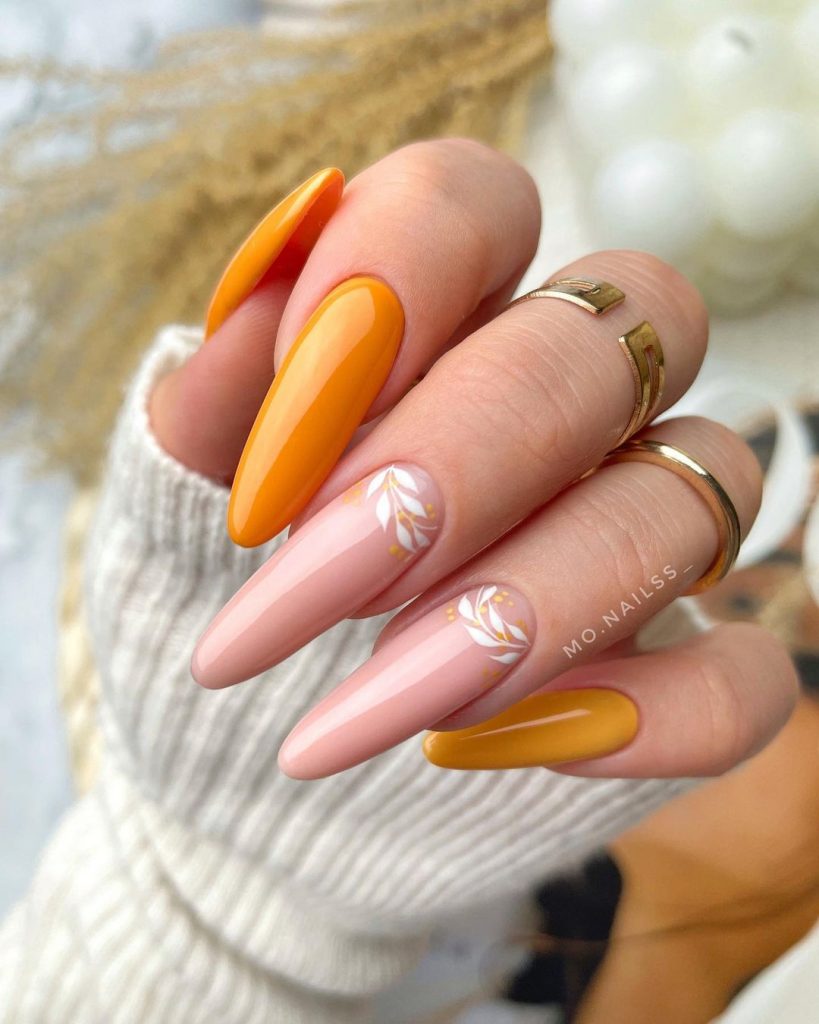
Autumn Knits and Leafy Details
This design embraces the essence of fall with warm, cozy tones and intricate details. The standout feature is the knitted sweater effect on two of the nails, paired with delicate leaf art that adds a touch of nature. The pointed almond shape enhances the elegance, while the vibrant orange color makes the design pop. This look is perfect for those who want to combine comfort with style, reflecting the textures and colors of the autumn season.

Consumables:
- Warm orange polish: Essie in “Playing Koi”
- Nude polish for accent nails: OPI in “Samoan Sand”
- Black polish for leaf art: Essie in “Licorice”
- 3D nail art gel for knitted design
- Almond-shaped Acrylic tips
DIY Tips:
- Start by shaping your nails into a pointed almond shape.
- Apply a base coat to protect your nails and enhance polish adhesion.
- Paint most of your nails with the orange polish, and use the nude polish on the accent nails.
- Use 3D nail art gel to create the knitted pattern on two nails, following the pattern of a cozy sweater.
- Add the leaf art with a fine brush, then seal the design with a glossy top coat for shine and durability.
Bold Contrast with Leopard Accents
This nail design is for those who love a bold and edgy look. The combination of sleek black nails with vibrant orange leopard print accents creates a striking contrast that is sure to turn heads. The long square shape adds drama and elegance, making this design perfect for those who want their nails to make a statement. The Art is simple yet effective, providing a chic and modern twist on the classic animal print.
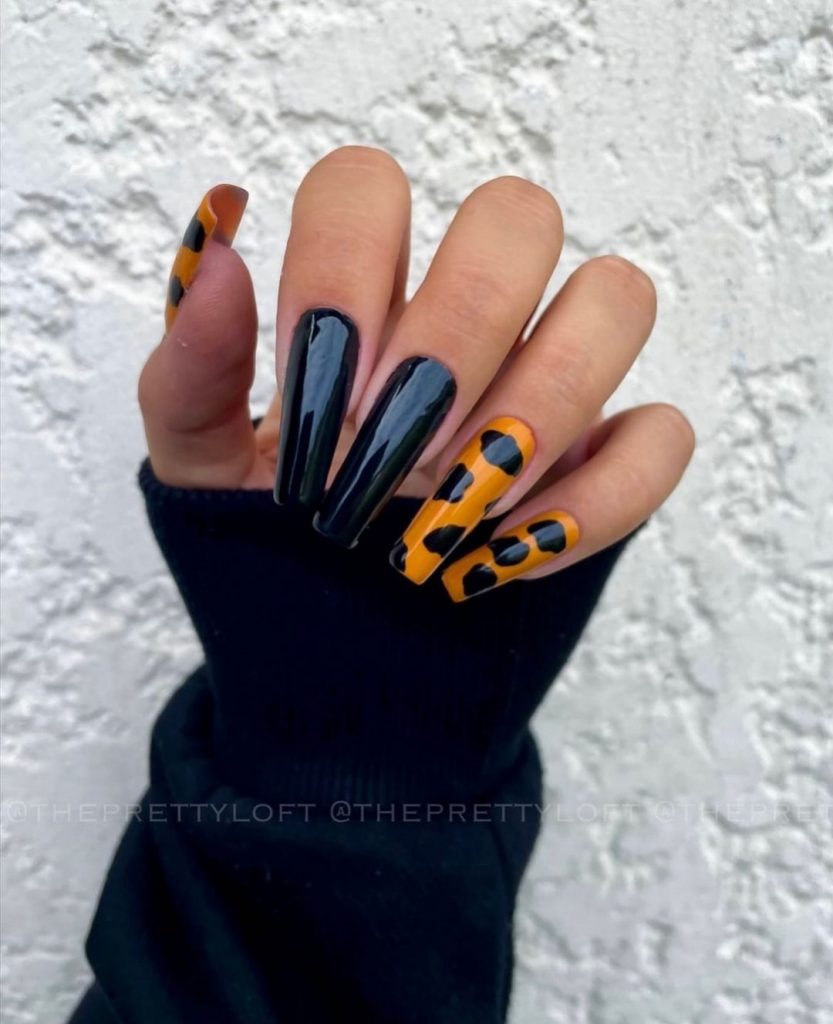
Consumables:
- Black polish: OPI in “Black Onyx”
- Orange polish for accent nails: China Glaze in “Orange Knockout”
- Black polish for leopard spots: Essie in “Licorice”
- Long square Acrylic tips
DIY Tips:
- Shape your nails into a long square shape for a bold look.
- Apply a base coat to ensure your nails are smooth and protected.
- Paint the majority of your nails with the black polish, applying two coats for full coverage.
- On the accent nails, use the orange polish as a base, then create the leopard spots with a fine brush dipped in black polish.
- Finish with a clear top coat to lock in the design and add a high-gloss finish.
Subtle Florals with a Pop of Yellow
This design combines the soft elegance of nude nails with a vibrant pop of yellow. The delicate floral accents on the nude nails add a feminine touch, while the bold yellow nails provide a cheerful contrast. The stiletto shape adds a touch of drama, making this design perfect for those who want a mix of softness and boldness in their fall manicure. It’s a Cute and Pretty look that’s perfect for any occasion.
Consumables:
- Bright yellow polish: OPI in “Sun, Sea, and Sand in My Pants”
- Nude polish: Essie in “Ballet Slippers”
- White and yellow polish for floral accents: Sally Hansen in “White On” and Essie in “Mellow Yellow”
- Stiletto-shaped Acrylic tips
DIY Tips:
- Shape your nails into a stiletto shape for an edgy yet elegant look.
- Apply a base coat to protect your nails.
- Paint the majority of your nails with the yellow polish, using the nude polish on the accent nails.
- Add the floral accents with a fine nail art brush, using white for the petals and yellow for the center.
- Seal the design with a top coat to ensure it lasts and remains glossy.
Cozy Browns with Autumn Leaves
This design features a rich brown base with a playful accent nail that showcases colorful autumn leaves. The round shape is both practical and stylish, making this design a great choice for everyday wear during the fall season. The warm brown tone is perfect for fall, while the detailed leaf art on the accent nail adds a touch of seasonal charm. This Simple yet Elegant design is ideal for those who love nature-inspired nail art.
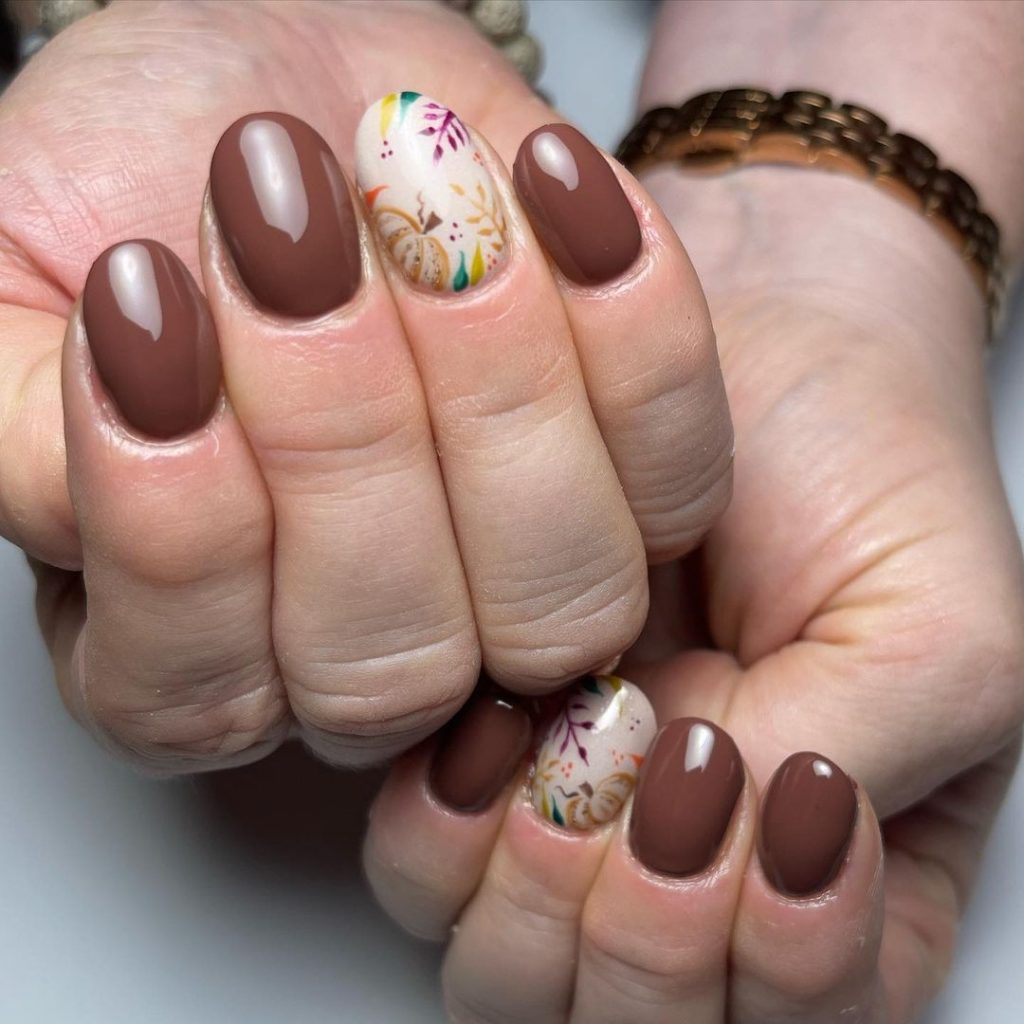
Consumables:
- Warm brown polish: Essie in “Don’t Sweater It”
- Nude polish for accent nail: OPI in “Samoan Sand”
- Multiple colors for leaf art: Essie in “Playing Koi”, Sally Hansen in “Golden-I”, OPI in “Lincoln Park After Dark”
- Round-shaped Acrylic tips
DIY Tips:
- File your nails into a round shape for a classic look.
- Apply a base coat to prevent staining and help your polish last longer.
- Paint most of your nails with the warm brown polish, leaving one or two accent nails nude.
- Use a fine nail art brush to paint small, detailed leaves in various fall colors on the accent nail.
- Finish with a top coat to protect your design and add shine.
Playful Blues with a Fun Twist
This design is a fun and playful take on fall nails, featuring a bold blue base with a cute character accent. The addition of a glittery gold nail adds a touch of glam, making this design both whimsical and stylish. The square shape keeps it modern and clean, while the blue and gold combination is perfect for adding a bit of brightness to the cooler fall days. This design is perfect for those who want something a bit more playful and Cute this season.
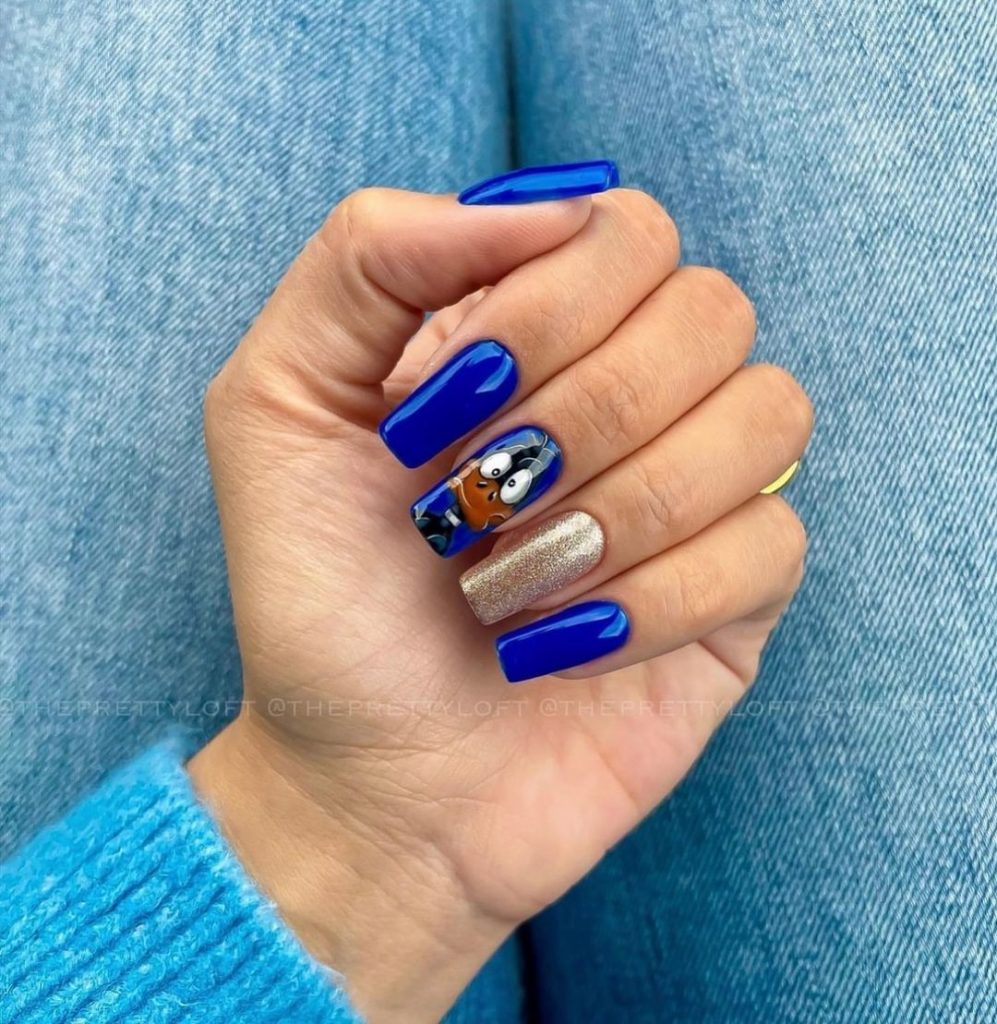
Consumables:
- Bold blue polish: Essie in “Butler Please”
- Gold glitter polish: China Glaze in “Golden Enchantment”
- Nude polish for accent nail: OPI in “Be There in a Prosecco”
- Nail art tools for creating the character design
- Square Acrylic tips
DIY Tips:
- Shape your nails into a square for a modern, clean look.
- Apply a base coat to help your polish adhere better and last longer.
- Paint most of your nails with the bold blue polish, using the glitter polish on one accent nail and the nude polish on another.
- Use nail art tools to create the cute character on the nude nail, adding eyes and other details with a fine brush.
- Finish with a top coat to ensure your design is protected and shines beautifully.
Autumn Leaves with Red and Nude
This nail design is a perfect balance between bold color and delicate artistry. The combination of vibrant red with soft nude creates a striking contrast, while the hand-painted leaf designs on the accent nails add a touch of nature-inspired beauty. The almond shape gives the design an elegant, feminine silhouette, making it a great choice for anyone looking to embrace the fall season with style.
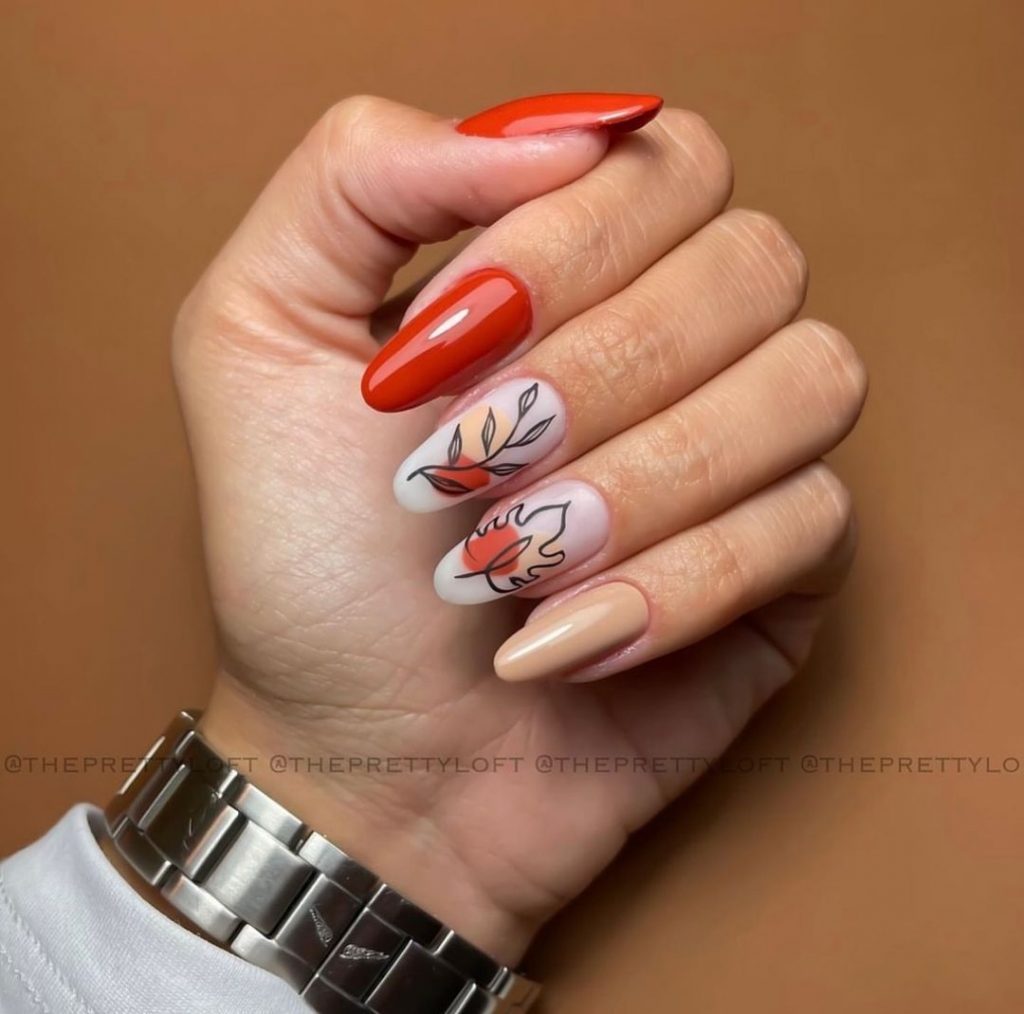
Consumables:
- Bright red polish: Essie in “Russian Roulette”
- Nude polish for accent nails: OPI in “Bubble Bath”
- Black polish for leaf art: Essie in “Licorice”
- Almond-shaped Acrylic tips
DIY Tips:
- Shape your nails into an almond shape for an elegant look.
- Apply a base coat to protect your natural nails.
- Paint most of your nails with the bright red polish, leaving a couple of accent nails for the nude base.
- Use a fine nail art brush to draw delicate leaf designs on the accent nails, allowing them to dry completely.
- Finish with a glossy top coat to seal the design and enhance the shine.
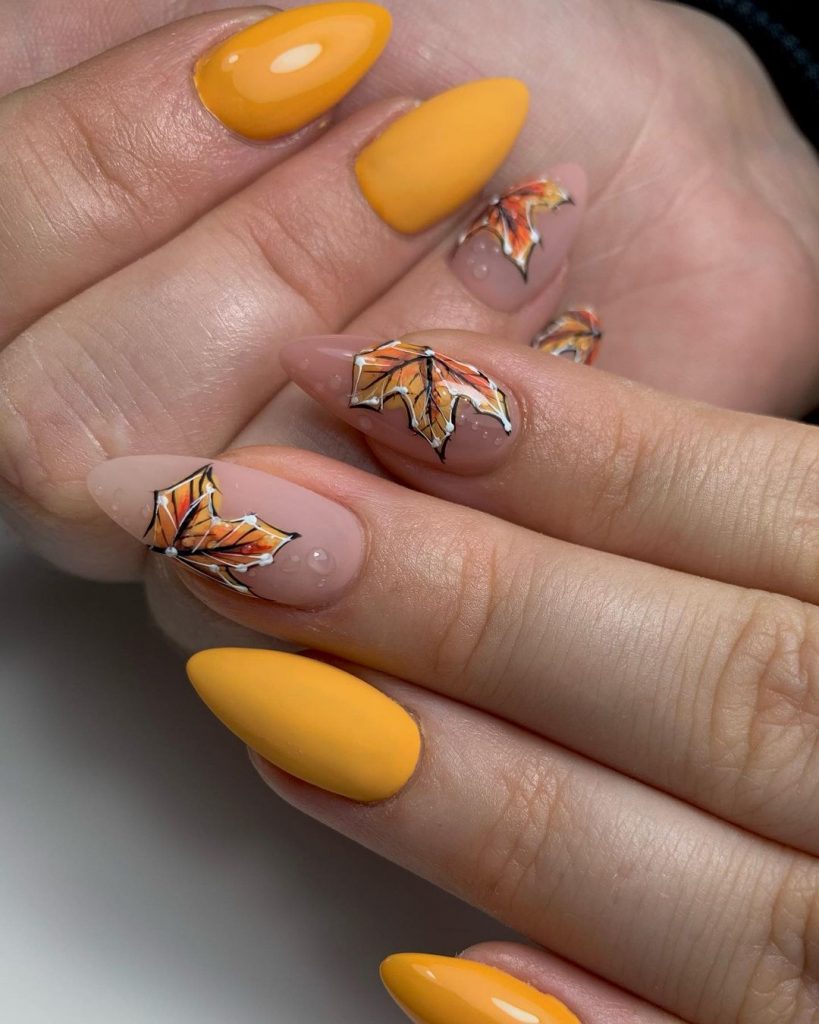
Mustard Yellow with Autumn Leaf Art
This design captures the warm, rich hues of autumn with its mustard yellow base and intricate leaf art. The pointed almond shape adds a touch of drama, while the delicate leaves painted on the nude nails bring the design to life. This look is perfect for those who want to make a statement with their nails while keeping the theme distinctly seasonal. It’s an ideal Cute design that embodies the essence of fall.
Consumables:
- Mustard yellow polish: China Glaze in “Mustard the Courage”
- Nude polish for accent nails: OPI in “Samoan Sand”
- Various colors for leaf art: Essie in “Playing Koi”, Sally Hansen in “Golden-I”, OPI in “Lincoln Park After Dark”
- Almond-shaped Acrylic tips
DIY Tips:
- Start by shaping your nails into a pointed almond shape.
- Apply a base coat to prepare your nails for polish.
- Paint most of your nails with the mustard yellow polish, using the nude polish on the accent nails.
- Create the leaf designs with a fine nail art brush, using a variety of fall colors to add depth and detail.
- Finish with a top coat to protect your artwork and give your nails a glossy finish.
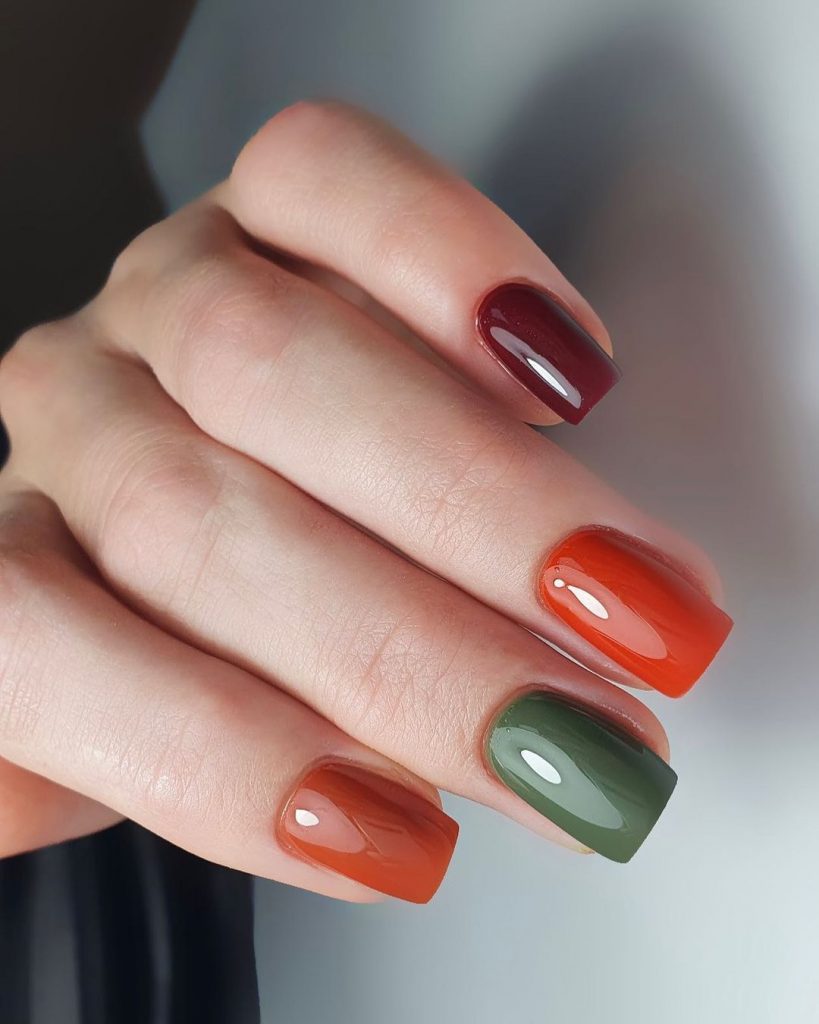
Multicolored Fall Vibes
This nail design features a rich palette of fall colors, with each nail painted in a different hue. The mix of burgundy, orange, and green captures the essence of the autumn season, while the short square shape keeps the design modern and easy to wear. This look is perfect for those who love Colors and want to showcase multiple fall shades in one cohesive design. It’s a Simple yet bold choice for the season.
Consumables:
- Burgundy polish: Essie in “Bordeaux”
- Burnt orange polish: OPI in “It’s a Piazza Cake”
- Deep green polish: Essie in “Off Tropic”
- Short square Acrylic tips
DIY Tips:
- File your nails into a short square shape.
- Apply a base coat to ensure your nails are smooth and protected.
- Paint each nail with a different fall color, applying two coats for full coverage.
- Finish with a glossy top coat to enhance the colors and ensure they last.
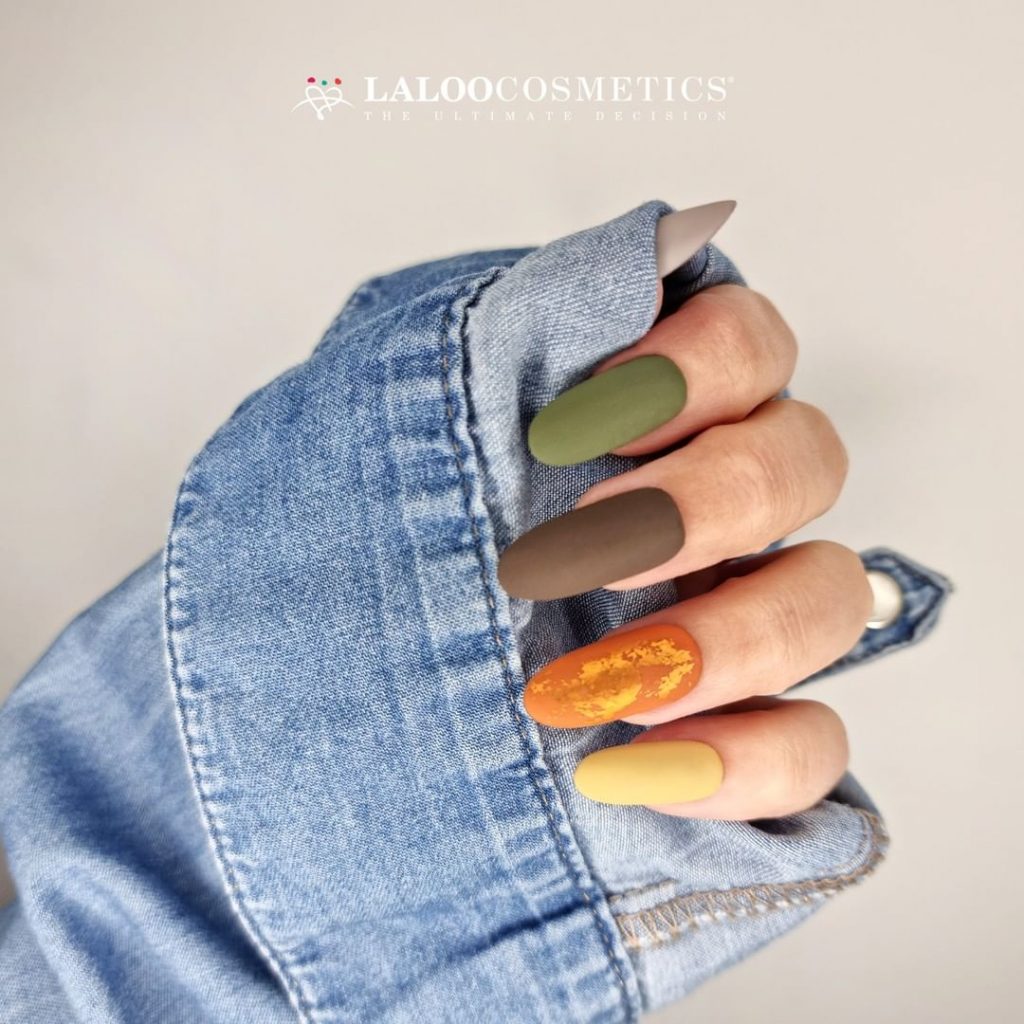
Matte Earth Tones with Gold Accent
This design is all about embracing the natural, earthy tones of fall with a touch of glam. The matte finish gives the design a soft, sophisticated look, while the gold foil accent adds just the right amount of sparkle. The almond shape is flattering and versatile, making this design a great choice for everyday wear. The mix of olive green, taupe, and mustard yellow creates a warm and inviting palette that’s perfect for the season.
Consumables:
- Matte olive green polish: OPI in “Olive for Green”
- Matte taupe polish: Essie in “Comfy in Cashmere”
- Matte mustard yellow polish: China Glaze in “Mustard the Courage”
- Gold foil accent: Born Pretty Gold Foil Nail Art
- Almond-shaped Acrylic tips
DIY Tips:
- Shape your nails into an almond shape for a chic look.
- Apply a base coat and let it dry completely.
- Paint each nail with a different matte polish, applying two coats for full opacity.
- Apply the gold foil to one or two accent nails, pressing it gently into the wet polish.
- Finish with a matte top coat to keep the design smooth and sophisticated.
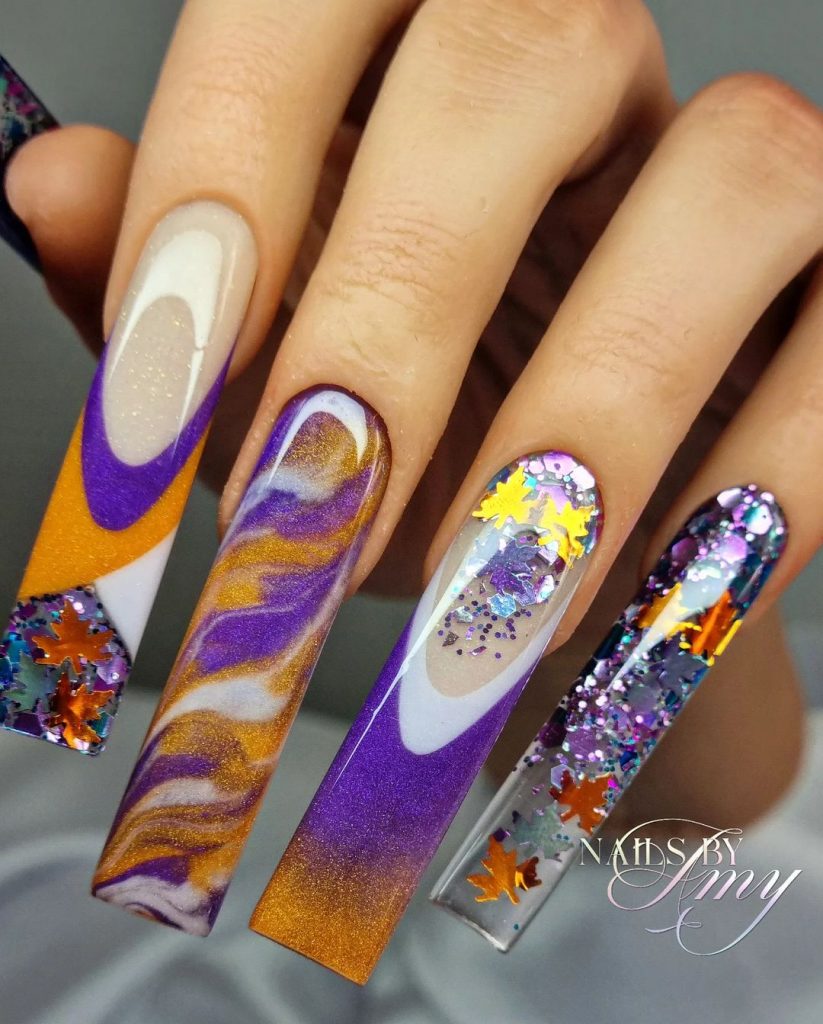
Whimsical Swirls and Glitter
This nail design is a playful and whimsical take on fall nails, featuring a mix of vibrant swirls and glitter. The long coffin shape adds drama, while the combination of purple, orange, and gold creates a magical, autumnal vibe. This design is perfect for those who love to experiment with Art and aren’t afraid to go bold with their nail choices. The glitter accents add a touch of sparkle, making this look perfect for special occasions.
Consumables:
- Purple polish: OPI in “Do You Lilac It?”
- Orange polish: Essie in “Playing Koi”
- Gold glitter polish: Sally Hansen in “Golden-I”
- Various colors for swirls and accents: China Glaze in “Liquid Leather”, Essie in “Go Overboard”
- Long coffin Acrylic tips
DIY Tips:
- Start by shaping your nails into a long coffin shape.
- Apply a base coat to protect your nails.
- Paint your nails with a mix of purple and orange polishes, using the glitter polish on one or two accent nails.
- Use a fine nail art brush to create the swirling patterns on a few nails, allowing each layer to dry before adding more details.
- Finish with a glossy top coat to seal the design and keep the glitter in place.
Save Pin
