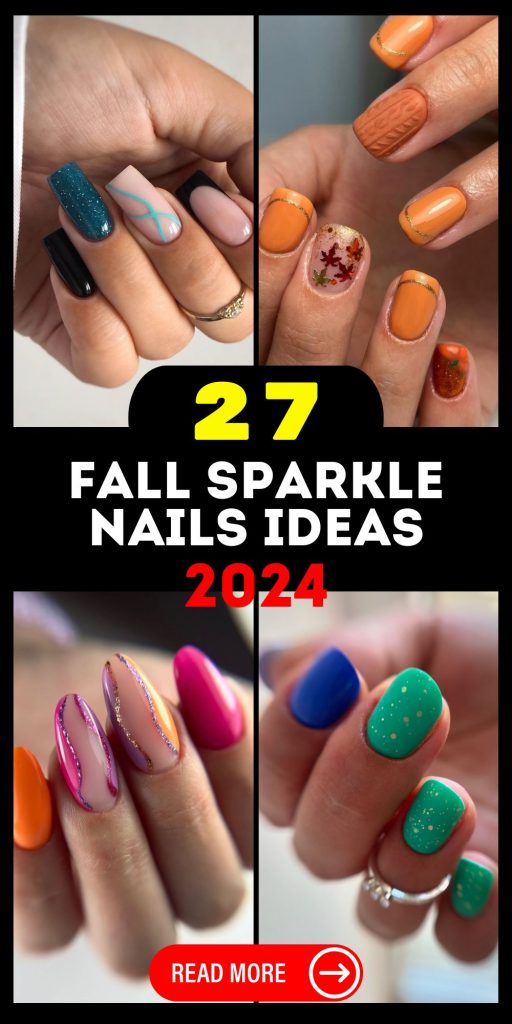
Fall is the perfect time to experiment with nail designs that reflect the rich colors and textures of the season. Fall sparkle nails 2024 are set to be a major trend, blending autumnal hues with glittering accents that capture the magic of the season. Ready to explore the top designs? Let’s dive into the most captivating ideas that will keep your nails looking stunning all autumn long.
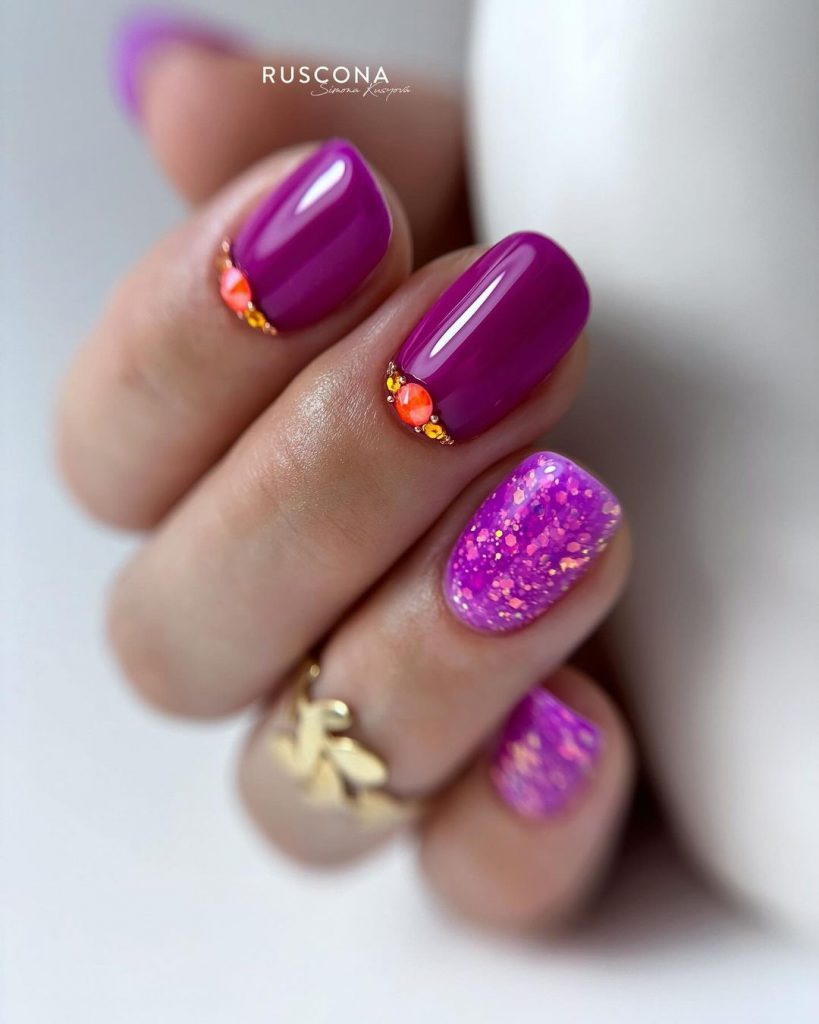
Purple Glamour with Subtle Sparkle
This nail design showcases a deep, rich purple base with perfectly placed glitter accents. The color is bold yet elegant, making it ideal for fall. The addition of glitter near the cuticles adds a subtle yet eye-catching detail, ensuring your nails stand out. The contrast between the deep purple and the bright sparkle captures the essence of autumn’s cozy yet glamorous vibe.
Tools & Products:
- Nail Polish: OPI in “Purple Palazzo Pants”
- Glitter: Swarovski Crystal Pixie in “Fairy Dust”
- Top Coat: Seche Vite Dry Fast Top Coat
- Tools: Fine brush for detailed work, LED lamp for curing
DIY Tips:
- Begin with a base coat to protect your nails and create a smooth surface.
- Apply two coats of the deep purple polish, allowing each layer to dry thoroughly.
- Using a fine brush, apply the glitter near the cuticles or along the tips for a gradient effect.
- Finish with a glossy top coat, curing under an LED lamp for durability.
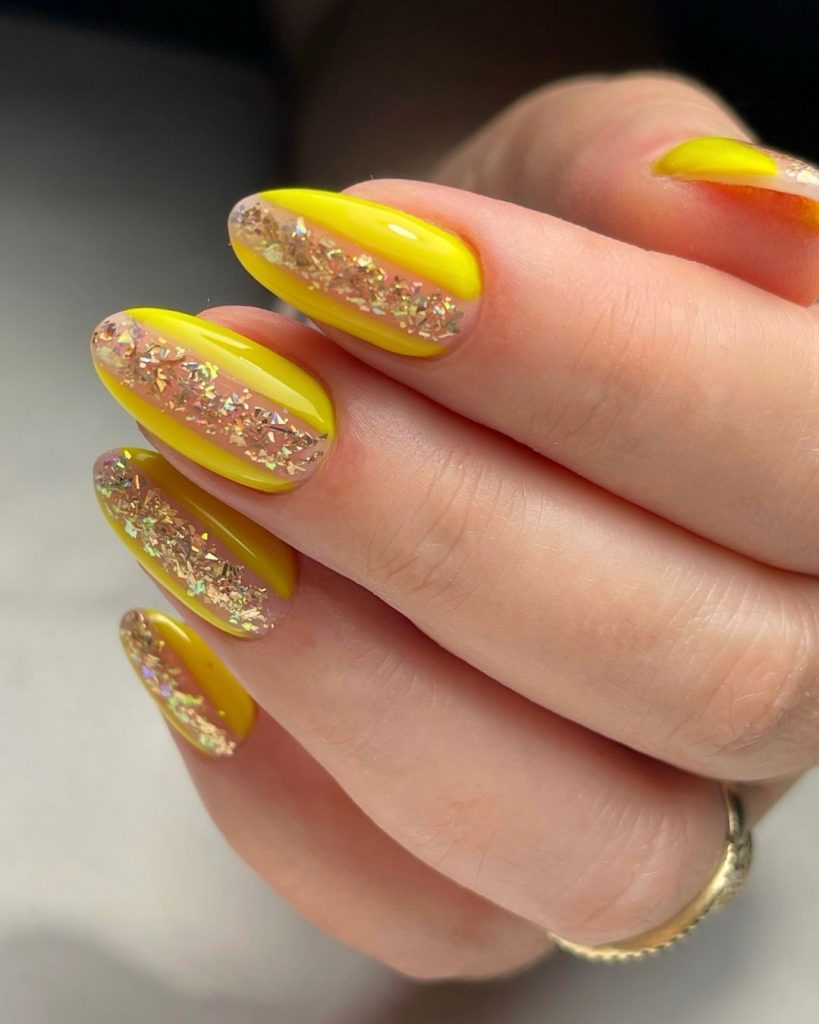
Bright Yellow with Glitter Accents
A vibrant yellow base with glitter accents makes this design perfect for those who want to embrace the brightness of fall. The yellow color is complemented by a clear section filled with multi-dimensional glitter, creating a fun and dynamic look. This design is ideal for anyone who loves a pop of color with a bit of sparkle.
Tools & Products:
- Nail Polish: Essie in “Hay There”
- Glitter: Holo Taco in “Flakie Holo Taco”
- Top Coat: Sally Hansen Miracle Gel Top Coat
- Tools: Dotting tool, fan brush
DIY Tips:
- Start with a solid base coat to ensure longevity.
- Apply the yellow polish, then use a dotting tool to create a clear section for the glitter.
- Apply the glitter within the clear section, using a fan brush for even distribution.
- Seal with a top coat and cure under a UV light to finish.
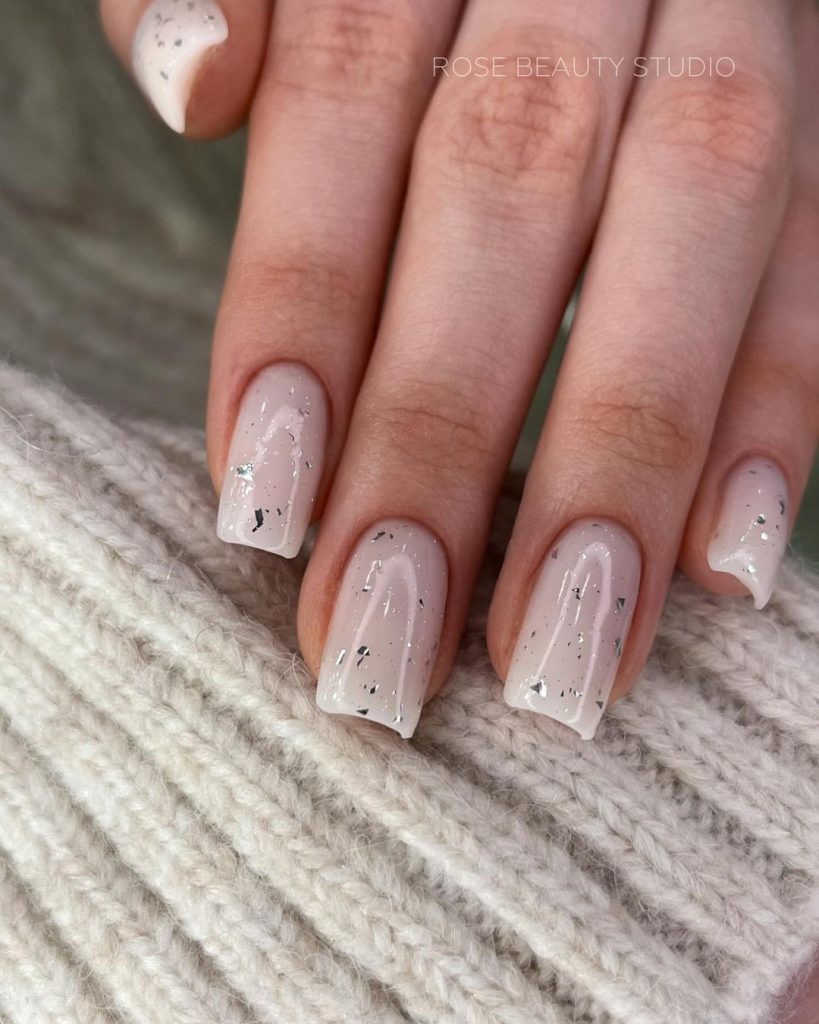
Neutral Elegance with Glitter Flakes
This neutral nail design with subtle glitter flakes offers a sophisticated and understated look. The light beige base is soft and elegant, while the glitter flakes add a touch of sparkle without overpowering the design. This manicure is perfect for those who prefer a minimalist look with a hint of glamour.
Tools & Products:
- Nail Polish: Zoya in “Jill”
- Glitter: China Glaze in “Fairy Dust”
- Top Coat: Essie Gel Setter Top Coat
- Tools: Fan brush, UV lamp
DIY Tips:
- Apply a base coat to protect your nails and ensure smooth polish application.
- Layer on two coats of the light beige polish, letting each coat dry completely.
- Lightly dust the glitter flakes over the nails using a fan brush for a subtle effect.
- Finish with a gel top coat and cure under a UV lamp for a long-lasting shine.
Dark Glamour with Fishnet Accent
This design combines a classic black manicure with a unique fishnet pattern accent, giving it a touch of edge and sophistication. The contrast between the deep black and the shimmering gold fishnet pattern adds an element of surprise, making it perfect for a bold fall look.
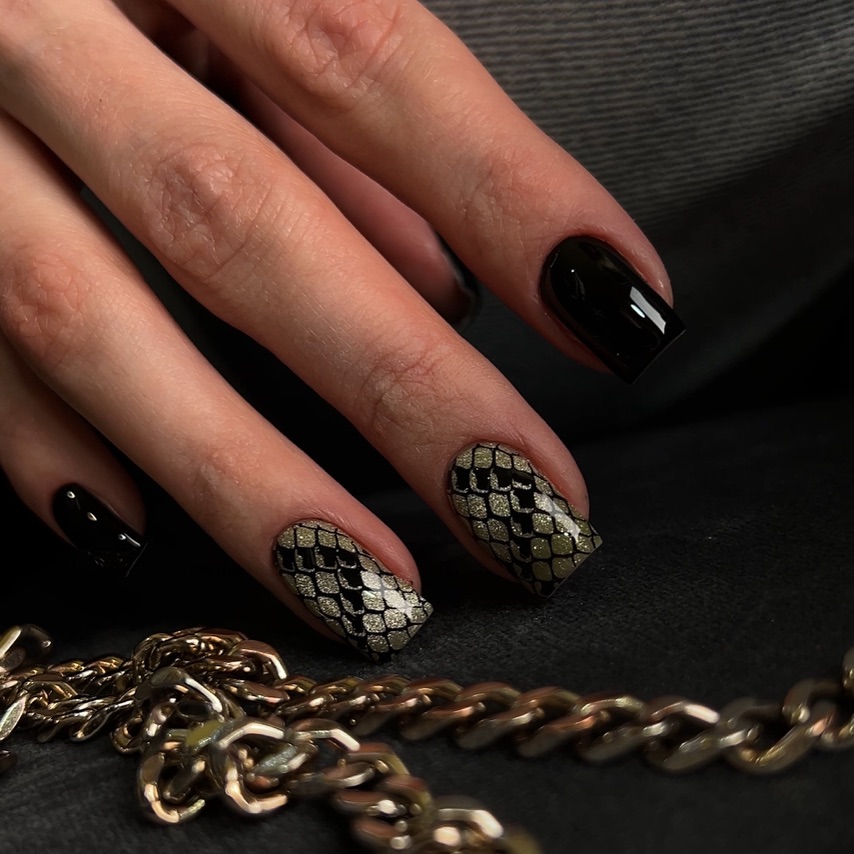
Tools & Products:
- Nail Polish: OPI in “Black Onyx”
- Glitter: Ciaté London in “Heirloom”
- Top Coat: Sally Hansen Insta-Dri Anti-Chip Top Coat
- Tools: Stamping kit for the fishnet pattern, detailing brush
DIY Tips:
- Start with a protective base coat to ensure your nails stay healthy.
- Apply two coats of the black polish, making sure each layer is fully dry before proceeding.
- Use a stamping kit to apply the fishnet pattern on one or two accent nails, and fill in with gold glitter as needed.
- Seal with a top coat and allow to dry completely for a durable finish.
Emerald Green Shine
This emerald green manicure is both rich and sophisticated, perfect for those looking to add a touch of luxury to their fall look. The green polish has a subtle shimmer that catches the light beautifully, making your nails look polished and elegant.
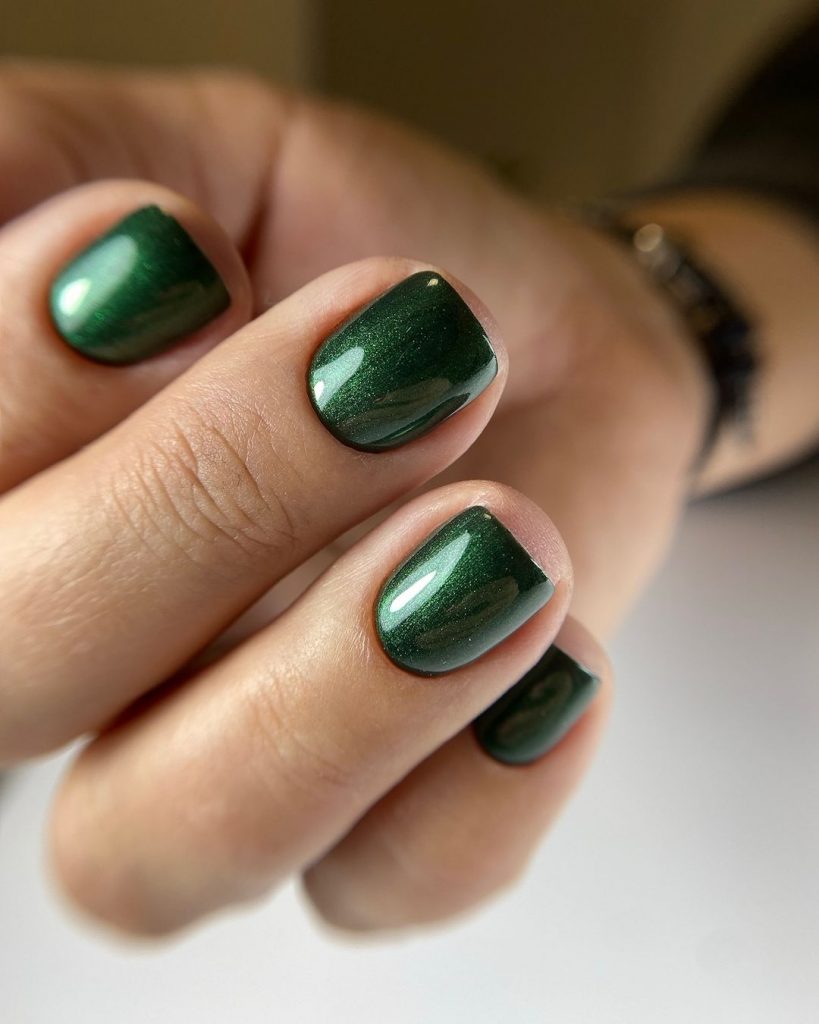
Tools & Products:
- Nail Polish: Essie in “Off Tropic”
- Top Coat: Seche Vite Dry Fast Top Coat
- Tools: Buffing block, fine detailing brush
DIY Tips:
- Prep your nails by buffing them to a smooth finish and applying a base coat.
- Apply two coats of the emerald green polish, allowing each coat to dry completely.
- For added shine, apply a second layer of top coat and cure under a UV lamp for maximum durability.
Yellow and Black Leaf Design
This striking design combines a vibrant yellow with a black leaf pattern that gives it a fresh and modern look. The contrast between the bright yellow and the intricate black leaves is eye-catching, making it perfect for a bold autumn statement. The touch of glitter within the leaves adds a subtle sparkle, elevating the entire design to a new level of sophistication.
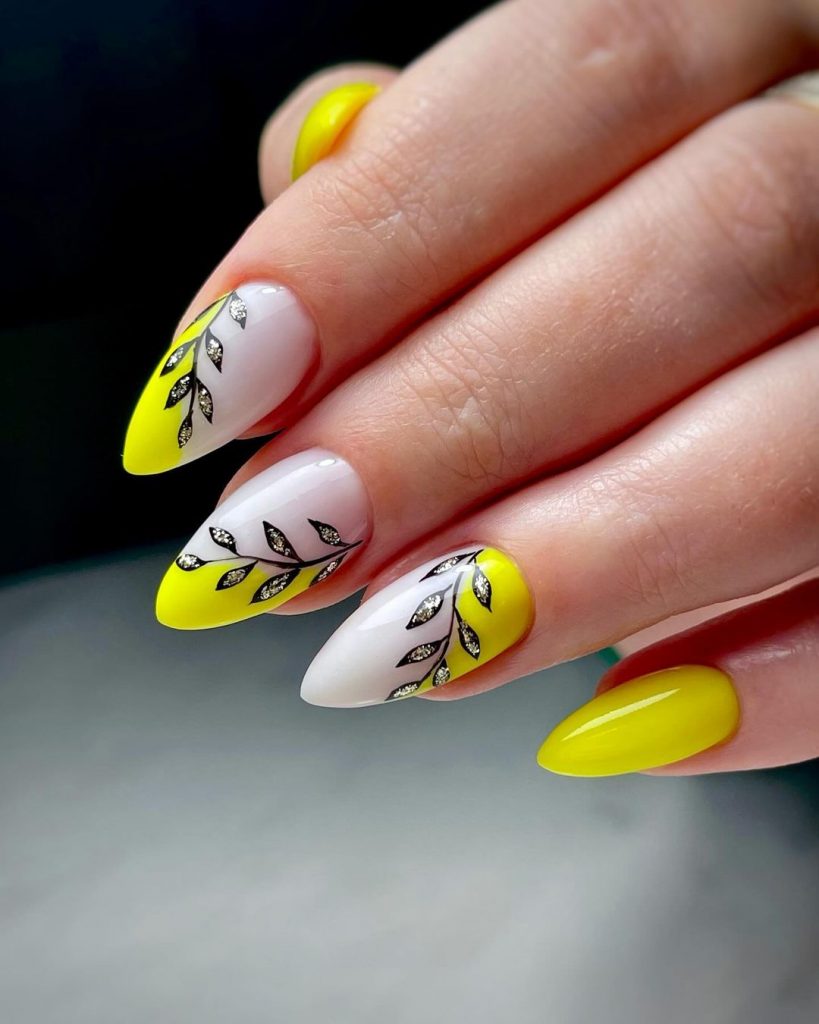
Tools & Products:
- Nail Polish: OPI in “Sun, Sea, and Sand in My Pants”
- Glitter: CND Additives in “Gold Sparkle”
- Top Coat: Essie Gel Couture Top Coat
- Tools: Fine brush for leaf details, UV lamp for curing
DIY Tips:
- Start with a solid base coat to protect your nails.
- Apply two coats of the yellow polish, ensuring each layer dries completely.
- Use a fine brush to paint the black leaf pattern, then fill in with glitter for added sparkle.
- Seal with a top coat and cure under a UV lamp for a long-lasting finish.
Pink and Silver Glitter Ombre
This design features a beautiful pink base with a gradient of silver glitter that cascades down the nail. The combination of the soft pink and sparkling silver creates a glamorous yet playful look, perfect for any special occasion this fall. The long, pointed nails add an extra touch of drama to the overall design.
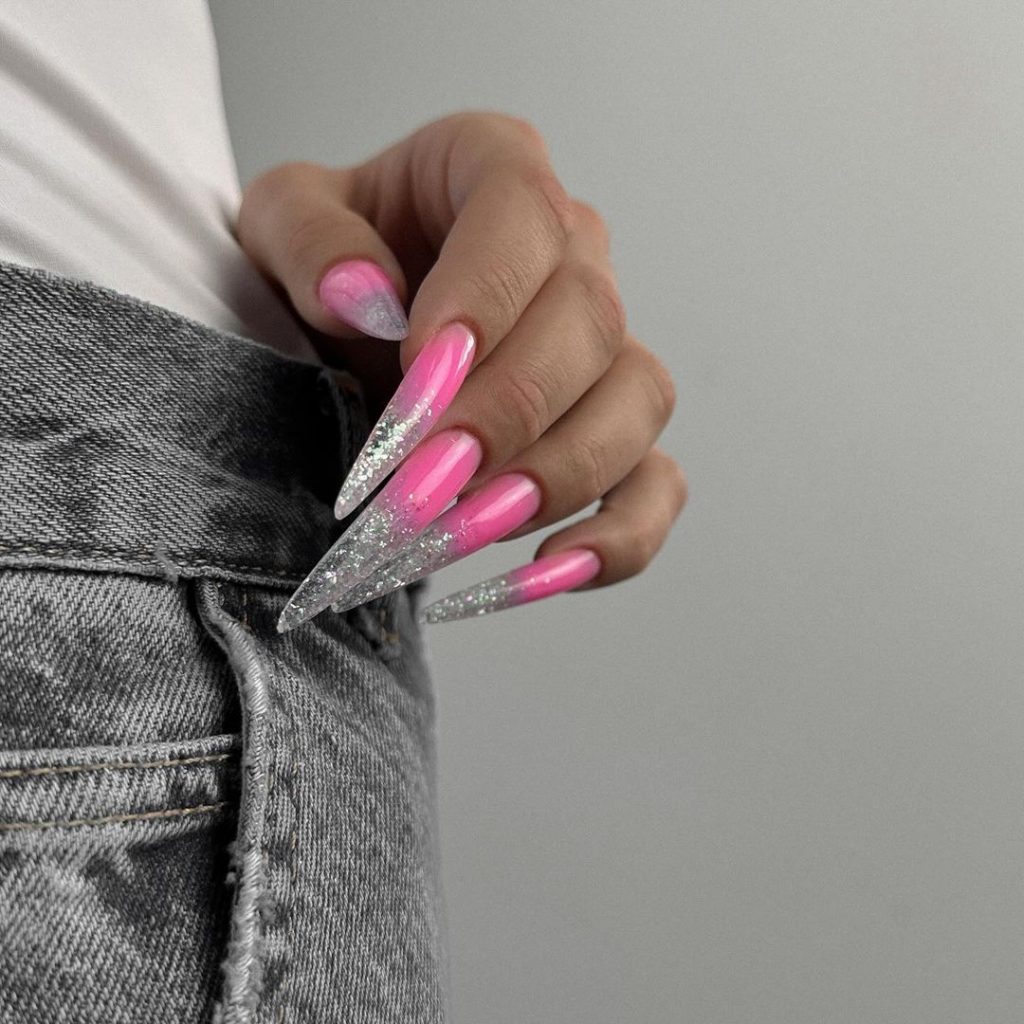
Tools & Products:
- Nail Polish: Essie in “Fiji”
- Glitter: China Glaze in “Techno”
- Top Coat: Seche Vite Dry Fast Top Coat
- Tools: Sponge for ombre effect, detailing brush
DIY Tips:
- Apply a base coat to start.
- Layer on the pink polish, applying two coats for full opacity.
- Use a sponge to apply the silver glitter, starting from the tips and blending downwards for the ombre effect.
- Finish with a top coat to seal the design and cure under a UV lamp.
Soft Pink Elegance
This soft pink manicure is the epitome of understated elegance. The sheer pink polish gives a natural, healthy look to the nails while adding a subtle shine. This design is perfect for those who prefer a minimalist look with just a hint of sparkle.
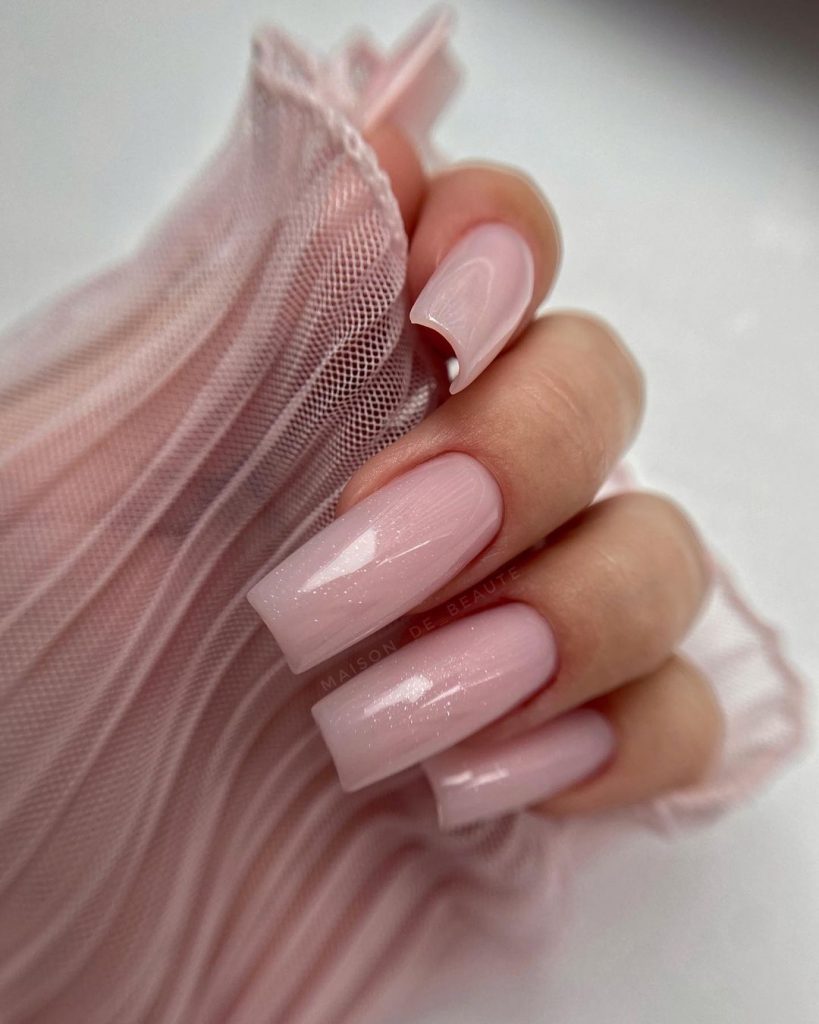
Tools & Products:
- Nail Polish: OPI in “Bubble Bath”
- Top Coat: Essie Gel Setter Top Coat
- Tools: Buffing block, fine detailing brush
DIY Tips:
- Prep your nails with a base coat and a light buff to ensure smoothness.
- Apply two coats of the soft pink polish, allowing each coat to dry fully.
- Finish with a gel top coat and cure under a UV lamp for a long-lasting, glossy finish.
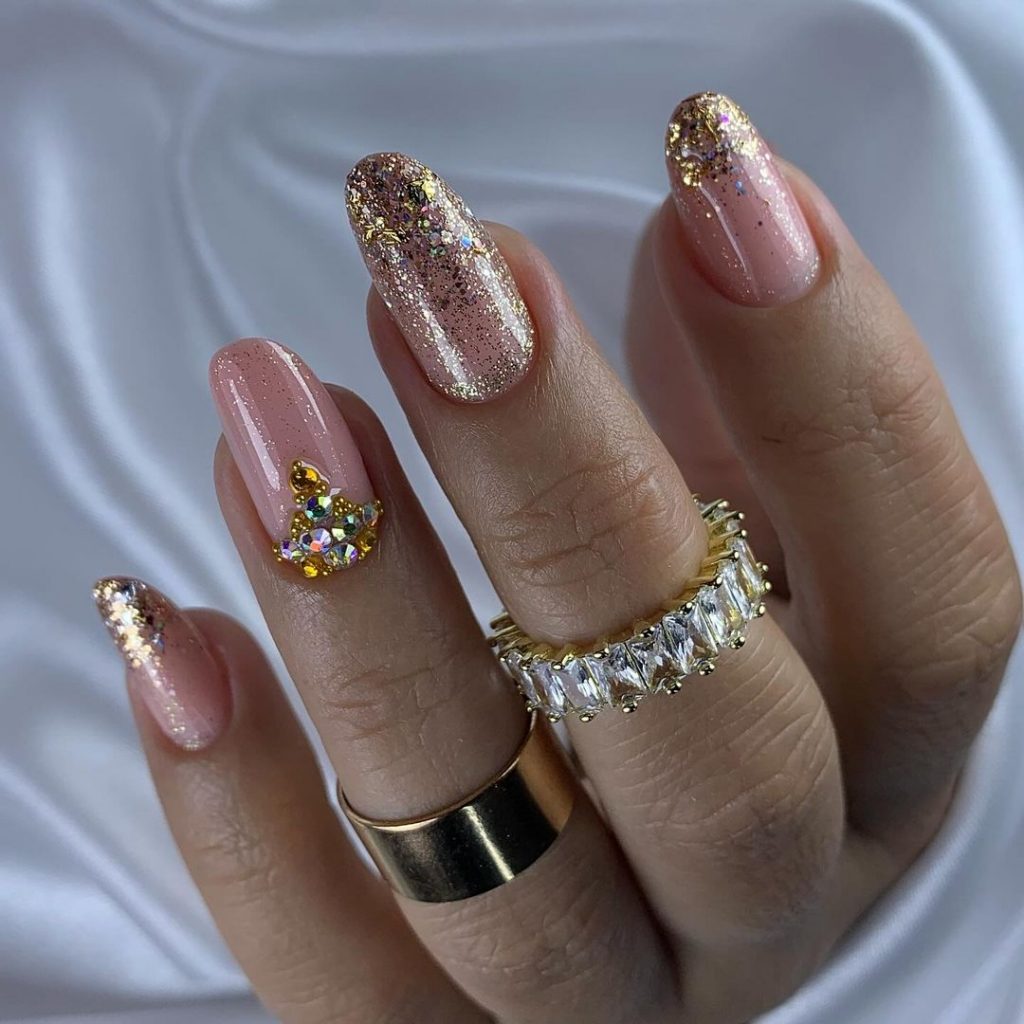
Champagne Gold Glitter and Nude Swirls
This design features a sophisticated blend of champagne gold glitter and nude swirls, creating a luxurious and trendy look. The soft, flowing lines add a touch of elegance, while the glitter brings just the right amount of sparkle for a chic autumn manicure.
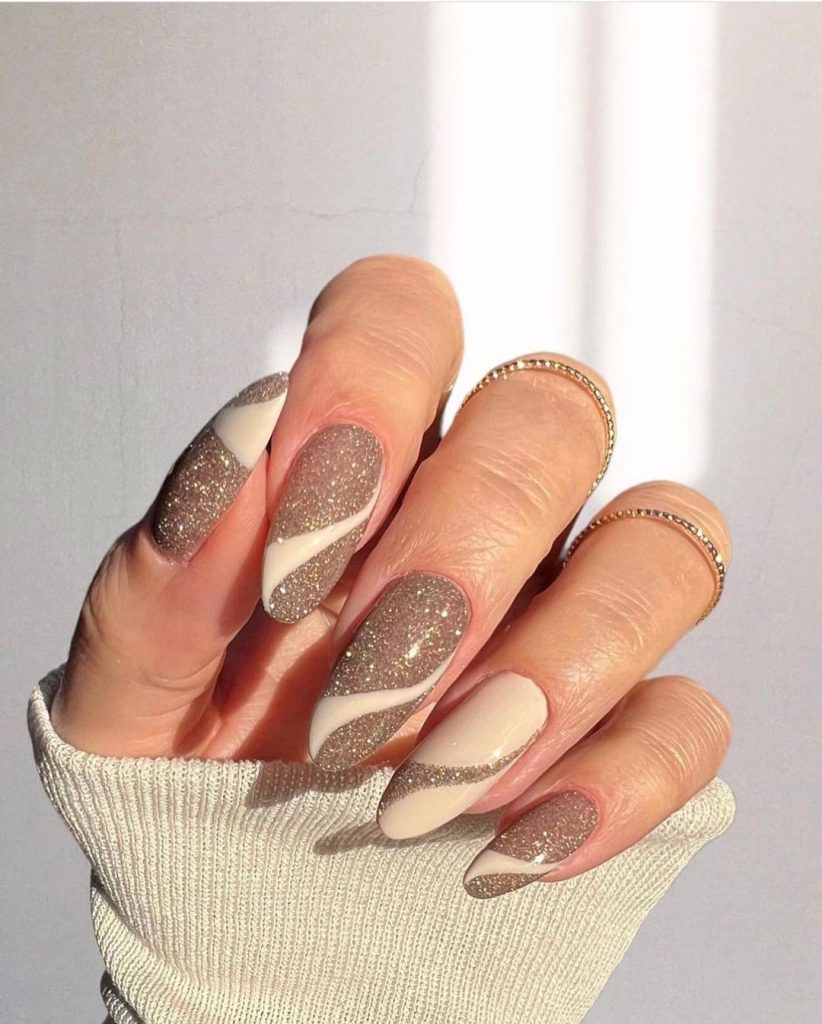
Tools & Products:
- Nail Polish: Essie in “Spin the Bottle”
- Glitter: OPI in “Champagne for Breakfast”
- Top Coat: Sally Hansen Miracle Gel Top Coat
- Tools: Detailing brush, UV lamp
DIY Tips:
- Start with a base coat for protection.
- Apply the nude polish and allow it to dry completely.
- Use a detailing brush to create soft, flowing swirls with the glitter polish.
- Seal with a top coat and cure under a UV lamp to ensure durability.
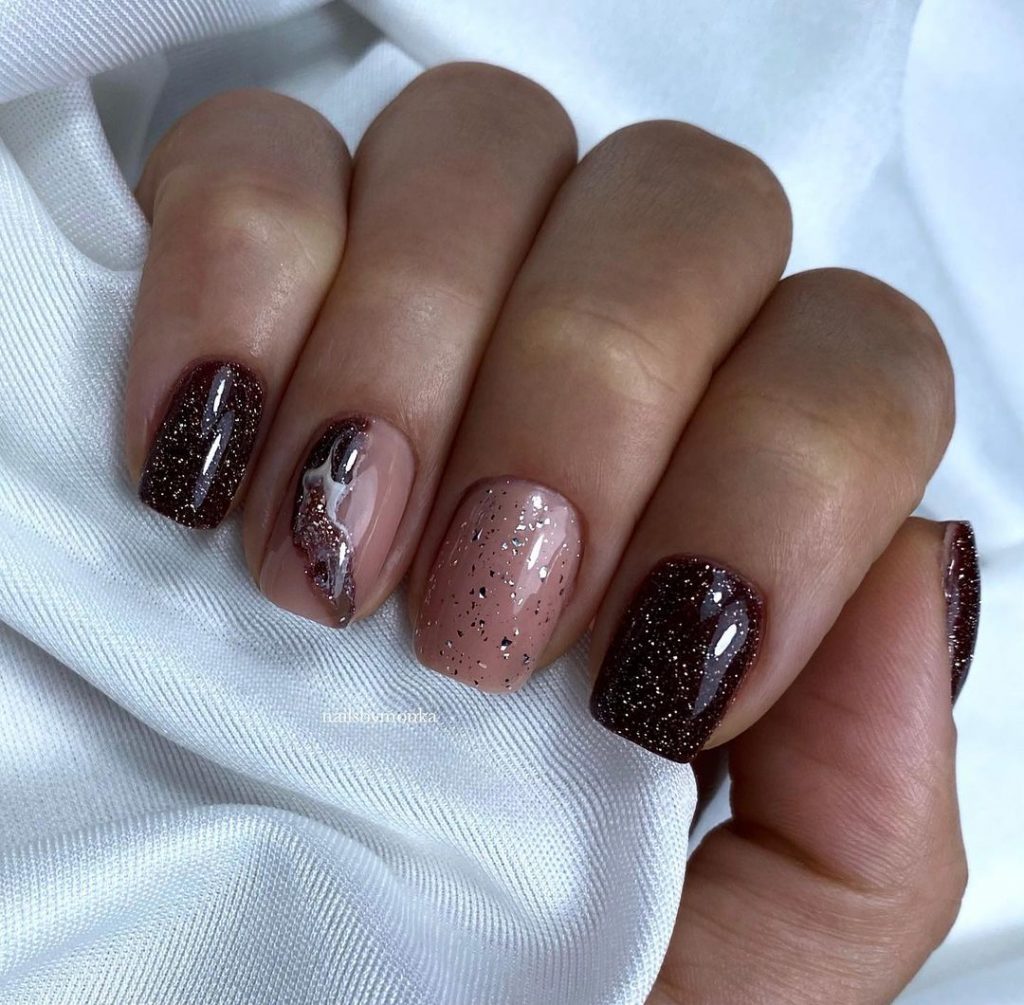
Burgundy with Glitter Accents
This rich burgundy manicure with glitter accents is perfect for the fall season. The deep, warm tones of burgundy paired with the sparkling glitter create a look that is both elegant and festive. The glitter is concentrated near the tips, adding a glamorous touch without overwhelming the design.
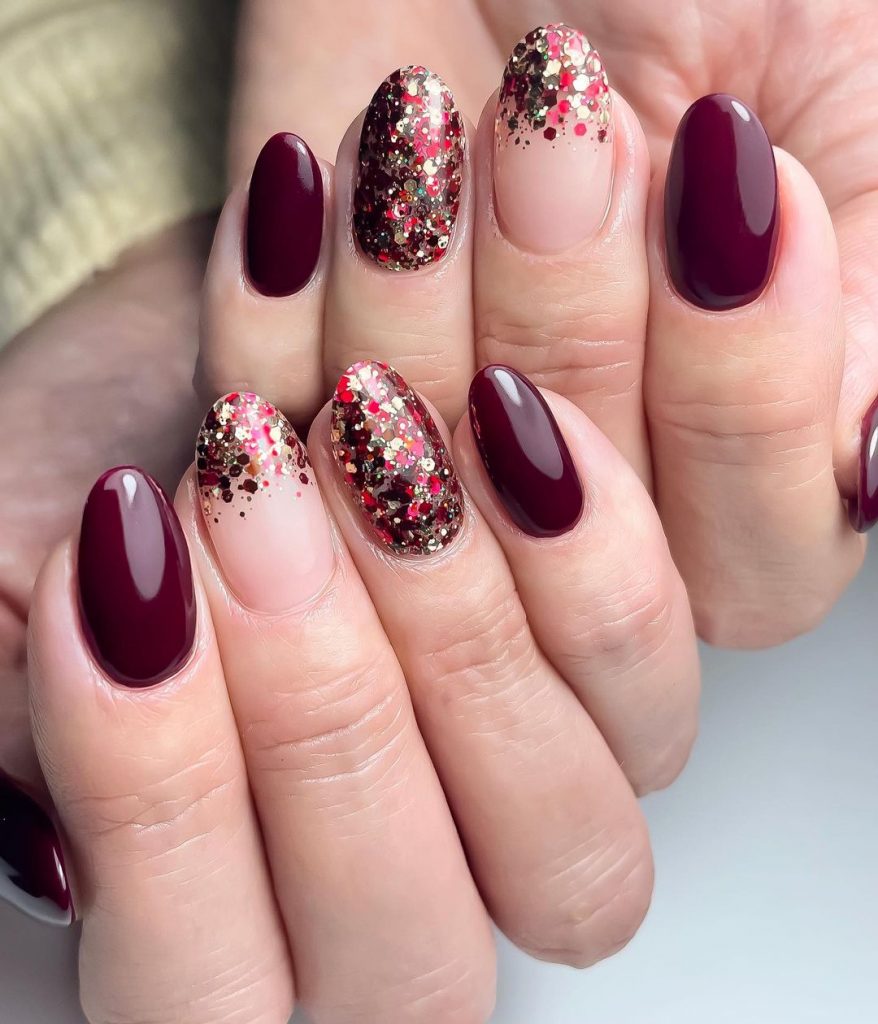
Tools & Products:
- Nail Polish: Zoya in “Claire”
- Glitter: Ciaté London in “Heirloom”
- Top Coat: Seche Vite Dry Fast Top Coat
- Tools: Sponge for glitter application, detailing brush
DIY Tips:
- Begin with a base coat to protect your nails.
- Apply two coats of the burgundy polish, letting each layer dry completely.
- Use a sponge to apply the glitter near the tips for a gradient effect.
- Finish with a top coat and cure under a UV lamp for a long-lasting shine.
Soft Pink Glitter Gradient
This delightful design features a soft pink base with a subtle gradient of gold glitter cascading from the tips. The combination of baby pink and glitter adds a delicate and feminine touch, perfect for anyone looking to keep their nails simple yet stylish for fall. The gradient effect gives a sense of depth and movement, making this a versatile design that can be dressed up or down.
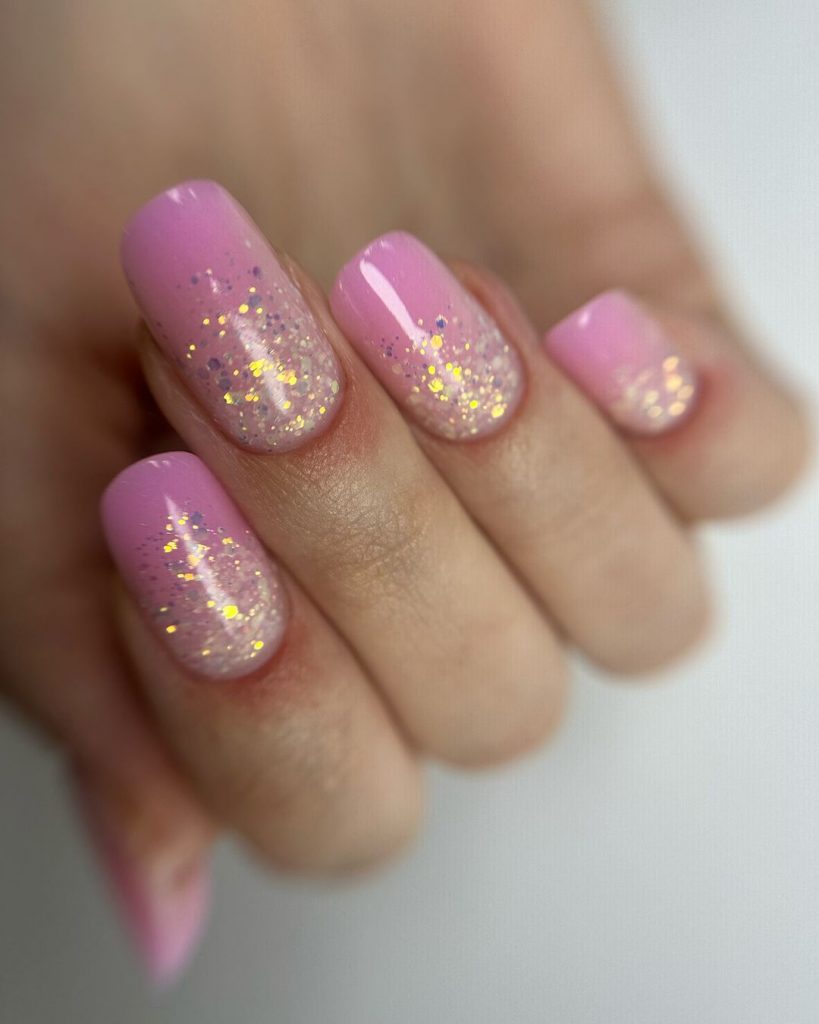
Tools & Products:
- Nail Polish: OPI in “Mod About You”
- Glitter: CND Additives in “Gold Sparkle”
- Top Coat: Essie Gel Couture Top Coat
- Tools: Sponge for gradient effect, detailing brush
DIY Tips:
- Start with a protective base coat.
- Apply two coats of the soft pink polish, allowing each coat to dry thoroughly.
- Use a sponge to gently dab the gold glitter onto the tips, creating a smooth gradient.
- Finish with a top coat to seal the design and add extra shine.
Swirling Metallic Marble
This striking design combines metallic shades in a swirling marble pattern, creating a futuristic and edgy look. The mix of silver, gold, and black gives these nails a luxurious feel, while the white tips add a modern twist. The swirling patterns give a dynamic and artistic vibe, making these nails a perfect choice for those who want something bold and unique this fall.
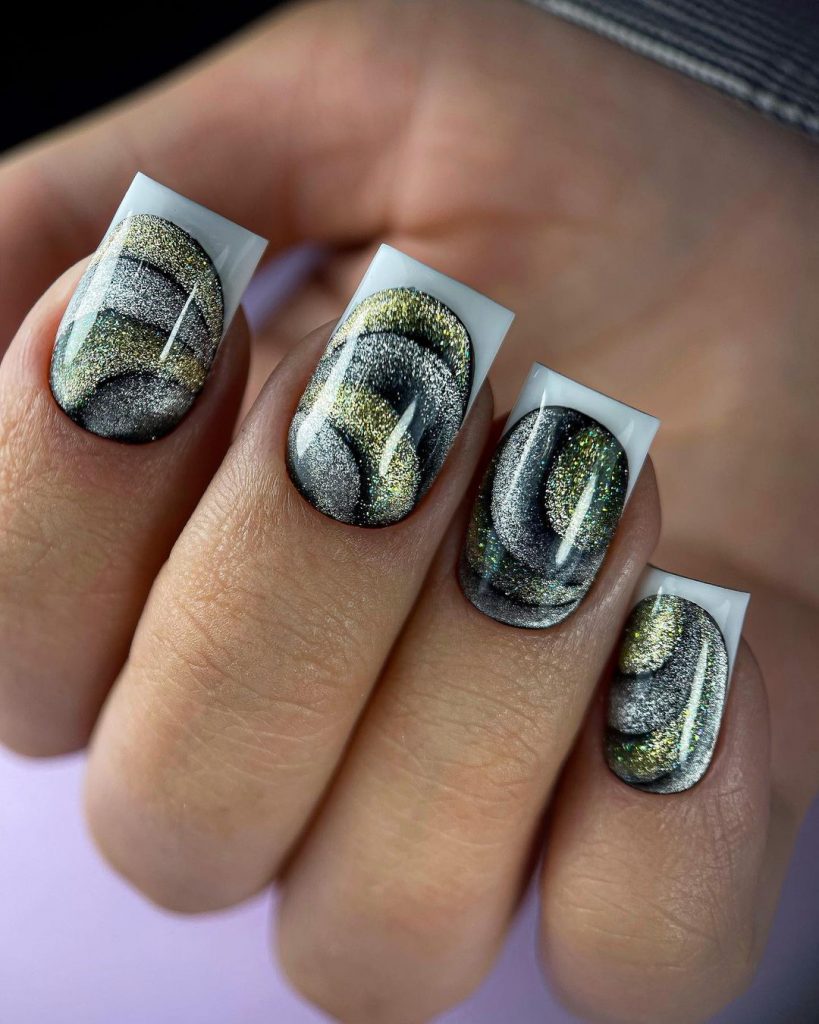
Tools & Products:
- Nail Polish: Essie in “Good as Gold,” Zoya in “Storm”
- Top Coat: Seche Vite Dry Fast Top Coat
- Tools: Fine detailing brush, marble nail tool
DIY Tips:
- Begin with a base coat to protect your nails.
- Apply a layer of silver polish as the base color.
- Use a marble nail tool to create swirling patterns with gold and black polish.
- Finish with a top coat to seal in the design and cure under a UV lamp.
Fiery Fall Glitter
This design features a fiery mix of red, orange, and yellow glitter, creating a dazzling ombre effect. The vibrant colors capture the essence of fall, reminiscent of the changing leaves. This design is perfect for anyone looking to make a bold statement with their nails, as the glitter provides a lively and energetic feel.
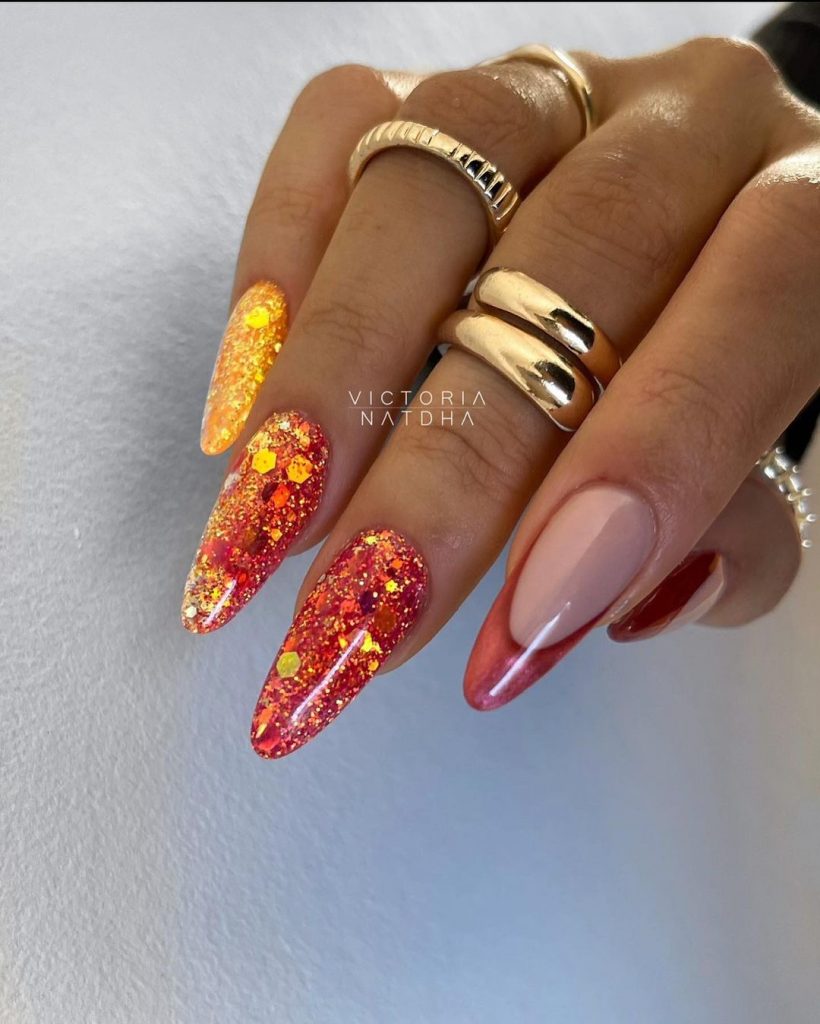
Tools & Products:
- Nail Polish: OPI in “Big Apple Red”
- Glitter: Holo Taco in “Gold Flake Taco”
- Top Coat: Essie Gel Setter Top Coat
- Tools: Sponge for ombre effect, detailing brush
DIY Tips:
- Start with a base coat to protect your nails.
- Apply a solid base color, such as red or orange, to set the stage for the glitter.
- Use a sponge to apply the glitter from the tips, blending it down for a gradient effect.
- Seal the design with a top coat and cure under a UV lamp for durability.
Bold Green and Blue Glitter
This playful design features a mix of bright green and blue nails with gold glitter accents. The contrasting colors create a fun and vibrant look that’s perfect for adding a pop of color to your fall wardrobe. The glitter speckles add a whimsical touch, making this design ideal for anyone who loves a bit of sparkle with their bold color choices.
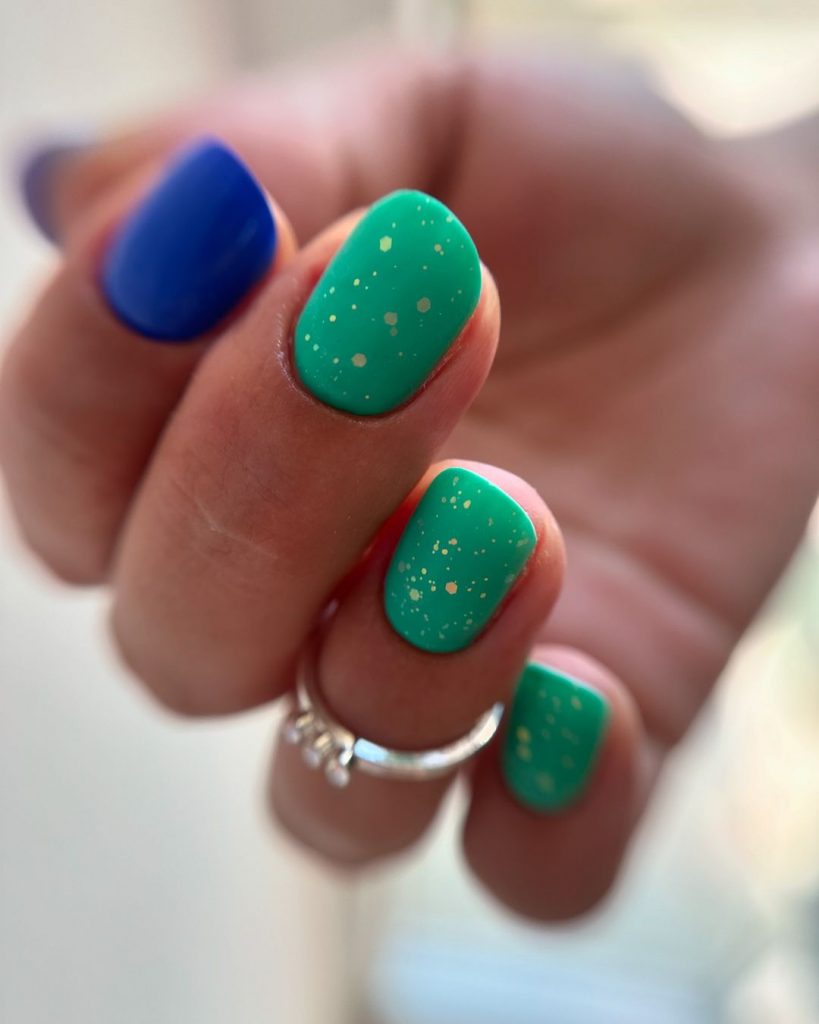
Tools & Products:
- Nail Polish: Essie in “Butler Please” and “Mojito Madness”
- Glitter: CND Additives in “Gold Sparkle”
- Top Coat: Seche Vite Dry Fast Top Coat
- Tools: Dotting tool, detailing brush
DIY Tips:
- Apply a base coat to protect your nails.
- Alternate between green and blue polish on each nail, applying two coats for full opacity.
- Use a dotting tool to apply gold glitter accents.
- Finish with a top coat and cure under a UV lamp for a long-lasting shine.
Pink Glamour with Rhinestones
This glamorous pink design is perfect for those who want a little extra sparkle in their lives. The combination of bright pink nails with a glitter accent nail and rhinestone embellishments creates a look that’s both playful and luxurious. The addition of rhinestones elevates the design, making it ideal for special occasions or whenever you want to feel a little extra glamorous.
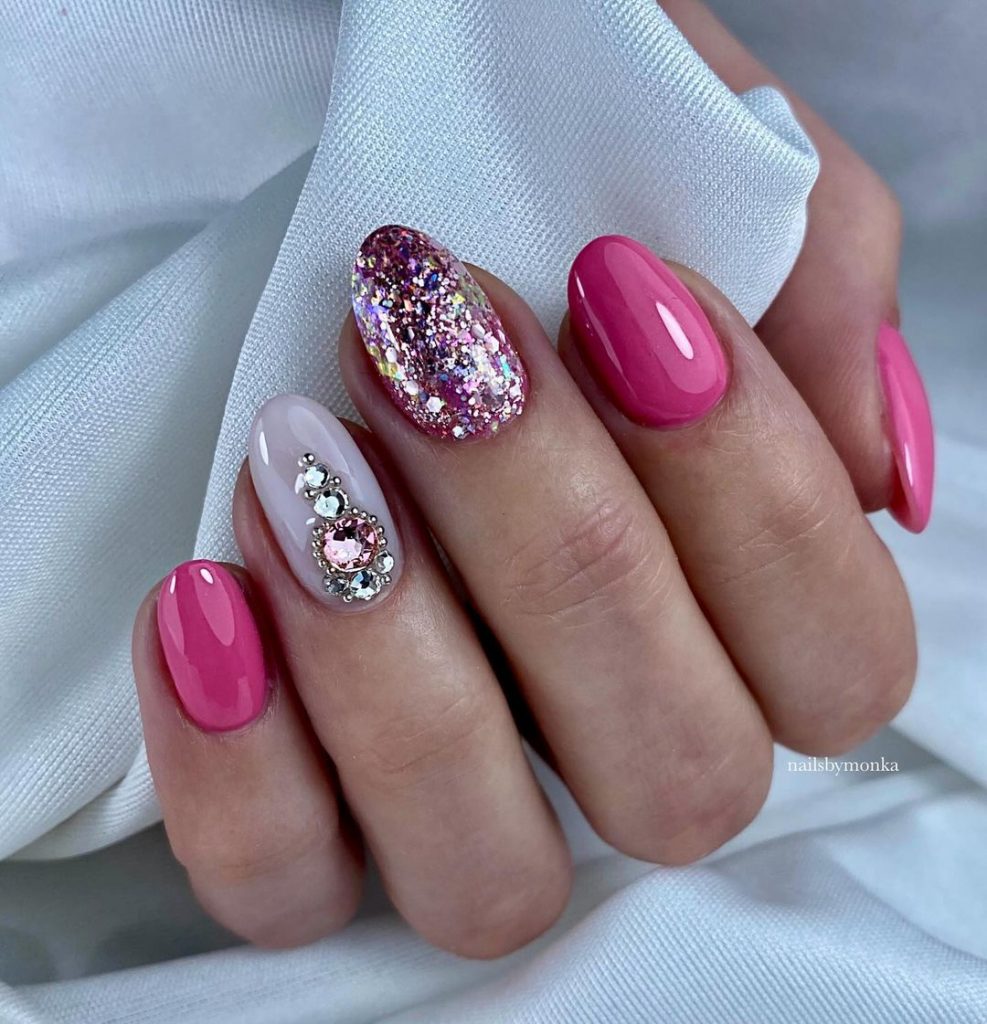
Tools & Products:
- Nail Polish: OPI in “Passion”
- Glitter: China Glaze in “Fairy Dust”
- Top Coat: Essie Gel Couture Top Coat
- Tools: Rhinestone applicator, UV lamp
DIY Tips:
- Begin with a base coat to ensure a smooth application.
- Apply two coats of pink polish to all nails except the accent nail.
- Apply glitter polish to the accent nail and add rhinestones while the polish is still tacky.
- Seal with a top coat and cure under a UV lamp to lock in the design.
Peach and Purple Glitter Ombre
This vibrant design combines warm peach tones with a striking purple glitter ombre. The transition from the soft peach at the base to the rich purple at the tips creates a mesmerizing effect that’s perfect for those looking to make a bold statement this fall. The glitter adds an extra touch of glamour, making these nails ideal for a special occasion or a night out.
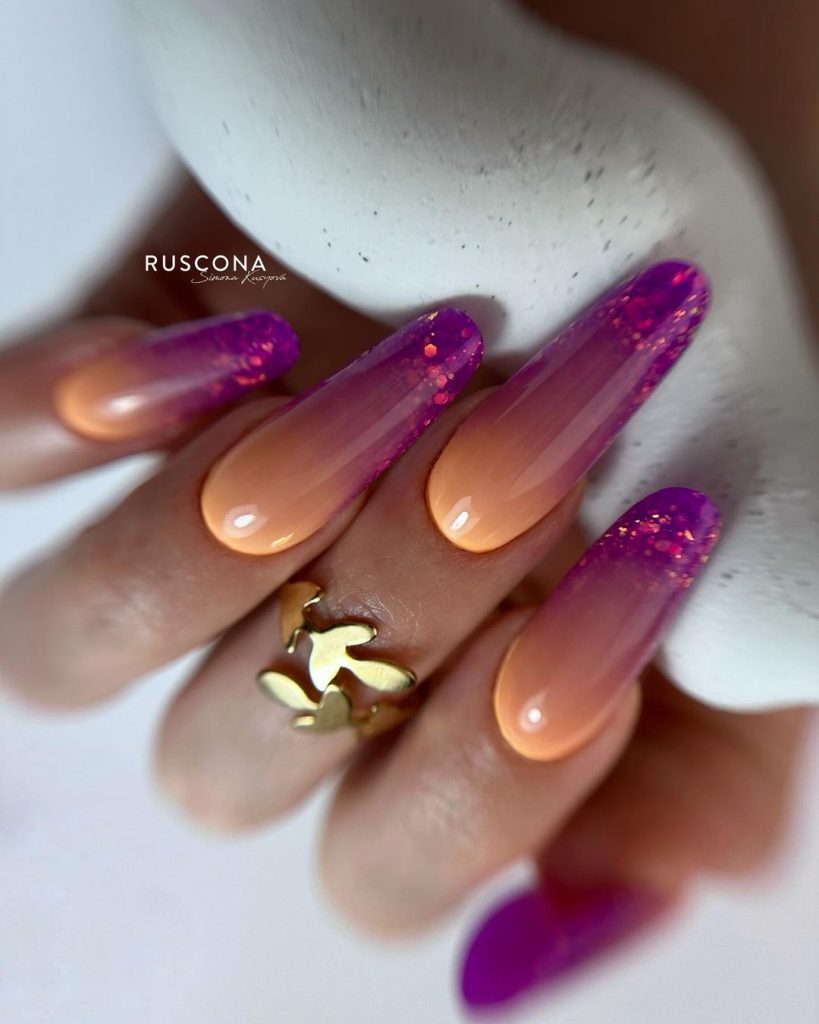
Tools & Products:
- Nail Polish: OPI in “Crawfishin’ for a Compliment”
- Glitter: Holo Taco in “Purple Flakie Holo Taco”
- Top Coat: Seche Vite Dry Fast Top Coat
- Tools: Sponge for ombre effect, detailing brush
DIY Tips:
- Begin with a base coat to protect your nails.
- Apply two coats of the peach polish, allowing each layer to dry thoroughly.
- Use a sponge to apply the purple glitter from the tips, blending down for an ombre effect.
- Seal with a top coat and cure under a UV lamp for a long-lasting finish.
Nude and Gold Glitter with Rhinestones
This elegant design features a nude base with a gold glitter gradient, topped off with rhinestone accents. The combination of soft nude tones with sparkling gold creates a sophisticated look, while the rhinestones add a luxurious touch. This design is perfect for those who want to add a bit of sparkle without going over the top.
Tools & Products:
- Nail Polish: Essie in “Topless & Barefoot”
- Glitter: OPI in “Goldeneye”
- Top Coat: Essie Gel Couture Top Coat
- Tools: Rhinestone applicator, sponge for gradient effect
DIY Tips:
- Start with a protective base coat.
- Apply two coats of the nude polish, ensuring each coat dries completely.
- Use a sponge to apply the gold glitter at the tips, creating a gradient effect.
- Add rhinestones for extra bling, then finish with a top coat and cure under a UV lamp.
Cosmic Black Glitter
This bold and mysterious design features a black base with a multicolored glitter overlay, creating a cosmic effect. The deep black provides a perfect backdrop for the colorful glitter, making it appear as though your nails are adorned with tiny galaxies. This design is ideal for those who love a bit of drama and sparkle in their nail art.
Tools & Products:
- Nail Polish: Zoya in “Willa”
- Glitter: China Glaze in “Fairy Dust”
- Top Coat: Sally Hansen Insta-Dri Top Coat
- Tools: Detailing brush, UV lamp
DIY Tips:
- Begin with a base coat to protect your nails.
- Apply two coats of the black polish, letting each layer dry thoroughly.
- Use a detailing brush to apply the multicolored glitter, focusing on areas where you want the most sparkle.
- Finish with a top coat and cure under a UV lamp for a long-lasting finish.
Black and Clear Glitter Fusion
This design offers a captivating mix of clear and black nails, adorned with multicolored glitter and rhinestone embellishments. The contrast between the solid black and the transparent glitter nails creates a unique and modern look, perfect for making a statement this fall. The rhinestones add an extra touch of luxury, making these nails stand out even more.
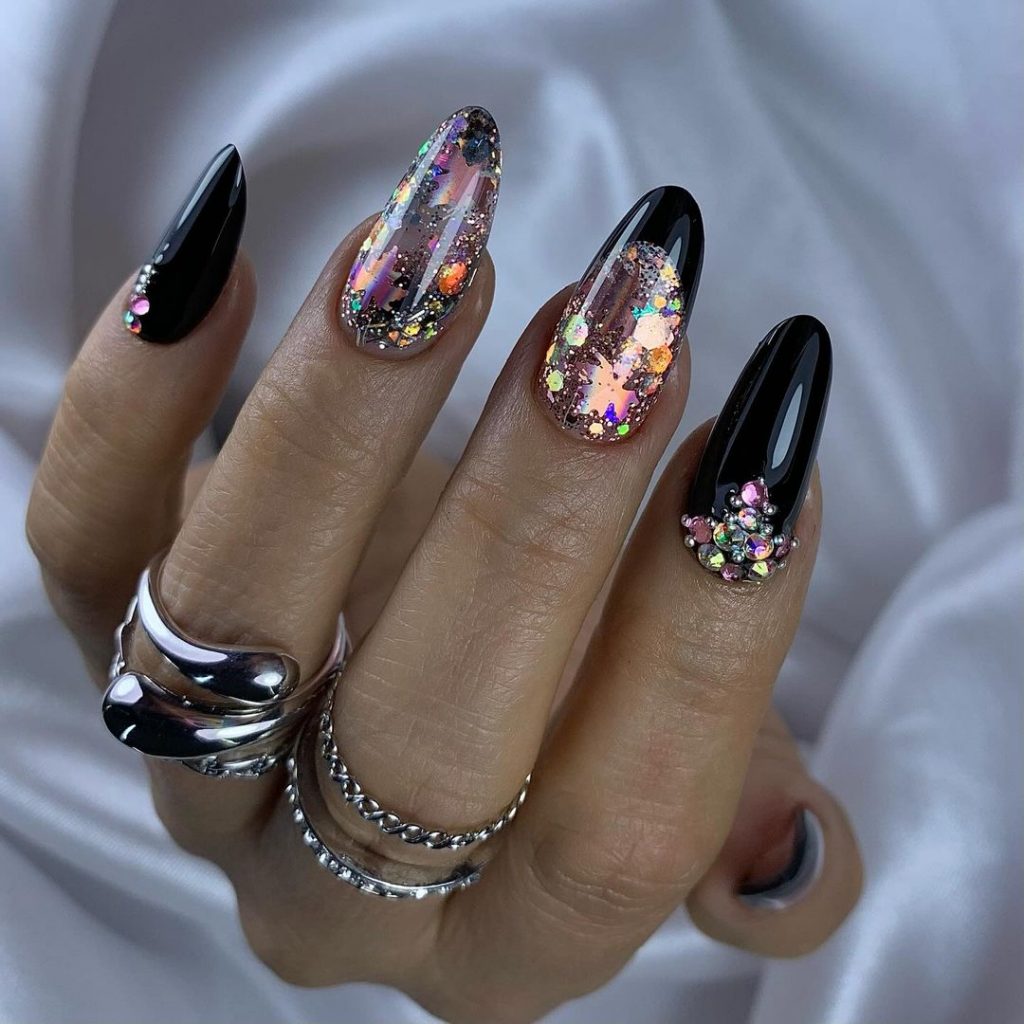
Tools & Products:
- Nail Polish: OPI in “Black Onyx”
- Glitter: Ciaté London in “Heirloom”
- Top Coat: Essie Gel Couture Top Coat
- Tools: Rhinestone applicator, detailing brush
DIY Tips:
- Start with a base coat to protect your nails.
- Apply black polish to select nails, leaving others clear for the glitter application.
- Use a detailing brush to apply glitter to the clear nails, and add rhinestones for extra flair.
- Seal with a top coat and cure under a UV lamp to ensure durability.
Subtle Nude Glitter Ombre
This soft and subtle design features a nude base with a delicate glitter ombre effect. The combination of the nude color with the shimmering glitter creates a refined and elegant look that’s perfect for everyday wear or special occasions. The glitter is applied in a gradient, adding just the right amount of sparkle without overpowering the design.
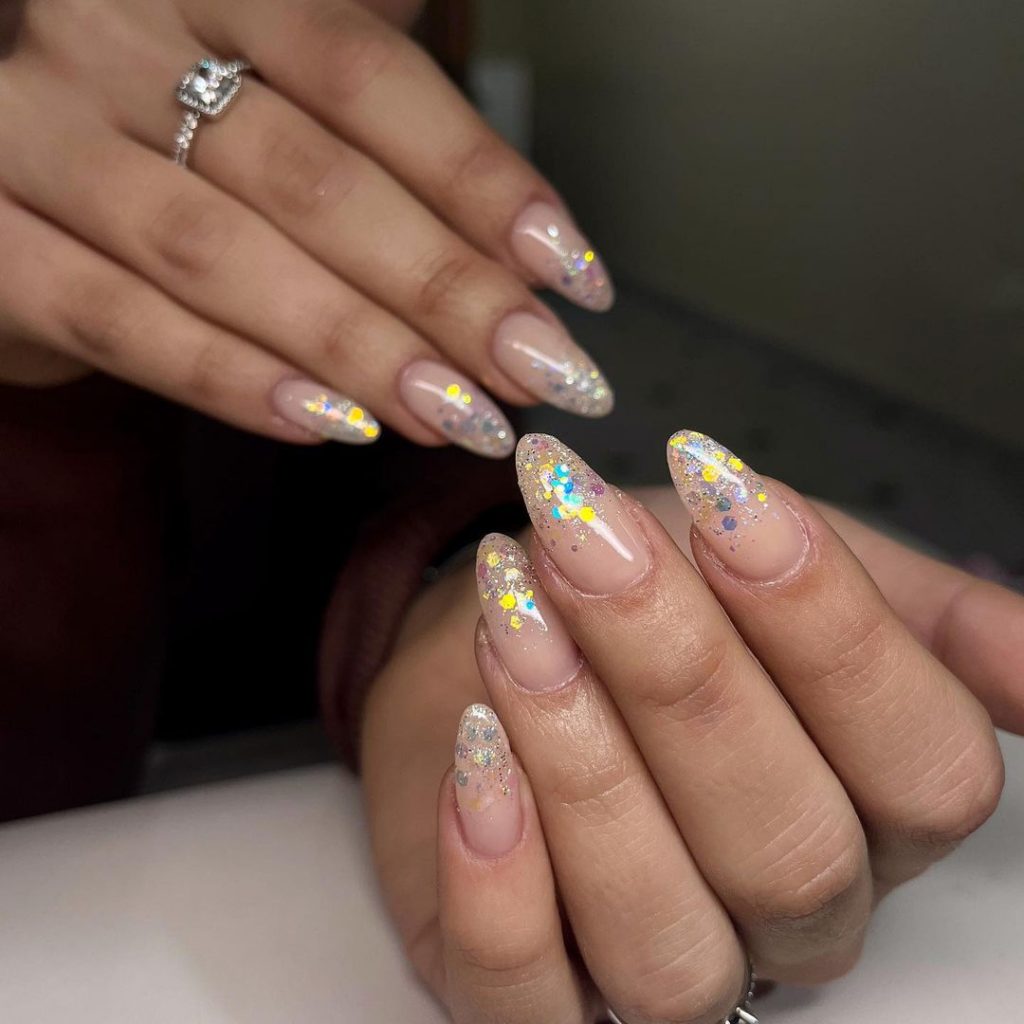
Tools & Products:
- Nail Polish: Essie in “Ballet Slippers”
- Glitter: OPI in “Pirouette My Whistle”
- Top Coat: Seche Vite Dry Fast Top Coat
- Tools: Sponge for ombre effect, detailing brush
DIY Tips:
- Begin with a base coat to protect your nails.
- Apply two coats of the nude polish, letting each layer dry thoroughly.
- Use a sponge to apply the glitter from the tips, blending down for a subtle ombre effect.
- Finish with a top coat and cure under a UV lamp for a glossy, long-lasting finish.
Teal Matte with Glitter Accent
This stunning design features a deep teal matte base with a pop of silver glitter on select nails. The matte finish gives the nails a velvety appearance, while the glitter accent adds a touch of sparkle without overwhelming the look. This combination is perfect for those who want a chic and understated fall manicure that still has a hint of glam.
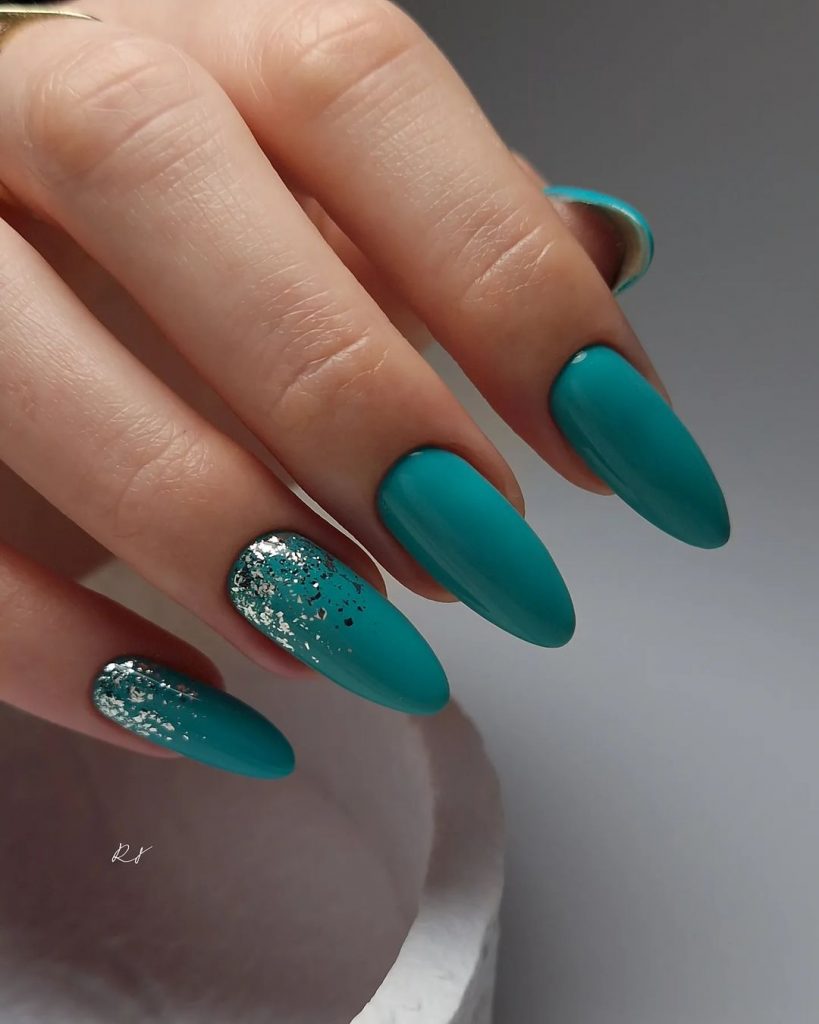
Tools & Products:
- Nail Polish: OPI in “Suzi Says Feng Shui”
- Matte Top Coat: Essie Matte About You
- Glitter: Holo Taco in “Scattered Holo Taco”
- Top Coat: Essie Gel Couture Top Coat
- Tools: Detailing brush, sponge for gradient effect
DIY Tips:
- Apply a base coat to protect your nails.
- Use two coats of the teal polish, allowing each layer to dry thoroughly.
- Apply the matte top coat to create a velvety finish.
- Add silver glitter to select nails using a detailing brush, then seal with a top coat for added durability.
Vibrant Pink and Orange Swirl
This bold design combines bright pink and orange with glittery swirl accents, creating a playful and energetic look. The vibrant colors are perfect for those who love to stand out, while the swirl details add an artistic touch. This manicure is ideal for anyone looking to add some fun and color to their fall nail game.
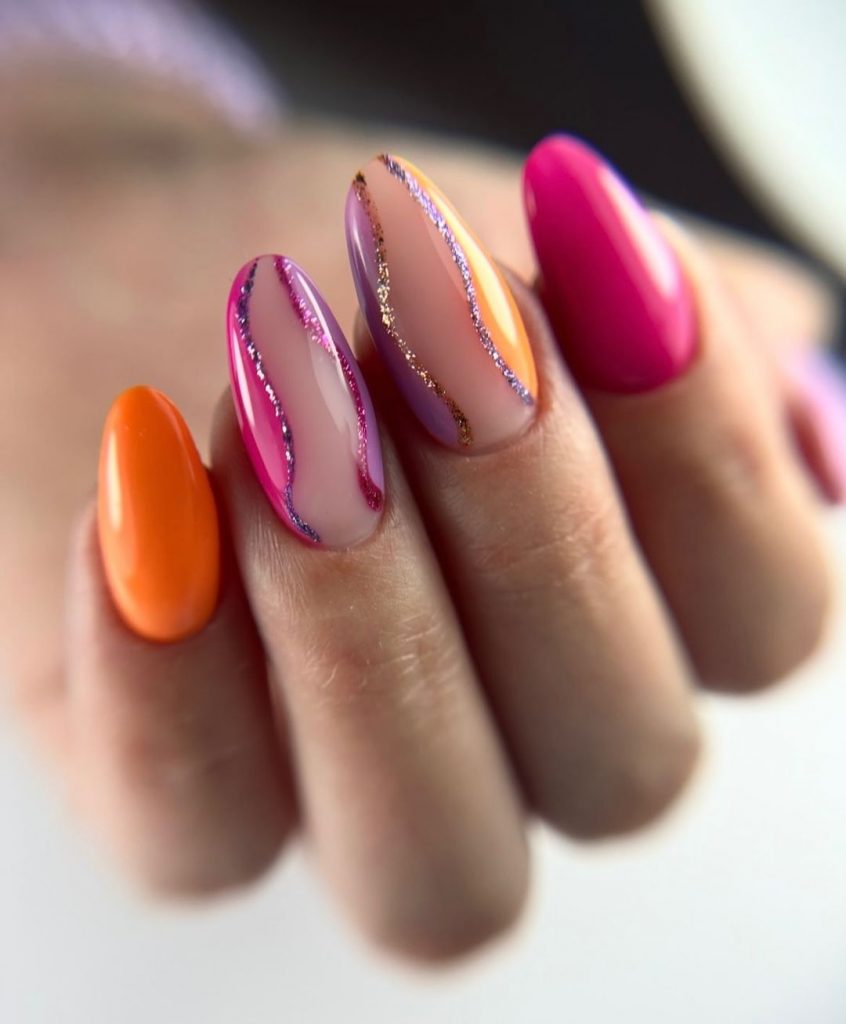
Tools & Products:
- Nail Polish: OPI in “Hot & Spicy” and “Pompeii Purple”
- Glitter: CND Additives in “Gold Sparkle”
- Top Coat: Seche Vite Dry Fast Top Coat
- Tools: Fine detailing brush for swirls, UV lamp
DIY Tips:
- Start with a base coat to protect your nails.
- Apply two coats of pink and orange polish, alternating between nails.
- Use a fine detailing brush to create glittery swirls on select nails.
- Seal the design with a top coat and cure under a UV lamp.
Autumn Leaves and Sweater Texture
This cozy design captures the essence of fall with its warm orange tones, autumn leaves, and sweater texture accents. The mix of glossy and textured finishes adds dimension to the design, making it perfect for the cooler months. This manicure is a great choice for anyone looking to embrace the season’s vibes with their nails.
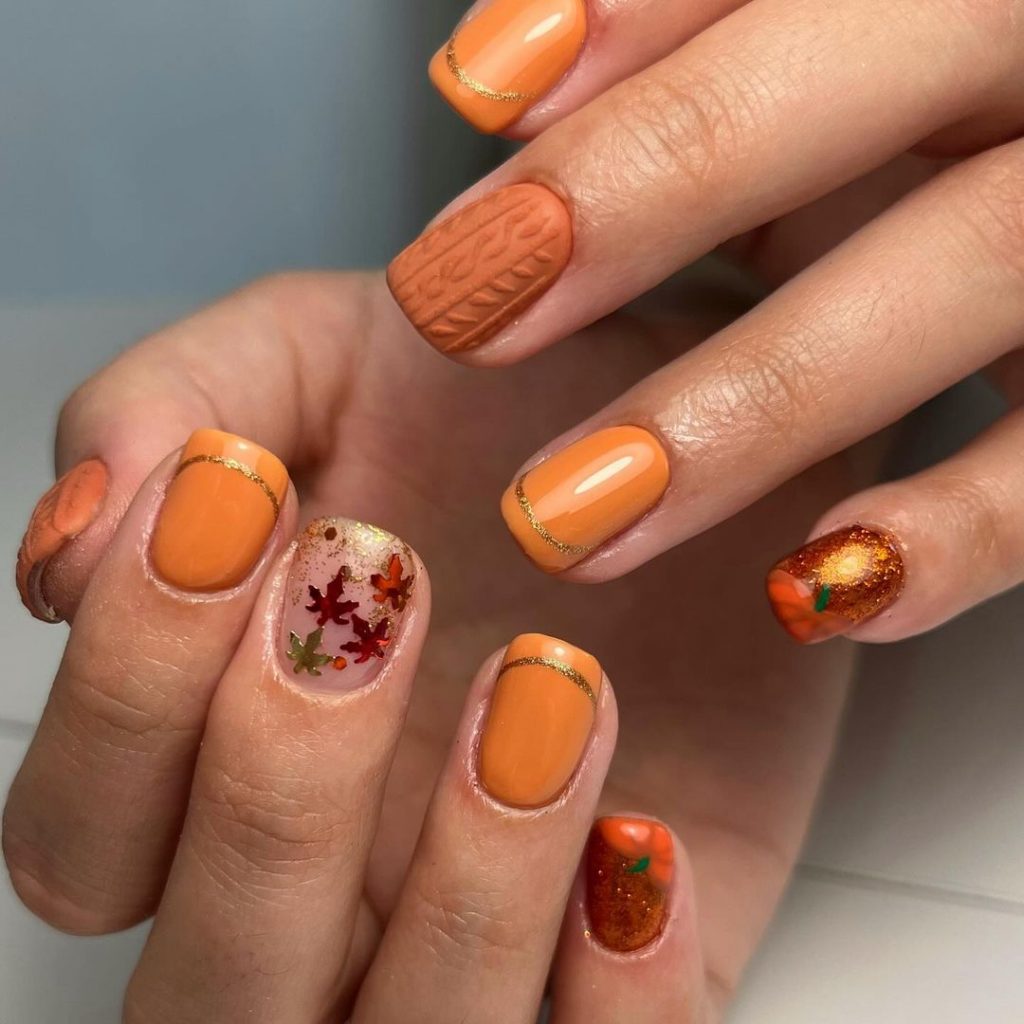
Tools & Products:
- Nail Polish: Essie in “Playing Koi”
- Texture Polish: OPI in “It’s a Piazza Cake”
- Glitter: China Glaze in “Fairy Dust”
- Top Coat: Seche Vite Dry Fast Top Coat
- Tools: Dotting tool, detailing brush for leaves
DIY Tips:
- Apply a base coat to protect your nails.
- Use two coats of orange polish for the base.
- Create the sweater texture on one nail using a textured polish and a dotting tool.
- Add autumn leaves with a detailing brush and finish with a top coat for shine.
Teal and Black Elegance
This elegant design features a striking combination of deep teal, black, and nude tones, accented with a hint of glitter. The mix of colors creates a sophisticated look that’s perfect for any occasion. The use of teal glitter on one nail adds a pop of sparkle, making this manicure both classy and eye-catching.
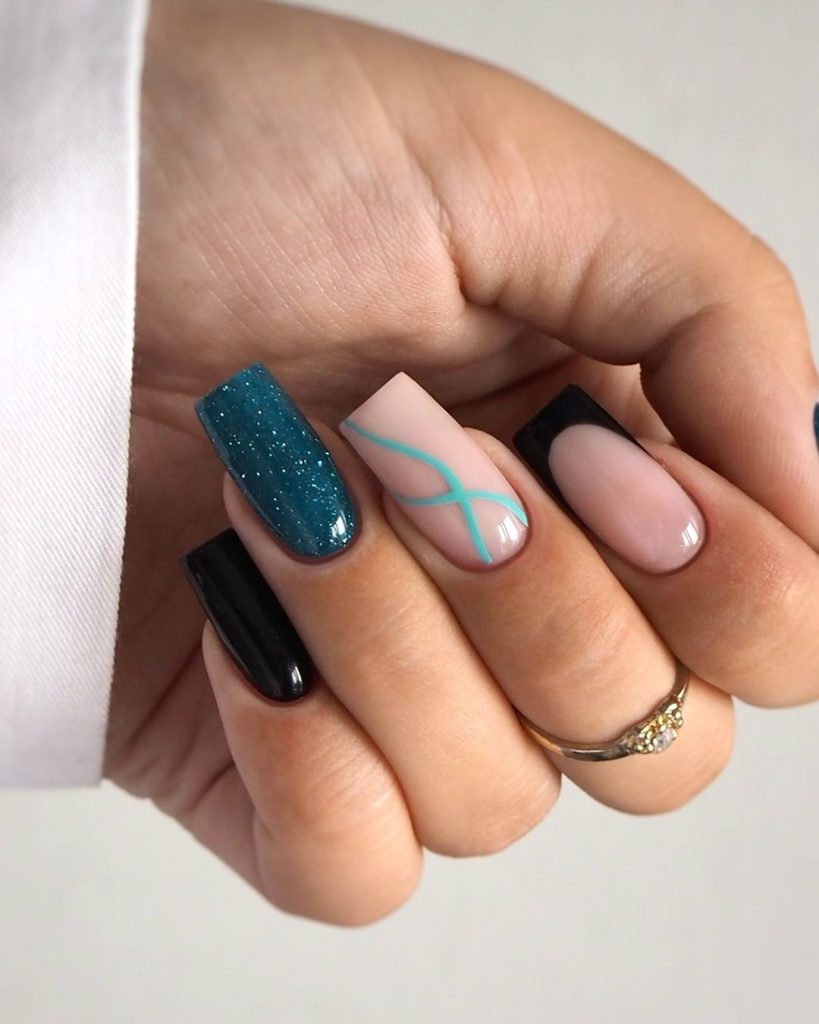
Tools & Products:
- Nail Polish: Zoya in “Talia” and “Willa”
- Glitter: Holo Taco in “Frosted Metals”
- Top Coat: Essie Gel Couture Top Coat
- Tools: Detailing brush for fine lines, UV lamp
DIY Tips:
- Start with a base coat to protect your nails.
- Apply two coats of teal, black, and nude polish, alternating between nails.
- Use a detailing brush to add fine lines and glitter accents.
- Finish with a top coat and cure under a UV lamp for a long-lasting finish.
Yellow Floral Glitter
This cheerful design features soft yellow nails with delicate floral glitter accents. The combination of the bright yellow and the subtle glitter creates a fresh and fun look that’s perfect for brightening up any fall day. The floral elements add a touch of nature to the design, making it ideal for those who love a more whimsical style.
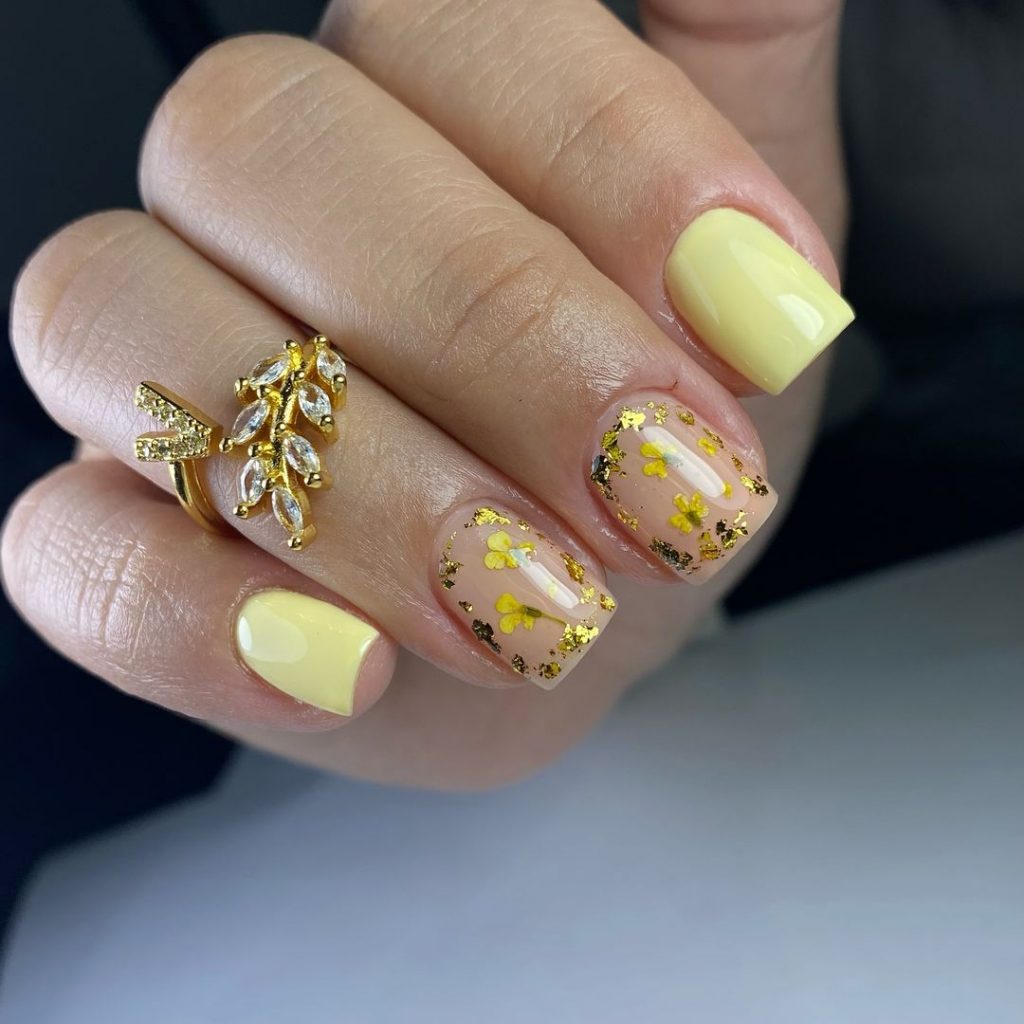
Tools & Products:
- Nail Polish: OPI in “Don’t Tell a Sol”
- Glitter: CND Additives in “Gold Sparkle”
- Top Coat: Seche Vite Dry Fast Top Coat
- Tools: Dotting tool, sponge for glitter application
DIY Tips:
- Apply a base coat to protect your nails.
- Use two coats of yellow polish, allowing each layer to dry thoroughly.
- Apply floral glitter accents using a dotting tool, focusing on the center of each nail.
- Seal with a top coat and cure under a UV lamp.
Brown Glitter Elegance
This design features rich brown tones with glitter accents, creating a sophisticated and chic look perfect for fall. The mix of matte and glossy finishes adds depth to the design, while the glitter provides just the right amount of sparkle. This manicure is ideal for those looking for a polished and elegant look.
Tools & Products:
- Nail Polish: Essie in “Wicked” and “Mink Muffs”
- Glitter: OPI in “Goldeneye”
- Top Coat: Essie Gel Couture Top Coat
- Tools: Detailing brush, sponge for glitter application
DIY Tips:
- Apply a base coat to protect your nails.
- Use two coats of brown polish, letting each layer dry completely.
- Apply glitter accents using a sponge for a more diffused effect.
- Seal with a top coat and cure under a UV lamp.
Burgundy and Pink with Rhinestones
This luxurious design combines deep burgundy with soft pink, accented by rhinestones and glitter. The rich colors create a glamorous look, perfect for a special event or when you just want to add a touch of elegance to your day. The rhinestones add an extra level of sophistication, making this manicure truly stand out.
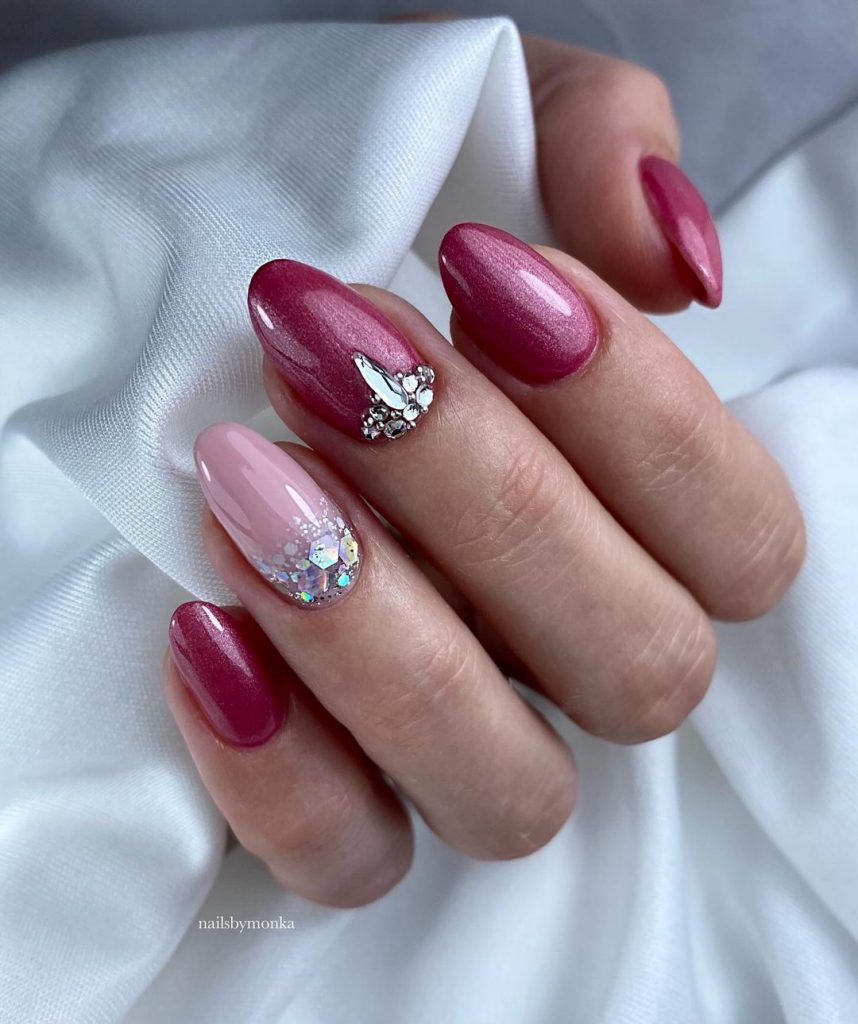
Tools & Products:
- Nail Polish: OPI in “Malaga Wine” and “Bubble Bath”
- Glitter: Holo Taco in “Linear Holo Taco”
- Top Coat: Seche Vite Dry Fast Top Coat
- Tools: Rhinestone applicator, UV lamp
DIY Tips:
- Apply a base coat to protect your nails.
- Use two coats of burgundy and pink polish, alternating between nails.
- Add glitter and rhinestone accents for a touch of sparkle and glam.
- Finish with a top coat and cure under a UV lamp to lock in the design.
Save Pin