As the leaves turn and the air grows crisp, it’s the perfect time to update your nail game with some bold, dark, and edgy styles. Goth fall nails 2024 are all about combining the deep, mysterious shades of autumn with intricate designs that evoke a sense of grunge sophistication. Are you ready to dive into the world of gothic nail art? Let’s explore some stunning designs that will inspire your next manicure.
Dark Burgundy Elegance
When it comes to goth fall nails 2024, nothing says elegance like a rich, dark burgundy. This color exudes a sense of mystery and sophistication, perfect for those who love a classic goth vibe. The long, pointed nails add an extra edge, making this design both fierce and classy.
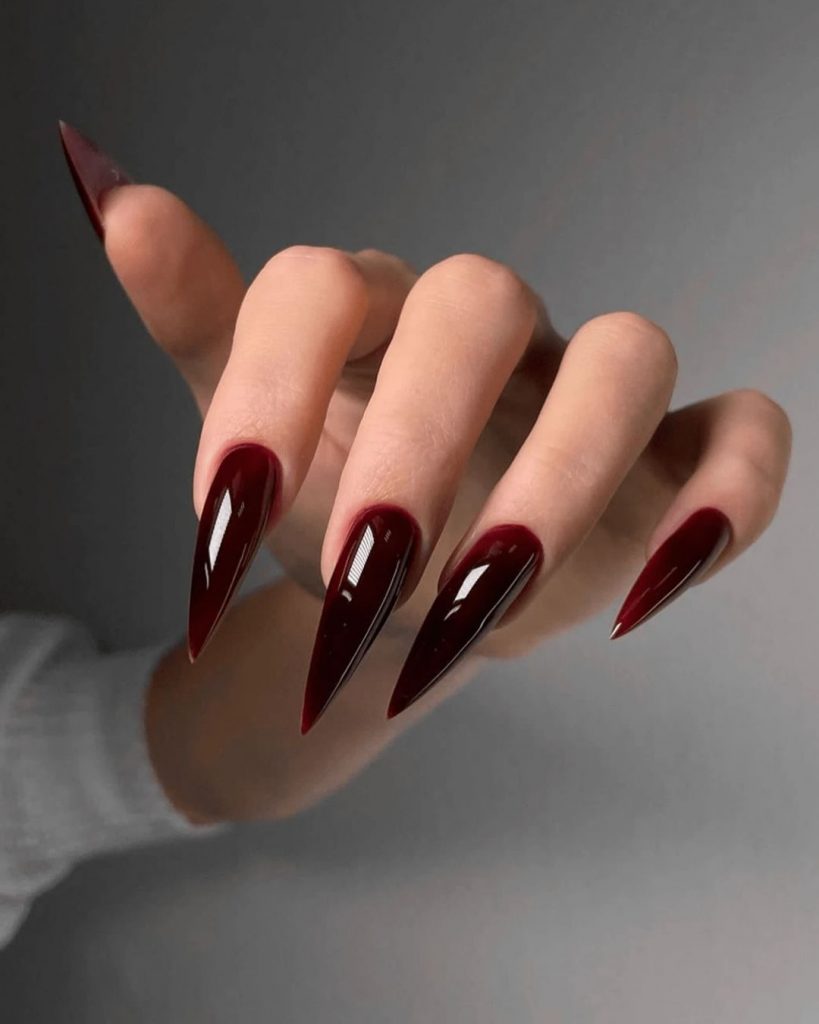
Consumables:
- Dark burgundy nail polish (e.g., OPI’s “Malaga Wine”)
- Base coat and top coat (e.g., Seche Vite)
- Nail file and buffer
- Cuticle oil (e.g., Sally Hansen Vitamin E Nail & Cuticle Oil)
Recommendations:
- Opt for a gel polish to ensure long-lasting wear.
- Use a high-gloss top coat to enhance the rich color.
- Regularly apply cuticle oil to maintain healthy-looking nails.
DIY Instructions
- Prep: Start by filing your nails into a sharp point and buffing the surface for a smooth base. Apply a base coat to protect your nails.
- Color: Apply two coats of the dark burgundy polish, allowing each coat to dry completely.
- Finish: Seal the look with a high-gloss top coat for a shiny, professional finish. Don’t forget to hydrate your cuticles with oil.
Green Glitter Glam
For a more playful yet gothic look, this green glitter design is a perfect choice. The mix of green shades and glitter creates a magical, forest-inspired effect that’s perfect for the fall season.
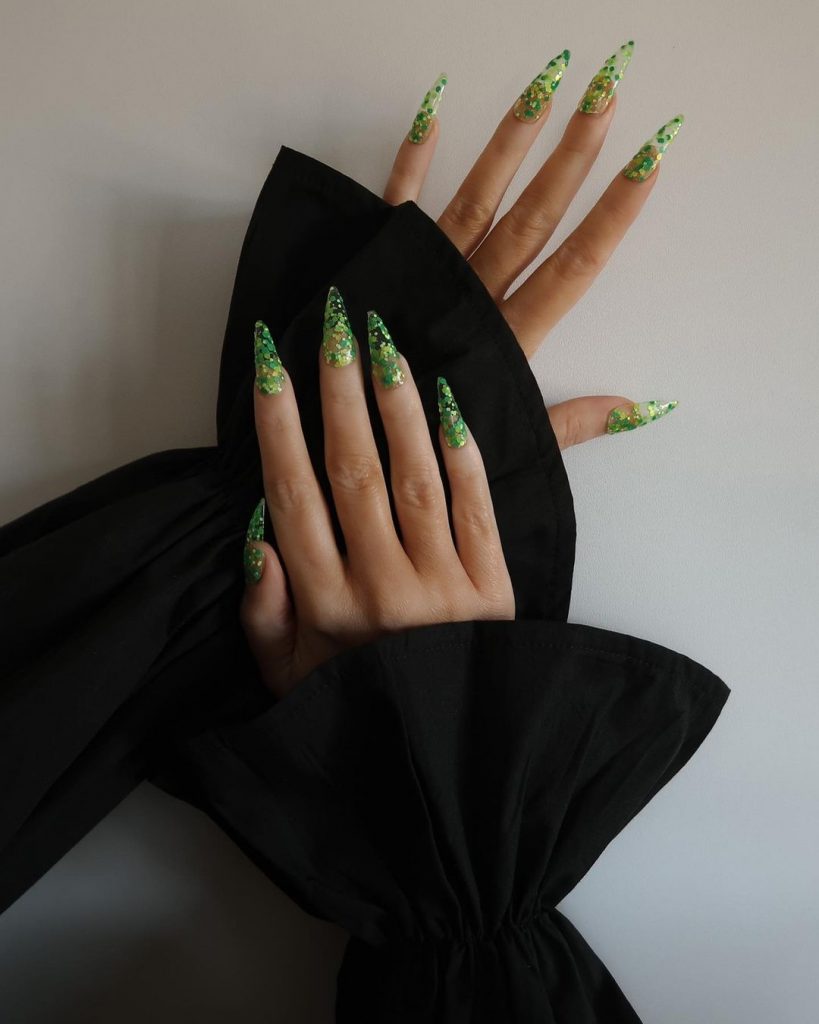
Consumables:
- Green glitter nail polish (e.g., China Glaze’s “Emerald Sparkle”)
- Base coat and top coat
- Nail file and buffer
- Nail art brush
Recommendations:
- Layer different shades of green glitter for a more dimensional look.
- Use a nail art brush to apply glitter precisely.
- Seal with a top coat to prevent chipping and enhance shine.
DIY Instructions
- Prep: Shape your nails and buff the surface. Apply a base coat to protect your nails.
- Color: Apply a base coat of green polish. Once dry, use a nail art brush to apply green glitter polish in layers for a textured effect.
- Finish: Apply a top coat to seal in the glitter and add extra shine.
Spiderweb Spooky
Get ready for Halloween with these spooky spiderweb nails. The gradient black and orange base with intricate white spiderwebs is perfect for those looking to embrace the spooky season in style.

Consumables:
- Black and orange gradient nail polish (e.g., Sally Hansen’s “Blacky-O” and “Sun-Kissed”)
- White nail art polish for spiderwebs (e.g., LA Colors Art Deco)
- Base coat and top coat
- Nail art brush and dotting tool
Recommendations:
- Use a sponge to create the gradient effect.
- Practice drawing spiderwebs on a piece of paper before applying to nails.
- Finish with a matte top coat for a unique twist.
DIY Instructions
- Prep: File and buff your nails. Apply a base coat to protect your nails.
- Color: Create a gradient effect using black and orange polish with a sponge. Once dry, use a nail art brush and white polish to draw spiderwebs.
- Finish: Apply a matte top coat to seal the design and add a spooky, sophisticated touch.
Marble Madness
Marble nails are a chic way to add a touch of sophistication to your goth fall nails. This design uses a mix of black and beige tones to create a swirling marble effect that’s both elegant and edgy.
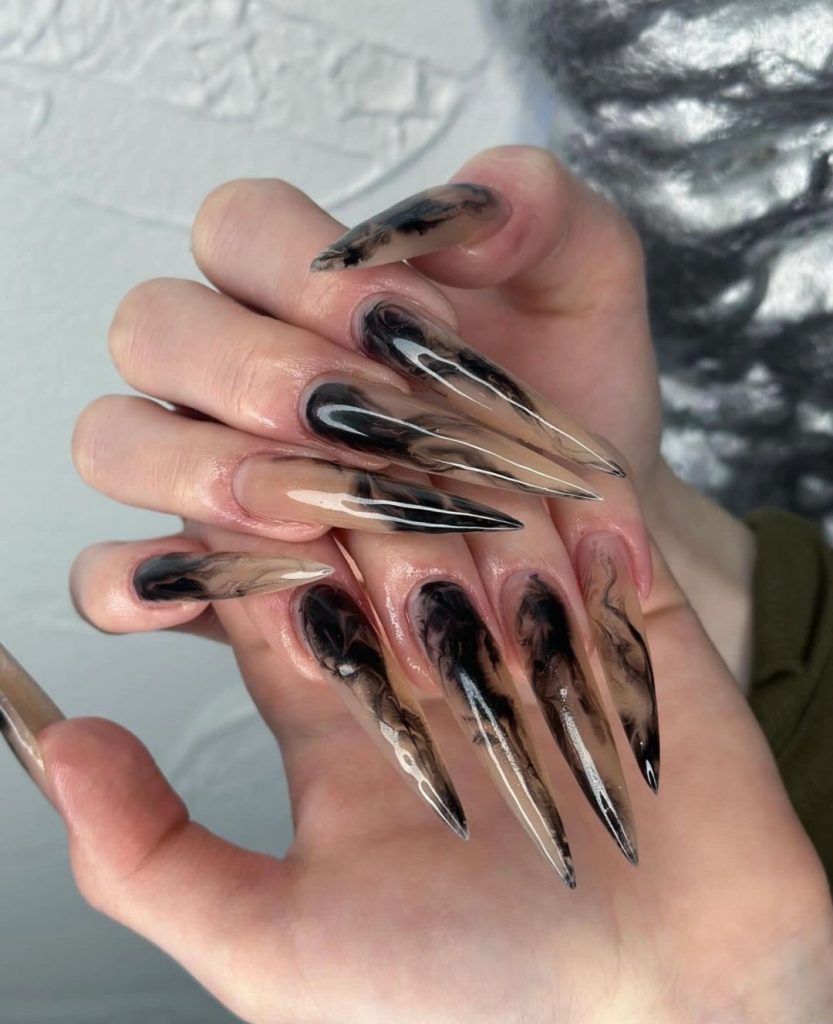
Consumables:
- Black and beige nail polish (e.g., Essie’s “Licorice” and “Sand Tropez”)
- Base coat and top coat
- Nail art brush and plastic wrap
Recommendations:
- Use a nail art brush to create thin, swirling lines.
- Experiment with different color combinations for a unique look.
- Apply a high-gloss top coat to enhance the marble effect.
DIY Instructions
- Prep: Shape your nails and buff the surface. Apply a base coat to protect your nails.
- Color: Apply a base coat of beige polish. Use a nail art brush and black polish to create thin, swirling lines. Lightly press plastic wrap on the wet polish for a marbled effect.
- Finish: Apply a high-gloss top coat to seal the design and enhance the marble effect.
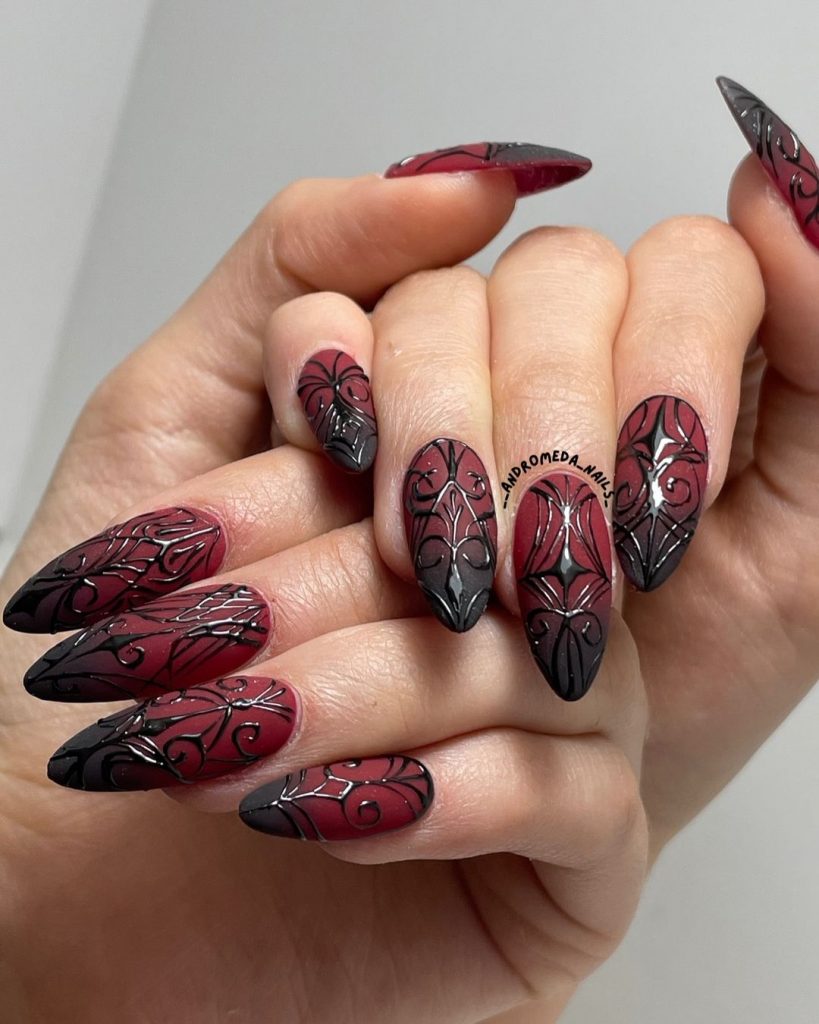
Gothic Glam
These black and red nails scream gothic elegance. The deep red gradient combined with black accents and intricate designs make for a striking and bold manicure perfect for any gothic look.
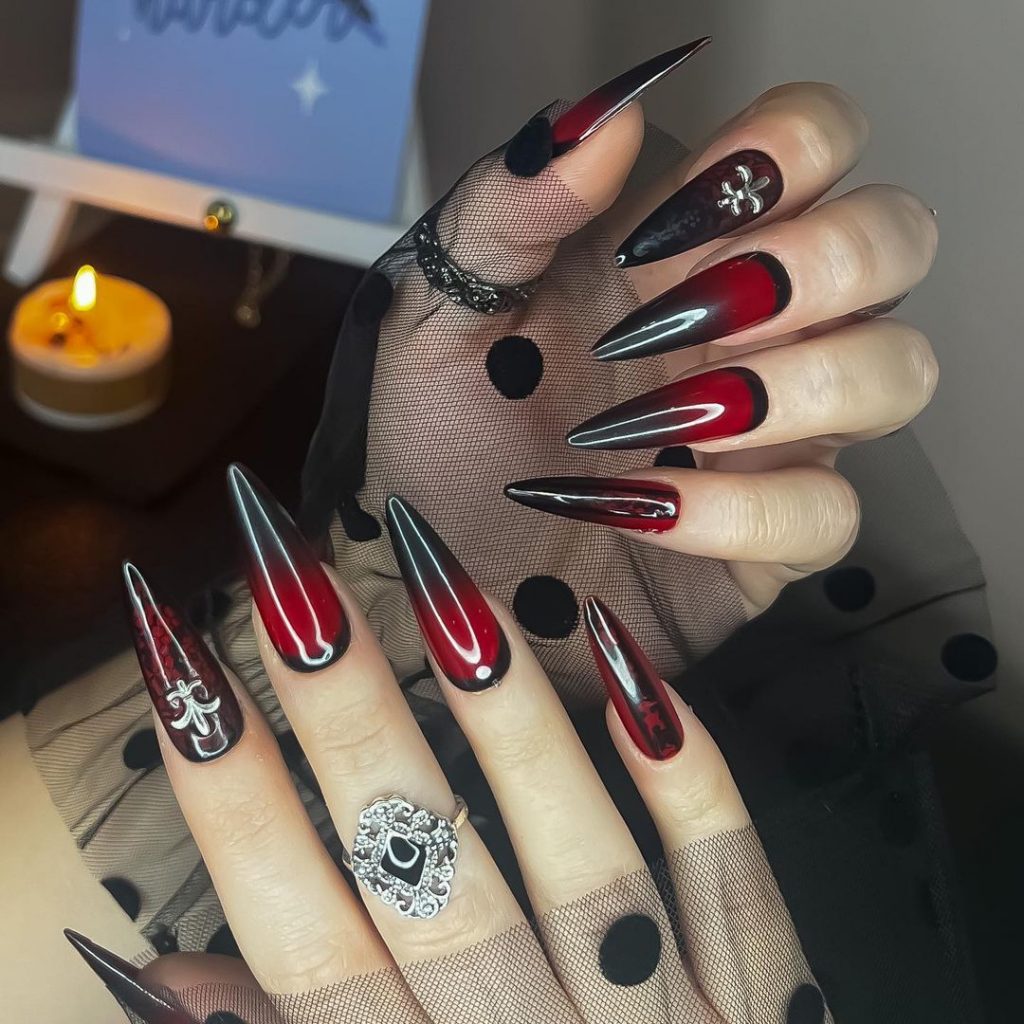
Consumables:
- Black and red nail polish (e.g., OPI’s “Black Onyx” and “Big Apple Red”)
- Base coat and top coat
- Nail art brush and dotting tool
- Rhinestones (optional)
Recommendations:
- Create a smooth gradient using a sponge.
- Add rhinestones for extra glam.
- Use a high-gloss top coat for a polished finish.
DIY Instructions
- Prep: File and buff your nails. Apply a base coat to protect your nails.
- Color: Create a gradient effect using black and red polish with a sponge. Once dry, use a nail art brush to add intricate designs.
- Finish: Apply a top coat to seal the design and add shine. For extra glam, add rhinestones before applying the top coat.
Metallic Masterpiece
This striking metallic design embodies the ultimate goth aesthetic for fall. The sharp, pointed nails with a combination of silver and black tones create a futuristic and edgy look that’s sure to turn heads. The intricate patterns and textures give it a unique, artistic flair.
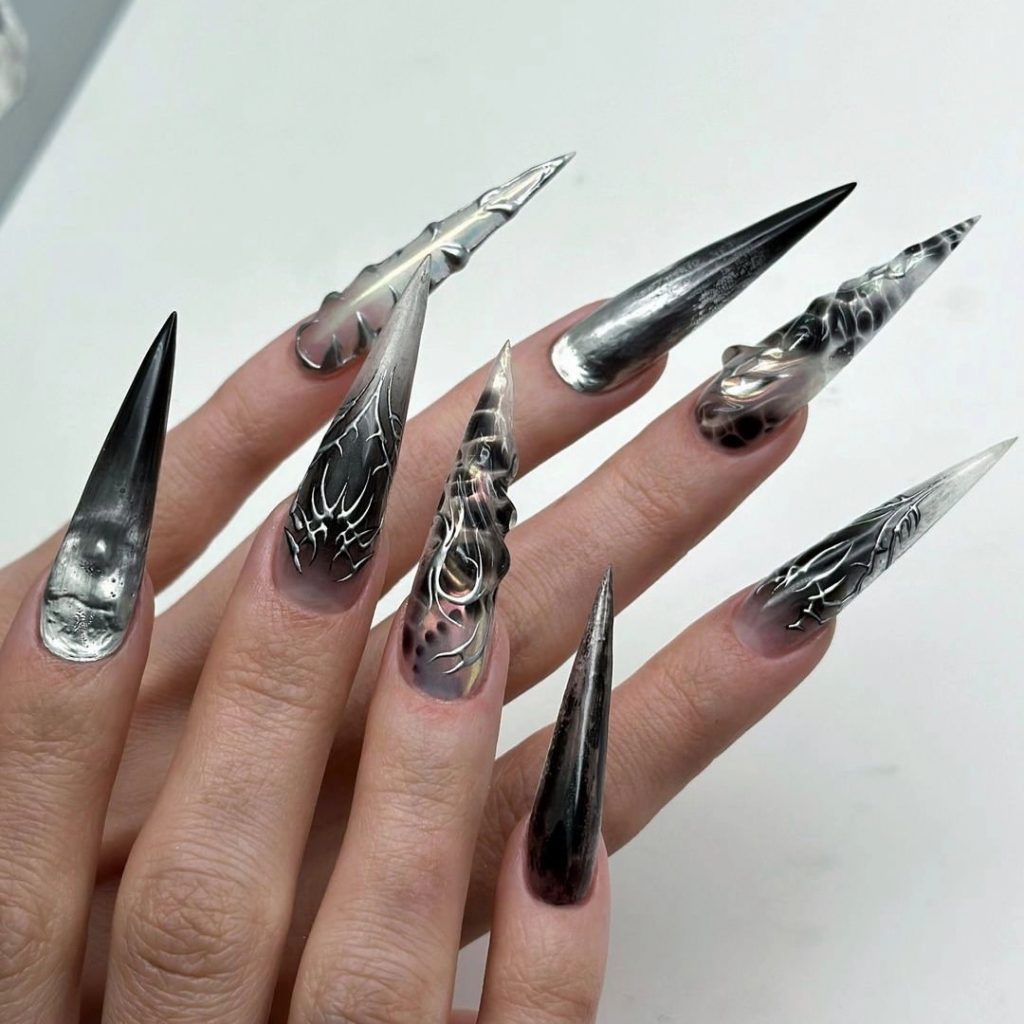
Consumables:
- Black and silver nail polish (e.g., Sally Hansen “Blacky-O” and “Silver Sweep”)
- Base coat and top coat
- Nail file and buffer
- Nail art brush
- Metallic foil or chrome powder
Recommendations:
- Use a chrome powder for a more reflective finish.
- Apply a high-gloss top coat to enhance the metallic effect.
- Ensure nails are filed to a sharp point for a dramatic look.
DIY Instructions
- Prep: Shape your nails into sharp points and buff the surface. Apply a base coat to protect your nails.
- Color: Apply a black base color. Once dry, use a nail art brush to apply silver polish in intricate patterns. For a more reflective finish, use chrome powder.
- Finish: Apply a high-gloss top coat to seal the design and add shine. Use a cuticle oil to keep nails hydrated and healthy.
Vintage Gothic Vibes
These nails feature a stunning black and red vintage-inspired design. The intricate patterns on a matte base give off an elegant yet gothic feel, perfect for those who love a touch of old-world charm with their edgy style.
Consumables:
- Black and red matte nail polish (e.g., OPI “Lincoln Park After Dark” and “Got the Blues for Red”)
- Base coat and matte top coat
- Nail file and buffer
- Nail art brush and stamping tools
Recommendations:
- Use stamping tools for intricate patterns.
- Apply a matte top coat to give a sophisticated finish.
- Regularly apply cuticle oil to maintain healthy nails.
DIY Instructions
- Prep: File and buff your nails. Apply a base coat to protect your nails.
- Color: Apply a base coat of red matte polish. Once dry, use a nail art brush or stamping tool to create black intricate patterns.
- Finish: Apply a matte top coat to seal the design. Hydrate your cuticles with oil to keep them healthy.
Purple Perfection
These purple and black nails are perfect for adding a touch of goth glam to your fall look. The deep purple combined with black accents and a glossy finish makes for a striking and dramatic manicure.
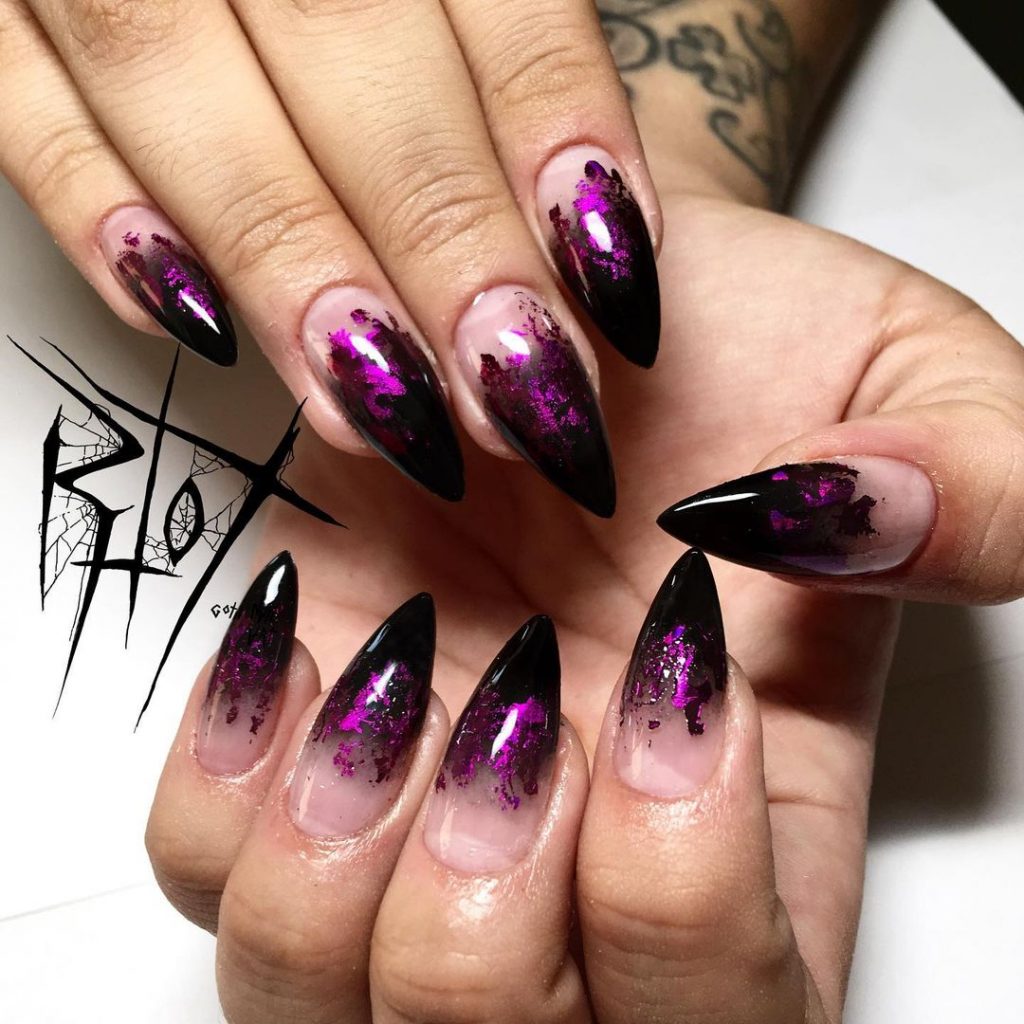
Consumables:
- Black and purple nail polish (e.g., Essie “Licorice” and “Sexy Divide”)
- Base coat and top coat
- Nail file and buffer
- Nail art brush
Recommendations:
- Use a high-quality top coat for a glossy finish.
- Experiment with different shades of purple for a unique look.
- Regularly apply cuticle oil to keep nails looking fresh.
DIY Instructions
- Prep: Shape your nails and buff the surface. Apply a base coat to protect your nails.
- Color: Apply a base coat of black polish. Once dry, use a nail art brush to add purple accents.
- Finish: Apply a high-gloss top coat to seal the design. Keep your cuticles hydrated with oil.
Classic Black
Nothing beats the timeless elegance of black nails. These sleek, glossy black nails are a staple for any goth-inspired look. The simplicity of the design makes it versatile and perfect for any occasion.

Consumables:
- Black nail polish (e.g., OPI “Black Onyx”)
- Base coat and top coat
- Nail file and buffer
Recommendations:
- Apply a high-gloss top coat for a shiny finish.
- Keep nails filed to a uniform shape for a polished look.
- Regularly apply cuticle oil to maintain nail health.
DIY Instructions
- Prep: File and buff your nails. Apply a base coat to protect your nails.
- Color: Apply two coats of black polish, allowing each coat to dry completely.
- Finish: Seal with a high-gloss top coat. Hydrate your cuticles with oil for a healthy look.
Starry Night
These nails feature a starry night design, combining black, purple, and white shades to create a cosmic effect. The long, coffin shape adds to the drama, making it a perfect choice for those who love celestial-inspired nail art.
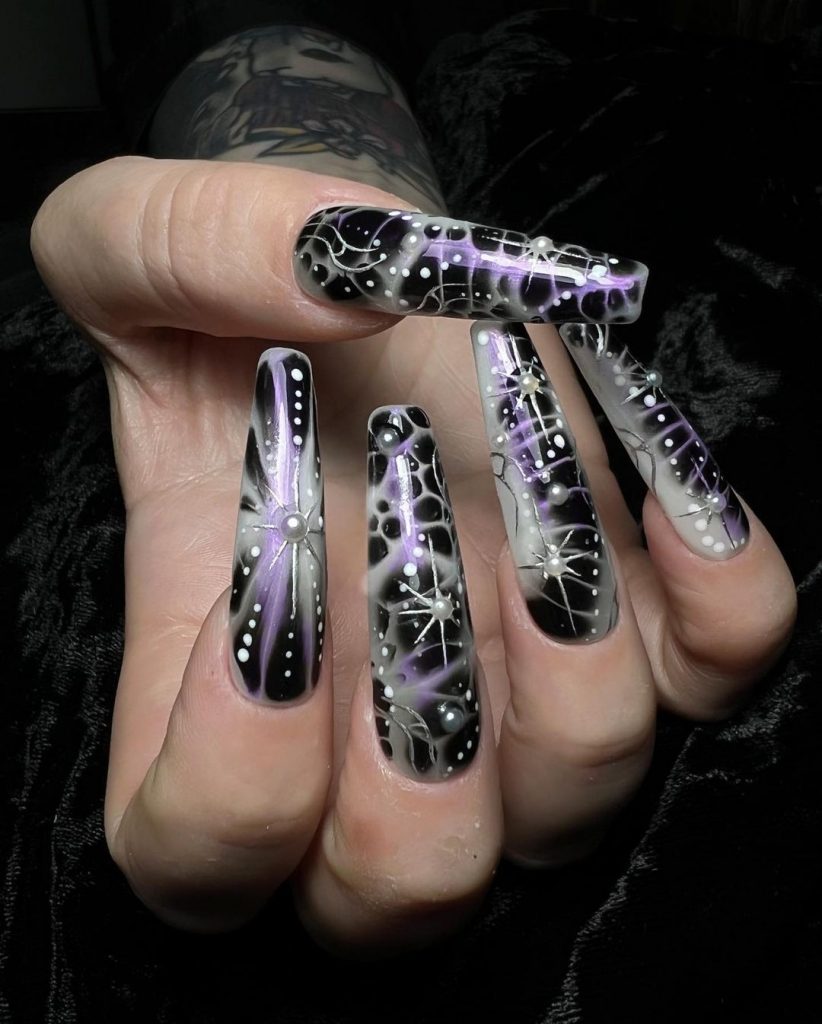
Consumables:
- Black, purple, and white nail polish (e.g., Sally Hansen “Black Heart”, Essie “Play Date”, and OPI “Alpine Snow”)
- Base coat and top coat
- Nail file and buffer
- Nail art brush and dotting tool
Recommendations:
- Use a dotting tool to create precise stars and dots.
- Apply a high-gloss top coat for a shiny finish.
- Regularly apply cuticle oil to maintain nail health.
DIY Instructions
- Prep: Shape your nails into a coffin shape and buff the surface. Apply a base coat to protect your nails.
- Color: Apply a base coat of black polish. Once dry, use a nail art brush to add purple and white accents to create a starry effect. Use a dotting tool to add stars.
- Finish: Apply a high-gloss top coat to seal the design. Keep your cuticles hydrated with oil.
Edgy Matte Black
This matte black design is perfect for those who want an edgy, modern look. The sleek black base is accented with glossy black swirls, creating a dynamic contrast that adds depth and interest to the nails. The long, pointed shape enhances the dramatic effect, making this design a standout for the season.
Consumables:
- Matte black nail polish (e.g., Zoya “Willa”)
- Glossy black nail polish (e.g., OPI “Black Onyx”)
- Base coat and matte top coat
- Nail file and buffer
- Nail art brush
Recommendations:
- Use a matte top coat to achieve the perfect matte finish.
- Carefully apply glossy swirls for a striking contrast.
- Regularly apply cuticle oil to keep nails healthy.
DIY Instructions
- Prep: Shape your nails into sharp points and buff the surface. Apply a base coat to protect your nails.
- Color: Apply two coats of matte black polish, allowing each coat to dry completely. Use a nail art brush to create glossy black swirls.
- Finish: Apply a matte top coat to seal the design. Use cuticle oil to hydrate your nails.
Metallic and Pearl Glam
These nails combine metallic hues and pearls for a truly glamorous look. The mix of black, purple, and silver tones with intricate 3D elements like chains and pearls creates a luxurious and edgy design that’s perfect for special occasions.
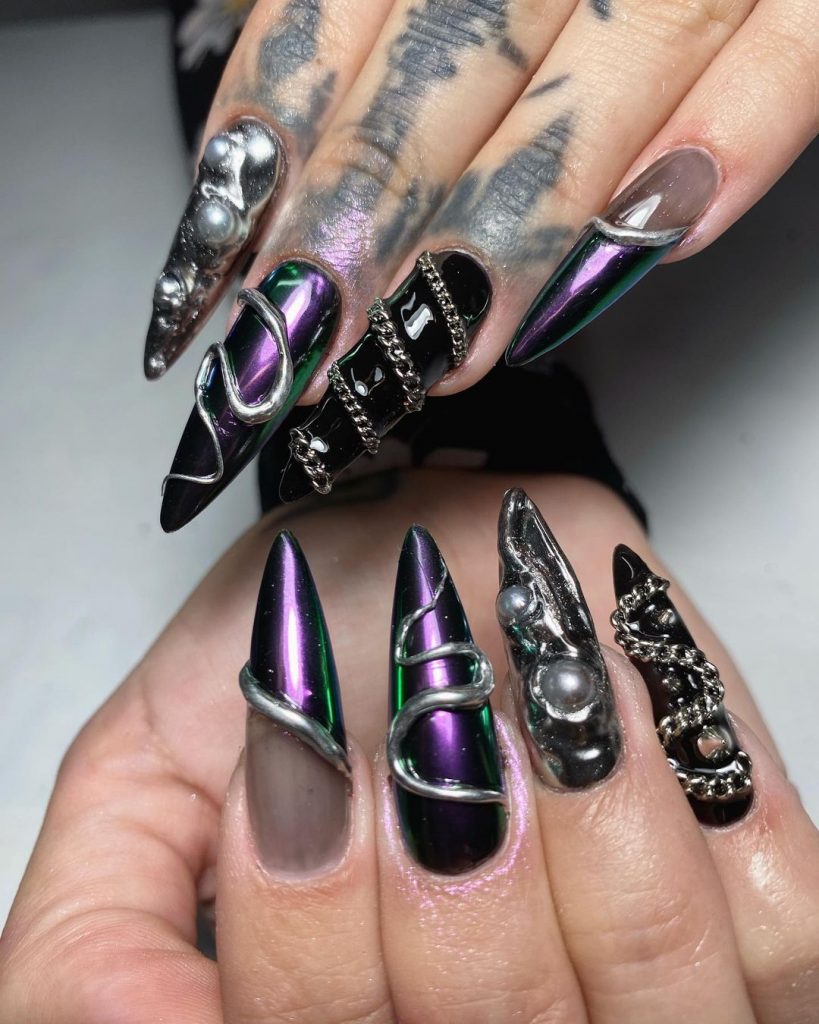
Consumables:
- Black, purple, and silver nail polish (e.g., Essie “Licorice”, Zoya “Olivera”, and Sally Hansen “Silver Sweep”)
- Base coat and top coat
- Nail file and buffer
- 3D nail art elements (chains, pearls)
- Nail art brush and glue
Recommendations:
- Use high-quality 3D elements for a more durable design.
- Apply a high-gloss top coat to enhance the metallic finish.
- Regularly apply cuticle oil to keep nails healthy.
DIY Instructions
- Prep: Shape your nails and buff the surface. Apply a base coat to protect your nails.
- Color: Apply a base coat of black polish. Once dry, use a nail art brush to add purple and silver accents. Attach 3D elements with nail glue.
- Finish: Apply a high-gloss top coat to seal the design. Hydrate your cuticles with oil.
Transparent Blue Gradient
This transparent blue gradient design is perfect for those who love a subtle yet striking look. The gradient effect from clear to blue creates a modern, minimalist aesthetic that’s both chic and sophisticated.
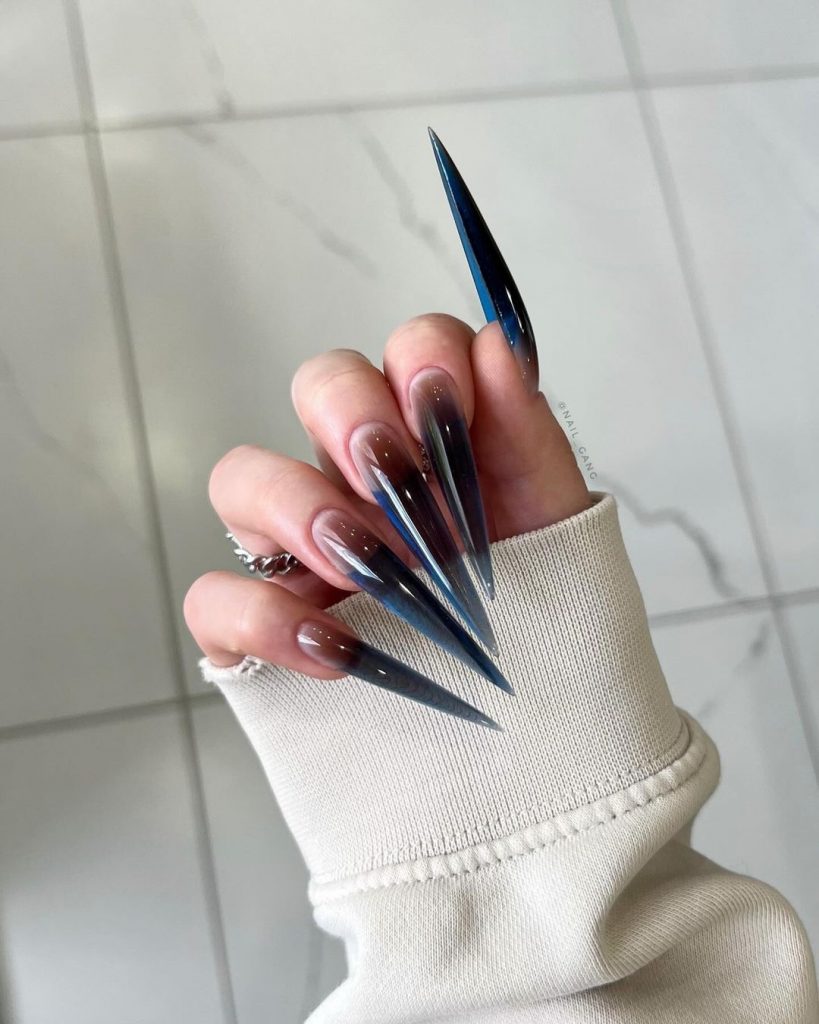
Consumables:
- Clear and blue nail polish (e.g., Essie “Ballet Slippers” and OPI “Russian Navy”)
- Base coat and top coat
- Nail file and buffer
- Sponge for gradient effect
Recommendations:
- Use a sponge to create a seamless gradient.
- Apply a high-gloss top coat for a shiny finish.
- Regularly apply cuticle oil to maintain healthy nails.
DIY Instructions
- Prep: Shape your nails into sharp points and buff the surface. Apply a base coat to protect your nails.
- Color: Apply a clear base coat. Use a sponge to dab blue polish on the tips, creating a gradient effect.
- Finish: Apply a high-gloss top coat to seal the design. Use cuticle oil to keep nails hydrated.
Spiked Blood Red
This spiked blood red design is perfect for those who love a dramatic, gothic look. The deep red base is accented with black spikes and metallic elements, creating a fierce and edgy manicure that’s perfect for fall.
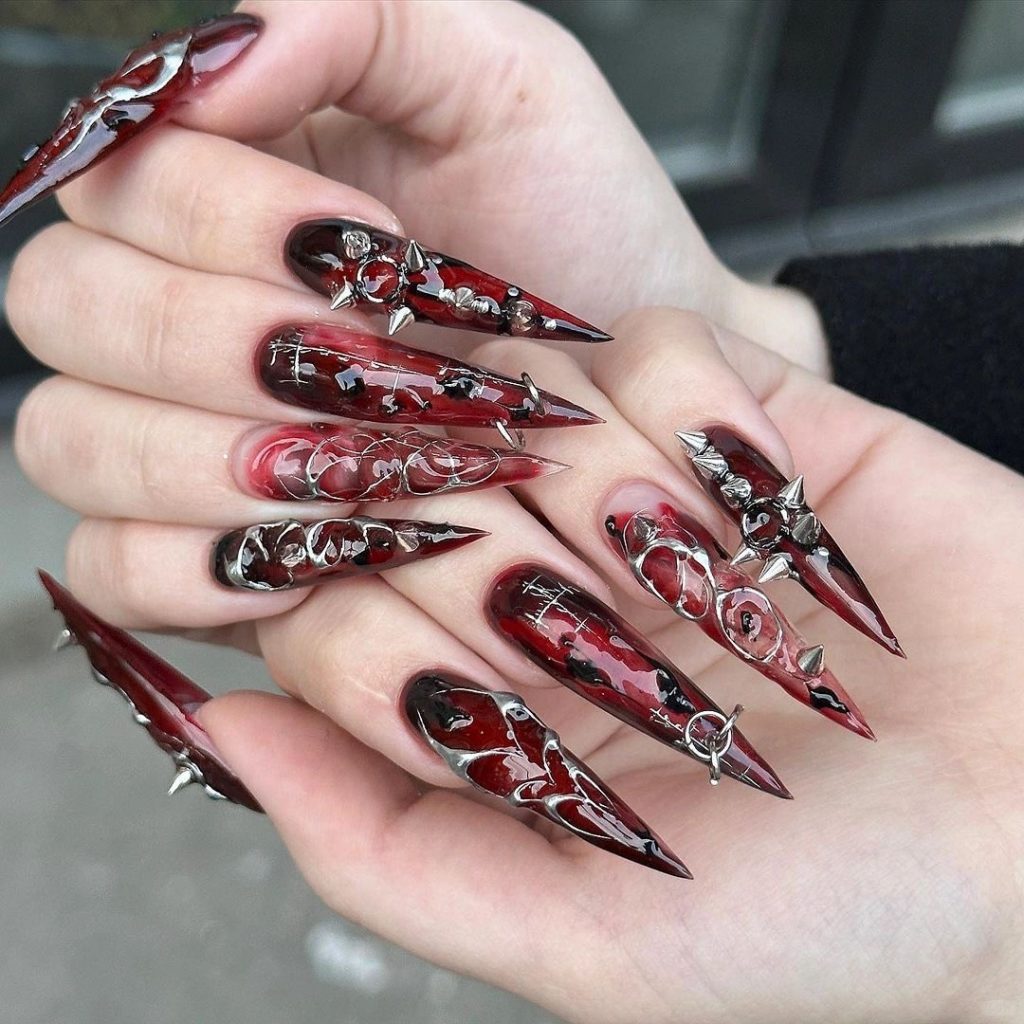
Consumables:
- Deep red nail polish (e.g., OPI “Malaga Wine”)
- Black nail polish (e.g., Essie “Licorice”)
- Base coat and top coat
- Nail file and buffer
- 3D nail art elements (spikes, chains)
Recommendations:
- Use high-quality 3D elements for durability.
- Apply a high-gloss top coat to enhance the shine.
- Regularly apply cuticle oil to maintain nail health.
DIY Instructions
- Prep: Shape your nails and buff the surface. Apply a base coat to protect your nails.
- Color: Apply a base coat of deep red polish. Once dry, use a nail art brush to add black accents and attach 3D elements with nail glue.
- Finish: Apply a high-gloss top coat to seal the design. Keep your cuticles hydrated with oil.
Spider and Web Design
This spider and web design is perfect for those who love a spooky, gothic aesthetic. The clear to dark gradient base is accented with 3D spider and web elements, creating a creepy yet chic look that’s perfect for Halloween or any gothic-inspired outfit.
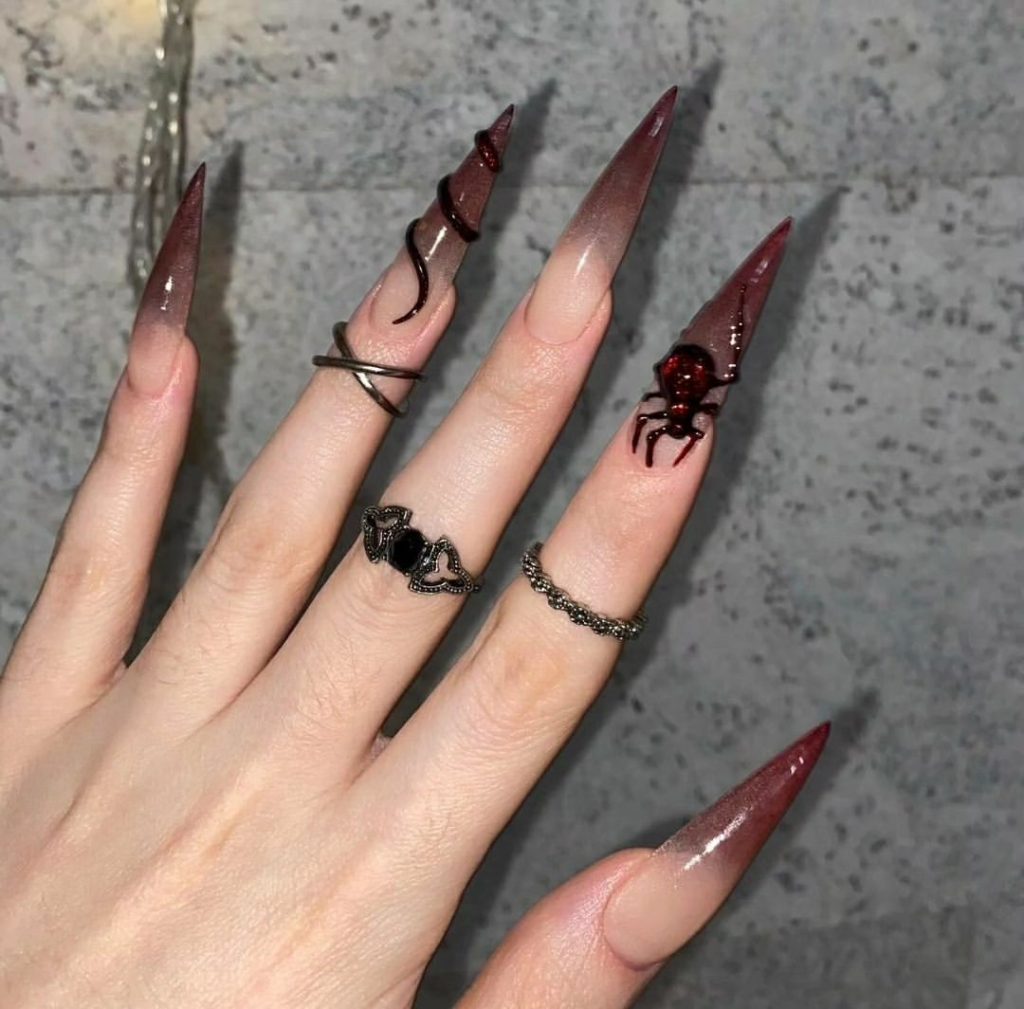
Consumables:
- Clear and dark red nail polish (e.g., OPI “Alpine Snow” and “Malaga Wine”)
- Base coat and top coat
- Nail file and buffer
- 3D nail art elements (spiders, webs)
- Nail art brush and glue
Recommendations:
- Use high-quality 3D elements for a more realistic effect.
- Apply a high-gloss top coat to enhance the shine.
- Regularly apply cuticle oil to keep nails healthy.
DIY Instructions
- Prep: Shape your nails into sharp points and buff the surface. Apply a base coat to protect your nails.
- Color: Apply a clear base coat. Use a sponge to create a gradient effect with dark red polish. Attach 3D elements with nail glue.
- Finish: Apply a high-gloss top coat to seal the design. Hydrate your cuticles with oil.
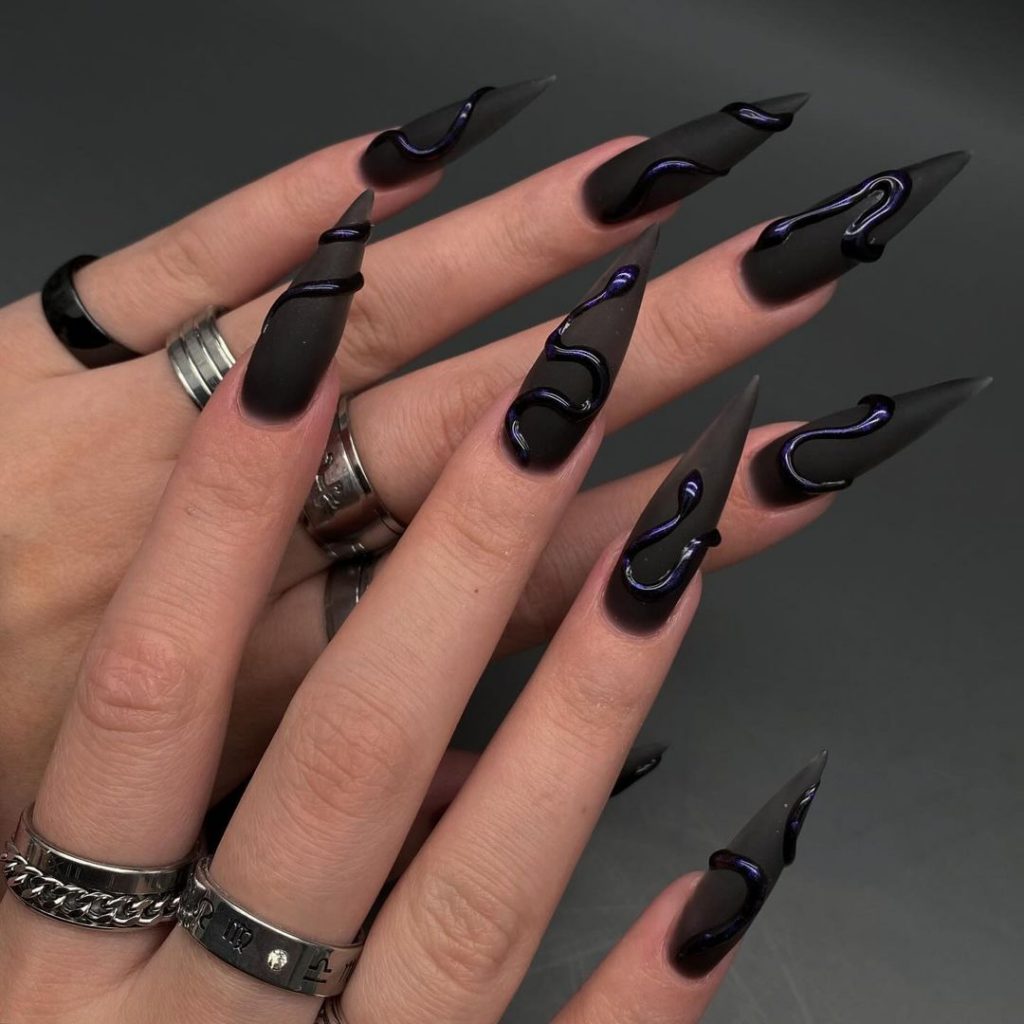
Purple Flames
This purple flames design is an eye-catching choice for goth fall nails 2024. The combination of deep black and vibrant purple with a glossy finish creates a dramatic and fiery look. The long, pointed shape enhances the edgy vibe, making these nails a bold statement piece.
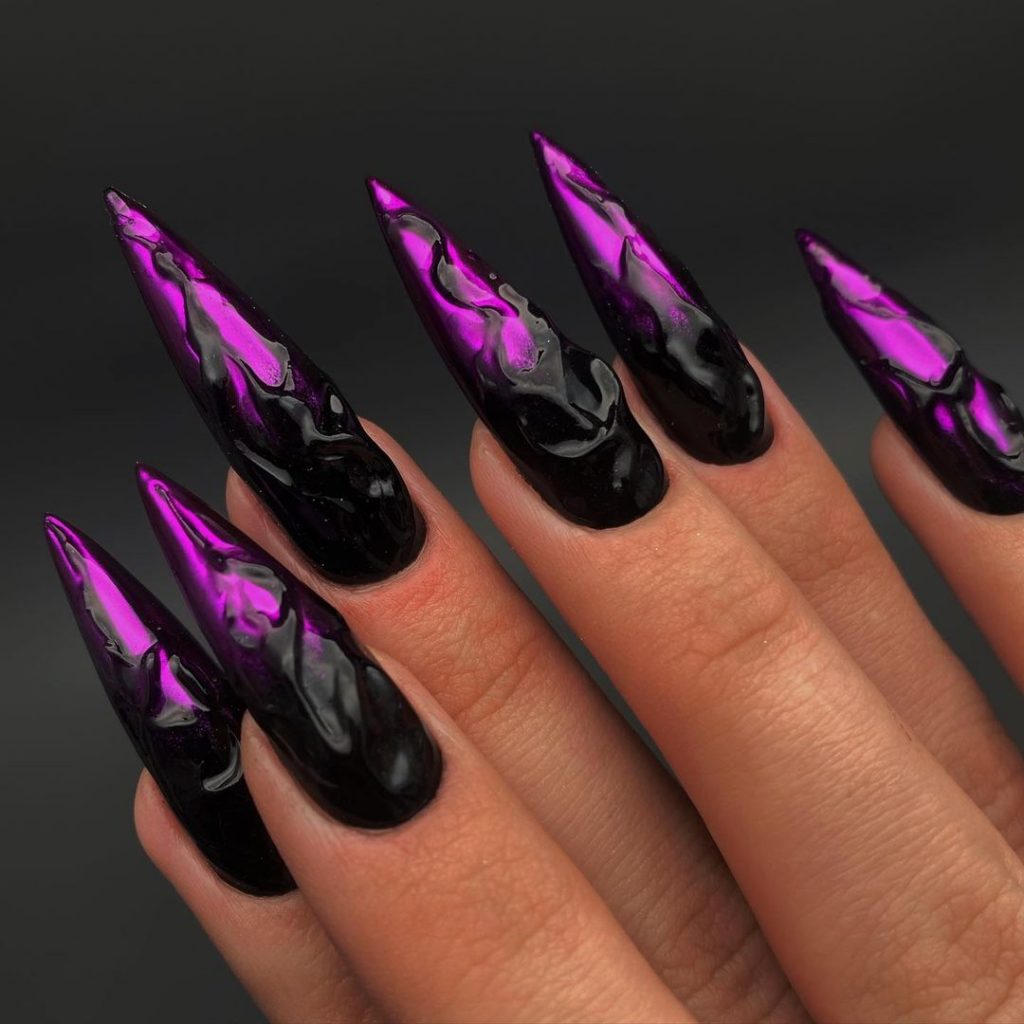
Consumables:
- Black nail polish (e.g., OPI “Black Onyx”)
- Purple chrome powder (e.g., Daily Charme “Iridescent Purple Chrome Powder”)
- Base coat and top coat
- Nail file and buffer
- Nail art brush
Recommendations:
- Use a high-quality purple chrome powder for a reflective finish.
- Apply a glossy top coat to enhance the shine and depth.
- Regularly apply cuticle oil to keep nails healthy.
DIY Instructions
- Prep: Shape your nails into sharp points and buff the surface. Apply a base coat to protect your nails.
- Color: Apply a black base color. Once dry, use a nail art brush to apply the purple chrome powder in flame patterns.
- Finish: Apply a high-gloss top coat to seal the design and add shine. Use cuticle oil to keep nails hydrated.
Blood Red and Black Spirals
This blood red and black design with spiral accents is perfect for those who love a dramatic, gothic look. The deep red base with black spirals creates a striking contrast, and the glossy finish adds a touch of sophistication.
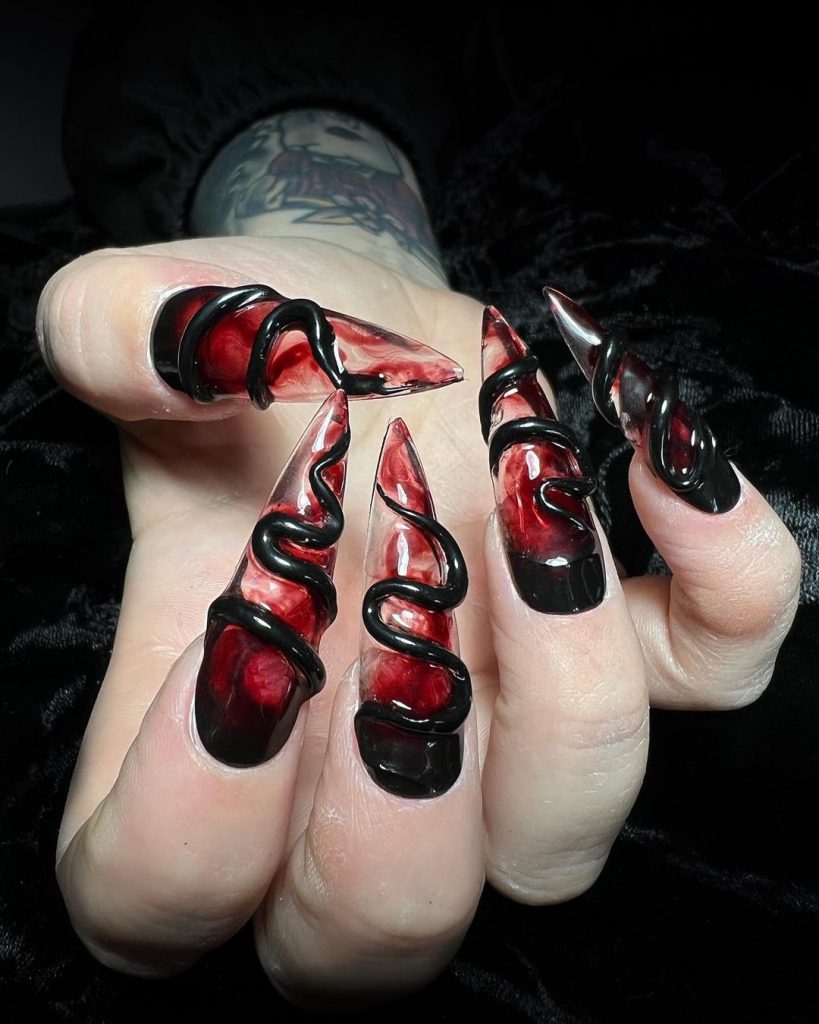
Consumables:
- Deep red nail polish (e.g., OPI “Malaga Wine”)
- Black nail polish (e.g., Essie “Licorice”)
- Base coat and top coat
- Nail file and buffer
- Nail art brush
Recommendations:
- Use a high-gloss top coat for a shiny finish.
- Carefully apply black spirals for a bold contrast.
- Regularly apply cuticle oil to maintain nail health.
DIY Instructions
- Prep: Shape your nails and buff the surface. Apply a base coat to protect your nails.
- Color: Apply two coats of deep red polish, allowing each coat to dry completely. Use a nail art brush to create black spirals.
- Finish: Apply a high-gloss top coat to seal the design. Hydrate your cuticles with oil.
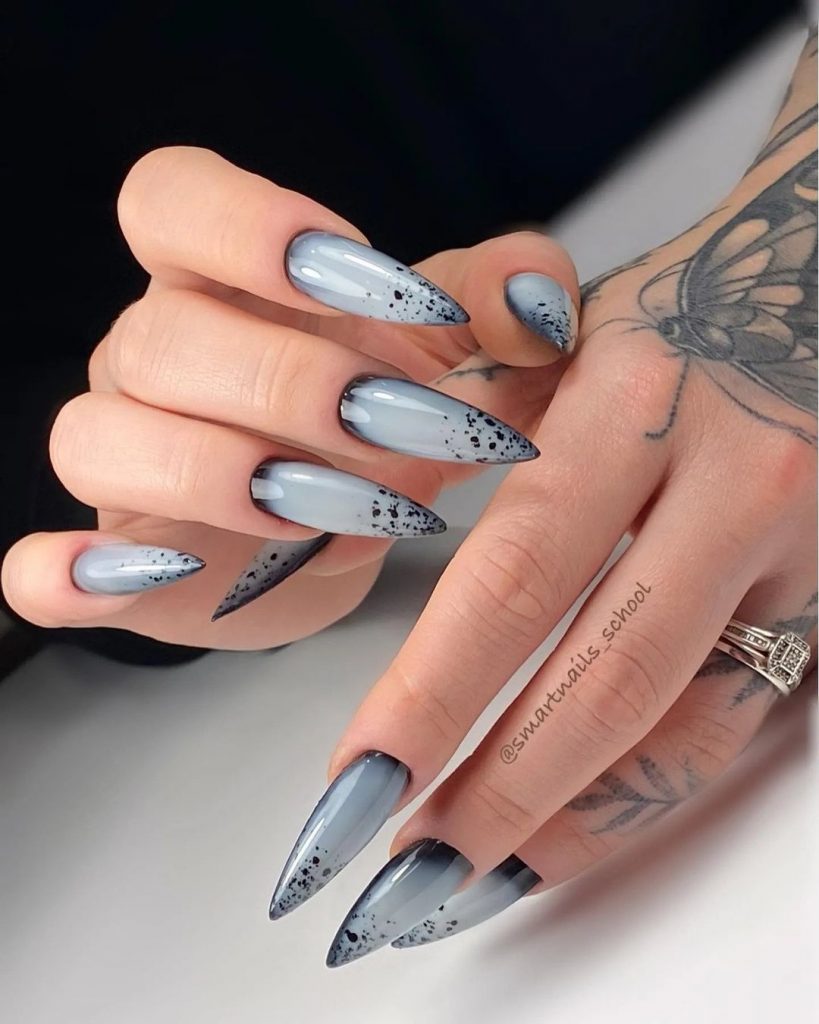
Gray and Black Flames
This gray and black flames design is perfect for those who want a sophisticated yet edgy look. The matte gray base with glossy black flame accents creates a chic and modern aesthetic that’s ideal for fall.
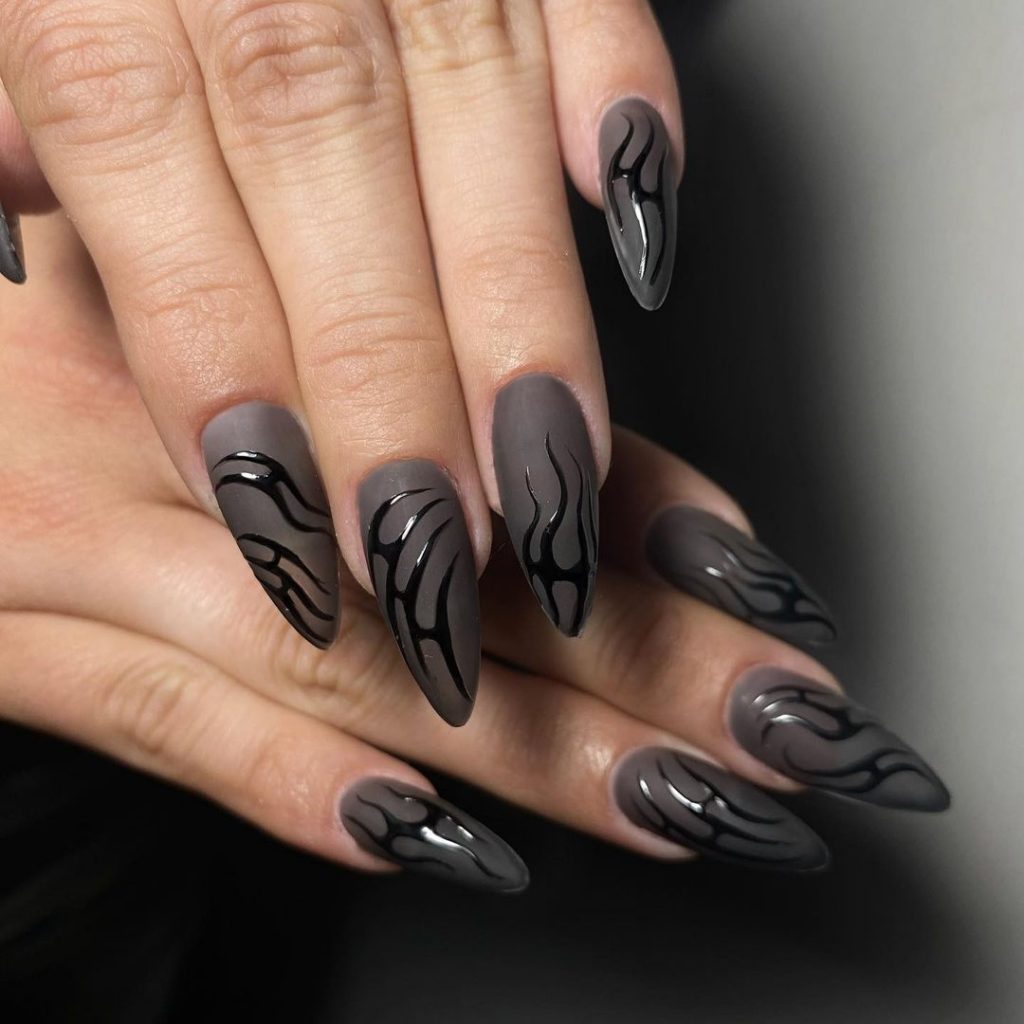
Consumables:
- Matte gray nail polish (e.g., Zoya “Dove”)
- Black nail polish (e.g., OPI “Black Onyx”)
- Base coat and matte top coat
- Nail file and buffer
- Nail art brush
Recommendations:
- Use a matte top coat for a chic finish.
- Apply glossy black flames for a striking contrast.
- Regularly apply cuticle oil to keep nails healthy.
DIY Instructions
- Prep: Shape your nails and buff the surface. Apply a base coat to protect your nails.
- Color: Apply two coats of matte gray polish, allowing each coat to dry completely. Use a nail art brush to create glossy black flame accents.
- Finish: Apply a matte top coat to seal the design. Use cuticle oil to hydrate your nails.
Blue and Black Gradient
This blue and black gradient design is perfect for those who love a subtle yet striking look. The gradient effect from clear to blue with black speckles creates a modern, minimalist aesthetic that’s both chic and sophisticated.
Consumables:
- Clear and blue nail polish (e.g., Essie “Ballet Slippers” and OPI “Russian Navy”)
- Black speckle polish (e.g., China Glaze “Splatter Paint”)
- Base coat and top coat
- Nail file and buffer
- Sponge for gradient effect
Recommendations:
- Use a sponge to create a seamless gradient.
- Apply a high-gloss top coat for a shiny finish.
- Regularly apply cuticle oil to maintain healthy nails.
DIY Instructions
- Prep: Shape your nails into sharp points and buff the surface. Apply a base coat to protect your nails.
- Color: Apply a clear base coat. Use a sponge to dab blue polish on the tips, creating a gradient effect. Add black speckles for extra detail.
- Finish: Apply a high-gloss top coat to seal the design. Use cuticle oil to keep nails hydrated.
Classic Blood Red
Nothing beats the timeless elegance of blood red nails. These sleek, glossy red nails are a staple for any goth-inspired look. The simplicity of the design makes it versatile and perfect for any occasion.
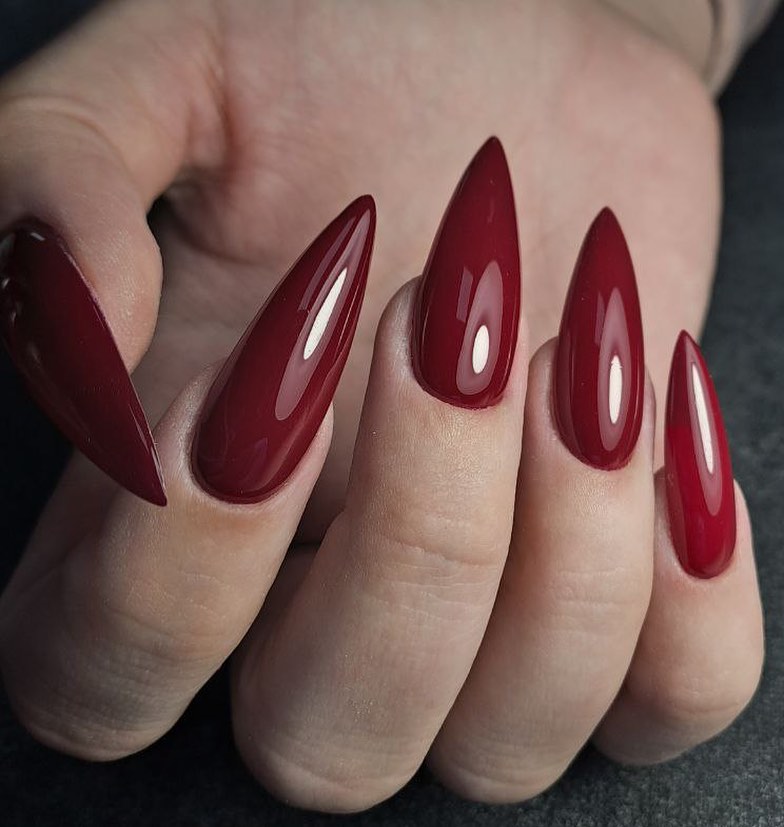
Consumables:
- Blood red nail polish (e.g., OPI “Big Apple Red”)
- Base coat and top coat
- Nail file and buffer
Recommendations:
- Apply a high-gloss top coat for a shiny finish.
- Keep nails filed to a uniform shape for a polished look.
- Regularly apply cuticle oil to maintain nail health.
DIY Instructions
- Prep: File and buff your nails. Apply a base coat to protect your nails.
- Color: Apply two coats of blood red polish, allowing each coat to dry completely.
- Finish: Seal with a high-gloss top coat. Hydrate your cuticles with oil for a healthy look.
Pink and Black Jewels
This pink and black jeweled design is perfect for those who love a glamorous, gothic look. The combination of pink accents, black base, and rhinestones creates a luxurious and edgy manicure.
Consumables:
- Black and pink nail polish (e.g., OPI “Black Onyx” and Essie “Fiji”)
- Rhinestones and nail gems
- Base coat and top coat
- Nail file and buffer
- Nail art brush and glue
Recommendations:
- Use high-quality rhinestones for durability.
- Apply a high-gloss top coat to enhance the shine.
- Regularly apply cuticle oil to maintain nail health.
DIY Instructions
- Prep: Shape your nails and buff the surface. Apply a base coat to protect your nails.
- Color: Apply a base coat of black polish. Once dry, use a nail art brush to add pink accents and attach rhinestones with nail glue.
- Finish: Apply a high-gloss top coat to seal the design. Hydrate your cuticles with oil.
Gothic Red and Black Stained Glass
These nails feature a stunning red and black stained glass design. The intricate patterns on a glossy base give off an elegant yet gothic feel, perfect for those who love a touch of art with their edgy style.
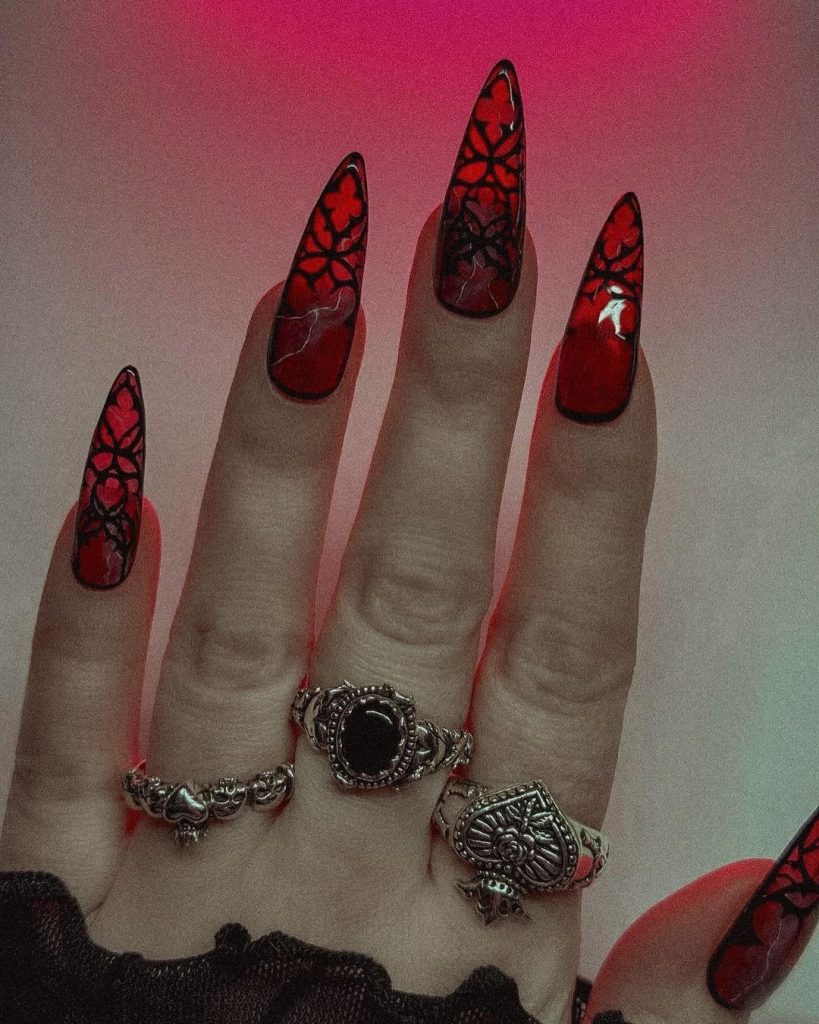
Consumables:
- Black and red nail polish (e.g., OPI “Black Onyx” and “Got the Blues for Red”)
- Base coat and top coat
- Nail file and buffer
- Nail art brush and stamping tools
Recommendations:
- Use stamping tools for intricate patterns.
- Apply a high-gloss top coat to give a sophisticated finish.
- Regularly apply cuticle oil to maintain healthy nails.
DIY Instructions
- Prep: File and buff your nails. Apply a base coat to protect your nails.
- Color: Apply a base coat of red polish. Once dry, use a nail art brush or stamping tool to create black intricate patterns.
- Finish: Apply a high-gloss top coat to seal the design. Hydrate your cuticles with oil to keep them healthy.
Glittery Red and Black Flames
This glittery red and black flames design is perfect for adding a touch of sparkle to your goth fall nails. The deep red glitter base combined with black flame accents creates a bold and dramatic look that’s sure to turn heads.
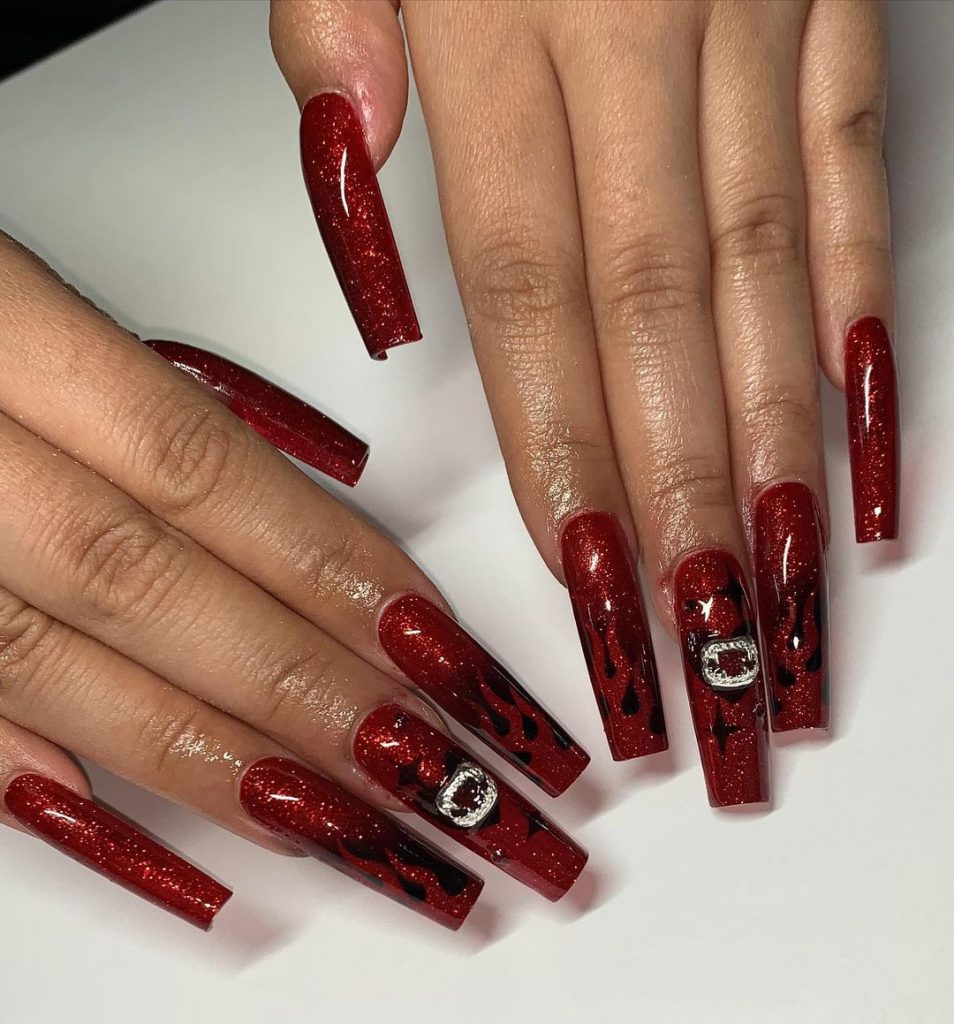
Consumables:
- Red glitter nail polish (e.g., China Glaze “Ruby Pumps”)
- Black nail polish (e.g., OPI “Black Onyx”)
- Base coat and top coat
- Nail file and buffer
- Nail art brush
Recommendations:
- Use a high-quality glitter polish for maximum sparkle.
- Apply a high-gloss top coat to enhance the shine.
- Regularly apply cuticle oil to keep nails healthy.
DIY Instructions
- Prep: Shape your nails and buff the surface. Apply a base coat to protect your nails.
- Color: Apply a base coat of red glitter polish. Once dry, use a nail art brush to create black flame accents.
- Finish: Apply a high-gloss top coat to seal the design. Keep your cuticles hydrated with oil.
Save Pin