Discover the Best Fall Nail Colors for 2024 27 Ideas: Trends, Tips, and Top Picks
Are you ready to spice up your nails for the autumn season? With the changing leaves and cooler weather, it’s the perfect time to experiment with some of the best fall nail colors 2024 has to offer. Whether you have fair skin, dark skin, short nails, or prefer longer styles, there’s something for everyone. From matte finishes to gel and dip options, let’s dive into the top trends and nail designs that will make your nails the highlight of your fall look. Ready to discover the hottest nail colors and designs for this season? Let’s get started!
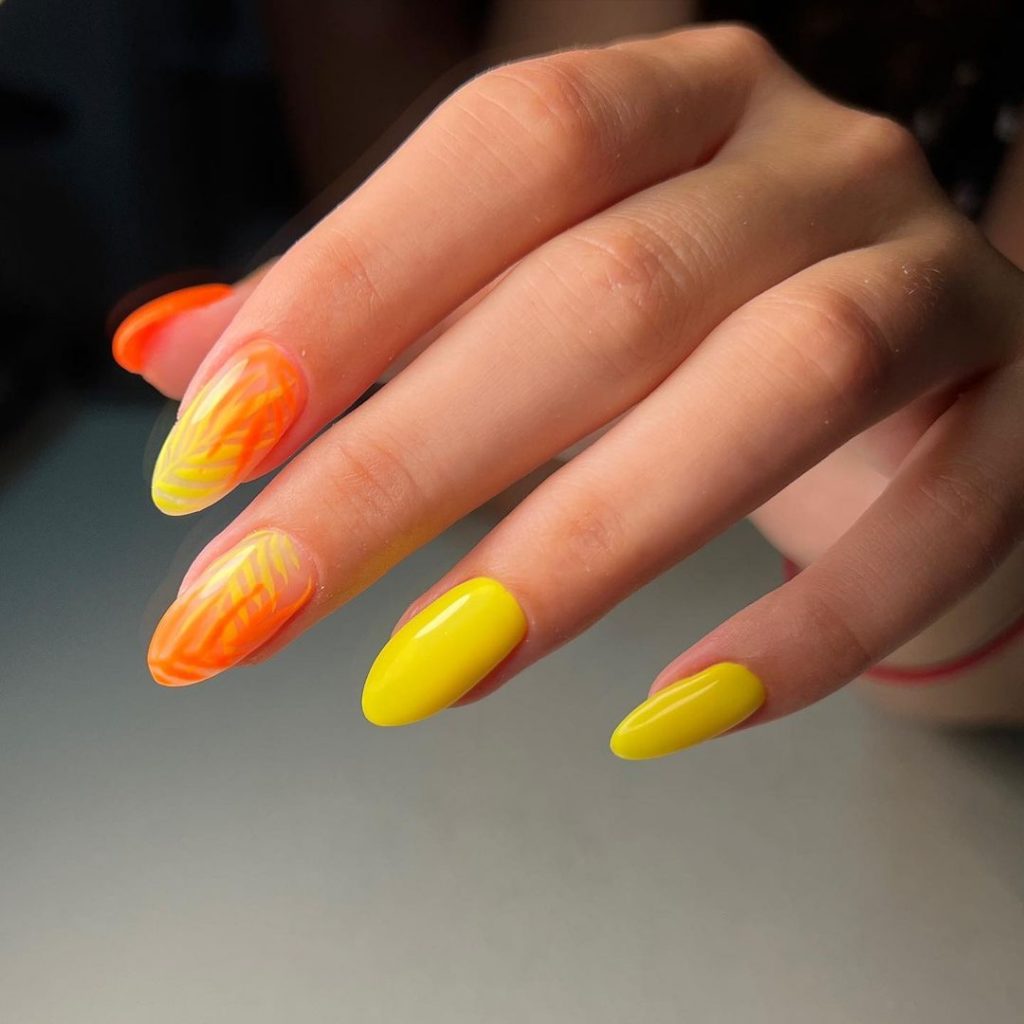
Vibrant Yellow and Orange Flames
This vibrant nail design features a stunning combination of bright yellow and fiery orange, creating a bold and eye-catching look. The intricate flame patterns add a dynamic touch, making these nails perfect for those who love to stand out. The smooth, glossy finish enhances the vivid colors, giving the nails a polished and professional appearance. Ideal for short nails, this design is both playful and trendy, embodying the spirit of fall.
Consumables Needed:
- Yellow nail polish (e.g., OPI GelColor in ‘Sun, Sea, and Sand in My Pants’)
- Orange nail polish (e.g., DND Gel in ‘Tangerine Orange’)
- Nail art brushes for flame details
- Top coat (e.g., Seche Vite Dry Fast Top Coat)
- Base coat (e.g., OPI Natural Nail Base Coat)
Recommendations:
- Opt for high-quality gel polishes to ensure vibrant colors and long-lasting wear.
- Use fine nail art brushes to create precise flame details.
- Finish with a durable top coat to maintain the glossy finish and protect the design.
Instructions for Creating at Home:
- Start with clean, trimmed nails and apply a base coat.
- Apply two coats of yellow nail polish on the entire nail.
- Using a fine nail art brush, draw flame patterns with orange nail polish on each nail.
- Allow the design to dry completely before applying a top coat.
- Seal the look with a high-gloss top coat to ensure longevity and shine.
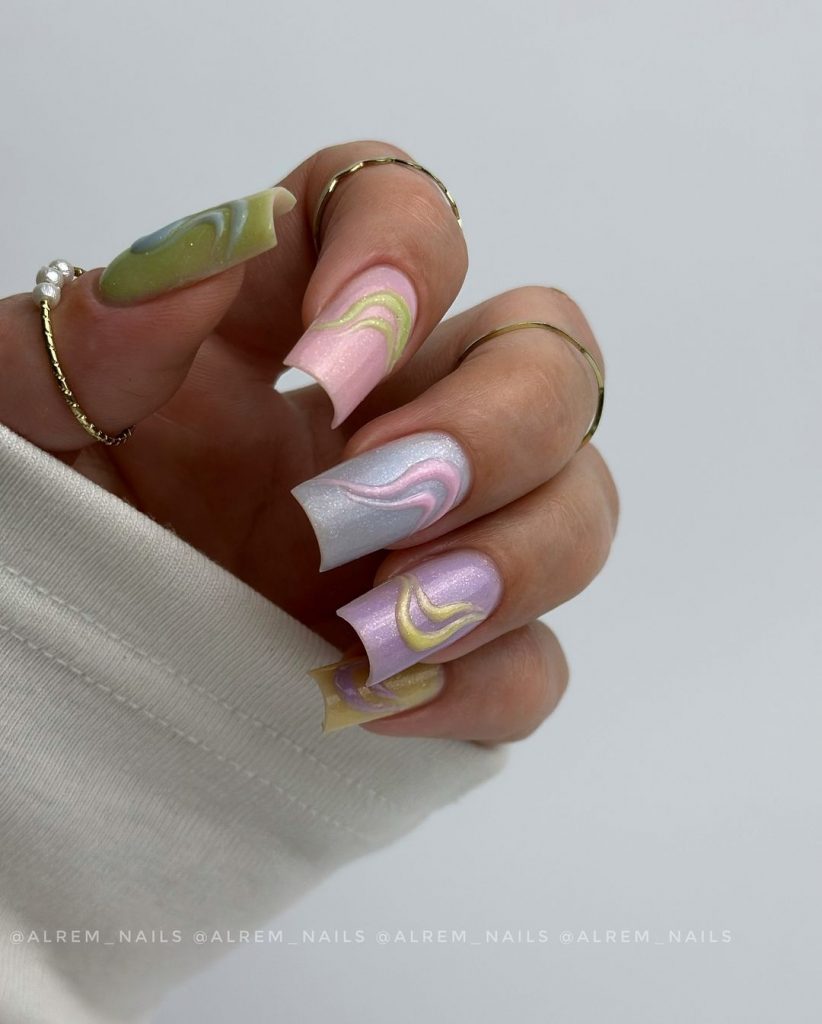
Pastel Swirls with Shimmer
This pastel swirl design features a dreamy combination of soft pinks, greens, and blues with a touch of shimmer, creating a delicate and sophisticated look. The smooth transitions between colors give a marble-like effect, perfect for adding a touch of elegance to any outfit. This design works beautifully on both short nails and longer lengths, offering a versatile option for fall.
Consumables Needed:
- Pink nail polish (e.g., OPI GelColor in ‘Bubble Bath’)
- Green nail polish (e.g., DND Gel in ‘Mint Green’)
- Blue nail polish (e.g., OPI GelColor in ‘Gelato on My Mind’)
- Nail art brushes for swirls
- Shimmer top coat (e.g., Essie Gel Couture Top Coat)
- Base coat (e.g., OPI Natural Nail Base Coat)
Recommendations:
- Use gel polishes for a long-lasting and vibrant finish.
- Apply a shimmer top coat to enhance the marble effect.
- Ensure even transitions between colors by using a blending brush.
Instructions for Creating at Home:
- Apply a base coat to clean, trimmed nails.
- Paint the nails with a base color (choose either pink, green, or blue).
- Use a nail art brush to add swirls of the other two colors, blending slightly for a marble effect.
- Allow the design to dry thoroughly before applying a shimmer top coat.
- Finish with a high-gloss top coat to seal and protect the design.
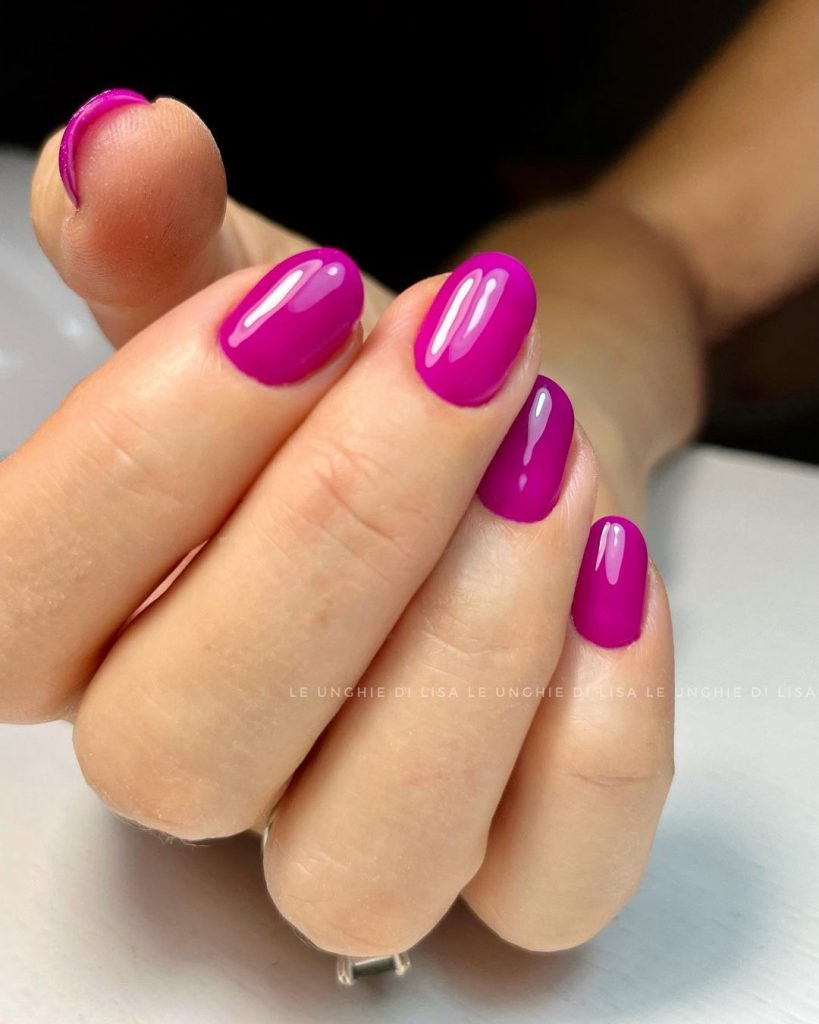
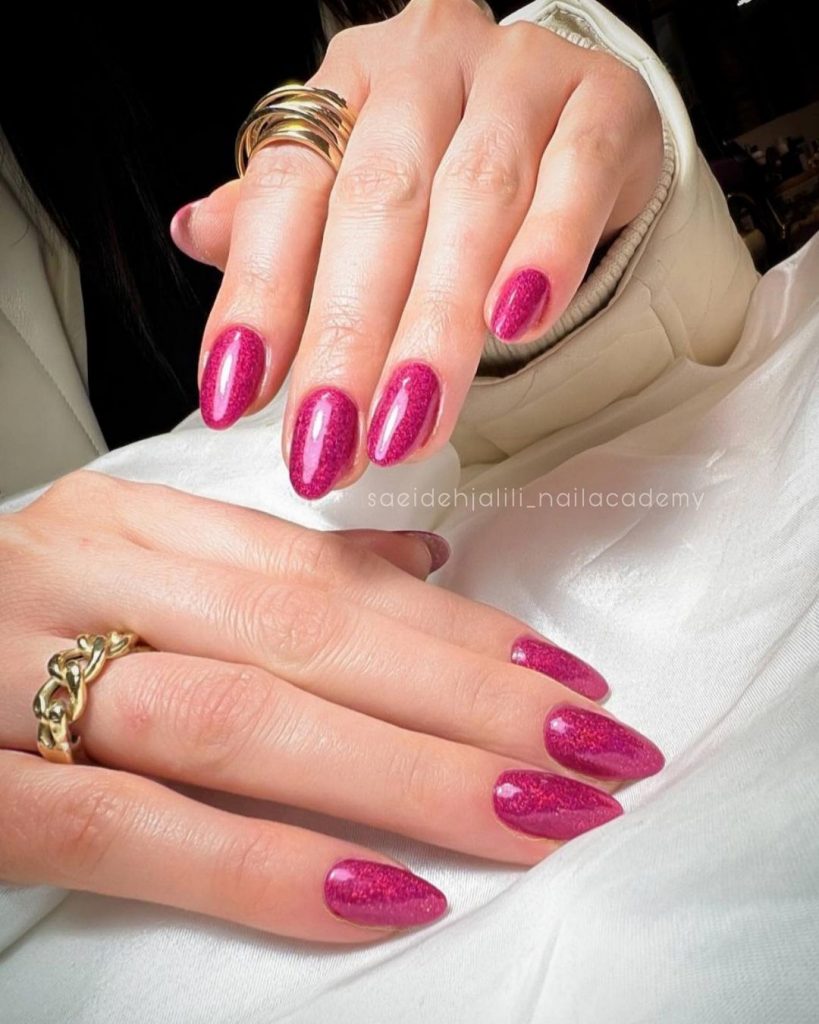
Glossy Magenta Perfection
This striking magenta manicure is a bold and vibrant choice for fall, perfect for making a statement. The high-gloss finish gives the nails a sleek and polished look, while the rich magenta color adds a touch of sophistication and drama. This design is ideal for both short nails and longer lengths, providing a versatile option for any occasion.
Consumables Needed:
- Magenta nail polish (e.g., OPI GelColor in ‘Aloha from OPI’)
- Top coat (e.g., Seche Vite Dry Fast Top Coat)
- Base coat (e.g., OPI Natural Nail Base Coat)
Recommendations:
- Choose a high-quality gel polish for a rich and lasting color.
- Apply multiple coats for an even and opaque finish.
- Use a high-gloss top coat to enhance the shine and longevity of the manicure.
Instructions for Creating at Home:
- Start with clean, trimmed nails and apply a base coat.
- Apply two to three coats of magenta nail polish for full coverage.
- Allow each coat to dry before applying the next.
- Finish with a high-gloss top coat to seal the color and add shine.
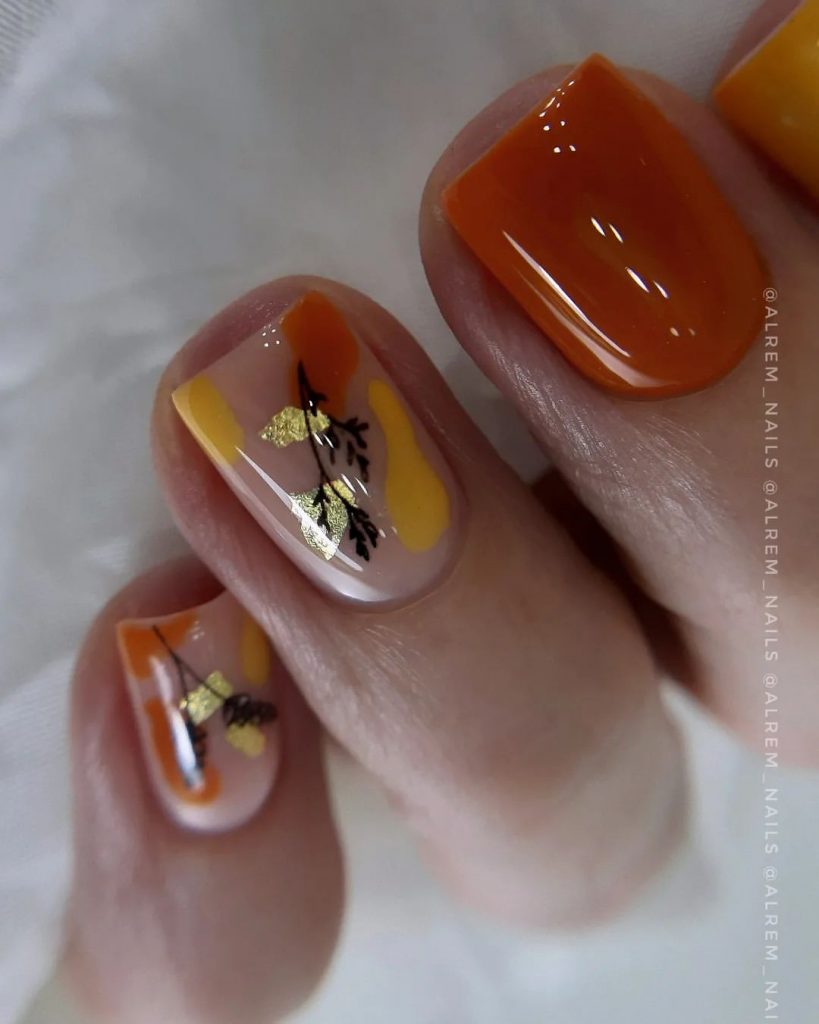
Autumn Leaves and Gold Accents
This design captures the essence of fall with its warm orange and yellow hues, accented by delicate gold leaf details. The combination of colors and textures creates a rich and festive look, perfect for celebrating the season. The semi-translucent base allows the colors and gold accents to stand out, making this design suitable for both fair skin and dark skin tones.
Consumables Needed:
- Orange nail polish (e.g., OPI GelColor in ‘Cajun Shrimp’)
- Yellow nail polish (e.g., DND Gel in ‘Sunshine Yellow’)
- Gold leaf accents
- Top coat (e.g., Essie Gel Couture Top Coat)
- Base coat (e.g., OPI Natural Nail Base Coat)
Recommendations:
- Use a semi-translucent base to allow the colors and gold accents to pop.
- Apply gold leaf accents sparingly for a subtle, elegant touch.
- Seal the design with a high-quality top coat to protect the gold accents.
Instructions for Creating at Home:
- Apply a base coat to clean, trimmed nails.
- Paint the nails with a semi-translucent base color.
- Add orange and yellow patches randomly on the nails.
- Place gold leaf accents on the nail using a fine brush.
- Finish with a high-gloss top coat to seal and protect the design.
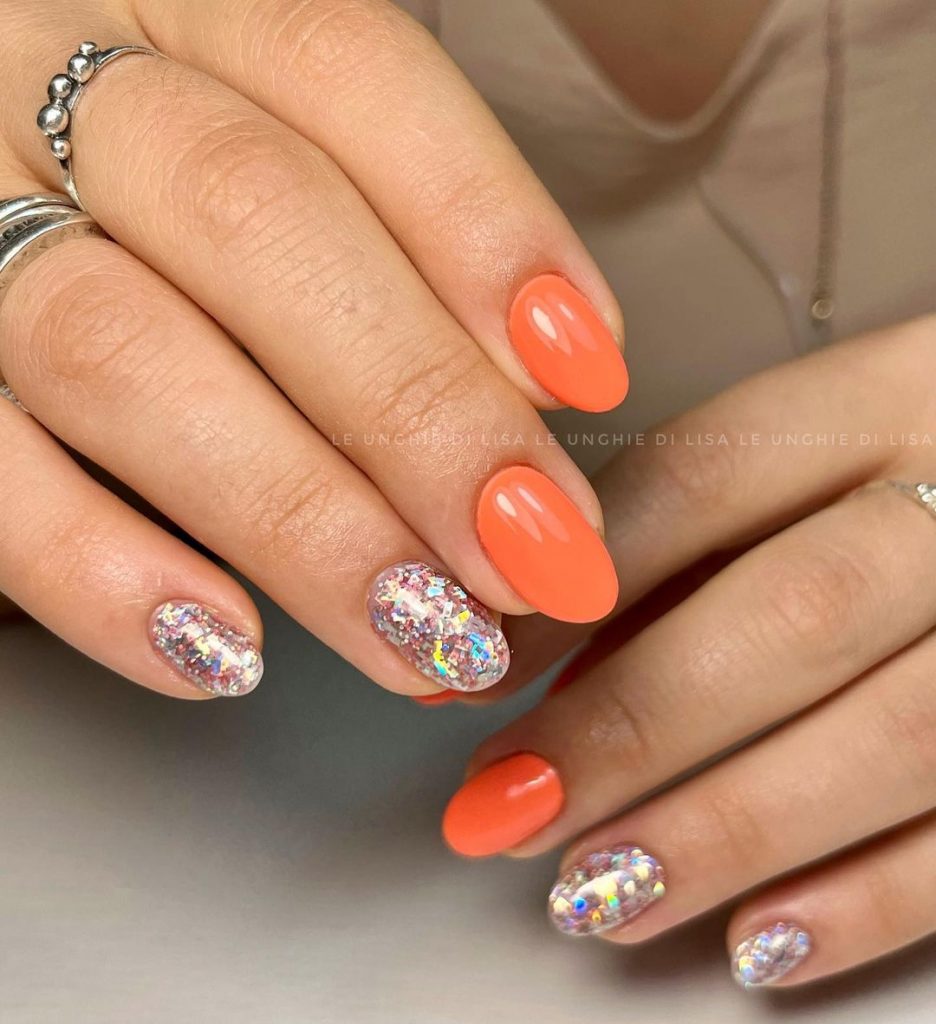
Glittering Orange Delight
This vibrant orange manicure with glitter accents is perfect for those who love a bit of sparkle. The bright orange color is both fun and festive, while the glitter adds a touch of glamour. This design is ideal for short nails, making it a great choice for anyone looking to add some bling to their fall look.
Consumables Needed:
- Orange nail polish (e.g., OPI GelColor in ‘Living on the Bula-vard!’)
- Glitter polish (e.g., Essie Gel Couture in ‘Jazzy Jubilant’)
- Top coat (e.g., Seche Vite Dry Fast Top Coat)
- Base coat (e.g., OPI Natural Nail Base Coat)
Recommendations:
- Use a vibrant orange polish for a bold base.
- Apply glitter polish on accent nails for a touch of sparkle.
- Finish with a high-gloss top coat to enhance the glitter and ensure a long-lasting manicure.
Instructions for Creating at Home:
- Start with clean, trimmed nails and apply a base coat.
- Apply two coats of orange nail polish for full coverage.
- Add glitter polish to one or two accent nails.
- Finish with a high-gloss top coat to seal the color and glitter.
Elegant Burgundy with Gold Accents
This sophisticated nail design features a deep burgundy base with intricate gold accents and marbled patterns. The matte finish gives it a luxurious and elegant look, making it perfect for any occasion this fall. The combination of gold leaf and fine detailing adds a touch of glamour, ideal for those who appreciate a classic yet modern style.
Consumables Needed:
- Burgundy nail polish (e.g., OPI GelColor in ‘Malaga Wine’)
- Gold leaf
- White nail polish (e.g., DND Gel in ‘White’)
- Nail art brushes for detailing
- Matte top coat (e.g., OPI Matte Top Coat)
- Base coat (e.g., OPI Natural Nail Base Coat)
Recommendations:
- Use a high-quality burgundy gel polish for a rich and long-lasting color.
- Apply gold leaf sparingly to add an elegant touch without overwhelming the design.
- Ensure the matte top coat is evenly applied to maintain the design’s sophistication.
Instructions for Creating at Home:
- Begin with clean, trimmed nails and apply a base coat.
- Apply two coats of burgundy nail polish and let dry.
- Use a nail art brush to add marbled white details and gold leaf accents.
- Once dry, apply a matte top coat to finish the look and protect the design.
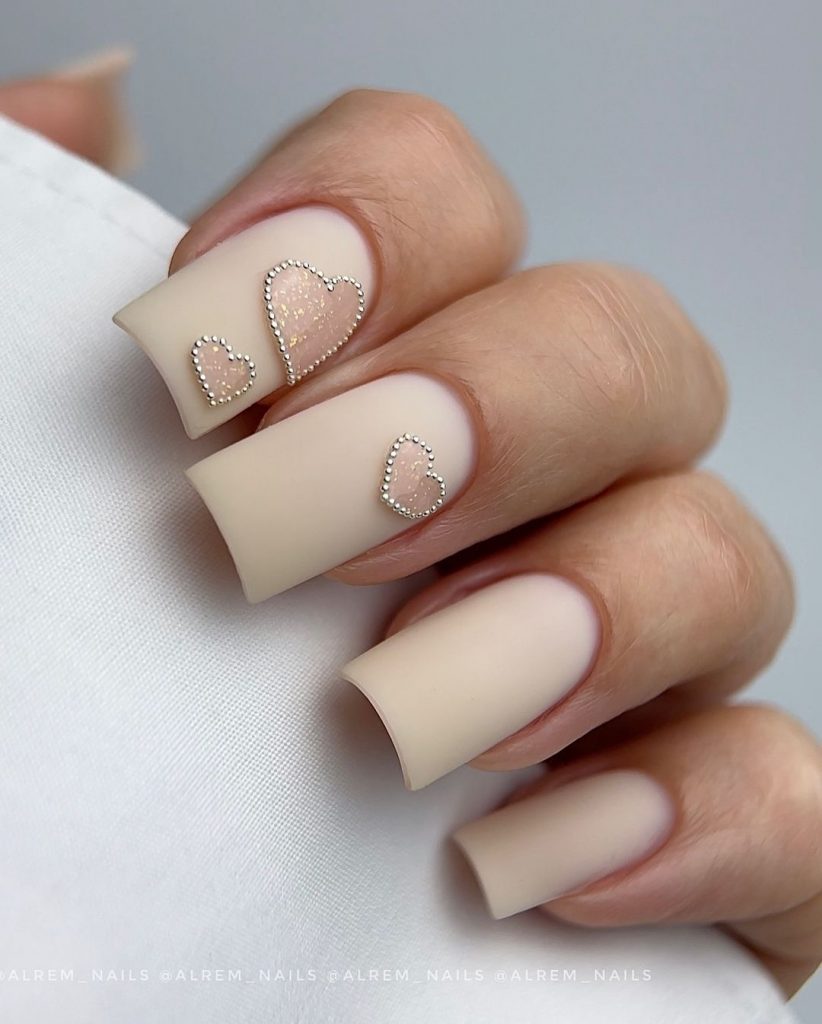
Neutral Matte with Heart Accents
This soft, neutral matte design with heart accents is both cute and sophisticated. The matte finish on the beige base provides a smooth and understated look, while the small hearts add a charming and playful touch. Perfect for both everyday wear and special occasions, this design works well with fair skin and pale skin tones.
Consumables Needed:
- Beige nail polish (e.g., OPI GelColor in ‘Samoan Sand’)
- Heart-shaped nail art decals
- Nail art brushes for detailing
- Matte top coat (e.g., Essie Matte About You Top Coat)
- Base coat (e.g., OPI Natural Nail Base Coat)
Recommendations:
- Choose a neutral beige polish that complements your skin tone.
- Use matte top coat to achieve a sophisticated finish.
- Add heart-shaped decals to create a cute, personalized touch.
Instructions for Creating at Home:
- Apply a base coat to clean, trimmed nails.
- Paint your nails with two coats of beige nail polish.
- Place heart-shaped decals on your nails as desired.
- Seal the design with a matte top coat to protect the look and ensure longevity.
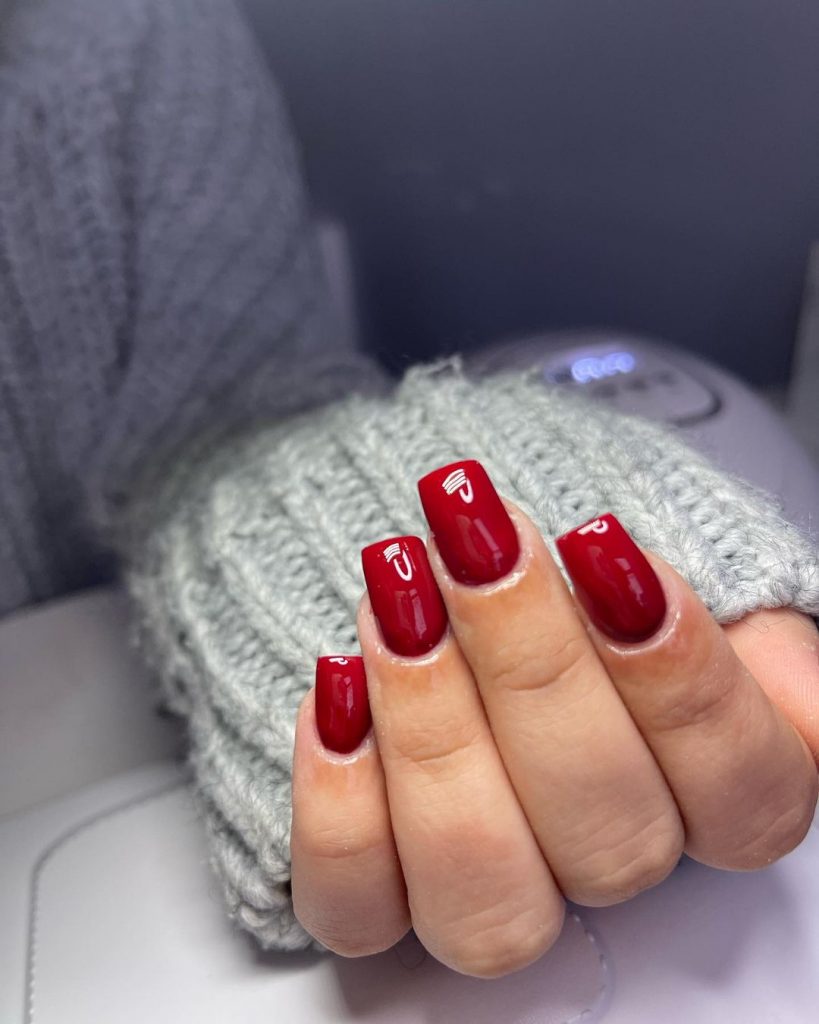
Glossy Deep Red
This classic deep red manicure is a timeless choice for the fall season. The high-gloss finish adds a touch of elegance and sophistication, making it perfect for any occasion. The rich red color complements both dark skin and fair skin tones, adding a bold and chic statement to your look.
Consumables Needed:
- Deep red nail polish (e.g., OPI GelColor in ‘Big Apple Red’)
- Top coat (e.g., Seche Vite Dry Fast Top Coat)
- Base coat (e.g., OPI Natural Nail Base Coat)
Recommendations:
- Opt for a high-quality gel polish to achieve a rich, deep color.
- Apply multiple coats for a smooth, opaque finish.
- Use a high-gloss top coat to enhance the shine and longevity of the manicure.
Instructions for Creating at Home:
- Start with clean, trimmed nails and apply a base coat.
- Apply two to three coats of deep red nail polish for full coverage.
- Let each coat dry before applying the next.
- Finish with a high-gloss top coat to seal the color and add shine.
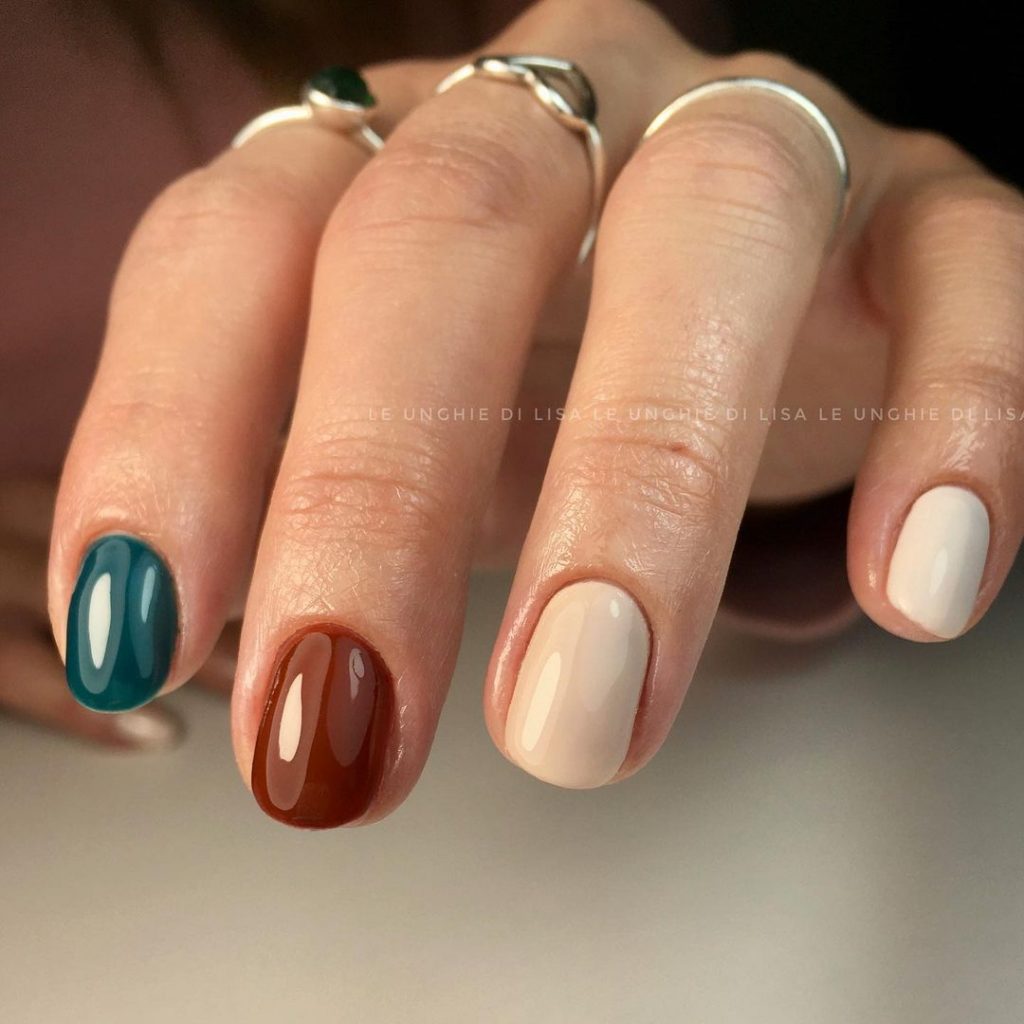
Autumn Mix and Match
This mix-and-match manicure features a variety of fall-inspired colors, creating a fun and unique look. The combination of teal, burnt orange, and cream provides a versatile and trendy style that works well with different outfits. The glossy finish enhances the vibrancy of the colors, making your nails stand out.
Consumables Needed:
- Teal nail polish (e.g., DND Gel in ‘Teal Blue’)
- Burnt orange nail polish (e.g., OPI GelColor in ‘My Italian Is A Little Rusty’)
- Cream nail polish (e.g., OPI GelColor in ‘Be There in a Prosecco’)
- Top coat (e.g., Seche Vite Dry Fast Top Coat)
- Base coat (e.g., OPI Natural Nail Base Coat)
Recommendations:
- Choose contrasting fall colors for a vibrant mix-and-match look.
- Apply a high-gloss top coat to enhance the color and shine.
- Use gel polishes for long-lasting wear.
Instructions for Creating at Home:
- Apply a base coat to clean, trimmed nails.
- Paint each nail with a different color from the selected palette.
- Allow each coat to dry completely.
- Finish with a high-gloss top coat to seal and protect the design.
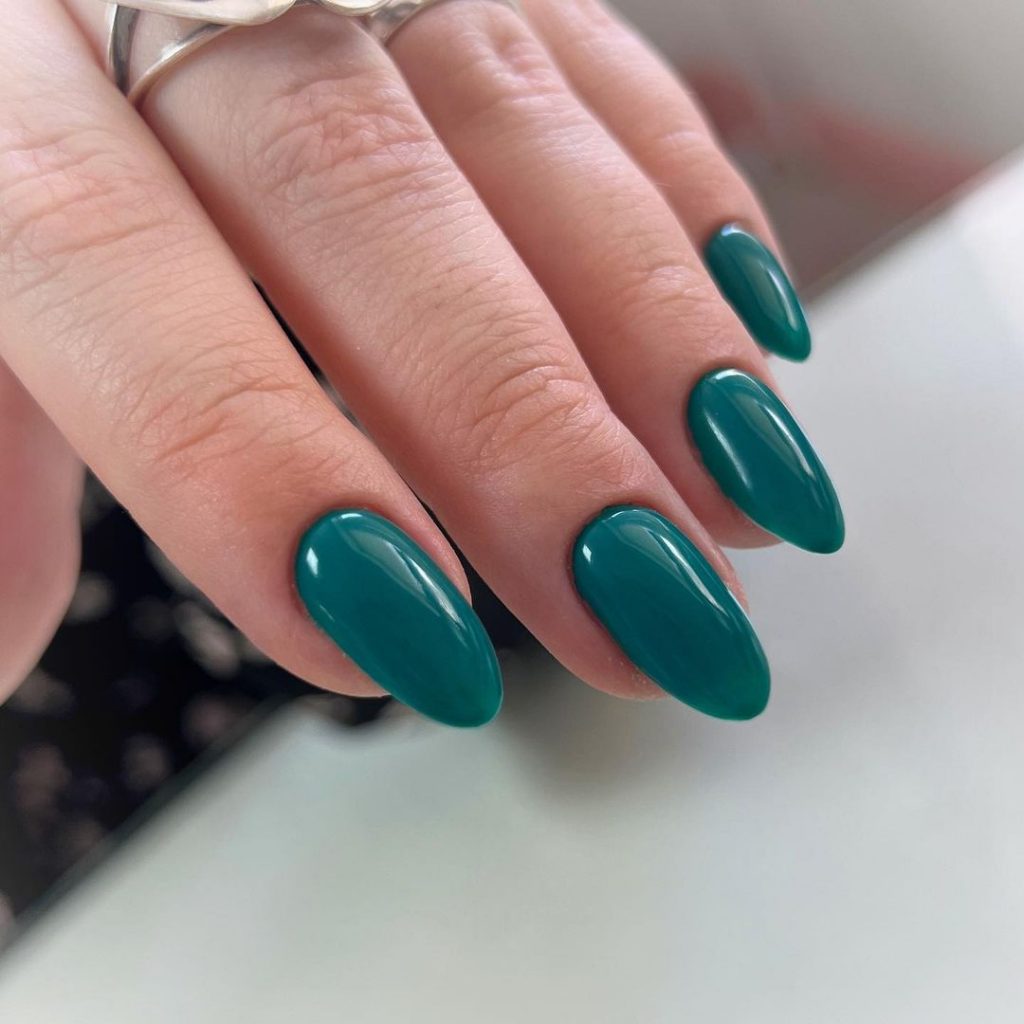
Teal Elegance
This rich teal manicure is perfect for adding a pop of color to your fall wardrobe. The high-gloss finish gives the nails a sleek and polished look, while the deep teal color is both bold and elegant. This design works beautifully on both short nails and longer lengths, offering a versatile option for fall.
Consumables Needed:
- Teal nail polish (e.g., OPI GelColor in ‘Teal the Cows Come Home’)
- Top coat (e.g., Seche Vite Dry Fast Top Coat)
- Base coat (e.g., OPI Natural Nail Base Coat)
Recommendations:
- Opt for a high-quality teal polish for a vibrant and long-lasting color.
- Apply multiple coats for a rich, opaque finish.
- Use a high-gloss top coat to enhance the shine and durability of the manicure.
Instructions for Creating at Home:
- Start with clean, trimmed nails and apply a base coat.
- Apply two to three coats of teal nail polish for full coverage.
- Let each coat dry before applying the next.
- Finish with a high-gloss top coat to seal the color and add shine.
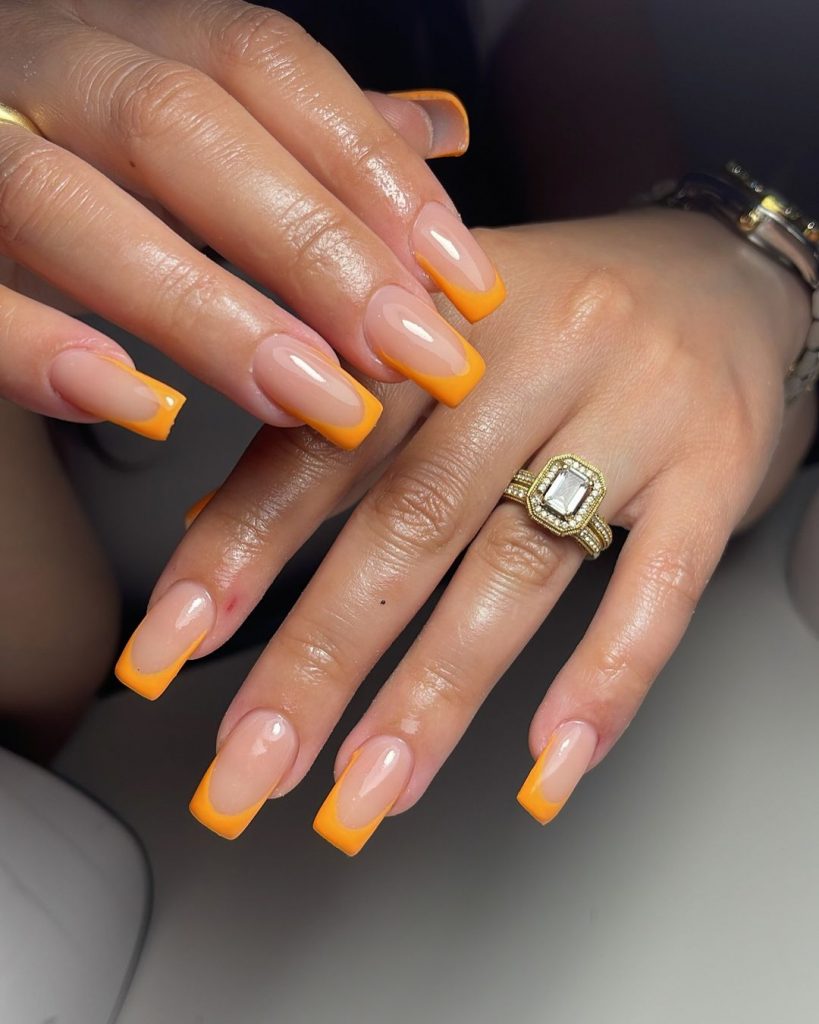
Vibrant Orange French Tips
This modern take on the classic French manicure features a vibrant orange tip that perfectly complements the natural base color. The high-gloss finish enhances the bright orange, making it a standout design for the fall season. This design is ideal for those who want a fresh and fun twist on a timeless look, suitable for both fair skin and dark skin tones.
Consumables Needed:
- Nude base nail polish (e.g., OPI GelColor in ‘Samoan Sand’)
- Orange nail polish for tips (e.g., DND Gel in ‘Mandarin Orange’)
- Top coat (e.g., Seche Vite Dry Fast Top Coat)
- Base coat (e.g., OPI Natural Nail Base Coat)
Recommendations:
- Use a vibrant orange polish to ensure the tips pop.
- Apply a high-gloss top coat to enhance the color and shine.
- Consider using a fine brush or French manicure guide stickers for precise application.
Instructions for Creating at Home:
- Begin with clean, trimmed nails and apply a base coat.
- Apply two coats of nude base nail polish and let dry.
- Carefully paint the tips with orange nail polish using a fine brush or guide stickers.
- Finish with a high-gloss top coat to seal the design and add shine.
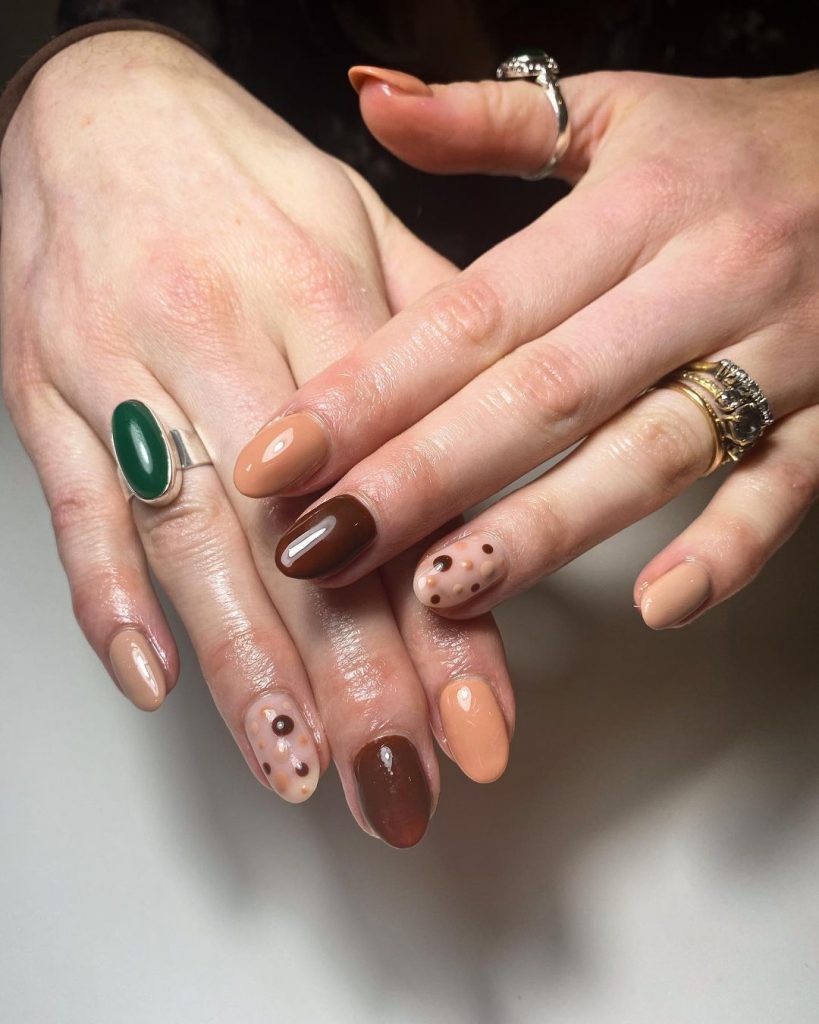
Warm Tones with Polka Dots
This charming nail design combines various warm tones with playful polka dots. The mixture of beige, brown, and nude colors creates a cozy and autumnal look. The polka dots add a whimsical touch, making this design perfect for those who love a bit of fun in their manicure.
Consumables Needed:
- Beige nail polish (e.g., OPI GelColor in ‘Be There in a Prosecco’)
- Brown nail polish (e.g., OPI GelColor in ‘Chocolate Moose’)
- Nude nail polish (e.g., DND Gel in ‘Sandy Beach’)
- Dotting tool for polka dots
- Top coat (e.g., Seche Vite Dry Fast Top Coat)
- Base coat (e.g., OPI Natural Nail Base Coat)
Recommendations:
- Use a variety of warm tones to create a cohesive yet dynamic look.
- Apply polka dots with a dotting tool for precise and even spots.
- Seal with a top coat to ensure the polka dots stay intact.
Instructions for Creating at Home:
- Apply a base coat to clean, trimmed nails.
- Paint each nail with a different shade from the warm tones palette.
- Use a dotting tool to add polka dots to select nails.
- Finish with a high-gloss top coat to protect and enhance the design.
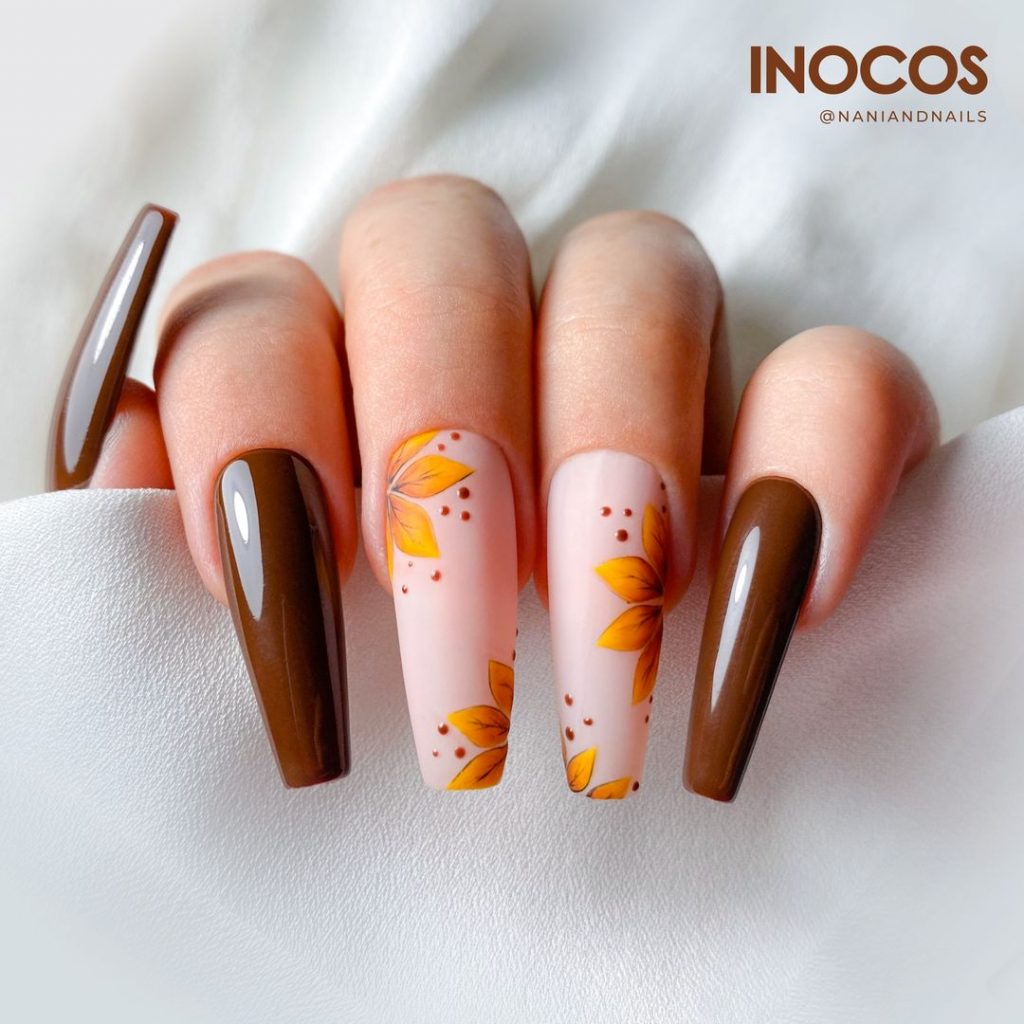
Autumn Leaves on Brown Base
This nail design captures the essence of fall with beautifully detailed autumn leaves on a rich brown base. The combination of the warm brown background and the intricate yellow and orange leaf designs creates a stunning and season-appropriate look. Ideal for those who love nature-inspired nail art.
Consumables Needed:
- Brown nail polish (e.g., OPI GelColor in ‘Espresso Your Inner Self’)
- Yellow and orange nail polish for leaves (e.g., DND Gel in ‘Sunshine Yellow’ and ‘Tangerine Orange’)
- Nail art brushes for detailing
- Top coat (e.g., Seche Vite Dry Fast Top Coat)
- Base coat (e.g., OPI Natural Nail Base Coat)
Recommendations:
- Use a dark brown base to make the leaf designs stand out.
- Apply leaf details with fine nail art brushes for precision.
- Finish with a top coat to protect the intricate designs.
Instructions for Creating at Home:
- Apply a base coat to clean, trimmed nails.
- Paint the nails with two coats of brown nail polish.
- Use nail art brushes to paint detailed autumn leaves in yellow and orange.
- Seal with a high-gloss top coat to enhance the design and protect it.
Bright Yellow with Floral Accents
This cheerful nail design features a bright yellow base with delicate floral accents. The combination of the vibrant yellow and the subtle floral designs creates a lively and fresh look, perfect for brightening up your fall wardrobe. Suitable for short nails, this design is both fun and sophisticated.

Consumables Needed:
- Yellow nail polish (e.g., OPI GelColor in ‘Need Sunglasses?’)
- White nail polish for floral accents (e.g., DND Gel in ‘White’)
- Nail art brushes for detailing
- Top coat (e.g., Seche Vite Dry Fast Top Coat)
- Base coat (e.g., OPI Natural Nail Base Coat)
Recommendations:
- Use a vibrant yellow polish for a bold base.
- Paint floral accents with fine brushes for a delicate touch.
- Finish with a top coat to ensure the floral designs stay intact.
Instructions for Creating at Home:
- Begin with clean, trimmed nails and apply a base coat.
- Apply two coats of yellow nail polish and let dry.
- Use nail art brushes to paint delicate floral accents on select nails.
- Seal with a high-gloss top coat to protect the design and add shine.
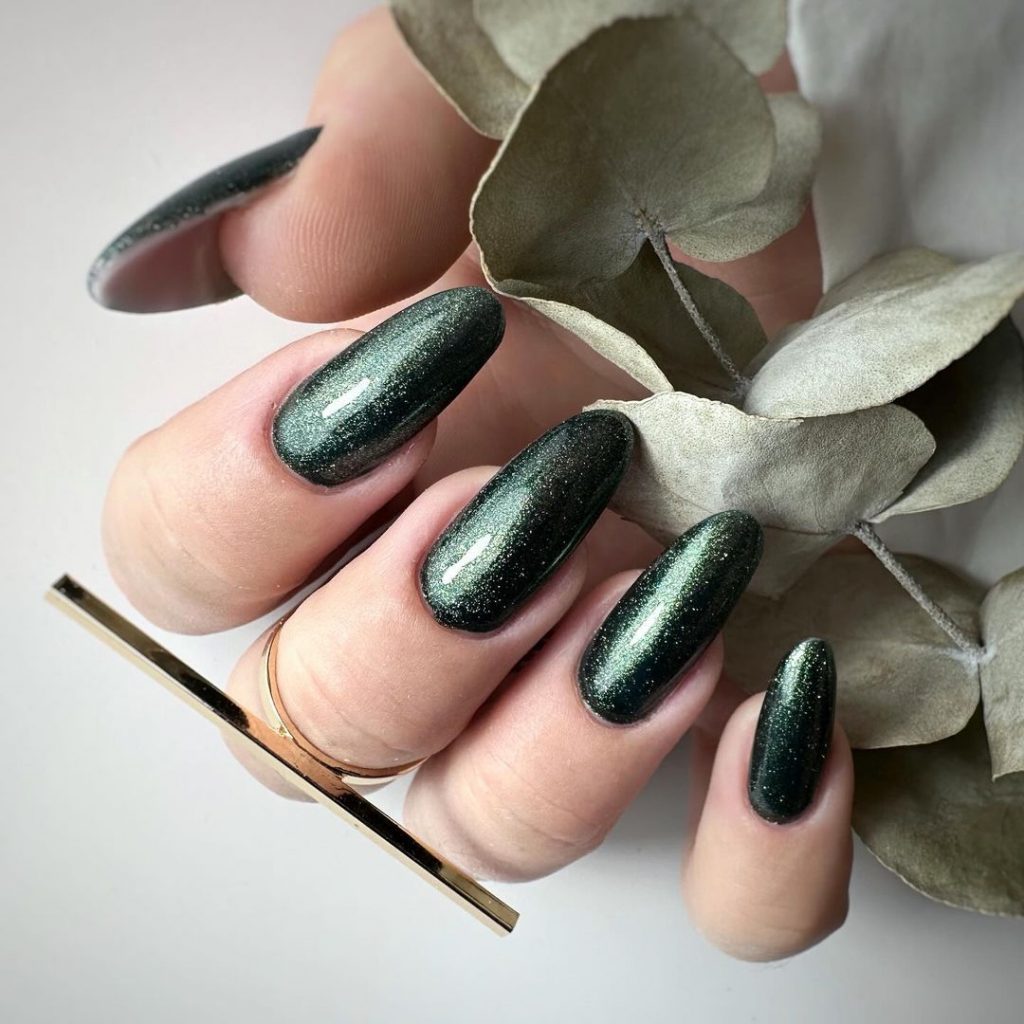
Shimmering Forest Green
This stunning forest green nail design features a shimmering finish, adding a touch of glamour to the classic autumn color. The deep green shade is perfect for the fall season, and the shimmer adds an extra dimension to the look. This design is ideal for both fair skin and dark skin tones.
Consumables Needed:
- Forest green nail polish (e.g., OPI GelColor in ‘Stay Off the Lawn!’)
- Shimmer top coat (e.g., Essie Gel Couture Top Coat in ‘Sequ-In The Know’)
- Base coat (e.g., OPI Natural Nail Base Coat)
Recommendations:
- Use a deep forest green polish for a rich color base.
- Apply a shimmer top coat to add dimension and shine.
- Finish with a high-gloss top coat to enhance the shimmer and protect the manicure.
Instructions for Creating at Home:
- Start with clean, trimmed nails and apply a base coat.
- Apply two to three coats of forest green nail polish for full coverage.
- Apply a shimmer top coat to add dimension.
- Finish with a high-gloss top coat to seal the design and add shine.
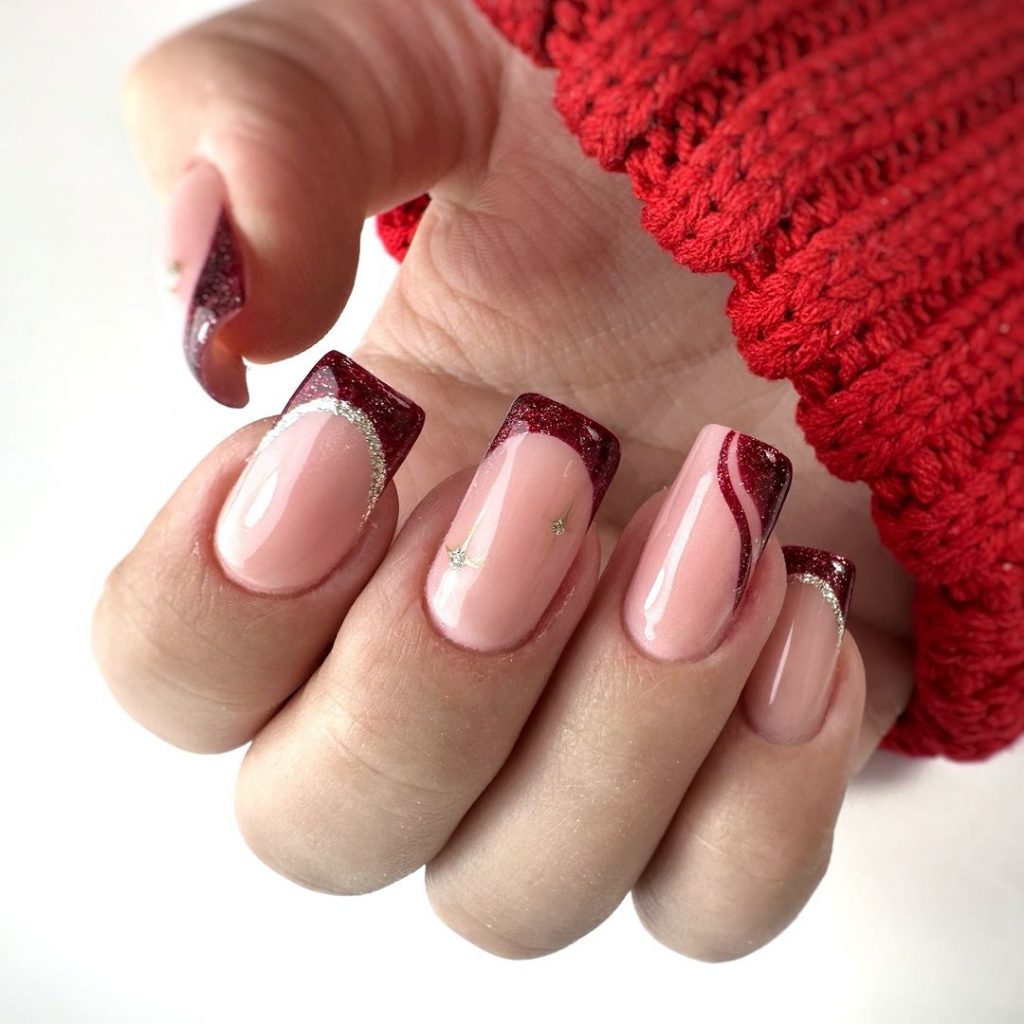
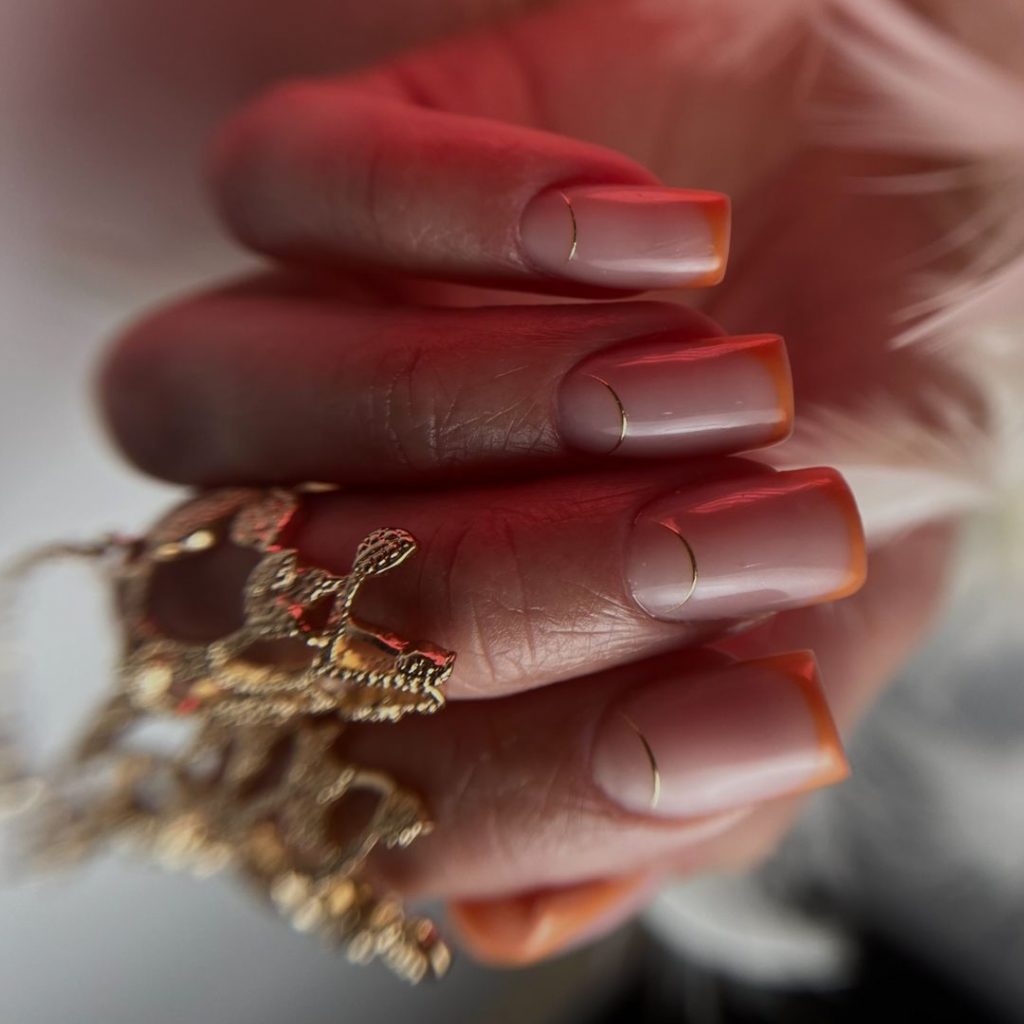
Glittery Burgundy French Tips
This chic nail design features glittery burgundy French tips with a twist. The elegant curves and touches of silver glitter add sophistication to the traditional French manicure. The soft pink base provides a perfect contrast, making the burgundy tips pop. This design is ideal for the fall season, offering a classy yet festive look.
Consumables Needed:
- Soft pink nail polish (e.g., OPI GelColor in ‘Bubble Bath’)
- Burgundy glitter nail polish (e.g., DND Gel in ‘Glitter Burgundy’)
- Silver glitter polish (e.g., OPI Nail Lacquer in ‘Happy Anniversary!’)
- Top coat (e.g., Seche Vite Dry Fast Top Coat)
- Base coat (e.g., OPI Natural Nail Base Coat)
Recommendations:
- Use a fine brush to create precise burgundy French tips.
- Add silver glitter accents sparingly for an elegant touch.
- Seal the design with a high-gloss top coat to enhance the glitter effect.
Instructions for Creating at Home:
- Apply a base coat to clean, trimmed nails.
- Paint the nails with two coats of soft pink nail polish and let dry.
- Use a fine brush to create burgundy French tips with glitter polish.
- Add silver glitter accents along the tips.
- Finish with a high-gloss top coat to protect the design and add shine.
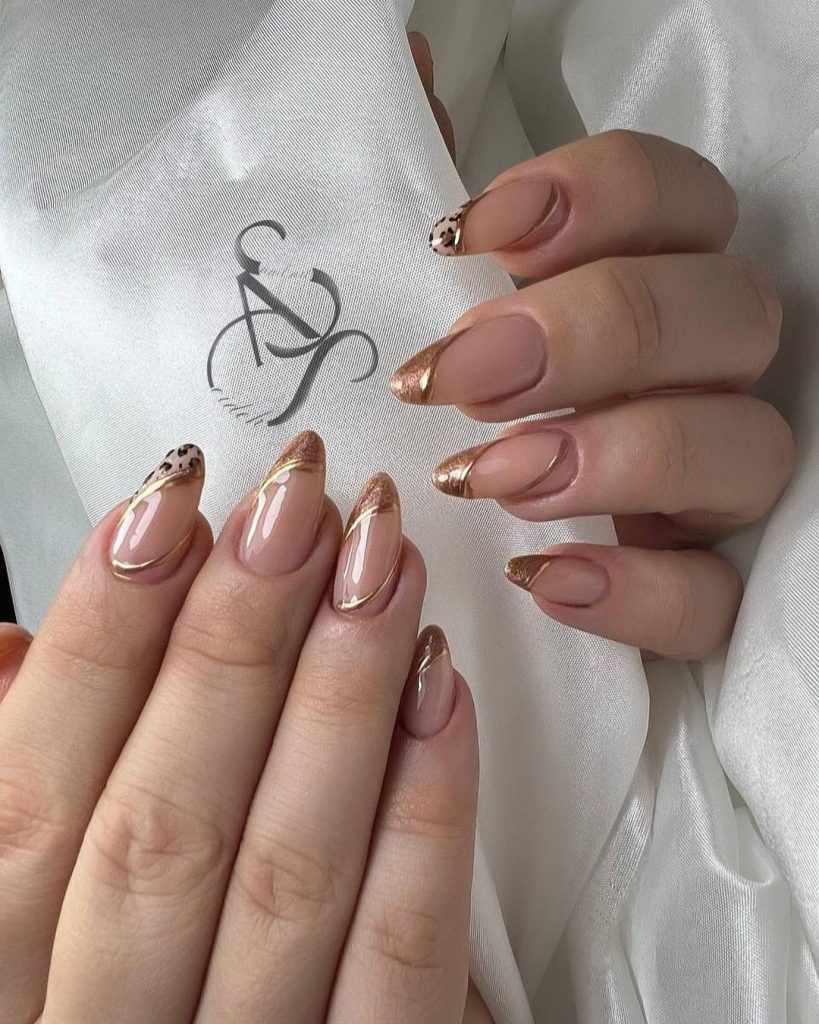
Copper and Leopard French Tips
This unique nail design combines copper French tips with subtle leopard print accents. The warm copper tones add a touch of elegance, while the leopard print introduces a playful element. The glossy finish ties the look together, making it suitable for both everyday wear and special occasions.
Consumables Needed:
- Nude base nail polish (e.g., OPI GelColor in ‘Samoan Sand’)
- Copper nail polish (e.g., DND Gel in ‘Copper Penny’)
- Black and brown nail polish for leopard print (e.g., OPI GelColor in ‘Black Onyx’ and ‘Chocolate Moose’)
- Nail art brushes for detailing
- Top coat (e.g., Seche Vite Dry Fast Top Coat)
- Base coat (e.g., OPI Natural Nail Base Coat)
Recommendations:
- Use a fine brush for precise copper French tips.
- Apply leopard print accents on select nails for a stylish touch.
- Seal with a top coat to protect the intricate details.
Instructions for Creating at Home:
- Apply a base coat to clean, trimmed nails.
- Paint the nails with two coats of nude base nail polish and let dry.
- Use a fine brush to create copper French tips.
- Add leopard print accents on select nails with black and brown polish.
- Finish with a high-gloss top coat to seal the design.
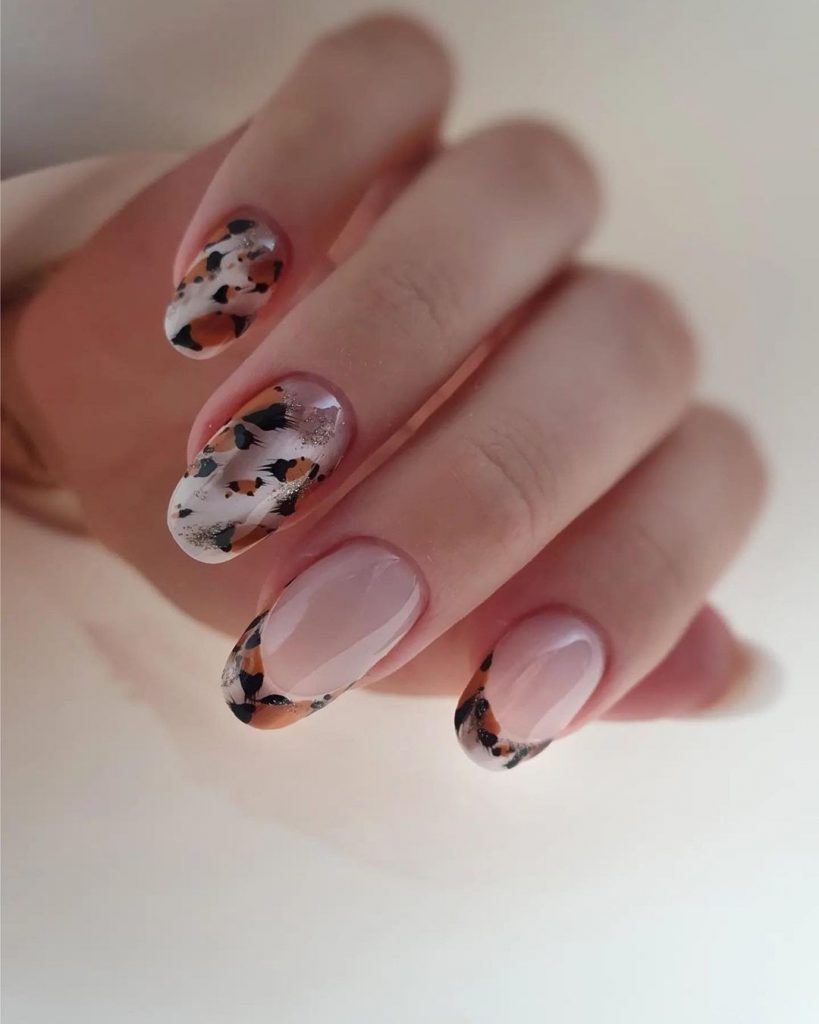
Abstract Leopard Print
This abstract nail design features a unique take on the classic leopard print. The blend of nude, black, and brown creates a modern and stylish look, perfect for adding a touch of wild elegance to your nails. The glossy finish enhances the vibrant colors, making this design suitable for both short nails and longer lengths.
Consumables Needed:
- Nude base nail polish (e.g., OPI GelColor in ‘Dulce de Leche’)
- Black and brown nail polish for leopard print (e.g., DND Gel in ‘Black’ and ‘Coffee Bean’)
- Nail art brushes for detailing
- Top coat (e.g., Seche Vite Dry Fast Top Coat)
- Base coat (e.g., OPI Natural Nail Base Coat)
Recommendations:
- Use a fine brush to create detailed leopard print designs.
- Apply multiple coats for an opaque finish.
- Seal with a top coat to enhance the shine and protect the design.
Instructions for Creating at Home:
- Apply a base coat to clean, trimmed nails.
- Paint the nails with two coats of nude base nail polish.
- Use a fine brush to add abstract leopard print details with black and brown polish.
- Finish with a high-gloss top coat to protect the design.
Sparkling Magenta
This vibrant magenta manicure features a shimmering finish, adding a touch of glamour to your nails. The rich magenta color is perfect for the fall season, offering a bold and elegant look. The glitter accents make this design stand out, suitable for both casual and formal occasions.
Consumables Needed:
- Magenta nail polish (e.g., OPI GelColor in ‘Magenta Muse’)
- Glitter top coat (e.g., Essie Gel Couture in ‘Jazzy Jubilant’)
- Base coat (e.g., OPI Natural Nail Base Coat)
Recommendations:
- Use a high-quality magenta polish for a vibrant base color.
- Apply a glitter top coat to add sparkle and dimension.
- Finish with a high-gloss top coat to enhance the shine.
Instructions for Creating at Home:
- Start with clean, trimmed nails and apply a base coat.
- Apply two to three coats of magenta nail polish for full coverage.
- Add a glitter top coat for extra sparkle.
- Finish with a high-gloss top coat to seal the design.
Green and White Elegance
This elegant nail design features a striking green base with intricate white and silver accents. The deep green color is perfect for the fall season, while the white and silver details add a touch of sophistication. This design is ideal for those who want a bold yet refined look.

Consumables Needed:
- Green nail polish (e.g., OPI GelColor in ‘Stay Off the Lawn!’)
- White nail polish for accents (e.g., DND Gel in ‘White’)
- Silver glitter polish (e.g., OPI Nail Lacquer in ‘Happy Anniversary!’)
- Nail art brushes for detailing
- Top coat (e.g., Seche Vite Dry Fast Top Coat)
- Base coat (e.g., OPI Natural Nail Base Coat)
Recommendations:
- Use a deep green polish for a rich color base.
- Apply white and silver accents with fine brushes for precision.
- Seal with a top coat to protect the intricate details.
Instructions for Creating at Home:
- Apply a base coat to clean, trimmed nails.
- Paint the nails with two coats of green nail polish.
- Use nail art brushes to add white and silver details.
- Finish with a high-gloss top coat to seal the design.
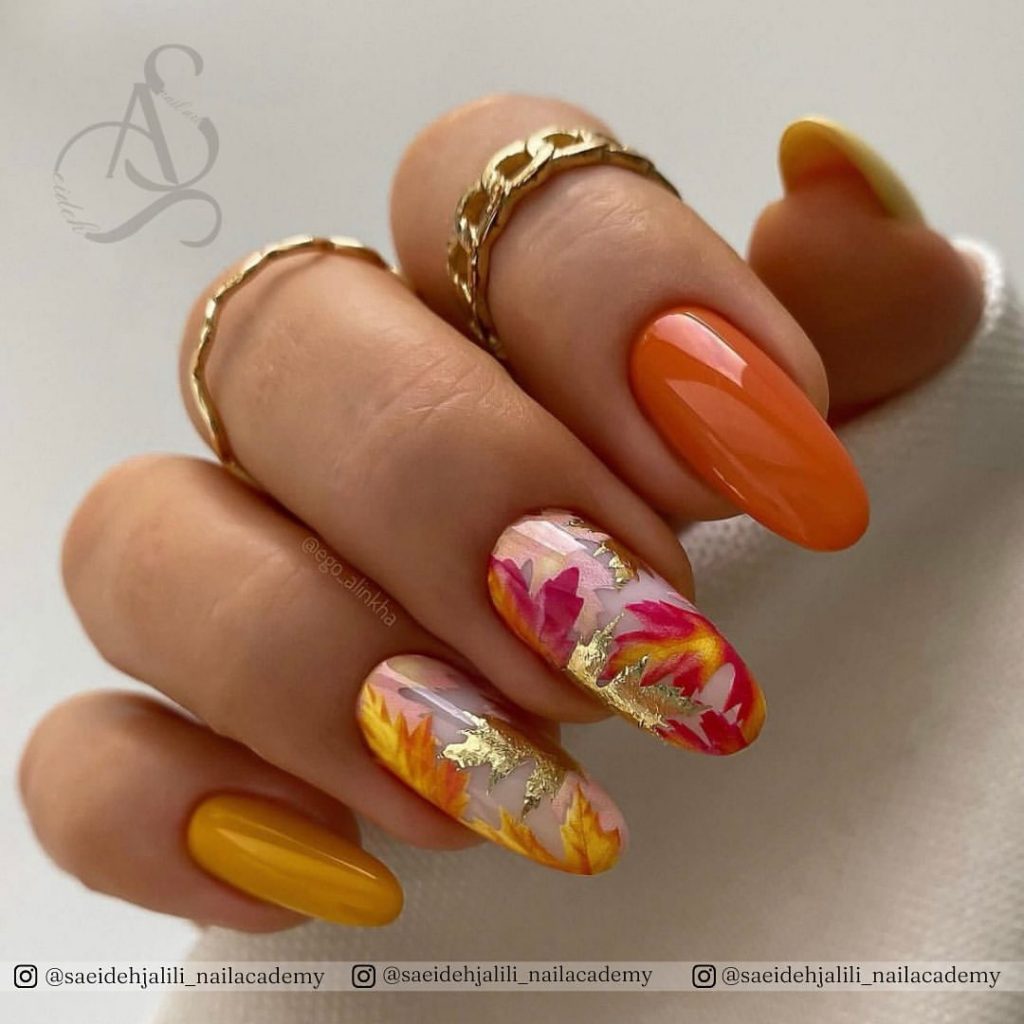
Autumn Leaves and Gold Accents
This vibrant design features autumn leaves with gold accents on a nude base, complemented by solid orange and mustard nails. The detailed leaf designs are enhanced with touches of gold, creating a beautiful and seasonal look perfect for fall. This manicure is ideal for those who love nature-inspired designs with a bit of sparkle.
Consumables Needed:
- Nude base nail polish (e.g., OPI GelColor in ‘Bubble Bath’)
- Orange nail polish (e.g., OPI GelColor in ‘A Good Man-Darin is Hard to Find’)
- Mustard nail polish (e.g., DND Gel in ‘Golden Yellow’)
- Gold leaf
- Nail art brushes for detailing
- Top coat (e.g., Seche Vite Dry Fast Top Coat)
- Base coat (e.g., OPI Natural Nail Base Coat)
Recommendations:
- Use fine nail art brushes to create detailed leaf designs.
- Apply gold leaf sparingly for a luxurious touch.
- Finish with a high-gloss top coat to enhance the design and protect the manicure.
Instructions for Creating at Home:
- Start with clean, trimmed nails and apply a base coat.
- Paint the nails with two coats of nude, orange, and mustard nail polish as shown.
- Use nail art brushes to paint detailed autumn leaves and add gold leaf accents.
- Finish with a high-gloss top coat to seal the design and add shine.
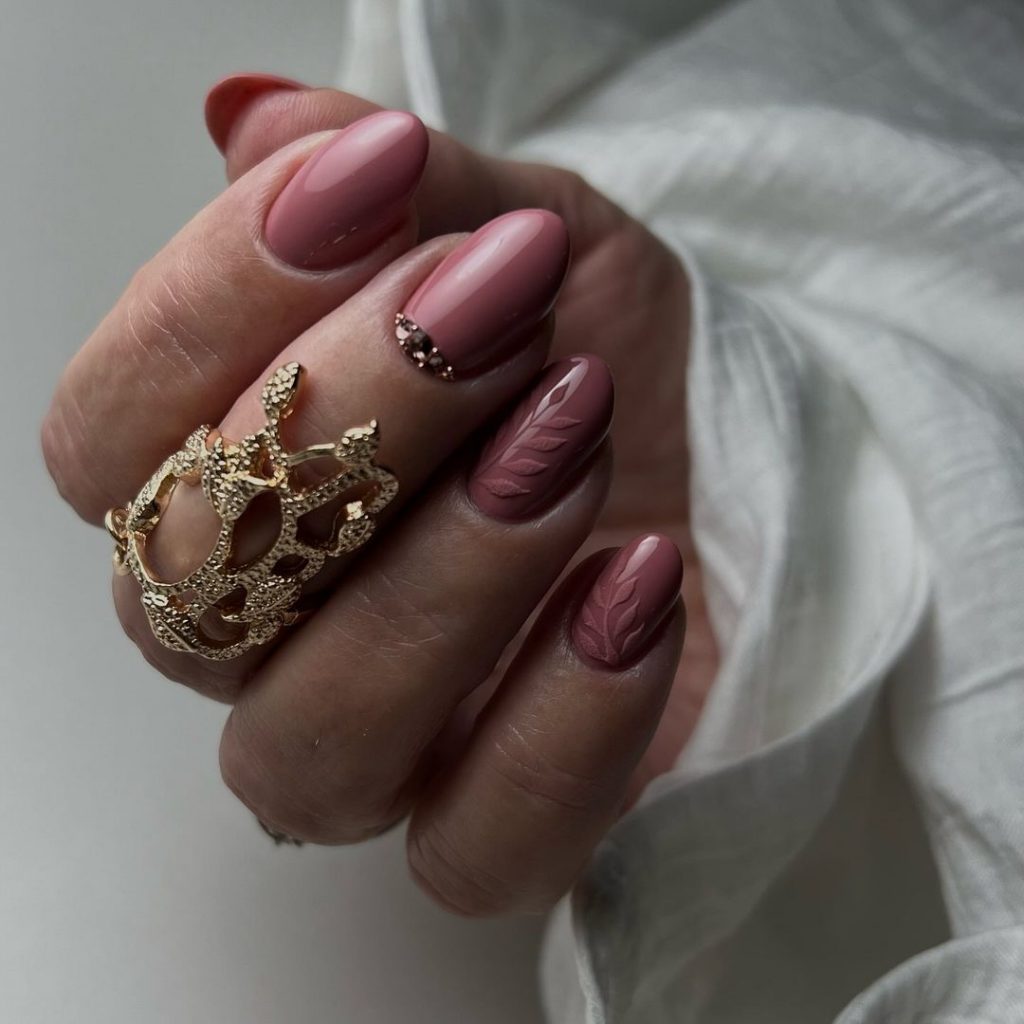
Elegant Mauve with Leaf Accents
This elegant manicure features a sophisticated mauve color palette with delicate leaf accents. The combination of glossy and matte finishes adds depth to the design, while the tiny leaf details provide a subtle touch of nature. Perfect for those who appreciate understated elegance.
Consumables Needed:
- Mauve nail polish (e.g., OPI GelColor in ‘Mauve-lous Memories’)
- Matte top coat (e.g., Essie Matte About You Top Coat)
- Glossy top coat (e.g., Seche Vite Dry Fast Top Coat)
- Nail art brushes for detailing
- Base coat (e.g., OPI Natural Nail Base Coat)
Recommendations:
- Use a matte top coat on select nails for a varied texture.
- Apply leaf details with fine brushes for precision.
- Seal with a glossy top coat on the remaining nails to enhance the shine.
Instructions for Creating at Home:
- Apply a base coat to clean, trimmed nails.
- Paint the nails with two coats of mauve nail polish.
- Apply a matte top coat to select nails.
- Use nail art brushes to add leaf details on the matte nails.
- Finish with a glossy top coat on the remaining nails.
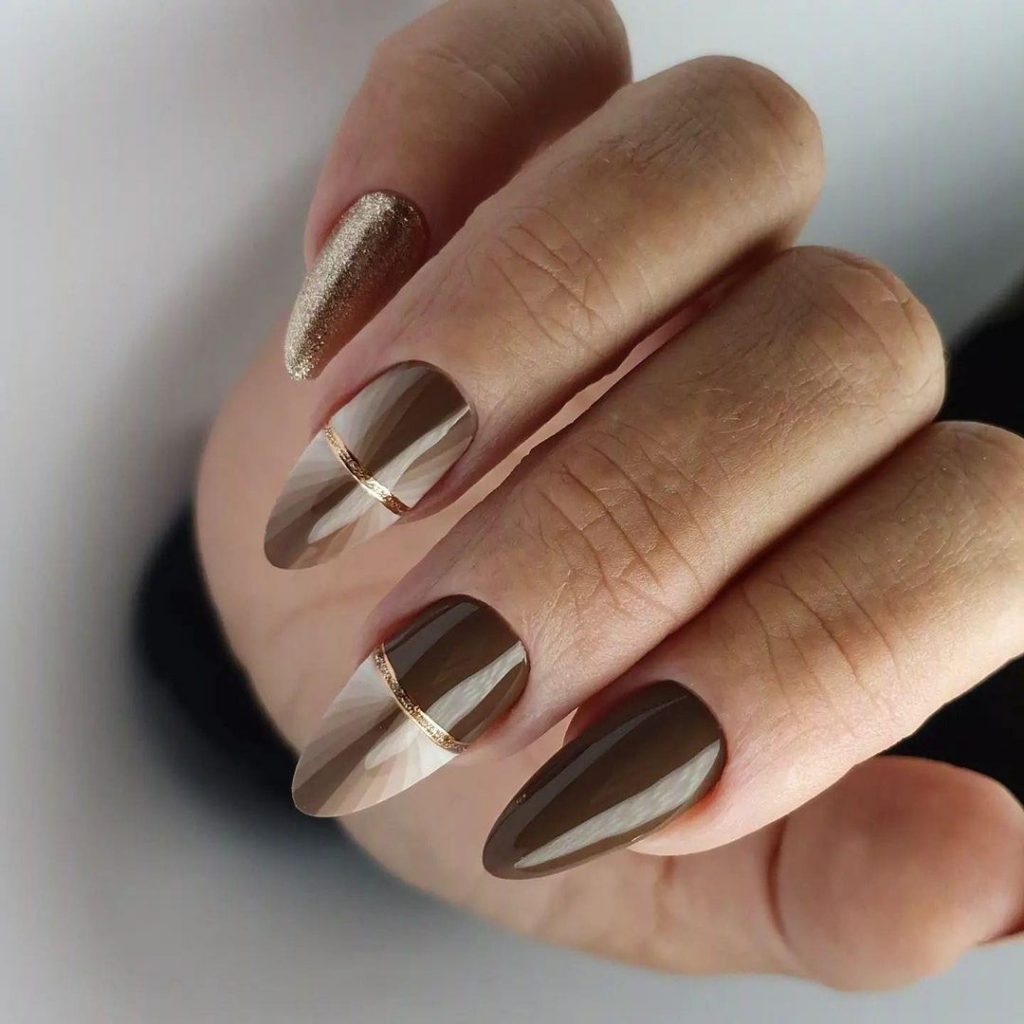
Neutral Browns with Gold Stripes
This sophisticated nail design features various shades of brown with elegant gold stripes. The combination of neutral tones creates a chic and versatile look, perfect for any occasion. The gold stripes add a touch of glamour, making this design both classic and modern.
Consumables Needed:
- Light brown nail polish (e.g., OPI GelColor in ‘San Tan-tonio’)
- Dark brown nail polish (e.g., OPI GelColor in ‘Espresso Your Inner Self’)
- Gold stripe tape or gold nail polish for stripes
- Top coat (e.g., Seche Vite Dry Fast Top Coat)
- Base coat (e.g., OPI Natural Nail Base Coat)
Recommendations:
- Use contrasting shades of brown for a dynamic look.
- Apply gold stripes with stripe tape for clean lines.
- Finish with a high-gloss top coat to enhance the shine.
Instructions for Creating at Home:
- Apply a base coat to clean, trimmed nails.
- Paint the nails with alternating shades of brown nail polish.
- Use stripe tape or a fine brush to add gold stripes to select nails.
- Finish with a high-gloss top coat to seal the design.
Minimalist Gold Outlines
This minimalist nail design features subtle gold outlines on a nude base, creating a chic and understated look. The simplicity of the design makes it perfect for any occasion, while the gold accents add a touch of elegance. This manicure is ideal for those who prefer a clean and sophisticated style.
Consumables Needed:
- Nude base nail polish (e.g., OPI GelColor in ‘Bubble Bath’)
- Gold nail polish for outlines (e.g., OPI Nail Lacquer in ‘Glitzerland’)
- Fine nail art brushes for detailing
- Top coat (e.g., Seche Vite Dry Fast Top Coat)
- Base coat (e.g., OPI Natural Nail Base Coat)
Recommendations:
- Use fine nail art brushes to create precise gold outlines.
- Keep the design simple and clean for a minimalist look.
- Seal with a high-gloss top coat to enhance the shine and protect the design.
Instructions for Creating at Home:
- Apply a base coat to clean, trimmed nails.
- Paint the nails with two coats of nude base nail polish.
- Use fine nail art brushes to add gold outlines around the edges of the nails.
- Finish with a high-gloss top coat to seal the design.
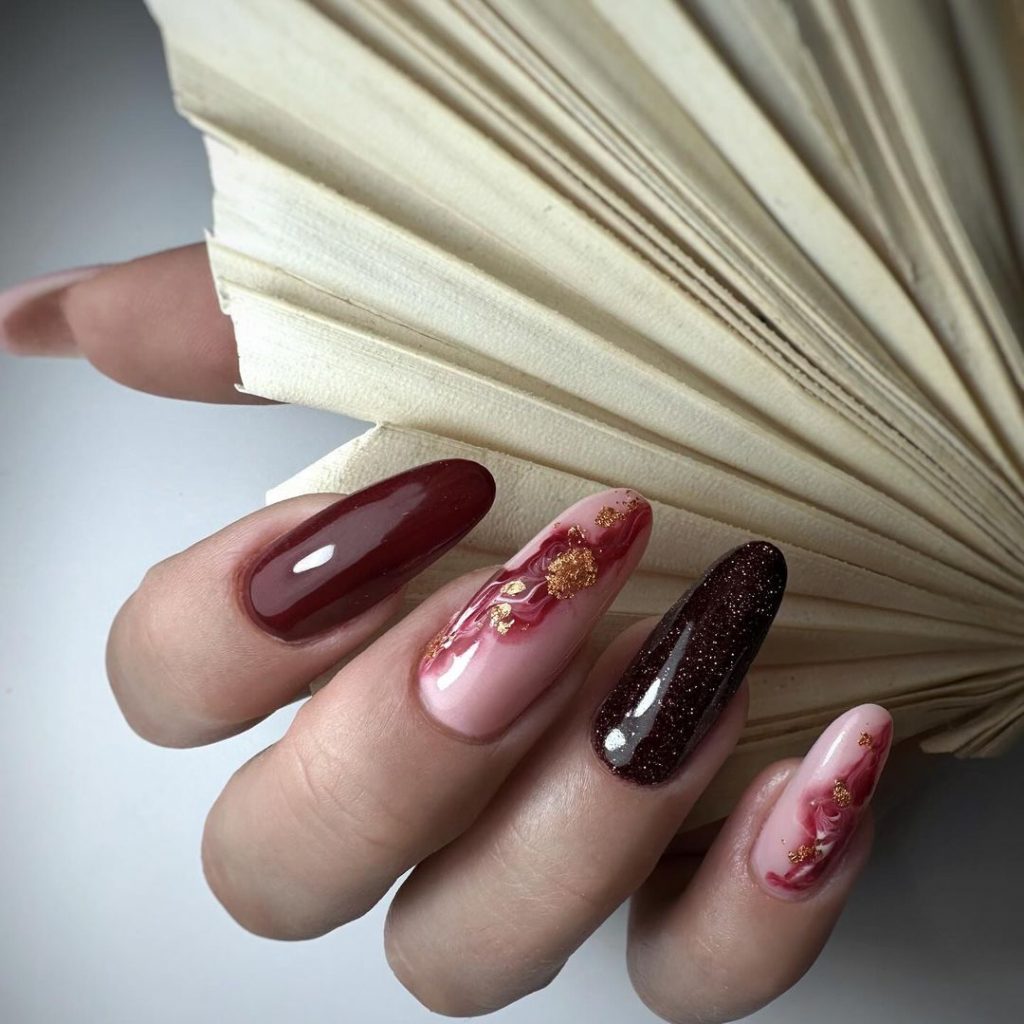
Burgundy and Glitter Accents
This luxurious nail design features rich burgundy tones with glitter accents and marbled details. The combination of deep burgundy and sparkling glitter creates a glamorous look, perfect for special occasions. The marbled details add an artistic touch, making this manicure a true statement piece.
Consumables Needed:
- Burgundy nail polish (e.g., OPI GelColor in ‘Malaga Wine’)
- Glitter nail polish (e.g., DND Gel in ‘Glitter Burgundy’)
- Pink nail polish for marbling (e.g., OPI GelColor in ‘Pink Flamenco’)
- Gold leaf for accents
- Nail art brushes for detailing
- Top coat (e.g., Seche Vite Dry Fast Top Coat)
- Base coat (e.g., OPI Natural Nail Base Coat)
Recommendations:
- Use a deep burgundy polish for a rich base color.
- Apply glitter accents sparingly to enhance the design.
- Add marbled details with a fine brush for an artistic touch.
Instructions for Creating at Home:
- Apply a base coat to clean, trimmed nails.
- Paint the nails with two coats of burgundy nail polish.
- Use a fine brush to create marbled details with pink polish.
- Add glitter accents and gold leaf sparingly.
- Finish with a high-gloss top coat to seal the design.
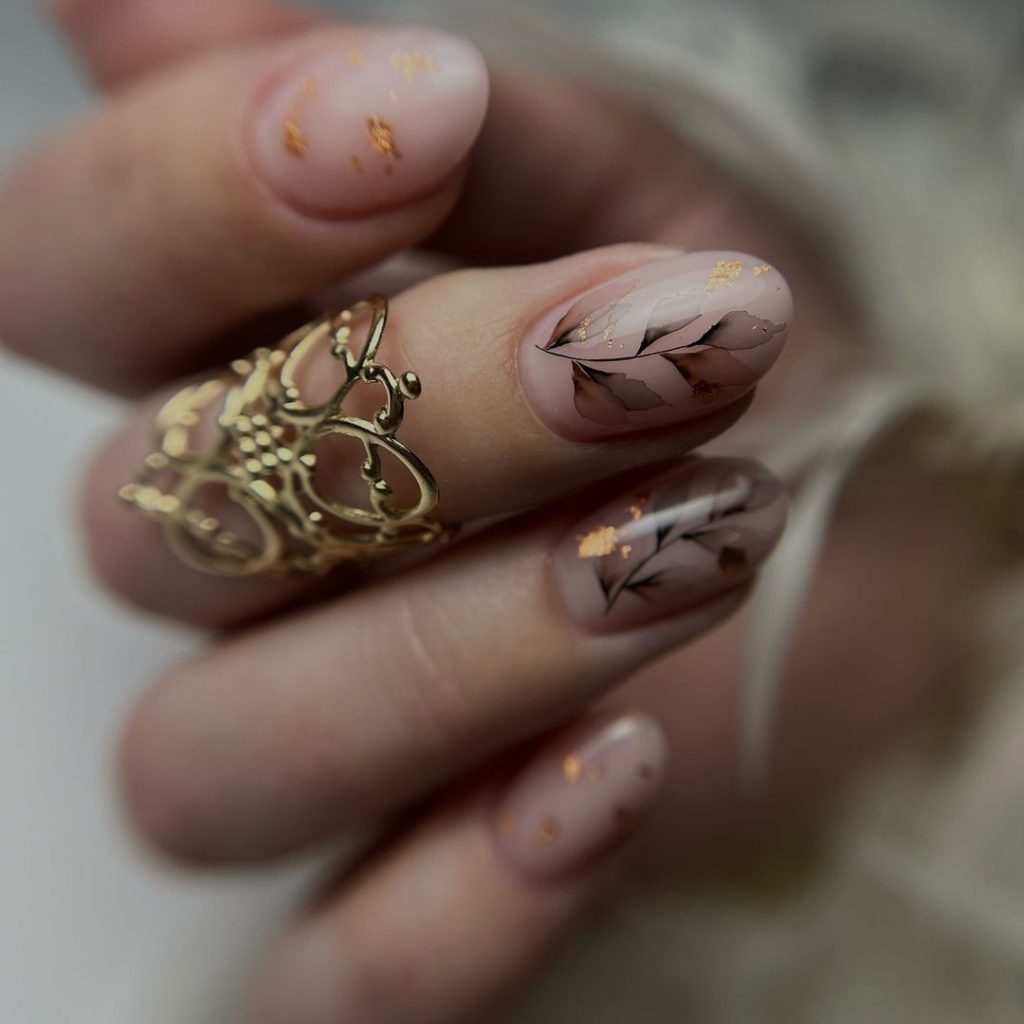
Delicate Leaves and Gold Flecks
This delicate nail design features soft nude tones with intricate leaf details and gold flecks. The subtle colors and fine details create a sophisticated and elegant look, perfect for fall. The gold flecks add a touch of sparkle, making this design both understated and glamorous.
Consumables Needed:
- Nude base nail polish (e.g., OPI GelColor in ‘Pale to the Chief’)
- Black and brown nail polish for leaf details (e.g., OPI GelColor in ‘Black Onyx’ and ‘Chocolate Moose’)
- Gold flecks
- Nail art brushes for detailing
- Top coat (e.g., Seche Vite Dry Fast Top Coat)
- Base coat (e.g., OPI Natural Nail Base Coat)
Recommendations:
- Use fine brushes to create detailed leaf designs.
- Apply gold flecks sparingly for a touch of glamour.
- Finish with a high-gloss top coat to protect the design.
Instructions for Creating at Home:
- Apply a base coat to clean, trimmed nails.
- Paint the nails with two coats of nude base nail polish.
- Use fine brushes to add leaf details with black and brown polish.
- Add gold flecks sparingly for a touch of sparkle.
- Finish with a high-gloss top coat to seal the design.
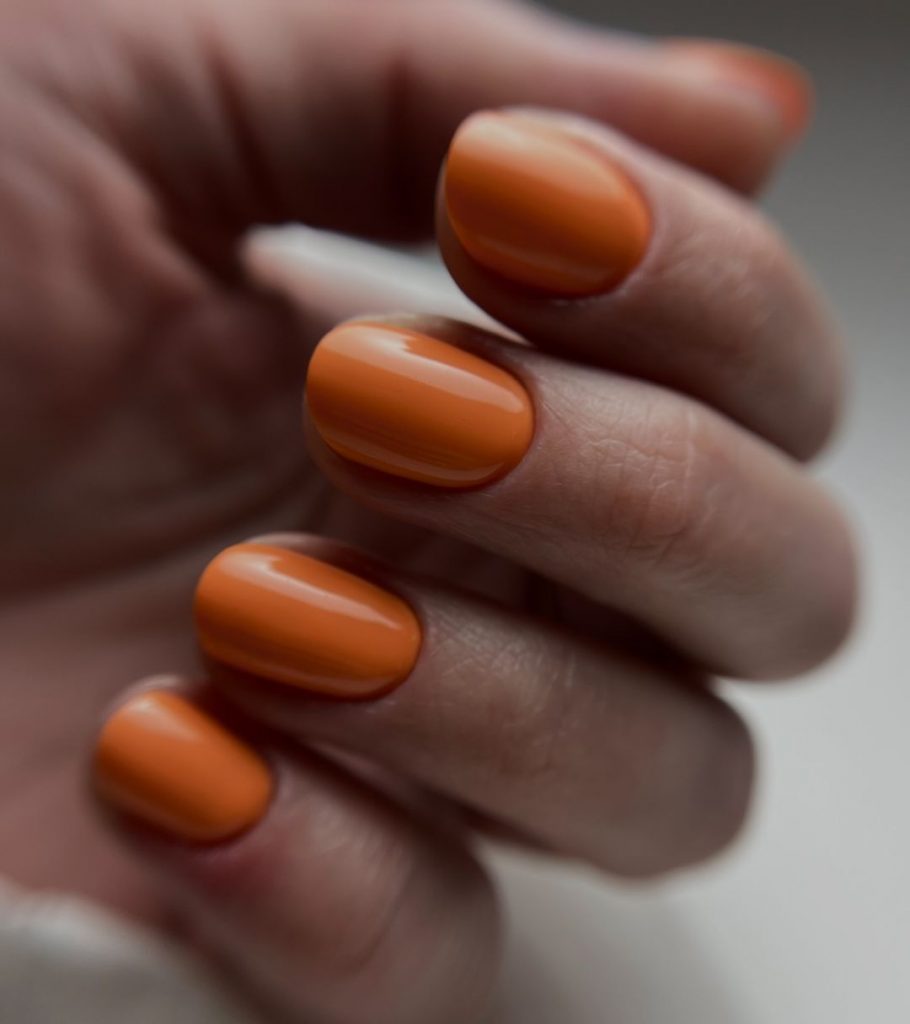
Bright Orange Simplicity
This bright orange manicure is simple yet striking, perfect for adding a pop of color to your fall wardrobe. The high-gloss finish enhances the vibrant orange, making this design stand out. Ideal for those who prefer a bold and minimalist look, this manicure is both fun and sophisticated.
Consumables Needed:
- Bright orange nail polish (e.g., OPI GelColor in ‘A Good Man-Darin is Hard to Find’)
- Top coat (e.g., Seche Vite Dry Fast Top Coat)
- Base coat (e.g., OPI Natural Nail Base Coat)
Recommendations:
- Use a vibrant orange polish for a bold look.
- Apply multiple coats for an even, opaque finish.
- Finish with a high-gloss top coat to enhance the shine.
Instructions for Creating at Home:
- Start with clean, trimmed nails and apply a base coat.
- Apply two to three coats of bright orange nail polish for full coverage.
- Finish with a high-gloss top coat to seal the color and add shine.
Save Pin